In this exercise, you build a simple HelloWorld Node.js application,
containerize it, and deploy it into Google's managed Cloud Run and Cloud Run
for Anthos offerings.
Objectives
In this lab, you learn how to:
Create a basic JavaScript application and package it as a Docker container.
Harness Cloud Build to create a Docker image and deploy it into Container Registry.
Run the container in Google's fully managed Cloud Run.
Deploy the application to Cloud Run for Anthos.
Setup and requirements
For each lab, you get a new Google Cloud project and set of resources for a fixed time at no cost.
Sign in to Qwiklabs using an incognito window.
Note the lab's access time (for example, 1:15:00), and make sure you can finish within that time.
There is no pause feature. You can restart if needed, but you have to start at the beginning.
When ready, click Start lab.
Note your lab credentials (Username and Password). You will use them to sign in to the Google Cloud Console.
Click Open Google Console.
Click Use another account and copy/paste credentials for this lab into the prompts.
If you use other credentials, you'll receive errors or incur charges.
Accept the terms and skip the recovery resource page.
Task 1. Review your Anthos GKE cluster and install Cloud Run for Anthos
In this task, you review and prepare the pre-created Anthos GKE cluster to
execute Cloud Run for Anthos. First, you verify that the GKE cluster is
registered in an Anthos Fleet. Second, you check that Cloud Service Mesh is installed in the cluster as a pre-requisite to installing Cloud Run for
Anthos. Third, you enable and install Cloud Run for Anthos in the cluster.
On the Navigation menu (), click Kubernetes Engine > Clusters.
Notice that a new GKE cluster has been created.
Click Workloads, and
verify that the cluster is running the Cloud Service Mesh components
istio-ingressgateway and istiod-asm.
On the Navigation menu, click Anthos > Clusters and verify that the
cluster is registered and appears in the list of
Anthos managed clusters.
In the Cloud Platform Console, click Activate Cloud Shell. If prompted, click Continue.
In Cloud Shell, set the Zone environment variable:
C1_ZONE={{{ project_0.default_zone| "Zone added at lab start" }}}
In Cloud Shell, initialize the environment variables:
In Node.js, the package.json file is used to define dependencies, key files,
and general application information. This package.json file:
Defines an Apache licensed application named knative-helloworld_js.
Sets the main starting file as index.js.
Defines the script "start" so that it executes the index.js file. If you test locally, npm start would cause this code to execute. Node is essentially the JavaScript engine that's part of Chrome.
Sets up a runtime dependency on express version 4.17.1 or higher, if bug fixes are available.
Create and edit the application's main execution file index.js:
touch index.js
edit index.js
Paste the following code into index.js, and save the file:
const express = require('express');
const app = express();
app.get('/', (req, res) => {
console.log('Hello world received a request.');
const target = process.env.TARGET || 'World';
res.send(`Hello ${target}!`);
});
const port = process.env.PORT || 8080;
app.listen(port, () => {
console.log('Hello world listening on port', port);
});
Express.js is a lightweight JavaScript based web server. This code:
Creates an Express web server instance.
Sets it up to listen on whatever port is configured in the PORT environment
variable, or port 8080 if PORT is empty.
Waits for requests coming into the server's root (/).
When a request comes to root, the code:
Logs a message to the console (Cloud Operations).
Returns the message "Hello target," where target is either what's
configured in the TARGET environment variable, or 'World'.
Test the application
Use the node package manager to load
all the application dependencies:
npm install
A node_modules folder is created. All the dependencies, and
the dependencies of the dependencies, are loaded into that folder.
Execute the code:
npm start
The server is now waiting for a request to port 8080.
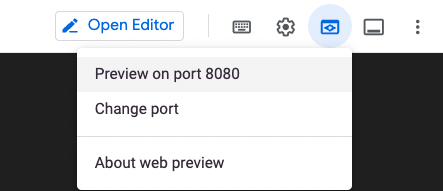
Click Web preview, and then click Preview on port 8080.
To close the "Hello World" browser tab and stop Express, click into the Cloud Shell prompt and press CTRL + C.
Turn the application into a container
Create and edit a Dockerfile to define a containerized version of the application:
touch Dockerfile
edit Dockerfile
Paste the following into the Dockerfile, and save the file:
FROM node:alpine
WORKDIR /usr/src/app
COPY package*.json ./
RUN npm install --only=production
COPY . .
CMD [ "npm", "start" ]
Sets the WORKDIR to /user/scr/app. Subsequent file commands will be
relative to this folder.
Copies the package.json and package-lock.json into the WORKDIR.
Just as when you did testing, runs npm install, but only installs
production dependencies and ignores any dev dependencies that might be listed
(none in this case).
Copies any files from the current folder into the WORKDIR.
When the container is launched, executes the CMDnpm start.
The npm installation generated some files you don't need copied into your
container. Create a .dockerignore file to tell Docker which files to ignore:
touch .dockerignore
edit .dockerignore
Paste the following code into .dockerignore, and save the file:
Dockerfile
README.md
node_modules
npm-debug.log
Use Cloud Build to create the Docker image and push it to your project's
Container Registry, under the name helloworld:
When the process completes, view the image in Container Registry in the helloworld folder.
Task 3. Deploy helloworld to Cloud Run
To enable the Cloud Run service in your project, enter the following code
in Cloud Shell:
gcloud services enable run.googleapis.com
In the Google Cloud console, navigate to Cloud Run.
Click Create Service to create a new service.
To populate the Container image URL field, click Select and
choose the latest image from your helloworld repository.
Leave the Service name as helloworld.
Leave Region as us-central1 (Iowa).
Scroll down to Autoscaling, and set the Maximum number of instances
to 4.
Under Authentication, select Allow unauthenticated invocations.
Click Container, Networking, Security, and
investigate the different options to manage your container workload, set up
environment variables, or connect your container to a Cloud SQL instance or
via a VCP Connector to your private VPC.
Click Create and wait for the service to come
up.
When an URL is displayed, click it to test the service.
To deploy a new revision, click Edit & Deploy New Version.
Under Environment variables, click Add Variable.
For Name1 type ENV, and for Value type your name.
Click Deploy.
When the new service revision finishes
deploying and the new version starts receiving 100% of the traffic,
re-test your application.
What changed?
Congratulations! You have created and deployed a
Node.js application to fully managed Cloud Run.
Task 4. Deploy helloworld into Cloud Run for Anthos
On the Navigation menu, click Kubernetes Engine > Workloads.
Notice that several workloads have been created in the knative-serving
namespace to run your Cloud Run for Anthos services.
On the Navigation menu, click Anthos > Clusters, and click on your
cluster to verify that Cloud Run for Anthos is enabled.
On the Navigation menu, click Kubernetes Engine > Application. Click
Go to list of services and click Create Service to create a new service.
Configure these settings for Service settings. Note that the gke
might take a few minutes to be ready before you can schedule Cloud Run
workloads.
Property
Value
Available Anthos GKE clusters
gke selected
Namespace
default
Service name
helloworld-gke
Note: You can also select the Kubernetes Namespace
that you want to deploy your Cloud Run container in. For this lab, use
the default namespace.
Click Next, and then paste your helloworld image URL(Example URL: gcr.io/qwiklabs-gcp-00-28785963622a/helloworld).
Click Next, and then select External.
This invokes the service through the internet.
Click Create.
Note: After the service deploys, the generated URL is set to
the nip.io base domain. This allows you to test your
applications immediately.Note: For production, you must map a custom domain, which is
also required to enable HTTPS and use automatic TLS certificates.
Click on the URL to open your application.
Congratulations! You deployed a Node.js
application to a fully configurable, custom GKE cluster using Cloud Run for
Anthos.
End your lab
When you have completed your lab, click End Lab. Google Cloud Skills Boost removes the resources you’ve used and cleans the account for you.
You will be given an opportunity to rate the lab experience. Select the applicable number of stars, type a comment, and then click Submit.
The number of stars indicates the following:
1 star = Very dissatisfied
2 stars = Dissatisfied
3 stars = Neutral
4 stars = Satisfied
5 stars = Very satisfied
You can close the dialog box if you don't want to provide feedback.
For feedback, suggestions, or corrections, please use the Support tab.
Copyright 2022 Google LLC All rights reserved. Google and the Google logo are trademarks of Google LLC. All other company and product names may be trademarks of the respective companies with which they are associated.
I lab creano un progetto e risorse Google Cloud per un periodo di tempo prestabilito
I lab hanno un limite di tempo e non possono essere messi in pausa. Se termini il lab, dovrai ricominciare dall'inizio.
In alto a sinistra dello schermo, fai clic su Inizia il lab per iniziare
Utilizza la navigazione privata
Copia il nome utente e la password forniti per il lab
Fai clic su Apri console in modalità privata
Accedi alla console
Accedi utilizzando le tue credenziali del lab. L'utilizzo di altre credenziali potrebbe causare errori oppure l'addebito di costi.
Accetta i termini e salta la pagina di ripristino delle risorse
Non fare clic su Termina lab a meno che tu non abbia terminato il lab o non voglia riavviarlo, perché il tuo lavoro verrà eliminato e il progetto verrà rimosso
Questi contenuti non sono al momento disponibili
Ti invieremo una notifica via email quando sarà disponibile
Bene.
Ti contatteremo via email non appena sarà disponibile
Un lab alla volta
Conferma per terminare tutti i lab esistenti e iniziare questo
Utilizza la navigazione privata per eseguire il lab
Utilizza una finestra del browser in incognito o privata per eseguire questo lab. In questo modo eviterai eventuali conflitti tra il tuo account personale e l'account Studente, che potrebbero causare addebiti aggiuntivi sul tuo account personale.
Build, deploy, and execute a basic Node.js application in Google Cloud Run
Durata:
Configurazione in 23 m
·
Accesso da 90 m
·
Completamento in 90 m
 ), click Kubernetes Engine > Clusters.
Notice that a new GKE cluster has been created.
), click Kubernetes Engine > Clusters.
Notice that a new GKE cluster has been created. . If prompted, click Continue.