Checkpoints
Create a tabular dataset
/ 40
Train an AutoML classification model
/ 30
Create a prediction request
/ 30
Vertex AI Tabular Data: Qwik Start
GSP1067

Overview
In this lab, you'll learn how to build a binary classification model from tabular data using Vertex AI. The goal of the trained model is to predict whether a bank client will buy a term deposit (a type of investment) using features like age, income, and profession. This type of model can help banks determine who to focus its marketing resources on.
This lab uses the Bank marketing open-source dataset, which is available through a Creative Commons CCO: Public Domain license. The column names have been updated for clarity.
In this lab, you will create a tabular dataset in Vertex AI and use it to train an AutoML classification model. Since the time it takes to train a tabular model is above the time limit of the lab, you will interact and request predictions from a hosted model in a different project trained on the same dataset. You will then tweak the values of the data for the prediction request and examine how it changes the resulting prediction from the model.
Objectives
In this lab, you will:
- Create a Vertex AI tabular dataset
- Train an AutoML classification model
- Request predictions from a hosted model
Setup and requirements
Before you click the Start Lab button
Read these instructions. Labs are timed and you cannot pause them. The timer, which starts when you click Start Lab, shows how long Google Cloud resources will be made available to you.
This hands-on lab lets you do the lab activities yourself in a real cloud environment, not in a simulation or demo environment. It does so by giving you new, temporary credentials that you use to sign in and access Google Cloud for the duration of the lab.
To complete this lab, you need:
- Access to a standard internet browser (Chrome browser recommended).
- Time to complete the lab---remember, once you start, you cannot pause a lab.
How to start your lab and sign in to the Google Cloud console
-
Click the Start Lab button. If you need to pay for the lab, a pop-up opens for you to select your payment method. On the left is the Lab Details panel with the following:
- The Open Google Cloud console button
- Time remaining
- The temporary credentials that you must use for this lab
- Other information, if needed, to step through this lab
-
Click Open Google Cloud console (or right-click and select Open Link in Incognito Window if you are running the Chrome browser).
The lab spins up resources, and then opens another tab that shows the Sign in page.
Tip: Arrange the tabs in separate windows, side-by-side.
Note: If you see the Choose an account dialog, click Use Another Account. -
If necessary, copy the Username below and paste it into the Sign in dialog.
{{{user_0.username | "Username"}}} You can also find the Username in the Lab Details panel.
-
Click Next.
-
Copy the Password below and paste it into the Welcome dialog.
{{{user_0.password | "Password"}}} You can also find the Password in the Lab Details panel.
-
Click Next.
Important: You must use the credentials the lab provides you. Do not use your Google Cloud account credentials. Note: Using your own Google Cloud account for this lab may incur extra charges. -
Click through the subsequent pages:
- Accept the terms and conditions.
- Do not add recovery options or two-factor authentication (because this is a temporary account).
- Do not sign up for free trials.
After a few moments, the Google Cloud console opens in this tab.

Activate Cloud Shell
Cloud Shell is a virtual machine that is loaded with development tools. It offers a persistent 5GB home directory and runs on the Google Cloud. Cloud Shell provides command-line access to your Google Cloud resources.
- Click Activate Cloud Shell
at the top of the Google Cloud console.
When you are connected, you are already authenticated, and the project is set to your Project_ID,
gcloud is the command-line tool for Google Cloud. It comes pre-installed on Cloud Shell and supports tab-completion.
- (Optional) You can list the active account name with this command:
- Click Authorize.
Output:
- (Optional) You can list the project ID with this command:
Output:
gcloud, in Google Cloud, refer to the gcloud CLI overview guide.
Create a tabular dataset
Tabular data is made up of many rows of data. Each row has the same features, or columns. Each feature has a source data type, which depends on the source (BigQuery or a CSV file in Cloud Storage). When you use the data to train a model, Vertex AI examines the source data type and feature values, and infers how it will use that feature in model training. This is called the transformation for that feature. If needed, you can specify a different supported transformation for any feature.
The first step in creating effective tabular training data is to make sure that your problem is well defined and will yield the prediction results you need. For this lab, you will use a classification model which analyzes your tabular data and returns a list of categories that describe the data. For example, you could train a model to predict whether the purchase history for a customer predicts that they will buy a subscription or not.
-
In the Google Cloud Console, on the Navigation menu (≡) click Vertex AI > Dashboard.
-
Click Enable all Recommended API.
-
From the Vertex AI navigation menu on the left, click Datasets.
-
At the top of the console, click + Create.
-
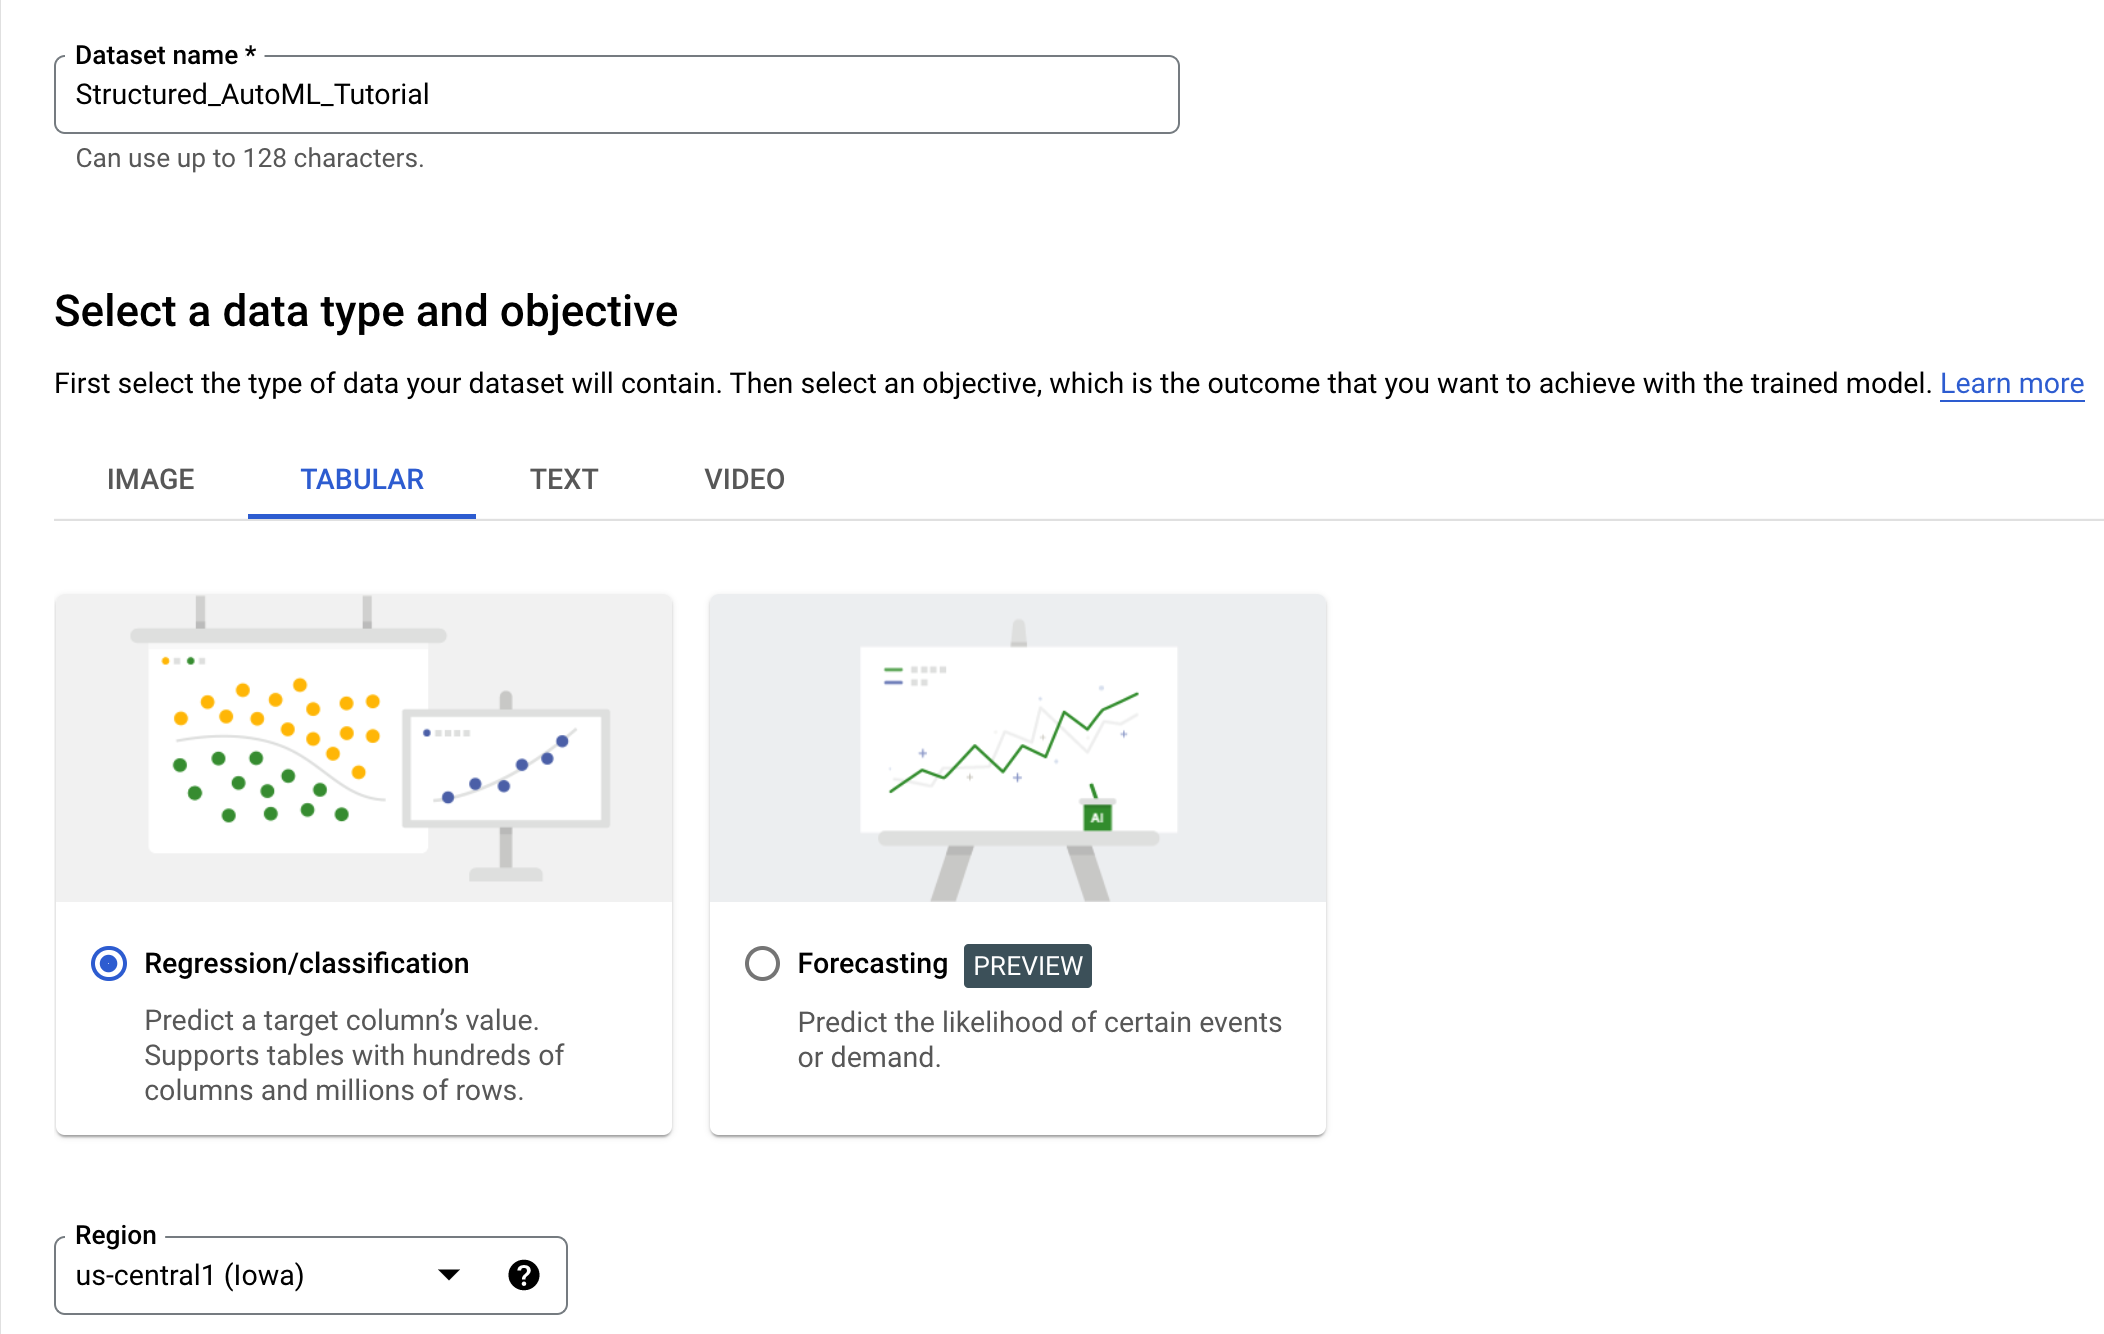
Enter
Structured_AutoML_Tutorialfor the dataset name and select the Tabular tab.
-
Select the Regression/Classification objective and leave the Region set to
. -
Click Create to create the dataset.
For this lab, you'll use a publicly available bank dataset hosted on Cloud Storage.
-
For Select a data source, click Select CSV files from Cloud Storage.
-
In Import file path, enter
cloud-ml-tables-data/bank-marketing.csv. -
Click Continue.
Vertex AI examines the source data type and feature values and infers how it will use that feature in model training. It's recommended that you review each column's data type to verify that it's been interpreted correctly. If needed, you can specify a different supported transformation for any feature. Learn more about transformations.
This lab uses a dataset that's been cleaned and formatted for AutoML training, but most data will require some work before it's ready to be used. The quality of your training data impacts the effectiveness of the models you create. Learn more about preparing data.
Click Check my progress to verify the objective.
Analyze the dataset
The analyze section lets you view more information about the dataset, like missing or NULL values. Because the dataset is formatted correctly for this tutorial, this section is optional.
-
Click Generate Statistics to view the number of missing or NULL values in the dataset. This can take roughly 10 minutes or longer.
-
Click on one of the feature columns to learn more about the data values.
Train an AutoML classification model
-
Click Train new model > Other.
-
In the Training method pane, confirm that the dataset you created previously is selected for the Dataset field.
-
For the Objective field, select Classification.
-
Confirm that the AutoML training method is selected.
-
Click Continue.
-
In the Model details pane, select Deposit for the target column and click Continue.
The target column is what you're training the model to predict. For the
bank-marketing.csvdataset, the Deposit column indicates whether the client purchased a term deposit (2 = yes, 1 = no).The Training options pane gives you an opportunity to add features and transform column data. If no columns are selected, then by default all non-target columns will be used as features for training. This dataset is ready to use, so there's no need to apply any transformations.
-
Click Continue.
-
In the Compute and pricing pane, enter
1for the training budget.The training budget determines actual training time, but the time to complete training includes other activities, so the entire process can take longer than one hour. When the model finishes training, it is displayed in the model tab as a live link, with a green checkmark status icon.
-
Click Start training.
Your model is now being trained, which can take roughly two hours to complete.
Click Check my progress to verify the objective.
Request a prediction from a hosted model
For the purposes of this lab, a model trained on the exact same dataset is hosted in a different project so that you can request predictions from it while your local model finishes training. It is likely that the local model training will exceed the limit of this lab (training it on this dataset with ~45,000 rows takes roughly two hours), so you can follow the rest of the tutorial outside of this lab.
A proxy to the pre-trained model is set up for you so you don't need to run through any extra steps to get it working within your lab environment.
To request predictions from the model, you will send predictions to an endpoint inside of your project that will forward the request to the hosted model and return back the output. Sending a prediction to the AutoML Proxy is very similar to the way that you would interact with your model you just created, so you can use this as practice.
Get the name of AutoML proxy endpoint
-
In the Google Cloud Console, on the Navigation menu (≡) click Cloud Run.
-
Click automl-proxy.
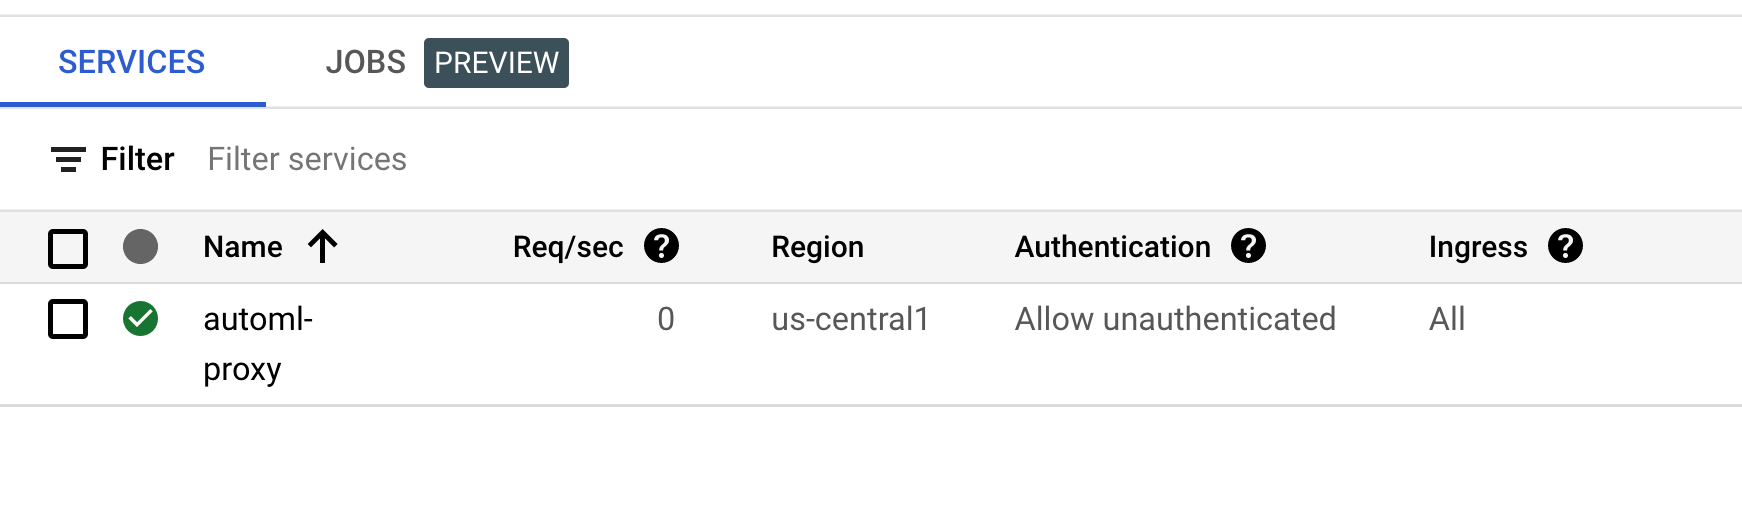
- Copy the URL to the endpoint. It should look something like:
https://automl-proxy-xfpm6c62ta-uc.a.run.app.

You will use this endpoint for the prediction request in the next section.
Create a prediction request
-
Open a new Cloud Shell window.
-
On the Cloud Shell toolbar, click Open Editor.
-
Click File > New File. If prompted click Open in a new tab.
-
Copy the following content into the new file you just created:
-
Save the file and name it
payload.json.
- Next, set the following environment variables. Copy in your AutoML Proxy URL and add a
/v1after it. It should look something likehttps://automl-proxy-xfpm6c62ta-uc.a.run.app/v1.
/v1 at the end of your proxy URL will cause issues. Make sure that you have done this before continuing.
- Perform a API request to the AutoML Proxy endpoint to request the prediction from the hosted model:
If you ran a successful prediction, your output should resemble the following:
For this model, a prediction result of 1 represents a negative outcome—a deposit is not made at the bank. A prediction result of 2 represents a positive outcome—a deposit is made at the bank.
As you can see for the prediction returned, it is predicting that based on the tabular data it was given, it would predict a negative outcome (1) with 99% and a positive outcome (2) with ~0.01 percent.
- Change the values in the JSON file you created. For instance, try increasing the duration to a much higher value (i.e
1000.0) to see how it affects the model prediction. Run the prediction request command again.
Your output might resemble the following:
Play around with the data and see if any features are heavily weighted within the model and run some more predictions.
Click Check my progress to verify the objective.
Congratulations!
In this lab you created a tabular dataset in Vertex AI and used it to train an AutoML classification model. You then used the AutoML proxy endpoint to serve predictions to a hosted model in a different project trained on the same dataset, and tweaked values to examine how it changes the prediction value.
Next Steps / learn More
Be sure to check out the following documentation for more practice with Vertex AI:
- To deploy your model to an endpoint and request a prediction, check out the following tutorial.
- Learn more about creating a tabular dataset.
- Learn more about training an AutoML for classification or regression.
- Sourcing and preparing your data is critical to ensuring an accurate machine learning model. Learn more about best practices.
- Vertex AI offers two model training methods, AutoML and custom training. AutoML lets you train with minimal effort and machine learning experience, while custom training gives you complete control over training functionality. Learn more about training methods.
Google Cloud training and certification
...helps you make the most of Google Cloud technologies. Our classes include technical skills and best practices to help you get up to speed quickly and continue your learning journey. We offer fundamental to advanced level training, with on-demand, live, and virtual options to suit your busy schedule. Certifications help you validate and prove your skill and expertise in Google Cloud technologies.
Manual Last Updated May 06, 2024
Lab Last Tested May 06, 2024
Copyright 2024 Google LLC All rights reserved. Google and the Google logo are trademarks of Google LLC. All other company and product names may be trademarks of the respective companies with which they are associated.