

시작하기 전에
- 실습에서는 정해진 기간 동안 Google Cloud 프로젝트와 리소스를 만듭니다.
- 실습에는 시간 제한이 있으며 일시중지 기능이 없습니다. 실습을 종료하면 처음부터 다시 시작해야 합니다.
- 화면 왼쪽 상단에서 실습 시작을 클릭하여 시작합니다.
Create the partner authorized view
/ 20
Authorize the view and Assign IAM permissions for the customer user
/ 20
Create the customer authorized view
/ 20
Authorize the view and Assign IAM permissions for the partner user
/ 20
Connect BigQuery to Looker Studio
/ 20
In a challenge lab you’re given a scenario and a set of tasks. Instead of following step-by-step instructions, you will use the skills learned from the labs in the course to figure out how to complete the tasks on your own! An automated scoring system (shown on this page) will provide feedback on whether you have completed your tasks correctly.
When you take a challenge lab, you will not be taught new Google Cloud concepts. You are expected to extend your learned skills, like changing default values and reading and researching error messages to fix your own mistakes.
To score 100% you must successfully complete all tasks within the time period!
This lab is recommended for students who have enrolled in the Share Data Using Google Data Cloud course. Are you ready for the challenge?
Read these instructions. Labs are timed and you cannot pause them. The timer, which starts when you click Start Lab, shows how long Google Cloud resources are made available to you.
This hands-on lab lets you do the lab activities in a real cloud environment, not in a simulation or demo environment. It does so by giving you new, temporary credentials you use to sign in and access Google Cloud for the duration of the lab.
To complete this lab, you need:
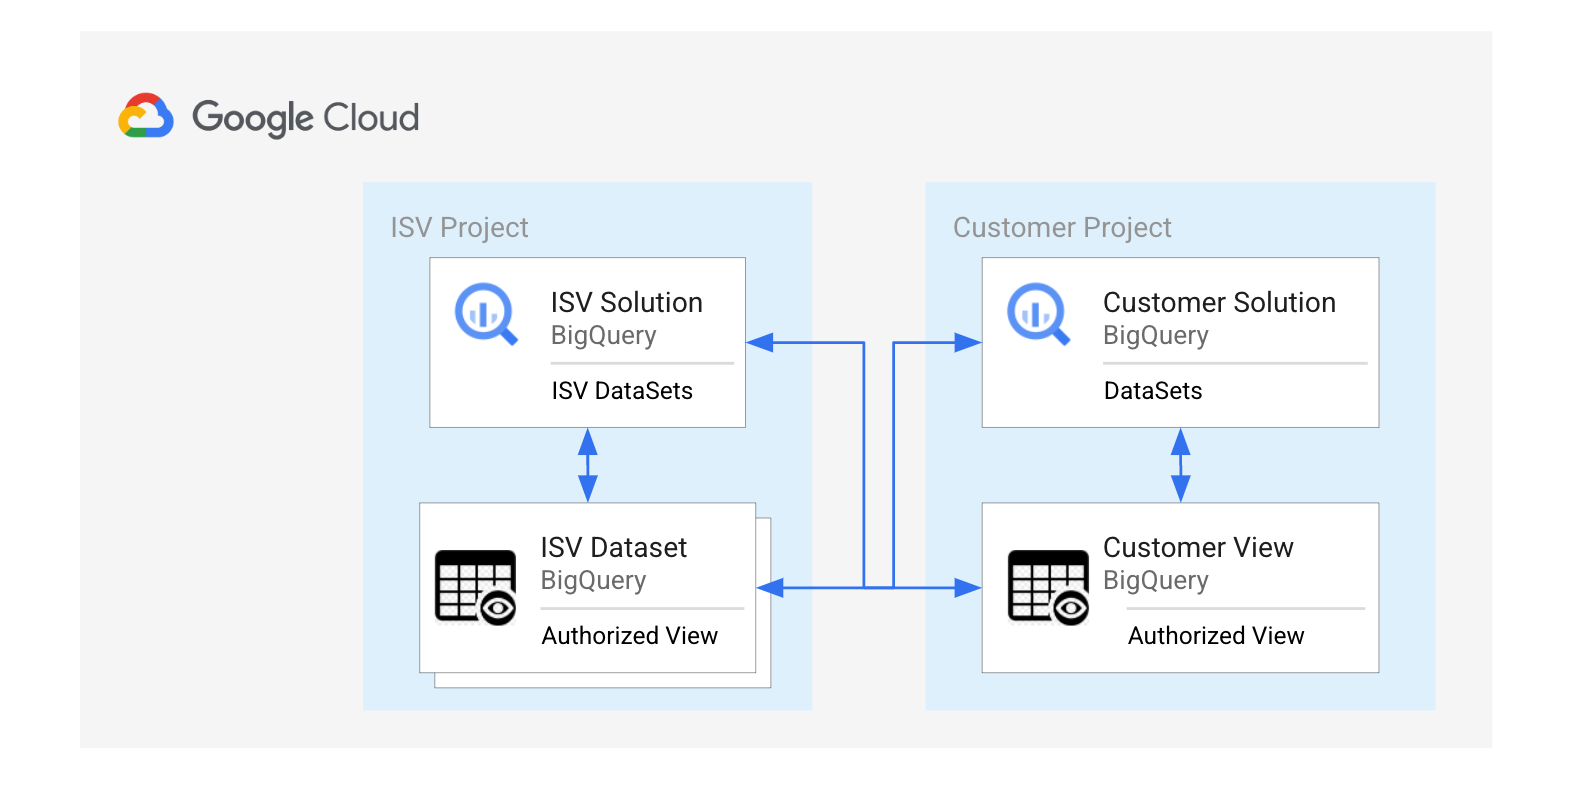
You are a Google Cloud Data Sharing Partner hosting an application for multiple customers, storing data, and providing analytics as a service. The application caters to a customer that depends on your data to enrich their application data. In turn, the customer then shares high-level metrics with the Data Sharing Partner to better understand the customer footprint.
In this lab, you will be required to act as both the Data Sharing Partner and the customer by enabling bi-directional data exchange in BigQuery, as well as creating a visualization in Looker Studio.
Your first task as a Data Sharing Partner is to copy a BigQuery public dataset into your project. The dataset contains details of each zip code across the US. In this section, you will need to expose the loaded dataset as an authorized view and grant access to a specific customer user.
demo_dataset.Click Check my progress to verify the objective.
Next, you will need to assign IAM permissions by authorizing the view in the dataset.
Next, you will need to grant the Customer user the BigQuery Data Viewer role on the authorized view you created.
Click Check my progress to verify the objective.
In this task, you will be acting as the customer. Your next step is to run a query to update the customer table inside of your project.
You should see the following result:
In this section, you will need to create a customer authorized view and grant access to a specific Data Sharing Partner user.
customer_dataset.Click Check my progress to verify the objective.
Next, you will need to assign IAM permissions by authorizing the customer view in the dataset.
Next, you will need to grant the Data Sharing Partner user the BigQuery Data Viewer role on the customer authorized view you created.
Click Check my progress to verify the objective.
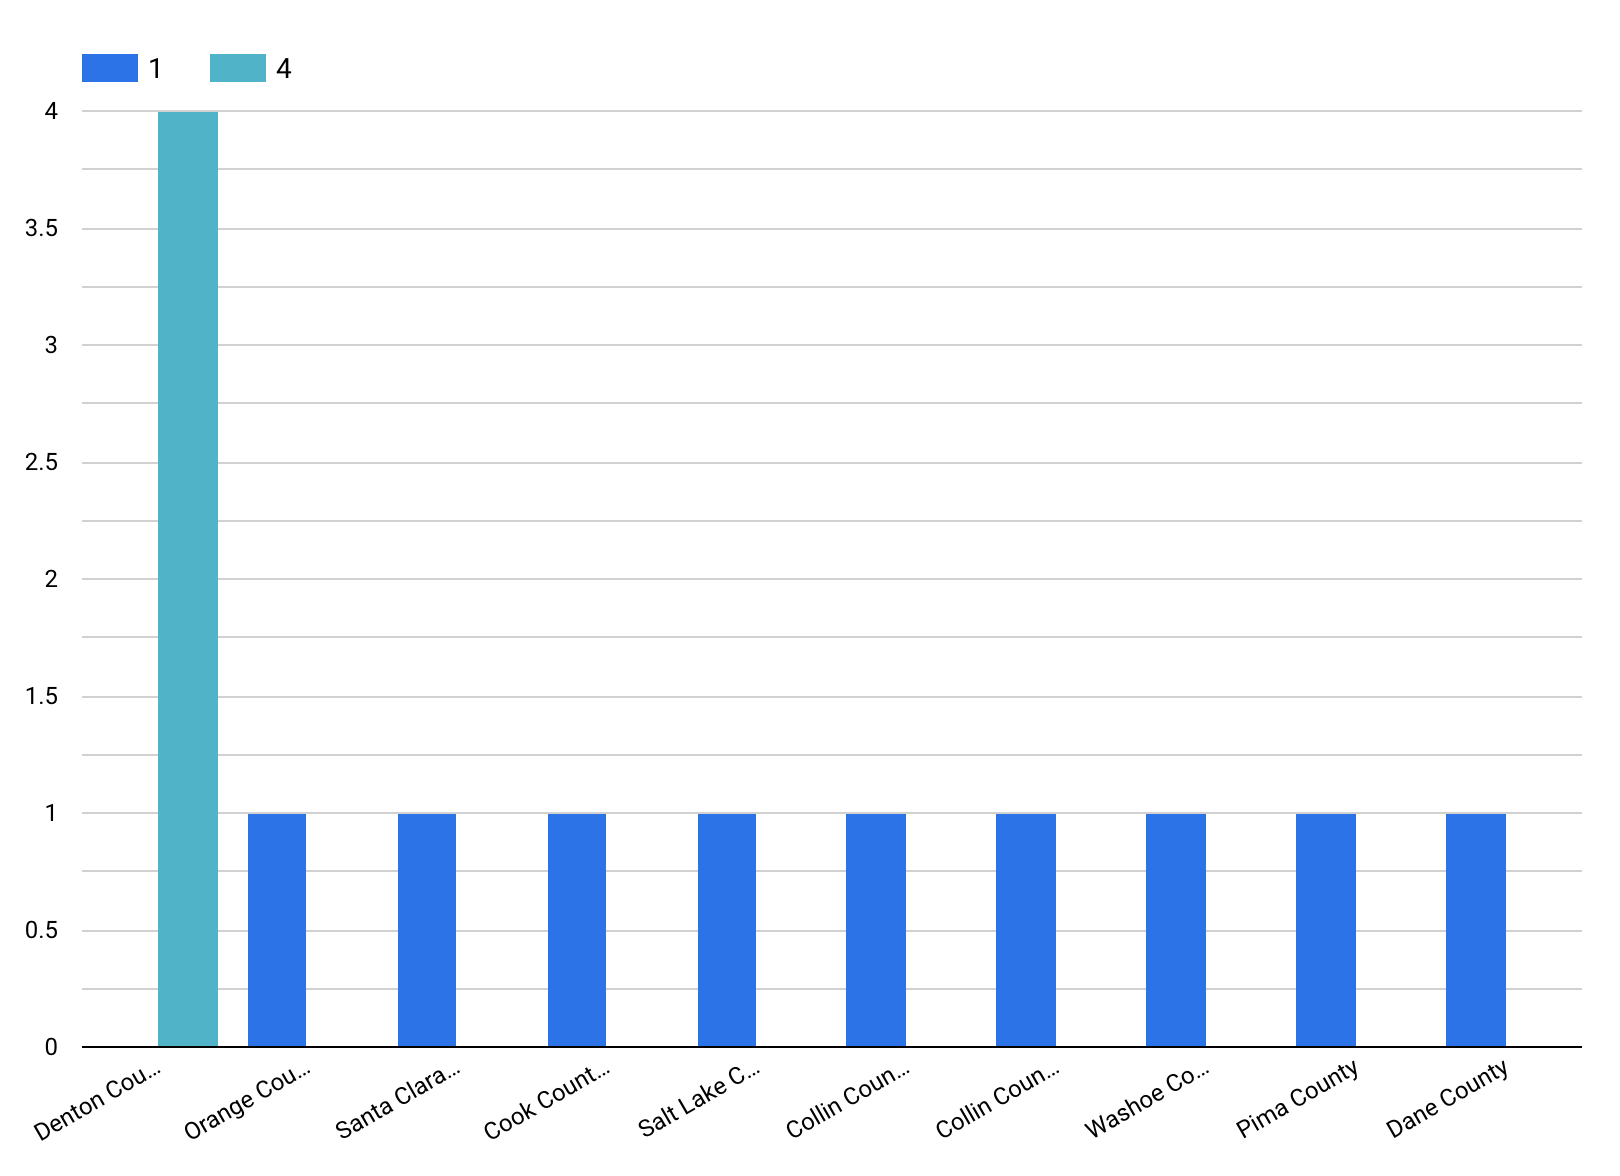
Your fourth task is to consume the customer’s authorized view in the Data Sharing Partner project and create a column chart visualization that shows the distribution of the customers and counties.
Open Google Looker Studio and create a Blank Report.
Connect BigQuery and authorize to Looker Studio.
From My Projects on the left pane, navigate to the customer project and select
Click Check my progress to verify the objective.
county as the Dimension and Count as the Breakdown Dimension and Metric.The visualization should resemble the following:
In this lab, you shared BigQuery datasets across Google Cloud projects, enriched datasets based on curated data, enabled bi-directional data exchange, and created a visualization.
This self-paced lab is part of the Share Data Using Google Data Cloud skill badge course. Completing this skill badge course earns you the badge above, to recognize your achievement. Share your badge on your resume and social platforms, and announce your accomplishment using #GoogleCloudBadge. Search the catalog for 20+ other skill badge courses in which you can enroll.
...helps you make the most of Google Cloud technologies. Our classes include technical skills and best practices to help you get up to speed quickly and continue your learning journey. We offer fundamental to advanced level training, with on-demand, live, and virtual options to suit your busy schedule. Certifications help you validate and prove your skill and expertise in Google Cloud technologies.
Manual Last Updated May 22, 2025
Lab Last Tested May 22, 2025
Copyright 2025 Google LLC. All rights reserved. Google and the Google logo are trademarks of Google LLC. All other company and product names may be trademarks of the respective companies with which they are associated.


현재 이 콘텐츠를 이용할 수 없습니다
이용할 수 있게 되면 이메일로 알려드리겠습니다.

감사합니다
이용할 수 있게 되면 이메일로 알려드리겠습니다.

한 번에 실습 1개만 가능
모든 기존 실습을 종료하고 이 실습을 시작할지 확인하세요.