Checkpoints
Create Authorized Views
/ 20
Assign IAM permissions to both the views
/ 20
Grant permissions to the users to access the views
/ 20
Verify shared authorized views in customer projects
/ 40
Data Publishing on BigQuery using Authorized Views for Data Sharing Partners
GSP1041

Overview
A common scenario is where a Google Cloud Data Sharing Partner has proprietary datasets that customers can use for their analytics use cases. Customers need to subscribe to this data, query it within their own platform, then augment it with their own datasets and use their visualization tools for their customer facing dashboards. This enables Data Sharing Partners to simplify and accelerate how they build and deliver value from data-driven solutions.

Through integration with Google Cloud IAM, you can set permissions on BigQuery objects to enable access by users inside or outside of organizations. In this lab, you will learn how to use authorized views in BigQuery to share customer specific data from a Data Sharing Partner. You will be given three projects: the Data Sharing Partner project which owns the dataset, and two separate and distinct customers who will access a subset of the dataset from their respective projects. Customers will list customer information specific to their state.
Objectives
In this lab, you will:
- Copy datasets from an Data Sharing Partner project to a customer’s BigQuery project
- Restrict datasets from the Data Sharing Partner project for consumption by a specific customer
- Coalesce the dataset provided by the Data Sharing Partner with a customer’s own dataset to enhance business intelligence
Setup and Requirements
Before you click the Start Lab button
Read these instructions. Labs are timed and you cannot pause them. The timer, which starts when you click Start Lab, shows how long Google Cloud resources will be made available to you.
This hands-on lab lets you do the lab activities yourself in a real cloud environment, not in a simulation or demo environment. It does so by giving you new, temporary credentials that you use to sign in and access Google Cloud for the duration of the lab.
To complete this lab, you need:
- Access to a standard internet browser (Chrome browser recommended).
- Time to complete the lab---remember, once you start, you cannot pause a lab.
How to start your lab and sign in to the Google Cloud console
-
Click the Start Lab button. If you need to pay for the lab, a pop-up opens for you to select your payment method. On the left is the Lab Details panel with the following:
- The Open Google Cloud console button
- Time remaining
- The temporary credentials that you must use for this lab
- Other information, if needed, to step through this lab
-
Click Open Google Cloud console (or right-click and select Open Link in Incognito Window if you are running the Chrome browser).
The lab spins up resources, and then opens another tab that shows the Sign in page.
Tip: Arrange the tabs in separate windows, side-by-side.
Note: If you see the Choose an account dialog, click Use Another Account. -
If necessary, copy the Username below and paste it into the Sign in dialog.
{{{user_0.username | "Username"}}} You can also find the Username in the Lab Details panel.
-
Click Next.
-
Copy the Password below and paste it into the Welcome dialog.
{{{user_0.password | "Password"}}} You can also find the Password in the Lab Details panel.
-
Click Next.
Important: You must use the credentials the lab provides you. Do not use your Google Cloud account credentials. Note: Using your own Google Cloud account for this lab may incur extra charges. -
Click through the subsequent pages:
- Accept the terms and conditions.
- Do not add recovery options or two-factor authentication (because this is a temporary account).
- Do not sign up for free trials.
After a few moments, the Google Cloud console opens in this tab.

Task 1. Create authorized views
In the first project, you will take on the role of a Data Sharing Partner creating and sharing a dataset using an authorized view.
Create Authorized View A
-
From the lab pane. open the Data Sharing Partner Project Console and log in with the associated credentials.
-
From the Navigation Menu, go to BigQuery > BigQuery Studio.
-
Run the following query to create an authorized view for Customer A, based on a public geographical dataset.
-
From the toolbar, click Save > Save View.
-
Keep the project as default and for the Dataset select
demo_dataset. -
For Table type
authorized_view_a. -
Click Save.
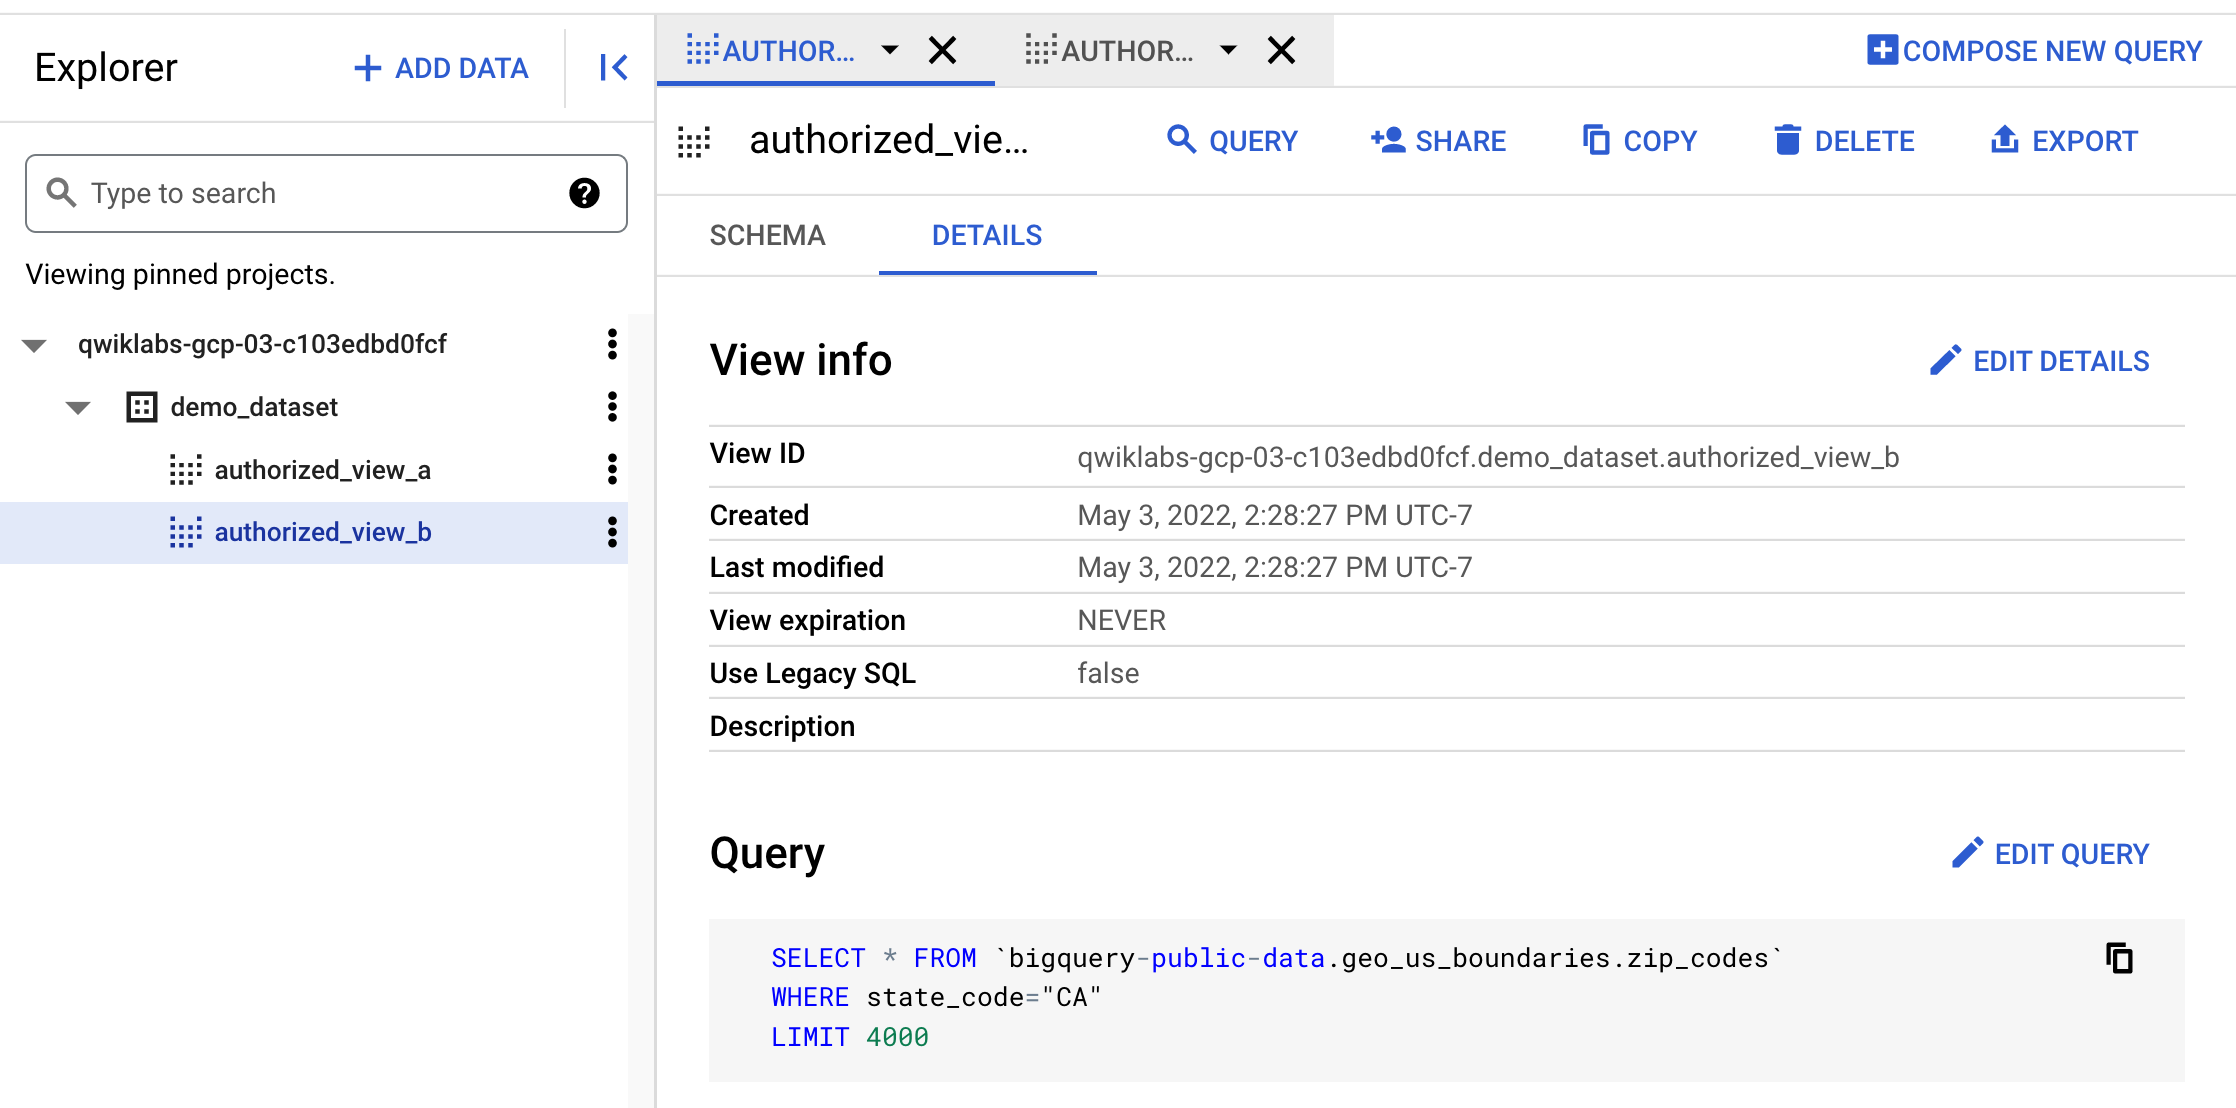
Create Authorized View B
-
In the query editor, remove the previous query you just ran.
-
Run the following query to create an authorized view for Customer B, based on a public geographical dataset.
-
From the toolbar, click Save > Save View as.
-
Keep the project as default and for the Dataset select
demo_dataset. -
For Table type
authorized_view_b. -
Click Save.
Your authorized views should resemble the following:
Click Check my progress to verify the objective.
Task 2. Assign IAM permissions to both the views
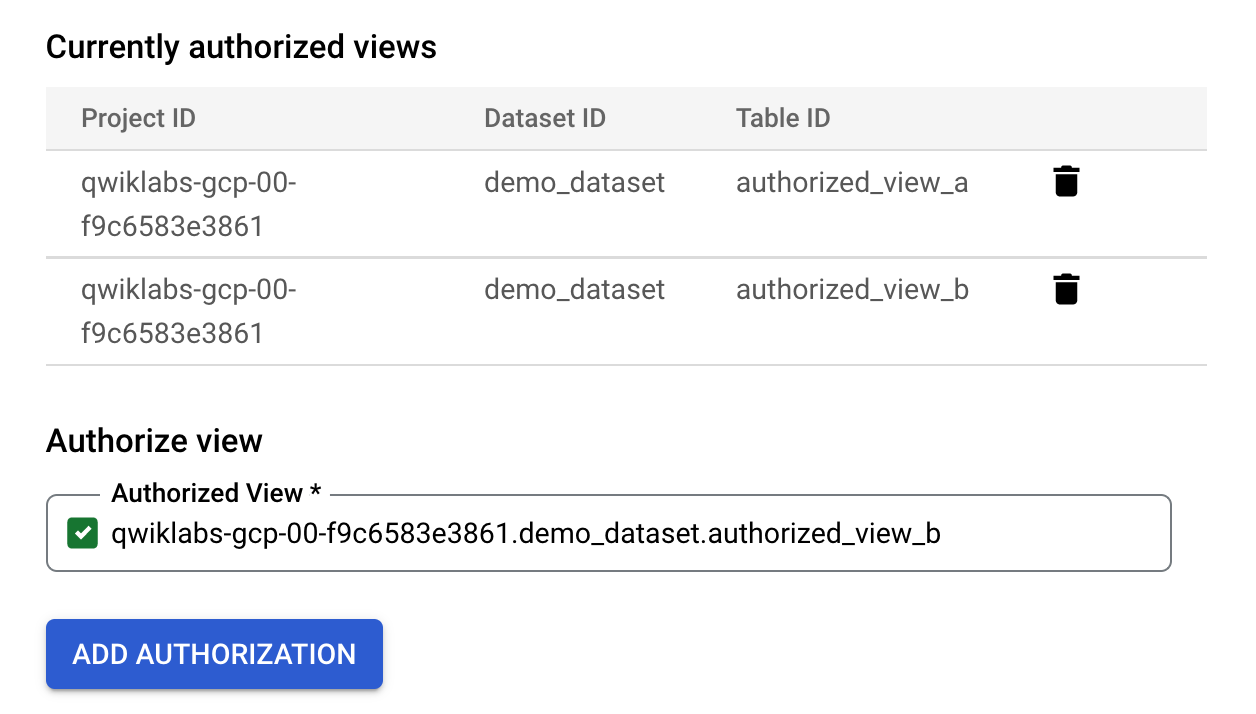
- From the BigQuery Explorer pane, open the demo_dataset and click + Sharing > Authorize Views.

-
Add Authorized View A that needs to be authorized to share:
.demo_dataset.authorized_view_a -
Click Add Authorization.
-
Add Authorized View B that needs to be authorized to share:
.demo_dataset.authorized_view_b -
Click Add Authorization. Your authorized views should resemble the following:
- Click Close.
Click Check my progress to verify the objective.
Task 3. Grant permissions to the users to access the views
In this section, you will assign permissions for each customer user and their associated authorized views.
Assign IAM permissions for Customer A
-
Under your project, inside of demo_dataset, open the
authorized_view_aview. -
Click Share.
-
Click on Add Principal and add the Customer A user:
-
Select the BigQuery Data Viewer role.

- Click Save.
Assign IAM permissions for Customer B
-
Under your project, inside of demo_dataset, open the
authorized_view_bview. -
Click Share.
-
Click on Add Principal and add the Customer B user:
-
Select the BigQuery Data Viewer role.
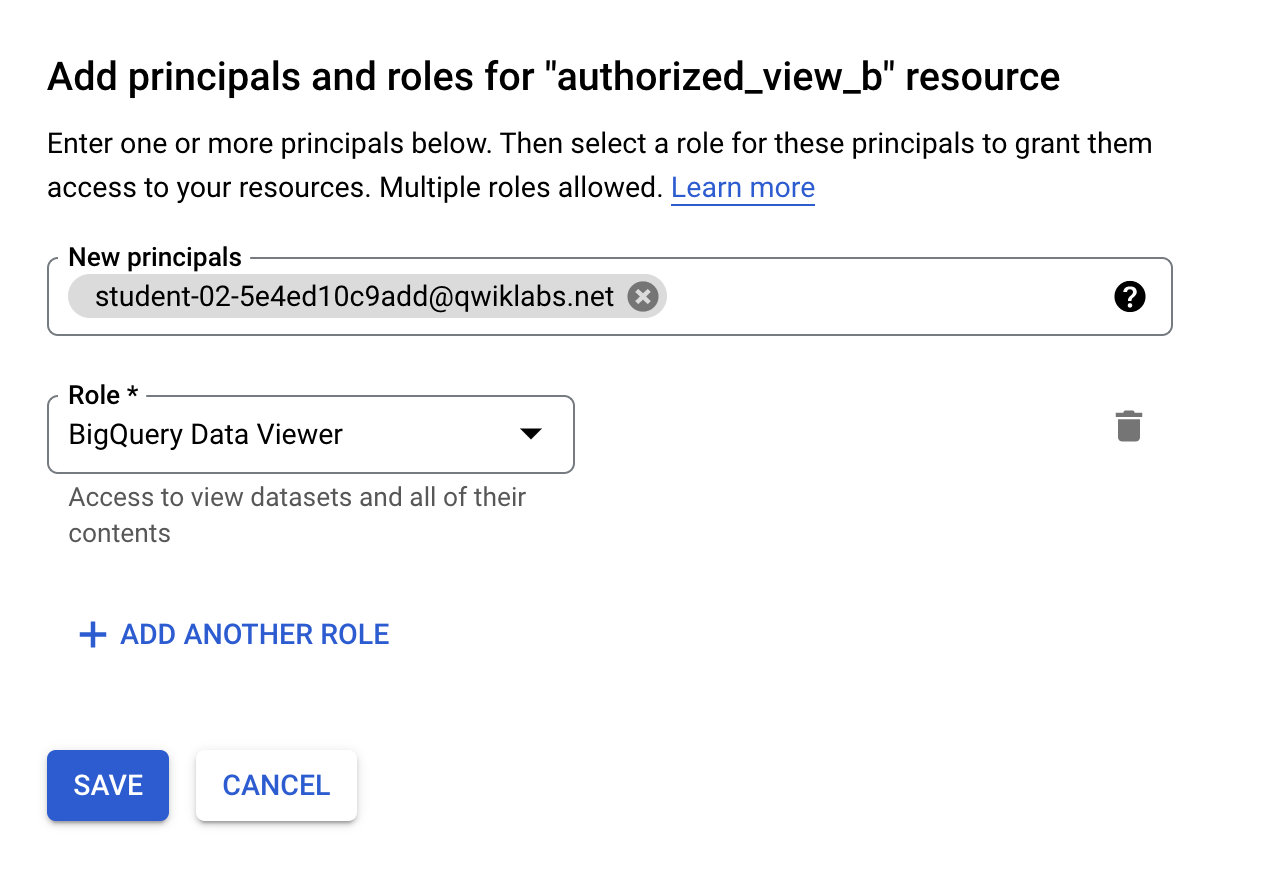
- Click Save.
Click Check my progress to verify the objective.
Task 4. Verify shared authorized views in customer projects
In this section, you will verify that the authorized views were shared for each customer user correctly.
Verify authorized view sharing for Customer A
-
Close the Data Sharing Partner Project Console and from the lab pane open the Customer Project A Console. Log in with the associated credentials.
-
From the Navigation Menu, go to BigQuery > BigQuery Studio.
-
Run the following query, which selects all columns from the demo_dataset.authorized_view_a view from the Data Sharing Partner project:
You should now see the results populated.
-
On the query toolbar, select Save > Save View.
-
Click in the Dataset field and select
customer_a_dataset. -
In the Table field, type
customer_a_table. -
Click Save. You should now be able to see the dataset and table, as well as query it.
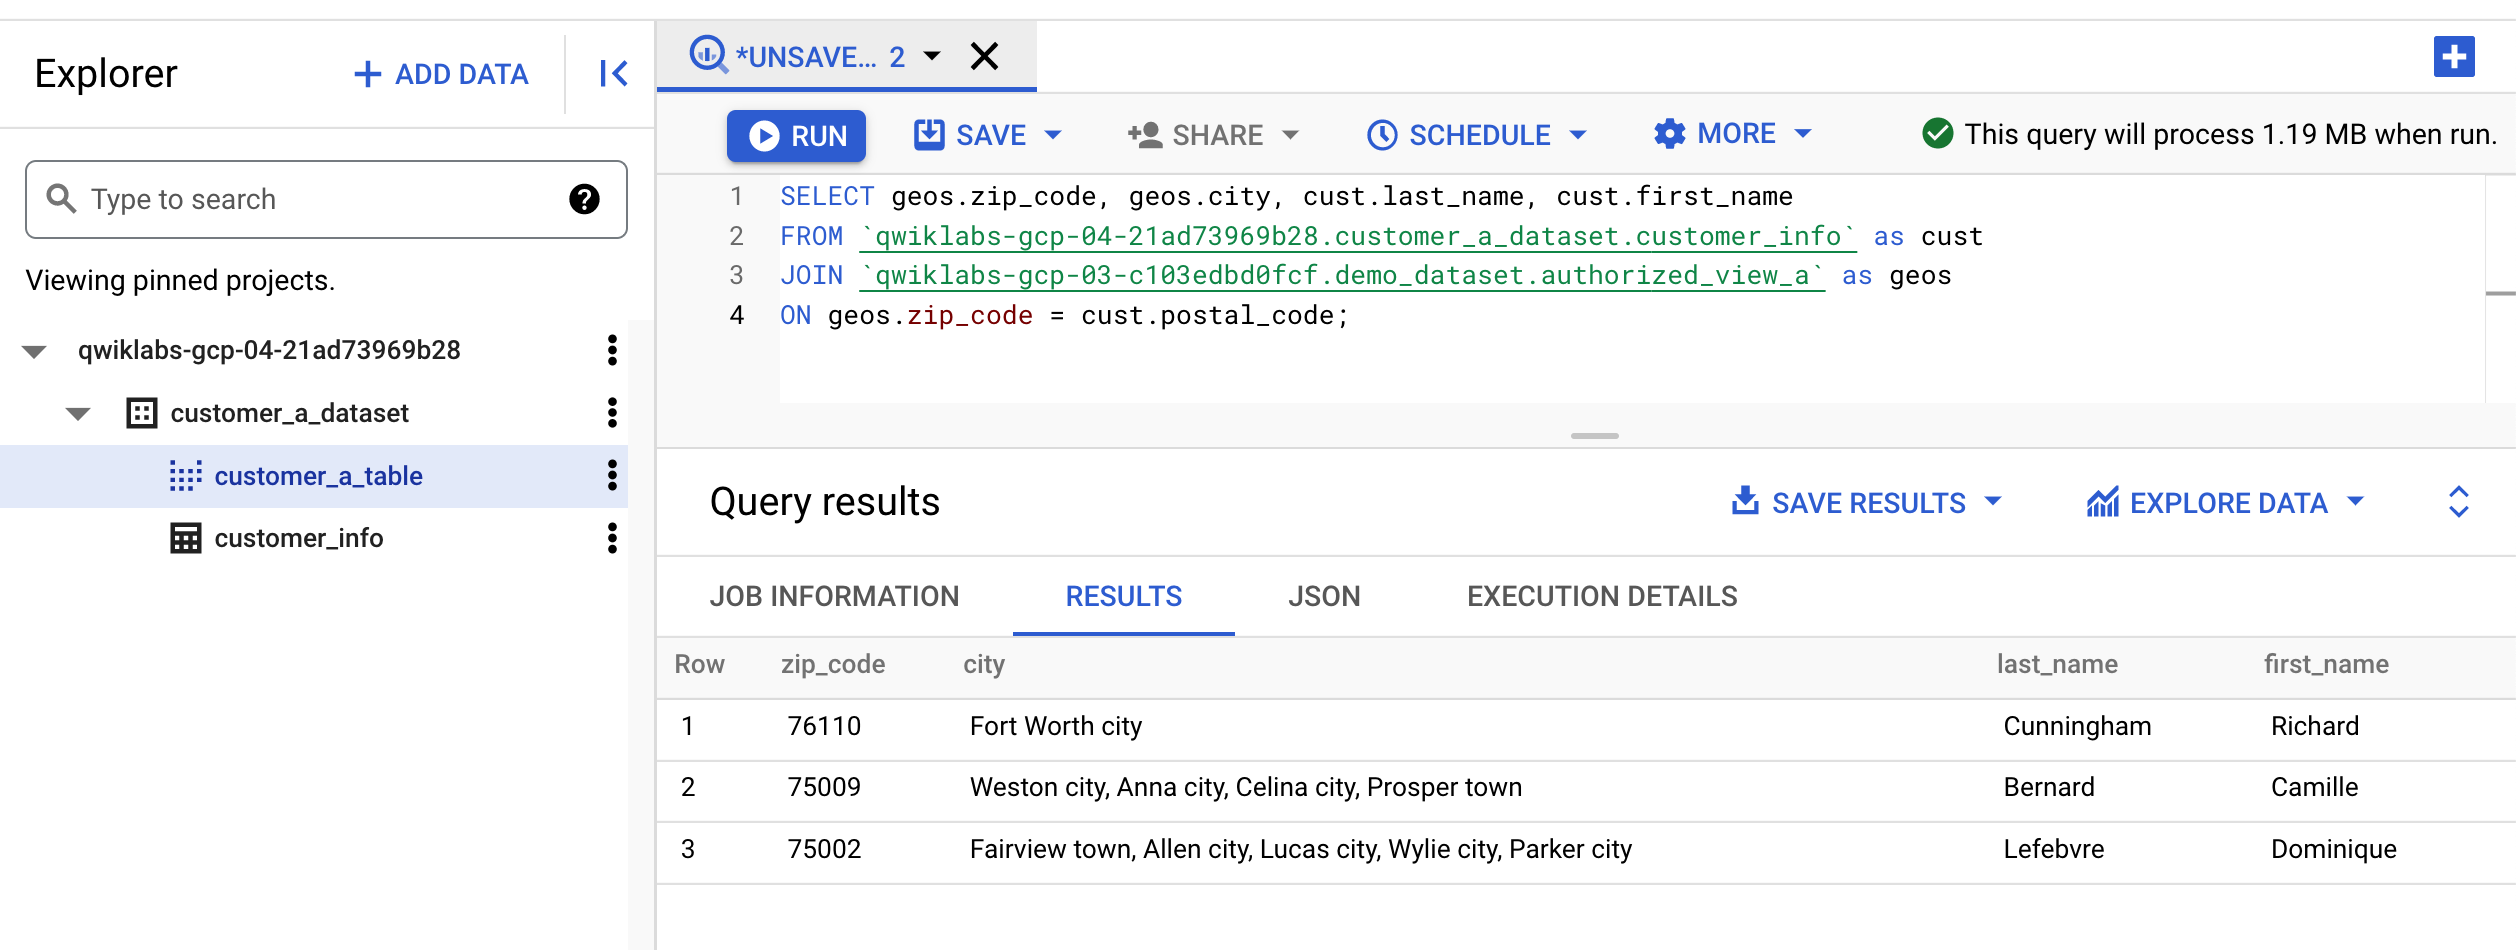
Now you will join the data from Customer A's authorized view to the customer specific dataset to generate new insights.
- Run the following query to find all customers in a State. Since the authorized view available to Customer A is filtered on the state of Texas, the query should return only customers in that state.
Your results should resemble the following:
- Run the following query to confirm only Customer A's specific data is visible.
You should receive the following error:
Verify authorized view sharing for Customer B
-
Close the Customer Project A Console and from the lab pane open the Customer Project B Console. Log in with the associated credentials.
-
From the Navigation Menu, go to BigQuery > BigQuery Studio.
-
Run the following query, which selects all columns from the demo_dataset.authorized_view_b view from the Data Sharing Partner project:
You should now see the results populated.
-
On the query toolbar, select Save > Save View.
-
Click in the Dataset field and select
customer_b_dataset. -
In the Table field, type
customer_b_table. -
Click Save. You should now be able to see the dataset and table, as well as query it.
Now you will join the data from Customer B's authorized view to the customer specific dataset to generate new insights.
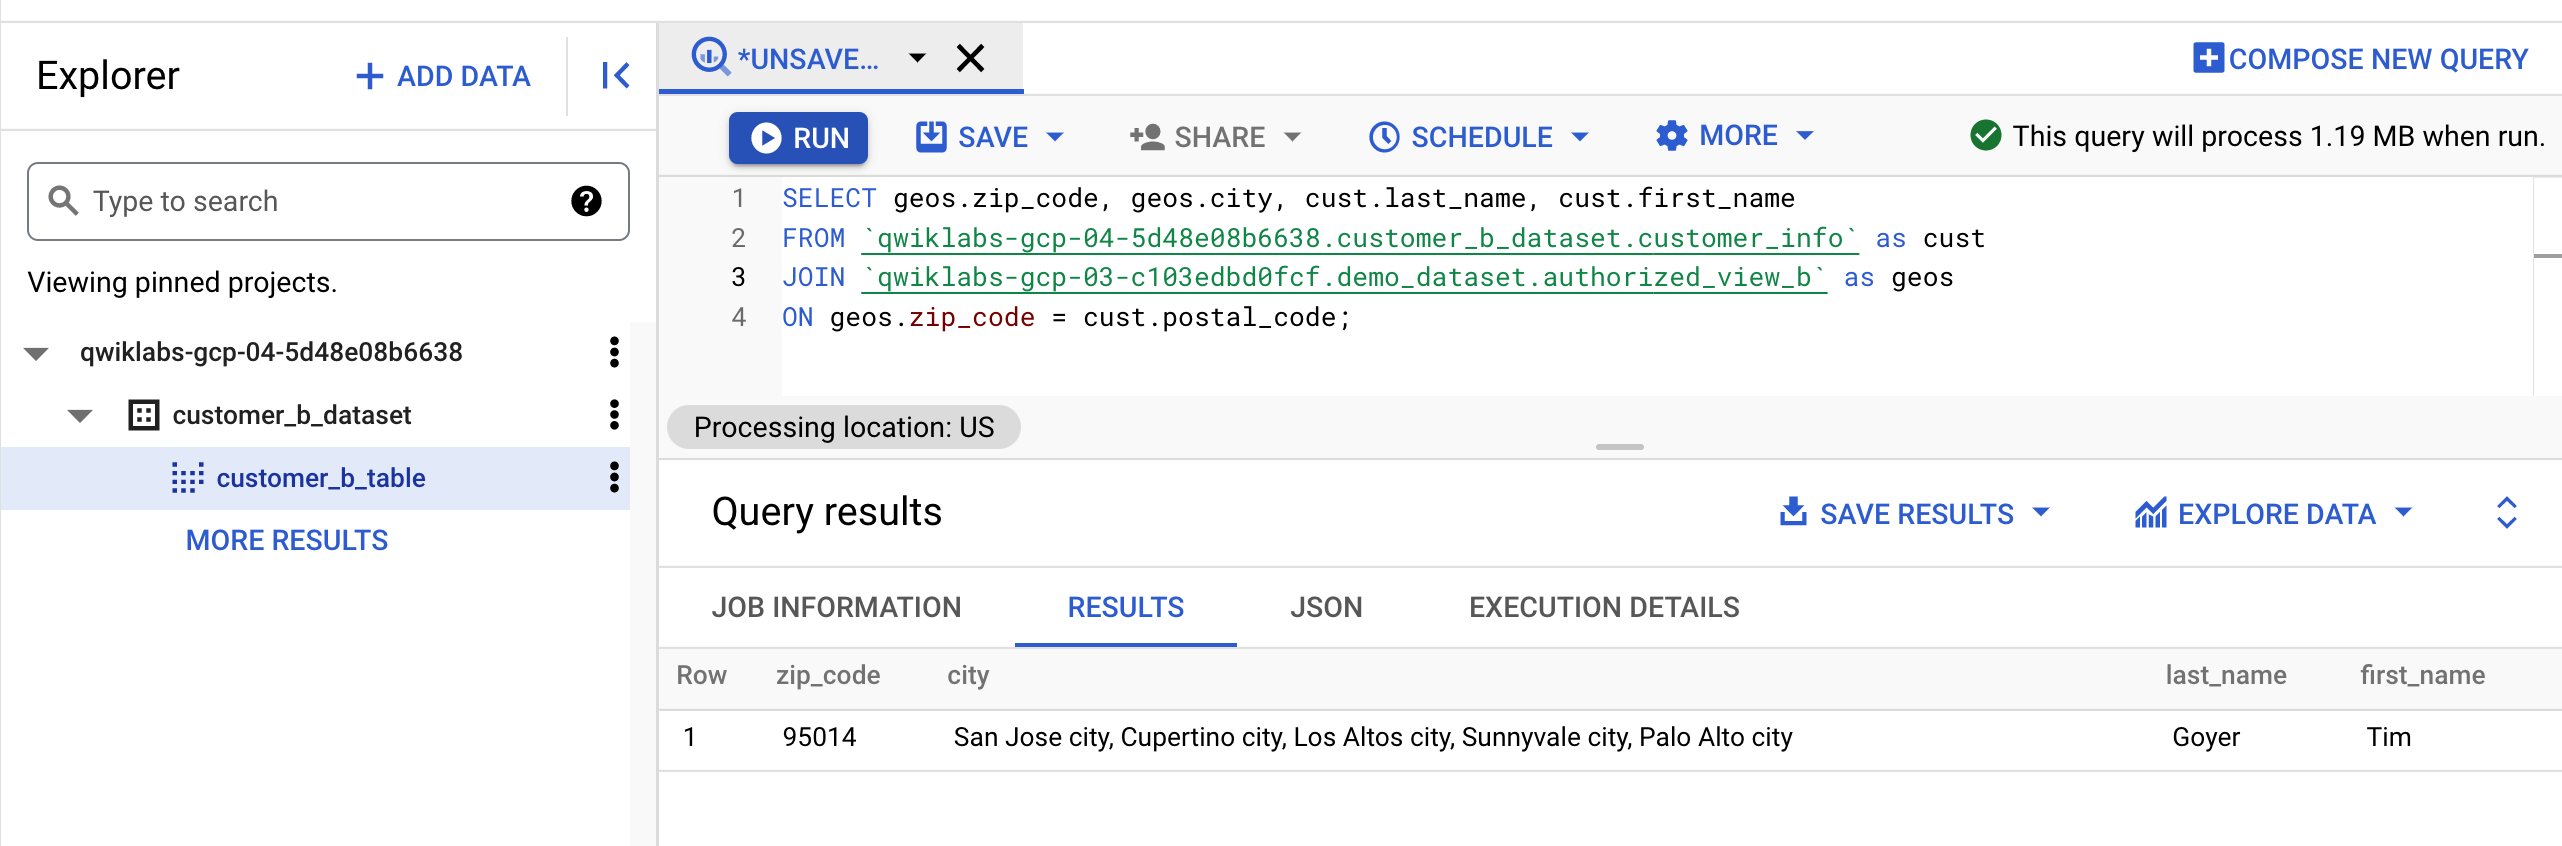
- Run the following query to find all customers in a State. Since the authorized view available to Customer A is filtered on the state of California, the query should return only customers in that state.
Your results should resemble the following:
- Run the following query to confirm only Customer B's specific data is visible.
You should receive the following error:
Click Check my progress to verify the objective.
Congratulations!
In this lab, you learned how to copy datasets from a Data Sharing Partner to a customer's BigQuery project, restrict datasets from the Data Sharing Partner project for consumption by a specific customer, and coalesce the dataset with a customer's own dataset to enhance business intelligence.
Google Cloud training and certification
...helps you make the most of Google Cloud technologies. Our classes include technical skills and best practices to help you get up to speed quickly and continue your learning journey. We offer fundamental to advanced level training, with on-demand, live, and virtual options to suit your busy schedule. Certifications help you validate and prove your skill and expertise in Google Cloud technologies.
Manual Last Updated January 08, 2024
Lab Last Tested January 08, 2024
Copyright 2024 Google LLC All rights reserved. Google and the Google logo are trademarks of Google LLC. All other company and product names may be trademarks of the respective companies with which they are associated.