Checkpoints
Confirm OAuth Consent has been setup
/ 25
Allow a principal to access the application by configuring IAM
/ 25
Restrict access with IAP
/ 25
Securing Compute Engine Applications and Resources using BeyondCorp Enterprise (BCE)
GSP1033

Overview
In this lab, you will explore how to secure Compute Engine workloads using BeyondCorp Enterprise’s Identity Aware Proxy to restrict traffic based on identity.
The lab provisions a web based IDE that you will restrict access to via zero trust configuration you will enable in this lab.
What You’ll Do
- Configure OAuth Consent.
- Setup OAuth access credentials.
- Setup IAP access for the deployed application.
- Restrict access to the application using Identity Aware Proxy (IAP).
Setup
Before you click the Start Lab button
Read these instructions. Labs are timed and you cannot pause them. The timer, which starts when you click Start Lab, shows how long Google Cloud resources will be made available to you.
This hands-on lab lets you do the lab activities yourself in a real cloud environment, not in a simulation or demo environment. It does so by giving you new, temporary credentials that you use to sign in and access Google Cloud for the duration of the lab.
To complete this lab, you need:
- Access to a standard internet browser (Chrome browser recommended).
- Time to complete the lab---remember, once you start, you cannot pause a lab.
How to start your lab and sign in to the Google Cloud console
-
Click the Start Lab button. If you need to pay for the lab, a pop-up opens for you to select your payment method. On the left is the Lab Details panel with the following:
- The Open Google Cloud console button
- Time remaining
- The temporary credentials that you must use for this lab
- Other information, if needed, to step through this lab
-
Click Open Google Cloud console (or right-click and select Open Link in Incognito Window if you are running the Chrome browser).
The lab spins up resources, and then opens another tab that shows the Sign in page.
Tip: Arrange the tabs in separate windows, side-by-side.
Note: If you see the Choose an account dialog, click Use Another Account. -
If necessary, copy the Username below and paste it into the Sign in dialog.
{{{user_0.username | "Username"}}} You can also find the Username in the Lab Details panel.
-
Click Next.
-
Copy the Password below and paste it into the Welcome dialog.
{{{user_0.password | "Password"}}} You can also find the Password in the Lab Details panel.
-
Click Next.
Important: You must use the credentials the lab provides you. Do not use your Google Cloud account credentials. Note: Using your own Google Cloud account for this lab may incur extra charges. -
Click through the subsequent pages:
- Accept the terms and conditions.
- Do not add recovery options or two-factor authentication (because this is a temporary account).
- Do not sign up for free trials.
After a few moments, the Google Cloud console opens in this tab.

Activate Cloud Shell
Cloud Shell is a virtual machine that is loaded with development tools. It offers a persistent 5GB home directory and runs on the Google Cloud. Cloud Shell provides command-line access to your Google Cloud resources.
- Click Activate Cloud Shell
at the top of the Google Cloud console.
When you are connected, you are already authenticated, and the project is set to your Project_ID,
gcloud is the command-line tool for Google Cloud. It comes pre-installed on Cloud Shell and supports tab-completion.
- (Optional) You can list the active account name with this command:
- Click Authorize.
Output:
- (Optional) You can list the project ID with this command:
Output:
gcloud, in Google Cloud, refer to the gcloud CLI overview guide.
Task 1: Create a Compute Engine template
-
In the Cloud Console, navigate to Compute Engine > Instance Templates.
-
Click Create an instance template.
-
Use the default values except for the following:
-
Machine configuration:
- Series: E2
- Machine Type: e2-micro (2 vCPU, 1GB memory)
-
Access scopes:
- Set access for each API
- Compute Engine: Read Only
-
Firewall:
- Allow HTTP traffic
- Allow HTTPs traffic
-
Click Advanced Options.
-
Click Management.
-
In the Automation > Startup script window, copy and paste the following script:
When you're finished updating values, click Create to create the template.
Task 2: Create a Health Check
-
In the Cloud Console, navigate to Compute Engine > Health Checks
-
Click the Create Health Check button.
-
On the Create a Health Check page, provide the following information in the form:
- Name: my-health-check
- Protocol: HTTP
Click Create.
Task 3: Create a Managed Instance Group
-
In the Cloud Console, navigate to Compute Engine > Instance Groups.
-
Click Create instance group.
-
Use the default values except for the following:
- Name: my-managed-instance-group.
- Instance template: Select the instance template you created in Step 1.
- Location: Multiple zones.
-
Region:
- Number of instances: To change the number of instances, you must first turn off autoscaling.
- Autoscaling mode: Off: Do not autoscale.
-
Autohealing: select the Health Check dropdown, then select the health check created in the previous section
my-health-check.
When you're finished updating values, click Create to create the Managed Instance Group (MIG).
Task 4: Get a domain name and certificate
Step 1: Create a private key and certificate
If you already have a private key and a certificate from a certificate authority (CA), skip this section and go to Creating an SSL certificate resource. Otherwise, open Cloud Shell and perform the steps below.
Select or create a private key
A Google Cloud SSL certificate includes both a private key and the certificate itself, both in PEM format. Your private key must meet the following criteria:
- It must be in PEM format.
- It cannot be protected by a passphrase. Google Cloud stores your private key in its own encrypted format.
- Its encryption algorithm must be either RSA-2048 or ECDSA P-256.
You can create a new private key with RSA-2048 encryption in the PEM format using the following OpenSSL command.
Create a CSR
After you have a private key, you can generate a certificate signing request (CSR) in the PEM format using OpenSSL. Your CSR must meet the following criteria:
- It must be in PEM format.
- It must have a common name (
CN) or a subject alternative name (SAN) attribute. Practically speaking, your certificate should contain bothCNandSANattributes, even if it is for a single domain—modern clients, like the current versions of macOS and iOS don't rely on just theCNattribute.
- Create an OpenSSL configuration file. When you create an SSL config file, name the file ssl_config and use the following configuration.
- Run the following OpenSSL command to create a certificate signing request (CSR) file.
Sign the CSR
When a Certificate Authority (CA) signs your CSR, it uses its own private key to create a certificate.
Using a publicly-trusted CA
- If you request a publicly-trusted CA to sign your CSR, the resulting certificate is trusted by all clients that trust that public CA.
- To produce a signed certificate, the public CA only needs your CSR.
Managing your own CA
- If you manage your own CA, you can use it to sign your CSR. Using your CA to sign your CSR creates an internally-trusted certificate when your clients have also been configured to trust your own CA.
Using a self-signed certificate
- If you use the same private key that you used to create the CSR to sign the CSR, you create a self-signed certificate. Self-signed certificates are not trusted by any client unless the client is configured to skip certificate validation. For example, a web browser client displays a message asking you if you want to trust a self-signed certificate. You should only use self-signed certificates for testing.
If you manage your own CA, or if you want to create a self-signed certificate for testing, you can use the following OpenSSL command:
Wildcards in common names
Wildcards in common names
Your self-managed SSL certificates can use a wildcard in the common name. For example, a certificate with the common name *.example.com. matches the hostnames www.example.com and foo.example.com, but not a.b.example.com or example.com. When the load balancer selects a certificate, it always prefers to match a hostname to certificates without wildcards over certificates with wildcards.
Certificates with wildcard fragments, such as f*.example.com, aren't supported.
Step 2: Create a self-managed SSL certificate resource
Before you can create a Google Cloud SSL certificate resource, you must have a private key and certificate. Refer to Creating a private key and certificate if you have not already created or obtained them.
To create a global SSL certificate, use the gcloud compute ssl-certificates create command with the --global flag:
Task 5: Create a load balancer
-
In Cloud Console, go to the Network Services > Create a load balancer page and click Create a Load Balancer.
-
Select Application Load Balancer (HTTP/HTTPS) and Next.
-
Select Public facing (external) and Next.
-
Select Best for global workloads and Next.
-
Select Global external Application Load Balancer and Next.
-
Select Configure.
-
On the Create global external Application Load Balancer page that appears, enter name as my-load-balancer for your load balancer.
-
Click Backend configuration, then select Backend services & backend buckets > Create a backend service.
-
On the Create backend service panel, in the Name box, enter
my-backend-service.
-
Under New backend, use the default values except for the following:
- Instance group: my-managed-instance-group
- Port: 80
-
Under Health check, select my-health-check.
-
When you're finished updating values, click Create. The Create global external Application Load Balancer panel reappears.
-
Click Routing rules to load the default values. You don't need to add any rules.
-
Click Frontend configuration. Use the default values except for the following:
-
Protocol: HTTPS (includes HTTP/2 and HTTP/3)
-
IP address: click Create IP address
-
Enter a Name to associate with your new static IP address.
-
Click Reserve to reserve the static IP address.
-
-
Certificate: my-cert
-
-
When you're finished entering frontend configuration values, click Done. The Create global external Application Load Balancer panel reappears.
-
Under Create global external Application Load Balancer, click Create. The Load balancing page appears and your new load balancer will be created in the list of load balancers.
-
After the Cloud Console finishes creating the new load balancer, click the name of the load balancer and note the external IP address under Details > Frontend. You will need it in the next step.
Restart your VMs
To correctly authenticate requests from IAP, you must restart the VMs in your MIG by following the steps below:
- In the Cloud Console, go to the Compute Engine > Instance groups page.
- Click my-managed-instance-group.
- On the top of the instance group details that appear, click Restart/Replace VMs.
- On the Restart/replace VMs in my-managed-instance-group page that appears, set the following values:
- Operation: Restart
- Maximum unavailable instances: 3 instances
- Minimum wait time: 0 s
- When you're finished updating values, click Restart VMs.
Task 6: Set up IAP
Configure your firewall
Next, you'll configure your firewall to block access to the underlying VMs and only allow access through IAP:
-
Go to the Cloud Console VPC network > Firewall rules.
-
Select the checkbox next to the following rules:
- default-allow-internal
-
Click Delete and select delete again to confirm it.
-
Click Create firewall rule and set the following values:
- Name: allow-iap-traffic
- Targets: All instances in the network
-
Source IPv4 ranges (press Enter after you paste each value in the box):
- 130.211.0.0/22
- 35.191.0.0/16
-
Protocols and ports:
- Specified protocols and ports
- select tcp and enter
80, 78
-
When you're finished updating values, click Create.
Set up IAP
To set up IAP for your project, follow the steps below:
- In the Cloud Console, go to the Security > Identity-Aware Proxy page and select the project for which you want to enable IAP.
- Click Enable API.
- If you haven't configured your project's OAuth consent screen, you'll be prompted to do so:
a. Go to the OAuth consent screen and select External as User Type. Click Create.
b. Under Support email, select the email address you want to display as a public contact. The email address must belong to the currently logged in user account or to a Google Group of which the currently logged in user belongs.
c. Enter the Application name you want to display.
d. Enter the same email address in the Developer contact information.
e. Add any optional details you'd like.
f. Click Save and Continue three times and select Back to Dashboard.
To change information on the OAuth consent screen later, such as the product name or email address, repeat the preceding steps to configure the consent screen.
-
GO TO THE IDENTITY-AWARE PROXY PAGE and select a project. Click Go to Identity-Aware Proxy.
-
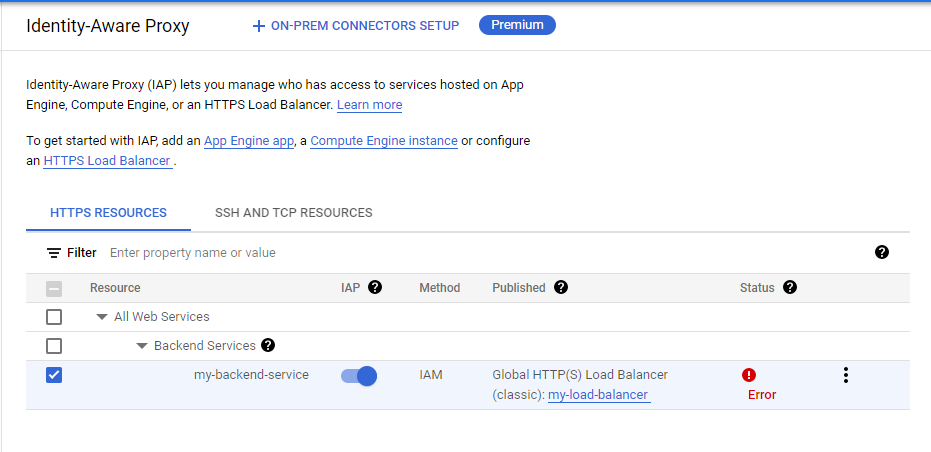
Next to my-backend-service, toggle the on/off switch in the IAP column.
-
In the Turn on IAP window that appears, select the checkbox next to "I have read the configuration requirements and configured my Compute Engine resource according to documentation."
-
Click Turn on.
Add principals to the access list
Next, you'll add principals to the IAP access list for your project.
- On the IAM & admin > Identity-Aware Proxy page, select the my-backend-service checkbox. Click Add Principal.
- Enter the following to grant access to yourself.
-
New Principals: Enter your qwiklabs account email here
-
Role: IAP-secured Web App User
- Click Save.
Task 7: Test IAP
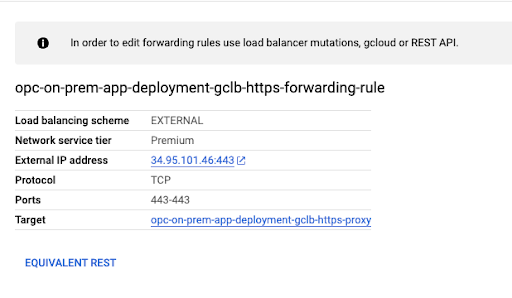
- Go to the Network Services > Load balancing page and select Frontends.
- Select the Forwarding rule — you should see information like the following:
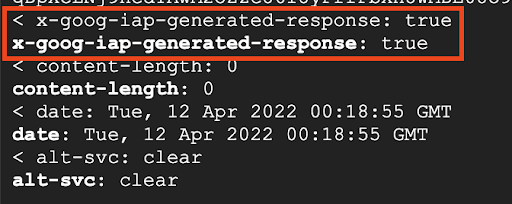
- Run the following curl command to hit the external IP address. You may need to wait a few minutes before the expected IAP header pictured in the figure below appears as expected with the redirect location parameter.
- You will see an IAP generated response that is true—this means you have successfully configured IAP for your GCE Instance
-
This should show the 302 redirection to accounts.google.com if you click on the
External IP addresslink. -
If you follow the URL, you should see a page similar to the following:
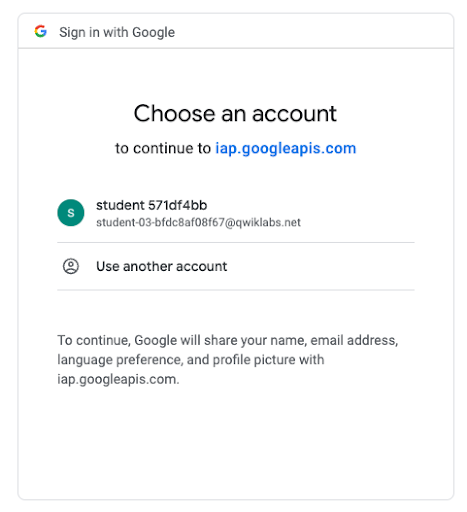
- Because you used a self-signed cert, you won’t be able to access the application itself. However, this confirms that IAP is configured and is protecting traffic.
Congratulations!
You have successfully secured a web application running on a compute engine instance using Identity Aware Proxy.
In this lab, you learned to:
- Create an instance template.
- Create an instance group.
- Create a self signed certificate.
- Create a load balancer.
- Configure an Oauth consent screen.
- Grant access to the application using IAP.
Google Cloud training and certification
...helps you make the most of Google Cloud technologies. Our classes include technical skills and best practices to help you get up to speed quickly and continue your learning journey. We offer fundamental to advanced level training, with on-demand, live, and virtual options to suit your busy schedule. Certifications help you validate and prove your skill and expertise in Google Cloud technologies.
Manual Last Updated April 09, 2024
Lab Last Tested April 09, 2024
End your lab
When you have completed your lab, click End Lab. Your account and the resources you've used are removed from the lab platform.
You will be given an opportunity to rate the lab experience. Select the applicable number of stars, type a comment, and then click Submit.
The number of stars indicates the following:
- 1 star = Very dissatisfied
- 2 stars = Dissatisfied
- 3 stars = Neutral
- 4 stars = Satisfied
- 5 stars = Very satisfied
You can close the dialog box if you don't want to provide feedback.
For feedback, suggestions, or corrections, please use the Support tab.
Copyright 2024 Google LLC All rights reserved. Google and the Google logo are trademarks of Google LLC. All other company and product names may be trademarks of the respective companies with which they are associated.

