GSP410

Overview
BigQuery is Google's fully managed, NoOps, low cost analytics database. With BigQuery you can query terabytes and terabytes of data without having any infrastructure to manage or needing a database administrator. BigQuery uses SQL and can take advantage of the pay-as-you-go model. BigQuery allows you to focus on analyzing data to find meaningful insights.
The dataset you'll use is an ecommerce dataset that has millions of Google Analytics records for the Google Merchandise Store loaded into BigQuery. You have a copy of that dataset for this lab and will explore the available fields and row for insights.
In this lab you will learn how to create new permanent reporting tables and logical reviews from an existing ecommerce dataset.
Setup and requirements
Before you click the Start Lab button
Read these instructions. Labs are timed and you cannot pause them. The timer, which starts when you click Start Lab, shows how long Google Cloud resources are made available to you.
This hands-on lab lets you do the lab activities in a real cloud environment, not in a simulation or demo environment. It does so by giving you new, temporary credentials you use to sign in and access Google Cloud for the duration of the lab.
To complete this lab, you need:
- Access to a standard internet browser (Chrome browser recommended).
Note: Use an Incognito (recommended) or private browser window to run this lab. This prevents conflicts between your personal account and the student account, which may cause extra charges incurred to your personal account.
- Time to complete the lab—remember, once you start, you cannot pause a lab.
Note: Use only the student account for this lab. If you use a different Google Cloud account, you may incur charges to that account.
How to start your lab and sign in to the Google Cloud console
-
Click the Start Lab button. If you need to pay for the lab, a dialog opens for you to select your payment method.
On the left is the Lab Details pane with the following:
- The Open Google Cloud console button
- Time remaining
- The temporary credentials that you must use for this lab
- Other information, if needed, to step through this lab
-
Click Open Google Cloud console (or right-click and select Open Link in Incognito Window if you are running the Chrome browser).
The lab spins up resources, and then opens another tab that shows the Sign in page.
Tip: Arrange the tabs in separate windows, side-by-side.
Note: If you see the Choose an account dialog, click Use Another Account.
-
If necessary, copy the Username below and paste it into the Sign in dialog.
{{{user_0.username | "Username"}}}
You can also find the Username in the Lab Details pane.
-
Click Next.
-
Copy the Password below and paste it into the Welcome dialog.
{{{user_0.password | "Password"}}}
You can also find the Password in the Lab Details pane.
-
Click Next.
Important: You must use the credentials the lab provides you. Do not use your Google Cloud account credentials.
Note: Using your own Google Cloud account for this lab may incur extra charges.
-
Click through the subsequent pages:
- Accept the terms and conditions.
- Do not add recovery options or two-factor authentication (because this is a temporary account).
- Do not sign up for free trials.
After a few moments, the Google Cloud console opens in this tab.
Note: To access Google Cloud products and services, click the Navigation menu or type the service or product name in the Search field.

Open the BigQuery console
- In the Google Cloud Console, select Navigation menu > BigQuery.
The Welcome to BigQuery in the Cloud Console message box opens. This message box provides a link to the quickstart guide and the release notes.
- Click Done.
The BigQuery console opens.
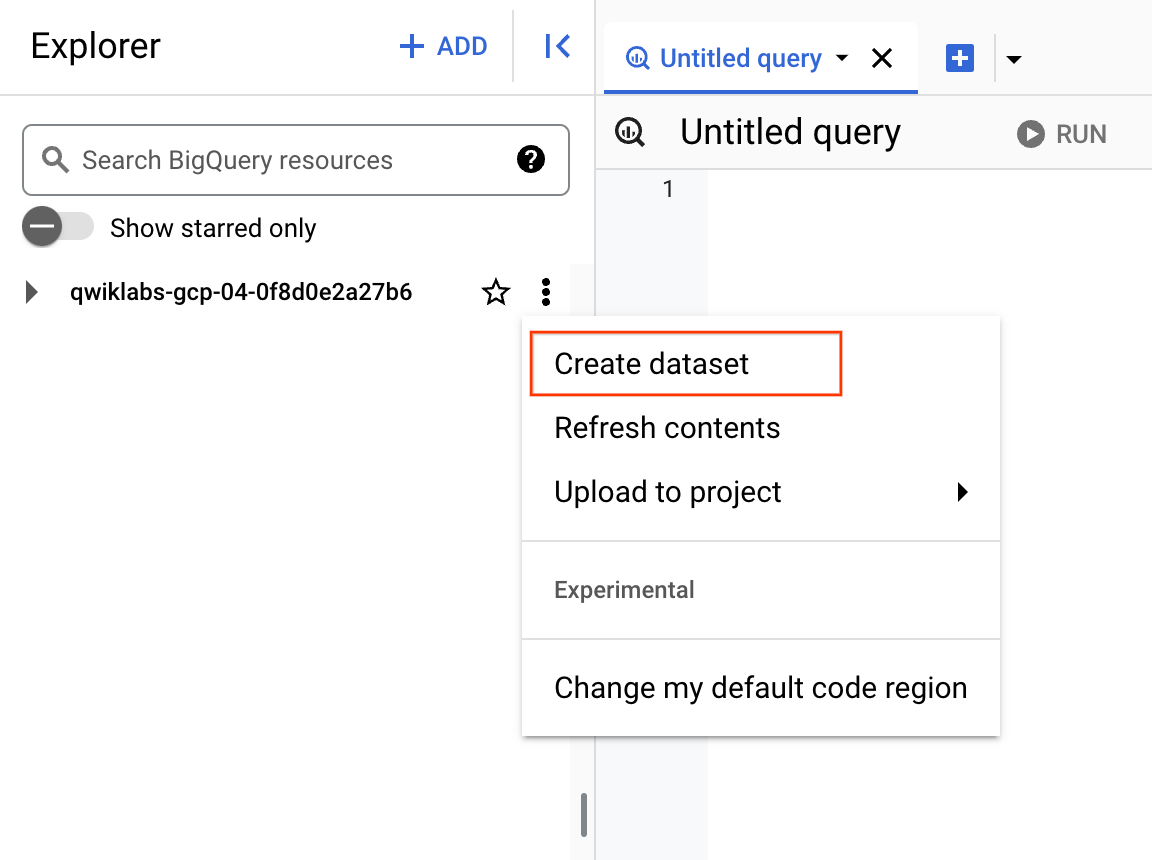
Task 1. Create a new dataset to store the tables
-
In BigQuery, click on the View actions icon next to your project ID and select Create dataset.
-
Set the Dataset ID to ecommerce and leave the other options at their default values (Data Location, Default table Expiration).
-
Click CREATE DATASET.
Click Check my progress to verify the objective.
Create a new dataset to store the tables
Task 2. Troubleshooting CREATE TABLE statements
Your data analyst team has provided you with the below query statements designed to create a permanent table in your new ecommerce dataset. Unfortunately they're not working properly.
Diagnose why each of the queries is broken and offer a solution.
Rules for creating tables with SQL in BigQuery
Read through these create table rules which you will use as your guide when fixing broken queries:
- Either the specified column list or inferred columns from a query_statement (or both) must be present.
- When both the column list and the as query_statement clause are present, BigQuery ignores the names in the as query_statement clause and matches the columns with the column list by position.
- When the as query_statement clause is present and the column list is absent, BigQuery determines the column names and types from the as query_statement clause.
- Column names must be specified either through the column list or as query_statement clause.
- Duplicate column names are not allowed.
Query 1: Columns, columns, columns
- Add this query in the BigQuery Editor, then Run the query, diagnose the error, and answer the questions that follow:
#standardSQL
# copy one day of ecommerce data to explore
CREATE OR REPLACE TABLE ecommerce.all_sessions_raw_20170801
OPTIONS(
description="Raw data from analyst team into our dataset for 08/01/2017"
) AS
SELECT fullVisitorId, * FROM `data-to-insights.ecommerce.all_sessions_raw`
WHERE date = '20170801' #56,989 records
;
Error: CREATE TABLE has columns with duplicate name fullVisitorId at [7:2]
Which one of the create table rules is violated in the above query?
Query 2: Columns revisited
- Add this query in the BigQuery Editor, then Run the query, diagnose the error, and answer the questions that follow:
#standardSQL
# copy one day of ecommerce data to explore
CREATE OR REPLACE TABLE ecommerce.all_sessions_raw_20170801
#schema
(
fullVisitorId STRING OPTIONS(description="Unique visitor ID"),
channelGrouping STRING OPTIONS(description="Channel e.g. Direct, Organic, Referral...")
)
OPTIONS(
description="Raw data from analyst team into our dataset for 08/01/2017"
) AS
SELECT * FROM `data-to-insights.ecommerce.all_sessions_raw`
WHERE date = '20170801' #56,989 records
;
Error: The number of columns in the column definition list does not match the number of columns produced by the query at [5:1]
Which one of the create table rules is violated in the above query?
Note: You cannot specify a schema of fields for a new table which does not match the number of columns returned by the query statement. In the above a two column schema was specified with fullVisitorId and channelGrouping but in the query statement all columns returned (\*) was specified.
Query 3: It's valid! Or is it?
- Add this query in the BigQuery Editor, then Run the query, diagnose the error, and answer the questions that follow:
#standardSQL
# copy one day of ecommerce data to explore
CREATE OR REPLACE TABLE ecommerce.all_sessions_raw_20170801
#schema
(
fullVisitorId STRING OPTIONS(description="Unique visitor ID"),
channelGrouping STRING OPTIONS(description="Channel e.g. Direct, Organic, Referral...")
)
OPTIONS(
description="Raw data from analyst team into our dataset for 08/01/2017"
) AS
SELECT fullVisitorId, city FROM `data-to-insights.ecommerce.all_sessions_raw`
WHERE date = '20170801' #56,989 records
;
Valid: This query will process 1.1 GiB when run.
Remember Rule #2: when both the column list and the as query_statement clause are present, BigQuery ignores the names in the as query_statement clause and matches the columns with the column list by position.
Click Check my progress to verify the objective.
Create a table
Query 4: The gatekeeper
- Run the below query in the BigQuery Editor, then diagnose the error and answer the questions that follow:
#standardSQL
# copy one day of ecommerce data to explore
CREATE OR REPLACE TABLE ecommerce.all_sessions_raw_20170801
#schema
(
fullVisitorId STRING NOT NULL OPTIONS(description="Unique visitor ID"),
channelGrouping STRING NOT NULL OPTIONS(description="Channel e.g. Direct, Organic, Referral..."),
totalTransactionRevenue INT64 NOT NULL OPTIONS(description="Revenue * 10^6 for the transaction")
)
OPTIONS(
description="Raw data from analyst team into our dataset for 08/01/2017"
) AS
SELECT fullVisitorId, channelGrouping, totalTransactionRevenue FROM `data-to-insights.ecommerce.all_sessions_raw`
WHERE date = '20170801' #56,989 records
;
Valid: This query will process 907.52 MiB when run.
Fix and re-run the modified query to confirm it executes successfully.
Query 5: Working as intended
- Run this query in the BigQuery Editor, and answer the questions that follow:
#standardSQL
# copy one day of ecommerce data to explore
CREATE OR REPLACE TABLE ecommerce.all_sessions_raw_20170801
#schema
(
fullVisitorId STRING NOT NULL OPTIONS(description="Unique visitor ID"),
channelGrouping STRING NOT NULL OPTIONS(description="Channel e.g. Direct, Organic, Referral..."),
totalTransactionRevenue INT64 OPTIONS(description="Revenue * 10^6 for the transaction")
)
OPTIONS(
description="Raw data from analyst team into our dataset for 08/01/2017"
) AS
SELECT fullVisitorId, channelGrouping, totalTransactionRevenue FROM `data-to-insights.ecommerce.all_sessions_raw`
WHERE date = '20170801' #56,989 records
;
- Browse your ecommerce dataset panel to confirm the
all_sessions_raw_(1) is present.
Why is the full table name not showing?
Answer: The table suffix 20170801 is automatically partitioned by day. If we created more tables for other days, the all_sessions_raw_(N) would increment by N distinct days of data. There is another lab that explores different ways of partitioning your data tables.
Click Check my progress to verify the objective.
Working as intended
Query 6: Your turn to practice
Goal: In the Query Editor, create a new permanent table that stores all the transactions with revenue for August 1st, 2017.
Use the below rules as a guide:
- Create a new table in your ecommerce dataset titled revenue_transactions_20170801. Replace the table if it already exists.
- Source your raw data from the data-to-insights.ecommerce.all_sessions_raw table.
- Divide the revenue field by 1,000,000 and store it as a FLOAT64 instead of an INTEGER.
- Only include transactions with revenue in your final table (hint: use a WHERE clause).
- Only include transactions on 20170801.
- Include these fields:
- fullVisitorId as a REQUIRED string field.
- visitId as a REQUIRED string field (hint: you will need to type convert).
- channelGrouping as a REQUIRED string field.
- totalTransactionRevenue as a FLOAT64 field.
- Add short descriptions for the above four fields by referring to the schema.
- Be sure to deduplicate records that have the same
fullVisitorId and visitId (hint: use DISTINCT).
- Write the answer to the above prompt in BigQuery and compare it to the answer below.
Possible Answer:
#standardSQL
# copy one day of ecommerce data to explore
CREATE OR REPLACE TABLE ecommerce.revenue_transactions_20170801
#schema
(
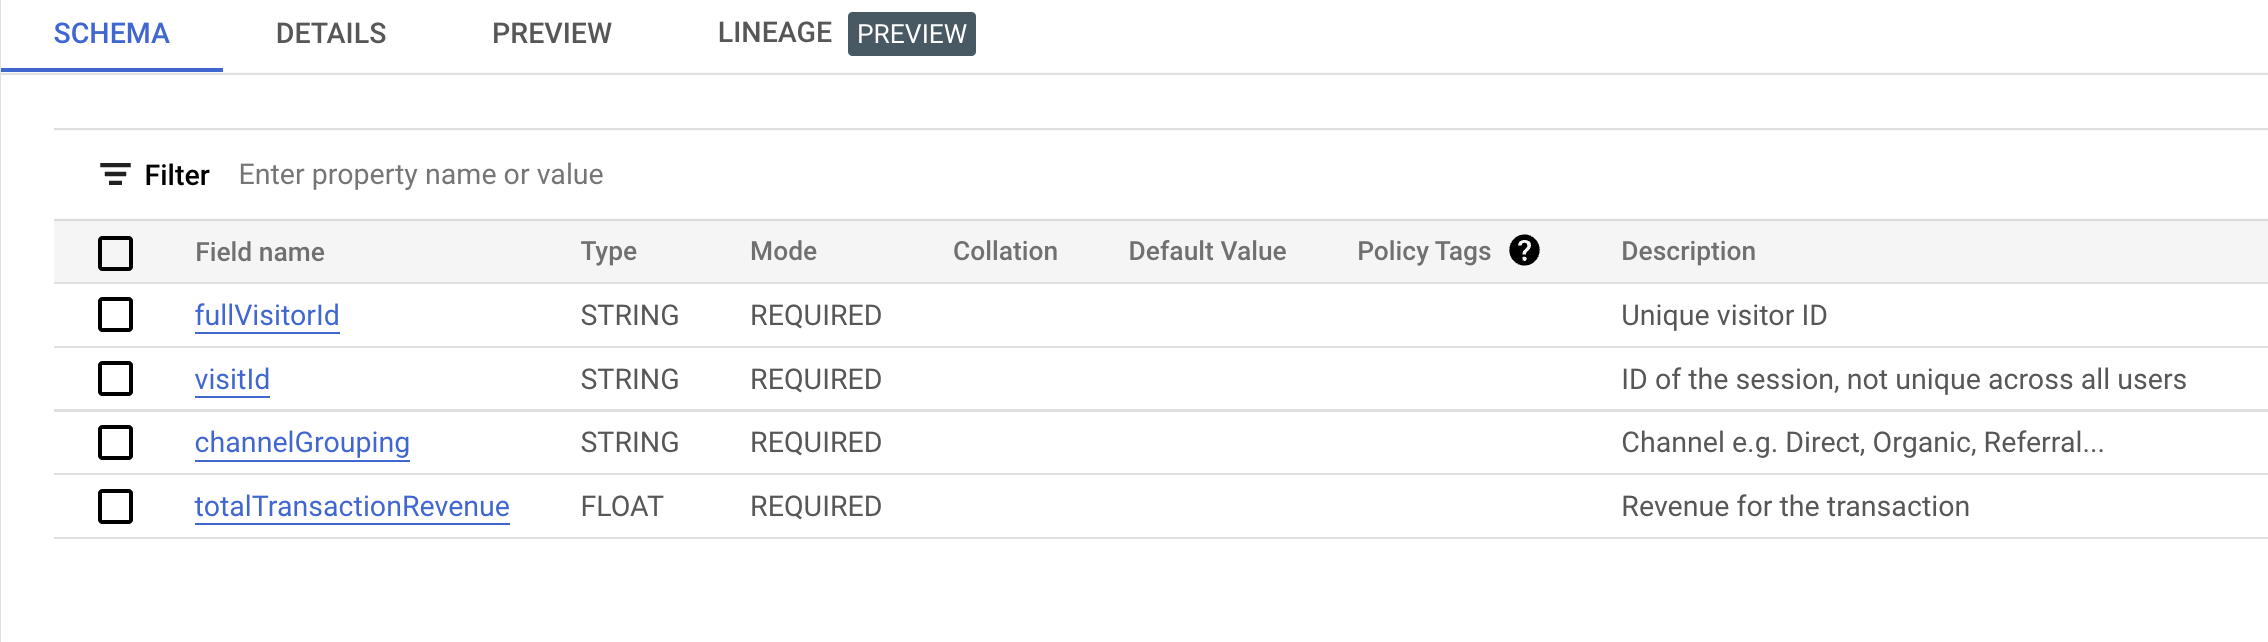
fullVisitorId STRING NOT NULL OPTIONS(description="Unique visitor ID"),
visitId STRING NOT NULL OPTIONS(description="ID of the session, not unique across all users"),
channelGrouping STRING NOT NULL OPTIONS(description="Channel e.g. Direct, Organic, Referral..."),
totalTransactionRevenue FLOAT64 NOT NULL OPTIONS(description="Revenue for the transaction")
)
OPTIONS(
description="Revenue transactions for 08/01/2017"
) AS
SELECT DISTINCT
fullVisitorId,
CAST(visitId AS STRING) AS visitId,
channelGrouping,
totalTransactionRevenue / 1000000 AS totalTransactionRevenue
FROM `data-to-insights.ecommerce.all_sessions_raw`
WHERE date = '20170801'
AND totalTransactionRevenue IS NOT NULL #XX transactions
;
-
After successfully running the query, confirm in your ecommerce dataset that the new table is present name as revenue_transactions_20170801 and select it.
-
Confirm the schema against the below example. Note the field types, required, and optional description:
Handling upstream source data updates
What are ways to overcome stale data?
There are two ways to overcome stale data in reporting tables:
- Periodically refresh the permanent tables by re-running queries that insert in new records. This can be done with BigQuery scheduled queries or with a Cloud Dataprep / Cloud Dataflow workflow.
- Use logical views to re-run a stored query each time the view is selected
In the remainder of this lab you will focus on how to create logical views.
Click Check my progress to verify the objective.
Create a table
Task 3. Creating views
Views are saved queries that are run each time the view is called. In BigQuery, views are logical and not materialized. Only the query is stored as part of the view -- not the underlying data.
Query the latest 100 transactions
- Copy and paste the below query and execute it in BigQuery:
#standardSQL
SELECT DISTINCT
date,
fullVisitorId,
CAST(visitId AS STRING) AS visitId,
channelGrouping,
totalTransactionRevenue / 1000000 AS totalTransactionRevenue
FROM `data-to-insights.ecommerce.all_sessions_raw`
WHERE totalTransactionRevenue IS NOT NULL
ORDER BY date DESC # latest transactions
LIMIT 100
;
- Scan through to filter the results. What was the latest transaction above $2,000?
Answer:
|
date
|
fullVisitorId
|
visitId
|
channelGrouping
|
totalTransactionRevenue
|
|
20170801
|
9947542428111966715
|
1501608078
|
Referral
|
2934.61
|
If new records were added to this public ecommerce dataset, the latest transaction would also update.
- To save time and enable better organization and collaboration, you can save your common reporting queries as views as demonstrated below:
#standardSQL
CREATE OR REPLACE VIEW ecommerce.vw_latest_transactions
AS
SELECT DISTINCT
date,
fullVisitorId,
CAST(visitId AS STRING) AS visitId,
channelGrouping,
totalTransactionRevenue / 1000000 AS totalTransactionRevenue
FROM `data-to-insights.ecommerce.all_sessions_raw`
WHERE totalTransactionRevenue IS NOT NULL
ORDER BY date DESC # latest transactions
LIMIT 100
;
Note: It is often difficult to know whether or not you are SELECTing from a Table or a View by just looking at the name. A simple convention is to prefix the view name with vw_ or add a suffix like _vw or _view.
You can also give your view a description and labels using OPTIONS.
- Copy and paste the below query and execute it in BigQuery:
#standardSQL
CREATE OR REPLACE VIEW ecommerce.vw_latest_transactions
OPTIONS(
description="latest 100 ecommerce transactions",
labels=[('report_type','operational')]
)
AS
SELECT DISTINCT
date,
fullVisitorId,
CAST(visitId AS STRING) AS visitId,
channelGrouping,
totalTransactionRevenue / 1000000 AS totalTransactionRevenue
FROM `data-to-insights.ecommerce.all_sessions_raw`
WHERE totalTransactionRevenue IS NOT NULL
ORDER BY date DESC # latest transactions
LIMIT 100
;
-
Find the newly created vw_latest_transactions table in your ecommerce dataset and select it.
-
Select the DETAILS tab.
-
Confirm your view Description and Labels are properly shown in the BigQuery UI.
You can also view the query that defines the view on the Details page. This is useful for understanding the logic of views you or your team created.
Click Check my progress to verify the objective.
Create view
- Now run this query to create a new view:
#standardSQL
# top 50 latest transactions
CREATE VIEW ecommerce.vw_latest_transactions # CREATE
OPTIONS(
description="latest 50 ecommerce transactions",
labels=[('report_type','operational')]
)
AS
SELECT DISTINCT
date,
fullVisitorId,
CAST(visitId AS STRING) AS visitId,
channelGrouping,
totalTransactionRevenue / 1000000 AS totalTransactionRevenue
FROM `data-to-insights.ecommerce.all_sessions_raw`
WHERE totalTransactionRevenue IS NOT NULL
ORDER BY date DESC # latest transactions
LIMIT 50
;
Error: Already Exists: Table project-name:ecommerce.vw_latest_transactions
You'll likely receive an error if you have already created the view before. Can you see why?
Answer: The view creation statement was updated to simply be CREATE instead of CREATE OR REPLACE which will not let you overwrite existing tables or views if they already exist. A third option, CREATE VIEW IF NOT EXISTS, will allow you to only create if the table or view doesn't exist or else it will skip the creation and not error.
View creation: Your turn to practice
Scenario: Your anti-fraud team has asked you to create a report that lists the 10 most recent transactions that have an order amount of 1,000 or more for them to review manually.
Task: Create a new view that returns all the most recent 10 transactions with revenue greater than 1,000 on or after January 1st, 2017.
Use these rules as a guide:
-
Create a new view in your ecommerce dataset titled "vw_large_transactions". Replace the view if it already exists.
-
Give the view a description "large transactions for review".
-
Give the view a label [("org_unit", "loss_prevention")].
-
Source your raw data from the data-to-insights.ecommerce.all_sessions_raw table.
-
Divide the revenue field by 1,000,000.
-
Only include transactions with revenue greater than or equal to 1,000
-
Only include transactions on or after 20170101 ordered by most recent first.
-
Only include currencyCode = 'USD'.
-
Return these fields:
- date
- fullVisitorId
- visitId
- channelGrouping
- totalTransactionRevenue AS revenue
- currencyCode
- v2ProductName
-
Be sure to deduplicate records (hint: use DISTINCT).
-
You try:
/*
write the answer to the above prompt in BigQuery and compare it to the answer given below
*/
Possible solution:
#standardSQL
CREATE OR REPLACE VIEW ecommerce.vw_large_transactions
OPTIONS(
description="large transactions for review",
labels=[('org_unit','loss_prevention')]
)
AS
SELECT DISTINCT
date,
fullVisitorId,
visitId,
channelGrouping,
totalTransactionRevenue / 1000000 AS revenue,
currencyCode
#v2ProductName
FROM `data-to-insights.ecommerce.all_sessions_raw`
WHERE
(totalTransactionRevenue / 1000000) > 1000
AND currencyCode = 'USD'
ORDER BY date DESC # latest transactions
LIMIT 10
;
Note that you need to repeat the division in the WHERE clause because you cannot use aliased field names as filters.
Click Check my progress to verify the objective.
Create a new view to returns recent 10 transactions
Extra credit
Scenario: Your anti-fraud department is grateful for the query and they are monitoring it daily for suspicious orders. They have now asked you to include a sample of the products that are part of each order along with the results you returned previously.
Using the BigQuery string aggregation function STRING_AGG and the v2ProductName field, modify your previous query to return 10 of the product names in each order, listed alphabetically.
Possible solution:
#standardSQL
CREATE OR REPLACE VIEW ecommerce.vw_large_transactions
OPTIONS(
description="large transactions for review",
labels=[('org_unit','loss_prevention')]
)
AS
SELECT DISTINCT
date,
fullVisitorId,
visitId,
channelGrouping,
totalTransactionRevenue / 1000000 AS totalTransactionRevenue,
currencyCode,
STRING_AGG(DISTINCT v2ProductName ORDER BY v2ProductName LIMIT 10) AS products_ordered
FROM `data-to-insights.ecommerce.all_sessions_raw`
WHERE
(totalTransactionRevenue / 1000000) > 1000
AND currencyCode = 'USD'
GROUP BY 1,2,3,4,5,6
ORDER BY date DESC # latest transactions
LIMIT 10
Note the two additions here to aggregate the list of products in each order with STRING_AGG() and, since you're performing an aggregation, the necessary GROUP BY is added for the other fields.
Using SESSION_USER() in views for limiting data access
Scenario: Your data team lead has asked you to come up with a way to limit who in your organization can see the data returned by the view you just created. Order information is especially sensitive and needs to be shared only with users that have a need to see such information.
Task: Modify the view you created earlier to only allow logged in users with a qwiklabs.net session domain to be able to see the data in the underlying view. (Note: You will be creating specific user group allowlists in a later lab on access; for now you are validating based on the session user's domain).
- To view your own session login information, run the below query that uses SESSION_USER():
#standardSQL
SELECT
SESSION_USER() AS viewer_ldap;
You will see xxxx@qwiklabs.net.
- Modify the below query to add an additional filter to only allow users in the
qwiklabs.net domain to see view results:
#standardSQL
SELECT DISTINCT
SESSION_USER() AS viewer_ldap,
REGEXP_EXTRACT(SESSION_USER(), r'@(.+)') AS domain,
date,
fullVisitorId,
visitId,
channelGrouping,
totalTransactionRevenue / 1000000 AS totalTransactionRevenue,
currencyCode,
STRING_AGG(DISTINCT v2ProductName ORDER BY v2ProductName LIMIT 10) AS products_ordered
FROM `data-to-insights.ecommerce.all_sessions_raw`
WHERE
(totalTransactionRevenue / 1000000) > 1000
AND currencyCode = 'USD'
# add filter here
GROUP BY 1,2,3,4,5,6,7,8
ORDER BY date DESC # latest transactions
LIMIT 10
Possible solution:
#standardSQL
SELECT DISTINCT
SESSION_USER() AS viewer_ldap,
REGEXP_EXTRACT(SESSION_USER(), r'@(.+)') AS domain,
date,
fullVisitorId,
visitId,
channelGrouping,
totalTransactionRevenue / 1000000 AS totalTransactionRevenue,
currencyCode,
STRING_AGG(DISTINCT v2ProductName ORDER BY v2ProductName LIMIT 10) AS products_ordered
FROM `data-to-insights.ecommerce.all_sessions_raw`
WHERE
(totalTransactionRevenue / 1000000) > 1000
AND currencyCode = 'USD'
AND REGEXP_EXTRACT(SESSION_USER(), r'@(.+)') IN ('qwiklabs.net')
GROUP BY 1,2,3,4,5,6,7,8
ORDER BY date DESC # latest transactions
LIMIT 10
- Execute the above query to confirm you can see records returned.
Now, remove all domains from the IN filter REGEXP_EXTRACT(SESSION_USER(), r'@(.+)') IN (''), execute the query again, and confirm you see zero records returned.
- Re-create and replace the vw_large_transactions view with the new query above. As an additional OPTIONS parameter, add an
expiration_timestamp for the entire view to be 90 days from now:
expiration_timestamp=TIMESTAMP_ADD(CURRENT_TIMESTAMP(), INTERVAL 90 DAY).
Possible solution:
#standardSQL
CREATE OR REPLACE VIEW ecommerce.vw_large_transactions
OPTIONS(
description="large transactions for review",
labels=[('org_unit','loss_prevention')],
expiration_timestamp=TIMESTAMP_ADD(CURRENT_TIMESTAMP(), INTERVAL 90 DAY)
)
AS
#standardSQL
SELECT DISTINCT
SESSION_USER() AS viewer_ldap,
REGEXP_EXTRACT(SESSION_USER(), r'@(.+)') AS domain,
date,
fullVisitorId,
visitId,
channelGrouping,
totalTransactionRevenue / 1000000 AS totalTransactionRevenue,
currencyCode,
STRING_AGG(DISTINCT v2ProductName ORDER BY v2ProductName LIMIT 10) AS products_ordered
FROM `data-to-insights.ecommerce.all_sessions_raw`
WHERE
(totalTransactionRevenue / 1000000) > 1000
AND currencyCode = 'USD'
AND REGEXP_EXTRACT(SESSION_USER(), r'@(.+)') IN ('qwiklabs.net')
GROUP BY 1,2,3,4,5,6,7,8
ORDER BY date DESC # latest transactions
LIMIT 10;
Note: The expiration_timestamp option can also be applied to permanent tables.
Click Check my progress to verify the objective.
Run a query with session_user in views for limiting data access
- Confirm with the below SELECT statement you can see the data returned in the view (given your domain access) and the expiration timestamp in the view details:
#standardSQL
SELECT * FROM ecommerce.vw_large_transactions;
Congratulations!
You've successfully created tables and access-controlled views using SQL DDL (Data Definition Language) inside of BigQuery.
Next steps / learn more
Already have a Google Analytics account and want to query your own datasets in BigQuery? Follow this export guide.
Manual Last Updated December 24, 2024
Lab Last Tested December 24, 2024
Copyright 2025 Google LLC. All rights reserved. Google and the Google logo are trademarks of Google LLC. All other company and product names may be trademarks of the respective companies with which they are associated.


