Checkpoints
Verify that the Automated Assessment has been created
/ 10
Verify that the Collector is activated and the IP scanner is properly configured
/ 10
Verify database collection is configured and data is transmitted to StratoZone portal.
/ 30
Verify Assets were manually loaded (Inventory Check).
/ 10
Verify that the StratoZone Database pricing report has been generated
/ 10
Verify Database info has been reviewed.
/ 10
Verify that the Optimization Mode was set to Aggressive
/ 10
Verify that the second set of reports were generated
/ 10
Database and Multi-Cloud Assessment with StratoZone
- GSP804
- Overview
- Setup and requirements
- Task 1. Log in to StratoZone portal
- Task 2. Start new assessment (automatic)
- Task 3. Deploy StratoProbe data collector
- Task 4. Start database collection
- Task 5. Start new assessment (manual)
- Task 6. Generate database pricing report
- Task 7. Review database level data
- Task 8. Generate summary report
- Task 9. Generate detailed pricing report
- Congratulations!
- Next steps / Learn more
GSP804

Overview
The StratoZone® SaaS platform provides customers with a data-driven cloud decision framework. The StratoProbe® Data Collector Application delivers the ability to easily deploy and scale the discovery of a customer's IT environment for Private, Public, or Hybrid-cloud planning. Most recent release supports collection of database information from servers running PostgreSQL, MySQL or SQL Server to further ease and accelerate the VM migration journey. Google Cloud offers assistance and guidance in making the right decisions when deciding to go to cloud.
In this hands-on lab you'll learn how to assess a customer's current environment and collect information from supported databases as well as import data collected from Azure/AWS infrastructure. You'll generate inventory, cloud fit score, and financial reports including TCO and ROI analysis.
What you'll do
- Collect data automatically from an existing environment.
- Collect data from MS SQL Server, MySQL, and Postgres databases.
- Import data from an existing AWS environment.
- Review data and create groups.
- Obtain TCO and detailed pricing reports.
Setup and requirements
Before you click the Start Lab button
Read these instructions. Labs are timed and you cannot pause them. The timer, which starts when you click Start Lab, shows how long Google Cloud resources will be made available to you.
This hands-on lab lets you do the lab activities yourself in a real cloud environment, not in a simulation or demo environment. It does so by giving you new, temporary credentials that you use to sign in and access Google Cloud for the duration of the lab.
To complete this lab, you need:
- Access to a standard internet browser (Chrome browser recommended).
- Time to complete the lab---remember, once you start, you cannot pause a lab.
How to start your lab and sign in to the Google Cloud console
-
Click the Start Lab button. If you need to pay for the lab, a pop-up opens for you to select your payment method. On the left is the Lab Details panel with the following:
- The Open Google Cloud console button
- Time remaining
- The temporary credentials that you must use for this lab
- Other information, if needed, to step through this lab
-
Click Open Google Cloud console (or right-click and select Open Link in Incognito Window if you are running the Chrome browser).
The lab spins up resources, and then opens another tab that shows the Sign in page.
Tip: Arrange the tabs in separate windows, side-by-side.
Note: If you see the Choose an account dialog, click Use Another Account. -
If necessary, copy the Username below and paste it into the Sign in dialog.
{{{user_0.username | "Username"}}} You can also find the Username in the Lab Details panel.
-
Click Next.
-
Copy the Password below and paste it into the Welcome dialog.
{{{user_0.password | "Password"}}} You can also find the Password in the Lab Details panel.
-
Click Next.
Important: You must use the credentials the lab provides you. Do not use your Google Cloud account credentials. Note: Using your own Google Cloud account for this lab may incur extra charges. -
Click through the subsequent pages:
- Accept the terms and conditions.
- Do not add recovery options or two-factor authentication (because this is a temporary account).
- Do not sign up for free trials.
After a few moments, the Google Cloud console opens in this tab.

To begin, you will download and deploy the collector in a simulated customer environment created for this purpose in Google Cloud.
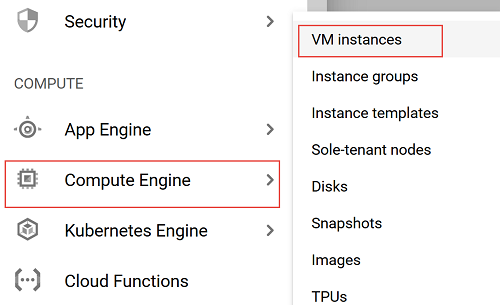
- In the Console, from the Navigation menu, select Compute Engine > VM instances.
If prompted, select the Google Cloud project assigned to your lab.
- Click the RDP button next to the lab-winvm01 instance.
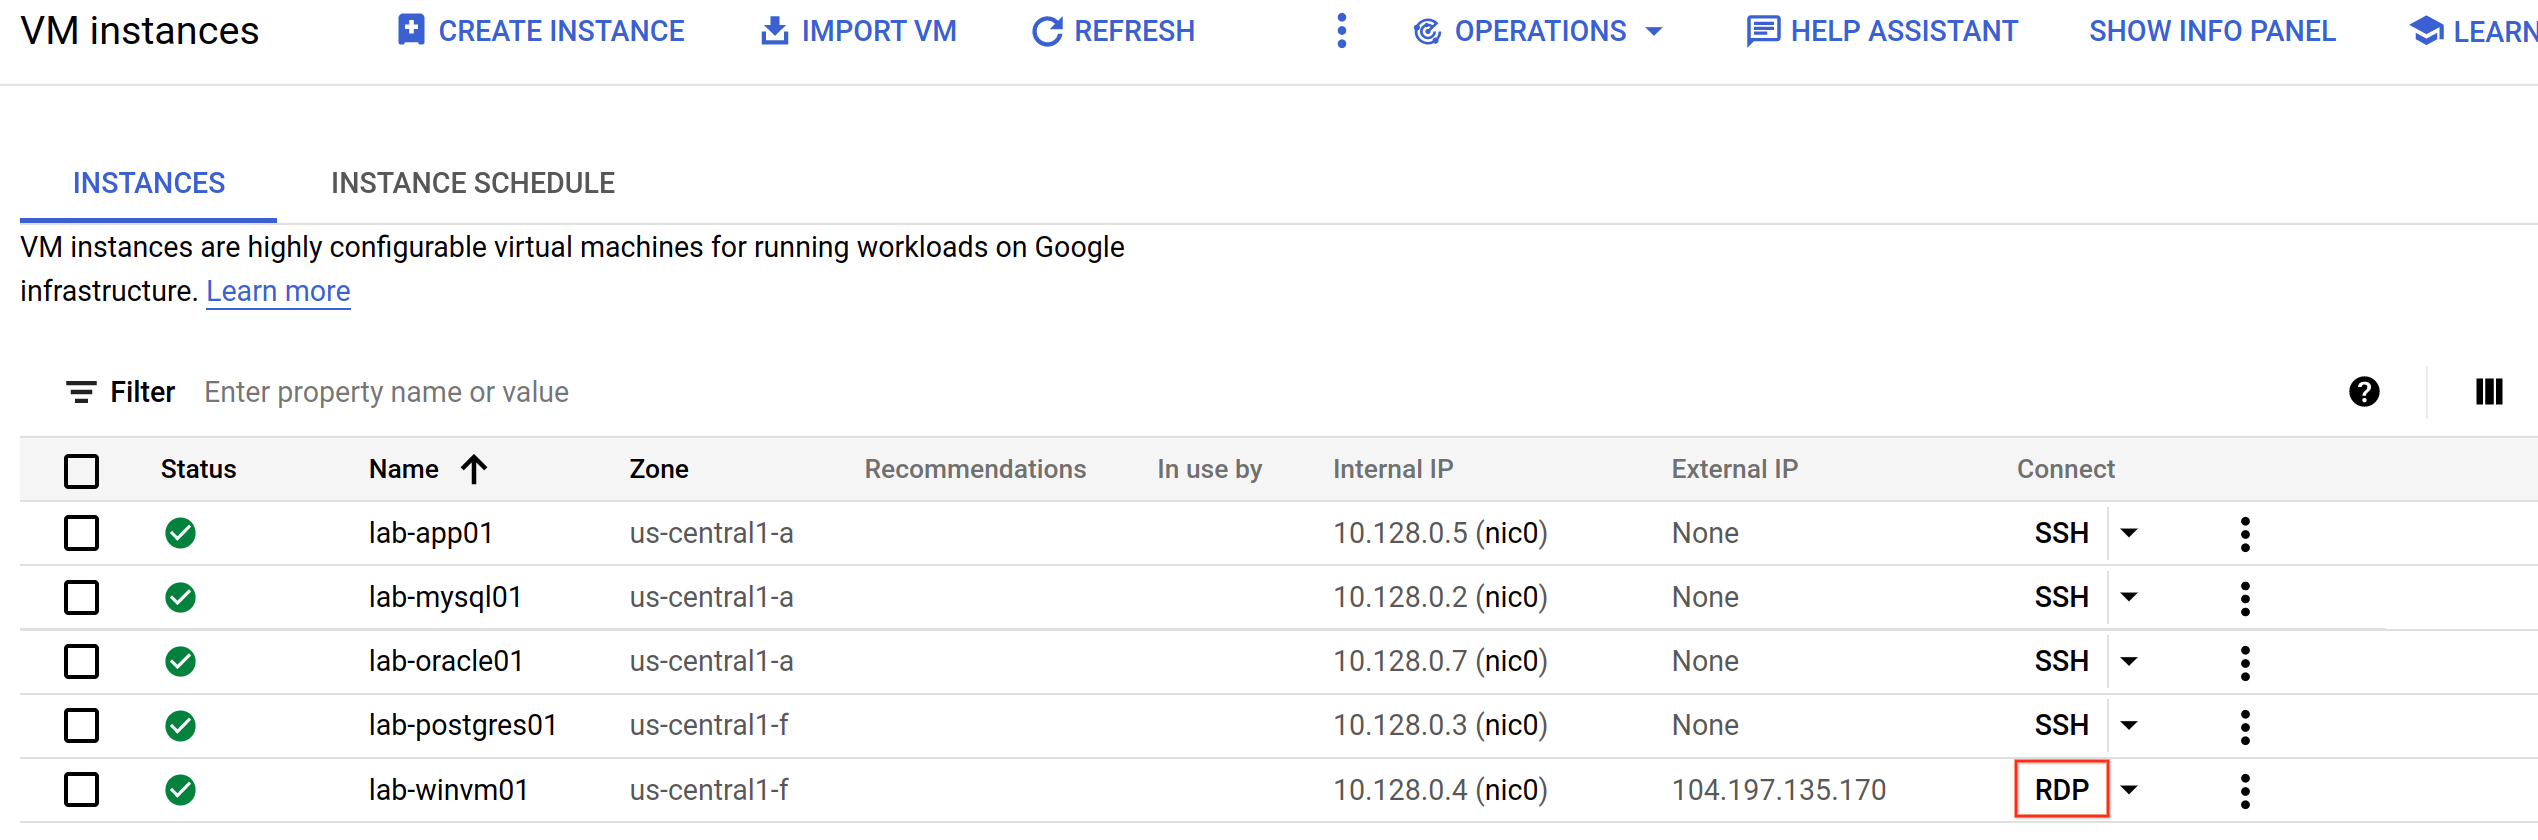
- Use the following credentials to complete the RDP login:
User name |
stratozone |
Password |
$tr@t0z0n3 |
Task 1. Log in to StratoZone portal
In this section, you will log in to the StratoZone portal.
-
Minimize the Server Manager Dashboard if it's too big.
-
From the windows-vm desktop, right click on the Google Chrome icon and click Run as administrator.
-
Use the lab credentials provided to log in to the StratoZone lab session.
-
Agree to the terms and conditions and click Next.
Once logged in you will be able to access the assessments and review collected data.
Task 2. Start new assessment (automatic)
Next, collect live data from a set of machines running in the Google Cloud environment. This automatically collected data is how 99% of assessments are conducted in real world customer environments. The main benefit of this approach is that you will receive unbiased information directly from the systems scanned. This natively collected data provides machine inventory, specs, utilization, execution processes, services, software versions installed, and network connectivity. This data enables all of the advanced StratoZone features such as:
-
Cloud Fit scores
-
Optimization of underutilized workloads
-
Network dependency mapping
-
Financial business case (TCO/ROI)
-
Automated summary reporting and proposal
-
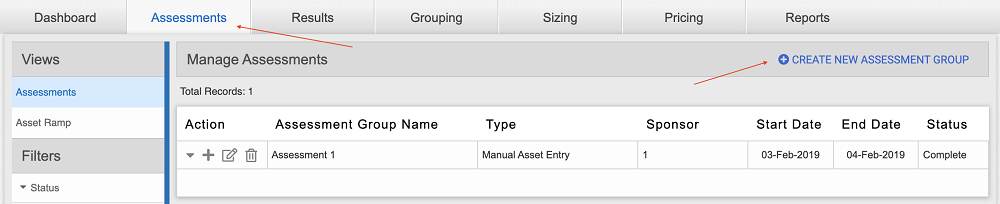
To begin the discovery and start the assessment wizard, click the Assessments tab, then click the Create New Assessment Group button in the top menu.
Establish Collector
- On the Create New Assessment page, use the following values for this lab:
Assessment Type |
Automatic Asset Discovery |
Assessment Group Name |
Advanced-Assessment |
Customer Sponsor Name & Email |
Enter your name and a personal email address |
Customer Tech Contact Name & Email |
Enter your name and personal email address Note: This email will receive an email with collector installation instructions |
- Click Save.
Once the Assessment has been created, the system will automatically start the data collector configuration wizard.
- On the Details tab use the following values:
Assessment / Data Center |
Oregon-DC |
Expected Number of Assets to Collect |
7 |
Leave the default values for the remainder of the options.
-
Click Save & Next.
-
Under the Run Schedule tab, leave the default values and click Save & Next.
-
Under the Data Security tab, note the available options for removing data sent from the data collector to StratoZone. For this lab use the default option Level 1.
-
Click Save & Next.
Pre-configuration of the data collector has been completed and the install package can be downloaded.
- Click Download
to obtain the installation package.

-
Click
to obtain the Temporary Access Code. Make a note of the Temporary Access Code as it will be needed later in the lab.
Click Check my progress to verify the objective.
Task 3. Deploy StratoProbe data collector
Once the Assessment has been created in the StratoZone portal, the customer installs the collector and begins the discovery process within their current datacenter (or cloud) infrastructure.
In this section, you will configure the collector to understand what's involved in this process. You should be able to describe the collector's high level requirements and configuration steps such as:
- Line-of-sight connection requirements
- Scanning an IP range
- Connection methods (WMI, SSH)
- Credential requirements
-
Double-Click on the setup.exe file.
-
Click Yes when prompted to confirm permitting changes to the system.
-
In the Microsoft Visual C++ setup window, click OK.
-
Accept the License Agreement and click Next.
-
In the Information window, click Next.
-
In the Select Destination Location window, accept the defaults and click Next.
-
In the Select Additional Tasks window, click Next and then click Install.
This will take a few minutes. Let the installation complete. While you're waiting, check the email that you used earlier to see an alert from StratoProbe Collector.
- Once the installation is complete click Finish.
Click on the Windows Start button and launch StratoProbe.
-
When the StratoProbe Data Collector opens, click Start Activation button.
-
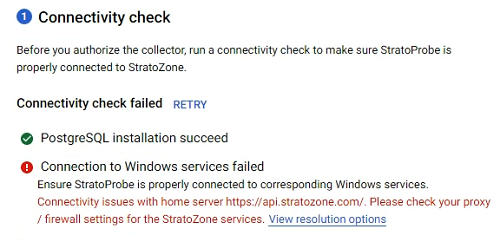
Click Run Check link to verify installation completed successfully.
After verification completes and all checks pass collector can be activated.
- Click Continue.
- Enter the Temporary Access Code and click the Authorize button.
Hint: To find the Temporary Access Code again, follow the steps below:
-
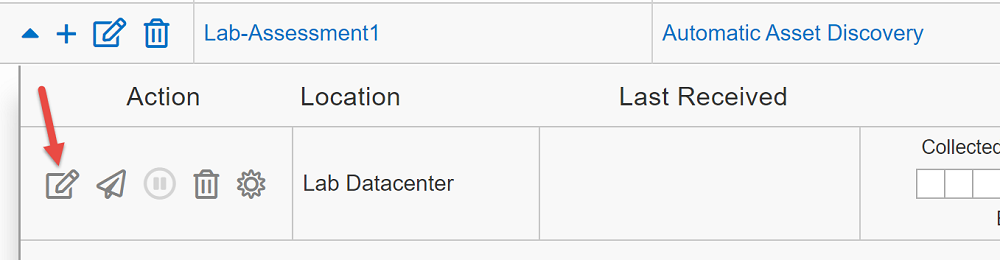
Click Assessments tab > Lab-Assessment1 > Edit Data Collector icon.
-
Click
-
Enter the Temporary Access Code and click the Authorize button.
Once activation completes, the StratoProbe Data Collector will open.
-
Click Add Credentials button in the upper left menu.

Multiple credentials can be stored within StratoProbe to allow the collector to access systems belonging to different Active Directory domains, or having local accounts, or SSH keys.
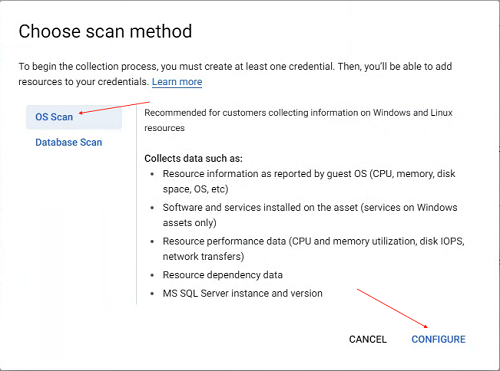
- Choose OS as the scanning method and click Configure.
- Use the following values to set up a credential group:
Credential Name |
Lab |
Credential Type |
Username and Password |
Username |
stratozone |
Password |
$tr@t0z0n3 |
Group Scheduling |
Accept Defaults |
- Click Add Credential button.
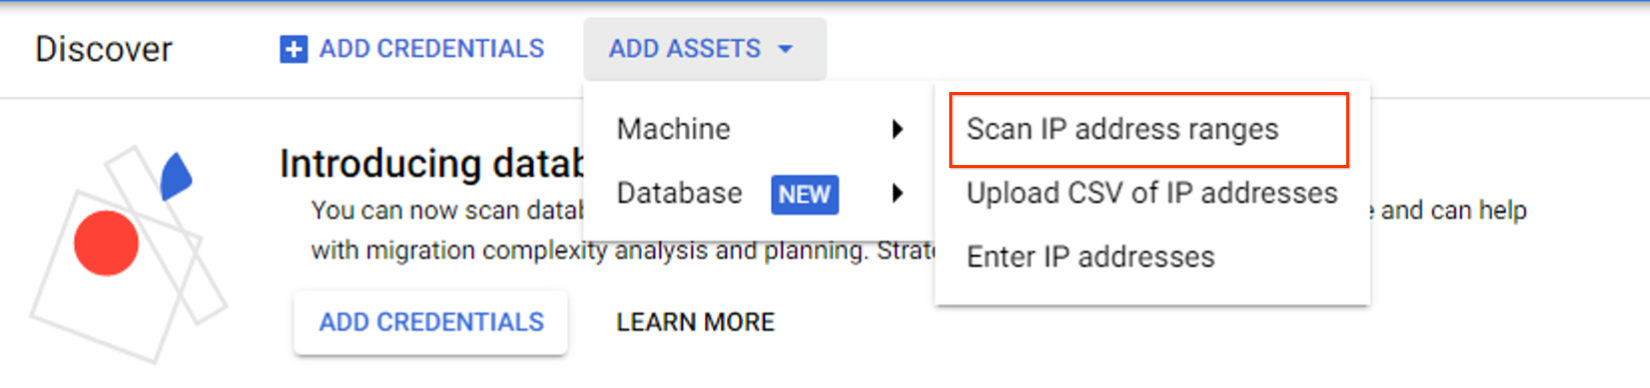
- From the Add Assets dropdown, click Machine and select Scan IP address ranges from Machine sub-menu. IP address range scan allows for discovery of assets across the network.
- Agree to the Terms & Conditions by checking the box and clicking Continue.
- From the Add IP Address Ranges dropdown select Enter ranges.
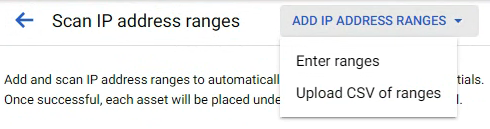
-
For the beginning IP address, use the first three octets plus .1 (10.128.0.1 in this example).
-
For the ending IP address, use the first three octets plus .8 (10.128.0.8 in this example).
-
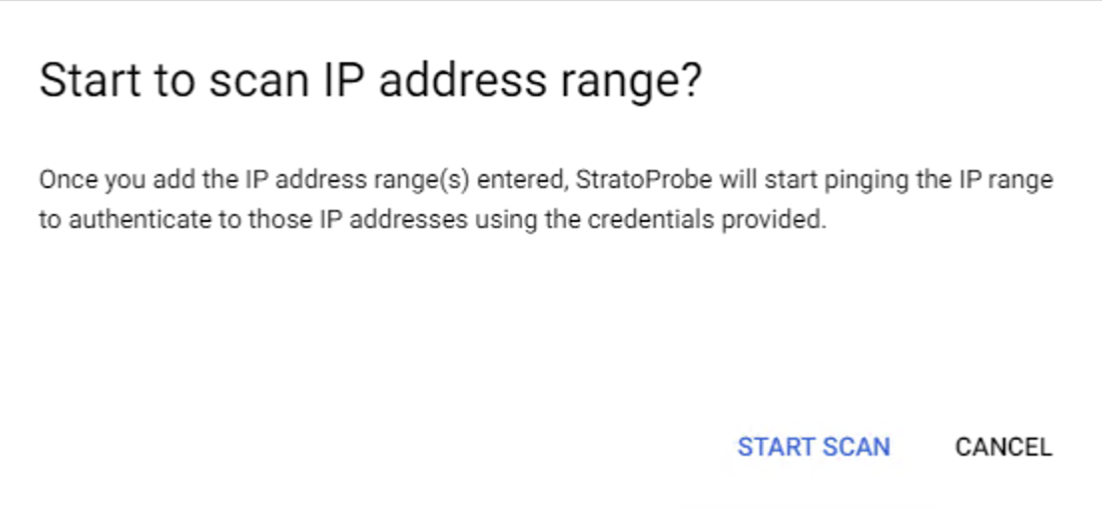
Click the Start IP scan button.
-
On the Start to scan IP address range popup, click Start Scan button.
- Click on the arrow button to go back to the dashboard.
Click Check my progress to verify the objective.
Task 4. Start database collection
To begin, create credentials for every database type.
-
Click Add Credentials button.
-
From the popup select Database Scan and click Configure.
-
Use the following values for first set of credentials
Credential Name |
lab-mysql |
Database Type |
MySQL |
Username |
collectionuser |
Password |
$tr@t0z0n3 |
-
Click Add Credential.
-
Repeat the steps above with following values for PostgreSQL:
Credential Name |
lab-postgresql |
Database Type |
PostgreSQL |
Username |
dbuser |
Password |
$tr@t0z0n3 |
- Repeat the steps above with following values for Microsoft SQL Server:
Credential Name |
lab-mssql |
Database Type |
SQL Server |
Username |
dbuser |
Password |
$tr@t0z0n3 |
Use Windows Authentication |
False (default) |
Once all database credentials are saved you can proceed to adding database resources.
-
From the top menu click Add Assets, click Database and select Enter connection strings
-
Enter the following values to complete connection configuration for MySQL database and click Add Asset:
Name of database resource |
Northwind |
OS machine resource |
from dropdown select vm starting with lab-mysql01.* |
Credential Name |
lab-mysql |
Host |
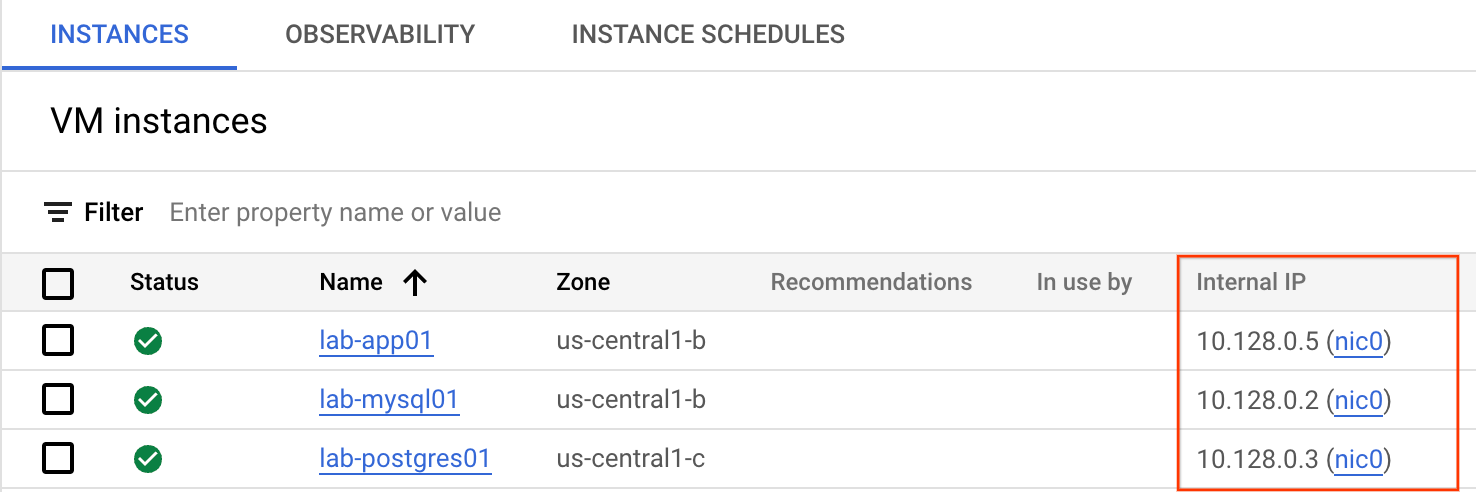
10.128.0.2 |
Port number |
3306 |
- Enter the following values to complete connection configuration for Microsoft SQL database and click Add Asset:
Name of database resource |
AdventureWorks |
OS machine resource |
from dropdown select vm starting with lab-winvm01.* |
Credential Name |
lab-mssql |
Host |
10.128.0.4 |
Port number |
1433 |
For the remaining database type you will import the settings from provided csv file.
- In the windows-vm, Open Chrome, then go to following URLs:
-
Download the file.
-
From the top menu click Add Assets, click Database and select Upload CSV of connection strings
-
From the credential dropdown select lab-postgresql
-
Click Browse in step 2 and select the postgresql_import.csv file from the location it was downloaded to and click Save.
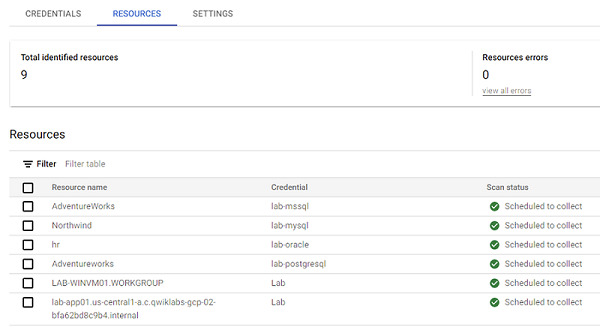
Verify status of all resources
Click Resources tab on the StratoProbe home screen and verify Scan Status shows green check box next to all resources. If there are any errors, verify credentials used, delete resource and recreate it.
Task 5. Start new assessment (manual)
In a scenario where a customer is unable to scan an environment, uploading data manually is an effective alternative to conduct an assessment with a quick turnaround time to results.
Manual imports allow for pre-formatted data to be sourced from customer’s CMDB, monitoring, management systems (VMware report and RVtools are also common sources).
Data can also be imported from AWS and Azure clouds, using provided export scripts that collect information directly from the cloud management interfaces. In this example, you will import AWS sourced data.
To begin a manual-load assessment, create a new assessment, as previously outlined for the automatic scan.
- Click on the Assessments tab, then click the Create New Assessment Group button in the top menu.
Establish an assessment source
- Use the following values for this lab and click Save when done:
Assessment Type |
Manual Asset Entry |
Assessment Group Name |
Lab-Assessment2 |
Customer Sponsor Name & Email |
Enter your name and personal email address |
- When prompted, use the following value for manual inventory assessment:
Assessment Name |
AWS Manual Import |
Upload Type |
AWS/Azure Scripted Discovery |
- Click Save & Next button to go to the Upload tab.
StratoZone provides script for both Azure and AWS to collect data on existing deployments and save it to compressed file ready for import. Scripts capture instance state as well as up to 30 days performance data. In this lab you will use a pre-existing zip file.
- In the windows-vm, Open Chrome, then go to following URL:
and download the file. This is an output file generated from AWS account.
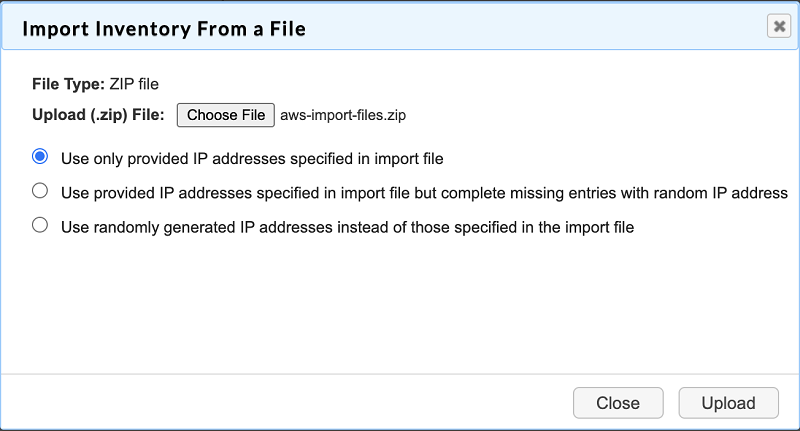
- Click the UPLOAD button next to Data file.

-
From the popup, click the Choose File button and browse to Downloads and choose the aws-import-files.zip file, then click Open.
-
From the available options, select Use only provided IP addresses specified in import file, then click the Upload button.
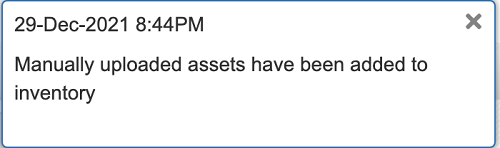
File should be imported successfully into the staging area for review. Check the status displayed next to the file. Initially file status will be Uploaded, Processing. Once completed, you will receive notification on the screen.
After 2 minutes, if the status does not change click the refresh button.

- Once the status changes to Processed, click Save & Next button to go to the next tab.
Servers should be imported successfully into the staging area for review. If the import was successful there will be a ✓ icon in the status column. If there are problems with a server from the import, there will be an X icon in the status column for the affected row.

- Click the Complete import button at the bottom of the page.
Once processing completes, the "Add Inventory" button will be disabled and notification will popup that import completed successfully.
Verify assets were loaded (inventory check)
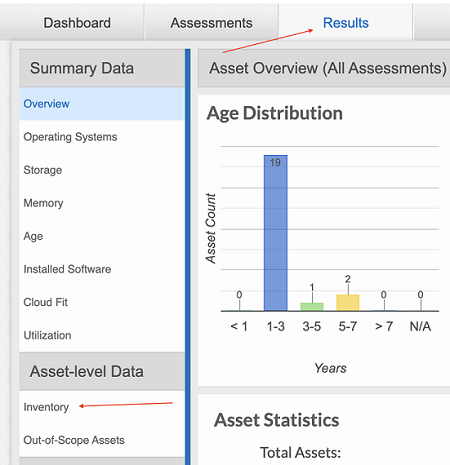
- Select the Results tab in the top menu then click on Inventory link in the left menu.
- From Filters menu expand Assessment and click "AWS Manual Import".
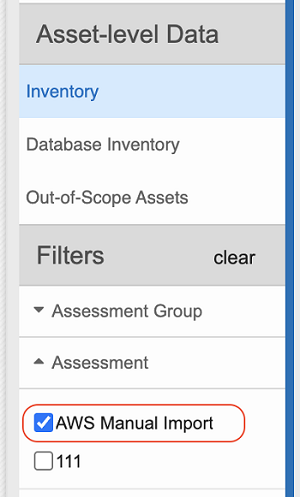
The system should display 170 records.
Click Check my progress to verify the objective.
Task 6. Generate database pricing report
-
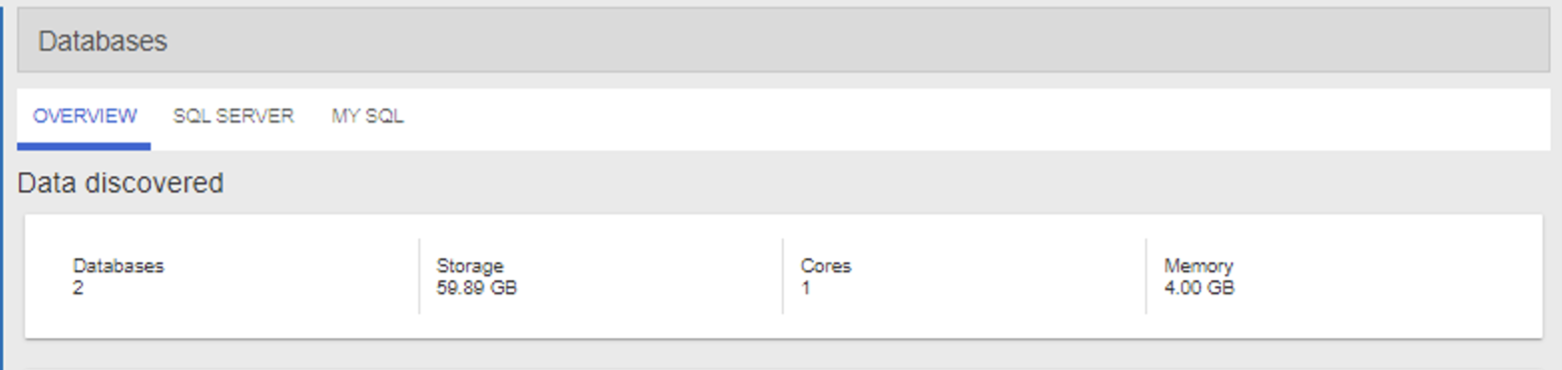
Click on the Results tab, then click the Databases link in the left menu.
-
Review data available for the collected databases. Use the tabs to switch between databases.
- Click Download Pricing Report link in the Estimated cloud spend section
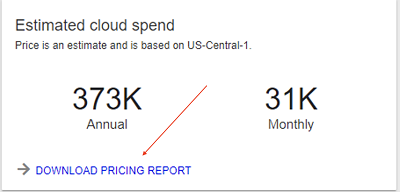
- Use the following values for the report:
Report Name |
mysql-pricing-report |
Report Format |
Google Sheets |
Select Filters |
MySQL |
Commit Term 1 |
On-Demand |
Commit Term 2 |
1 Year Commit |
Commit Term 3 |
3 Year Commit |
-
Click Create Report button.
-
Open report and view available data.
Task 7. Review database level data
- Click on the Results tab, then click the Database Inventory link in the left menu.
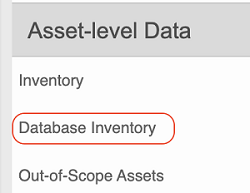
A list of collected databases should be visible along with Cloud Fit score.
-
Click on AdventureWorks database hosted on LAB-WINVM01 server.
-
View data for other collected databases.
-
Review the presented details paying attention especially to the list of Cloud fit factors section.
Task 8. Generate summary report
This time around, the report will be generated differently based on the created groups. It will also display financials based on applied optimization settings. Overall costs and savings will reflect these optimizations.
-
Click the Reports tab.
-
Click the Generate Report on the
Assessment Summary and Proposaltile. -
When prompted, use the following settings:
Report Name |
AWS Summary Report |
Report Format |
Google Slides |
Filters |
AWS Manual Import |
Vendor Catalog 1 |
Private Data Center |
Vendor Catalog 2 |
Google Cloud On-Demand |
Vendor Catalog 3 |
Google Cloud 1 Year Commit |
Vendor Catalog 4 |
Google Cloud 3 Year Commit |
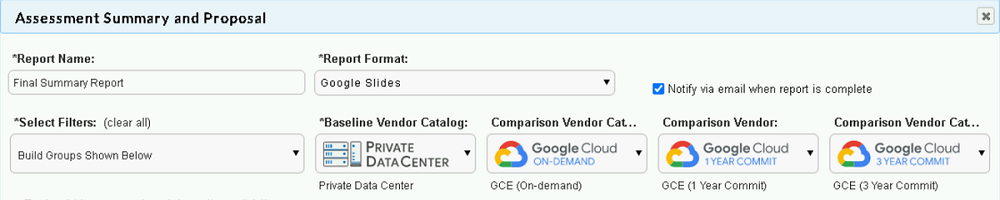
-
Click Create Report.
-
Click the Google Slides icon to view the report in Google Slides.
Click Check my progress to verify the objective.
Task 9. Generate detailed pricing report
Hint: Financial comparisons that are visible in this report can also be generated live in the Pricing tab to evaluate any number of configurations or procurement scenarios.
- Click the Reports tab.
- Click the Generate Report on the Detailed Pricing tile.
The Pricing report provides a detailed breakdown of pricing that was applied to each individually evaluated workload. It gives additional visibility into the choices that are recommended. It also identifies specific VM and storage selections.
- When prompted, use the following settings:
|
Report Name |
StratoMatch Report |
|
Report Format |
Google Sheets |
|
Build Groups |
AWS Manual Import |
|
Vendor Catalog 1 |
Private Data Center |
|
Vendor Catalog 2 |
Google Cloud On-Demand |
|
Vendor Catalog 3 |
Google Cloud 1 Year Commit |
|
Vendor Catalog 4 |
Google Cloud 3 Year Commit |
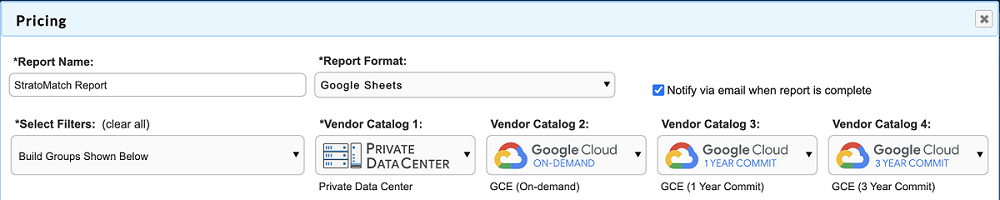
-
Click Create Report button.
-
Click the Google Sheets icon to view the report in Google Sheets
.
Click Check my progress to verify the objective.
Congratulations!
You've completed an assessment for a sample customer, and scanned an environment within Google Cloud in the same way you would discover physical or virtual servers on a customer's network within their datacenter(s). You've also loaded an inventory list of assets to be analyzed without the scan, and navigated through some of the key areas of delivery such as forming groups, optimizing around utilization of assets, and generating reports (inventory, TCO/ROI).
While there is significantly more functionality in the StratoZone platform that ultimately feeds into a comprehensive cloud transformation plan, this lab serves as an introduction to approaching customer's transformation goals in a prescriptive, pragmatic, and measurable way and helps you establish a trusted advisory role by quickly providing this valuable information.
Finish your quest
This self-paced lab is part of the VM Migration quest. A quest is a series of related labs that form a learning path. Completing this quest earns you a badge to recognize your achievement. You can make your badge or badges public and link to them in your online resume or social media account. Enroll in this quest and get immediate completion credit. Refer to the Google Cloud Skills Boost catalog for all available quests.
Take your next lab
Continue your Quest with VM Migration: Modernize an Application Stack with GKE and MySQL, or check out these suggestions:
Next steps / Learn more
Google Cloud training and certification
...helps you make the most of Google Cloud technologies. Our classes include technical skills and best practices to help you get up to speed quickly and continue your learning journey. We offer fundamental to advanced level training, with on-demand, live, and virtual options to suit your busy schedule. Certifications help you validate and prove your skill and expertise in Google Cloud technologies.
Manual Last Updated September 29, 2023
Lab Last Tested October 6, 2023
Copyright 2024 Google LLC All rights reserved. Google and the Google logo are trademarks of Google LLC. All other company and product names may be trademarks of the respective companies with which they are associated.