

Before you begin
- Labs create a Google Cloud project and resources for a fixed time
- Labs have a time limit and no pause feature. If you end the lab, you'll have to restart from the beginning.
- On the top left of your screen, click Start lab to begin
Create a Compute Engine instance via API
/ 50
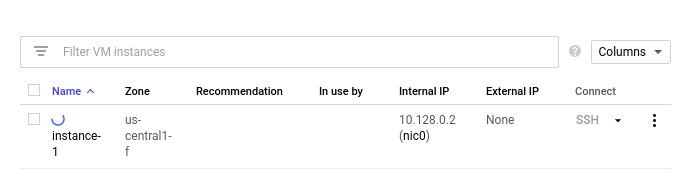
Delete your instance.
/ 50
The APIs Explorer enables you to construct REST-based API calls against any version of any Google service. In this lab, you use API Explorer to create (insert) a Compute Engine instance with the Compute Engine API and then use Cloud Monitoring to monitor CPU usage.
Read these instructions. Labs are timed and you cannot pause them. The timer, which starts when you click Start Lab, shows how long Google Cloud resources are made available to you.
This hands-on lab lets you do the lab activities in a real cloud environment, not in a simulation or demo environment. It does so by giving you new, temporary credentials you use to sign in and access Google Cloud for the duration of the lab.
To complete this lab, you need:
Click the Start Lab button. If you need to pay for the lab, a dialog opens for you to select your payment method. On the left is the Lab Details pane with the following:
Click Open Google Cloud console (or right-click and select Open Link in Incognito Window if you are running the Chrome browser).
The lab spins up resources, and then opens another tab that shows the Sign in page.
Tip: Arrange the tabs in separate windows, side-by-side.
If necessary, copy the Username below and paste it into the Sign in dialog.
You can also find the Username in the Lab Details pane.
Click Next.
Copy the Password below and paste it into the Welcome dialog.
You can also find the Password in the Lab Details pane.
Click Next.
Click through the subsequent pages:
After a few moments, the Google Cloud console opens in this tab.

To access the APIs Explorer tool, from the Navigation menu select APIs & Services > Library.
Type compute in the Search bar; all the APIs prefixed with "compute" are returned.
Click on Compute Engine API.
Make sure that API is enabled; if not, click Enable.
As the API is enabled, for reference, open Rest API Reference in a new tab. Refer to the Rest API Reference page for the Compute Engine API.
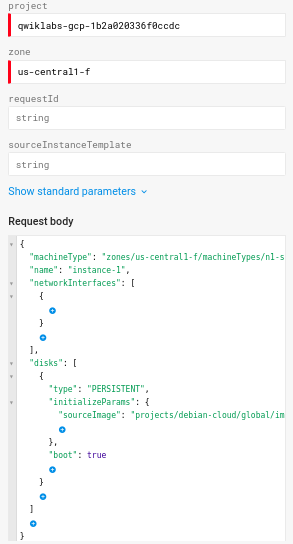
Next, fill out a form to use the compute.instances.insert method.
project=
zone =
Request body= Click inside the brackets to select the following properties:
instance-1
[{}]
PERSISTENT
projects/debian-cloud/global/images/family/debian-11
Your form should look like the following image:
Make sure that there are no trailing spaces in any of the fields, then scroll down and click Execute.
Select the student account you started the lab with.
On the next screen, click Allow to give APIs Explorer access.
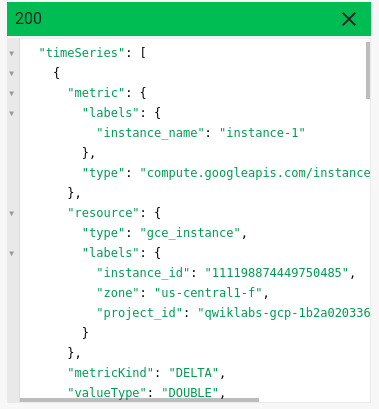
You can see the Request that was sent to your project as code, built from the input you provided in the form, and the Response below it.
Click Check my progress to verify your performed task. If you have successfully created a Compute Engine instance via API, you will see an assessment score.
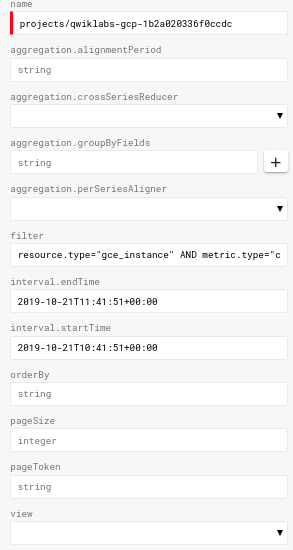
Use the Cloud Monitoring API documentation to navigate to Cloud Monitoring API.
Navigate to the Method: projects.timeSeries.list documentation to list time series.
For this method, the name is specified as a string in the format projects/Your_Project_ID.
The monitoring filter specifies which time series should be returned. The filter must specify a single metric type, and can additionally specify a metric label and other information.
For this lab, specify gce_instance as the resource type and cpu/usage_time as the metric type.
Add the following string in the filter box:
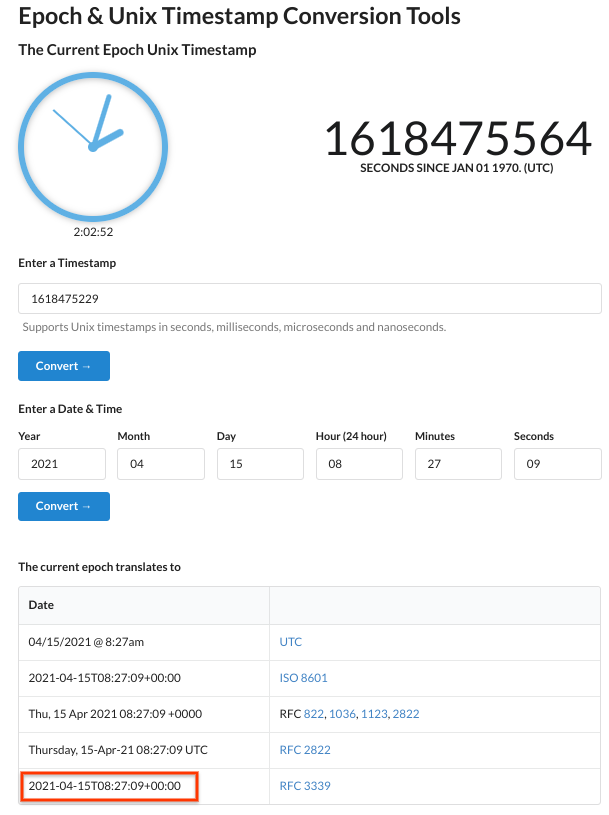
interval.endTime and interval.startTime: Calculate RFC-3339 timestamps to filter the time series returned by APIs Explorer. You can use Unix Time Stamp - Epoch Converter to get the current time.
Copy the last RFC 3339 timestamp and add it to interval.endTime:
interval.startTime.Your form should display as follows:
You can do the same exercise in Cloud Monitoring if you want. Open a Cloud monitoring workspace in the Cloud Console, then use the Metrics Explorer to monitor your VMs CPU usage.
Set up a Monitoring Metrics Scope that's tied to your Google Cloud Project. The following steps create a new account that has a free trial of Monitoring.
 ) > View All Products > Observability > Monitoring.
When the Monitoring Overview page opens, your metrics scope project is ready.
In the left menu, click Metrics Explorer.
Metric: Navigate to VM Instance > Instance > CPU Usage, then click Apply.
Filter: instance_name (select your instance.)
Now use APIs Explorer to delete the instance you created.
Open Rest API Reference. This will open a new tab with the Rest API Reference page for the Compute Engine API.
Navigate to the Method: instances.delete documentation to delete an instance resource.
Add your project, zone, and instance name to the form.
Make sure that the Google OAuth 2.0 checkbox is selected in the Credentials section.
Your Response will indicate that the deletion process has been started.
Click Check my progress to verify your performed task. If you have successfully deleted your instance, you will see an assessment score.
Test your knowledge about the Google Cloud by taking our quiz.
You have created an instance, monitored its CPU usage, and removed an instance using APIs Explorer.
...helps you make the most of Google Cloud technologies. Our classes include technical skills and best practices to help you get up to speed quickly and continue your learning journey. We offer fundamental to advanced level training, with on-demand, live, and virtual options to suit your busy schedule. Certifications help you validate and prove your skill and expertise in Google Cloud technologies.
Manual Last Updated November 04, 2024
Lab Last Tested November 04, 2024
Copyright 2025 Google LLC. All rights reserved. Google and the Google logo are trademarks of Google LLC. All other company and product names may be trademarks of the respective companies with which they are associated.


This content is not currently available
We will notify you via email when it becomes available

Great!
We will contact you via email if it becomes available

One lab at a time
Confirm to end all existing labs and start this one