

准备工作
- 实验会创建一个 Google Cloud 项目和一些资源,供您使用限定的一段时间
- 实验有时间限制,并且没有暂停功能。如果您中途结束实验,则必须重新开始。
- 在屏幕左上角,点击开始实验即可开始
Deploy the exported Cosmetic Inspection anomaly detection solution artifact
/ 25
Prepare resources to serve the exported assembly inspection solution artifact
/ 25
Identify defective product
/ 25
Identify non-defective product
/ 25
In a challenge lab you’re given a scenario and a set of tasks. Instead of following step-by-step instructions, you will use the skills learned from the labs in the course to figure out how to complete the tasks on your own! An automated scoring system (shown on this page) will provide feedback on whether you have completed your tasks correctly.
When you take a challenge lab, you will not be taught new Google Cloud concepts. You are expected to extend your learned skills, like changing default values and reading and researching error messages to fix your own mistakes.
To score 100% you must successfully complete all tasks within the time period!
This lab is recommended for students enrolled in the Detect Manufacturing Defects using Visual Inspection AI course. Are you ready for the challenge?
Read these instructions. Labs are timed and you cannot pause them. The timer, which starts when you click Start Lab, shows how long Google Cloud resources are made available to you.
This hands-on lab lets you do the lab activities in a real cloud environment, not in a simulation or demo environment. It does so by giving you new, temporary credentials you use to sign in and access Google Cloud for the duration of the lab.
To complete this lab, you need:
You are part of an international mobile manufacturing organization and tasked with inspecting defects on the surface of the mobile phones that are out from the assembly line. Your manager has asked you to help develop a system that will be used to analyze images taken on the production like to identify defects such as scratches, dents, deformations, etc. using a pre-prepared Google Visual Inspection Cosmetic Inspection model. The Visual Inspection model and solution artifact have been prepared by another member of your team and reside in shared resource project that you have access to.
Your challenge is to deploy the solution artifact and test that it can successfully identify both mobile phones that have cosmetic defects (defective mobile phones) and mobile phones that do not have cosmetic defects (non-defective mobile phones).
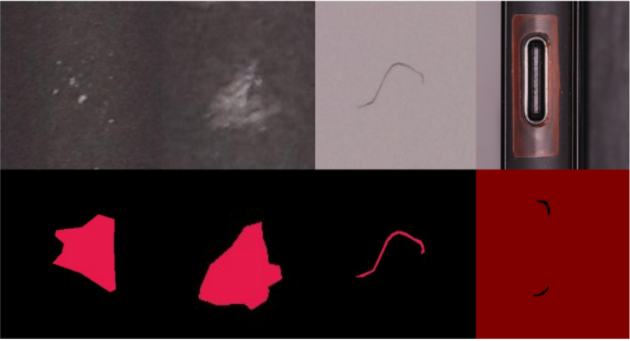
Sample defects
You are expected to have the skills and knowledge for these tasks, so don't expect step-by-step guides to be provided.
A number of sample images of mobile phones from your company's assembly line have been taken by one of your teammates and stored in a cloud storage bucket. The location of this cloud storage bucket has been shared with you. You have also been provided with a pre-configured Compute Engine virtual machine instance that you must use to deploy and test the pre-prepared Cosmetic Inspection anomaly defection solution artifact. You have also been provided with a script that you must use to process the images by calling Visual Inspection AI rest APIs via the solution artifact container.
This challenge expects you to:
Your first task is to connect to the Compute Engine virtual machine instance and run the pre-prepared solution artifact container locally inside that virtual machine.
The Visual Inspection Cosmetic Inspection anomaly detection solution artifact was trained using the Visual Inspection cosmetic defect dataset. This solution artifact identifies cosmetic defects in images. This solution container is stored in the Container Registry (gcr.io) location listed below.
The exported solution artifact container uses port 8601 for grpc traffic, port 8602 for http traffic, and port 8603 for Prometheus metric traffic. You can map these ports to locally available ports in the virtual machine instance environment when starting the container with Docker using the command line switches -v 9000:8602 or -v 3006:8603.
| Name | Value |
|---|---|
| Container name | |
| Container Registry location | gcr.io/ql-shared-resources-test/defect_solution@sha256:776fd8c65304ac017f5b9a986a1b8189695b7abbff6aa0e4ef693c46c7122f4c |
docker run commands used in the Visual Inspection deploy and test labs in the course for the syntax that you should use to deploy the solution artifact.
Once you have started the solution artifact container in the previous section, you must now process images by sending requests to the running container using the python script named prediction_script.py.
prediction_script.py to your virtual machine instance to process images by calling Visual Inspection AI rest APIs via the solution artifact container:The Python script takes the following parameters that must be set correctly when executing it:
| Name | Description |
|---|---|
| --input_image_file | Path to the image file to run predictions against. |
| --port | The port for http traffic. |
| --output_result_file | Path to the output file containing predictions. |
The images of the mobile phones are stored in a shared Cloud Storage bucket. You must create your own Cloud Storage bucket and copy the folder containing the test images to your own Cloud Storage bucket.
Create a Cloud Storage bucket named
Copy the folder containing the images of your product to your bucket from the following location: gs://spls/gsp366/cosmetic-test-data into a folder called /cosmetic-test-data in your Cloud Storage bucket.
In this task, you must identify one defective product using the python script to process images stored in your cloud storage bucket. Store the prediction result that identifies a defective product in a file called HOME directory of your Compute Engine virtual machine.
HOME directory of your Compute Engine virtual machine.Over the course of this challenge lab you have demonstrated your knowledge of working with Visual Inspection AI. You have successfully deployed the exported Cosmetic Inspection anomaly detection solution artifact and tested it by identifying both defective and non-defective mobile phones.
This self-paced lab is part of the Detect Manufacturing Defects using Visual Inspection AI course. Completing this skill badge course earns you the badge above, to recognize your achievement. Share your badge on your resume and social platforms, and announce your accomplishment using #GoogleCloudBadge.
...helps you make the most of Google Cloud technologies. Our classes include technical skills and best practices to help you get up to speed quickly and continue your learning journey. We offer fundamental to advanced level training, with on-demand, live, and virtual options to suit your busy schedule. Certifications help you validate and prove your skill and expertise in Google Cloud technologies.
Manual Last Updated July 16, 2024
Lab Last Tested July 16, 2024
Copyright 2025 Google LLC. All rights reserved. Google and the Google logo are trademarks of Google LLC. All other company and product names may be trademarks of the respective companies with which they are associated.


此内容目前不可用
一旦可用,我们会通过电子邮件告知您

太好了!
一旦可用,我们会通过电子邮件告知您

一次一个实验
确认结束所有现有实验并开始此实验