
Before you begin
- Labs create a Google Cloud project and resources for a fixed time
- Labs have a time limit and no pause feature. If you end the lab, you'll have to restart from the beginning.
- On the top left of your screen, click Start lab to begin
In this lab, you create an image classification dataset and import images, train an AutoML image classification model, deploy a model to an endpoint, and send a prediction.
For each lab, you get a new Google Cloud project and set of resources for a fixed time at no cost.
Sign in to Qwiklabs using an incognito window.
Note the lab's access time (for example, 1:15:00), and make sure you can finish within that time.
There is no pause feature. You can restart if needed, but you have to start at the beginning.
When ready, click Start lab.
Note your lab credentials (Username and Password). You will use them to sign in to the Google Cloud Console.
Click Open Google Console.
Click Use another account and copy/paste credentials for this lab into the prompts.
If you use other credentials, you'll receive errors or incur charges.
Accept the terms and skip the recovery resource page.
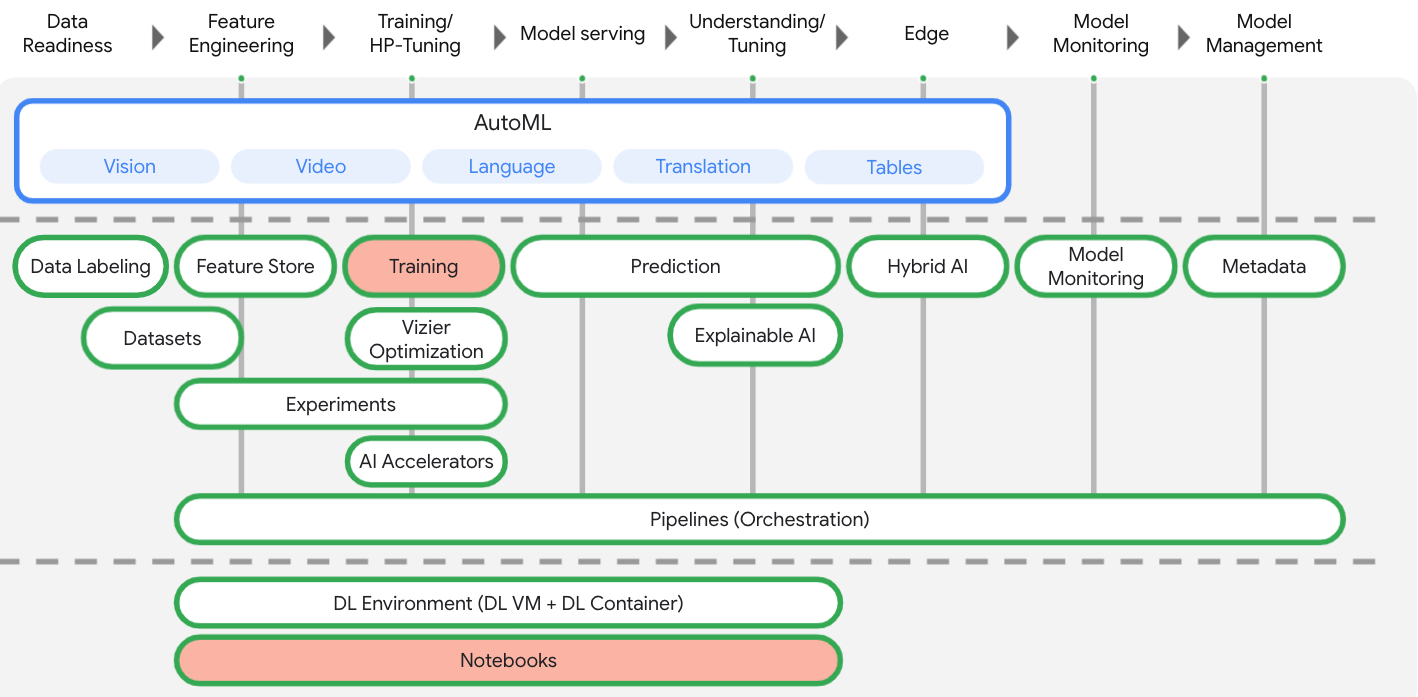
This lab uses the newest AI product offering available on Google Cloud. Vertex AI integrates the ML offerings across Google Cloud into a seamless development experience. Previously, models trained with AutoML and custom models were accessible via separate services. The new offering combines both into a single API, along with other new products. You can also migrate existing projects to Vertex AI. If you have any feedback, please see the Get support page.
Vertex AI includes many different products to support end-to-end ML workflows. This lab focuses on the products highlighted below: Training/HP-Tuning and Notebooks.
The image files you use in this tutorial are from the flower dataset used in this Tensorflow blog post. These input images are stored in a public Cloud Storage bucket. This publicly accessible bucket also contains a CSV file you use for data import. This file has two columns: the first column lists an image's URI in Cloud Storage, and the second column contains the image's label. Following are some sample rows.
gs://cloud-training/mlongcp/v3.0_MLonGC/toy_data/flowers_toy.csv:
To begin the process of creating your dataset and training your image classification model, on the Vertex AI page, in the navigation pane, click Dashboard.
In the central pane, for Prepare Data, click Create dataset.
Optional: Specify a name for this dataset.
For Select a data type and objective, on the Image tab, select Single-label classification.
For Region, select
To create the empty dataset, click Create.
The Import page opens.
Select Select import files from Cloud Storage, and specify the Cloud Storage URI of the CSV file with the image location and label data.
The CSV file is at: gs://cloud-training/mlongcp/v3.0_MLonGC/toy_data/flowers_toy.csv.
For Import file path, type cloud-training/mlongcp/v3.0_MLonGC/toy_data/flowers_toy.csv
To begin image import, click Continue.
The import process takes about 15 minutes. When it is complete, the next page shows all of the images, both labeled and unlabeled, identified for your dataset.
Use the Google Cloud Console to train an AutoML image classification model. After your dataset is created and data is imported, use the Cloud Console to review the training images and begin model training.
After the dataset is imported, the Browse tab opens. You can also access this tab by selecting Datasets from the side menu, and then selecting the annotation set (set of single-label image annotations) associated with your new dataset.
On the Browse tab, you can choose Train new model to begin training.
Training takes about 2 hours. When the model finishes training, it is displayed with a green checkmark status icon.
After your AutoML image classification model training is complete, use the Google Cloud Console to create an endpoint and deploy your model to the endpoint. After your model is deployed to this new endpoint, send an image to the model for label prediction.
Access your trained model to deploy it to a new or existing endpoint from the Models page.
On the Vertex AI page, in the navigation pane, click Model Registry.
Select your trained AutoML model and then click on Version ID.
The Evaluate tab opens, where you can view model performance metrics.
On the Deploy & Test tab, click Deploy to endpoint.
The Endpoint options page opens.
Under Define your endpoint, select Create new endpoint, and for Endpoint name, type hello_automl_image.
Click Continue.
Under Model settings, accept the Traffic split of 100%, and set the Number of compute nodes to 1.
Click Deploy.
It takes about 20 minutes to create the endpoint and deploy the AutoML model to the new endpoint.
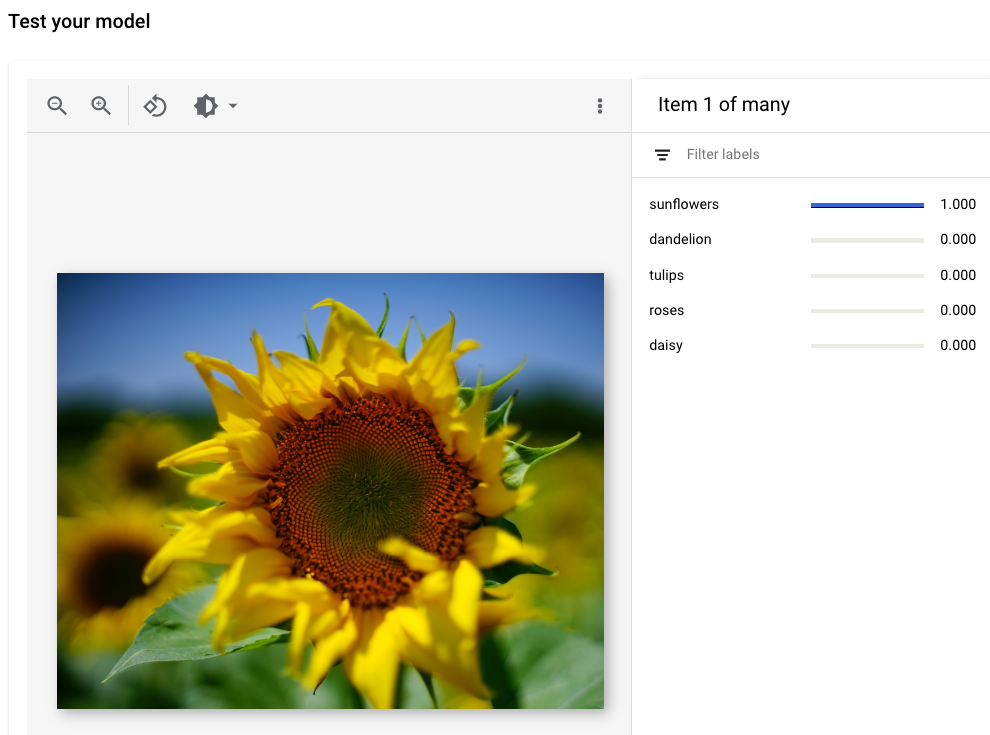
After the endpoint creation process finishes, you can send a single image annotation (prediction) request in the Cloud Console.
When you have completed your lab, click End Lab. Qwiklabs removes the resources you’ve used and cleans the account for you.
You will be given an opportunity to rate the lab experience. Select the applicable number of stars, type a comment, and then click Submit.
The number of stars indicates the following:
You can close the dialog box if you don't want to provide feedback.
For feedback, suggestions, or corrections, please use the Support tab.
Copyright 2022 Google LLC All rights reserved. Google and the Google logo are trademarks of Google LLC. All other company and product names may be trademarks of the respective companies with which they are associated.


This content is not currently available
We will notify you via email when it becomes available

Great!
We will contact you via email if it becomes available

One lab at a time
Confirm to end all existing labs and start this one