

시작하기 전에
- 실습에서는 정해진 기간 동안 Google Cloud 프로젝트와 리소스를 만듭니다.
- 실습에는 시간 제한이 있으며 일시중지 기능이 없습니다. 실습을 종료하면 처음부터 다시 시작해야 합니다.
- 화면 왼쪽 상단에서 실습 시작을 클릭하여 시작합니다.
Deploy Microsoft SQL Server
/ 50
Create a Windows user and password
/ 50
Compute Engine is a customizable compute service that lets you create and run virtual machines on Google’s infrastructure. You can create either a pre-defined or customized Virtual Machine (VM) to fit your needs.
In this lab, you learn how to create a virtual machine with Microsoft SQL Server installed. You'll create a Windows user and password, and learn how to connect to the Windows Server via remote desktop.
In this lab you do the following:
To maximize your learning, you should have the following:
Read these instructions. Labs are timed and you cannot pause them. The timer, which starts when you click Start Lab, shows how long Google Cloud resources are made available to you.
This hands-on lab lets you do the lab activities in a real cloud environment, not in a simulation or demo environment. It does so by giving you new, temporary credentials you use to sign in and access Google Cloud for the duration of the lab.
To complete this lab, you need:
Click the Start Lab button. If you need to pay for the lab, a dialog opens for you to select your payment method. On the left is the Lab Details pane with the following:
Click Open Google Cloud console (or right-click and select Open Link in Incognito Window if you are running the Chrome browser).
The lab spins up resources, and then opens another tab that shows the Sign in page.
Tip: Arrange the tabs in separate windows, side-by-side.
If necessary, copy the Username below and paste it into the Sign in dialog.
You can also find the Username in the Lab Details pane.
Click Next.
Copy the Password below and paste it into the Welcome dialog.
You can also find the Password in the Lab Details pane.
Click Next.
Click through the subsequent pages:
After a few moments, the Google Cloud console opens in this tab.

Create a new Compute Engine virtual machine instance running Microsoft SQL Server from the Cloud Console.
In Cloud Console, click the Navigation menu in the top left of the screen.
Click Compute Engine > VM Instance.
Click Create Instance.
In the Machine configuration.
Select the values for:
sqlserver-lab
Click OS and storage.
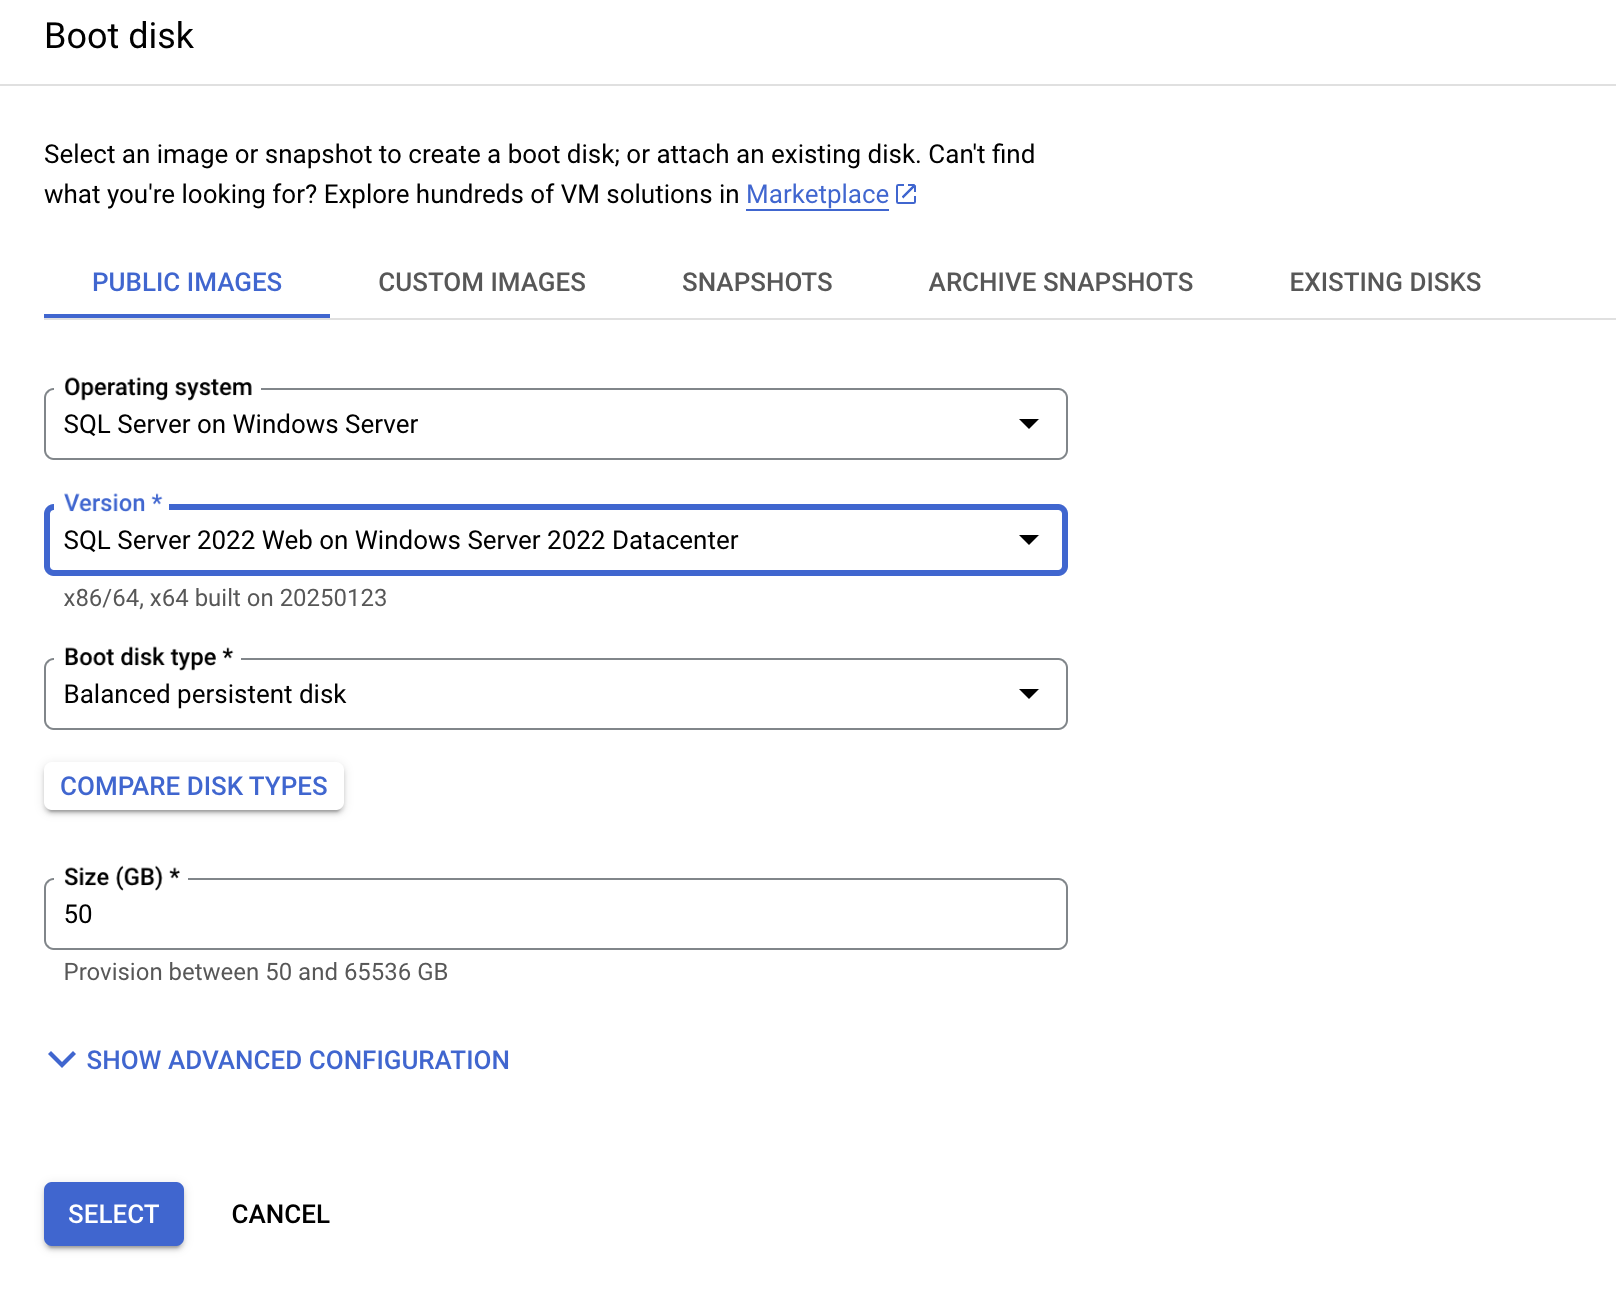
Click Change to begin configuring your boot disk and select the values for:
Remain in the Public images tab:
SQL Server on Windows Server
SQL Server 2022 Web on Windows Server 2022 Datacenter
At the bottom of the window, click Select.
This takes you to a new page where you can see the new instance being created. A checked green circle appears when the instance is ready.
You've created a VM named sqlserver-lab, but you need a Windows user and password to use Remote Desktop Protocol (RDP) to access sqlserver-lab from this page.
Click Check my progress to verify the objective.
To RDP into a Windows instance, you must create a Windows user and password.
To create it for your VM, click the name of your VM, sqlserver-lab, to see the VM instance details.
Then, select Set Windows password.
A new window opens where you can create a user.
After a few seconds, you should have a New Windows password dialog with the newly created password.
Once you are securely logged into your instance, you may find yourself copying and pasting commands from the lab manual.
To paste, hold the CTRL-V keys (if you are a Mac user, using CMND-V will not work.) If you are in a Powershell window, be sure that you have clicked into the window or else the paste shortcut won't work.
If you are pasting into putty, right click.
Click Check my progress to verify the objective.
It's time to RDP into the Windows Server. There are two different ways to do this, depending on whether or not you are on Windows.
If you are not on Windows but are using Chrome, open the Spark View extension page in a normal window.
Click Add to Chrome. Then, click Launch app.
A login page opens, add your VM instance's External IP in the Computer field.
Enter your Windows user name and password and click Connect.
If you are on a Windows machine, download the RDP file by selecting it from the RDP dropdown menu.
Double click the RDP file and log in using the Windows user and password.
Inside your remote desktop window, click the Start menu, and type SQL.
Then right-click on SQL Server Management Studio 20 and Run as administrator.
Microsoft SQL Server Management Studio launches and a Connect to Server window opens.
In the Connect to Server window, check the box for Trust server certificate.
Click Connect.
Use the Object Explorer window to examine your new database.
Compute Engine is the foundation to Google Cloud's Infrastructure-as-a-Service. As you've seen, application images make it easy to run Microsoft SQL Server.
Continue your learning with Running Windows Containers on Compute Engine, or check out these suggestions:
...helps you make the most of Google Cloud technologies. Our classes include technical skills and best practices to help you get up to speed quickly and continue your learning journey. We offer fundamental to advanced level training, with on-demand, live, and virtual options to suit your busy schedule. Certifications help you validate and prove your skill and expertise in Google Cloud technologies.
Manual Last Updated June 23, 2025
Lab Last Tested June 23, 2025
Copyright 2025 Google LLC. All rights reserved. Google and the Google logo are trademarks of Google LLC. All other company and product names may be trademarks of the respective companies with which they are associated.


현재 이 콘텐츠를 이용할 수 없습니다
이용할 수 있게 되면 이메일로 알려드리겠습니다.

감사합니다
이용할 수 있게 되면 이메일로 알려드리겠습니다.

한 번에 실습 1개만 가능
모든 기존 실습을 종료하고 이 실습을 시작할지 확인하세요.