

Before you begin
- Labs create a Google Cloud project and resources for a fixed time
- Labs have a time limit and no pause feature. If you end the lab, you'll have to restart from the beginning.
- On the top left of your screen, click Start lab to begin
Use SQL Runner to explore available data and troubleshoot SQL queries
/ 30
Create a new dimension
/ 20
Run the Explore query and save as a Look
/ 30
Modify the name of existing dimensions
/ 20
Looker is a modern data platform in Google Cloud that you can use to analyze and visualize your data interactively. LookML developers curate the data used by business users by creating new fields, tables, views, and Explores to customize and organize data.
In this lab, you learn how to troubleshoot and diagnose LookML code by using SQL Runner, LookML Validator, and Content Validator in Looker.
Familiarity with LookML is necessary. We recommend that you complete Understanding LookML in Looker before you begin this lab.
Read these instructions. Labs are timed and you cannot pause them. The timer, which starts when you click Start Lab, shows how long Google Cloud resources are made available to you.
This hands-on lab lets you do the lab activities yourself in a real cloud environment, not in a simulation or demo environment. It does so by giving you new, temporary credentials that you use to sign in and access Google Cloud for the duration of the lab.
To complete this lab, you need:
When ready, click Start Lab.
The Lab Details pane appears with the temporary credentials that you must use for this lab.
If you need to pay for the lab, a pop-up opens for you to select your payment method.
Notice your lab credentials in the Lab details pane. You use them to sign in to the Looker instance for this lab.
Click Open Looker.
Enter the provided Username and Password in the Email and Password fields.
Username:
Password:
Click Log In.
After a successful login, you see the Looker instance for this lab.
In this section, you learn about the different tools and methods you can use to troubleshoot your LookML code and common use cases for each of them.
The LookML Validator is used to perform a full model validation. Some errors, such as an invalid field reference due to a missing join, require a holistic look at the model and therefore are only surfaced when the LookML Validator is run. The LookML Validator checks all of the LookML code in a model, such as the syntax of object definitions (for example, dimensions and measures) and defined relationships (for example, joins). However, it does not check the SQL parameters of LookML objects (for example, SQL derived tables).
After defining new LookML objects, you can run queries in the Explore. This helps troubleshoot your LookML code because it displays SQL errors provided by the underlying database (for example, inadequate permissions, incorrect SQL object references, or invalid aggregations).
SQL Runner provides a way to directly access your database and is also a useful tool for checking SQL errors in queries. This is where you can test the custom SQL that you want to include within SQL parameters of LookML objects. You can also see a list of database tables, run ad hoc queries, write queries for SQL derived tables, etc.
The Content Validator validates all references that your Looks and dashboards make to your LookML models, Explores, views, and fields, and displays an error for any references your content makes to an unknown LookML object. It also checks the Looks and dashboards that were created in the instance to ensure that their references to LookML objects are valid (for example, the name of a specific dimension or measure the Explore might have changed over time).
Are you still not sure about where you might see a particular error? The Looker error catalog provides a list of common error messages, their underlying causes, and where in Looker the message is displayed.
SQL Runner provides direct access to the underlying tables in your database connection. Within SQL Runner, the data tables and columns that are available are listed, and you can run custom SQL queries on your data. In this task, you create a new SQL derived table in SQL Runner after exploring available data and troubleshooting an SQL query.
Click the toggle button to enter Development mode.
On the Develop tab, select SQL Runner.
Click Settings (
The box for Project is now empty.
Type cloud-training-demos, and press ENTER.
For Dataset, select looker_ecomm.
A list of the available tables in this BigQuery dataset is displayed.
Add the following query to the SQL Query window:
Click Settings (
For Project, select qwiklabs-ecommerce.
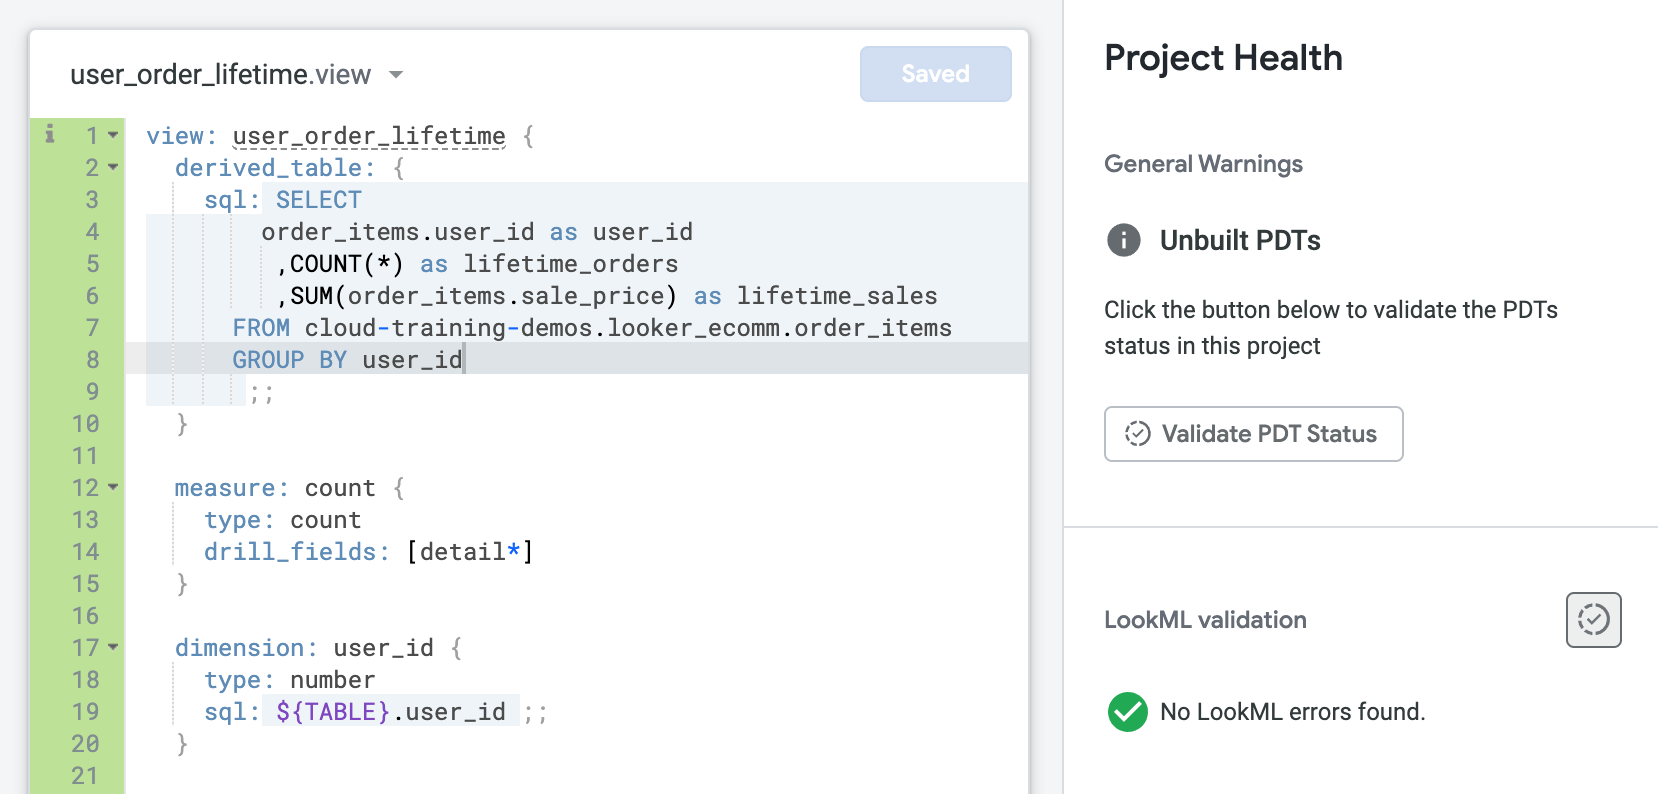
For View Name, type user_order_lifetime.
Click Add.
In the File Browser, drag user_order_lifetime.view to the views folder.
In the user_order_lifetime.view file, delete the code line for LIMIT 10 from the sql parameter.
primary_key for the view at this time.
Navigate to the training_ecommerce.model file.
In the explore: events definition, on a new line before join: event_session_facts, use the following code to define a new join:
Click Validate LookML and then click Commit Changes & Push.
Add a commit message and click Commit.
Lastly, click Deploy to Production.
Click Check my progress to verify the objective.
The LookML Validator helps you test the syntax for defined objects (for example, dimensions and measures) and validate the relationships (for example, joins) in the model. In this task, you create a new dimension with incorrect LookML syntax that references another view that has not been joined to the base view of the Explore. You then use the LookML Validator to identify and correct the two issues.
In the qwiklabs-ecommerce project, open users.view.
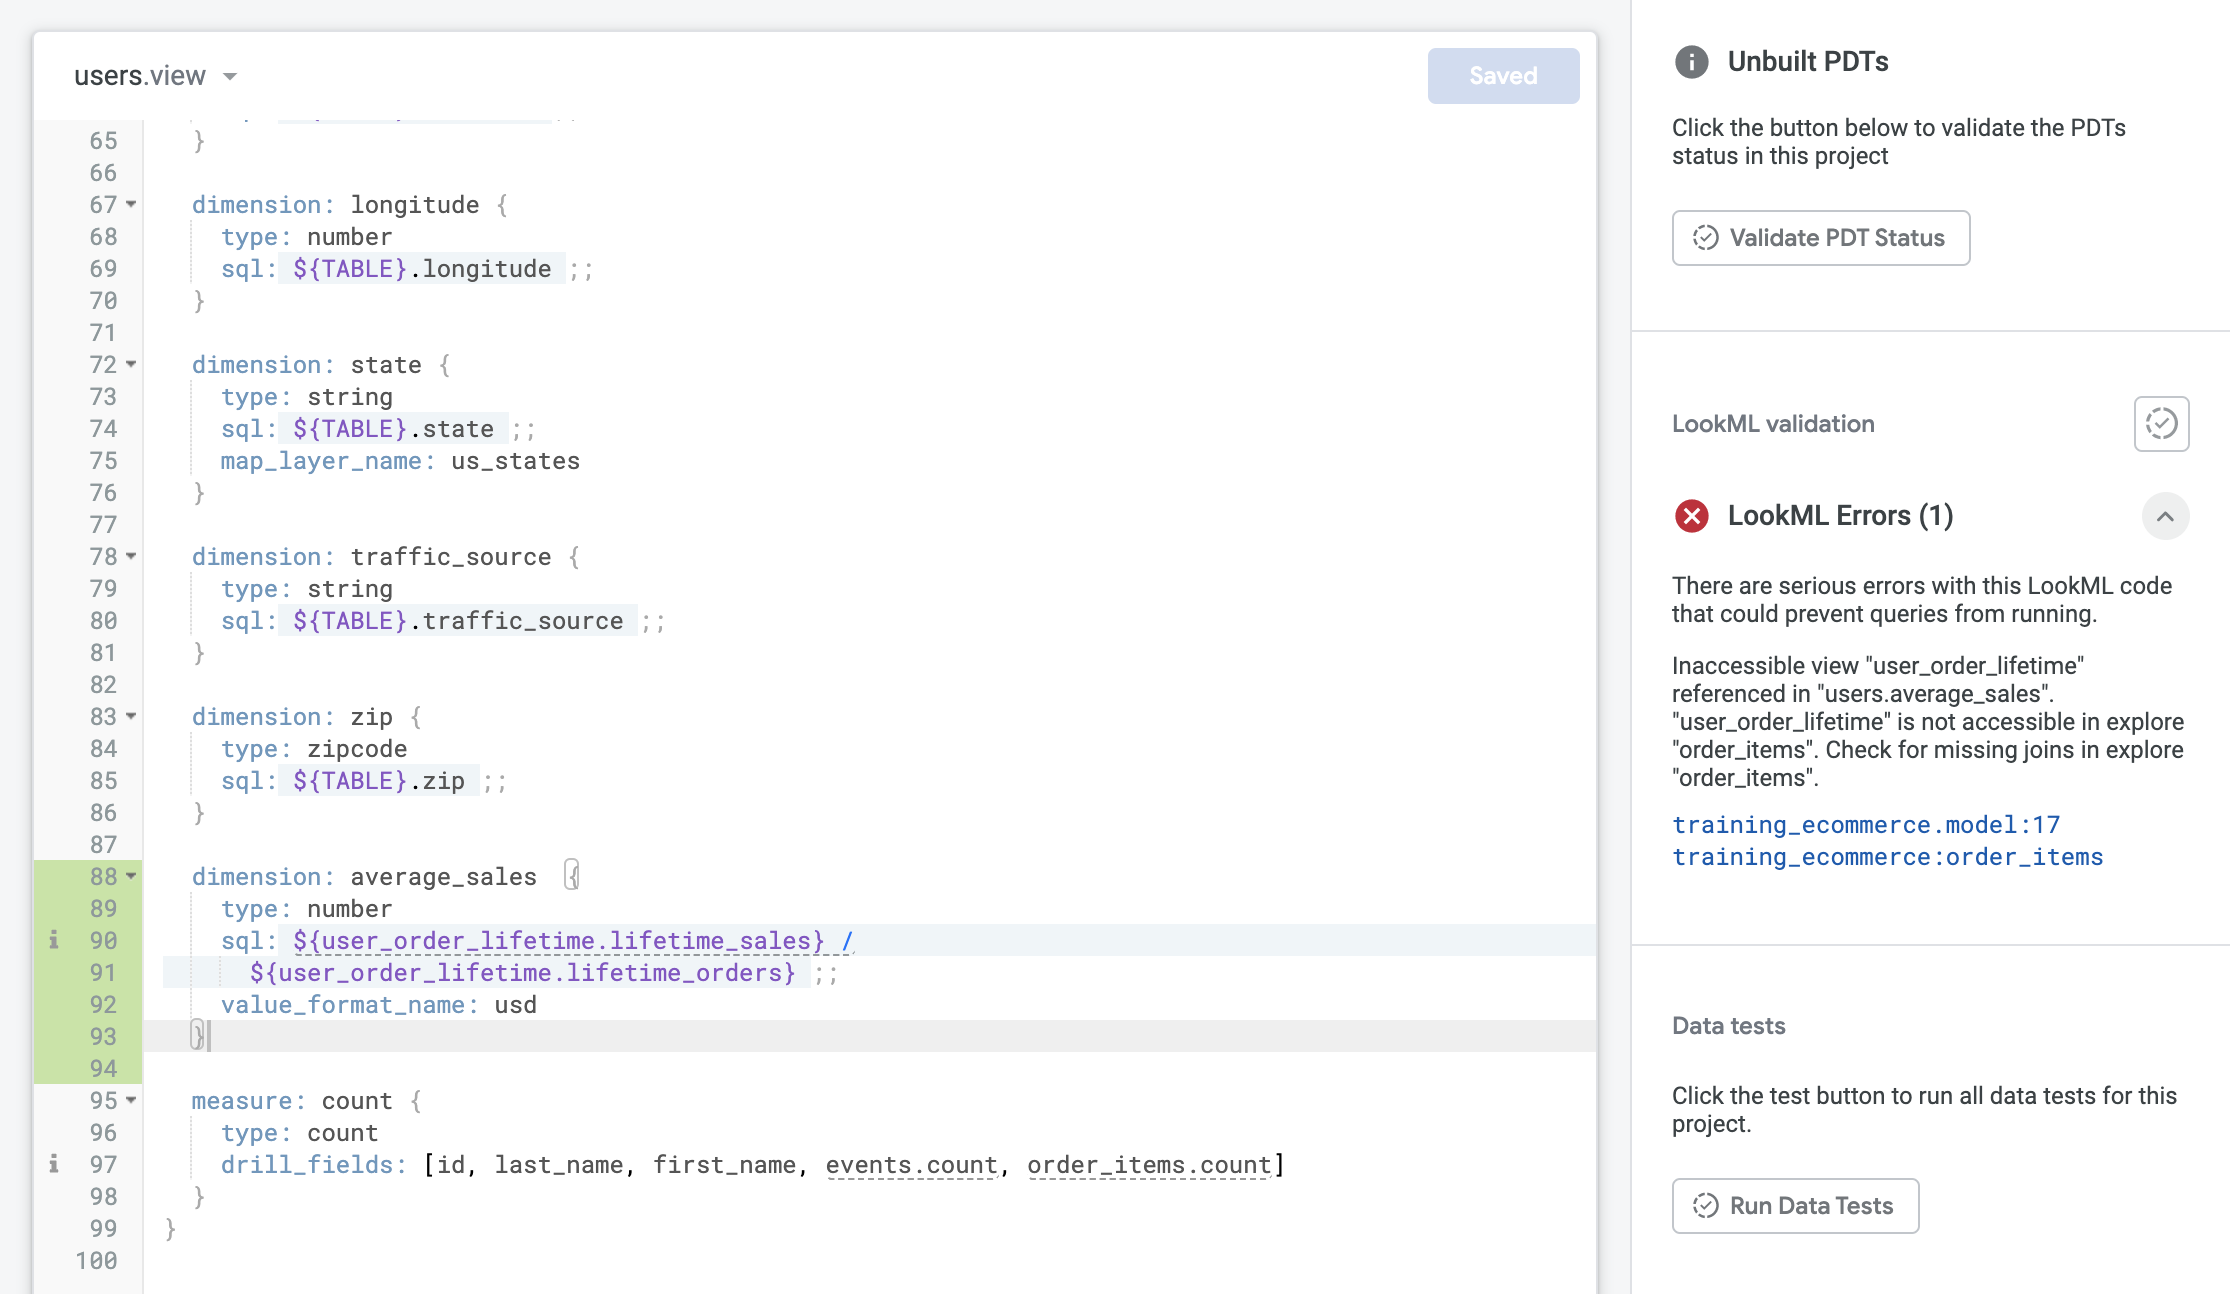
Find the last dimension, and add the following code (around line 88) to create a new dimension:
Notice that the new dimension references dimensions from the newly created view called user_order_lifetime.
Because the view now contains invalid syntax, it is no longer considered a valid view; thus, additional errors are identified within the model file because the view cannot be found:
After the syntax for the new dimension in the view file is corrected, these model file errors are also resolved because the view is again valid.
You now troubleshoot the errors in the LookML code.
Review the other dimensions in the users.view file.
Review the documentation on Dimension, filter and parameter types.
Click Save Changes, and then click Validate LookML.
Because the syntax was updated, the view is valid again, and the model errors have also been resolved. However, there is now new error:
Review the error message for Inaccessible view in the Looker error catalog.
There are a few possible options to investigate:
Review the list of views in the File Browser. Notice that the view called user_order_lifetime actually exists in the File Browser.
Open and review training_ecommerce.model.
Notice that the new view called user_order_lifetime is not joined to the base views of the Explores in the model file. Also notice that the users.view is joined to both the order_items and event Explores. For this reason, the new view for user_order_lifetime must also be joined to both Explores in order for the new dimension to be defined successfully within users.view.
In the explore: order_items definition, on a new line before join: users, use the following code to define a new join:
Leave the browser tab for the IDE open as you begin the next task.
Click Validate LookML and then click Commit Changes & Push.
Add a commit message and click Commit.
Lastly, click Deploy to Production.
Click Check my progress to verify the objective.
An easy way to test your changes of LookML code is to run a query in the Explore so that you can see how business users will view and interact with the modified code. By running Explore queries, you can identify missing or invalid LookML objects (for example, a missing primary_key) and see SQL errors provided by the underlying database, such as inadequate permissions or incorrect SQL object references (for example, an incorrectly defined join).
In this task, you run queries in the Explore to identify incorrectly defined joins and missing measures. You also correct the LookML for the newly defined joins and add a primary_key to the new view to ensure that aggregations (that is, measures) are successful.
Open a new Looker window in a new tab.
Navigate to Explore > Order Items.
Expand the view for User Order Lifetime.
Three dimensions are displayed, lifetime_orders, lifetime_sales, user_id, but no measures.
Leave this browser tab open as you continue to the next steps.
Return to the browser tab for the Looker IDE, and navigate back to user_order_lifetime.view. One measure called count should be displayed in the Explore.
Review the documentation on requirements for symmetric aggregates. The first requirement is that all views involved in the join need to have a primary_key defined.
Review user_order_lifetime.view again.
There is no primary_key defined.
user_id dimension to define it as the primary_key for the view:Click Save Changes, and then click Validate LookML.
Return to the browser tab for the Order Items Explore, and refresh the page.
Expand the view for User Order Lifetime.
After you define a primary_key for the view, the Count measure is now displayed.
In the next steps, you remain in the Order Items Explore to test the new dimension defined in users.view (Average Sales) that relies on the dimensions in user_order_lifetime.view.
An error message is displayed along with the SQL query that the Explore sent to the underlying database. The error message identifies the problem at line 13: Query execution failed: - Syntax error: Expected end of input but got identifier "order_items" at [13:1].
Although not much information is given about the error, remember that you also joined this new view to Events Explore. In the next steps, you run the same query in the Events Explore to test the view in that Explore.
Leave this browser tab for the Order Items Explore open, and open a new Looker window in a new tab.
Navigate to Explore > Events.
Under Users > Dimensions, click Average Sales, and then click Run.
In the Data pane, open the SQL tab to see the successful query.
Review line 13 in this query.
Unlike the query in the Order Items Explore, the query syntax at line 13 specifies a join between events and user_order_lifetime:
Return to the browser tab for the Looker IDE, and open training_ecommerce.model.
Review the join for user_order_lifetime in both the order_items Explore and the events Explore.
Review parameters by referring to LookML parameter reference by function.
explore: order_items definition, update the join for user_order_lifetime:Click Save Changes, and then click Validate LookML.
There are no LookML errors.
Return to the browser tab for the Order Items Explore, and refresh the page.
Now that you have correctly defined the join for user_order_lifetime within the order_items explore, the query runs successfully.
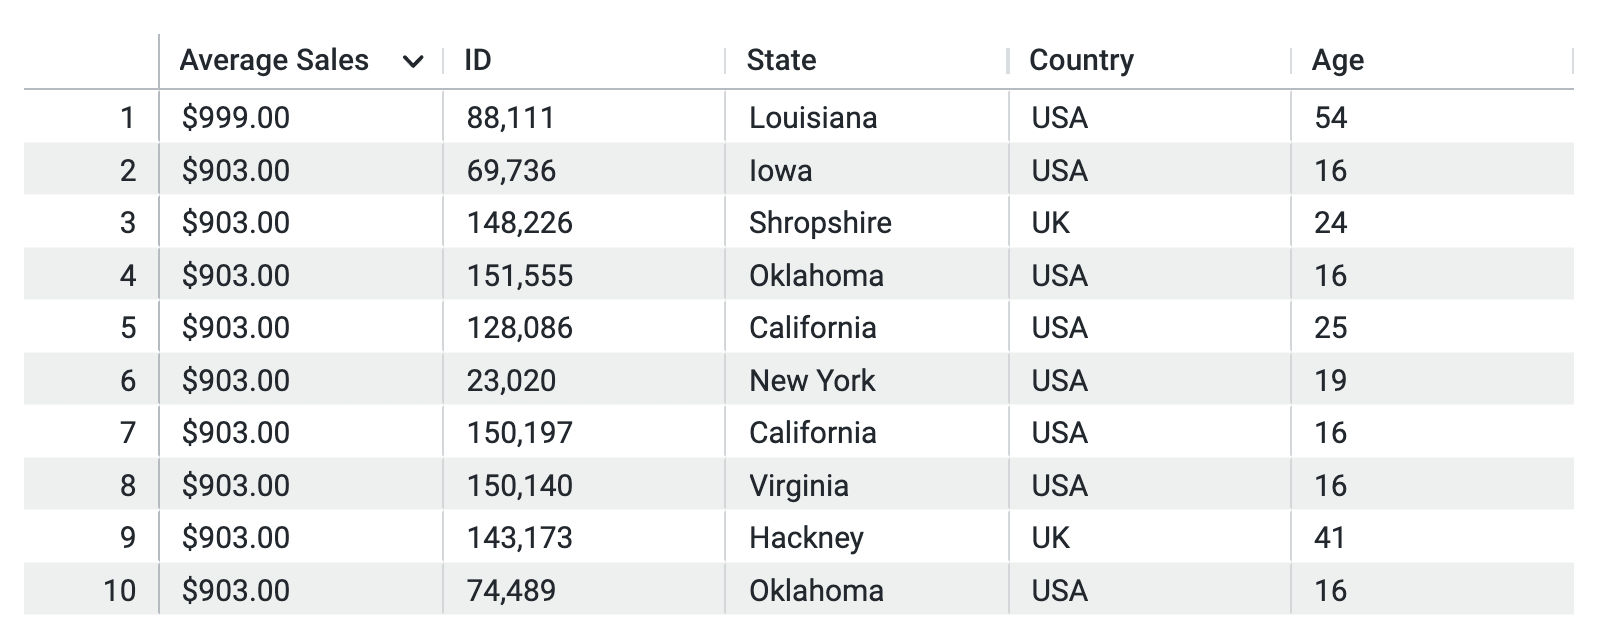
Click once on the column for Average Sales to sort in descending order.
Expand the query by clicking on additional dimensions: ID, State, Country, and Age.
For Row Limit, enter: 10.
Click Run.
Expand the Visualization pane, and select the Table visualization.
Click Settings (
Click Save > As a Look.
Name the Look Top 10 Users With Highest Average Sales.
Click Save & View Look.
Your visualization should resemble the following:
Click Check my progress to verify the objective.
The Content Validator helps you check the Looks and dashboards that were created in the instance to ensure that their references to LookML objects are valid. This is especially helpful if the names of dimensions, measures, views, Explores, or models have been modified. Review the documentation, Before using the Content Validator for more information on how the tool may affect content and objects in your instance.
In this task, you modify the name of a LookML object (for example, a dimension) to be more user friendly, and then use the Content Validator to validate and update the references to the LookML object within existing content (for example, a Look).
average_sales, and modify the name of the dimension to be more specific for business users:Click Save Changes, and then click Validate LookML.
There are no LookML errors.
Leave this browser tab open for the IDE, return to the browser tab for the Look, and refresh the page.
Notice that there is now a warning: 'users.average_sales' no longer exists on Order Items, or you do not have access to it, and it will be ignored.
Open a new Looker window in a new tab.
Navigate to Develop > Content Validator.
Click Validate.
The Error tab is active, and there is an error for “Unknown field "users.average_sales" for the Look called Top 10 Users With Highest Average Sales, which you created in the previous task.
Click Find & Replace in All Content.
For Type, select Field.
For Field Name, type users.average_sales.
For Replacement Field Name, type users.average_order_price.
Click Replace Field Name.
Click OK.
Click Validate.
The Error tab is now empty because the name of the dimension has been updated in all the content that referenced it (in this case, the Look named Top 10 Users With Highest Average Sales).
Return to the browser tab for the Look, and refresh the page.
The Look has been updated and is rendering the visualization successfully, so you can now push your LookML changes to production.
Return to the browser tab for the IDE.
Click Validate LookML. There should be no LookML errors.
Click Validate LookML and then click Commit Changes & Push.
Add a commit message and click Commit.
Lastly, click Deploy to Production.
Click Check my progress to verify the objective.
In this lab, you first used the SQL Runner to troubleshoot problematic SQL queries and used the LookML Validator to validate syntax for defined objects and relationships. You then used the Explore query window to diagnose missing objects and error messages and used the Content Validator to test and update content after changing a LookML object.
...helps you make the most of Google Cloud technologies. Our classes include technical skills and best practices to help you get up to speed quickly and continue your learning journey. We offer fundamental to advanced level training, with on-demand, live, and virtual options to suit your busy schedule. Certifications help you validate and prove your skill and expertise in Google Cloud technologies.
Manual Last Updated April 23, 2024
Lab Last Tested February 9, 2023
Copyright 2025 Google LLC. All rights reserved. Google and the Google logo are trademarks of Google LLC. All other company and product names may be trademarks of the respective companies with which they are associated.


This content is not currently available
We will notify you via email when it becomes available

Great!
We will contact you via email if it becomes available

One lab at a time
Confirm to end all existing labs and start this one