

准备工作
- 实验会创建一个 Google Cloud 项目和一些资源,供您使用限定的一段时间
- 实验有时间限制,并且没有暂停功能。如果您中途结束实验,则必须重新开始。
- 在屏幕左上角,点击开始实验即可开始
This lab introduces data analysts to BigQuery ML. BigQuery ML enables users to create and execute machine learning models in BigQuery using SQL queries. This lab introduces a method of hyperparameter tuning that specifies the num_trials training option.
In this lab, you use the tlc_yellow_trips_2018 sample table to create a model that predicts the tip for a taxi ride. You will see a ~40% performance (r2_score) improvement with hyperparameter tuning.
In this lab, you use BigQuery ML to:
CREATE MODEL statement with the num_trials set to 20.ML.TRIAL_INFO function.ML.EVALUATE function.ML.PREDICT function.For each lab, you get a new Google Cloud project and set of resources for a fixed time at no cost.
Sign in to Qwiklabs using an incognito window.
Note the lab's access time (for example, 1:15:00), and make sure you can finish within that time.
There is no pause feature. You can restart if needed, but you have to start at the beginning.
When ready, click Start lab.
Note your lab credentials (Username and Password). You will use them to sign in to the Google Cloud Console.
Click Open Google Console.
Click Use another account and copy/paste credentials for this lab into the prompts.
If you use other credentials, you'll receive errors or incur charges.
Accept the terms and skip the recovery resource page.
 ), click APIs & services > Library.
The first task is to create a BigQuery dataset to store your training data and ML model. To create your dataset:
 ) next to your project ID, and select Create dataset.
In this task, you materialize the training input table with 100k rows.
View the schema of the source table tlc_yellow_trips_2018 (Open this link in a new tab).
Click Compose New Query, and paste the following query in the Query Editor text area to create the training input data table:
tlc_yellow_trips_2018 sample table in BigQuery.The following standard SQL query is used to create the model with hyperparameter tuning:
The LINEAR_REG model has two tunable hyperparameters: l1_reg and l2_reg. The previous query uses the default search space. You can also specify the search space explicitly:
In addition, these other hyperparameter tuning training options also use their default values:
"VIZIER_DEFAULT"
["r2_score"]
max_parallel_trials is set to 2 to accelerate the tuning process. With two trials running at any time, the whole tuning should take approximately as long as 10 serial training jobs instead of 20. Note, however, that the two concurrent trials cannot benefit from each other's training results.
To run the CREATE MODEL query to create and train your model:
In the Cloud Console, click Compose New Query.
Enter the standard SQL query (above) in the Query Editor text area.
Click Run. The query takes about 17 minutes to complete.
Track the tuning progress in execution details under Stages:
ML.TRIAL_INFO function, and view the result in the Cloud Console after running the SQL:You can run this SQL query as soon as one trial is done. If the tuning is stopped in the middle, all already-completed trials will remain available to use.
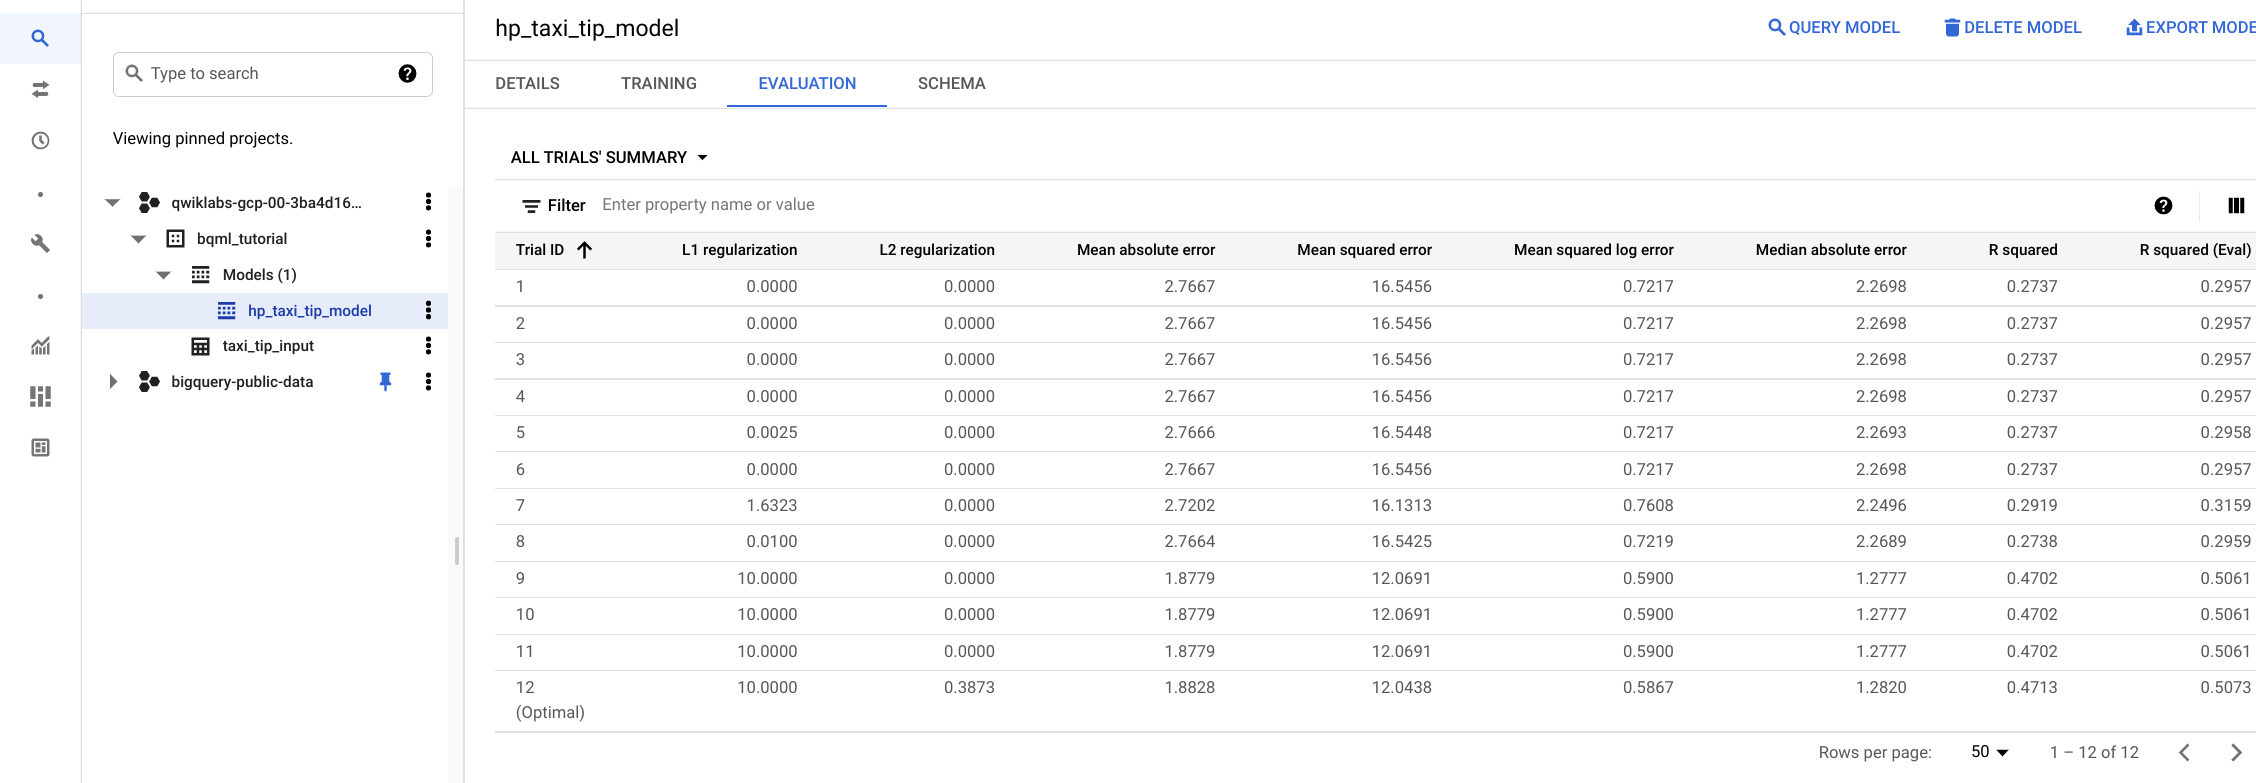
After creating your model, view the evaluation metrics of all trials either by using the ML.EVALUATE function or through the Google Cloud Console.
This SQL fetches evaluation metrics for all trials calculated from the TEST data.
ML.TRIAL_INFO objectives and ML.EVALUATE evaluation metrics.You can also evaluate a specific trial by providing your own data. See ML.EVALUATE for more details.
You can also check evaluation metrics by viewing the Evaluation tab of the model.
After evaluating your model, the next step is to use it to predict the taxi tip.
The first SELECT statement retrieves all columns, including the predicted_label column. This column is generated by the ML.PREDICT function. When you use the ML.PREDICT function, the output column name for the model is predicted_label_column_name.
The prediction is made against the optimal trial by default.
trial_id parameter.For more information about using model serving functions, refer to ML.PREDICT.
To avoid incurring charges to your Google Cloud account for the resources used in this tutorial, either delete the project that contains the resources, or keep the project and delete the individual resources.
Deleting your project removes all datasets and all tables in the project. If you prefer to reuse the project, you can delete the dataset you created in this tutorial:
) next to your dataset, and then click Delete.You've learned how to use BigQuery ML to:
CREATE MODEL statement with the num_trials set to 20.ML.TRIAL_INFO function.ML.EVALUATE function.ML.PREDICT function.When you have completed your lab, click End Lab. Qwiklabs removes the resources you’ve used and cleans the account for you.
You will be given an opportunity to rate the lab experience. Select the applicable number of stars, type a comment, and then click Submit.
The number of stars indicates the following:
You can close the dialog box if you don't want to provide feedback.
For feedback, suggestions, or corrections, please use the Support tab.
Copyright 2022 Google LLC All rights reserved. Google and the Google logo are trademarks of Google LLC. All other company and product names may be trademarks of the respective companies with which they are associated.


此内容目前不可用
一旦可用,我们会通过电子邮件告知您

太好了!
一旦可用,我们会通过电子邮件告知您

一次一个实验
确认结束所有现有实验并开始此实验