This lab introduces data analysts to BigQuery ML. BigQuery ML enables users to create and execute machine learning models in BigQuery using SQL queries. This lab introduces a method of hyperparameter tuning that specifies the num_trials training option.
In this lab, you use the tlc_yellow_trips_2018 sample table to create a model that predicts the tip for a taxi ride. You will see a ~40% performance (r2_score) improvement with hyperparameter tuning.
Objectives
In this lab, you use BigQuery ML to:
Create a linear regression model using the CREATE MODEL statement with the num_trials set to 20.
Check the overview of all 20 trials using the ML.TRIAL_INFO function.
Evaluate the ML model using the ML.EVALUATE function.
Make predictions using the ML model and ML.PREDICT function.
Setup and requirements
For each lab, you get a new Google Cloud project and set of resources for a fixed time at no cost.
Sign in to Qwiklabs using an incognito window.
Note the lab's access time (for example, 1:15:00), and make sure you can finish within that time.
There is no pause feature. You can restart if needed, but you have to start at the beginning.
When ready, click Start lab.
Note your lab credentials (Username and Password). You will use them to sign in to the Google Cloud Console.
Click Open Google Console.
Click Use another account and copy/paste credentials for this lab into the prompts.
If you use other credentials, you'll receive errors or incur charges.
Accept the terms and skip the recovery resource page.
Enable the BigQuery API
In the Google Cloud Console, on the Navigation menu (), click APIs & services > Library.
Search for BigQuery API, and then click Enable if it isn't already enabled.
Task 1. Create your training dataset
The first task is to create a BigQuery dataset to store your training data and ML model. To create your dataset:
On the BigQuery page, in the Explorer panel, click View actions () next to your project ID, and select Create dataset.
For Dataset ID, type bqml_tutorial, and for Data location, select United States (US).
Currently, the public datasets are stored in the US multiregional location. For simplicity, place your dataset in the same location.
Leave the remaining settings as their defaults, and click Create dataset.
Task 2. Create your training input table
In this task, you materialize the training input table with 100k rows.
View the schema of the source table tlc_yellow_trips_2018 (Open this link in a new tab).
Click Compose New Query, and paste the following query in the Query Editor text area to create the training input data table:
CREATE TABLE `bqml_tutorial.taxi_tip_input` AS
SELECT
* EXCEPT(tip_amount), tip_amount AS label
FROM
`bigquery-public-data.new_york_taxi_trips.tlc_yellow_trips_2018`
WHERE
tip_amount IS NOT NULL
LIMIT 100000
Click Run.
Task 3. Create your model
Next, create a linear regression model with hyperparameter tuning using the tlc_yellow_trips_2018 sample table in BigQuery.
The following standard SQL query is used to create the model with hyperparameter tuning:
CREATE MODEL `bqml_tutorial.hp_taxi_tip_model`
OPTIONS
(model_type='linear_reg',
num_trials=20,
max_parallel_trials=2) AS
SELECT
*
FROM
`bqml_tutorial.taxi_tip_input`
Query details
The LINEAR_REG model has two tunable hyperparameters: l1_reg and l2_reg. The previous query uses the default search space. You can also specify the search space explicitly:
In addition, these other hyperparameter tuning training options also use their default values:
hparam_tuning_algorithm: "VIZIER_DEFAULT"
hparam_tuning_objectives: ["r2_score"]
max_parallel_trials is set to 2 to accelerate the tuning process. With two trials running at any time, the whole tuning should take approximately as long as 10 serial training jobs instead of 20. Note, however, that the two concurrent trials cannot benefit from each other's training results.
Run the CREATE MODEL query
To run the CREATE MODEL query to create and train your model:
In the Cloud Console, click Compose New Query.
Enter the standard SQL query (above) in the Query Editor text area.
Click Run.
The query takes about 17 minutes to complete.
Track the tuning progress in execution details under Stages:
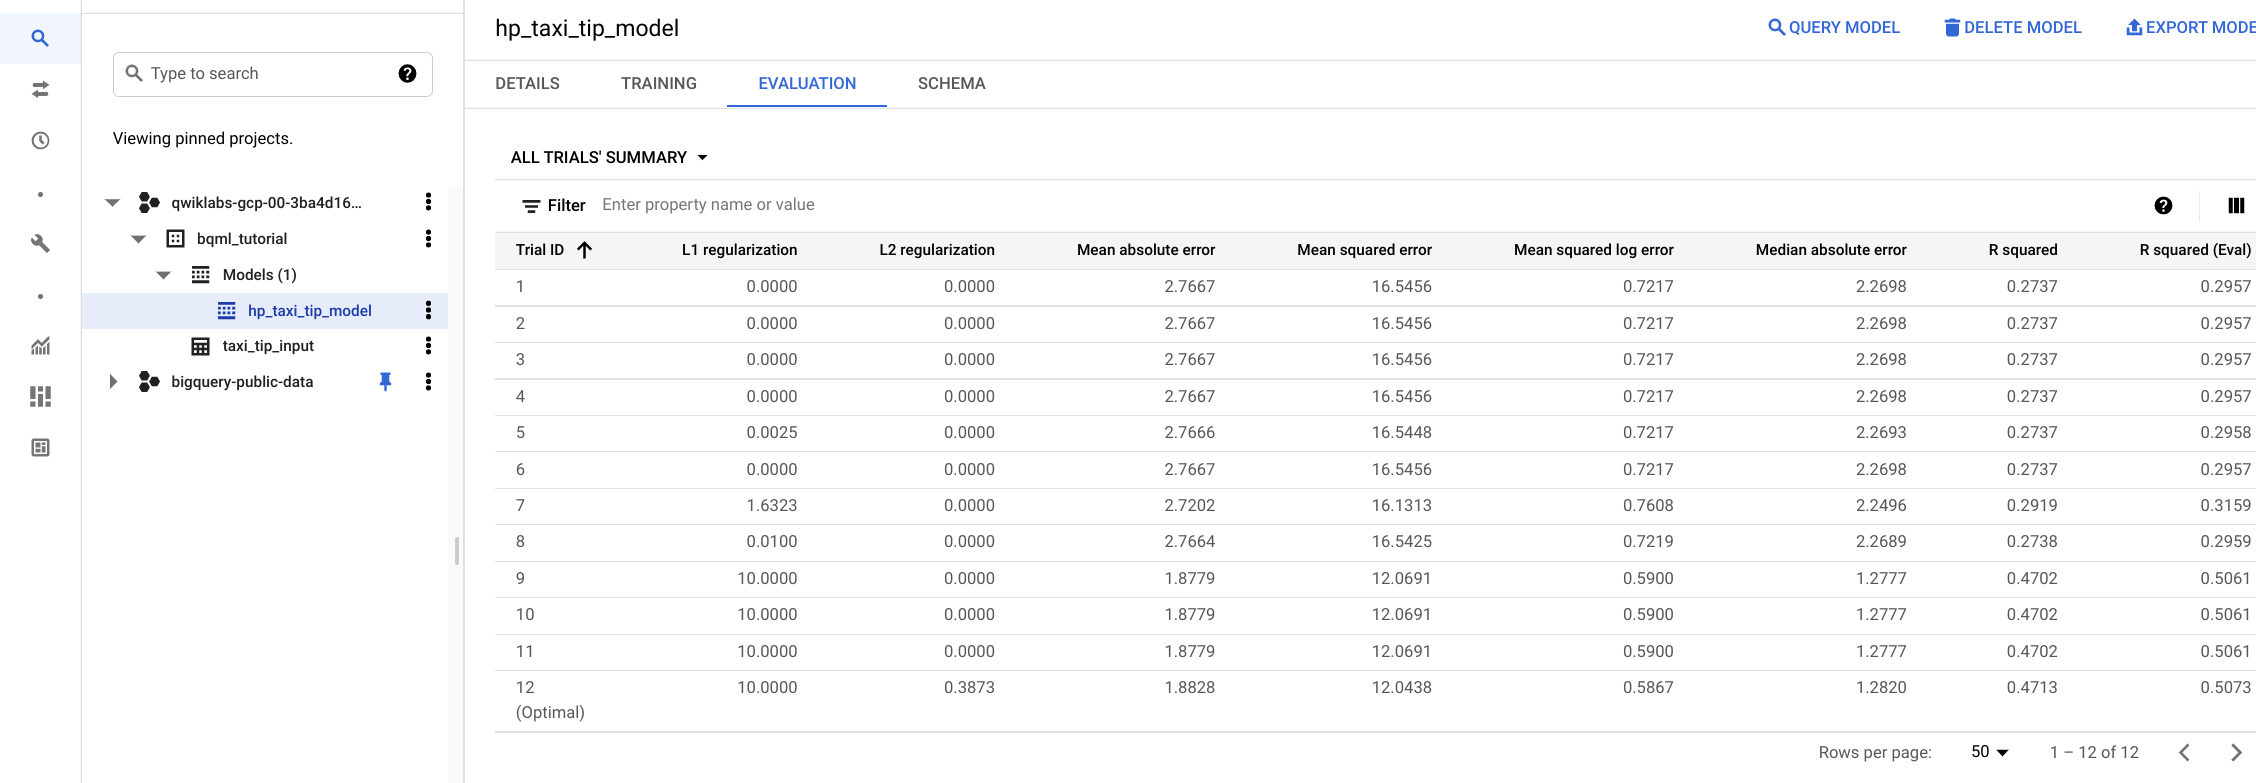
Task 4. Get trials information
To see the overview of all trials, including their hyperparameters, objectives, status, and the optimal trial, use the ML.TRIAL_INFO function, and view the result in the Cloud Console after running the SQL:
SELECT *
FROM
ML.TRIAL_INFO(MODEL `bqml_tutorial.hp_taxi_tip_model`)
You can run this SQL query as soon as one trial is done. If the tuning is stopped in the middle, all already-completed trials will remain available to use.
Task 5. Evaluate your model
After creating your model, view the evaluation metrics of all trials either by using the ML.EVALUATE function or through the Google Cloud Console.
Run ML.EVALUATE:
SELECT *
FROM
ML.EVALUATE(MODEL `bqml_tutorial.hp_taxi_tip_model`)
This SQL fetches evaluation metrics for all trials calculated from the TEST data.
Check the Data Split section to see the difference between ML.TRIAL_INFO objectives and ML.EVALUATE evaluation metrics.
You can also evaluate a specific trial by providing your own data. See ML.EVALUATE for more details.
Check evaluation metrics through the Google Cloud Console
You can also check evaluation metrics by viewing the Evaluation tab of the model.
Task 6. Use your model to predict taxi tips
After evaluating your model, the next step is to use it to predict the taxi tip.
Use this query to predict the tip:
SELECT
*
FROM
ML.PREDICT(MODEL `bqml_tutorial.hp_taxi_tip_model`,
(
SELECT
*
FROM
`bqml_tutorial.taxi_tip_input`
LIMIT 10))
Query details
The first SELECT statement retrieves all columns, including the predicted_label column. This column is generated by the ML.PREDICT function. When you use the ML.PREDICT function, the output column name for the model is predicted_label_column_name.
The prediction is made against the optimal trial by default.
You can select another trial by specifying the trial_id parameter.
SELECT
*
FROM
ML.PREDICT(MODEL `bqml_tutorial.hp_taxi_tip_model`,
(
SELECT
*
FROM
`bqml_tutorial.taxi_tip_input`
LIMIT
10),
STRUCT(3 AS trial_id))
For more information about using model serving functions, refer to ML.PREDICT.
Task 7. Clean up
To avoid incurring charges to your Google Cloud account for the resources used in this tutorial, either delete the project that contains the resources, or keep the project and delete the individual resources.
Deleting your dataset
Deleting your project removes all datasets and all tables in the project. If you prefer to reuse the project, you can delete the dataset you created in this tutorial:
If necessary, open the BigQuery page in the Cloud Console.
In the Explorer panel, click View actions () next to your dataset, and then click Delete.
In the Delete dataset dialog, to confirm the delete command, type delete, and then click Delete.
Congratulations!
You've learned how to use BigQuery ML to:
Create a linear regression model using the CREATE MODEL statement with the num_trials set to 20.
Check the overview of all 20 trials using the ML.TRIAL_INFO function.
Evaluate the ML model using the ML.EVALUATE function.
Make predictions using the ML model and ML.PREDICT function.
End your lab
When you have completed your lab, click End Lab. Qwiklabs removes the resources you’ve used and cleans the account for you.
You will be given an opportunity to rate the lab experience. Select the applicable number of stars, type a comment, and then click Submit.
The number of stars indicates the following:
1 star = Very dissatisfied
2 stars = Dissatisfied
3 stars = Neutral
4 stars = Satisfied
5 stars = Very satisfied
You can close the dialog box if you don't want to provide feedback.
For feedback, suggestions, or corrections, please use the Support tab.
Copyright 2022 Google LLC All rights reserved. Google and the Google logo are trademarks of Google LLC. All other company and product names may be trademarks of the respective companies with which they are associated.
Lab membuat project dan resource Google Cloud untuk jangka waktu tertentu
Lab memiliki batas waktu dan tidak memiliki fitur jeda. Jika lab diakhiri, Anda harus memulainya lagi dari awal.
Di kiri atas layar, klik Start lab untuk memulai
Gunakan penjelajahan rahasia
Salin Nama Pengguna dan Sandi yang diberikan untuk lab tersebut
Klik Open console dalam mode pribadi
Login ke Konsol
Login menggunakan kredensial lab Anda. Menggunakan kredensial lain mungkin menyebabkan error atau dikenai biaya.
Setujui persyaratan, dan lewati halaman resource pemulihan
Jangan klik End lab kecuali jika Anda sudah menyelesaikan lab atau ingin mengulanginya, karena tindakan ini akan menghapus pekerjaan Anda dan menghapus project
Konten ini tidak tersedia untuk saat ini
Kami akan memberi tahu Anda melalui email saat konten tersedia
Bagus!
Kami akan menghubungi Anda melalui email saat konten tersedia
Satu lab dalam satu waktu
Konfirmasi untuk mengakhiri semua lab yang ada dan memulai lab ini
Gunakan penjelajahan rahasia untuk menjalankan lab
Gunakan jendela Samaran atau browser pribadi untuk menjalankan lab ini. Langkah ini akan mencegah konflik antara akun pribadi Anda dan akun Siswa yang dapat menyebabkan tagihan ekstra pada akun pribadi Anda.
In this lab, you will use BigQuery ML Hyperparameter Tuning to improve model performance
 ), click APIs & services > Library.
 ) next to your project ID, and select Create dataset.