In this lab, you create a tabular dataset using Vertex AI and use it to train a classification model.
Learning objectives
Create a dataset and train an AutoML classification model.
Deploy a model and request a prediction.
Introduction to Vertex AI
This lab uses the newest AI product offering available on Google Cloud. Vertex AI integrates the ML offerings across Google Cloud into a seamless development experience. Previously, models trained with AutoML and custom models were accessible via separate services. The new offering combines both into a single API, along with other new products. You can also migrate existing projects to Vertex AI. If you have any feedback, please refer to the support page.
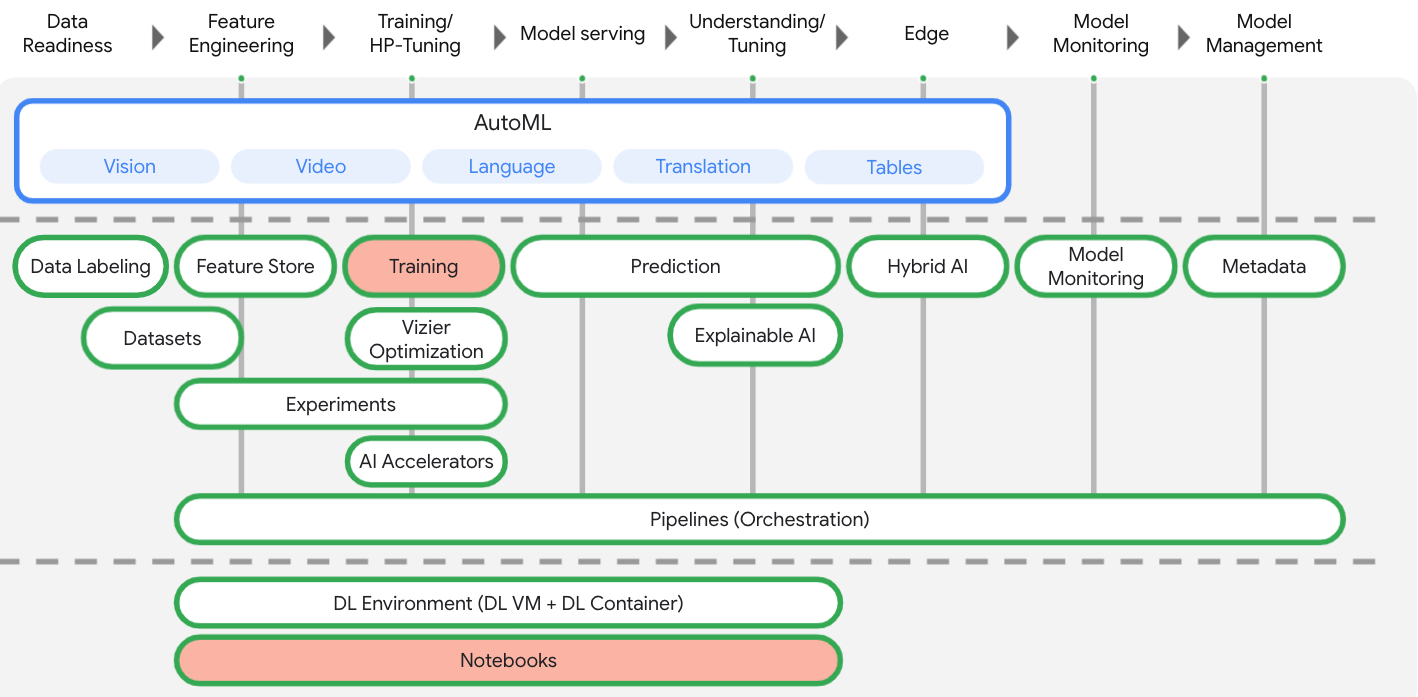
Vertex AI includes many different products to support end-to-end ML workflows. This lab focuses on the products highlighted below: Training/HP-Tuning and Notebooks.
Setup
For each lab, you get a new Google Cloud project and set of resources for a fixed time at no cost.
Sign in to Qwiklabs using an incognito window.
Note the lab's access time (for example, 1:15:00), and make sure you can finish within that time.
There is no pause feature. You can restart if needed, but you have to start at the beginning.
When ready, click Start lab.
Note your lab credentials (Username and Password). You will use them to sign in to the Google Cloud Console.
Click Open Google Console.
Click Use another account and copy/paste credentials for this lab into the prompts.
If you use other credentials, you'll receive errors or incur charges.
Accept the terms and skip the recovery resource page.
Task 1. Enable the Vertex AI API
In the Google Cloud Console, on the Navigation menu, click Vertex AI.
Click Enable All Recommended API.
Task 2. Create a dataset and training an AutoML classification model
Create a tabular dataset
In the Vertex AI console, on the Dashboard page, click Create dataset.
For the dataset name, type Structured_AutoML_Tutorial
For data type and objective, select Tabular.
Accept the defaults and click Create.
For Select a data source, select Select CSV files from Cloud Storage, and for Import file path, type cloud-training/mlongcp/v3.0_MLonGC/toy_data/bank-marketing_toy.csv
Click Continue.
The Analyze pane opens.
Click Generate statistics.
It will take few minutes to generate statistics.
When the statistics are generated, you can click on any feature to see more details about the data for that feature.
Train an AutoML classification model
Click Train new model and select Other.
In the Train new model pane, for Objective, select Classification.
Select the AutoML training method, and click Continue.
For Target column, select Deposit, and click Continue.
The list of columns is displayed with the transformation that will be used for each feature.
To display the Compute and pricing pane, click Continue.
For Budget, type 1
Click Start training.
The training budget determines actual training time, but the time to complete training includes other activities, so the entire process can take about two hours. When the model finishes training it is displayed in the Model Registry pane as a live link with a green checkmark status icon.
Note: It takes nearly 2 hours to complete the training. Please wait till the training get completed.
Task 3. Deploy a model and requesting a prediction
Deploy your model to an endpoint
In the Vertex AI console, in the navigation pane, click Model Registry.
Click on your Model name and then click on your Version ID to open its Evaluate pane.
This panel displays quality metrics for the model, including a confusion matrix.
To see evaluation metrics for a value, select that value for the target column.
The effect of each column on model training (feature importance) is displayed.
In the Deploy & test pane, under Deploy your model, click Deploy to endpoint.
For Endpoint name, type Structured_AutoML_Tutorial and click Continue.
On Model settings page, for Explainability option enable the Enable feature attributions for this model.
Click Done, and click Continue.
On Model monitoring page review the default settings and click Continue.
For Training data source, select Vertex AI dataset and choose your dataset from the dropdown.
For Target column type Deposit.
Under Alert thresholds enable the toggle to train model that are configured to have attribution scrores through Explainable AI.
To create your endpoint and deploy your model to it, click Deploy.
Deploying a model can take several minutes.
Request a prediction
While the endpoint is being created, you can optionally enter a set of values for a prediction.
Return to the Models list in the navigation pane and open your newly created model.
Open the Deploy & test pane.
You can use the prefilled values for the prediction data or enter your own.
When the model is deployed, click Predict.
For this model, a prediction result of 1 represents a negative outcome: a deposit is not made at the bank. A prediction result of 2 represents a positive outcome: a deposit is made at the bank.
If you used the pre-filled prediction values, the local feature importance values are all zero. This is because the pre-filled values are the baseline prediction data, so the prediction returned is the baseline prediction value.
End your lab
When you have completed your lab, click End Lab. Qwiklabs removes the resources you’ve used and cleans the account for you.
You will be given an opportunity to rate the lab experience. Select the applicable number of stars, type a comment, and then click Submit.
The number of stars indicates the following:
1 star = Very dissatisfied
2 stars = Dissatisfied
3 stars = Neutral
4 stars = Satisfied
5 stars = Very satisfied
You can close the dialog box if you don't want to provide feedback.
For feedback, suggestions, or corrections, please use the Support tab.
Copyright 2022 Google LLC All rights reserved. Google and the Google logo are trademarks of Google LLC. All other company and product names may be trademarks of the respective companies with which they are associated.
Labs erstellen ein Google Cloud-Projekt und Ressourcen für einen bestimmten Zeitraum
Labs haben ein Zeitlimit und keine Pausenfunktion. Wenn Sie das Lab beenden, müssen Sie von vorne beginnen.
Klicken Sie links oben auf dem Bildschirm auf Lab starten, um zu beginnen
Privates Surfen verwenden
Kopieren Sie den bereitgestellten Nutzernamen und das Passwort für das Lab
Klicken Sie im privaten Modus auf Konsole öffnen
In der Konsole anmelden
Melden Sie sich mit Ihren Lab-Anmeldedaten an. Wenn Sie andere Anmeldedaten verwenden, kann dies zu Fehlern führen oder es fallen Kosten an.
Akzeptieren Sie die Nutzungsbedingungen und überspringen Sie die Seite zur Wiederherstellung der Ressourcen
Klicken Sie erst auf Lab beenden, wenn Sie das Lab abgeschlossen haben oder es neu starten möchten. Andernfalls werden Ihre bisherige Arbeit und das Projekt gelöscht.
Diese Inhalte sind derzeit nicht verfügbar
Bei Verfügbarkeit des Labs benachrichtigen wir Sie per E-Mail
Sehr gut!
Bei Verfügbarkeit kontaktieren wir Sie per E-Mail
Es ist immer nur ein Lab möglich
Bestätigen Sie, dass Sie alle vorhandenen Labs beenden und dieses Lab starten möchten
Privates Surfen für das Lab verwenden
Nutzen Sie den privaten oder Inkognitomodus, um dieses Lab durchzuführen. So wird verhindert, dass es zu Konflikten zwischen Ihrem persönlichen Konto und dem Teilnehmerkonto kommt und zusätzliche Gebühren für Ihr persönliches Konto erhoben werden.
In this lab, we will create a tabular dataset using Vertex AI and use it to train a classification model.