CBL406

In this lab, you learn to:
- Enable the Cloud Run API.
- Deploy a Cloud Run Service.
- Assign tags to a revision.
- Migrate traffic to a revision.
- Roll back a revision.
Overview
Cloud Run allows you to specify which revisions should receive traffic and to specify traffic percentages that are received by a revision.
This feature allows you to rollback to a previous revision, gradually roll out a revision, and split traffic between multiple revisions.
In this lab you will learn how to use Cloud Run features.
The lab features three high level sections that resolve a technical problem:
- Situational Overview
- Requirements Gathering
- Developing a minimal viable product
Prerequisites
These labs are based on intermediate knowledge of Google Cloud.
While the steps required are covered in the content, it would be helpful to have familiarity with any of the following products:
Setup
Before you click the Start Lab button
Note: Read these instructions.
Labs are timed and you cannot pause them. The timer, which starts when you click Start Lab, shows how long Google Cloud resources will be made available to you.
This Qwiklabs hands-on lab lets you do the lab activities yourself in a real cloud environment, not in a simulation or demo environment. It does so by giving you new, temporary credentials that you use to sign in and access Google Cloud for the duration of the lab.
What you need
To complete this lab, you need:
- Access to a standard internet browser (Chrome browser recommended).
- Time to complete the lab.
Note: If you already have your own personal Google Cloud account or project, do not use it for this lab.
Note: If you are using a Pixelbook, open an Incognito window to run this lab.
How to start your lab and sign in to the Console
-
Click the Start Lab button. If you need to pay for the lab, a pop-up opens for you to select your payment method.
On the left is a panel populated with the temporary credentials that you must use for this lab.

-
Copy the username, and then click Open Google Console.
The lab spins up resources, and then opens another tab that shows the Choose an account page.
Note: Open the tabs in separate windows, side-by-side.
-
On the Choose an account page, click Use Another Account. The Sign in page opens.

-
Paste the username that you copied from the Connection Details panel. Then copy and paste the password.
Note: You must use the credentials from the Connection Details panel. Do not use your Google Cloud Skills Boost credentials. If you have your own Google Cloud account, do not use it for this lab (avoids incurring charges).
- Click through the subsequent pages:
- Accept the terms and conditions.
- Do not add recovery options or two-factor authentication (because this is a temporary account).
- Do not sign up for free trials.
After a few moments, the Cloud console opens in this tab.
Note: You can view the menu with a list of Google Cloud Products and Services by clicking the Navigation menu at the top-left.

Activate Google Cloud Shell
Google Cloud Shell is a virtual machine that is loaded with development tools. It offers a persistent 5GB home directory and runs on the Google Cloud.
Google Cloud Shell provides command-line access to your Google Cloud resources.
-
In Cloud console, on the top right toolbar, click the Open Cloud Shell button.

-
Click Continue.
It takes a few moments to provision and connect to the environment. When you are connected, you are already authenticated, and the project is set to your PROJECT_ID. For example:

gcloud is the command-line tool for Google Cloud. It comes pre-installed on Cloud Shell and supports tab-completion.
- You can list the active account name with this command:
gcloud auth list
Output:
Credentialed accounts:
- @.com (active)
Example output:
Credentialed accounts:
- google1623327_student@qwiklabs.net
- You can list the project ID with this command:
gcloud config list project
Output:
[core]
project =
Example output:
[core]
project = qwiklabs-gcp-44776a13dea667a6
Note:
Full documentation of gcloud is available in the
gcloud CLI overview guide
.
Situational overview

In this lab, you will help the development team at Critter Junction investigate Cloud Run revisions.
The team would like to explore how revision management can be incorporated into their existing development workflow.
Requirements gathering
The operations team at Critter Junction would like to create a status page for their services without introducing additional complexity to their existing systems.
Experimentation with Serverless products has led them to select Cloud Run due to the wealth of features supported.
Defining the service priorities
The operations team at Critter Junction are keen to define a solution that can be implemented quickly.
After discussions with the engineering team, they discovered that serverless may be a good option.
To move forward, a series of meetings are held with stakeholders to ascertain the key priorities.
The results of which are shown below:
|
Ref
|
User Story
|
|
1
|
As a product lead, I want to ensure the website remains responsive, so customers face minimal wait times.
|
|
2
|
As a developer lead, I want to increase the velocity of service deployments.
|
|
3
|
As an ops lead, I want to ensure system stability is observed, so the system performance is not degraded through the deployment of new revisions.
|
The team leads follow up the meetings and agree the following high level tasks would indicate the project requirements have been met:
|
Ref
|
Definition of Done
|
|
1
|
User base are not impacted by the rollout of new features
|
|
2
|
Revision management enabled for service deployments
|
|
3
|
New revision retains existing level of operational stability by deployment to a reduced user base
|
In consideration of the requirements, the development team decide to look in to the following:
- Traffic Migration
- Revision Tags
Traffic migration versus revision tags
|
Feature
|
Description
|
|
Revision Tags
|
"Appropriate for use cases where a task producer needs to defer or control the execution timing of a specific webhook or remote procedure call."
|

|
|
Traffic Migration
|
"Cloud Run allows you to specify which revisions should receive traffic and to specify traffic percentages that are received by a revision.."
|
|
The following high level architecture diagram summaries the minimal viable product they wish to investigate.
MVP architecture
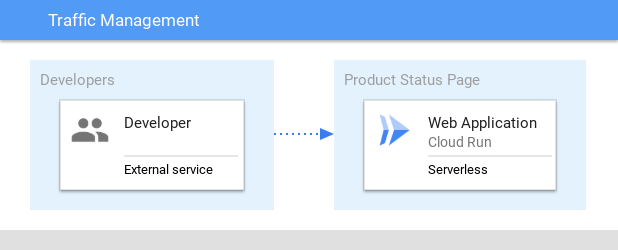
In the proposed solution, the product service is used to demonstrate how traffic migration and revision tagging can be used with Cloud Run.
Developing a minimal viable product (MVP)
Critter Junction has a backend product status service that they would like integrated with Cloud Run.
To build an MVP the following activities are required:
- Configure the environment
- Test Revision Tags
- Test Traffic Migration
- Deploy a public service
Task 1. Configure the environment
Cloud Run requires some environmental settings.
In this section, enable the API and deploy the service.
Enable the Cloud Run API
Before deploying the application, config the environment.
- Enable Cloud Run API:
gcloud services enable run.googleapis.com
- Set the compute region:
gcloud config set compute/region {{{project_0.default_region | REGION}}}
- Create a LOCATION environment variable:
LOCATION="{{{project_0.default_region | REGION}}}"
Cloud Run requires knowledge of the region in which it will be deployed.
In addition the Cloud Run service should be enabled to allow API access.
Deploy a service
The development team needs to configure the product status service.
To test the process, the development team decided to look at the deployment patterns for Cloud Run.
An example series of container images has been created by the development team.
Use these images to configure and deploy within the project:
- Deploy the payment service:
gcloud run deploy product-service \
--image gcr.io/qwiklabs-resources/product-status:0.0.1 \
--tag test1 \
--region $LOCATION \
--allow-unauthenticated
- Add the product status service to an environment variable:
TEST1_PRODUCT_SERVICE_URL=$(gcloud run services describe product-service --platform managed --region {{{project_0.default_region | REGION}}} --format="value(status.address.url)")
- Test the API is online:
curl $TEST1_PRODUCT_SERVICE_URL/help -w "\n"
Example output:
.
API Microservice example: v1
.
- Test the product status is responding:
curl $TEST1_PRODUCT_SERVICE_URL/v1/revision -w "\n"
Example output:
.
{"api":"version 1"}
.
Note: Traffic management
- 100 percent of traffic is being served to the revision TEST1
- Service is accessible and set to the default
The Cloud Run service has been successfully deployed and is responding to requests.
In the next section explore how to utilise Traffic Migration to specify which revision receives traffic.
Task 2. Revision tags
Each new Cloud Run revision can be assigned a tag.
Doing this allows access to a URL without serving traffic.
An approach like this can be useful to handle the traffic profile across multiple revisions.
The main uses cases for revision tags are shown in the following table:
|
Use Case
|
Description
|
|
Integration testing
|
Run containers revisions during the development phase
|
|
Tagged revision migration
|
Migrate traffic to a tagged revision
|
|
Tagged revision rollback
|
Rollback to prior version based on tagged revision
|
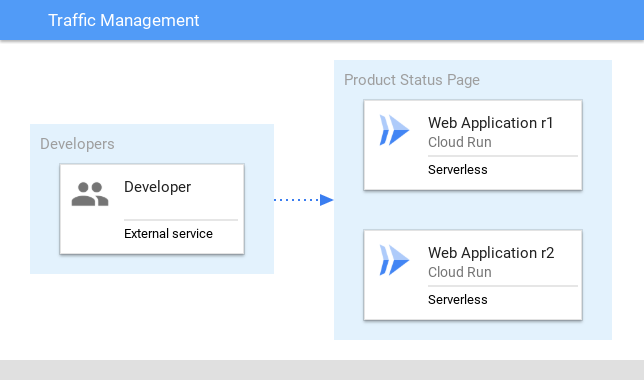
In this section deploy a new revision and learn how to control the traffic to direct to the correct destination.
Revised architecture
Integration testing
Cloud Run provides the ability to deploy a new revision with redirecting traffic.
A deployment of this kind is useful for integration testing of components.
- Deploy a new tagged revision (
test2) with redirection of traffic:
gcloud run deploy product-service \
--image gcr.io/qwiklabs-resources/product-status:0.0.2 \
--no-traffic \
--tag test2 \
--region=$LOCATION \
--allow-unauthenticated
-
Observe the name of the Tagged Revision in the command output.
-
Create an environment variable for the new URL:
TEST2_PRODUCT_STATUS_URL=$(gcloud run services describe product-service --platform managed --region={{{project_0.default_region | REGION}}} --format="value(status.traffic[1].url)")
- Test the tag revision is able to receive traffic:
curl $TEST2_PRODUCT_STATUS_URL/help -w "\n"
Example output:
.
API Microservice example: v2
.
The new revision can be used to independently test the deployment.
At this point the original revision is still serving 100% of the traffic.
Revision migration
There are now two versions available.
However only one revision is serving traffic.
Alter the deployed revisions to share the traffic profile.
- Migrate 50% of the traffic to the revision tag
test2:
gcloud run services update-traffic product-service \
--to-tags test2=50 \
--region=$LOCATION
-
Observe the name of the Tagged Revision in the command output.
-
Confirm the original test endpoint is distributing traffic:
for i in {1..10}; do curl $TEST1_PRODUCT_SERVICE_URL/help -w "\n"; done
Example output:
API Microservice example: v1
.
.
.
API Microservice example: v2
At this point observe the traffic pattern is distributed between the original (TEST1) and new revision (TEST2).
Tagged revision rollback
In the event an issue is found, the traffic migration can be rolled back by resetting the percentage.
- Migrate the distributed traffic back to the
test1 service:
gcloud run services update-traffic product-service \
--to-tags test2=0 \
--region=$LOCATION
-
Observe the name of the Tagged Revision in the command output.
-
Test the endpoint is distributing traffic to TEST1 only:
for i in {1..10}; do curl $TEST1_PRODUCT_SERVICE_URL/help -w "\n"; done
Example output:
.
API Microservice example: v1
.
In this section a second Cloud Run revision was deployed and used to migrate traffic.
The second revision was labelled with the tag test2 and used to migrate a percentage of the traffic determined at deployment.
Task 3. Traffic migration
Migration of traffic provides a simple mechanism on which to direct communication to a deployed service.
Cloud Run provides the ability to have multiple revisions to be deployed without a cost penalty.
Remember Cloud Run only charges where traffic is handled by the service.
The main uses cases for traffic migration are shown in the following table:
|
Use Case
|
Description
|
|
Traffic migration
|
Enable traffic to be sent to the latest version of the deployed service
|
|
Traffic splitting
|
Perform a ratio traffic split between defined deployed services
|
|
Rollout migration
|
Deploy a service and gradually enable traffic at a predetermined time
|
Revised architecture
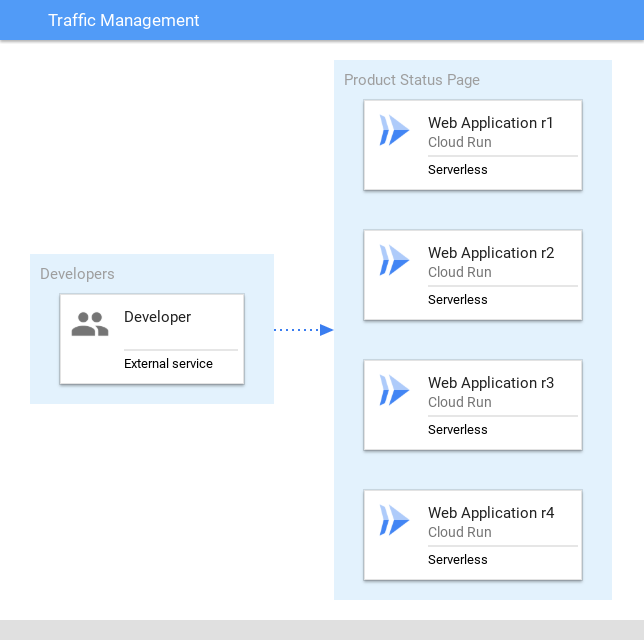
In this section multiple revisions will be deployed.
Learn how to split traffic to a specific host.
Traffic migration - deploy a new version
When splitting traffic between two or more revisions, a comma separated list can be used.
The list represents the revisions deployed.
- Deploy a new tagged revision (
test3) with redirection of traffic:
gcloud run deploy product-service \
--image gcr.io/qwiklabs-resources/product-status:0.0.3 \
--no-traffic \
--tag test3 \
--region=$LOCATION \
--allow-unauthenticated
- Deploy a new tagged revision (
test4) with redirection of traffic:
gcloud run deploy product-service \
--image gcr.io/qwiklabs-resources/product-status:0.0.4 \
--no-traffic \
--tag test4 \
--region=$LOCATION \
--allow-unauthenticated
- Output a list of the revisions deployed:
gcloud run services describe product-service \
--region=$LOCATION \
--format='value(status.traffic.revisionName)'
- Create an environment variable for the available
revisionNames:
LIST=$(gcloud run services describe product-service --platform=managed --region=$LOCATION --format='value[delimiter="=25,"](status.traffic.revisionName)')"=25"
- Split traffic between the four services using the
LIST environment variable:
gcloud run services update-traffic product-service \
--to-revisions $LIST --region=$LOCATION
-
Observe the name of the Tagged Revision in the command output.
-
Test the endpoint is distributing traffic:
for i in {1..10}; do curl $TEST1_PRODUCT_SERVICE_URL/help -w "\n"; done
Example output:
API Microservice example: v4
API Microservice example: v1
API Microservice example: v2
API Microservice example: v4
API Microservice example: v3
API Microservice example: v1
API Microservice example: v2
API Microservice example: v2
API Microservice example: v4
API Microservice example: v3
In this section a Cloud Run deployment was performed.
Traffic was then diverted to the new deployment.
Traffic splitting - update traffic between revisions
- Reset the service traffic profile to use the latest deployment:
gcloud run services update-traffic product-service --to-latest --platform=managed --region=$LOCATION
-
Observe the name of the Tagged Revision in the command output.
-
Create an environment variable for the new URL:
LATEST_PRODUCT_STATUS_URL=$(gcloud run services describe product-service --platform managed --region=$LOCATION --format="value(status.address.url)")
- Test the tag revision is able to receive traffic:
curl $LATEST_PRODUCT_STATUS_URL/help -w "\n"
Example output:
.
API Microservice example: v4
.
Critter Junction have now updated their solution to take advantage of Cloud Run traffic management.
Congratulations!
Over this course of this lab, you have seen how to incorporate Cloud Run traffic management within your Google Cloud infrastructure.
- Deploy a Cloud Run service
- Learn Revision Tagging
- Understand Traffic Migration
Next steps / Learn more
Follow the Serverless Expeditions video series to learn more about how to utilise these products within your project.
- Cloud Run
- Cloud Build
- Cloud Functions
Manual Last Updated: February 21, 2024
Lab Last Tested: February 21, 2024
Copyright 2022 Google LLC All rights reserved. Google and the Google logo are trademarks of Google LLC. All other company and product names may be trademarks of the respective companies with which they are associated.


