Checkpoints
Create a Cloud Storage bucket
/ 25
Upload an image in a storage bucket (demo-image.jpg)
/ 25
Make the uploaded image publicly accessible
/ 50
APIs Explorer: Qwik Start
GSP277

Overview
The Google APIs Explorer is a tool that lets you explore various Google API methods without writing code. With the APIs Explorer you can:
- Browse quickly through available APIs and versions.
- See methods available for each API and what parameters they support along with inline documentation.
- Execute requests for any method and see responses in real time.
- Make authenticated and authorized API calls.
- Search across all services, methods, and your recent requests to quickly find what you are looking for.
The APIs Explorer uses its own API keys whenever it makes a request. When you use the APIs Explorer to make a request, it displays the request syntax, which includes a placeholder labeled {YOUR_API_KEY}. If you want to make the same request in your application, you need to replace this placeholder with your own API key.
Objectives
- Create a Cloud Storage bucket.
- Upload an image to Cloud Storage and make it public.
- Make a request to the Vision API with that image.
Setup and requirements
Before you click the Start Lab button
Read these instructions. Labs are timed and you cannot pause them. The timer, which starts when you click Start Lab, shows how long Google Cloud resources will be made available to you.
This hands-on lab lets you do the lab activities yourself in a real cloud environment, not in a simulation or demo environment. It does so by giving you new, temporary credentials that you use to sign in and access Google Cloud for the duration of the lab.
To complete this lab, you need:
- Access to a standard internet browser (Chrome browser recommended).
- Time to complete the lab---remember, once you start, you cannot pause a lab.
How to start your lab and sign in to the Google Cloud console
-
Click the Start Lab button. If you need to pay for the lab, a pop-up opens for you to select your payment method. On the left is the Lab Details panel with the following:
- The Open Google Cloud console button
- Time remaining
- The temporary credentials that you must use for this lab
- Other information, if needed, to step through this lab
-
Click Open Google Cloud console (or right-click and select Open Link in Incognito Window if you are running the Chrome browser).
The lab spins up resources, and then opens another tab that shows the Sign in page.
Tip: Arrange the tabs in separate windows, side-by-side.
Note: If you see the Choose an account dialog, click Use Another Account. -
If necessary, copy the Username below and paste it into the Sign in dialog.
{{{user_0.username | "Username"}}} You can also find the Username in the Lab Details panel.
-
Click Next.
-
Copy the Password below and paste it into the Welcome dialog.
{{{user_0.password | "Password"}}} You can also find the Password in the Lab Details panel.
-
Click Next.
Important: You must use the credentials the lab provides you. Do not use your Google Cloud account credentials. Note: Using your own Google Cloud account for this lab may incur extra charges. -
Click through the subsequent pages:
- Accept the terms and conditions.
- Do not add recovery options or two-factor authentication (because this is a temporary account).
- Do not sign up for free trials.
After a few moments, the Google Cloud console opens in this tab.

Task 1. Create a Cloud Storage bucket
- In the Cloud console, go to Cloud Storage > Buckets.
- Click Create bucket.
- Give your bucket a unique name.
Do not include sensitive information in the bucket name - the bucket namespace is global and publicly visible. For example,
-bucket. - Click Choose how to control access to objects.
- Uncheck Enforce public access prevention on this bucket.
- Select Fine-grained Access control.
- Click Create.
Test completed task
Click Check my progress to verify your performed task. If you have successfully created a Cloud Storage bucket, you will see an assessment score.
Task 2. Upload an image
You'll be asking the Cloud Vision API to analyze an image through API Explorer. First, add an image to your bucket for it to analyze. You can use one of your own, or download the image below to your computer and save it as demo-image.jpg .

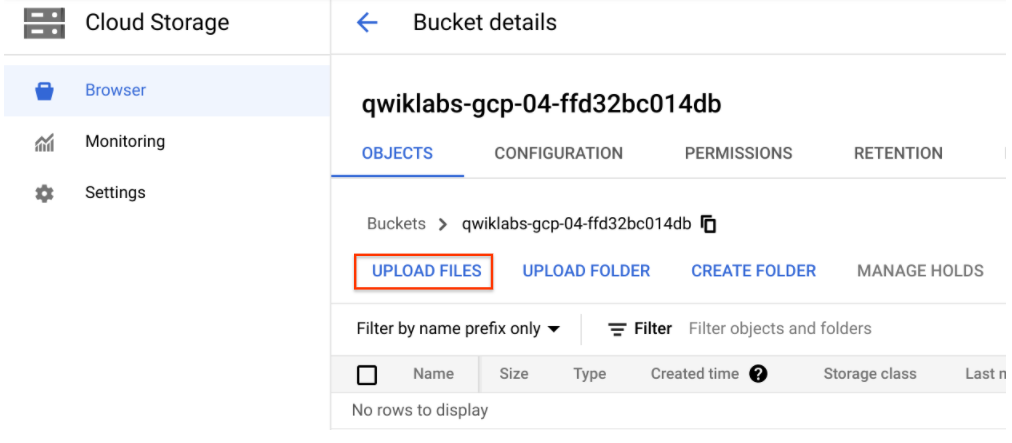
- In your bucket, click Upload Files and select the demo-image.jpg file you saved.
Test completed task
Click Check my progress to verify your performed task. If you have successfully uploaded an image in a storage bucket, you will see an assessment score.
After the file is uploaded and listed in your bucket, share the image publicly by following these steps:
- Click the three vertical dot object overflow menu associated with your image.
- Select Edit access from the drop-down menu.
- In the overlay that appears, click the + Add entry button.
- Add a permission for allUsers.
- Select Public for the Entity.
- Enter allUsers for the Name.
- Select Reader for the Access.
- Click Save.
Test completed task
Click Check my progress to verify your performed task. If you have successfully made the uploaded image publicly accessible, you will see an assessment score.
You should see that the image is now public. You're ready to use the API Explorer.
Task 3. Make a request to the Cloud Vision API service
-
Go to Navigation menu > APIs & Services.
-
Click + ENABLE APIS AND SERVICES, search for Cloud Vision, then select the Cloud Vision API from the results list and click on it.
-
Make sure that API is enabled, if not click Enable.
-
Open the Cloud Vision - Try this API link.
This will open a new tab with the APIs Explorer page loaded.
You will now be on the APIs Explorer page.
images.annotate method from Cloud Vision API is being used. You can view all API versions and its method on Cloud Vision API reference.
- Click inside of the curly braces in the Request body field.
- You'll be asked to select a property - choose "requests". This will generate the next level.
- Click inside the brackets and click the blue plus sign icon, select
[Add Item]- for your property select "features". - Inside "features" click inside the curly brace, click the blue plus icon and select
[Add Item], select "type"; next to it select LABEL_DETECTION. - You should have the blue plus icon at the end of the "features" block where you can choose to add "image"; then add "source", and "imageUri".
- Next to "imageUri" enter the path to the image file in your bucket.
The path should look like this:
gs://MY_BUCKET/demo-image.jpg
When you're done, your Request body field should look like this:
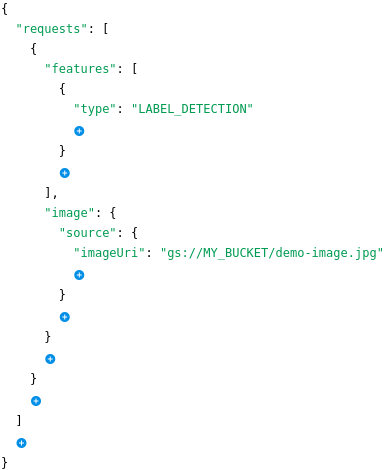
- Make sure that Google OAuth 2.0 and API key checkboxes are selected under Credentials section.
-
On the right panel of an API Explorer console, you can see Cloud Vision API call with
cURL,HTTPandJAVASCRIPT. -
Now click Execute.
-
Select your student account.
-
On the next screen, click Allow to give APIs Explorer access.
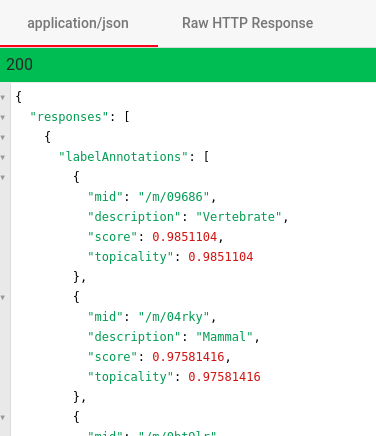
The results of Cloud Vision API analysis of the image will be below to your right panel. The top part of the results should look like this:
Task 4. Test your understanding
Try these multiple-choice questions to reinforce your understanding of this lab's concepts. Answer them to the best of your abilities.
Congratulations!
You've made your first images.annotate request to the Cloud Vision API service.
Finish your quest
This self-paced lab is part of the Exploring APIs and Intro to ML: Image Processing quests. A quest is a series of related labs that form a learning path. Completing a quest earns you a badge to recognize your achievement. You can make your badge or badges public and link to them in your online resume or social media account. Enroll in any quest that contains this lab and get immediate completion credit. See the Google Cloud Skills Boost catalog to see all available quests.
Take your next lab
This lab is part of a series of labs called Qwik Starts. These labs are designed to give you a little taste of the many features available with Google Cloud. Search for "Qwik Starts" in the lab catalog to find the next lab you'd like to take!
Next steps / learn more
- Learn to use APIs Explorer through the Frequently Asked Questions page for APIs Explorer page.
- Read more about the Cloud Vision API.
Google Cloud training and certification
...helps you make the most of Google Cloud technologies. Our classes include technical skills and best practices to help you get up to speed quickly and continue your learning journey. We offer fundamental to advanced level training, with on-demand, live, and virtual options to suit your busy schedule. Certifications help you validate and prove your skill and expertise in Google Cloud technologies.
End your lab
When you have completed your lab, click End Lab. Your account and the resources you've used are removed from the lab platform.
You will be given an opportunity to rate the lab experience. Select the applicable number of stars, type a comment, and then click Submit.
The number of stars indicates the following:
- 1 star = Very dissatisfied
- 2 stars = Dissatisfied
- 3 stars = Neutral
- 4 stars = Satisfied
- 5 stars = Very satisfied
You can close the dialog box if you don't want to provide feedback.
For feedback, suggestions, or corrections, please use the Support tab.
Manual Last Updated September 19, 2023
Lab Last Tested September 19, 2023
Copyright 2024 Google LLC All rights reserved. Google and the Google logo are trademarks of Google LLC. All other company and product names may be trademarks of the respective companies with which they are associated.