Контрольні точки
Examine GKE application SQL queries using SQL Insights.
/ 25
Enable SQLCommenter on a GKE application.
/ 25
Redeploy the gMemegen application.
/ 25
Take actions to tune and optimise the database to enhance performance.
/ 25
Cloud SQL for PostgreSQL Database Observability and Tuning
- GSP921
- Overview
- Setup and requirements
- Task 1. Examine GKE application SQL queries using SQL Insights
- Task 2. Enable SQLcommenter on a GKE application
- Task 3. Redeploy the gMemegen application
- Task 4. Review application queries in SQL Insights
- Task 5. Take actions to tune and optimize the database to enhance performance
- Congratulations!
GSP921

Overview
In this lab you will use SQL Insights to analyse Cloud SQL database performance. You will modify an existing Google Kubernetes Engine (GKE) Application with the SQLcommenter library to annotate application queries with comments which will aid you in identifying the source of queries within the application.
You must create or configure the services and resources that are specified for each task and you must follow any detailed instructions that are provided in order to successfully complete each task.
Objectives
In this lab, you will learn how to perform the following tasks:
- Configure and utilize SQL Insights.
- Configure an application to use SQLcommenter.
- Take actions to tune and optimize the database to enhance performance.
Setup and requirements
Before you click the Start Lab button
Read these instructions. Labs are timed and you cannot pause them. The timer, which starts when you click Start Lab, shows how long Google Cloud resources will be made available to you.
This hands-on lab lets you do the lab activities yourself in a real cloud environment, not in a simulation or demo environment. It does so by giving you new, temporary credentials that you use to sign in and access Google Cloud for the duration of the lab.
To complete this lab, you need:
- Access to a standard internet browser (Chrome browser recommended).
- Time to complete the lab---remember, once you start, you cannot pause a lab.
How to start your lab and sign in to the Google Cloud console
-
Click the Start Lab button. If you need to pay for the lab, a pop-up opens for you to select your payment method. On the left is the Lab Details panel with the following:
- The Open Google Cloud console button
- Time remaining
- The temporary credentials that you must use for this lab
- Other information, if needed, to step through this lab
-
Click Open Google Cloud console (or right-click and select Open Link in Incognito Window if you are running the Chrome browser).
The lab spins up resources, and then opens another tab that shows the Sign in page.
Tip: Arrange the tabs in separate windows, side-by-side.
Note: If you see the Choose an account dialog, click Use Another Account. -
If necessary, copy the Username below and paste it into the Sign in dialog.
{{{user_0.username | "Username"}}} You can also find the Username in the Lab Details panel.
-
Click Next.
-
Copy the Password below and paste it into the Welcome dialog.
{{{user_0.password | "Password"}}} You can also find the Password in the Lab Details panel.
-
Click Next.
Important: You must use the credentials the lab provides you. Do not use your Google Cloud account credentials. Note: Using your own Google Cloud account for this lab may incur extra charges. -
Click through the subsequent pages:
- Accept the terms and conditions.
- Do not add recovery options or two-factor authentication (because this is a temporary account).
- Do not sign up for free trials.
After a few moments, the Google Cloud console opens in this tab.

Activate Cloud Shell
Cloud Shell is a virtual machine that is loaded with development tools. It offers a persistent 5GB home directory and runs on the Google Cloud. Cloud Shell provides command-line access to your Google Cloud resources.
- Click Activate Cloud Shell
at the top of the Google Cloud console.
When you are connected, you are already authenticated, and the project is set to your Project_ID,
gcloud is the command-line tool for Google Cloud. It comes pre-installed on Cloud Shell and supports tab-completion.
- (Optional) You can list the active account name with this command:
- Click Authorize.
Output:
- (Optional) You can list the project ID with this command:
Output:
gcloud, in Google Cloud, refer to the gcloud CLI overview guide.
Enable the APIs
You must enable the required APIs for this lab. You will build and push a container to the Artifact Registry in a later task so you must enable the Artifact Registry API first.
- In Cloud Shell, run:
Get credentials for the Kubernetes cluster
- You must configure authentication to the Kubernetes cluster that was deployed for you when the lab started. This process creates a
configfile in a (hidden).kubefolder in your home folder.
Run the gMemgen application
-
In a browser, navigate to the load balancer's ingress IP address.
-
You can create a clickable link to the external IP address of the load balancer in the Cloud Shell using the following commands:
- Click the link in Cloud Shell and you will see the gMemegen application running in the browser.
Task 1. Examine GKE application SQL queries using SQL Insights
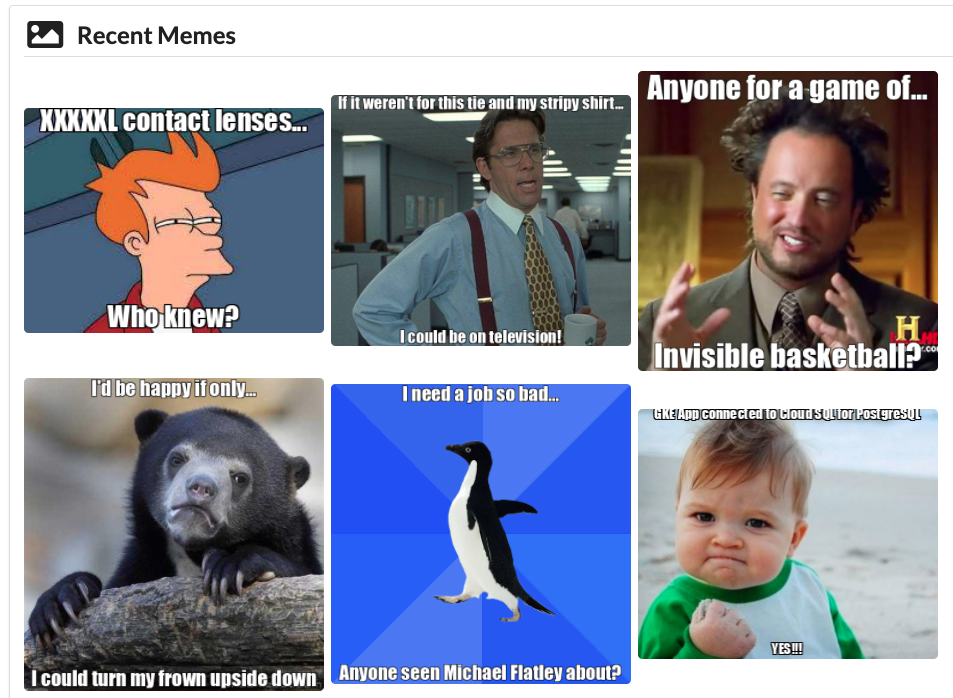
In this task you will examine the queries generated by the gMemegen application. You will need to generate some traffic by creating memes with the application and viewing them in the Recent and Random pages of the application.
Enable SQL Insights on your Cloud SQL for PostgreSQL instance
To complete this task you must enable SQL Insights on the Cloud SQL database.
-
In Cloud Console, navigate to Databases > SQL and select the
postgres-gmemegeninstance. -
In the Primary Instance menu, select Query Insights.
-
Click the Enable button.
-
In the Primary Instance > Query Insights page, in Top queries and tags, select the Tags tab.
-
Click Store application tags
Create and view some memes
In this step you will create at least four new memes and view them using the gMemegen application. The aim is to put the application through its paces, generating some sample data and utilizing all the routes available.
-
In the gMemegen application tab, navigate to the Home page and select an image.
-
In the new meme page, enter text in the top and bottom text boxes. You can make any memes that occur to you.
-
Click the Submit button. You will see your new meme rendered.
-
Navigate back using the browser's Back button.
-
Click the Recent menu item to view the recent memes you have created.
-
Click the Sorted menu item to view the memes sorted alphabetically by Top text.
-
Click the Random menu item to view a random meme. Close the
Randomtab in your browser. -
Click the Home menu item to return to the home page where you can create a new meme.
Run through points 1 to 8 above until you have created at least 4 new memes.
Examine the gMemegen application's database activity using SQL Insights
-
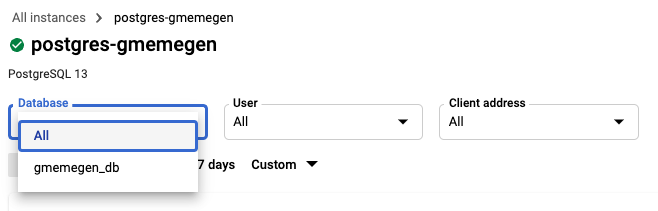
In the Primary Instance menu, navigate to Query Insights.
-
Open the drop-down menu in the Databases field and select
gmemegen_db. If you do not seegmemegen_dbin the list, refresh the page. It may take some time forgmemegen_dbto become available in the list. Generating more database traffic by performing more actions in thegMemegenapplication may help.
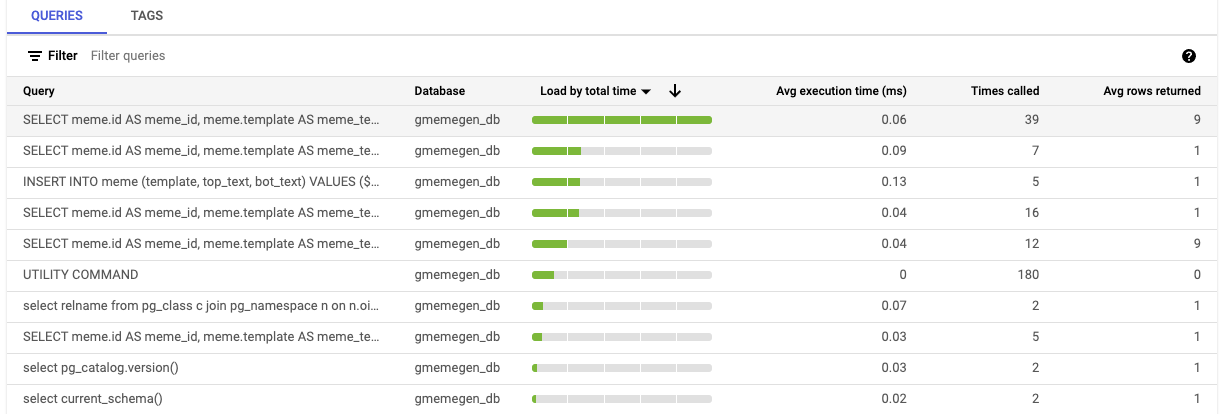
- Scroll down to
Top queries and tagsand note that queries generated by the gMemegen application are listed in the Queries tab.
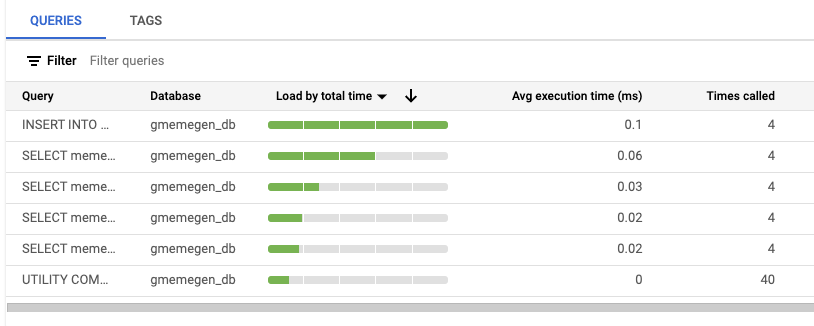
- Click on the Tags tab and note that there are no tags listed at this point in time.
SQL Insights is unable to differentiate the origins of the queries because they have no tags. There is a database developers' tool called SQLcommenter that can assist by appending comments to application queries, which will populate the tags in this view. This is very useful to developers and testers for tracing the source of application queries, to assist in debugging and optimisation.
You should make a note of the current time, so that you can compare results in SQL Insights before and after including the SQLcommenter library in the application code.
Click Check my progress to verify the objective.
Task 2. Enable SQLcommenter on a GKE application
In this task you will modify the gMemegen application to include the SQLcommenter library code which will annotate the application queries to make them more useful in SQL Insights.
Modify the gMemegen application and rebuild source code
In this step you will modify the main.py Python application code of the gMemegen app to enable SQLcommenter. The changes are already there in the code and only need to be uncommented, so this can be achieved with a simple sed command. You will also rebuild the application and store the new image in the Artifact Registry.
- In Cloud Shell, download the gMemegen application source code:
To enable SQLcommenter you will remove the comments from the following block of code in the gmemegen/app/main.py Python file to configure the application to add tags to queries using SQLcommenter.
- In Cloud Shell, to uncomment the gMemegen application code which enables SQLcommenter, run:
- In Cloud Shell, to identify the updated version, change the application's header template:
Build and push a new image to the Artifact Registry
In this step you will build the modifed application code and push the image to the Artifact Registry, labeled as version 2.
- Configure Docker authentication for the Artifact Registry:
export REGION={{{project_0.default_region | REGION}}} gcloud auth configure-docker ${REGION}-docker.pkg.dev
Enter Y if you are asked for confirmation.
-
Create the artifact repository:
export REPO=gmemegen gcloud artifacts repositories create $REPO \ --repository-format=docker --location=$REGION -
Build and push the new image to the Artifact Registry:
cd gmemegen export PROJECT_ID=$(gcloud config list --format 'value(core.project)') gcloud builds submit --tag ${REGION}-docker.pkg.dev/${PROJECT_ID}/gmemegen/gmemegen-app:v2
The build and push process will take a few minutes to complete. When it is done, the output should indicate a successful build as below.
Output:
Click Check my progress to verify the objective.
Task 3. Redeploy the gMemegen application
In this task, you will redeploy the modified gMemegen application. You will then be able to compare the queries from the two versions of the application using SQL Insights.
-
In Cloud Shell, to update the deployment YAML with your Project ID, Cloud SQL connection name and region, run:
export CLOUDSQL_INSTANCE=postgres-gmemegen export CONNECTION_NAME=$(gcloud sql instances describe $CLOUDSQL_INSTANCE --format 'value(connectionName)') sed -i "s/CONNECTION-NAME/${CONNECTION_NAME}/g" gmemegen_canary_deployment.yaml export PROJECT_ID=$(gcloud config list --format 'value(core.project)') sed -i "s/PROJECT-ID/${PROJECT_ID}/g" gmemegen_canary_deployment.yaml export REGION={{{project_0.default_region | REGION}}} sed -i "s/us-central1/${REGION}/g" gmemegen_canary_deployment.yaml -
In Cloud Shell, redeploy the application by running the following command:
-
In Cloud Shell, redeploy the Load Balancer, selecting
version 2.0of the app:sed -i "s/1.0/2.0/g" gmemegen-service.yaml kubectl apply -f gmemegen-service.yaml -
In Cloud Shell, check that the deployment was successful by running the following command:
Output:
You now have a new deployment of the gMemegen application running.
Click Check my progress to verify the objective.
Task 4. Review application queries in SQL Insights
In this task you will return to SQL Insights to review the database activity of the updated application, including SQLcommenter. You will first need to generate some more database activity by creating some memes using the new version of the app.
Create some new memes
In this step you will create new memes using the new version of the application deployed in Task 3. Notice that the application displays (SQLcommenter) next to its name in the menu bar, to show you that it's a new app.
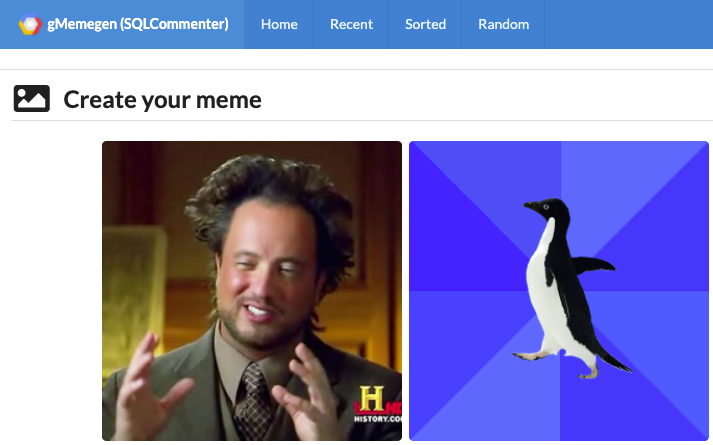
- Switch to the gMemegen application tab generate some database traffic by creating some new memes and clicking on the Recent and Sorted links a couple of times.
Review application queries in SQL Insights
In this step, you will review the queries from the newly deployed application, noting the tags inserted by SQLcommenter.
-
In the Cloud Console tab, on the Primary Instance > Query Insights page, in Top queries and tags, select the Tags tab.
-
Click the
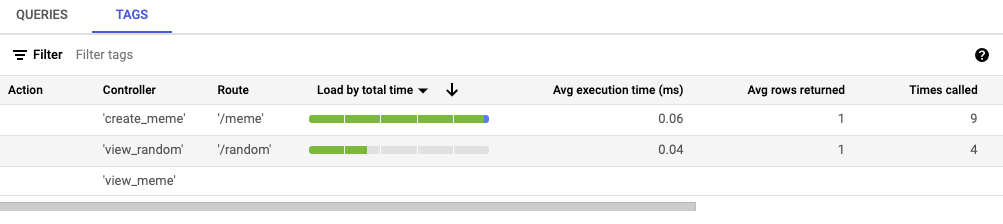
Load by total timecolumn name. This should refresh the list of tagged queries, showing all the recent queries that have been tagged by SQLcommenter.
Notice that the Controller, Route, DB Driver and Framework tags are now populated.
If you are unable to see this query in the Tags tab, then refresh the web page, click on the Tags tab, and click on the Load by total time column name again.

Identify a slow-running query in SQL Insights
In this step you will analyse the performance of the application queries to identify a slow-running query.
- In Cloud Console, on the Query Insights page, scroll down to
Top queries and tags.
-
Click on the Tags tab.
-
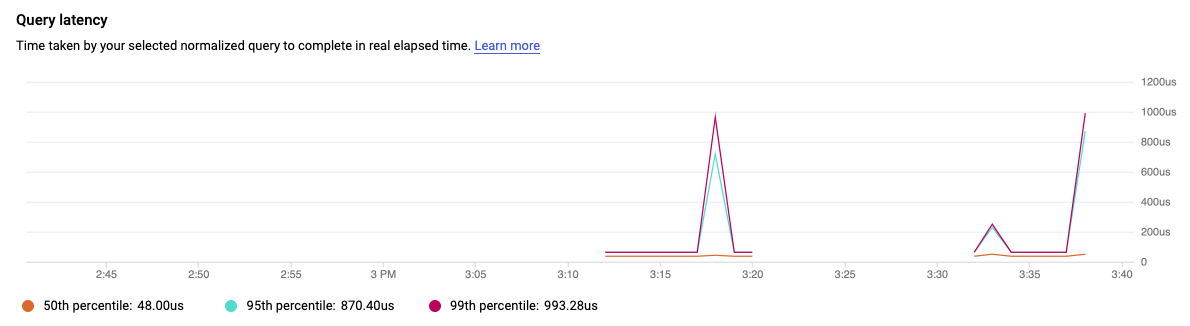
Select the tag with
/sortedin theRoutecolumn.
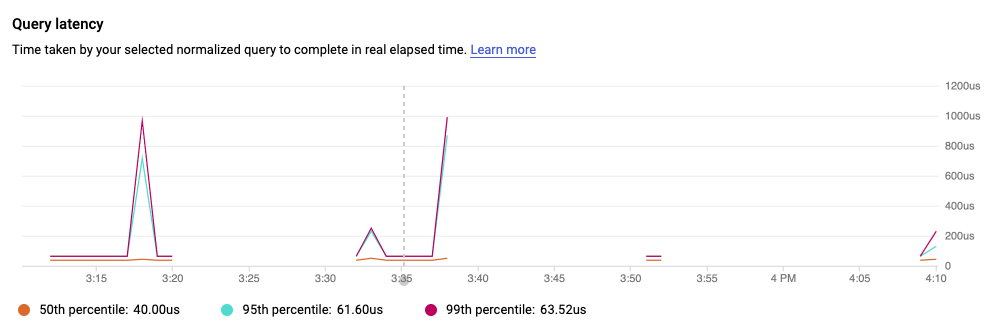
It should have the highest load, as indicated by the green bars, however with the relatively small amount of data in the lab this might not be the case. The Query latency graph in your lab will probably only show a few point entires but with additional data it will allows you to see queries that have high latency (P95 and P99) values.
-
Navigate back to the Top queries and tags view using the Back button in your browser. Alternately you can use the bread crumbs at the top of the Query Insights page, selecting the
postgres-gmemegeninstance. -
Select the
/recenttag in theRoutecolumn, which should have a slightly lower load and latency. Again, in your lab, this will show only point results that may not differ significantly from the/sortedroute.
These queries return around the same number of rows. Why is their performance different? The answer lies in the fact that the meme.id field is the primary key of the meme table, and is therefore indexed; while the meme.top_text field is not indexed, and therefore takes longer to run.
gmemegen_db database is very small, having only as many rows as you have generated through the UI for the duration of this lab, the difference in performance of these two routes may not be immediately obvious or even appreciable. In a production environment, the difference in performance of queries sorting on indexed and non-indexed fields will certainly be apparent.Task 5. Take actions to tune and optimize the database to enhance performance
In this task you will modify the gmemegen_db database to remedy the slow-running query identified in the previous task.
Add an index to the Cloud SQL for PostgreSQL database
In this step you will add an index to a database column to improve performance.
-
In Cloud Console, on the Primary Instance > Overview page, in the Connect to this instance section, click on Open Cloud Shell. A command will auto-populate the Cloud Shell console. Run it.
-
When prompted, enter the password
supersecret!. -
At the
postgres=>prompt in psql, run the following:\c gmemegen_db -
You will be prompted for the password again. Enter
supersecret!. -
At the
gmemegen_db=>prompt in psql, run the following:
- Open the gMemegen application tab and click the Sorted link a couple of times to generate some new queries.
Check the performance of the query
In this step you will check the performance of the slow-running query, now that an index has been added to the column on which it is sorting.
-
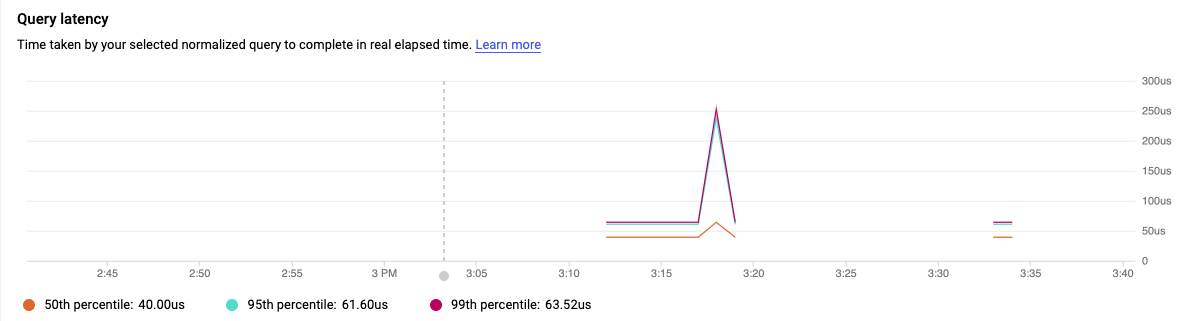
In Cloud Console, on the Primary Instance > Query Insights page, under Top queries and tags, on the Tags tab, select the
/sortedtag again. -
Scroll down to the Query latency graph and note the that the latency should now be reduced.
Click Check my progress to verify the objective.
You have completed this lab.
Congratulations!
Finish your quest
This self-paced lab is part of the Manage PostgreSQL Databases on Cloud SQL quest. A quest is a series of related labs that form a learning path. Completing this quest earns you a badge to recognize your achievement. You can make your badge or badges public and link to them in your online resume or social media account. Enroll in this quest and get immediate completion credit. Refer to the Google Cloud Skills Boost catalog for all available quests.
Manual Last Updated December 5, 2023
Lab Last Tested December 5, 2023
Copyright 2024 Google LLC All rights reserved. Google and the Google logo are trademarks of Google LLC. All other company and product names may be trademarks of the respective companies with which they are associated.