Checkpoints
Create the agent
/ 40
Restore the agent
/ 20
Set up a phone number for agent
/ 40
Dialogflow CX: Enable IVR Features for your Voice Agent
- GSP967
- Overview
- Prerequisites
- Setup and requirements
- Task 1. Create your Dialogflow CX agent
- Task 2. Restore the base Flight booker agent
- Task 3. Review the base Agent
- Task 4. Enable IVR features
- Task 5. Handling error scenarios
- Task 6. Add SSML support to your agent
- Task 7. Optional: Testing the agent with Dialogflow CX phone gateway
- Task 8. Set up a phone gateway
- Task 9. (Optional) Exporting your agent
- Congratulations!
GSP967

Overview
Dialogflow CX provides a simple, visual bot building approach to virtual agent design. For a full voice experience, your Dialogflow CX Agent can be integrated with various conversational platforms, including telephony providers. In this lab, you'll explore these Interactive Voice Response (IVR) features as well as two additional features - conversation repair and Speech Synthesis Markup Language (SSML) - that help end users feel as though they're having a natural, interactive, and cooperative conversation.
This lab will show you how to enable various IVR features, but you will only be able to test some of them with the Dialogflow CX Phone Gateway. Features like DTMF (Dual-Tone Multi-Frequency) and Barge-in (where the user can interrupt the bot) are not supported in Dialogflow Telephony and can only be tested with your telephony provider.
In this lab you will continue building a conversational agent, exploring and adding the IVR features that Dialogflow CX provides.
Voice and telephony features such as DTMF, Barge-in, and End of speech sensitivity (so the bot can accommodate for pauses in a phrase, such as a number or ID) can all be configured in Dialogflow CX.
Conversation repair is the practice of fixing misunderstandings, mishearings, and misarticulations to resume a conversation. Repairing a conversation can help build a user's trust by showing that the voice agent is listening to their request. Situations where conversations might fail are handled in a more graceful manner, such as when a voice agent cannot find an intent using the NoMatch event, or when the agent detects no verbal response using the NoInput event feature. You'll configure these events to rephrase a prompt up to a maximum of 3 times and then escalate to a live agent to avoid trapping users in a loop of handling errors.
SSML - Speech Synthesis Markup Language helps make the Text-to-Speech voice interaction sound more natural.
To do this work efficiently you'll restore a provided agent. This agent will have 2 new pages and an additional intent that will jumpstart your exploration of the new conversational features.
In this lab you will do the following
- Enable and configure IVR features
- Add in NoMatch and NoInput handling scenarios to escalate to an Agent
- Add in rich voice responses with SSML
Prerequisites
Students should be generally familiar with the basic concepts of conversational AI. Before you start the lab, read through these Sample Transcripts to get an idea of what client transcripts might look like. Often the first step in creating an agent is to read through client transcripts and/or other contextual data to understand the use case and specific business requirements.
This Lab builds upon the basic Flight Booker agent developed in Dialogflow CX: Bot Building Basics. Instructions to restore the previously built Flight Booker agent are described in the next section.
Setup and requirements
Before you click the Start Lab button
Read these instructions. Labs are timed and you cannot pause them. The timer, which starts when you click Start Lab, shows how long Google Cloud resources will be made available to you.
This hands-on lab lets you do the lab activities yourself in a real cloud environment, not in a simulation or demo environment. It does so by giving you new, temporary credentials that you use to sign in and access Google Cloud for the duration of the lab.
To complete this lab, you need:
- Access to a standard internet browser (Chrome browser recommended).
- Time to complete the lab---remember, once you start, you cannot pause a lab.
How to start your lab and sign in to the Google Cloud console
-
Click the Start Lab button. If you need to pay for the lab, a pop-up opens for you to select your payment method. On the left is the Lab Details panel with the following:
- The Open Google Cloud console button
- Time remaining
- The temporary credentials that you must use for this lab
- Other information, if needed, to step through this lab
-
Click Open Google Cloud console (or right-click and select Open Link in Incognito Window if you are running the Chrome browser).
The lab spins up resources, and then opens another tab that shows the Sign in page.
Tip: Arrange the tabs in separate windows, side-by-side.
Note: If you see the Choose an account dialog, click Use Another Account. -
If necessary, copy the Username below and paste it into the Sign in dialog.
{{{user_0.username | "Username"}}} You can also find the Username in the Lab Details panel.
-
Click Next.
-
Copy the Password below and paste it into the Welcome dialog.
{{{user_0.password | "Password"}}} You can also find the Password in the Lab Details panel.
-
Click Next.
Important: You must use the credentials the lab provides you. Do not use your Google Cloud account credentials. Note: Using your own Google Cloud account for this lab may incur extra charges. -
Click through the subsequent pages:
- Accept the terms and conditions.
- Do not add recovery options or two-factor authentication (because this is a temporary account).
- Do not sign up for free trials.
After a few moments, the Google Cloud console opens in this tab.

Enable the Dialogflow API
-
In the console search field, type in "Dialogflow API".
-
Select the Dialogflow API tile.
-
Click the Enable button.
Task 1. Create your Dialogflow CX agent
-
Navigate to the Dialogflow CX console, then select your Cloud Project name. Your Cloud Project name should match your Project ID for your lab like: qwiklabs-gcp-xx-xxxxxxxxxxx.
-
Select Create agent. If you do not see this page, refresh your browser.
-
When prompted, Get started with Dialogflow CX, click Build your own.
-
Call your agent "Flight Booker". Create your agent in the Global region. Google Dialogflow CX Phone Gateway currently only supports agents created in the Global region.
-
After creating the agent, navigate to Agent Settings > General > Logging settings and check the boxes next to Enable Cloud Logging option. It will generate logs for this agent.
-
Click Save.
Click Check my progress to verify the objective.
Task 2. Restore the base Flight booker agent
-
Download the sample virtual agent, gsp967-start-agent, to your local hard drive.
-
Select View all agents in the Agent dropdown menu at the top of the Dialogflow CX UI.
-
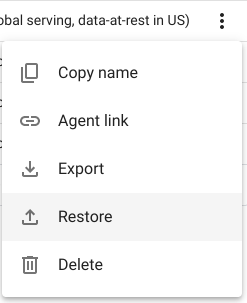
Click the context menu (three vertical dots) to the right of your virtual agent.
-
Select Restore from the expanded menu options.
-
Select the Upload radio button.
-
Click on select file and select the file we downloaded earlier then, click Restore.
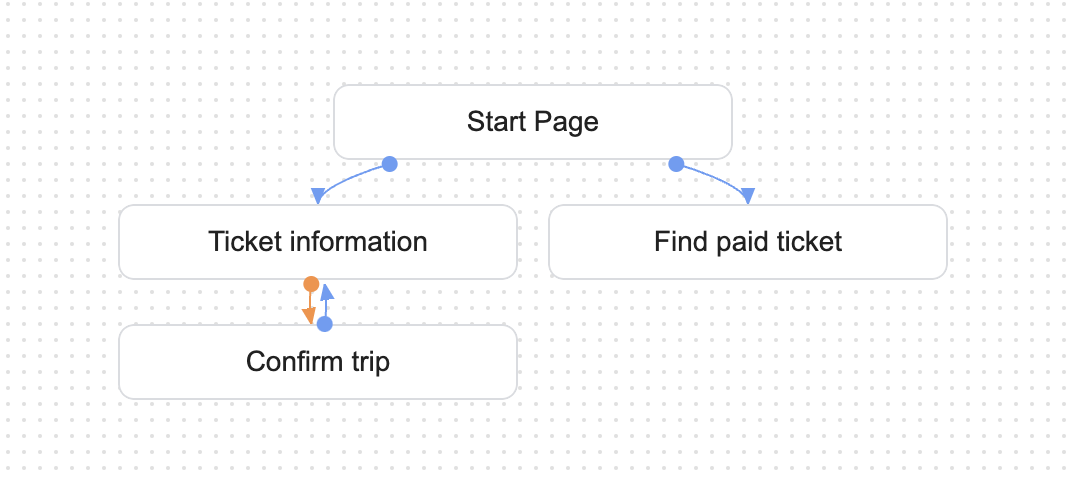
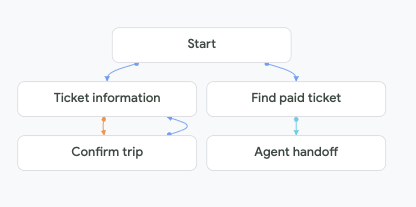
Your agent should now look like this:
Click Check my progress to verify the objective.
Task 3. Review the base Agent
The base Agent you restored has a few items to jumpstart your IVR exploration. Take a quick review of what the agent can do before enabling IVR and other features.
Look up Flight intent
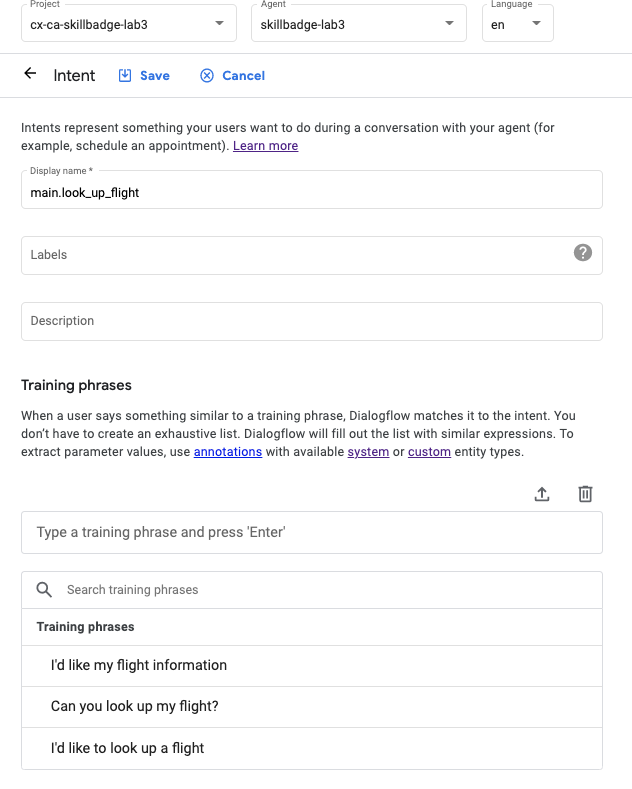
An intent called main.look_up_flight will be used to check for an existing reservation.
- To view this Intent, select the Manage tab, then the Intents list on the left menu. This Intent has a few training phrases to indicate that the user wants to look up existing Flight information.
This Intent will direct to the Find paid ticket page.
Find paid ticket page
- Navigate to the Build tab. The Visual Builder shows the Start page connected to the Find paid ticket page.
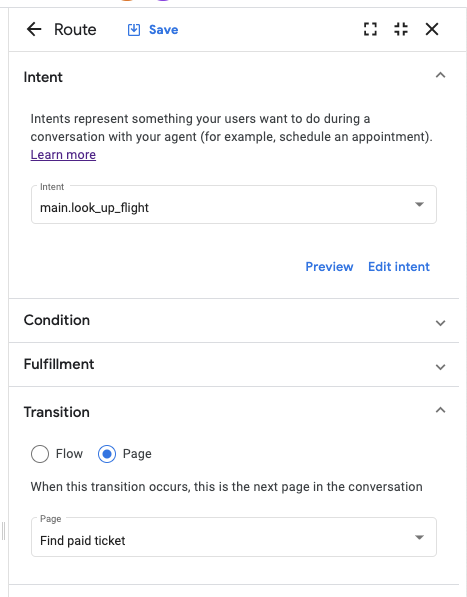
- Select the Start page to see that a new Route has been added using the
main.look_up_flightIntent.

- Select the Route main.look_up_flight to see that this Intent routes to Find paid ticket page in the Transition section.
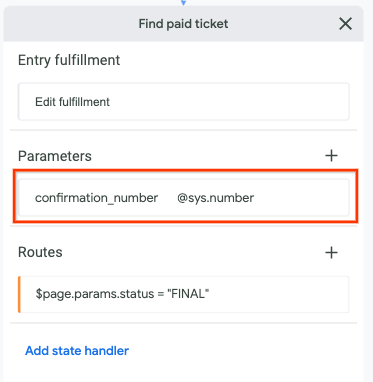
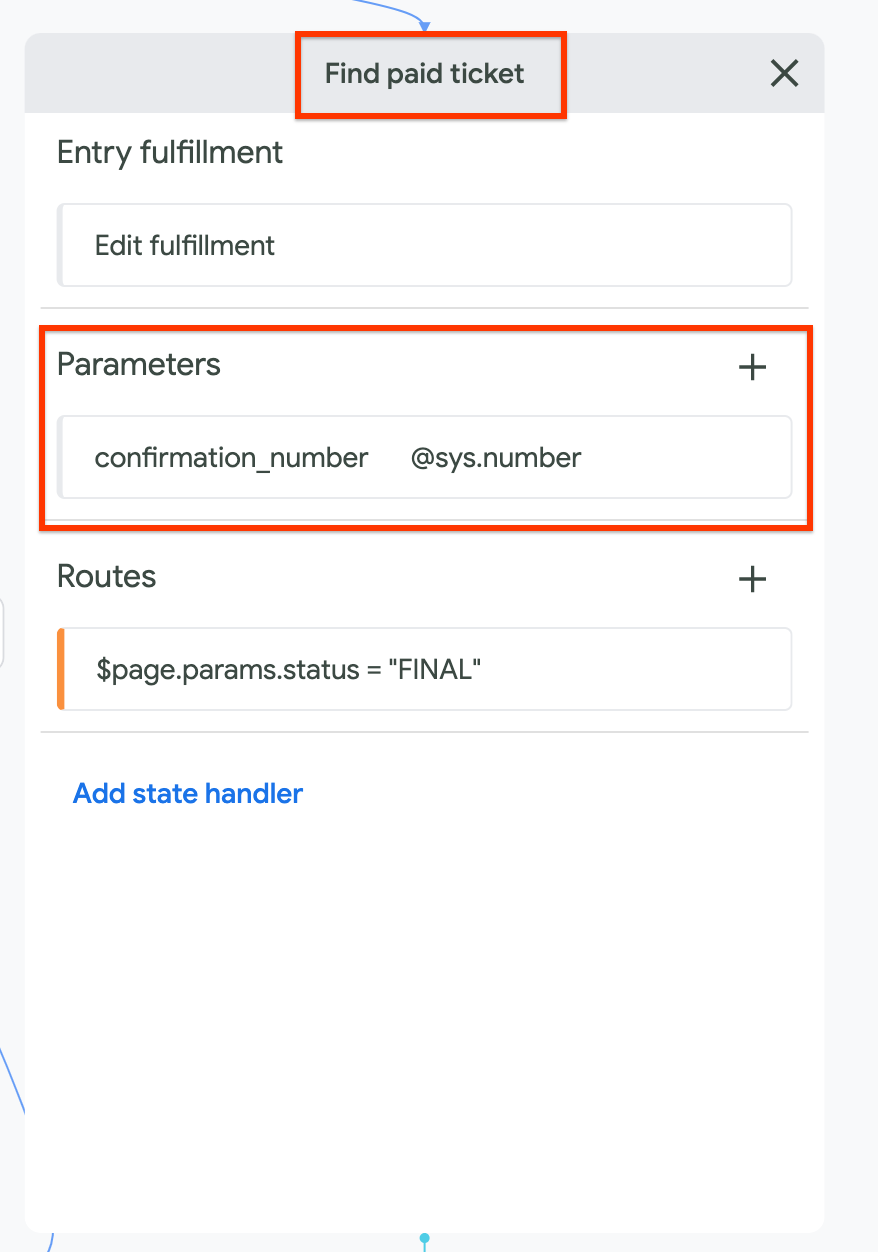
- Explore the configuration of the Find paid ticket page - it will look up a confirmation number by collecting a required confirmation number and then provide a mock response of the flight details.
To do this, a parameter has been added, as well as a route, to validate that all the parameters have been captured.
Confirmation Number Parameter
- Select the Find paid ticket page and notice that the base agent already has a parameter named confirmation_number.
-
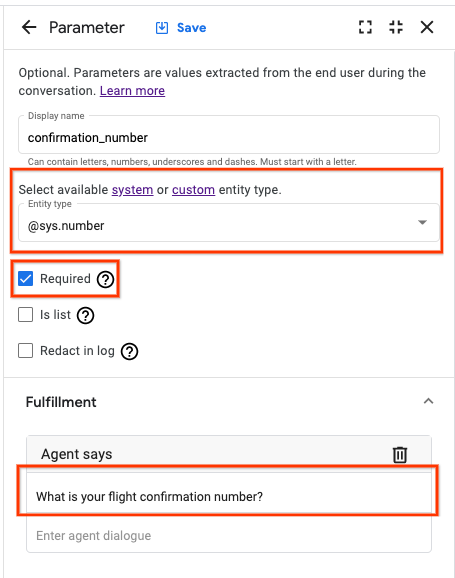
Select the confirmation_number parameter to see that its configuration has the following:
- Display name: confirmation_number
- Entity type: @sys.number
- The Required checkbox checked
- In the Fulfillment section, the Agent asks
What is your flight confirmation number?
- Now look how the parameter is handled once it's been gathered - the response with a mock reservation number.
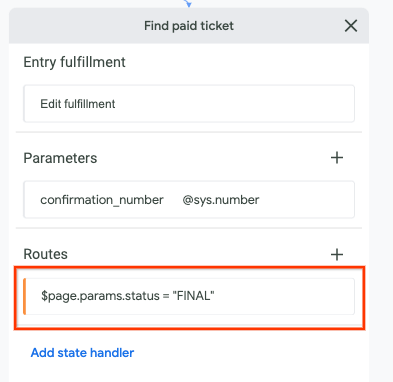
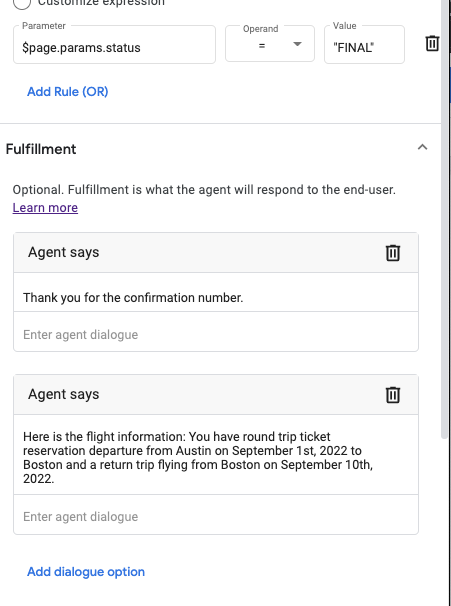
Route on collected parameter
- From the Find paid ticket page, select the new route named
$page.params.status = "FINAL"
- In the Condition section:
- Match At Least One rule option is selected.
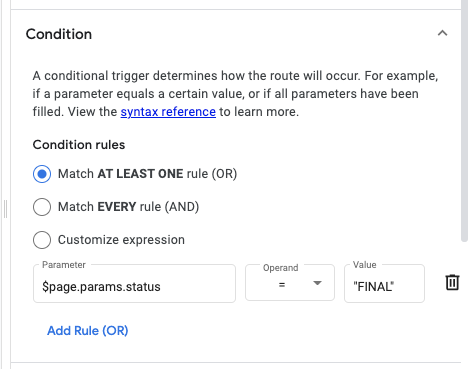
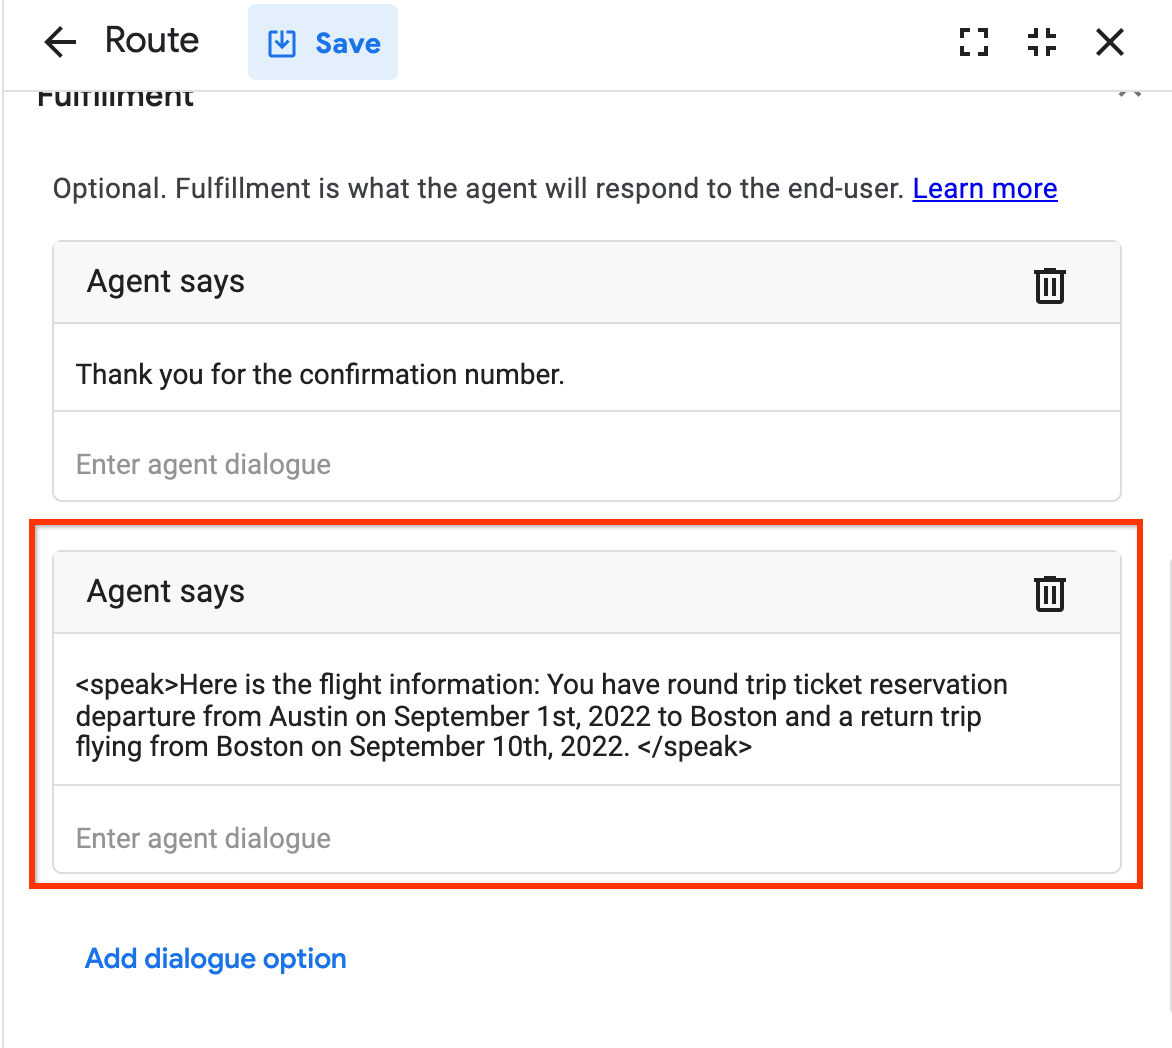
For this lab, in the Fulfillment section of this Route, the Agent says will only have two responses to be returned.
First, a response that thanks the user for the confirmation number. Second, a mock response of the result of a flight information lookup.
In a production scenario where there is an existing datasource of flights, you'd configure a Webhook in Dialogflow CX to connect to that backend system which stores flight information to retrieve the appropriate data. Creating a webhook and configuring it for this Page is outside the scope of this lab.
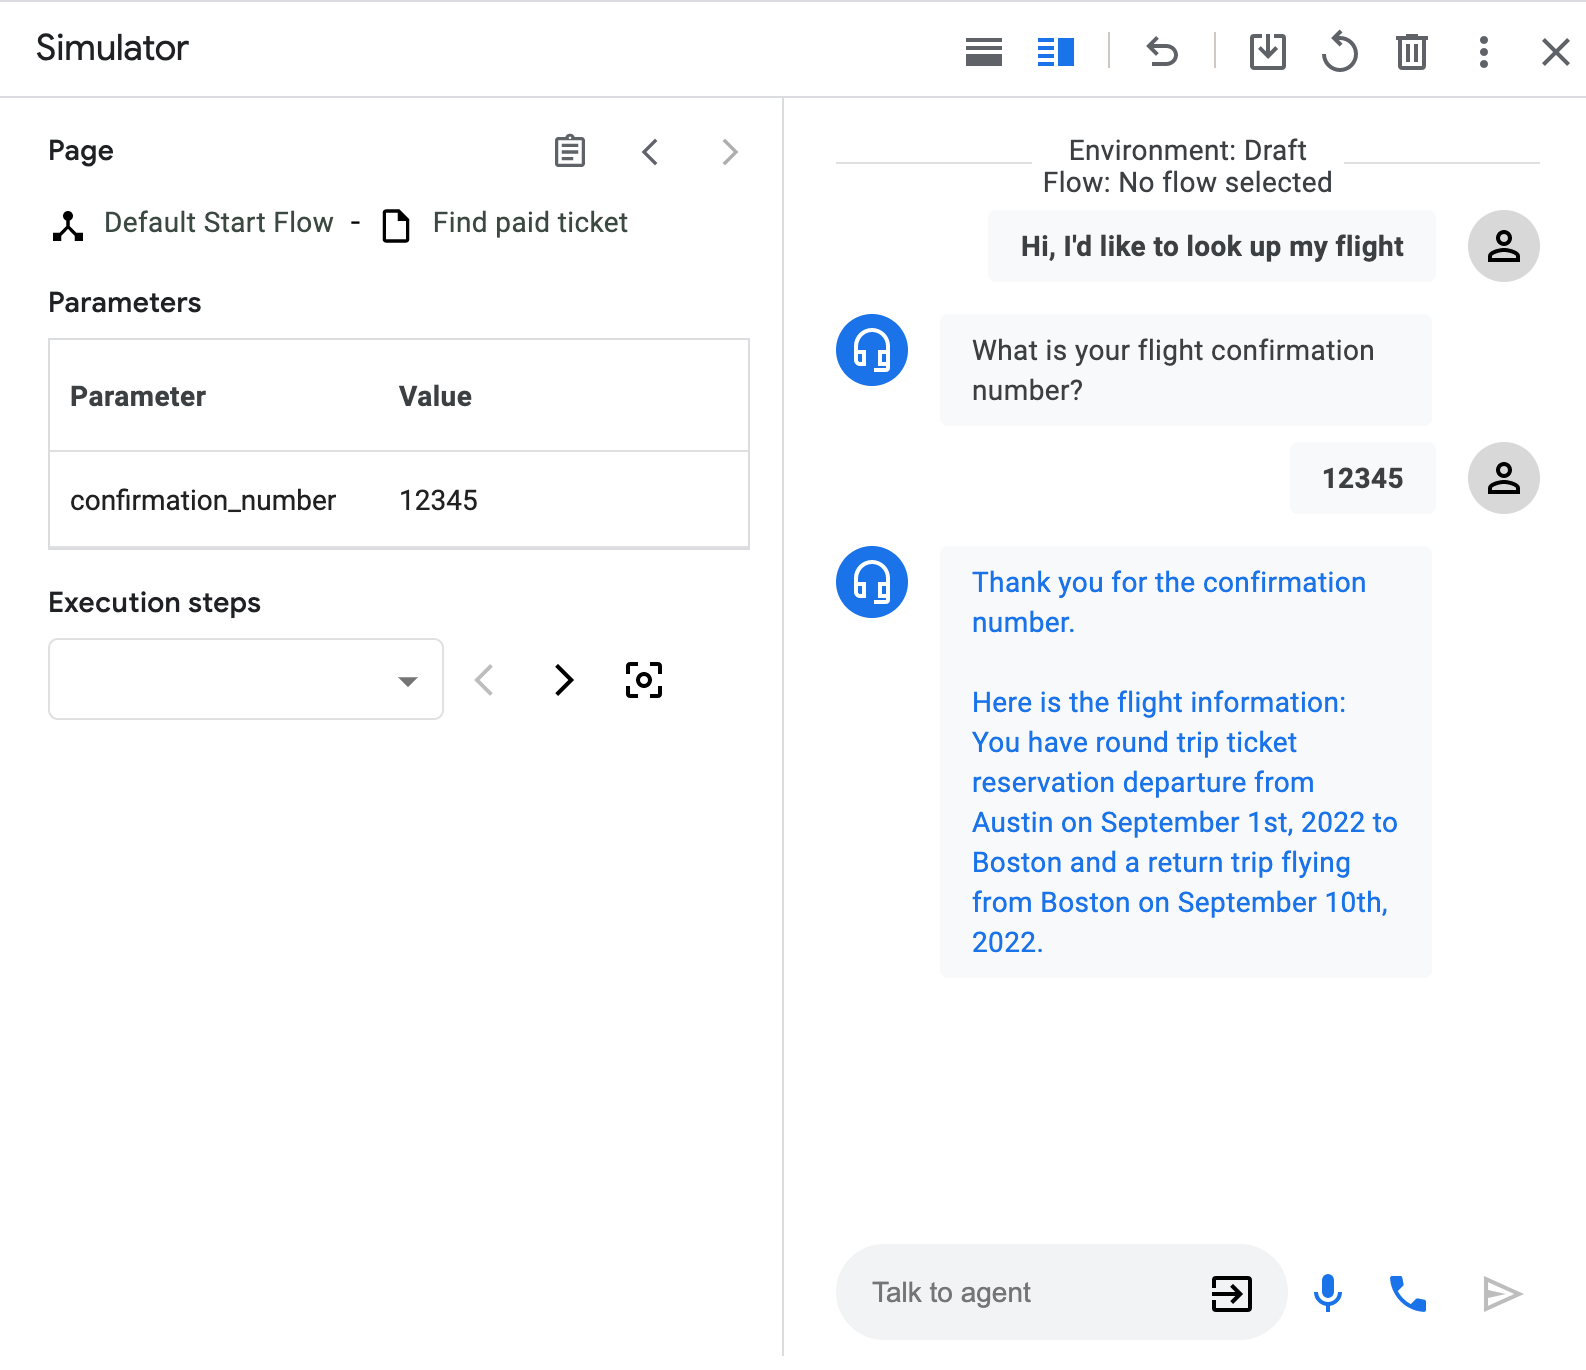
Now, test this agent to see what the user should expect so far.
-
Open the Simulator by selecting the Test Agent button at the upper right of the Dialgoflow console.
-
Enter a phrase like
I'd like to look up my flightand then a number, such as12345.
You should receive two sentences, a thank you and the mock flight lookup.
Great! Now you're all set to configure IVR and other features!
Task 4. Enable IVR features
The Speech and IVR Settings in Dialogflow can be enabled at three different levels: Agent level, Flow level and Page level.
To enable the settings at different levels, the Agent level settings have to be enabled first. You'll do this in the next section.
The Agent level settings have three features to point out for Speech and IVR:
-
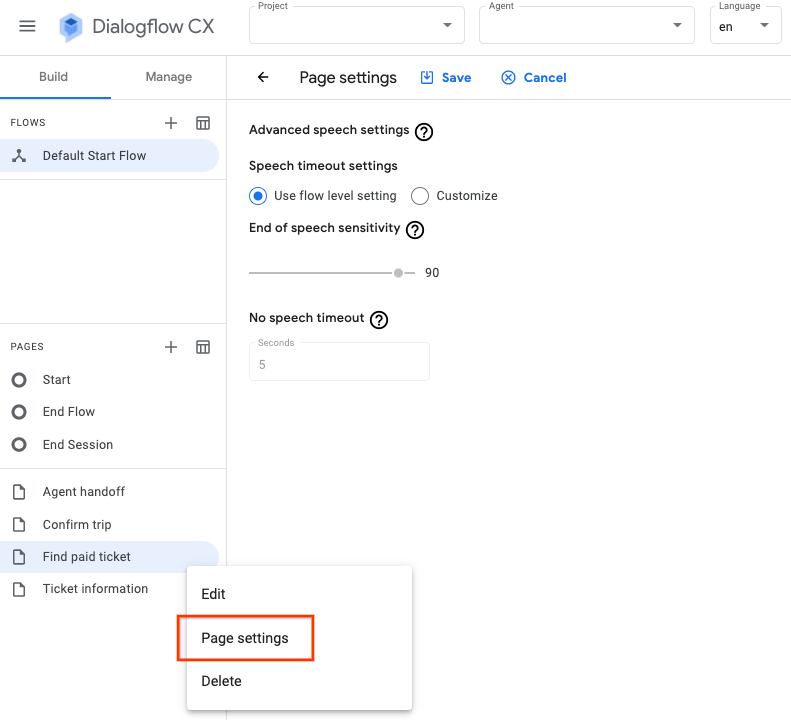
End of speech sensitivity: helps determine how sensitive the speech endpointing should be when the caller finishes speaking, and it uses Google Cloud Speech.
-
Barge-in: allows a speaker to interrupt the agent. This is helpful so that the caller doesn't have to wait to hear the full response from the agent in order to speak. Another way to understand this is, if Barge-in is disabled, the agent will only begin to listen to the user once the agent itself has finished playing its response.
-
Google Cloud Storage URI: enables you to reference a path to access pre-recorded audio for playback.
After enabling IVR settings at the Agent level, you can customize IVR settings on a per Flow level and at the Page level. Enabling settings at the Flow level overrides the default Agent level IVR settings. This is important if you want to have different settings per Flow in a multi-flow Agent.
How you use Flow and Page level IVR settings depends on your use case. For example, if the user is dictating a number, the user will benefit from extending the timeout period so they're not cut off by the Agent at the Page level where this input occurs. If the user stays silent, because they may be searching for their flight number, this will allow the agent to help the user further by prompting on where to get that account number.
Agent level Speech and IVR settings are from Agent Settings.
Flow level IVR settings are available from the Flows list and the three dots that show a context menu.
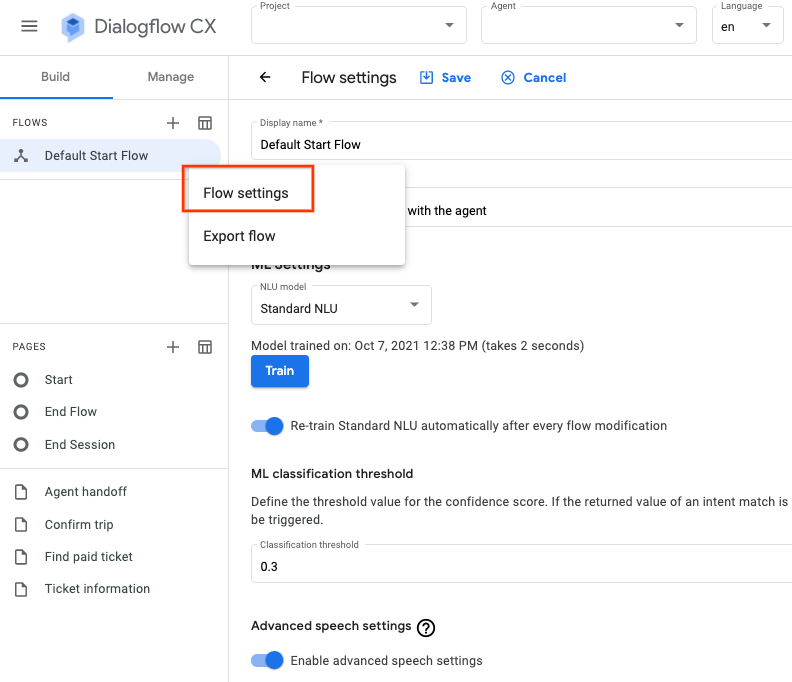
Page level IVR settings are available from the Pages list on the left of the console, also via the Page name's context menu.
Start with enabling the Agent level Speech and IVR settings first in the Agent Settings.
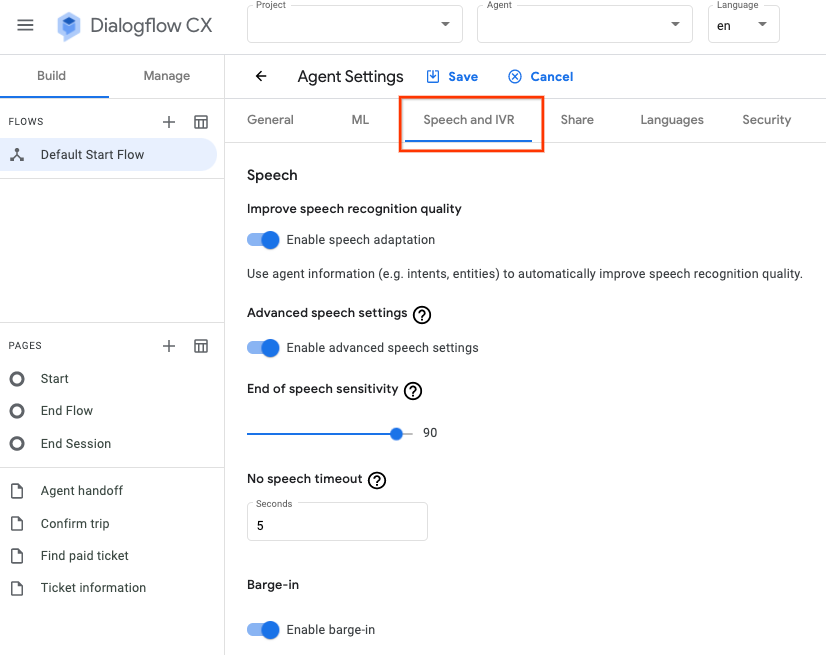
Enable Agent Settings
-
Click on Agent Settings in the upper right.
-
Click the Speech and IVR tab.
-
Check the box to enable each of the following:
-
Enable auto speech adaptation
-
Enable advanced speech settings
-
Enable barge-in
-

- Click Save.
Enable DTMF
Dual-Tone Multi-Frequency (DTMF) allows users to use the keypad on their phone to provide a response instead of using their voice. There are two types of DTMF implementations: Single-digit DTMF and Multi-digit DTMF. The Single-digit DTMF collects only one digit from a user response, while Multi-digit collects multiple digits in a response. In this lab, you will learn how to implement a multi-digit DTMF for collecting flight confirmation numbers.
-
Go to Find paid ticket Page and click on the Parameter confirmation_number.
-
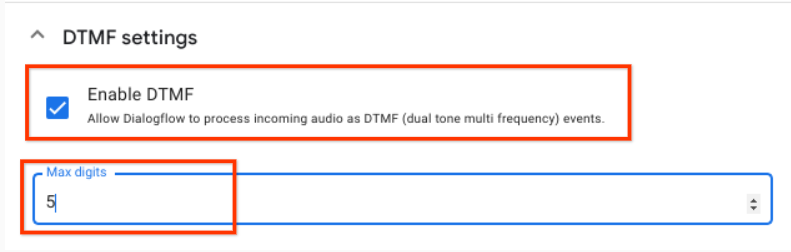
Scroll down to the DTMF settings and check the box to Enable DTMF. For now, assume the confirmation number is usually a 5 digit number such as "12345".
Set the Max digits to 5. You will not set a finish digit for this lab, but you should consider setting a finish digit for a production virtual agent as a sign that the user has finished entering digits - silence does not always mean that the user has finished typing. Also, a webhook is usually implemented to validate the numbers to make sure the user input matches the expected value in the customer database.
-
Click Save.
-
Close the Find paid ticket page.
You will not be able to test this feature in the simulator.
Knowledge check
Enable/disable Barge-in
Barge-in allows users to interrupt an agent in the middle of a response. This helps the user to move along the flow faster, if they are not interested in the content that the agent is providing.
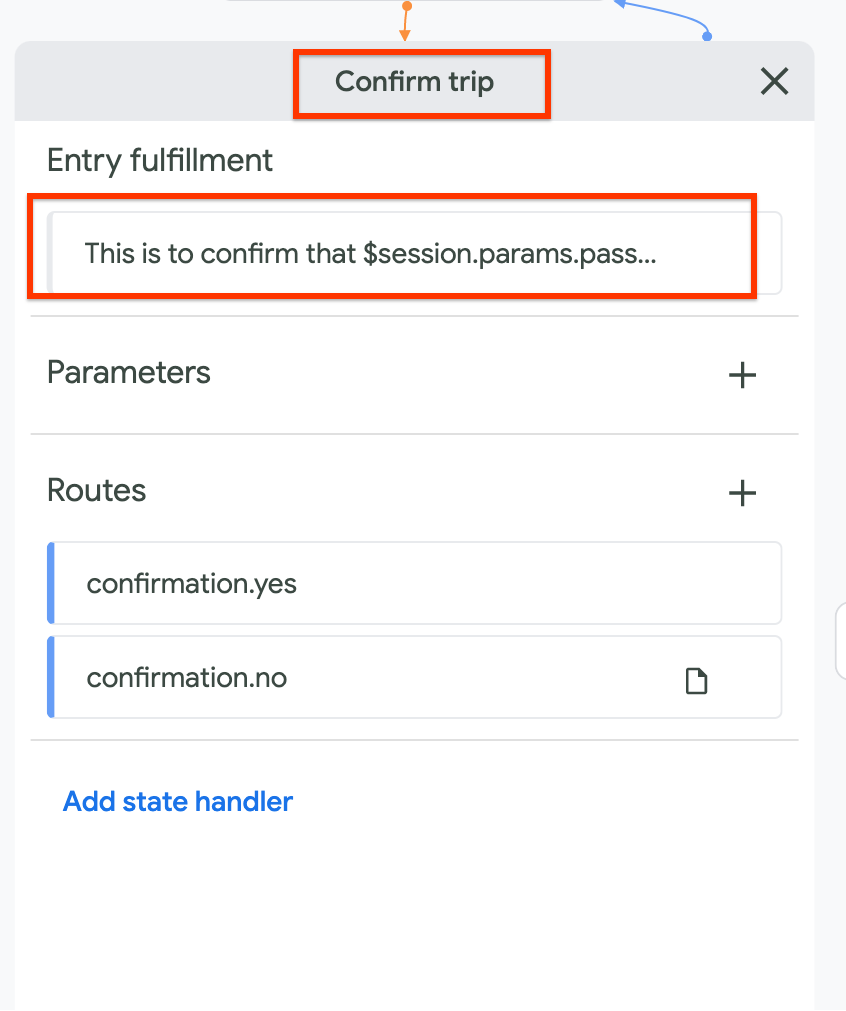
Barge-in can be enabled through the Advanced Settings on the agent level settings, flow level settings and page level settings. Since you already enabled Barge-in at the agent level, you do not need to enable barge-in everywhere else in the agent. You can disable barge-in on the pages where you do not want users to skip for certain important information. For this lab, you'll disable the barge-in on the Confirm trip page.
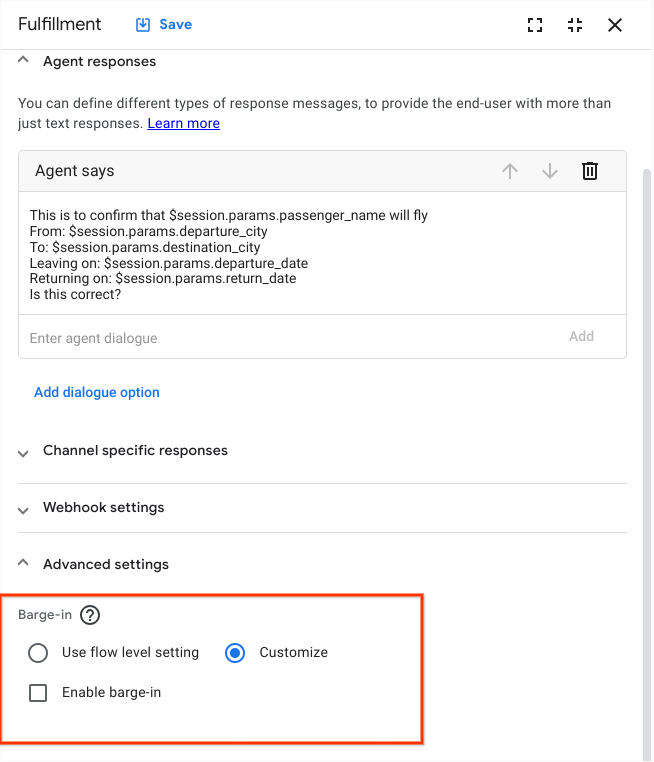
- Click on the Confirm trip page, then click on the entry fulfillment.
-
On the Fulfillment page, scroll down to Advanced settings and find Barge-in. Since this fulfillment provides the key information for the passenger who books the flight ticket, you do not want users to exit the flow in the middle of this response. Deselect the Enable barge-in option here by clicking Customize, which overrides the flow level barge-in setting.
-
Click Save.
-
Close the Confirm trip page.
Knowledge Check
Task 5. Handling error scenarios
To improve the user experience for callers with a voice agent, it's important to have a graceful way to handle conditions where the agent may have misunderstood, misheard, or is unable to collect the expected information - this is called conversation repair. Repairing a conversation can help build trust with the user by showing that the voice agent is listening to the request and attempting to understand.
Common conversation failures include inability to detect a verbal response from the user and the inability to match the intent of the user. In these cases, you'll implement the built-in events NoInput and NoMatch, respectively, to handle these, as well as make sure you're not stuck in an error loop by escalating to an Agent Handoff page after 3 errors.
Dialogflow CX has built-in events for NoInput and NoMatch that are available at the flow, page, and parameter levels. Additionally, there are up to 6 numerically ordered events, such as sys.no-match-1, sys.no-match-2, etc., where you will be able to decide on the number of attempts that users can make for each type of event and create customized agent responses.
- Flow-level event handlers apply to a whole Flow and are useful in the case where there are broad event requirements that need to be fulfilled when using a Flow, such as transitioning from one Flow to another.
- Page-level event handlers apply when there are unexpected end-user inputs or other errors in transitioning between Pages.
- Parameter-level event handlers are useful within a Page when capturing a single or a series of parameters that are needed.
This lab will focus on Parameter-level events around capturing the ticket confirmation number.
Handling silence/noise with NoInput
Sometimes, especially in a voice scenario, the end user might not say a confirmation number quickly enough, or there is a long silence. Also, background noise or static that is not recognized as any text is considered as no-input instead of no-match.
When the Agent registers this as a NoInput event, the built-in feature of Dialogflow can gracefully handle this and keep the user engaged and move along the flow.
State Handler events, such as NoInput and NoMatch can be added at a variety of levels, at the Flow, on the Page itself, and also on specific Parameters.
For this exercise, you'll add the No-Input and No-Match events to the ticket confirmation number parameter.
-
Open the Find paid ticket page and open the Parameter confirmation_number.
-
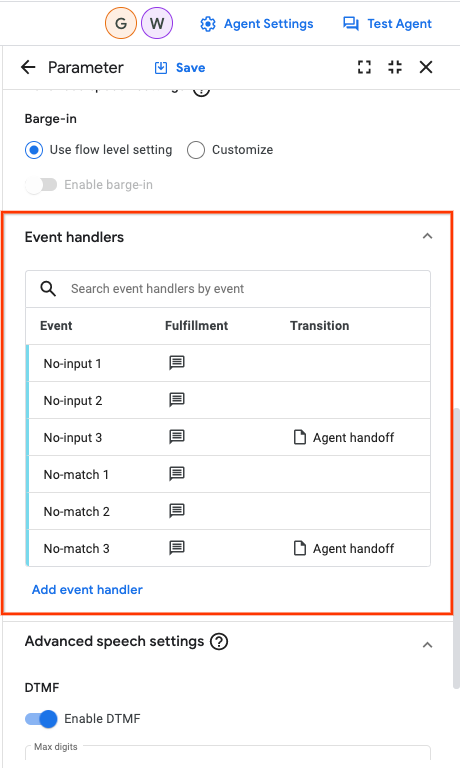
Scroll to the Reprompt Event handlers section of the Parameter and click the Add event handler link.
-
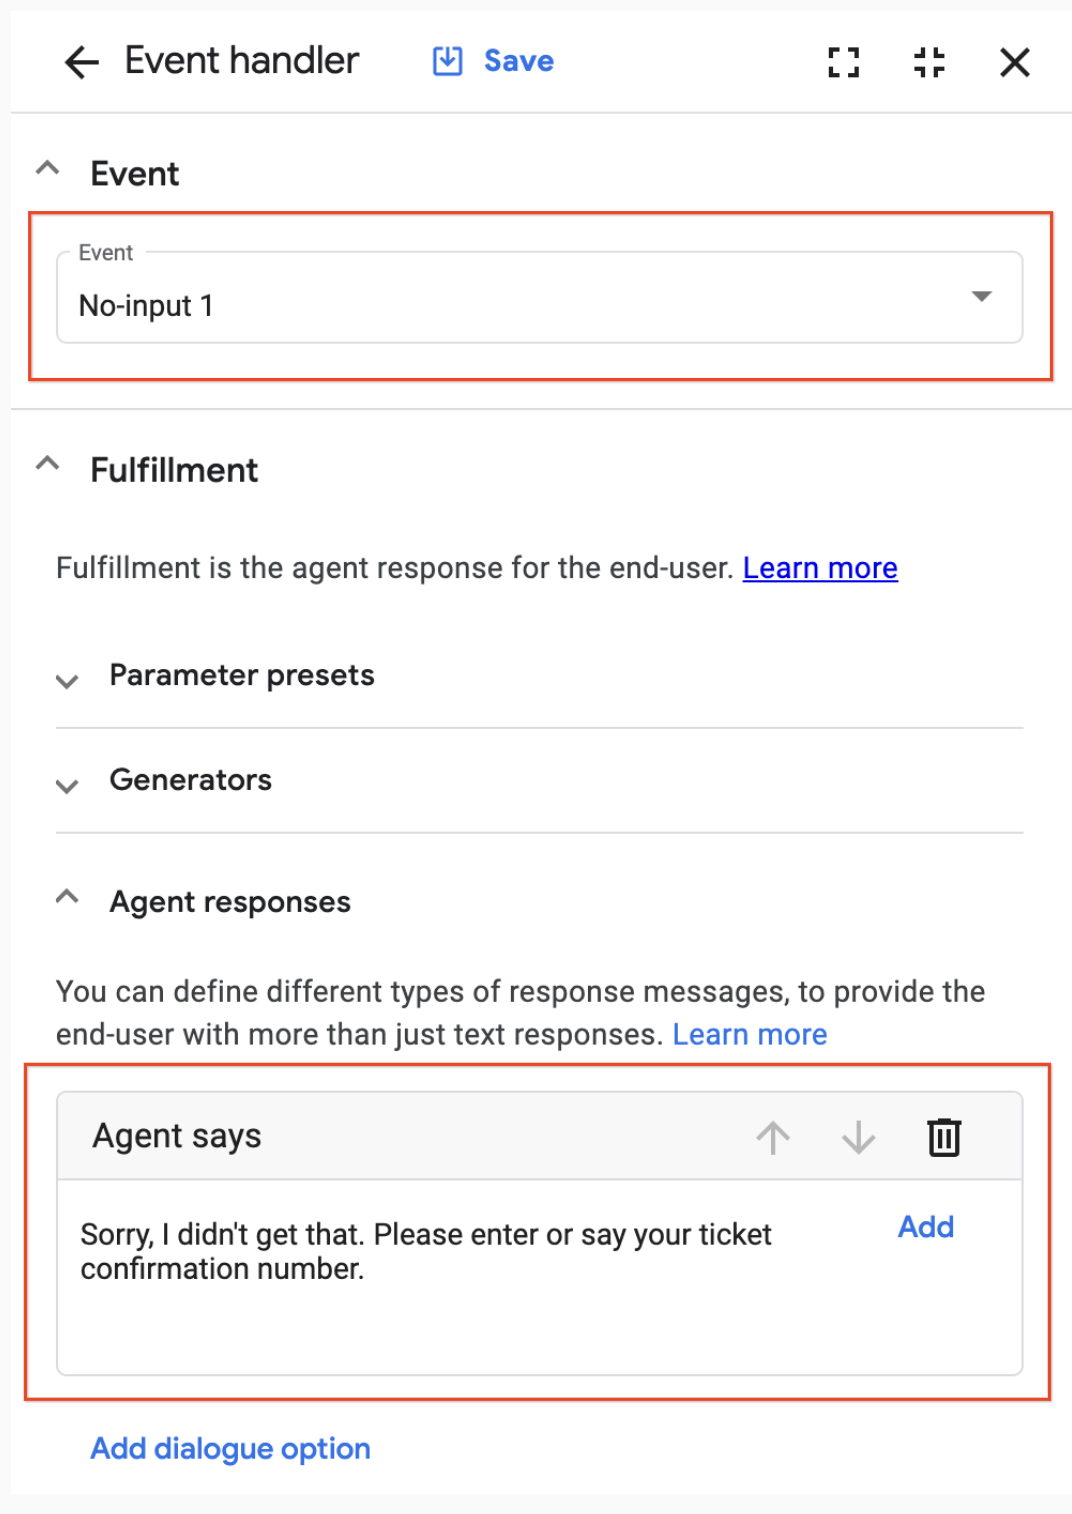
In the Event dropdown menu, select No-input 1.
-
In the Fulfillment section, in the Agent response, add the text
Sorry, I didn't get that. Please enter or say your ticket confirmation number. -
Click Save to save this Event.
-
Repeat above steps with the following to set up two more events.
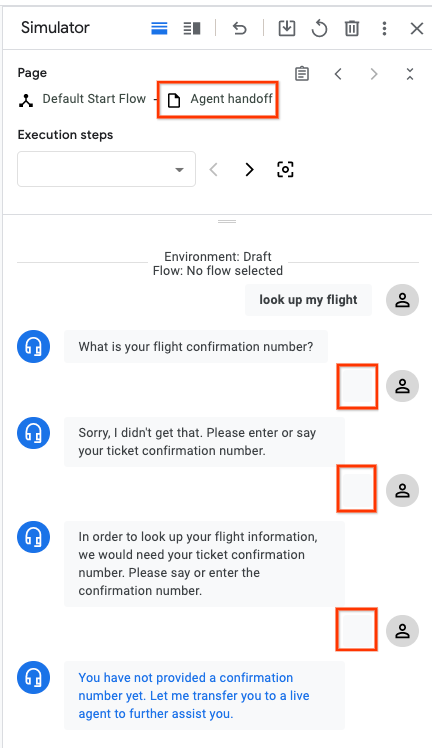
Event Fulfillment Transition No-input 2 In order to look up your flight information, we would need your ticket confirmation number. Please say or enter the confirmation number. No-input 3 You have not provided a confirmation number yet. Let me transfer you to a live agent to further assist you. Agent handoff -
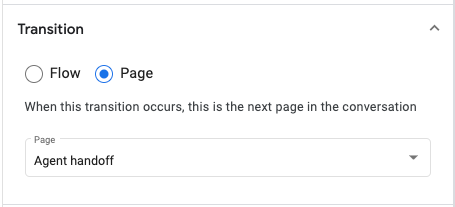
On the third, No-input 3, scroll down to the Transition section and configure the Transition to a new Page called Agent handoff.
-
Click Save. Close the Event handler and Find paid ticket pages.
Your agent should now look like this
-
Test this by opening up the simulator via the Test Agent button, located at the upper right of the Dialogflow CX console.

-
Type in a request for flight information, such as "I'd like to look up my flight information". When the agent asks for a confirmation number, instead of entering anything, press Enter a few times to simulate no input by the user.
You'll see that the Agent has transitioned to the Agent handoff page after three no inputs:
Knowledge Check
Select if the following statement is true or false:
Handling unrecognized input with No-Match
Add NoMatch events in the case that there's input received, but the agent is unable to match the confirmation_number parameter.
-
From the Find paid ticket's Page, in the Parameter confirmation_number's panel, add 3 new events, with the third No-match 3 transitioning to the Agent handoff page.
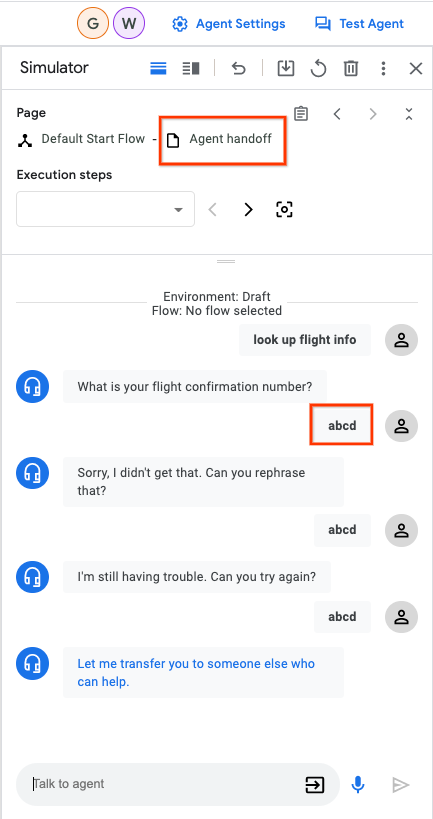
Event Fulfillment Transition No-match 1 Sorry, I didn't get that. Can you rephrase that? No-match 2 I'm still having trouble. Can you try again? No-match 3 Let me transfer you to someone else who can help. Agent handoff Your screen should look like this:
-
Test this by opening the simulator (Test Agent button) and asking the Agent to look up flight information. Since you defined the flight number as a
@sys.number, the Agent will be expecting all numbers. If you respond to the Agent with letters, that'll be registered as a NoMatch. After three attempts, you'll see the NoMatch handler transition to the Agent handoff page.
Knowledge Check
Select if the following statement is true or false:
A note on Agent Handoff
For this example we've added a page called Agent handoff which is used as the destination for the expected transfer to a live agent in the case this virtual agent is unable to detect a response or determine the correct confirmation number.
For this lab, while there is no target destination for a live agent, you can see where this would be configured. Dialgoflow CX provides a Fulfillment type that can be used to signal to the telephony or chat client to perform the required transfer.
-
To see where this is located, open the Agent handoff page and select the Entry fulfillment.
-
Select Live agent handoff from the Add dialogue option dropdown.
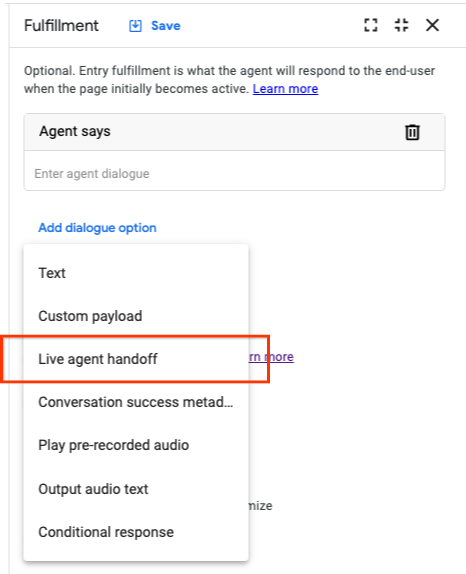
This will result in an area to provide a custom JSON message.
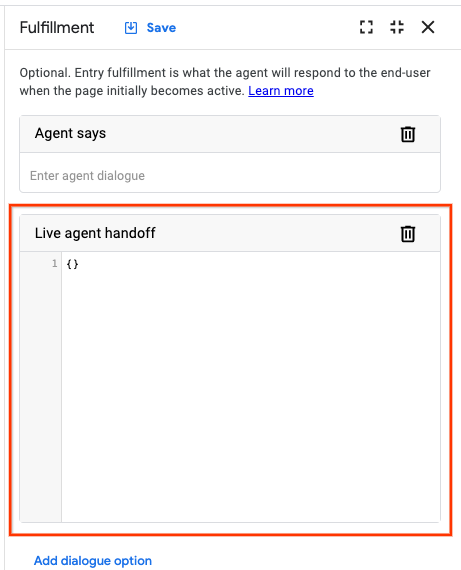
Every target live agent system is different. Refer to the system's documentation as to what message format will be necessary to add to provide the proper communication parameters.
As an example, if you're using Business Messages, the format that you'd enter here would look something like this:
Please check the Business Messages documentation for the precise JSON message.
For more information on Business Messages live agent handoff formats, see Handoff from bot to live agent.
Task 6. Add SSML support to your agent
Speech Synthesis Markup Language (SSML) enables you to customize your audio responses by providing details on pauses, audio formatting for numbers, dates, or text. This allows for your agent to have a more natural conversation.
<speak>is the root element of SSML response. Without this element, your text cannot talk. Implement them on the Find paid ticket page.
-
From the Find paid ticket page, click on the $page.params.status="FINAL" route and scroll down to the fulfillment.
-
Add the
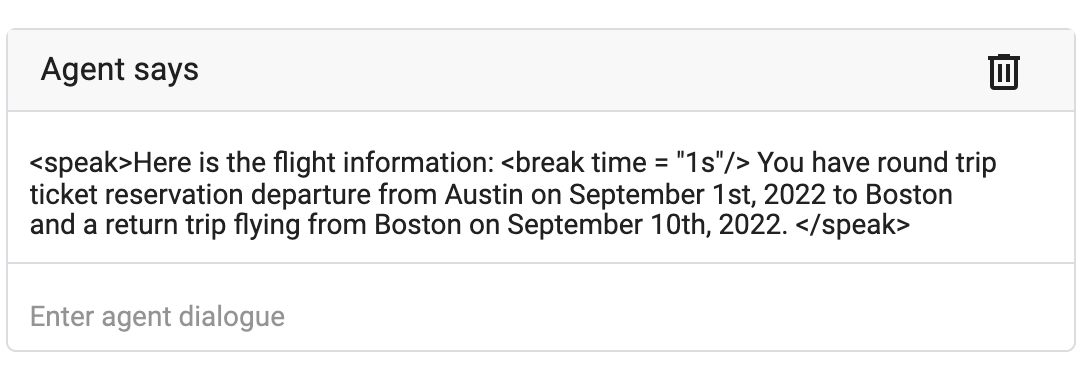
<speak>element to the entire text of the second fulfillment. Remember to close the text with</speak>.Now, increase the pause after "Here is the flight information". You can use the empty element
<break time>to control the pausing between words or sentences. The length of the break time can be either seconds or milliseconds. -
Add a pause after "Here is the flight information" with the following:
This is what it will look like after you add the break time.
-
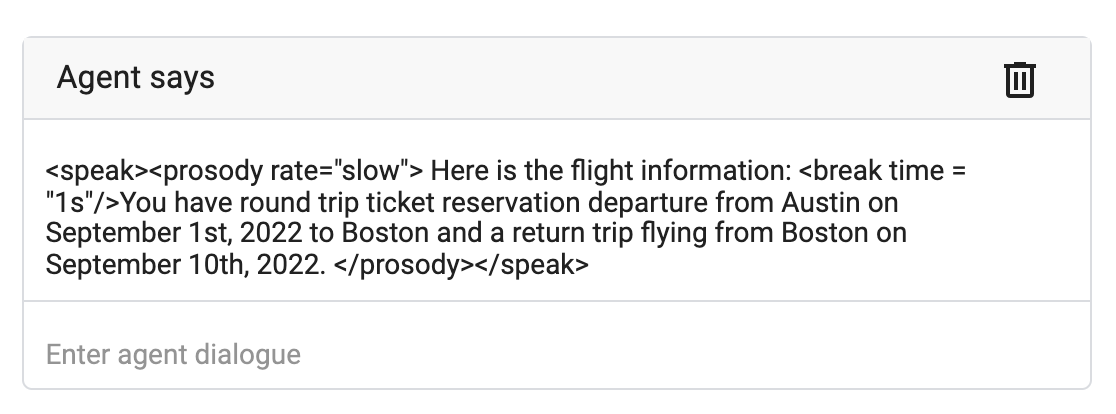
You can also adjust the speed of the response by using the
<prosody>element. -
Add the following before "Here is the flight information" so that this response will be rendered at a slower speech rate to allow users to take notes of their flight details:
When you finish adding the above mentioned SSML, this is what your fulfillment will look like.
In the next section you'll have an opportunity to test some of the settings you've created for your Agent. If you're running out of time, go as far as you can. The next section will not be part of your lab's score.
Task 7. Optional: Testing the agent with Dialogflow CX phone gateway
Dialogflow CX can be integrated with various conversation and telephony providers either directly through the 1-click Integrations in the Dialogflow Console or via the Dialogflow CX API.
Dialogflow CX includes a preview feature called the Dialogflow CX Phone Gateway that provides a telephone interface to your agent. For this lab, you'll use the Dialogflow CX Phone Gateway.
Please note that this feature has limited functionality. Current limitations are as follows:
- Agents must be in the global region
- Only US phone numbers are supported
- Features NOT supported relevant to this lab are: DTMF
Task 8. Set up a phone gateway
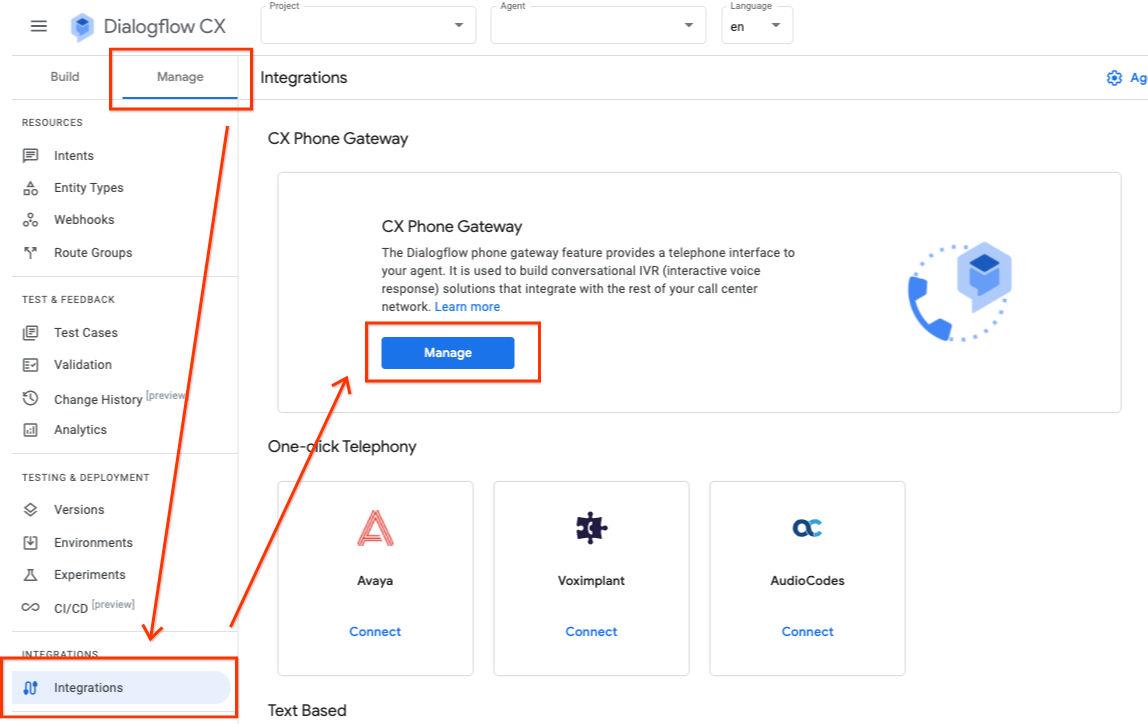
- From the Manage tab in the Dialogflow CX console, select Integrations.
- In the big CX Phone Gateway screen, click the Manage button.
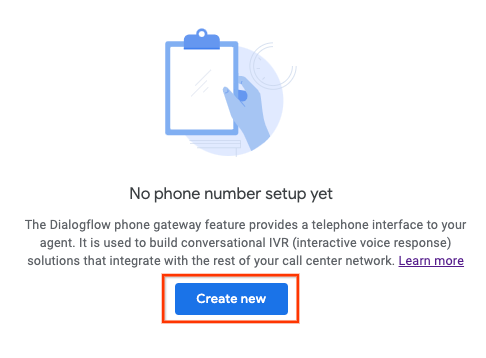
- Click Create new.
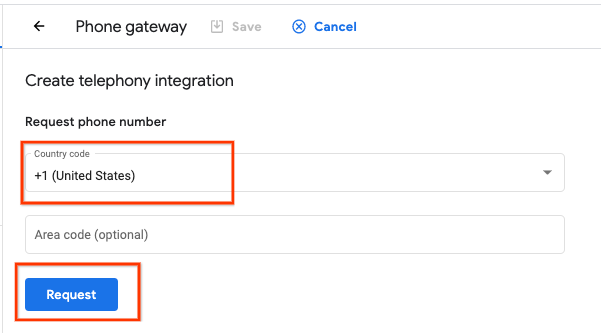
-
In Country Code, choose United States.
-
Enter an Area code of your choice, or leave it blank.
-
Then click Request.
-
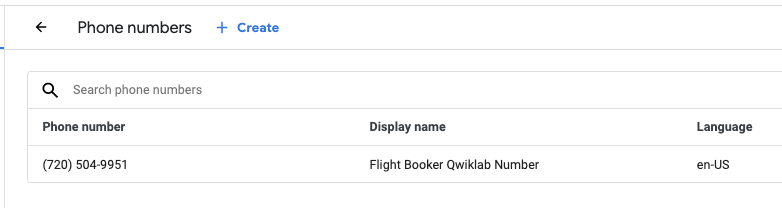
Select a phone number option, then add a display name.
-
Press Save.
You've reserved a number!
Click Check my progress to verify the objective.
Test your agent
- On your personal phone, call in to the phone number you created and follow the voice prompts. Try out the no-match, no-input, and barge-in features you enabled during this lab. (DTMF is not currently supported by the CX Gateway.)
If the agent reaches the end session state, the call ends.
Task 9. (Optional) Exporting your agent
When you build an agent for one project, you can export it to use in a different project. You can export your agent to continue building upon it in your own personal project!
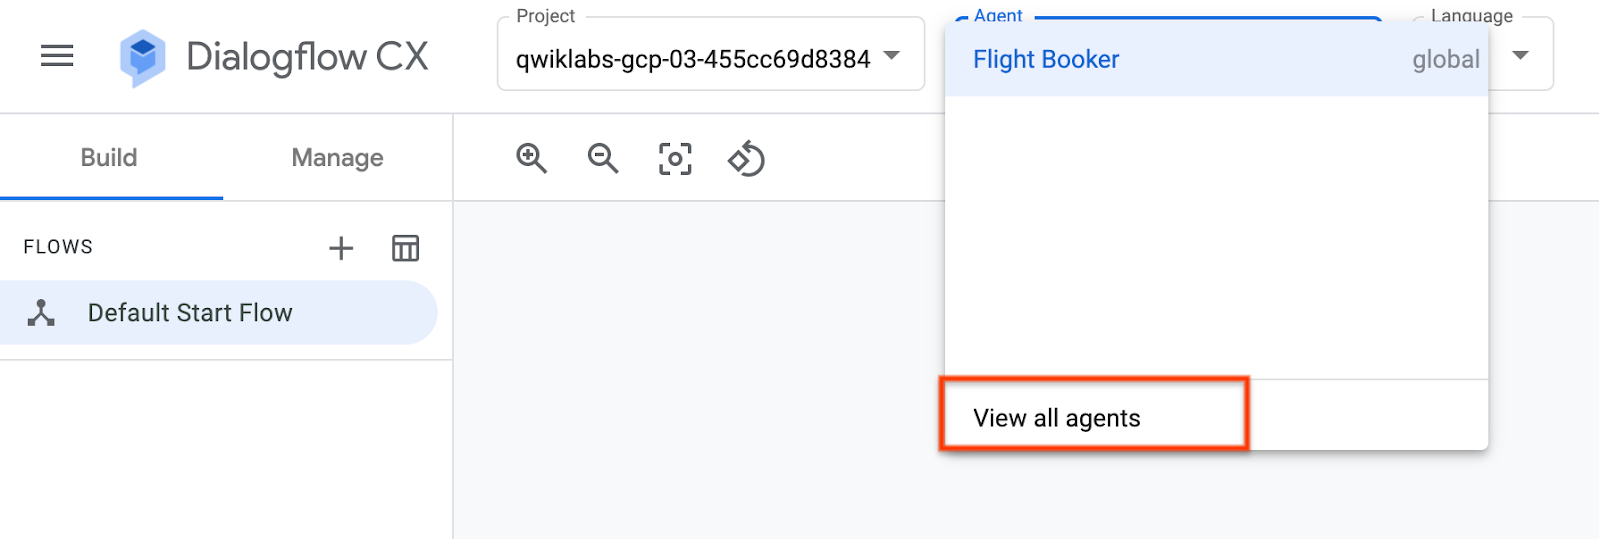
- In the Agent drop down at the top of the Dialogflow CX console, click View all agents.
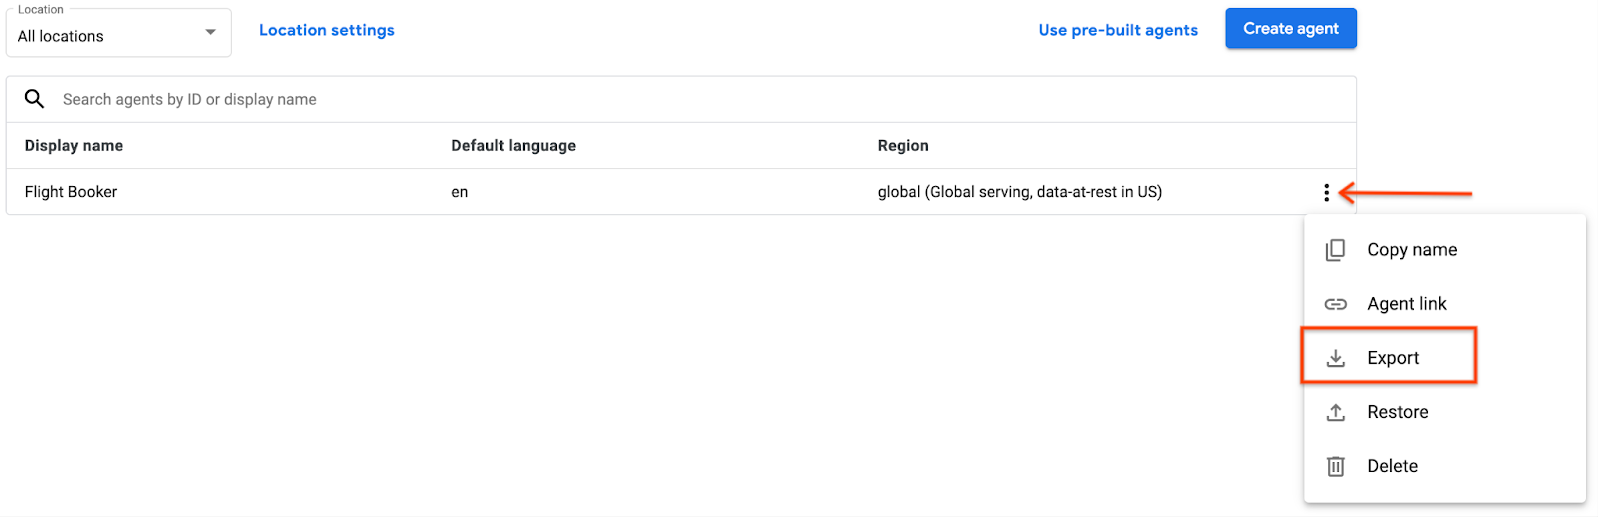
- On the Agent list screen, click the context menu next to your agent and then click Export.
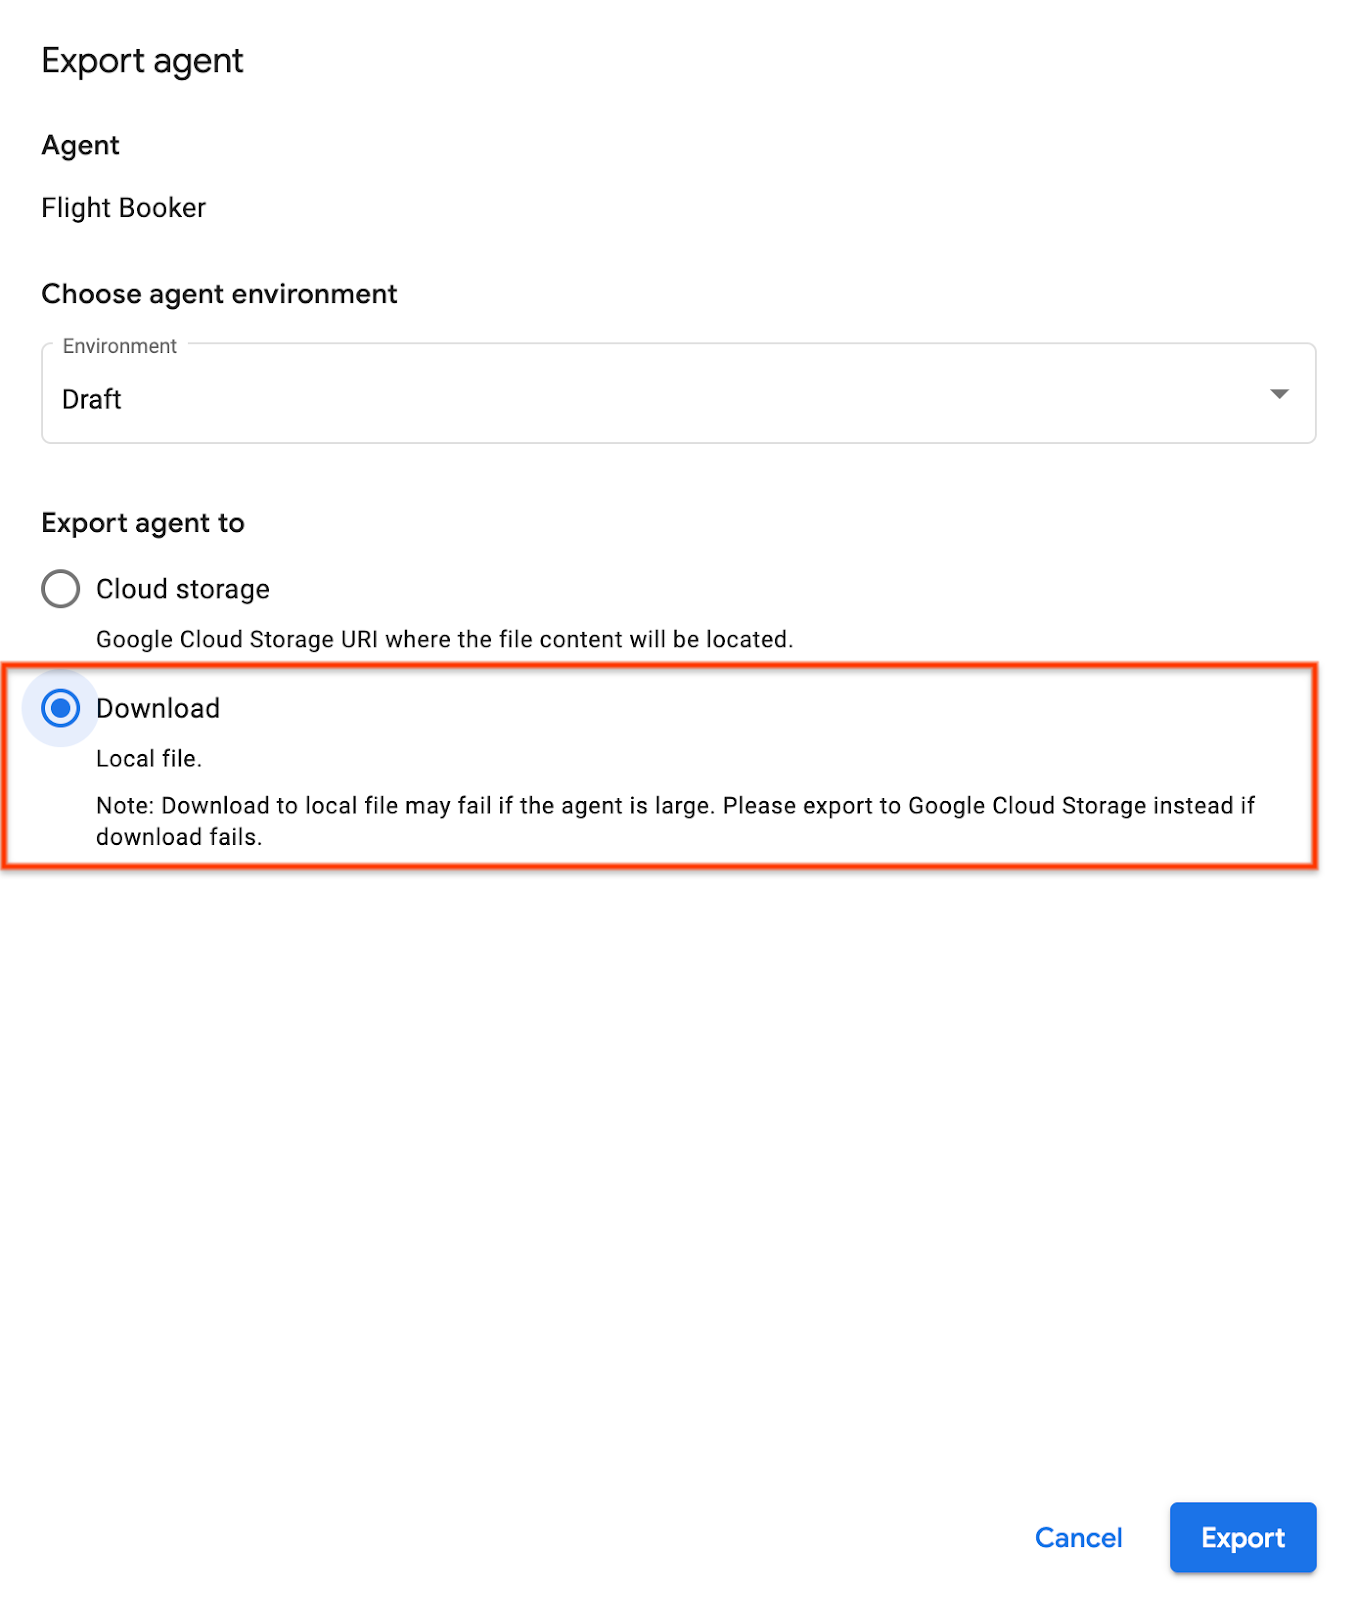
- On the Export Agent screen, choose Download to local file, then click Export.
Congratulations!
You've made your Dialogflow CX Agent IVR-ready! In this lab, you have learned how to configure Speech and IVR Settings and implement IVR features such as DTMF and Barge-in. You have also learned to use No-Input and No-Match to handle conversational repair and to use SSML to help create a more natural speech.
Finish your quest
This self-paced lab is part of the Create Conversational AI Agents with Dialogflow CX quest. A quest is a series of related labs that form a learning path. Completing this quest earns you a badge to recognize your achievement. You can make your badge or badges public and link to them in your online resume or social media account. Enroll in this quest and get immediate completion credit. Refer to the Google Cloud Skills Boost catalog for all available quests.
Next steps / Learn more
- Built-in events and their levels: https://cloud.google.com/dialogflow/cx/docs/concept/handler#event-built-in
- To learn more about SSML: https://cloud.google.com/text-to-speech/docs/ssml
- See more about the Dialogflow CX Phone Gateway here: https://cloud.google.com/dialogflow/cx/docs/concept/integration/phone-gateway
- Read more about Dialogflow CX in the Dialogflow CX Documentation
- The videos on this page cover the fundamental concepts of Dialogflow CX: Video playlist
Manual Last Updated January 03, 2024
Lab Last Tested January 03, 2024
Copyright 2024 Google LLC All rights reserved. Google and the Google logo are trademarks of Google LLC. All other company and product names may be trademarks of the respective companies with which they are associated.