GSP972

Overview
Vertex AI brings together the Google Cloud services for building Machine Learning (ML) under one, unified UI and API. In Vertex AI, you can now easily train and compare models using AutoML or custom code training and all your models are stored in one central model repository. These models can now be deployed to the same endpoints on Vertex AI.
AutoML Vision helps anyone with limited ML expertise train high quality image classification models. In this hands-on lab, you learn how to produce a custom ML model that automatically recognizes damaged car parts. Since the time it takes to train the model is above the time limit of the lab, you interact and request predictions from a hosted model in a different project trained on the same dataset. You then tweak the values of the data for the prediction request and examine how it changes the resulting prediction from the model.
Objectives
In this lab, you learn how to perform the following tasks:
- Upload a labeled dataset to Cloud Storage using a CSV file and connect it to Vertex AI as a Managed Dataset.
- Inspect uploaded images to ensure there are no errors in your dataset.
- Kick off an AutoML Vision model training job.
- Request predictions from a hosted model trained on the same dataset.
Setup and requirements
Before you click the Start Lab button
Read these instructions. Labs are timed and you cannot pause them. The timer, which starts when you click Start Lab, shows how long Google Cloud resources are made available to you.
This hands-on lab lets you do the lab activities in a real cloud environment, not in a simulation or demo environment. It does so by giving you new, temporary credentials you use to sign in and access Google Cloud for the duration of the lab.
To complete this lab, you need:
- Access to a standard internet browser (Chrome browser recommended).
Note: Use an Incognito (recommended) or private browser window to run this lab. This prevents conflicts between your personal account and the student account, which may cause extra charges incurred to your personal account.
- Time to complete the lab—remember, once you start, you cannot pause a lab.
Note: Use only the student account for this lab. If you use a different Google Cloud account, you may incur charges to that account.
How to start your lab and sign in to the Google Cloud console
-
Click the Start Lab button. If you need to pay for the lab, a dialog opens for you to select your payment method.
On the left is the Lab Details pane with the following:
- The Open Google Cloud console button
- Time remaining
- The temporary credentials that you must use for this lab
- Other information, if needed, to step through this lab
-
Click Open Google Cloud console (or right-click and select Open Link in Incognito Window if you are running the Chrome browser).
The lab spins up resources, and then opens another tab that shows the Sign in page.
Tip: Arrange the tabs in separate windows, side-by-side.
Note: If you see the Choose an account dialog, click Use Another Account.
-
If necessary, copy the Username below and paste it into the Sign in dialog.
{{{user_0.username | "Username"}}}
You can also find the Username in the Lab Details pane.
-
Click Next.
-
Copy the Password below and paste it into the Welcome dialog.
{{{user_0.password | "Password"}}}
You can also find the Password in the Lab Details pane.
-
Click Next.
Important: You must use the credentials the lab provides you. Do not use your Google Cloud account credentials.
Note: Using your own Google Cloud account for this lab may incur extra charges.
-
Click through the subsequent pages:
- Accept the terms and conditions.
- Do not add recovery options or two-factor authentication (because this is a temporary account).
- Do not sign up for free trials.
After a few moments, the Google Cloud console opens in this tab.
Note: To access Google Cloud products and services, click the Navigation menu or type the service or product name in the Search field.

Activate Cloud Shell
Cloud Shell is a virtual machine that is loaded with development tools. It offers a persistent 5GB home directory and runs on the Google Cloud. Cloud Shell provides command-line access to your Google Cloud resources.
-
Click Activate Cloud Shell  at the top of the Google Cloud console.
-
Click through the following windows:
- Continue through the Cloud Shell information window.
- Authorize Cloud Shell to use your credentials to make Google Cloud API calls.
When you are connected, you are already authenticated, and the project is set to your Project_ID, . The output contains a line that declares the Project_ID for this session:
Your Cloud Platform project in this session is set to {{{project_0.project_id | "PROJECT_ID"}}}
gcloud is the command-line tool for Google Cloud. It comes pre-installed on Cloud Shell and supports tab-completion.
- (Optional) You can list the active account name with this command:
gcloud auth list
- Click Authorize.
Output:
ACTIVE: *
ACCOUNT: {{{user_0.username | "ACCOUNT"}}}
To set the active account, run:
$ gcloud config set account `ACCOUNT`
- (Optional) You can list the project ID with this command:
gcloud config list project
Output:
[core]
project = {{{project_0.project_id | "PROJECT_ID"}}}
Note: For full documentation of gcloud, in Google Cloud, refer to the gcloud CLI overview guide.
Task 1. Upload training images to Cloud Storage
In this task, you upload the training images you want to use to Cloud Storage. This makes it easier to import the data into Vertex AI later.
To train a model to classify images of damaged car parts, you need to provide the machine with labeled training data. The model uses the data to develop an understanding of each image, differentiating between car parts and those with damage on them.
Note: For the purposes of this lab, you won’t need to label images because a labeled dataset (i.e. image plus label) in a CSV file has been provided. The next section outlines the steps to use the CSV file.
In this example, your model learns to classify five different damaged car parts: bumper, engine compartment, hood, lateral, and windshield.
Create a Cloud Storage bucket
- Open a Cloud Shell window and execute the following command to create a Cloud Storage bucket:
gsutil mb -p {{{project_0.project_id | PROJECT_ID}}} \
-c standard \
-l "{{{project_0.default_region | REGION}}}" \
gs://{{{project_0.project_id | BUCKET}}}
Upload car images to your Storage Bucket
The training images are publicly available in a Cloud Storage bucket. Again, copy and paste the script template that follows into Cloud Shell to copy the images into your own bucket.
- To copy images into your Cloud Storage bucket, execute the following command:
gsutil -m cp -r gs://car_damage_lab_images/* gs://{{{project_0.project_id | BUCKET}}}
-
In the navigation pane, click Cloud Storage > Buckets.
-
Click the Refresh button at the top of the Cloud Storage browser.
-
Click on your bucket name. You should see five folders of photos for each of the five different damaged car parts to be classified:
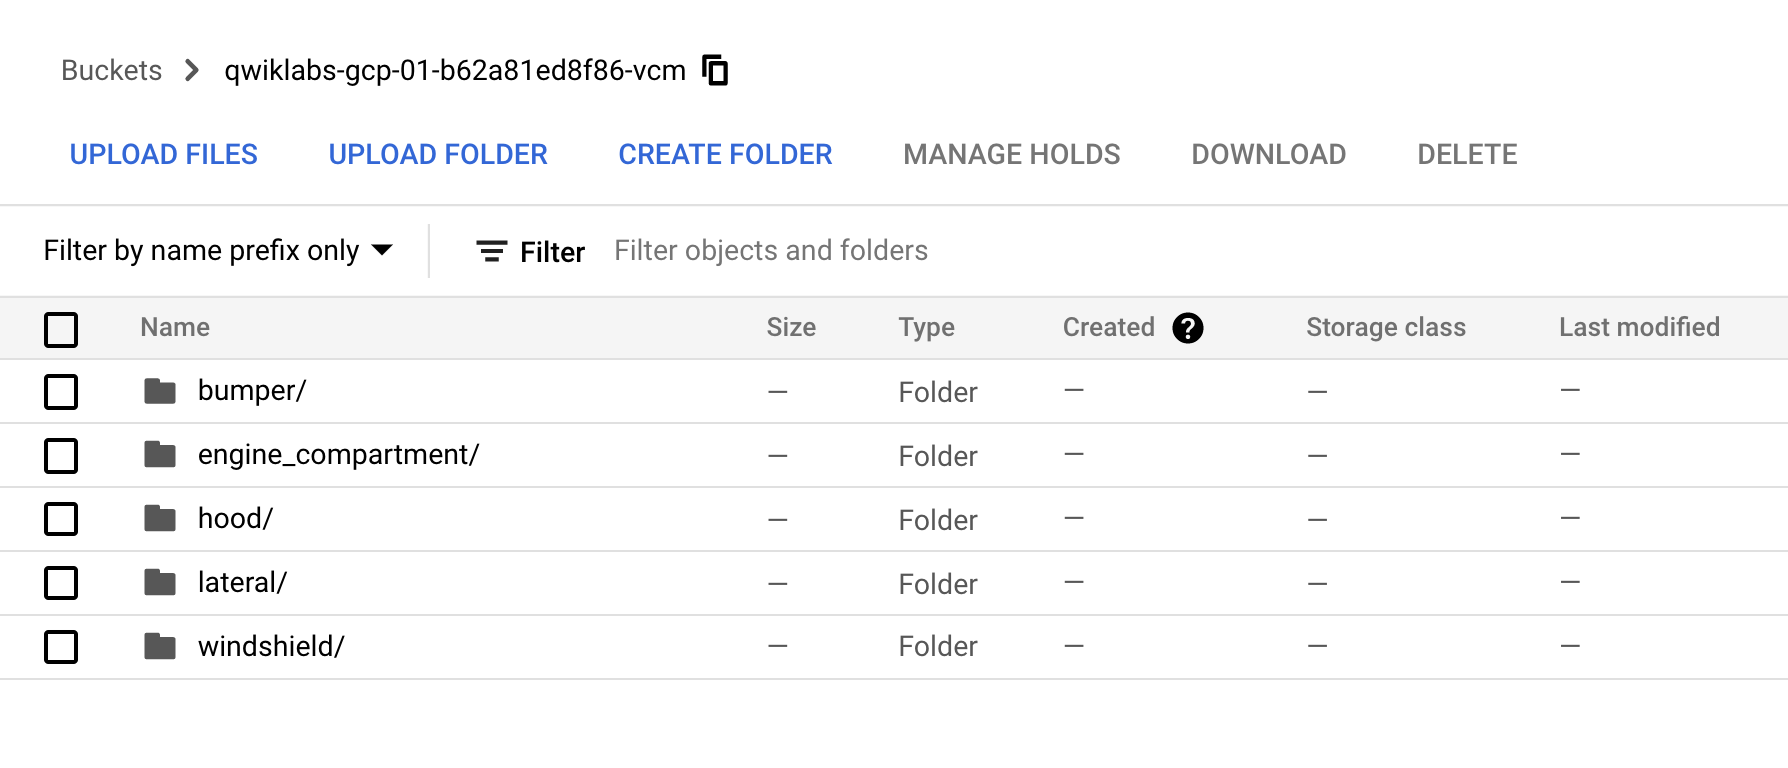
- Optionally, you can click one of the folders and check out the images inside.
Great! Your car images are now organized and ready for training.
Click Check my progress to verify the objective.
Upload car images to your Storage Bucket
Task 2. Create a dataset
In this task, you create a new dataset and connect your dataset to your training images to allow Vertex AI to access them.
Normally, you would create a CSV file where each row contains a URL to a training image and the associated label for that image. In this case, the CSV file has been created for you; you just need to update it with your bucket name, and upload the CSV file to your Cloud Storage bucket.
Update the CSV file
Copy and paste the script templates that follow into Cloud Shell and press ENTER to update, then upload the CSV file.
- To create a copy of the file, execute the following command:
gsutil cp gs://car_damage_lab_metadata/data.csv .
- To update the CSV with the path to your storage, execute the following command:
sed -i -e "s/car_damage_lab_images/{{{project_0.project_id | BUCKET}}}/g" ./data.csv
- Run the following command to verify your bucket name was inserted into the CSV properly:
cat ./data.csv
- To upload the CSV file to your Cloud Storage bucket, execute the following command:
gsutil cp ./data.csv gs://{{{project_0.project_id | BUCKET}}}
-
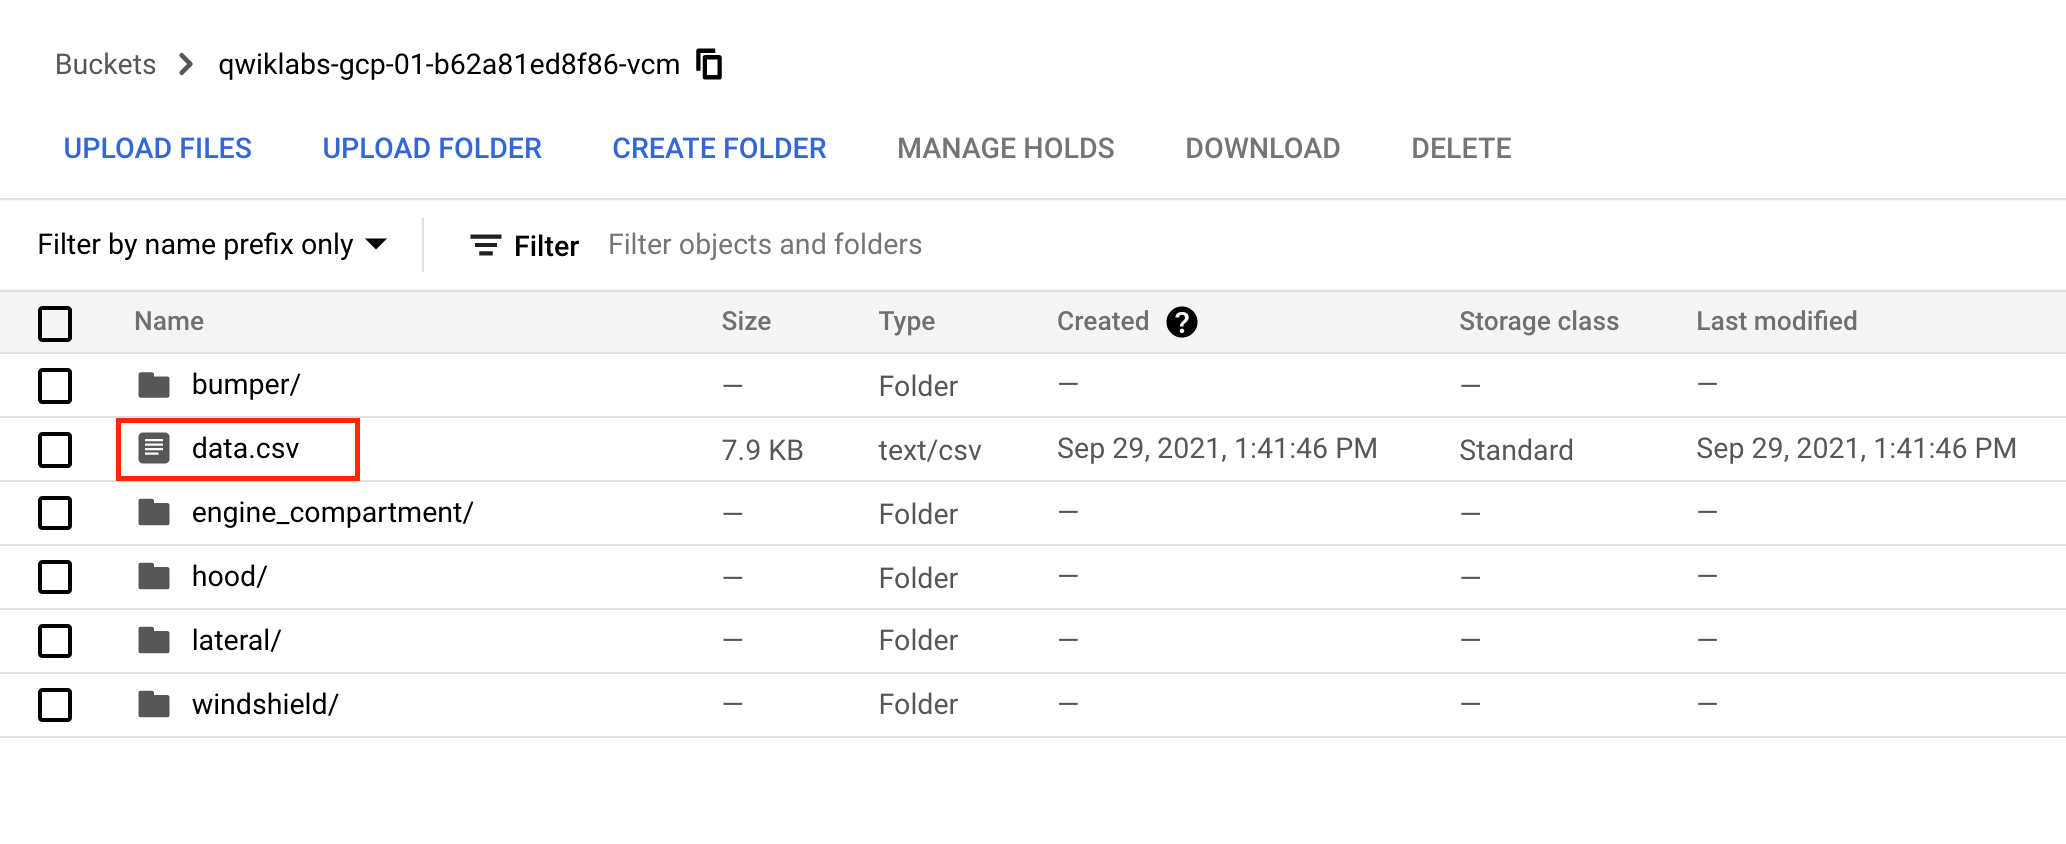
Once the command completes, click the Refresh button at the top of the Cloud Storage browser and open your bucket.
-
Confirm that the data.csv file is listed in your bucket.
Enable Gemini Code Assist in the Cloud Shell IDE
You can use Gemini Code Assist in an integrated development environment (IDE) such as Cloud Shell to receive guidance on code or solve problems with your code. Before you can start using Gemini Code Assist, you need to enable it.
- In Cloud Shell, enable the Gemini for Google Cloud API with the following command:
gcloud services enable cloudaicompanion.googleapis.com
- Click Open Editor on the Cloud Shell toolbar.
Note: To open the Cloud Shell Editor, click Open Editor on the Cloud Shell toolbar. You can switch between Cloud Shell and the code Editor by clicking Open Editor or Open Terminal, as required.
-
In the left pane, click the Settings icon, then in the Settings view, search for Gemini Code Assist.
-
Locate and ensure that the checkbox is selected for Geminicodeassist: Enable, and close the Settings.
-
Click Cloud Code - No Project in the status bar at the bottom of the screen.
-
Authorize the plugin as instructed. If a project is not automatically selected, click Select a Google Cloud Project, and choose .
-
Verify that your Google Cloud project () displays in the Cloud Code status message in the status bar.
Analyze the CSV file
To help you be more productive while minimizing context switching, Gemini Code Assist provides AI-powered smart actions directly in your code editor. In this section, you decide to ask Gemini Code Assist to help explain the structure and purpose of the CSV file to a team member.
-
In the Cloud Shell Editor's file Explorer, open data.csv file. This action enables Gemini Code Assist, as indicated by the presence of the  icon in the upper-right corner of the editor.
-
Click the Gemini Code Assist: Smart Actions icon and select Explain this.
-
Gemini Code Assist opens a chat pane with the prefilled prompt of Explain this. In the inline text box of the Code Assist chat, replace the prefilled prompt with the following, and click Send:
You are a Machine Learning Engineer at Cymbal AI. Provide a formal analysis of the CSV data data.csv, which is a training manifest for a Vertex AI single-label image classification model. Explain the file's structure and purpose to assist a new team member in understanding this dataset, which is designed to recognize damaged car parts.
Based on this data, provide the following insights in a structured and professional format:
* Dataset Overview: Describe the purpose and structure of the three columns (dataset split, image URI, and label).
* Dataset Splits: Provide a count of the total number of images in the TRAINING, VALIDATION, and TEST splits.
* Class Distribution: For each class (bumper, engine_compartment, hood, lateral, windshield), provide a count of the number of images assigned to it.
* Data Imbalance Analysis: Based on the class and split counts, assess if the dataset is balanced or imbalanced. Explain how this might impact model performance during training.
For the suggested improvements, don't make any changes to the file's content.
Detailed explanations for the structure and purpose of the CSV file data.csv code appear in the Gemini Code Assist chat.
Create a managed dataset
-
In the Google Cloud console, on the Navigation menu ( ) click Vertex AI > Dashboard.
-
Click Enable All Recommended APIs if it is not already enabled.
-
From the Vertex AI navigation menu on the left, click Datasets.
-
At the top of the console, click + Create.
-
For Dataset name, type damaged_car_parts.
-
Select Single-label classification. (Note: in your own projects, you may want to check the "Multi-label Classification" box if you're doing multi-class classification).
-
Select the Region as .
-
Click Create.
Connect your dataset to your training images
In this section, you choose the location of your training images that you uploaded in the previous step.
-
In the Select an import method section, click Select import files from Cloud Storage.
-
In the Select import files from Cloud Storage section, click Browse.
-
Follow the prompts to navigate to your storage bucket and click your data.csv file. Click Select.
-
Once you've properly selected your file, a green checkbox appears to the left of the file path. Click Continue to proceed.
Note: It takes around 9 to 12 minutes for your images to import and be aligned with their categories. You’ll need to wait for this step to complete before checking your progress.
- Once the import has completed, prepare for the next section by clicking the Browse tab. (Hint: You may need to refresh the page to confirm.)
Click Check my progress to verify the objective.
Create a dataset
Task 3. Inspect images
In this task, you examine the images to ensure there are no errors in your dataset.
Check image labels
-
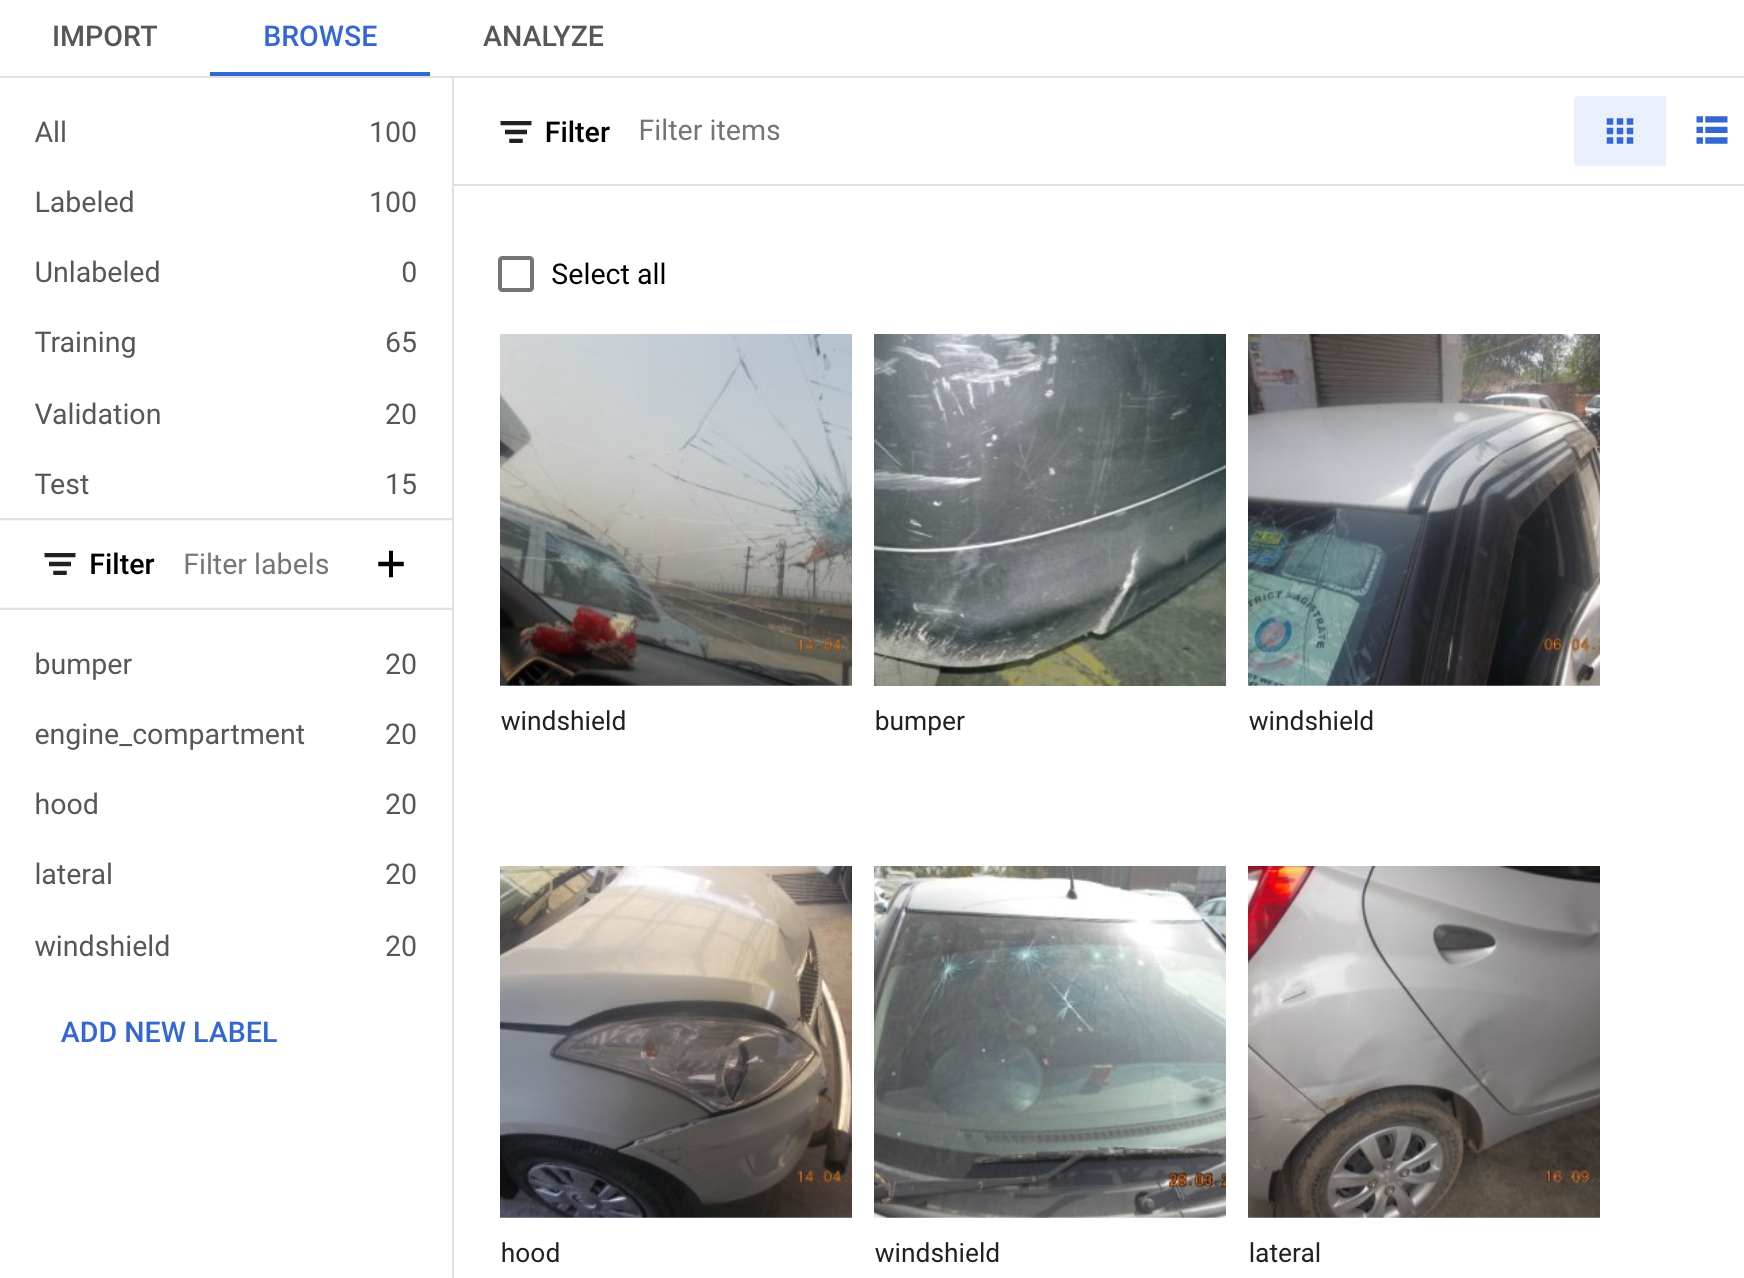
If your browser page has refreshed, click Datasets, select your image name, and click Browse.
-
Under Filter labels, click any one of the labels to view the specific training images. (Example: engine_compartment.)
Note: If you were building a production model, you'd want at least 100 images per label to ensure high accuracy. This is just a demo so only 20 images of each type were used so the model could train quickly.
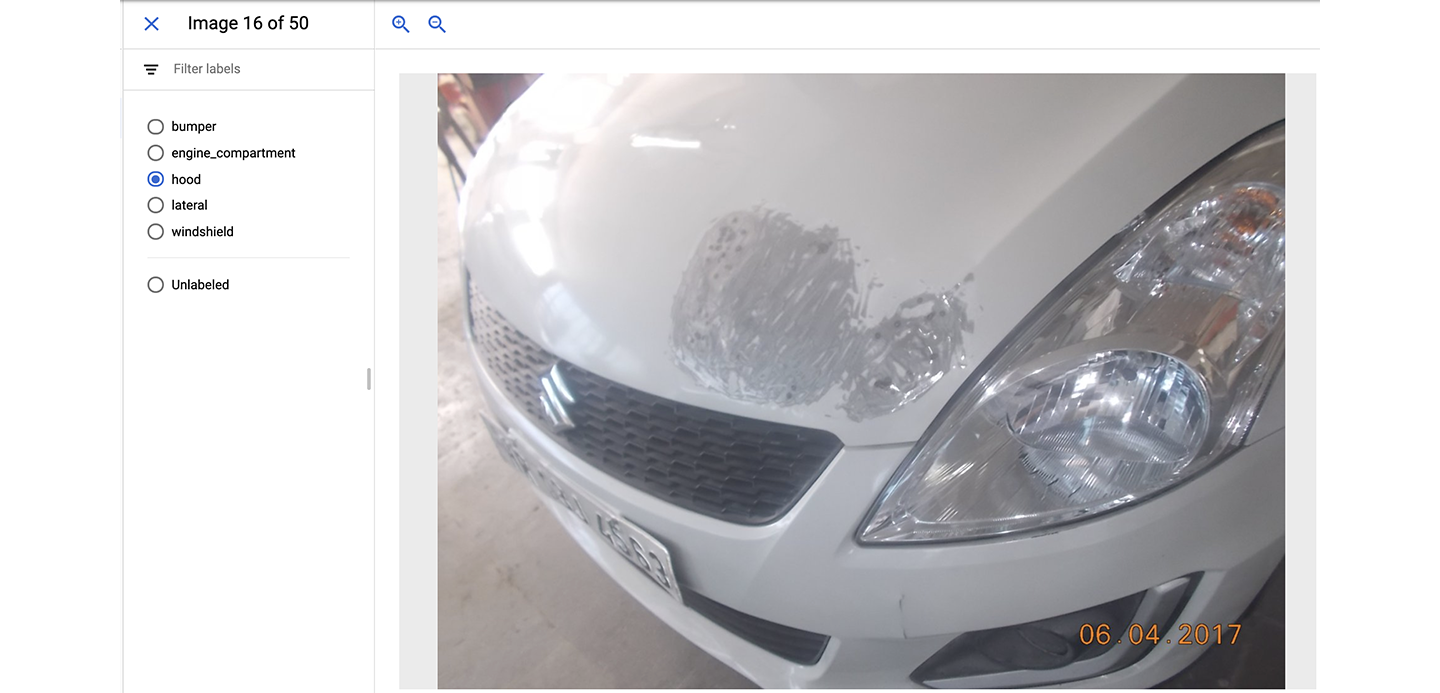
- If an image is labeled incorrectly, you can click on it to select the correct label or delete the image from your training set:
- Next, click on the Analyze tab to view the number of images per label. The Label Stats window appears on your browser.
Task 4. Train your model
You're ready to start training your model! Vertex AI handles this for you automatically, without requiring you to write any of the model code.
-
From the right-hand side, click Train New Model.
-
From the Training method window, leave the default configurations and select AutoML as the training method. Click Continue.
-
From the Model details window, enter a name for your model, use: damaged_car_parts_model. Click Continue.
-
From the Training options window, select Enable incremental training and click Continue.
-
From Compute and pricing window, set your budget to 8 maximum node hours.
-
Click Start Training.
Note: Model training can take longer than the allotted time to complete the lab. The model does not need to finish training for you to continue to the next section.
Click Check my progress to verify the objective.
Train your model
Task 5. Request a prediction from a hosted model
For the purposes of this lab, a model trained on the exact same dataset is hosted in a different project so that you can request predictions from it while your local model finishes training, as it is likely that the local model training may exceed the limit of this lab.
A proxy to the pre-trained model is set up for you so you don't need to run through any extra steps to get it working within your lab environment.
To request predictions from the model, you send predictions to an endpoint inside of your project that forwards the request to the hosted model and returns the output. Sending a prediction to the AutoML Proxy is very similar to the way that you would interact with your model you just created, so you can use this as practice.
Get the name of the AutoML proxy endpoint
-
In the Google Cloud console, on the Navigation menu (≡), click Cloud Run.
-
Click automl-proxy.
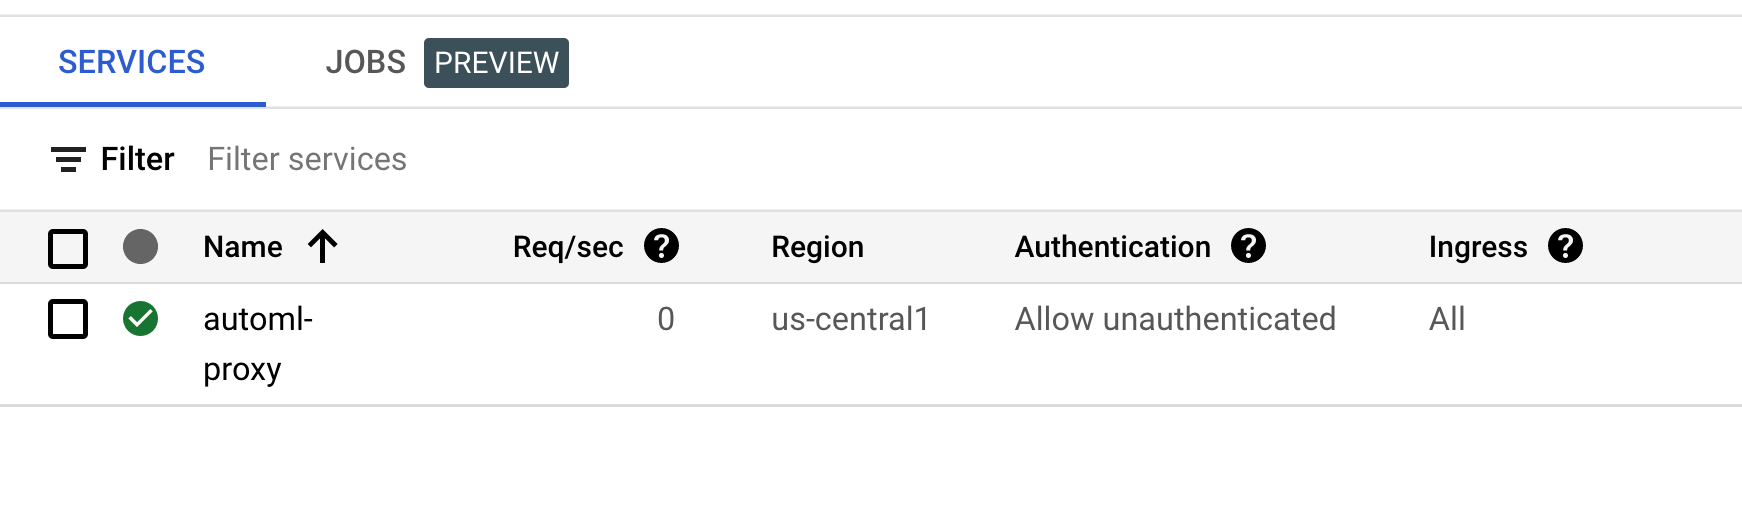
- Copy the URL to the endpoint. It should look something like:
https://automl-proxy-xfpm6c62ta-uc.a.run.app.

You will use this endpoint for the prediction request in the next section.
Create a prediction request
-
Open a new Cloud Shell window.
-
On the Cloud Shell toolbar, click Open Editor. If prompted, click Open in New Window.
-
Click File > New File.
-
Enter the filename as payload.json in the new file window then select your path from the dropdown (/home/student_xx_xxxxx).
-
Click Ok.
-
Paste the following content into the new file you just created:
{
"instances": [{
"content": "/9j/4AAQSkZJRgABAQAAAQABAAD/4gIoSUNDX1BST0ZJTEUAAQEAAAIYAAAAAAQwAABtbnRyUkdCIFhZWiAAAAAAAAAAAAAAAABhY3NwAAAAAAAAAAAAAAAAAAAAAAAAAAAAAAAAAAAAAQAA9tYAAQAAAADTLQAAAAAAAAAAAAAAAAAAAAAAAAAAAAAAAAAAAAAAAAAAAAAAAAAAAAAAAAAAAAAAAAAAAAlkZXNjAAAA8AAAAHRyWFlaAAABZAAAABRnWFlaAAABeAAAABRiWFlaAAABjAAAABRyVFJDAAABoAAAAChnVFJDAAABoAAAAChiVFJDAAABoAAAACh3dHB0AAAByAAAABRjcHJ0AAAB3AAAADxtbHVjAAAAAAAAAAEAAAAMZW5VUwAAAFgAAAAcAHMAUgBHAEIAAAAAAAAAAAAAAAAAAAAAAAAAAAAAAAAAAAAAAAAAAAAAAAAAAAAAAAAAAAAAAAAAAAAAAAAAAAAAAAAAAAAAAAAAAAAAAAAAAAAAAAAAAFhZWiAAAAAAAABvogAAOPUAAAOQWFlaIAAAAAAAAGKZAAC3hQAAGNpYWVogAAAAAAAAJKAAAA+EAAC2z3BhcmEAAAAAAAQAAAACZmYAAPKnAAANWQAAE9AAAApbAAAAAAAAAABYWVogAAAAAAAA9tYAAQAAAADTLW1sdWMAAAAAAAAAAQAAAAxlblVTAAAAIAAAABwARwBvAG8AZwBsAGUAIABJAG4AYwAuACAAMgAwADEANv/bAEMABgQFBgUEBgYFBgcHBggKEAoKCQkKFA4PDBAXFBgYFxQWFhodJR8aGyMcFhYgLCAjJicpKikZHy0wLSgwJSgpKP/bAEMBBwcHCggKEwoKEygaFhooKCgoKCgoKCgoKCgoKCgoKCgoKCgoKCgoKCgoKCgoKCgoKCgoKCgoKCgoKCgoKCgoKP/AABEIAlgDIAMBIgACEQEDEQH/xAAcAAACAwEBAQEAAAAAAAAAAAACAwABBAUGBwj/xABGEAABAwMDAgQEBAQEBQMEAAcBAAIRAwQhEjFBBVETImFxBjKBkRRCobEHI8HRFTNS4UNicvDxNFOSJCVEghY1VGNzdbL/xAAZAQEBAQEBAQAAAAAAAAAAAAABAAIDBAX/xAAsEQEBAQEAAgICAQQABgMBAAAAARECEiEDMUFREwQiYXEUMpGhscFCgfHh/9oADAMBAAIRAxEAPwD5L0uyq16rSMNacleztqVWoxjGy8gQVosOnMfljBTpei9J0jpV11F/gdLti6ImocD6ld/G9M7jk2vTqTCDckk8Nb/VaHVqTPK3QwDEAZXuqXwX02xoit8QdTBIEmlRMD2lJqdZ6JYk0ugdGo1aoGK9wZH1RfH63Wb3jxdPVUM0betVG5IYY+8JtAXWqWU6bDO9QgQmdZ+IOo3VRzK91St2A5ZSgD2wuK67aSSHVajuTEArPpS2vT0LWrUJe++t2xl3hsLoT2ULKo+bi8uX+rGNZ9ivJs6tWpNimxjCdySThIqdTrvy6qGx/pACty+jte4rWvRtMvpXVQjl9zA/QLnXFx0+3/8AT9Gtq0c1Lh0yvH1L6f8AMrkjsXJJ6jbNH+Yz903u0ZXtxcF3mpWvQbcR+clxH6rp9P6lY2zS28urIOPymlQ29sL5qOrW9MamnUDy0KHrrNmU6r/YYWZL+i+iH4ktaR//AJjdVADgUrUDE7TCI/F9qBin1Gr6Oe1sr5v/AIq93y2tT3JhT8dcuHltgB3JTPj6Gx9Gd8bn/g9NPp4lef6JR+N+pukUre2pj3JK+fi4vXflpt7blWx96f8Aisb7BM+K1bHt6nxb1qo7y17djfSnJ/dZn9f61WI19QeAf9LAB+y8oG3bt7kx2ATRavcB/wDU1iecwtfw2/geUeib1C+c+XdQuWnuHwP2WatWrOeS+8uCRmTWP91yBYg5c+qTzLk0WFIgQHl3fUSFr+Gjzje6ox0eJWLz3e8n+qhfbAeZ9P7rEzp9L/TPbdOZY0hMUxJ9Fr+G/tfySH+NaDd9NEy4tf8AWz6BAy0YD8o+y0U6DJw0e8K/i/yP5IJlzQGzp9gU5l1S7P8Ao0qU6IJEBdGjb0qLBWuJDBsOXFanxfsX5Iy06zHDFOqY3IaVqt9VU6aYLWned0bH1bp+lg8OiNmjH3XY6bY1KtanRosL6jjpAG5PZYskbm0uytTLWsBLjifVfSvhb4SFNrLnqTZdgton93f2W/4V+F6fS2Nr3Ya+73A3FP29fVephceu/wAR0kxTQGiAIA4ChyCJhWqMDK5lTZa3JmOVRBdk4b27ogOTlXCkrhKrkaNgT9inFZLt0DMR/wAyZ9iroExnHo5RwbOdH2IQWhJaY2/5dkwu8xBc9o7mIWr9oTIicaeSCV5zr3VjUe61tHRHle9px7I+tdWJcbSzw7Z7wcAeiV061pW/h1qzZc75WHJJ7lUgtM6T0xlEMrXQ8xy1h/crq1KzqktafKs9SoXHOT3UpkgzsFr7RraLgZmU9jT9EDHnlaKTgTlSWxkkLQ1oaMKNjhWudutIooohIpGZUUUkUUUUkUVSrUkUUUUkUJgEqKESCFJTXSrQBujnCMEHZSQ7LI3N0HcZytROFlY0/iR/p3WufyK1OALSDsRC4doDb9RcwDyukFd1cvqNItrMqNxnJVyqfbUwy4fHIlbQZCwsaS9rmnMZK10QQ2CZV1FBqKKLJRRRRSRC9wY0ucYA3JS7iuygzU854HJXMca19VgYYOOAmc77TRWu3VTpoy1vfkqUrYMZrrHS0ZMoalSh09mn560YC5lzcVbh2qq7HAGwXXnnfpjructlz1GAWWogcuO59lzi4klzjJO5KGeIUJXXnmc/TjerUdkY3XLuGltSCcTsukHA4WW5ognUPqkSkDQ5oEoXtNPMx2CTq01CGn2Vudqd53ZWL6bg2VhwJPKVUhx2kJbXFtUgGR3Vmocws2GdGtB0EaohKZVAJa/JOxQeKYxurbLvM4CPTdZnqtW6ldrmjB+qQ1zw6CZTZJMEkNPJQkCcGYVQ10mkUnPc4A8ITVe8CHbILc6nhrvlPK6X4AiXs2GfdWSlldWeG6ZB9VVs6XFznw6Yg7QuszpYrUZbDXETKXedMbaW4eSXO5hM5hZqmp7g17wwcHcFWxwtntfRdqIzKzVqZ8Jj2l+eI2Q0WVahgYPdZ8Vr1/Teo1K7BqAcOSOF1mkESNivM9IpVrWtTe4DQ/BPC9ONlmzGoiiiiyUUUUUkK4nWb3Hh0zjkjkrV1a8FvS0NPnd+gXmqhL5JWuZotx8nsOj2tCmK3VHjQMii0x9yiv8A4vFIfhrEso0W4JZgALyvxB1KoahbWqa5+VjD+681VrGNVV2lo2aFXb9sXry+vp6m/wDiGnUdNFhuKnD6hOkH0C4l3fVasuua+hhGzTAXGqXdV3lojQ3kn+gWV1LWdVUvef8AmK1z8VrNsjoVep29P/Kl7uIz+qzu6lc1MU6OnsXFKY0A4aAOya05H7LtPgn5F+WEufe1R5qoYDw0IPwj6g/mV6jjsYMBdCm0OBk6ewPdSOOTwuk+PmM/yViZYUhEgu9ytNOypNj+WCnAGO6NpE7Z7Lc4jN+SqpUGAYaB6QmaADjZG2dgEbQf90yM3q1TWhGGj2R6THvsrAA4+qcGqa0/RNY0THPPZWyBxk8o4wM7KWoI4EQjaYO3sVQajYBOf0SRgHumQPy/KgadLpIkdk0uLuMdlYFsG0Jwcdoj1S2NCc1sSoI1p3TmNyDyqpg8LZTpto0xWrbflbySi+vtrB0mspUvFrDA2HJKBoqXlbW/DRsOAFbKb7qprqbcAbALvdG6VXv7unbWdIvqO+gA7k9lw67t9O3HH7V0fp9a7r07a2pl9V5gAc+p7L678L/D9v0WiHVHNqXjx5qh2A7N7BM6D0Oj0Hp7xQDX3Tmy+oRue3suYLu58fXUdqdOCvP11vqO309frb/qH3Vgg7EFcbp98+rIrvYw8HSF0qIMeJVcIExAjCxhaFIVNcCAQcFSR3QlqKKKSnbLFdk4g/YLYZ9VivxMA598rXP2Ku2gjzET/wA2CuP1/qgon8Lbz4j8GMgBN6jeDp1k5+NZ2EZlcTplE3VbxHjzO8zi78oWsGtvTLFjRrdLm7kndxXSrESHQNfB7BWC2mzyiGDAHcpUkyXbndVqU2SU9jSlMiZmE8OgKRtMyU9pDVnb6fVOa0pRviQnUnEiTskU6Wp2eFqa0AQsdGLUUVFwAWSHxWeJpnzI0uGPzGfsUWoDBKkJRQEESFFJWkK1FFJCYUVRlUXAEA7nZSEopIVBwPKkVWkujiEDWvA8pynRL/oikBO4yVUJDWg7oS0/iGHiJKZUAdCORCtKAgoKzA+mQRtsowR9UYHlgo+iTbAaE/bCyUmnxC3UW9oRteBcaC4ucBsm/YaFFFEFEm4rtotzl3ASr26FBsNzUOw7epWO1oPuKhq1SdO+eVqc/mi38Cp0al3U11DDP+9lLu7ZbtNG2HmG7uyC+vQQaNudLRguH7Bc3AXXnnfdcu+8+guBcdRMuOST3VE90aArs46hKpQqKKtA1TGUi5xTdpOVoMLNeCGSHQf3RVHM5k7pdQmVKjnyTwlB8u2kLONbhjROXHPdKrOLAdJBnhNqQWCBCzuaPmOYWZ7PXqAbU0th43TmuLqe8RskuAcQQmUqjZgj3AVYOaaysXNLI3VACk7IVBwYZH2QGuC8YlYstdZZDHVi94jAC6VCvVFHSH+XYrjOqS/0Tqd15NEwO6LFuvRWFw/QWNqaiNiulZuNU6a5835SdoXmemVqdCuHPktO/Zevsa9KtApwQOUy+kp9vQaHNqBjJGDgArjhtJlchohgMyF1OttJotLRMHJWO1osrUCNQDowi2tR2emxUoAh7Xs4HYrcuB0ak+3utOohp3E4K76xTEUUXOuqzLmsbVlTTHzRz6ILTVvKFIw54LuzclA24rVv8mjpb/qfj9Fdra0aI8jfN3OStSk49704mm6q+oXP3PZef6g4UmGN17G8exlu81HBrYOSvDX/AIlcSMtcYBTKLNfl6vWFMkzqecklY3OfWOqNRH6KOZs55mUbXDAGAOy9HHEjhevWQJa4RqBEq8j+pWplUwACHN5DhKp9AO81LHJZyPZdo5k6sDG6sR2yNkAG42Mom7xC2yaBMThG0kEcxyhpNLnBvPqneH4ZmR7KxI09hvujaBON0AA/smMx7chUQmgAdvVNa3nhCyT6yjbP9wtAbQXeVs7o2tAwRkKUTodqAkbEIgJeTtJmFUibCKe26sNAPdEG5Eo05q25n9UYGFQEfRMaBOVKoAP90bW7K2AD+ybjeAJ4VAlMbDnhaGiTLjKW1q6FrRayn49x8n5Ry4qtxSJTpspUvFrfL+VvJKlGm+5qaqmw2HACjGvu62p4hvA4AXouh9HuOo3bLazplxkSTIDR3cuHfeu/HC+h9IrdRuqdta09Tjknho7n0X2P4d6HbdEs/CoDVVdmpVIy8/29Ffw90W36LZCjRGqoc1KhGXn+3ousvN135eo7SYxdXq+HZuAJBf5ZHC84xtJhggv7EFeruGMqUnNqxoIyvJVnUmVCBrDQcGNwrnFXV6datqu1nNNufr2XYDS4ecQ0bN4+qxdJuqFSg2kwaHN4dz6rpLNJGkt4pgdgFQLYP+XPsU8zGIQup6vzvHsYQS21NPzOYPaUxrwTEg+ytrYHzE+6gbmdR9lBcDss94adOmalQ6WtyTstKwdZs6l7aeHSqaHTMHZ3oUz7TyVVz+sdTdM+C3Yei7tC1FOl4bPldlx2MJ3w7Yus6VUVqempqid5C03TQ2lWc0aTq0n2Wt9jHNqu1PDW/KMAJb3EYTG743ChaXZ3UAM7lM8zhI2HCpgHykT6rRRsnvyPK3uU6QU6hnG66Vqx5bL8IbW0FLLoLu62DZZtWLAA2UUSqpMxwslbqoDtO6U9r9ZLTv6qjHZE9sw5azAjS8OBIMI6rgHQ4YPKKl8pROaHbhF+yCmBBgyCqgg4M9woKZa6WnHZWafm1NMFSHmBCgJO6poJaQ77qg1wO+OyENU5ocPMJVzG6EuGkxmFINNpbImRwlGk9jpYZb2RNqnWBGCnEkJ9wAaCSZ7JR1ioAdoyUb6sHACDUagI2KZKLU8QxDfN6o2PdyENMhog7qjWH+mB3TglaAQVfKRSeCcHCaSZEcrNmNSsnUZa0OYdLp3CVaNmp4ziexJ5KfeUX13MaDDQfMfRA6X3VOlS8tOnk+6Z9JuWW9um21Od3nYJl1Xbb0i930HcrgsFS+uSXGZOTwArnnfatxos6T7usX1HeXcn+iO/uwR4NvhgwSOfRVeXIp0xQt8NGHELmknhdued91y679ekLiNlRceUR2VGF1caoOBQiZzlWCEOrKkIqKKgVJJWe8DCzz78LRhY79pLQ4fVBjm1HQ0pDXDbko6gMzKRgOOrHYoxW+zzMaQfdAWgDO/ZU12e6OqQWgxB7rONS7C/DDhIwQgADSRO25RkhrQZhIruEgt5RPauRVR5DpBxwpSczXqdkdx3UaGPLWOdDuSuvaWtq+2c3V51qyCMBY15B2jKU5pbqhuDyjrnwqugbDnlHIc2NgVityVVF1VpEeZq7VCqbam2qKga8flHKx0G0qdNri7fcLNcPZ4p80tOxC52/p0x6hvVqNxQc15DXRjkFYX3xNMNpjQ5vI5Xn6bS6ph0ZwVte40yDOogYKfwI9L0CuPHJrkl52nhelBBEhea6A6jeMDardNZuQ4YlehqvbRoue75WiSsNxh6zei0tjBio7AC8xZXRZeNeTuclI6v1A3l4X7N2A9FmpP8wK6Tn08/yd7cj6JQdqYD3RVHinTc95hrRJKydJeallTJ7JfVbylTAouGpzuOFyrvz9OJfV63U64AllFpwO6bToUqboP5RMJtw5lvS1ARPHquXQpVLi4NQuIB4XLd9u1np+Ry6MK2GDJyFQIO8qgQHTwvpx4Kc0TkYjYp1OoAQCfN3WZpnPCIAF0DC1gro1qDKtMOaR4kZAWMS12Pm2R0qxBAPGxXQdbNuqfi0sVRuNpVLn2L7+nPbJ9SmjMTMKiCHeZsEIo7HHJWt0CEbJjAAdvcIA2RKYwc7wmCw1g7fdMaMgFU2dIATabCd1GI0cJzW8lRzQyIyjYOUacQthE1pBHY7Iox6I2t7hKkUA2I57pjGqmtHKaxsYBmValhv0HojY3OdkTW5z9St9jasqfzKx00m7+voEW4sSytWlhrVsUW7A/mPYInF95WGNLBgDgBMqOdeVAGjTSbhoGwC9L8K/D9XqVcNZTeaAzUeP2lcOu9duOD/hH4bq9SrB/hxa08ucXASewX1Wz6fbWVsWWrPAokAuDZye87q+m2NCztmU7amGUGsAIkmfdbabTUcHukMHytP7rh11rv9eoloxzWyXP0nYOMkLiddr16lwG29U0wzHOSurf3NSnFG1ZruHCQDgNHcpVW3ptsnVbsNa9rZcRgSsRPNC66hMOqyO52Q/irsnzAlo4IkLo0aRdbtrmm8U3ZB9FLmmD/AJTyWxvH7hNa5s/JLL6k8aa9Itj81MwfsurYXj2iGVRcUxwcPaP6rhG31EkkT3H9lTQ+k8bgd2oxXL9PY06wrAGk6CNwUbXO2e2PULk2DzWpiHzXbtONQ9Ctrb4NOmtSc1wweQpltBlRLZWpvy133wmISKQoopFgODu4KCpSDg8H5Xb+h7p6ik4bqJZULT9FbKL6jg1oweV1n0GPdLhPomNaGiGiAtaMZbeyZTy7zOWmIwESiyQgFEAoopIqcAVah2UiywHZW1sNg7hQ43KJuyUprYKJVmVaEiiiikiiiikkAqoHZWopK0iZhWoopM1VkOlSlJMcLQWg7hQADZa8hhNUAMHeVNLSDPaVdaSBGUl7jEDJKefoX7MoNwE+M+yVQaQPMnLN+zAvJa0kCTGB6pFFjbai51R2TLnO9VpXF6pcmq/wqZ8gOSOSqTVbjNc133lfy/LsB2CZUqttaPhUz5yMnshbptaJqO+d2wWBzX1Zc50E5hd+eXLroxzvXfcqEmN1n/DmMuIVCh2qFdcjjdatSE7rObd4yKhwgDa5Plft3UGs+iE42Czzct3hyWbmq3DqX1VibIQzO3G6zU71hMOBb7p7atJ3yuElWLVz2S6rSGu/NPCY5zW/MQOysgRvvsgxwa4LXGRB7LLUaQ3X+VbuoUyx5nbusGouaWDIUOvtTKokNATS4HylZDNN0gZ4VmoSSTsjqaeesMrOMQDgJBaSyTJHEcKPdtpMJ9OsBSIMk/oj6a3yrOAYEtkjYplJztYglh9EwM1NDmlJA/mwSs+WmzGjT4ZD6h1epV+O01AQ3HbhJuHEQ0OlhQh+hoDRJ7rNbjpGtTLACICxOnUdOWqmPc4TAA7J9q1j3kbdwucmN7rpdFtTWlz2EtAxhbrmzaLcuI0uJkA7rd8PXlJrG0QQHDBBxKX8U1mNDY8p7hal9KRv+HbV9KmKmoOa4bchZfizqJptFvSdv80fsh6FeC26TUqvqBwAwJyCvKXty64rve8zqJVxNus/J348oHAk5TWGDuszMgEmfVaaM4BE9l1rx8+3rfh67IttDtmqdRqipceI6NLRusfTqT6NsXOETt3We+rH5GmSd14+rtyPo/HxZPYDcG8r6R8g2XZtKGloXP6XbBuYyV3KFMBYro/EAdq2EKwc55VBo32KJpJP9F9WPnjac+iIfoqxp9SiaJyFqQWmAf8AYWyyrGjVDifLyFkZ9vVOY0zgj2Uo617btrN8ajuRJjlc6IK7Fgwtota4+wKz9Qtwx2umBpcchZlz0bPyxNAPMJtMCELW7YkJoxHC0ytpLcBPa4wM4CUBJkpzAMAZKdJ9FhcRjHdb6dEATv7rNbOJIacj9V0KYGBsi1pBbNduN0upavbJB1NW2mI4TS2RuiU45AEJrB2W19sKnyjzBVZWT7i4FJojlxOzRyStazl0fS7E3dUlx0UKfmqP4A7D1Wy4qNuqzadszRQbhoG59SruqzRTbZ2mKDD5iN6h5JXQ6B02vf3lK3tmF1Rx42A3JK49979OvHOtnw70Kt1K8bQoNho8znHgcr670fptCxtadK3aW02thxduT3lK6B0mj020p0qM6xPiPOC8rttaAMbLz9dPR9ei209UcMGw7+6K4rMtqL6tZ2ljRJKavNfEV1Qua34F9bwwIJdwT2WPsHdQq/jnW9bplam92oBzQYJHr7Lo3Fu65DKNT/IEGp/z+nssXw/0htg11V5Dqz8AjYN4W3qNyKVIsb85x7KtLmdcvwGihb4aMEjC5DKr43JPdXdCXnOVdNh0B3PC1IsaLRtSq18GSNgY/Za20G1NJqDQ041DafVMoWb22rbkPyPMQBJhMNOo8eMXhrKgmIgE+yhSGUXUarmzBbkf3C6dJzbpgDzFVuxHKQaWuk17XatO45AQtJo1PJBMSCjFrSKVbS5rhM7FLFvXpuDtRdB2C22tYV6WoCHDBHYpyvKjA03FzQSC09iiUUWSiiiikiiiikiiiikiiiikiiiikotBUAgK1nuqugaeTypA/FtDy2DAMLTTeKjZbsuUx4fXAePLuSeyN18G1SKQAZstWT8DXUUWCjeA6nPOAjtb5lcubs4cIyrWxRVqxKknsgrUUUUkUVT6K5UlOnhCXEQSMcoiVY2Ui3aHDJ+yFrGNy0ElHoAJMQUQEDeUpTQdzhEos91cNoUy477AdyhEdSufCZ4bD53foFy6LQJe/DWqiXVqhc4ySZJWW/useGz5Qu3PP4c+ui7m4Na5BPygwAn8SFy2u84PqujGpozC75jz7tGds7IWtAyFYHHChGMbqKKYVCYyqc2TMwpLKEt5R8IM6vRQwt9Jjt2hZ32LHGQS0+i2wojVjk3FrXFM6amtrcgFMsbwPaGPIDm4MreQIIA3Xn7uiKd4ASWtJmQtT2zZjp9TIfbmAPdcOnAP7ldGvYV/DLqdbW2NiuJVc+k4g7jcKk1Xq/Z9WCSUsNBaYMpH4khpDm/VXSugPLsCs+NXnKsxOkjOwTWkMZpMfVLZXo6i2rgHkJTqzQ8gyW8E4VZTz1JWlrhTadRxwq1AkOgykvq06hA1AeqKlcUnVNEhoAiSseNb85+WnS2owu2I3SaLgJBGoI69xSNDyw07Y2KzUqwpDUHCSiz01LIdqLnQB9FqtqZ8YaQc5WKlcU9Ul4BndbqN9Q16fFDSOVm61LHpejU6Lqw8Zv19VyviS5Na7NOlljTAKV03qlGhcOD6ocDgHhD1N9J9XXSezUfNgrONSwiq8UmNY15M7jiVnnU6EupWFR51Rq5IRQODjuuvH08vy33hzCWy39FusCHV2A991zmTqkrdaNLqjQN5wjv6Z+Pb09Vd1mMoiMNAyuNbk3FYv4nCd1FpZbhky4hH0qjopjGV4p6j6trrWlMNaF06DdsZWOg3YbLo0mwFmi/T8KgbdyjDYPf0VQOAE1oGn15X1nzwgfQImA+0bK9I0kkx6KwOBsmUU1gwDH0WmiGH5wfSO6zsaW5ggRhPpkc/cJ0uzZ1AWNHbhaKjQ5hxMhcy1NQeZrS5nJGwXQc/S2SY9Fzs9tfhzNJDi2OUynp5/RC52p5M4Kg4MrbODMAxwn0XadkgOlx59Ebck9+yS1036qoJEe2F06RBI/dcemfMOV1qDpghVUbdMQUwA77hKY4OHmweE1rocGjJOAOSVk06lTdUe1tMS92AE+7qtt6ZtLcy45q1BuT2CuvUFhS0CDcvHmP+gdkixtn16jWU2lz3GAP7rHXX4jXM0y0pCQIyeBlfZvgvof8AhvTWvqU/CuamXE5McD0XP+D/AIRoWZpXt3T13DQHM1zDHd47r2jPHDgHeGW8kSCvP11+I7yYYxoaIGyp72sEkxCXd3NO3plz3AHgLlVb9ngms9sMG3BeVmTVrV1O9dRs3OpNJqOw309VwOjdMde3fj3Xmp03aiN9RTumVKvVPxNvceQnzUzyM7L0lpbstbdlGkIa0ff1VfShlV/hsJ+y83fXMOc9+SdguzfVRpOdl5m7Bq1IbvKJGoS1xq1BxK10qfiVWsBgE7obei8PawNknAC79vQbZWp10jUcTJEAlNqMtqNM0C17NJ2MEwfVKp2zatqWl7wWkwNWFq/EUvC1Plg5DgQQjpvpPZ5C0tP6o1a5gozTD6hILjpA5CEeG1hAqedh2PIWyuKIoubEPBOkAyVmoWor1BVrMc2OI3TOheWqxaQ8uGxGVuSqFNtNsMH3TVm1IooopIooopIooopIooopIoopPqpIoqLgEPiZgNJKkNc++JD87cLbqf8A6PuUq4pPrNjDY5TE5dzLbcvb8vMLn0PGuHhtNsA8rruoupnRUEtdj0WilSYxsMEDkrUoZxZM0BhMtG/qU6hbU6Dg5oynEACTskueXH9lDW8GQosFOuWh5e6A1FTuPE+Wpg+iPE62qJQ1lvz57wibr2kH1WSNRQKKSQFFFFIqq1ziNOwTGiAArUJUgVXBjSSYA3K4V1WNxVx8owAndSufEeabD5RuRyskik3W7fgLrzMYtDcPFCkWj5iMrjVX6nGVpva2ppky4nK5xcvRzHn76PDmyI3XRDtNOXFcdrvMPddcNDmAHZNZl0bHh4kK5M+iEQ0ADZXKGhFUQhEBX5pxspLEqBQSrQgBsE+qFwJJnZMKhiFIrR6lYeq0NdEv3c3IXQe1xA0mENVpcwt3nBVqxg6bcGralsS4YXCvgRcvDsZW+g42fUSwghjjsldbohtYPa0gHMp/Ln+Mct7QcgoaZY0+cSmtbJMcLNVGl2OeU6zDwyk6CBOVL1lINDYIPCQx5aP1BTK9YVKIDvnGxR9NzCqFvSJ/muLWHkIH2zNRFOpqEp9tOgzmUu7tyyo1zAWh3HqracZ/w/n0l2AV13dFZ+B/EMeTHBXMrUajCHOO69VYFjOjvc94c3TgLN6a55m48wy1DnbEtG5C1f4fScA5p33HKZYuBcZwHHC21NAiN52XHvuu/PMYB01hcG6iJ5C32/w6bhn8utDgYIKYBoh28Fes6HRbdUy+NOoDI7rnx8mtdcSPnt3aP6feut6pBcOQmsGAur8cW/4fqQqSDIyQuRauNSnIyQvRLry/Nxl9NDRmF2+k0Y87tgJXIptiJ3K7rHChYR+YjC4/L1+I6/0/x+9pNSsbm6MbNMBduyZDQFwul0iHFx5Mr0du0QF569f5b7dsmVtas1s0gZWkLEHT8K0xpABWgNYWSCdY3EYj3SBMz2TWjyTmTuvrV4cNpsY5pPPAVAEHaAgbMjBAPKeykXKtQ/Fc5gacgbImglox9VA1rTkiVZqtGAJPY7K1Nlo5zRp1EN5EwFLquKjtLdgsjnvd8xgDYKmyYhUn5WntdAxuj1bA4SmYxzurkyJGeydRoP0TWER/VJBmOPVMkA+qtDQ0jjJWhjyIzBWVpkAJjHQ7TPsnS6IrvDQQ6Su3Zt/w62F3c5uqg/ksPA/1ELF0W1ptt39SvhFtSMMaf+K/gD0UFar1G5dcVzvgAbAdgs9dZ6ak/B1EOr1C58veTk9yvqnwH8OsoUm3lwJrGNIiY7Lynwh0c3l21+gmk0jjcr7PZWjbai1rRmBjt6Lz9dY78zGilOkTk87rN1G+bbN0s81U7Dsm3FTwacNBLjgQCcrCzpz6pL6sDVkh2SuefmlzGNfd1zUuHnw25dH7JF/ruKktAZTbhrBsAtPV6ptqrbaiwuYBLiBElLsWur3FNuiQSJE8creh1uhWItqHiv8A8yoP/iOAttaqG+Vp23V3NYUgGg+Y7DsFyK90GhzQJcefVY+/bQryoIOd9lkoUS52lrZcdk+3t31jqgmNwurZMYG/5TmOG5cP2UXPdZ12VKLWVGtecuPLV0rx9Slaywan4BMx9VT6VKtcglztbOOFpcGuIDgCRkArKpbXa6QLmkkgSIRGlTIgsEdoTIUUGdtsxtTVHsnafUhU94aJOyzPv6LW6iTHsszqbjWdde2sCFa5/wDitCNnA+oWqncU6gEHJ2BWmTlFFFJFFFFJFFFFJFFFFJFICiikiikqg4HYqS0NQlrCRwESXcO00nH6KTnuque7zGR2V+ITjhJ/7KkkmG/dbjNLv7l9Ol5TBKx21xWqkjVnv2W6tb+KyDwslyRbtaynAncpRlWoXANBkDc91KLiMfZIol9RuoiG7A91qFMFgcDpPdBwwXFcRAIW2zrVnvAePL3SbevTosiq2Xd91rtaza7C9uCMR2CKRPuabaugnPKeuU7w61yHN8oG8LQK5q1wxmGt3KMTaohYdQk7Hb2RISLndUuvDb4VM+d257Baby4bb0S4/McAeq4Mmo8veZJySVvmb7Z6uBaQ2XO+UblcXqHUHvrHwzDW4Cb1e+BJo0jDRuVymN8Q6eSu0c7THXZOXZ9UIuGO9Chq2bx8pB9Fiq0KrMkFdJXK866VOo0PBJBC6tC4p1ANLvovHl7m4kgomXVSmcEhWjxx7UkxhQAY7heWt+tVWHz+YLpWvWaFQw92j3Qo7SucLNSuGVcscHDvKc2czlRHKiqR3VFwaMlSF+yhMDKEGdlTsbmAhCc4NEuMBUCIkIKzQaZnZCwHQNLt9lKOX12mAWVRu0pVUG7s2PwdIyF1eo0jUtHt0yYn6rj9FqhwqUH+sBP3Gepl1ybmWOlojuUh5JbJyV0+rWvhN1N2O65QzDTsn8M9TKhdhp2nBUrUwW6gcqNjWWn6JdVr25PyqqldPpjqbrcte3IGI7pD2vcxxdMtOEzpjWGm6HQT+63tpiraVIPmG8rNrpzHKqNdUpQ7jYrT0lpq0jQcecZQDWKLm6ZA3Q2gfb31JwHlOYXKV1sxqqWopPLPzDhZH1CytJJgcLRe3PiXzjsFjqgueSPlXOx03Y6lCu2rSIJxyF0+mdQq2lPTbueHTgbj7Lz1Bp+WIB5Xf6VaupVaZLdQOVxzxb+2L4mbXqhte5IcT+i5dk4Bpa0aV634mtfG6eXDBbleOsZ1lp7Lv8d8o4/NPXp1+ntFSs3VtK6d44Go1jNguRTd4OWmSuj02i+s41KmB69ln5J+T8F9e3T6fTgDC7Nsw4EQuYx4YIpiT34RGrVIy8j0C4+Nr0bI7ratNuC8CPVE67pbNeCeAF50xu7J9UhtWoXkNpDSOThX8YtfkhtZm2lPNZvhw0Z3ysYac8gblTV9CF9J46eK5nYBNbUPJMH7LM1pAk/RNZJHZIPbnJ2RAjVvKGmQI1Ax2RyO3sEahahsrac/0Si6SANuyYzDp39E/Yw1uPdMFQAbTKQCScblMDSPmETyojBzKNhkpQIkBG1w/wBlDDwR3XW6FYC/u/5jtFtTGqq/aB2HqVxcyAV7zpXRXVfh5raNQNqVAXOBwD9VvmbNV9TXC6t1A9SvaVC3b4dnR8tNgwANpK6lmG+LSt6bNTnEAce65XS7QitUZUIa5roIK7fTK1G2uqz6zwKmnTTPAHJlefrdduMx9p+C6NhQt6X4S5pucG6SyP6r1kgbmPdfnKjdOpVS6hdEScljoldS06x1SneW7a11VdSJkl1SRC5Xna35PveFF8np9eq/jXtF091ENwQZEptv1zqAJJq1C3hHgvJ9EvenW1y4urAhx3LTEo7Cxt7QE0ASTiSZK8jadWuHafGualInc5IW/wDGVt2dQLm9ySFjfw00X1WqKz5EvnvhHYWjagFS5qhsfl5WI3dUyTcAk8kBKfdXA+R2qOQAlSvVM0lrfBe1rO2DKaTjBBK8JcdZvKLiC0wNzpwkU/ie6DXCQIyQW5Vg19DkRJIHqo0tcZET+q8I34squpNwHTjICfT+IjP8ymwHuFYte1kE7iVZMLyA6sKjS6nRJHcEJtLqLXDzNqGdwMlWF6K8MUHEDK5VxSe2221NP5hkIQ+i9oNQXDWnlxCsmyHl8WpHbELneZuunPVkxynVSwatJc0HK7Vi/wAQUXtaTHYJYfYNGgvI9DC12xosaPCruazeIELprFdJRZhe286TVE/VU6/tmu0uqgH6oDUoswvrY7VmIzdUAJNVke6kcos4vbYmBVar/F0P/db91I9UTCSby3H/ABWpL7q3ef8A1ACk0PqxsEs15xCSKtvOLlp7KaqB/wDyAn0DfEBGlwwUYbS3Do+qzF1CP/UNUa+iNrlmUFqDqbT8/wBJReI04BBWLTR5uWfomMfSYZFemlF1XMe7ILfZRlNr3aWkjCqo+3GXXFMRuli/tqbpbVB4mCkLDm/JJRGyp1NDqgxOe6yvvLWdRqATzBRnqtuxoaa7IG2CpOm6jSqUvCAAaNgMQsD7Oo0EAkgbLP8A4zatdP4gAj/lKYeuWkSbgQRiGlWVauhaPdVHjAimDM910ZoUASIbIggLljr1lsbgn0DEq56909nFR59AArLVsPAALzSEEnAKfb0X0qJNRwa05cfRcV/xJTJIoWwB4LjJWap1OrXM3NTy9hsnKtevtbmncavCMhuJ4QXd7Rth53S7ho3XkR1x1swstobKwm4r3FQ1qr4nJJTONF6egr3JuKpfUMDgcALl9R6jpBp0T6ErnXF+SNNMwOSsrSXHuSuk5cr0PL3QMuK206YoU8/O7daOn2gpjXUy87DshvR55H1W2WQuIBPdJfUMEyjeZ4Waq6AtRmqJa7DmApFS3pOE5Z6pgkBKqElaxjbGWpYudmm8OH6rNUoVqe7SI5W8Og7wjbXeDjI7FV5U7c6nUuKUOpuePZdC26/c0CBWGto4K6dpQpXFMPe0MfxCX1Do7K1P+V/mfoud6947TnYfbfEVpVjxAWO/RdNlalc0wWPBB7FeG6h0urbtDmMe4jcjIXPpXVe2cNDntI4yEs3mx9QaNLYCCoeH5BXjLD4rr0obcND29+V2KfWrS/cwNfofyCjGXcIAYYEiENu4BuAd8oqbmOaNDw4AcJDKhpVywiWnIKG42VI0GdoXlKhNt1PV+XUvVEa2niV5fr9s6m5tQbTBKeftnr6dq/pMubUACZEjC8hcUvCruacZwvY9CrCvYtEyWiCuD8Q2pbdlzRg5TL7xmzy51xqjYfHKoVMERPBQVQ9jocY7IQ45kQulmuUrVbOLDtgrr2tVrHQ/ZwhcSzcHAt54Wqm803icwvN8kyvV8eWNNR+ms5v5Ui7qPYadQEFoKO4ggP77+ixPa59JzXfKMhYn7daeXtrVy5uJQOcW1NMJFm9rY7jBC2hgdU1gY7rPV9tczY7vSLXxaHmAceDyut0oVGPcyo2Wt2K5VnceA1jqYzyF6KzqCrTD4g8rh01PSdRpirZ1G+hXibW2NOq9wEmdl7PqF0yjScDlxEALi21DUC5wiTMLfx7B1NmE2tqC7U4aj2XSptAgduAo0NaIiAio6nPIA1HiF0s37E9fR7IAQucPp+izX1wLNp8Uw7hq4VW+r3lTQwljDwEeK12q9+ym7RT/AJj+wQsp3NyZqu0MP5W7oOnWjaDAYl53JWu5rtoUi9x9lm1qPyFkDKtgBOTBULi7LpcTuowdsxuva8xoxjeNo2TGk7c90sGDEQmMx7cFKwxruETonB+yAE7cfqoTnCFYYCI2n0RhxBABgpdMSDJghNp03QXhupo3KQvUdUn7oy4uOfsk6zn9CmNzkR6qGGNGd8prIBk57hKLyDxHoicS0NO85gKawZd5iV6DpHWbxtLwKNUhjRELzYIJyPorY4gy0lvqDCZbPoWSu9cNrm4NWmS5zsmeUQNzU/4D57tIK4jKrx+d/tKc26rt+Wq8D3XOzWpcdWn49Gq17adVj+JYY+6dd3FWq/VVbUkYnSf7Lls6hdtEC4qeglPb1a+AH/1NSR3Mo8afKNVCsA7D3tJ33C6dK7ewD+dUDeMlchnWr8f/AJB25A/sm0+tX0ZrCOPKD/RXhVOpr11HrT/Aaw21sdIw+XA++6g61Vbs4D01n+68zS63fGJewgb+Qf2Tm9aupz4RH/8AjH9ln+Onyj0rOvVYw/P/AFlPpfEFwB/mkf8A7ryzOtXESads71NMJ1PrTi3U6hak9vDH7K/jq8o9KOu1zIdUeR/1AptXqjDSaWAlw3JIJXlh1oGJtLafRkJg6s072lH6SE+FXlHoXdS1mXNPYbJ9LqwaAND574K82OrUebOn9CQjb1Oh/wD0o/8AmUeFXlHraXXdMatbj3gLRT+ICD874/6QvHDqVsdrd4//AHKNt/bH/h1QP+pH8dPnHsm/EDSINV5HYtlOHXqThBef/ivGMvrTnxh9QUwXtmTh9YH1hH8a83sB1a2qvLn1DJ3GmJWun1m2pt0h0D1BXiBeWhGKlWf+kIhdW3Nep/8AFXgvJ7dvWrQOnxGA7iWlaR1i0reWrXpAf9BJXgxcWp//ACD/APFMbXt5AFz92lPgvJ7U3lg3zMuGFw2BBEqDqlEiA+mB9V49ta3I/wDVM/8AiUYqUOLpn2KPE+T1v46hGKtP6kohe0o/zaf3K8m19KcXVMpmtkf+opK8Rr1LLuiRmrT+hKjrqkT5atOPcrzA0bivS+6Maf8A3qZ+qvFa9NTr0onxaZd2nCsXTBP8yln/AJl5oAcVKZ9ioGmMOZ91eJ16YXTRuaJ9dSv8U2cmlA28y8yWE7R91PDd2Ri16J1/TZOoUzPYylO6oyYDQQvPPY8flKrTVH5TC14wbXo/8Qpub8jBPJKqlXYX5fTLe0rzpL45VDUOCjxh8q9Q+rRc2NVOf+pZK7Wv/wAt1IRyXLhyiAn/AMq8YfKukbN7jJrUf/krNoQNJr0o/wCpc4ROf3Ru8Fok5lOBsFrTGXXNL/5JVQW1P/jB57NCVRZTrSKVMuPfhSpaubOpob9QoULrhoaRTB9ys5rPLsnCU94a4tGfZL8ztmn6rpIzWsVg0yRJ4nZVUun1ME47DZIbRe85GfRb7Xp7nEF3lH6pxm0qg1z3QGknhduwtBS8z8u/ZDSosoRoHueU8El4IMt5WsZ1rJMQMLJcUYEzJ5T9QGScKagRwha5VWm5m4gLKWh5XUuwarw1v1KzvtdLC4kMAytC+2FzSyS7ZZKhk9gn13gugGQkOM4XSRx6oNyrGMD7qaVssLY1Hh2guaOE30J7dXpNQU7fS5onu4LZRJqElogKqTdTNL2gDsntaGiBgLydc+9eyd+sBUaxrPM0QsVx0qzu2S+kM8jBXQeA4Q4YVwAABsrFryN98JCS60qEdg7IXnr7ot/Zkl1IuaPzMyvqIhU5oIyJ9E+VHp8lodXvbF8MqPEbhy9D0z4wpEtbet83+oL03UOiWV4CKtBhPJGCvF9U+FqQqubaVS1w2a/b7rWyi8vYW3Xra6qMbbuDmncp3Vrf8RbPaORIXyy66d1PpbtZZUa0ZD2TC29N+L722IZcHxGbGd0fn0ss+3svhm48K4fRcY7BdrqdqK9IumCBheS6f1Lp17Wa+nXFG4mSDgEr2NC5bWp6CQZESCq3WeZjwt80NrAnjcLO8Goew4Xe63Yhoe9rRqBmVwNZiXCQN1uX059zKqhLSWn6Le2H0wRuN0ujorMwAHRCO5pPtNJOzly+Wa6fC0Pa6paF3ZZ6Z8RunlDSru8B7Qd90mi/SZndcsd9W23NKuWzvldKiS1sHY8rBXkPY8GQU+g6o+oGEGCs9e2p6dag6XN0t1Dsu0y6NOiGtbDiudTFKzttW7z9VdC+DRrfEdiiQ62Npvqu1EF7z+i32/TbmsBDNI7lZLDr9rQc5z6R9IymV/jMBum1tHudwTgLX0HYodCAzVqEnsNkd3UsumBjn1GsI35leTuOt9Xvhp1Cg08N3WelZPqP13VR9QnlxR7J/Waw6tfl9FpFLae6Za2jKAEDzd1op02UmDSIHoq1SUWobqgpsLnGAF52+uql5VLabXvbwAu+60/FQ1xOjkd10bTp1Ok0BlMNCzrpzZH42a4gEAAztPCYwHJ/QJYRtGYXueQ8AHIHt7qGRuqYcTsUJGUg0ExPKkHndLEBNpjcnso0cjY4PKNrn6TpcQ08SlETtk8opJhvA7IZ+0G+/wBSmAiYH3QYG0ogCRIGEk3GnfKa7wTRBD3+LO2IhZ2Scko2zt+iCMEbqgTGJhVtiITAMZ+iQOkwvMAwd0TWhAHZxhODWATqk9ihKnH6SjY0nbYIabgDBH1T6tvVZb07h1Mso1CQ13fur6QRIx2TNZODiOAktPIKIOSmuQGCBvxKgfjbGxSdcCIzyVbHT791BoY7y7pmobhZw4HGJRB3bZSaWPM4xCMP/RZdZmAUTXE/2Umtr2mJMeqLX6rGHI9ZiD9EstjHnujbU47rGxxA/dFq2gq1Y2B+c7lMY7IE5WEPR+IVLG8VSMAyr8QzusIf2RB5UW9tRH4pCxtcSMbFWHHIUG5tY7IhVPdYg4jBRGp9lYm9tY91fjH/AGWEVPurDlSDW9tZx5RisZ3ysDamIRh/qnxTcKx7mUwVnf6isVOppOcohUkynxWtorvx5j9Cm/iXgSHn2lc/WDz7Kw5WRnXRbd1T/wAR8+6YL2qPzmOy5oeUYf3yrxh8nSF7U5eUxt5V/wBS5YemNeDuVeEXk6P42qNyCiF688ArnBw5KY2C2VeEXlW4Xbv9IUF0f9AWIHmdkQcFeEXnW9t48fK0AeihunuyQCsesxAwE2kPEcGhXhB51soA1STsB2C10qDDkgn3Q0WhjQ0cJrXBGRrT6bWs+UAJzXFZQ8TumB6cWtLXY7oS4zIwUrxFYqeuysR2t0QRKF1YU2nyk+iRVqkNmYWd12WZ39E4zuNjKwY11R58x2C51zdPqkiYb2SK1Z1UyceiUDJjJW5y5Xu/gRPfdQZTqVu+psIHcrZb0GUz/MaSR9Qq2CS0i2tH13AkaW9yu1Ray3YGMEJVOozZpHsjBBIcQuXXt25kh1OoJzjsCjcXlwh2EoEYxlEHiYBWca08nHdWfTdJJJGDBRNcQIOfVGHTgFYKVqJ5VwS6Z9ws2HTeCV5vqzXm516THBXo5SqlFj/nEo+m5WewaKtmPHaCB3C5vU/hfpnUQ5wpBjz+angruii0UiwYbCG3otoAtkknus6Y+Z9T+CLqgXOsX+I0ZjY/dcin1HqvRKmmt4jWg5bU2+i+wU6rvFfqbDBskX1pbdQoubWtw9u2QEa3m+nh+n/GVtetFG88hODJ4910anShcUHVenVBWYRMCJC4/W/gm0LKla3e+2IO0SPsvP2w670J/i2bzXojJNM6hHstS/py65mvXdGokXnh1wabhg6sLtfEVs6laU34c0bEZXnuj/Hljejwes0Ayqca4jPqu6Lxl1ZVqVJ/iUIljgZWOrd104nM/trgAncbFC0R/VACWhzTuCjpgvIZHmOymZ9mF5qOaym2SCttW+pWFIY11zgDsqpUTQZIw6MlcvqDxWrsGkaxv6rGeTrPUei6dWfVoa62S7MFS5pCpUBGB6IbXy0GDsMhbaTBIKWZQUbdgbMALRTosJERjgIHsc520DutNBzKTYcZPohoLHAOLQMhaazDUpNaMTus5fTaS4Dfuh/EOccZj7I0tTyGtDQZjdMtaRrPjgbrEwue6OStzazbenBcG9ys046jdFFuN1Rujs0LzlfrTGEik01D6ZSm9ZuXHFuQPYrLpPj6flsAA4yVBvJMeicKNZrY0H7KFrxgsI+i+g8UpYGyZpwTzwoxhnzCI5VgmMAqF9BaM43TNOiJ37KhjzHdEZcZMk91LVsGC44HBRYIkY9UIaQM7cBWAMKUW3HKY10blBHYyjbHIk8KWrGco2OIzx6oZ/3hQxsNuylo9UZGe0otRPv2SxtvgowYiNlLTBgyrbBzx2QtEmDsmfKfZCXyOy7fULu7uOm2ra4Hg0hDWBoAI7lcSOZxuFNbnAAuJHAKsO+jQ4l5dAE8DZXifVLkhsxhQHO/1SNOJxMyra6UkTKMGCVLTg7sia87bpYcFYMZUjg7CtpJMYHqlBwnG6vVnulWmyZRTz+qUHZRBygaHHlGHeuAktPJRSN1WI7VlWHJYJMIgMSpG6+36JlKoGnOSkEAZP6KwRwEyCtGs7yjFaN1mDSRqgog09pWpyNafGJ2V6ykhp3hEGmZWpyx5HNcd0bXSPZKa07pjARlPivI0EI2u+wSgCZMIgD91eIvRweUQd9EkSjB9Mp8WfI4O4RA7CUsTuUQOVeK8j2wB3JRxiQkCSmyIVh01sRJKsEpU5wjadgrBpoI+qNrsb4SeUbCcdgrEeHAJrYHqUhsHY5VgkFS04nO30WywBL52Cy29F1V3ZvddSk0MbDeFm+jzDttsq2nMoQVYPZYbM1IgUkk8ItX3SjHOESSs1S8iQz7rLdVyX6QcBIknP3WpGOumh9Z7t3ISSRJSWkk+i129Euhztlpj7DTY55gZW+2tww6nZPCJrQ0AAQmA9lm1qc4a08Ip7/ZKDlYdystaNzGvyd+4Ql1SkPL52+qKY9kWoRnZQ0VG4bUEbOG4TRGqScrnOYTXDqTT6k7LoMaTBIz3VZFD2lEHIAx3ZMbTd2XP037WiY4bDhTQQJIWerd0aBh+CUbG5K1ajqiMd0xpBWS1vKVcnQZI4T9VVxinSn3K5ddyfbpz8dv0bJHCGQ52+EFSlf6TppME8yuXWfXoP01CWvOwXLzl+nafHZ7rqVHDWG/lG6j/Fc2KXkGwJXJqXFy3Oog+yUbmu/PivR5mcV0ru0BYDUeXk4IOxC8P1u1PSuoa7dxax3mAB29F6Jz6pILqhMLkfE1B1Wi2oHEx3W/j7zrGfk43kNXpHSOvdLNxc27BcNEOew6XH1leXd0HqPTneL0O+1sz/JqGCR2B2W7pdy6k80yTpdgiVvcI7xwFvuZXP4r5c+3CodaDnm36tQqWl1MSRAK9V0ltB1LUx2tx3K5d1Sp3FIMrsZUaeHiY9itXR7N9qNVAxR/0POfoVz6+nTmN3U3eDRL4wvN1KwrXDHUzscr11ZjatIh4lvIK8/bWQqXtZ1NoDW9tlcemu7rsUakMbPZa6FdrRk5XJp1QPKTDhghNpl7nQ1hKqxHW/EsjJJUFYn5Qs1O1qviRpWmnbMYf5tSP0Cy1JaIGT5zPoFppMJEu8jVgveqWHTrd1SpUYGt3JMr5v8AEnx9c3TnU7A+FS21clWNY+q3V9QoNLKdWmx/Ac4ArHQtfxtXVcXGpu4Y0wCvgta/r13aqlV7nE5LiSvR/CfxDcWF3TY+q91u8gFrjIB4IRebinefT7nRo0qLQ2nTAHsntcZ2H2XPs7sVrdj43GVqp1gSsNba/NbCz39E0UxU2bJPdaddGqRqYwHumeCyPKcei9seRmFFrQRpGd8BLdb0nTNMSVsLY5mOClFs+hSGYWNJ7gIj2RnpbAZafuFpoghy0nICTLjns6Yxxy0R3lPZ0WiRJP2WxpnCax3Cob3v4Yf8Dof6sqj0OlktK6jZ5GETZHzD2TtY1xXdEHGfRJPRy1xBacL0tOCRGVcODnEb9k6nln9NIEHACV+Dpj/jMB7FelrXYpA+PRLRsCRgrz/UrylWJFOmxo7jdXO1m3GY0WsMawfUJrWsj5hPJWInjZGCd5wt+I8mvwmH84hW2hTn5sLM1wB7hMdVEeUQVeK8mgUKfBP6InWrCJkn7LIHECZRtqkcp8T5NAtgDgPRfhff6pdOuZiZHqntrx80qxattmTkH6IhZPHKY1zo1N27p9KuH4dg90eK1j/CPAhX+FJjI+66QcD7d0LqLXfLgpxbWAWrpiR6ZTBZ1PQprqL2nCge5hT4jQfgqgjyyqdQewwQAVoFwS3H3TrKhWvK4pW7NdR23/lXjJ9jyt+mKnQfUIAMk4gBd61+FbupT8Wu5lClEk1DB+y71na2PQGtfXcLi9IktEQw+i5PWut1Ll5L3TGzBsAsbbf7Z6a9c/ah0fptv/6m91kbim3H3TmjoNIfJWqEd8LzL70OfNQ5/RZ6lyCZL5WrzjO69h+N6G2Q20J9yr/xPo42sfrK8Qbo/lwgNw8/m+iC92zqHSCc20LVTuuhPHmplhXzwVjPzFEK7p+b6K04+itHQqg8r4PqnMs+jVPlrMHuV85ZdPHKfTvDyrb+1kfRR0npzvlrM+6L/AbV3yvB9ivAMvAcaiPqntu6wzTrPHpKtv7GT9Pbn4do8EoHfDreHkLyDOrXlM/57x9StNP4ivmxFc/VO9D+39PQVOg6ASasepCQelsH/wCQxcw/EV44Q+pqad0l/VKlQZgHuFqW/lm47A6aAcV2Hsmf4c/ipTK4Yvn7ko2X5Bk5Hun7Zdf/AA+oMamE+6sdNrcEfdc5vUoGQfeVB1L/AE6591F0x06v2CNthXA+ULlDqdQH5zPumDq9YbPKtqdD8DVkJtK2DHfzATHZc/8Axe4j5ghHWK3MFHtenoKbmgBoEJwHbZecHV6sbMlabfrFbeGkLONSu3B7IoM4XLHWan/tsVHrVUyNDAUF1QDyFcEg4grjnq9U4gNQ/wCJ13fmj2UpGyta1dRIzKV4NU4DVkdfVnEgVCPdLZc1HOJLzPotSs3l0RTqMyWpzbs08O2XJ8aqSfOYSa7nATMq3Wby9A2/pxmB9UQ6hSH+y8r4pnfKIVCeU4Nr1rb6k7DXLaypQ0BzqoE8LxlCtpeJ2W1rg5ZsalemNzZt3qylu6nZMkiXLztQsYJIxykurUC0gDKJyb3j0x69as2pkpZ+I2TFOiPQleSc/PpwrDwZzCf44z/JXpqvxNWaYbSYPVIHX7uqY1Bg9Fw8PZHI5V0gGuBnKLxzFOuq7L+t3bBp8SZ5K59a8q1n6nuM8lZqzgXbpDnHk4ROY1eq6dlfVaLzDyD3C2f41dMPlrFcBjtJkH3TnuDvMDkrn1xN+nXnuyeq9Fb/ABFcsEPdrB7om9QF3WDqj9DhtK8wXFuPsibWI5XO/HPw6T5b+XvKF9SezRVLHceb+6ebOhVGqk7Q/twV4ahckYJMHhdbpnUn2zw1x10nbzwuHXxZ9PRz8mutcWz6PzDHB4WC9peLa1GbyML0FKoK9uWjzscJHcLk1WgOI7LlLZXWyWPnwJpXWl27XZXcLgWgjMjCxfENuaV3rAw7K7XQbAXVFtSqdNFuSTyvX8nUvM6eP4+bz3eTOmWLH/z7ry0Wic8rD1W/F1X0W40Um4EcqviDq4rP/B2eKLcEjlcpkNZC4zm33XfrqSeMdqz6iHMNJ5DngYk7q+k1BS8U1GkanHHK8d1a6/D1A6m+HjcBdzoPVRf0NFRw8doz/wAw7rpZjlr0grUAcU5KMXJA8rQOy57XZTmO7rFLS6vVdu6F5X4n6kywLqtzXOflZOSVt+Iuu0uk2T6hLDVA8re5Xxnq/Va/U7x1a4dJJwOAnHTm3n26HVurVuoVS57iGDZoOFzi6SY4SA7y5VTgmU/TNtp7DOe/K2WroIIMEGVz6Zhard2RnCWX6A+Ar5tforBVbrIjPK9dbutnOE0+V8x/h1cFnTdJPODwveWd0GvDnRAXm69OnL8pW93XonDiW9jsuna9VGqKktPfhcqrRNGrDhjtIKXJky3HC+l9vJr1TLwPIIcHApoeCZJ3XkqbnNy1xC10r6szd0jgFHj+lr1bGgZ+5R6hMTnsvPUOpgfOCJ5C3Ur5j8h4Lh3RlGunUcGwQUipfCmMnPoubeXxy1uSeVznVScbk8pkWu6erHjM+qtnVzIkGeMrzslxM7eiHU4HIPuteEG17Kj1Zjt3Z9VtoXzH1PM4AxuNl4RlV45wtFK6ex25B7ovK8nt+otFW0cJGnvuvE1QG1HAHY4IXQZ1F5oObqiR9CuWSC4yfcrfEsZ6/wALLpjMhQOwqMD5XSexwoB9StemfoxpHKsO1bbJeQrB+4WgZqO04TAZSRJP12RlxbjZSOBGJOU3WIgFY9Xqm034wpN1CuWscwjCJtUcGFkc7IP6Ig4O2+yDreys5pwZC0suR+f9FyQSPT0TqdQzDiAO6qZXVbWY7GpJuHajDSCPRc81S15AII7rrdV69f8AVaduy9q03soM0Uwym2nA9YCver7jJRaXuDR9l6Gz6kbK28G0aGOcIc8bn6rgUnBre07lMqViGlrcN5KbJftnyz6arzqBzpMnklcivc7kndIrVolYn1s5+irc+lPftqfVMSUp1UrN4h5KrxJWK3h4q59EYfxPussjuq1LGtRtDxtKIPCxB3qia71ygtofsmMqd1zw7PqmtqGJTqb21AmNqkHBysAqRhMa/wD8qlWOi2u78wkIvEadsHssDaiMO5CdGN7XDui1kc54WJryBCY2oVrR4tQqnafdMbUEbrI10mEQP6J1eLUKhTKVYNdJ2WA1CFYqE84VrOOg6rqcXDZMY71WBtQwe3KexwIlFpxr1HOfdU145WcOP+pVqxlUqrWH5Wu3qGB2XLa9am1yGAN3VVI6TXbz9EWoHPK5bbh4OThONV3GxQW7VjdXIhYvFduVZrEN7FSatQIjVCGk4yTPKztqamyd1VJxzBUnRpVodDhIKRdvLTB2VUaukyclLvazSJ3JVBfZQfhMa8rGHGJ4Rtfwujk2B5laaVzpWK2DalUBxwtv4RsS1xRaZLfoFW5Lz/RKLj3TDYu3DkJtarRuDCtgvNBqznhWXjjCDwaxMxIHZR9OqMBhVsZymNqw4ZwlV6jhUhpwqFGsfyELQ+3LWsc8Z5VbDJay0XuNbJK1VXADJ33VaWAyBBKTXMrFu1qTIjqkH0CbSqTusTHHVAyicY2weyrNM6dIQ9sSlPaWOSKVYDyh0+q06g8Q5crLK6yyra4R6rbZvGpoO05XMJLTvjhabd/mGYhZ6mxrnrK950qqGU2sJjsp1GmGVtQOHZWXpobWtWPYZIEH0XRdFWgWVYD25BPIXhvqvfzfTzPWbZlemzVjSc+ywdV6tptW2dn5WgQSOVPiO/Yx/hUnSRglefpyHFz/AJiu/POz249dZT6LQ0ScuO5SrysKVNxHAUe/HouP1asXN0gwFuTWHJu7hz6riczyUXTLp9tdsqsMaTKQWy70TBSAcNJkd1u/TH5fRenXwumA0/MSJhB1bqosqBJw/gFeTodWb0uk1zakOGx5BXn/AIg6/Vv6r3Tl2y4115jL8R9VqdQuTqdLWlcQHMDKjgTMnzFMpsjfdMIhtKHEgg+6sjEBC3LtP6oVaGnGcFOouiMJGQPVOojYd04K+jfCnUH2VlThocHbhe06R1B99cNaG6WDJXlvh6yD+igloLgJBXsfhGwBpa3SCTgrh3Y6cTJr8z+IScrQ2qPALCBO4PKxay7jhW1xaAYIB7r6Nnp4taQ7EKatifoEsPBA9f0Rkah7KiNLpDQCrbI2wUAlsTglMAJyN+y0F6z3+iMO5SDk+ybTI3fgKRjJOQEWeR9FZMs0jbghMtmlrDJl6mSIE4x3Uc6T6JlUA5Ag8pHPvymUHUiTjjsreCx0bqqGgHU4/RSo8OfI+idVW0g/VGDHoUsEq5KQZkwnAACHCCkNciBkxyrUJhAfOyF7iXkyhe4IScyMykU1rvsmuaGNBBMnhLDmeGQT5lNUgZmNgrUaHECJ9kylUDN2gnus4JO2ZRkQRwpZrUKxJJj2CZQHiVA12BufZYwYn14TmOLWkN3PKS6t8+0Fu1tNv84QCQsVOJHICANaxsvy47KUXnUAOTlE+lXSp0ZbqeYMYCz3dQNp6Wu9SVdzW0Uw0Yc5cm7qF7iAZAVqpdapqO+EnXyhOcThL1ZxtsqqGlxmRgohkeqUHZRBy51uLJgqTlUYKGRss1owFWHFLDo9lJjZBODvuiDjOUgHKMOj17FWhoa4bzlGHwVmDuO6Y0gg9/VRaW1O+6YHnhYw5GHkK1NrXd0wPM+iyB4KMOynU1sqkItZPKyhx4RNeE6GkPjB+6IObwkMdOCiOE6sPa4/RMbULfVZNRwiDjOUpuFbtuoHnCyBxxlHrIMzlQsaQ9PY8ad8rE0zuUQfpMTITqxsLj3Tm19LchYmPB5yiDiOdlJsNxIwMhAaxd/VI8Qzlu+8IgW4O3urRY2B404UpOgEzKy6j7oadSAUJs8YgHP1SalaQlteHiDgpVZxafRMZpwqIm1CsmoFEx3mhaZx0rR/89pK7DHjZecpVQx4J4O66VO5DgIdKzTy6oqDui1AiCueytIhNbUwsNWtbSAj1BZA/wBcdkQeoNQdCp4D2lpzKQHSEQOcKTn3LCx8Tss73HYrqXLRUYT+YbLlvwYdumCwouI2MFLkiXSicOQlucDgjK1Kxgg/lpg8rRRrnYnCxFp45RNBxjKrIebY6jHse2CYPCISwg7juueHERI9itNGvpGl2Wlc7zY6eUr0PReom3rAOd/LO63fEHWGCkGWz5JG/IXly/SNQy3hShTN0/zYYNyuHfxzfJ6Pj7smMlNj7m4NV5JE4T6zC0REdloOijUDBhvC0Vmtqsjnus7+mscOvUhhBXHu3aiYn6rq3zCHFu5XPdTOoGJjMLSxgLDGAiYwGmXE+eYAC31Wiq0ECOMLNWP4Og59QQ3j1KL1hnLz3W6b21Gl7wQeOy5JlzsfRa7ys6vUc9+5P6LM0HWsNUJAn15RxAwjDROrhESAAIwjUQ/GFdFuZUeZJkIqO87eiUdpBC2WlEVCyO4Sbdut8DM7BdXp9Ei5psggg5B4Sy+l9GDafS6VMHzEAQvofQ7YULOm0jMSvAfCts64uqYIlrYJX06mBTpie2F5r9u3P0/FsEFG6q8U/D1eQGYK0GmO2El1PO2y+nK8JQOJPKcXxET6qi0QYaJVaZGMBKNbUmNQ9k5jw3blZRMidgnahGlox3QhDDjJ9kcEs8ozyEsSSO6Yx5AglOg+jTIbnY8I3N0iM+4SRW0QNyd0ZOqC2RG6kICAYdKUZkY3wmPJDRJlIc+MbpgpuwMhDziIQB4ULh+XdagpzTxCMkx+yztd9kwOP0UKcHEDbCskR2KW0kqnSQpVZcPf0UY4jM7pUmVbST7JZrS0ggDlUD2SQcowT2kqTRTyCTgItUndJDiAjZJ4KSbJBlPpjTkbhJpsJMu+yY5waEbpxppVBUqNZVIawmC7sFpZbh9eobZs06YyZkR3XOZlvotNNxZScWmCcIpBc1CXOdOBgLm1XZnZablxDGt77rBXcDhMACYyeVTQSQB8xwELiCYUBIM9lUw57H0yW1Gljh3EKpHdA6q6p8zifU5VAys1o2VThyPqh1BE3PKylA/ZTUOUMwVUz7owj1I9SROEYKDpwIj1V6p90oFEHDlCw7UPpyrDkoFECAknNcU1r1lDhui1GVKtbXJrH/dY2P5OyYHqDdRcC1xMCFQfJnjhZQ4EbpgkCeEr6atQU1d1nD+QiDpyrVWgOEbqw4QkaiMcd1QduOyZRWjVmOFYcs8mFYdla1NIfGE1tY91ja7kqw6ThWpvFUHlWXAkErD4h2PCNtbCk3F5a3U3ZU2u04cIWYVQRuhcQdlMthEiWmeyW+o4iHDIWdrnNEtO6J9UuZBGUjB6jCIO29Vna4R69lbXCN8plFmNQdPKttUg4OVnDkTg4DV+XullvpXjhvkBbKV40+i4zHgHuFoo1GUageBrby0osGu22sHRBlOD/XdMsb7ol0xrKtE29X/UDiU666VUY3xbV4r0TtG65b+3Xx/TO2oidWDW6icLIXlrtLgWuHBQVqktA7rU9sX0eKprPy6ArubPWzVTfLxwVgc8tMBNp3BEdxwt3lidMznOY4teIKuA4ArpAUrkfzG+buEh9pofAPss416rKweaJ909jQBMIalB7TJafdEx3Cza1It1MHPKDSWnITg79Fmuq4a2B8x2Rqs1VWo57vDpZjddNlRlG2Yxphx3lc3p1wKAqawHSJMrHbXRuLtwOBOFy7mu/Hp1Op6jR1NmR2WWzv7moG0y0AzE8wuqwteAw5PIQ/hWB0tbpK57np1zS3UhVqQdxuhf04OOPqulZUwXGclbvCaAseTUjzg6aGOAGxXYZY2lW3/DXVOnUY7YOE5QX1NzqZNL5uEtjaz7cPa6SIkHuufVdZHneu/AeoPrdGqeYCTQqGf/AIu/uvCXNtWtazqdxTfTqsJa5rxBBX2alVq0ntqNOpnM7hV1rpNj1+2fTuW+FdBs06wGR6HuFTv8U3jXxZgJETuo5hgkbgYXS6p0y46Zcvt7lkPbsRs4cELmvcWmBsum65WYRqJBBH2TKYwgdE45TqfAKRYfQblev+DbA3/UQHS4NGSV5O3ZLoX1r+GHTT+GqXDm/MYCz16ike4+HOm0rNpc1uXcruuY522yVb0xTAHpK0NcZ3+i4Or8fOpDflCaY52K06SOUJkDK+jrxMxpiNvolPZiVsgqaQfm5WtTG5g0gtzjKCSJ7LcaIjCA0QR+6mayNdyjBIKY62IGMjuhNBwGEo2mWPEP3HKaDoMzj9Fm8KoOExrHznbkqS3uLiSEvSTvstDaY7fQo2sxkJlTLokwrLYGy1hoj+qzVxHP0TKyASfbsiJAiCgaRxkotRB2WwY0nEYVlxAyhDiG8GVW/MlCWHjYDfEqAnYY4V06TifRaGURzkq1YUAeEynTdvynsawbD2ViZgI0+KBrQExsASEskAwdleoDY47KlWGzA7JRcXPk7DYIX1SB5Sl6id0wVrDoaITazj4TGCASsodqqNA2wE6rmrPDQkM9dx1k8DCw1Hanp9VxIJnlYy478KkSyQTKouk+iqcRwoJiRlOFYdjCLVhBsoM/1QTA7CIOSieyIHss2GU4OIaYAMhK990YIDfNyluwVjCIR/uVZkOhLmIRB5GyDgwe+UQd6JQKIOH1QYaDMIgTCUDB3RBxiChYZq4V6v8AdLnlQE8pRwcjDkkEogUo4OM4TRVOnSThZgSi1KTQ1yYHAcrKHesog4Dn6KTRrlWHfRI1I2vEgkT3Vopwd5lZclOcCZAhU1xndMB2rPsia7kGCFn1Cc59VQdvG6dTSTie6ges2oxumNEsLp2SjhUI/ujbVHssocMg/RBrIP8AdLP06TXkwJTrphZRBIiVy2VIODlNfcuqCHOJjaVIerCtrlmDirFQjKWW1rpG+y0UKxDYOWrnsfPutNI62kdkprFNr/Mw6TyEmq54hrsQlguY5PZVbUGl4xtPKoKW1/C6PT+q3Vm8GlUfp5aTg/Rc2rRLPMMt4KV4h1b5TkrPuPa0utWd+Ws6hRDHf62rPf0aTKoNtV10jkFeVD5910bCqQ0iZAWfDPcPnvqu0bUaQ4uGdkipRLctMpFd1Tw2vk6VdtcZAJn3WoxYJlZ1N0laRcF7myk3VLAdwUugDrBT6ojtMcHNEwQkXFqHealg9lbCB7ow/Tklca6yuXXeaQOvBXP01Kjy84aNlqvnG6udAMAblDVaGANb8rRujW+ZhLZcHegWOydpvc4C6AYBRe4blZPA0sNQE6pwsV0n06VGo/8AGS0z3HC7rHB50j5gMheasHlsvduF2OjONaq5x5OFx6jrzXatWAGeVprNJaQ2NUK2UmtZqJghZnipUfInT3XDq47cwdG3YKR8R4DjuEVOlRpsLHO+oCYy2JAJKYaNItmdtwSuXk6YWyjRqUiwO+pCXcN/DupvEFoMYWulSpO+U/Yoq9rqpbyOAseXv23jzfxL0lnVrBwA03DJNN3PsvkNemadV7XDS5pIIO/ZferiNLGuaWuEZ4Xzj+I3SRRumXtFv8urh0DAcu/x9OfXOx4aCXd09gz+6BmcpzQuzjW2xpl9RjRuSAF+g/g+xFn0i3bEENBPuvjPwRYfjes2zIloOo+y++0milQa0CDEBc+61y0UHanuPGwUr12UmlxMQkl4pU/3XGvbk1qmkHy8rGNvzeTjZACA7IMdkxwg5QFonBXteOxTiePoqJAH6qFvbjZC5xaJIkcrSwRcIyQFGuDvlIPcSk0qfi+arnsOAEzQz/SFAcyB3VSOyDw25iR7Kix42dPeQmCnSIA2PdVgpJLwPM2fUKB49ko+ZwiEAJLTneUyTsdioEVqh2bj1WUknc7rRWZHsUhzVvlmoJBkKw7JJ3QAkYP2Vjf+q1qGHGPZMDgkg8K50tKg3U3y0QmCfryuex5a7dbKdSWzzysWNQ6QETCJEmB3SQ7uE+rTDKTXzvsFENUhroGfUJZcfZURieCgmTG61GdWSFASZKkEfMIQkmTCZWWi1JNYT9VquDpY4xkrJZGamey13LWfhXO8SHz8kbj3Vb7M+nKrOGn15WecI67tkucYWgqY3+yI4YCPulucTB44TDmnnhTX4Mps8RuoRq7JbgWu0njdACdP9FbZP9lCC2RBwj1QyTgIQSsk0u5OVZyEsORtPJWbGoGVckjCjxyqjmVimCafRXIAHdC0gq5wgwwOVgwlAn6IpCK1DAVepLBRAq0G6pHsqlAHEKapjMBSOGWyVYnvISy6NjICsGeU6MNDkQcf7JQIRucSlDDuFerO6TqB9lervkKDQ13ByjOFl1RMYTA6VIyd1CcIQfsFRdM8DhWgWrCgeYIB34QlxiNwhJnK1qM1KBwByfdKlQujbZIpmrsrD5SS6Sq1JZaNaJrpPqswci1JWNTXQYT6NQtdIOeVgD+yax8EKEddjg8dillpa6Qs9OpgEHdamODh+ytX2bSrkeV23Kla3D266W/IWd4LSTwrt7kswcD1TGaXBaYOCF0OnuwVZYys3Ig9wroUTS2MhO6z4utZ1wWaHQfQq6lqzVrp4PZc14IOppgp1O4qxDisZ79Na1VazjT0AZClu6OcrF+MbSqgu82crv8A4Old2nj2ThrAlzAm3PsSbchDH4ylXVcxpByUh9Q0pa/DhwVz69YknOSs36anPs6i4OuYHK13DQynHZcmhVFOs13Yrf4xrF5x9Fzx0W6BbCRuoYNAN5O0pdySKYZOd4RR4dGk5+5OAs2NqFvVb5NJn07L0XQaPh08jK4B6uaN3qawO04gr0NjfUqti+4c3Q8bjhc+/p05+3Qu7ptNukmByuZV6yymC1vmheevr99eo4z5ZwsZeXGB9l5uptemenqbbrep+mp8voV1aT6dem5zHSCNuy8XbW1d7g4MIb3OAvS9Ob+Hp+Y5O659ZG+a6lnSFBhc8+qx1+rkVyyk+GjBXP6t1J+g06R33K4lJzg6TKued903rHube7bdU20zh4OD3XM+J6H47pVzbeH5w3UPcLJ0yqXuEYIXe1/iaTnEDxGCD6hU/tuida+FFpa4tO4KbQBLwFs+Ibf8P1e4Zp0gvJA9JQdOomrVa0bk4Xq304dTK+o/wp6aQKl28YPlC+lOcBk8BcH4VtB0/pFCnph2kE+629QuvDZpG65X3WuS+oXZcdLTnZZBj3KQxxJ1OMkrTQpmq4AJw2vz0+DmZSnEJOogKi4/Zel5Tc7fYpVQnSVNeJAyEJhzU6MNY4aAPRWHDOcpLHeUHf3RAnv9FpUwunZUSUOoTumAtAkmVDNCSELiDiJ4RPLHfKI9BsgeAW4GQkYoNjLTHoiY5zfmB0zvxKXqz2TKNY0y5p8zHYcEoVQAjGVmMbJr3aHaWmRx7JLnEmUz0zfYXtAzPsh9kTmk5JwlQJ3Wt0GziQo0gkh2BwUA2AHKhxzJUcHUbEEZB2KOi/QZnKSCT8xkDYJ1Buog8ptDWx4fkbqySfYcIGnTgAYRSsUqO8HZDn3VkzxhADnkBalGCJMZMqTHsqLS0+/JVagIn2SmqyPnMbIrs4hKs3fzCpdO8+mfdX5H4Yq5yBGQlOyAmVhL87KUqfiODdYYDy7YLerCZiOyOcIXgNJbMkHcbK8FuBDuSkJCLIahkco9QIGMISAwCq1FWYOBieDuqLeSrCqUYMoCMqDCzYdPHmEJbxByo12MInAOHqsWNADvuja0uMDPol5CIOIyDB5hZag3HEER6oQeFUzlUY4QZ7MDsfui1dkkORauUYTpQ4hAD2UM44UsMnnZGHZSJ+qMOUsPDlJj1Sg7CKf1SMMDlCQglUHeuVaDJKsPiPVLJUBylNDH4P6otX2WfUEzU3hQw5jHPHlEoXAtMFC1xblpieyhMmZn3Uqjt0BcrLkskk7pgXq5CmrE/dARBVOgAHutxkzWYyiDsJTXSicSIlSw0PJxCIO/3WcOz2TGOGrO3KWWyi7gnHda2OLSIMyuYXgHG3Ce2sJBJhKrqMeH4KCpTLTqGW9llZU2IWmnWDsO2V9DdMoXRY4NOQujTeCJBwuVVpSdTEFvcPpHORyCnN+mb6ducpVesGDeFVCqHiQl3VE1Wy3fsifaY3OL3+i39O6jXsaofQcfVp2K5jmuZ82Dwjpu8uo7DZauWMS3Xb611oXekuosY7nTuVzW1hU2/VcurVNSoTOyZRqw/IXKz9O21vqOGIXW6QwaCX7zIXCLwTPK7di4ttiYwBkrFa1Vw/xOqADYDIWfq10TctbTyGiMLPRuWfiqr3HPCCyIur/S7DXmJQ39LsKZvLgt1BruSVurOq0Gut9WOY5W+6+H6VowVKNV5qbx3UtrENcX1jqd2Xn+XufTv8fO+2G0satc6j5WckrsWljRox5dbu5TA0xAxHCMOLRA35K8t6temcmvdoZGFzrzqIYNDCJTntFQaXuMJTrG35yiY1+HPFwHmTytNKH7DJQ1LFmTSMRwEqm51GoCcLpLrnZXfsaQotk/MRhdPpjnay7g4IXIs7kPbLjnsupQuGiGgQSudajwH8QKAZ1wkCJaCnfAnTfxnVqJLfIw6j2W/wCP6PjVres2JDYI5hek/h7082tgbh481Tb2Xfm/2ufyT29pqFNgAw1owuNd1vEr77Fbr2oW0tI+YrDaWrq9TUQQ0IiPtaBqERgd10pbRGhg8xwfdWwtpt0MHuQub1jqdDpFAuqOD65B0s5UpH5xc70wEGsdkw7++yXB4Xpx54rUPWULiJ3+iY84Ej6pZaeM9lYi2uIdE7qeIWk8+it9M7gZGcocHP3TuA1tbkjCvxNRlIMRsqa4bAq2rI0l0CQhDzMykyTznhWHEbZTL6GHufLYI+yVqKoGTlWQZWtZEHS2YkyjYMSUrPsr1EbJA3gEEn6BZeSYymPcSM+VIyTjPdbkBocB7q9JO6FmDLgnNzuPor6H2pjATABhOpt0meeytgxEIkWlJKuTGUMzwoSOUaR50zEhATjuiD4aRGEDi2MCFSpCcRwqJKEnGVZcStwNFm7+Ye8IbiDWQ2biKh9lHums6U/kUmsJdKU6YT6rYSSMHlMBcn3RtiEPElWBwNytAR2AIx3RMA54QicCZhMpiZ/ZVAT2/VQgY5CKRufoqIAKjqo7ISi+ioHPqjDomNLpjKIOKFtV9MODY826oHAH3CxY1KJ45Qh3dHB05SzIPqsYYkyEZYQBPOyVKsOIyDBCG0cYVh0EFCTJk5lCSASgw4OVgoWgtaHcHZQElZVizjZRrsqT90BUjg7ZHIj1SGn/AMog4pX5MLj9FY39FTXDTBGRsVU/ZQMBU5Sy5EClDBCjSUE91YGJlIMDiiDphKlQOUjTO5+iF+BMyVQdOJwqd+ihYonHqh/XuFDCGI2K1KMbum0BXquyBpEwTCTduArFo+UYWfURkSChLiTlOowHsYTA4Aevos4d6omuIGEsnh3dG10iCdlnDvsra4grTNa6daDEyPVaqdQHYrnOMZ4KKnULcjblLNdqhW3a79VdWkHjUzdYKdQOErXQrQYOQpalCu6k/O3K6tGs2oAWH3XOq0g8am7pVu91Kp+6vtn6dS7pioyeQufcOIZpbstFWuS3y/VIeCWbKW5WIfPKsO8yhBDvRXB1zws1pppHafqu7Xu2N6a1lP53CCuA39eUyi10ycrFmt83Pa6jYpnSM8pvQ3f/AHGmXbSrqNil7rT0WyNSs15+UHKx1cjcm17K4e14AbmAsz3MpjzHJ2SnXNOmNOrIWOpVfXqDSPQd14LL1de/nOZjbUrU2iSYPCx1r3fRsu70r4R6n1INf4Hh0z+epjHoF6ux+AramB+KuS5w3FMABU4Xm+XfinOcQHCeROUupXecGQF9ir/BfRBTmtSe71JyvPdQ/h7ZPBf0a/fTf/7NbzMPsdwrxO68DbV6jXhpyDytlakXskD3RdQ6Xc9Ju/w93TLHccgjuCtNEBzY2RUyWTyypBXetWgODjklcKpS0V8bHIXYs3aQHHP7IvuKfbN8QWJvOoWVNo3OfZe2sKLaNBlJg8rAFzrSjTe9td/zAYldihlm8A7la5+mertKNE160n5RutDnCm0Mpj0Qvqfkprl9dvn2Fo7wBruHAgchp7rWKTS/iHr1HolsYIqXT8NYOPUr5x1C/rXtd1evUL3P/QdgsPVGdRfcGtdg1Hl0kpHjy9jXy3POFrDb+I8wCSfVVq0+6pxjKoEDfMr0a8iySgccyFZcCMH6IHHaFfYGKh2OQOVTGguON9oQcfum24HiBrjAdge61Ii3UDmP1S3NLeFoqB9N5a7ccIS4EbfRGHWaFZaQcJ5YxyB1MxIPlGyEWCR/VENvVWWlRpLduVYdQuOnP3V5Iwd9kHvurE7HZUuC8yqcC12cwo2ADwSiE7HLVGtBO8HgFdee5XO8VQBmBytTGgATvCXSplrpdsNk3UB6qtEmDDRBnb90LnAEd0GokdlAQMoOrJk425VPEczhQntshMk+6UgJOOeyjhpOfshBIPqCm3Nbxnh2mIAGEotWIJ0jf1S5zjYqHASD7d2msAiB01nEgO9Cs9J0VW++U5zj4rv1Squo7UZiOwSSBPr2WgAEevCB7edgqUWMzgA7P2UBEqPkvwhzK6M32PE9x2Wik0mm5wGBys0FbaF3os3W4ZkmdSgzxkymGi8Ui/8AKlB0mImE191Vfbtokjw2nGP6qWkzGxVwDvsqjHorBhpAyCpQBjTA37qg4g52RvaBBB3SiYOUGU0HEyo6dxghA0+n90fC52Ohc/8AlRW4EZVAxlZrUqyUJyo45UznH2WaUY6DBOEwOmUkgbomdistGCSrc3y6gUMmVRcVahAwrlASCVNWI5ndWqmgp1Hwy13iOg8LJPZWHTuoU10Fx07Kg7CDUR/RWHcpBhPb7KB30QSpInJTBhk/qpOEskCSFfCUYHADKLVhIlWCeVIwn+yEmD6KSP8AZUcq0VbnyI2T69q2lQbULwS7aDKxOmFfjAUtGnzHmUjEaQXROEQJDvRJBRB3/haR4M+yoOQNPdQmDP6plZsaGOBwVYIDs7LOw/7prXBwg78FLJzKkGRsttOpqEhc4GGlpGe6bQfDo4W3N2Lap+Up1SnqMgwsVN0gELS15e0xgBZvpqe1k6d90bXBzdoWI1g50StFJ20Lnf23kJqyHKskplw3P7qU2+WStM2LyGHMLRaVtAIc2fVIwaZ7rRYUTVrNb90GR06FF1emHaYaeE8F1u3RTwD2WyoBbW3DYC9B8G/B9z1iq286iDQsG+YA4NT/AGXm+S76eniZ7cv4d+Hb3rtf+Qwil+aq7Yey+o9D+F+m9GY06BcXXL35grQ7qNpZeHY9OpsaxvlJZhbhJbOy5Wu3+zi8kdm9hshLg0eqWMpVV+YCymfqVb+XpJyVyA4tPlOfRbbmzr3dcBrgxg3K7XSui29Ih75e4ZJco2vN9Y6eer9LfRuKcV2DVSeRkFfO6dJ1J7muEPaYI9V9ovXCpcFwENGAB2Xzb4ushbdWNVghlYasd+Vmxqe5jzt00amuPsttifLpOyz1mgtHaVqtKeluoLOejqdZvnWtACmfMYhaOjdTvqlFjHmVlu+nVr69p+QikNzwvVdM6Yy3ptJEuW59Yz19tlu4CgDEVDuT3WepairJeNRPouiy3B3ReGW4ASHBqdEpVAQ5olc65+GLatLXUJnaf6L14pv16j8vZMDQYEexRh1+S6twadRjCx5Dmgkgbe6ayo12WuDvRc+o4uABJMdykw5uWmCty2M2SuuSDxHsoGh2A6Pdcxt5UZ841t5WildUqpgO0O5lbnbN5a3NLRBQZjy7jlCHviA4EKCsPzCPZbnWud5sb/GpXNFrK3krtEB42eOxWR7C0wQVQcx+xzzKPUQM+YDYFb8pWbMAjAICtxY8SGlp+4UacZOOAFKoW4yl6QZ7JziD8s6TwUsx2QiyM+yotMotMQo2DvhWHS8jKIQcHfhEWj1CBwIM7hFh0TXObgGQmte12D9is5dmRspInGFS4LJWkuAkx9EJcO09kDXkCDt35VkktwZHC1OtYsEXY4lDPI37oYMSVJ/2WgJxMgnJQyeFQ2ypvjdKxYChPCmwlUQUpbAXVABunGS8rPBnHCcwmRiQlHNJ2RkTxKukwE5MJr2/Ujss2rPTBWZq4hL0w7KfVkGDulPOe66SsWLe0b/ZVpcGgxAOQo8+UHvwhDi4wTIC3BRagNvqpOB/2FAZHqpgbTCmUBMKwJInEqgcQidHZRAWkYQkR/RMOYQuH0QYUmN+SZyhcAMcqNmICzY1Bbyh0gHKdScWiA0OlC4SZP1XOtSlxKtr9OIBHZG9wLQA2CN/VLIyhoLjJJiFUxlWqIKzSKVU8IROVC7CK0uVcmUKgmUIWqVAZQlQb5TIqZKsO+/ZLkK5yoGajgHCmpBJ3Vg+bOyRgpUmMyqOVRB+qULUpqhDnhCSQUo0uPdWHT/VJkomuAOdlAc8FC4Src5pdgGOysZGPlHfdSJIKsH7cowAd0LmQmVlYJ34VzwlF0BWCSlGkDj9FbCZSg4pjXf+VuM09jgcHfhMaCAAUhomE5rsZTHOxvtnF8N5XQq/y6BjdYemFuoknzdit9yQW6e6x1fbfMkcljvNOxXRoZDTwVgrMLX+hW2xB05WrGL9m3eC0QjpMLxDBJQ3Muewcyu5YUGspgnBKOri+OWuRSpyHNdg9iuz0Wy1PD4k8BNNhSqVNexXvfgHodKpWFxWHkZs3uVx679O849tHwt8HC5qt6h1cfyWQ6nSdsfUhdbr/XCXmysvIxuDpwur8S9Tp2HTn1HuDGAaWj14XgbIOrVTVJlzjJK89u16uZ4zXX6cwtuWEmSTJK9Z43kAXmOnt/nt7rvhvdZqaNZdsVIHKUHBuAqpVQ+tonzbwhN1nT1OnhdSo4ULYx8x/ZJs6YDR23JSb64D3EA4GAtfhRlMOkTleW+NKAqWLKoyabtx2XTv7mHaGHPJC53UGmr0q4YTPlmVlrm5Xh6xOgYWuzbIACzVG+QArpdMZrLQBysl6fp1sRQaXQcbLa2jGwPspbtIY0DEDIWtkDIwUsktaNuUwEbHJ2KZpnMSqLfMpAMzpdgcFVok53TtMbn2lV4ZnfB4Un440kfNsgcwxIXVubMsk5cOCFgqUzmDjsrUxPYdggNPvhatBmMyo+lOEpma59P/AC3GORwttpUNUHU0Ajf1SxSGwCdRbpPyyDunTgy2DPKku1Naz5nGEyGkSJ9imWjAaznHamwu+vCdsYxmddOpvLXsMDmJCtl3Tds7PZG4EkngpbqVOoPOwFandZ8WhtUHlCXAnfdZTbhpPhue30BkKg2uNnhwHcQt+Y8GwOZzPqqc5sYWXxqjR56ZIHIymMu6UwRB9RCfKM3k5roxuERAd/3lC2tTeI7IxByDha1WFOYRslxErU6I9UDqZP1QCZ7oHufT8zPM3kJj2lqDIE8KwmU67KgjZ3ZXEHH1WV9HV5qeD2VUrhzXaag2TKLGsnMyoDnG3KFrg7IVE8rcrFmDj1lQYKEO5BVykLB/8JtMgHeEkOyiBghNqb6T2wTsVHVBMjBWQOg+gVayRujFpx0EkvJHY9ykEgyrc4lukIXNc3JEBdIzQkwQEfh6XZcO4SyfoFU/7LQs0yQXb4Rx2SmkiDH0TQdzyeEsiY0F4DjDSclMuxSa8NpHWAMnZK0kbqiRuNuVCh3Vx91fzGYgcKbbIahT25/oqdvMwjegOThFaWx3aQmCN0knPqmB2IWLDELtMgcoJkZRuAO2Ch08rFageVRBKIjshO+6Gg7FURyrPKon1RTKpFMKNI91WPuslMq1BtlCoCUO/qhBxhSSlDlWChlQlSMRGoYjCUJhXPdOpeYVYyqBCnKgoSi1ACTupyp+qViAjurDiBhVAVAqiMDpOVRIPCDKIHukUL2ycboPRO33QkCUysgmDnBTHPBAgRCGO4VADhbgp7HRnhaKYBiOFkBA3Wi3eMha1nGplTS4RgzhdHxvEYHdt1yhk+q2WzpEbxws2AdyCQCtXT2y2d+yRUYajRA+y6PTqJDPMI9FW+lmtttaAkVHbjYFdOmJgcJFKPDGVpohcrddOZjZZUTVrtY3ckBfW+g2bLCwY2PMRJXhvg/p3jXArOHlbkL6BqOmOAvP3dd+I+Z/xr6s5ltb2jHQHu1EDsFm+DLw3XSqbifO3ylcb+L7zU6+xhOGUwj/AIcuP4eq0bAqk9Nd33H0npUuqajwu0DyuT0tumnPddEOWKYlxWFJjnuMACSVzvg65f1K+urkD+UHaGnuFzfi66qOszaWx/nVvKCOF6j4S6Y3ovRaLH/MGyfU8qkN/Tu3VYW9AMb87lw7u5LKZ5cdk26rF7i9xxwsdAvr1JHyzsr7TLRtq1w+WsJJR9RtK1rZVRXYW6mGF6jp1EtGt+GtyVyPiy58SxrOJhoEBNmHn3XzGo2S0Lu9Bp/zWYXH06qo7L0nRWBsE8bLnjVr0NPEJgGUmm4E/wBU8EHI+y0ya2EZDXDI/ulAEpgZ2O6khYNI/OP1RaA4SMjhW0EGN05rQRIweyE/GNpf1aFtDiKnmghxzC203W12NVNzGu5H9wuUxtMOOsw6JAiQrF4+i1zWEPkREQAtJvrUHMJx9krwC4EjdZbfqVVgirDm/qttG6pVoLDBPCLEQWFuAiGBlOeQTMR6hBAj9lJUgjtCZTOmzqP5e7SPYJTiRvCZcfy6FGnzGo+5SCZ/RScQh/ZWc7qC5Q6o9Qoc5VFKQuH+yo6HYIB90LhKU5vZSM8Fmry+U+hQmlUb8lU+kpZcRgFD+IcMbp2jIe2pcM+ZocByCnMruLSTTfpG5WVt2NiEYuGHcx+ifKi8ynm4pOxqjtKhcHZBxykHwqm4BKE0WbtJb3grU7F5aAAfRLqMa4eb7hWxlMMH82oH9iAR7yluc9mBD/VqdgwLQ6k7JlqaKgdgHKUazThwI9CEtxDfMMt4jhM6WNYcBGEUznYLHTuBs7bgrRAIEHC6SsWGNdn0KMxKU3fCZ6halZsOaJBP2S+8/oiBMRyludBwI4ITKBtMOBGyJ9Zz5D3S1C6IBA0hJq/NOy1AaACO6DLVbCSICOMZ+q1KzimuJxlEJBypjPBCoR/skGDZU0Aq2jlEdOrGB3VoqicR2Q5Vk9tlCrEEfpyEJiSR9kfEcqpgEOCKS+Rq2PKJryCQ35Sed1TnEgA7DYIOUVuGwqdj+ykkiSICYyk6rPhMLgBJgT9SsWGEjdU4ZKLTBUWWvosIXIyIQyDuikOf91c5VFTIyFmnRHZCSpPJKjYJyYlCVsrEfVSOyuPSFFcBXG6jcZUJ+ilU9lPX7qxBKpyQrlQBWJ3U9VJOfRXJHsqJUGEqiMJYMbInQVQCggV9lFI/2WgMGRjhWc7pY3iUwDCoKoiPqgcM4RkSYRmmQ2YWtxkkSPZOpydggdIABH1UZI2K3Ga1txnnlbLH/OglYqLpGkrXaHTUBTWXfpta0YC0sJxCz0iC0LTRA1Li6xsoDAGy6FnSNWqxgySYWGl5T6Lp9KrCjd03nYGVjr6akfTOhWos7FjYhxGV0g7hYrSuKtux7TghN1rzX7eiPnfx18Ps6j1Orc1a4phrBErB8BWfgU6rQZGqJ4K6nxw55vwwO8rgAAOV0vhyxFrasbphxyVrfS6nt6G2bpYAq6jeMs7Zz3mDwOSUyg0nYSeAmW/Qjd3TbnqAllMyynxPcrMLB8OdJfdXA6jftLQM02H916O6rF08NGwTapAGloho2C8j8W9Wq29NttZNL7qsdLQMkHulffuttvenqHU6lrQ8zKQ8xGRPZeksOnEEYgclI+Bvh3/CemNddea6q+eoT33XW6jdspNNKjvyVbgvsm8rNY3wqZ8o3PdeP+LrgC0awHLjsu3UqF05yV4z4mreJeaAZDRlFrfDl2jdVX3Xq+n0zTogxkrzvTaJc9uJXrqTAKbRwFmLpbWg7+U9wnMJGztQ9cIQ0cFGAQlkbbgtMOaR2PC0se07FIDTyppHImVJrBPumNJOxWOnqaPIZHYpwrFvzNI9VF+M3MBGNykvpkCY25XWbRpXDA+3cC08chJqW5+UTIHKr6UcvQSIOEIY9rtTDpI2IW99OOMyhNLY5Uiqd1VYAKnmH6rVRqsrCRIPKzvpA+6dau8J2GSD3RqG4E1A0ckBHevm4Ldw0ABSh57tpI2JcR9Eio7VUc48nC0LE1HjCsHCqMAjKqFIQgqpVKCYUNXHZCRI9VcwpjkwnES5iS5kYWoxPfsgc0EKTLpABJOeAluBC0uYISntxhJZy44zlG2s4bOKj29kDmnhQONct3Mgo6d3DgRuFkc3CFjXTAwrE6pumVv8yA48xCpzAaZAaC08gZC5RBBM59kVKvUpuBpuLT2Uvtr8Dhpx6qNfUomN2jcI6PVgPLdW9OoO7fKVpY60uGxTrFgOdLxytTqweIadRr2y3fsmtJiCsTqZpvljhAKcyrweOV156lc7y1hx53QvJJQhwKgPK6xyq5I5lTOk4BPdUBlEYLYGFpLpgg5CMz2wlMJ1R+qaNu6WVcq4iFHbxyrBj5vskWGAhoKrvhUYIVfKcz6JCwMqOA4VgiIUMc/RSQjA/dUQBuocn0UcYb+xQSjPaFBESeNkZdqicRhAWmfRBiySTnbhdDo9TRdBxdpbBDgTAcOy58HCYxxADe2VjqbGpfy09VdRdcONBuhp3AMiVhIMd05+DjPqllpCzGt0DgEEJh3yhIzhRCfXlVGEX0VcrNiApuj0/dDphBUP2TC4uAHCGYV8qxJlXwFAAoVYkHKog/RXH0U4QlDCnCsBXykBCsyFCqJndaVQkqZUweFM9lCrnkqjjZSUR0wSTngJgoRGe6bMhKamtEHKbQOmIIdyNkx7i6SUEnsihSpLxyqaE17cY5S9JBW4zTrcgO9FupGCFz6Zhy6FE6oWmK71q7+U31C2UgJBWC1H8oN+y3UIxK4115vpsDgBPAXLodcaOqGg8w2YB9V0zRfWpOYzdwgFedvfhe/pNqXFPQ8MOoiYMei59OvL7R8L3hqWYaTJau62oZXz7+Ht2a1lTc4nWBpIO8r3THLhY6c157qXTzddf8epljGiAdpXaoNgABVVANclbumUBXuWMOASg37dvodl5PFePZdCuA0LpUqVOhQDGRgLOLb8Q8ySG8kKTy3VrqtqFvY0n1bh+Ghuw9SVr+GfhVtjW/xHq7xWvTkTtTHYL0tG2t7JpNJgBO53JXPvrou5+iiZf9QwWUsDkrh1apJ3Ur1pJAKRMlCSo8MpuedgJXgryr4129xyS5ev63W8Hp9SDkiAvG0Wl1RVan07nRaUvDowNwu/jjCw9JoaKIcdyuiG8wiQWrYAfQqFp1bqwASiiRB+4SFskDeUckqMaI9UbQFJTCQU0uwgjOMI9JhSfjK2qijApNlx+Z2YC6NveteIraA8nEGVxXucQc47DCDxH7Y94yml6XTSdzpJ54SqlCD3b3XHt7p9LyuMt7Fb6F4HCGuk8goxI5hYTIxwggg/0Wp1RroBEFA8AM/SVLA22G1X9mwPdZMzlaoDbInlzoWU/ZSpjWksLpy3goOFASGnid1RP0SyhnupP6KpzndVJTSYhIUnCjnAjaDyoBM5Qkn6K3FDCko5CF22ESE+ikUWhC4cJp2zuluCaiiBGUDyJxIhMdt6pRGJUQHKB8hMgyqqDEkYUAVS2Rok9ye6priMjdQ5GFGtMp1H29y51bwznEyt0DYjfcLlWbf/ALiWnkLuGmCPNjsi+qmdrjT7lnY8LXRex7fT0SX0yN8gcpDmmm/U3A5HC68fJ+2OudboAdPCYBM9u6zUqwc0ScrU1wcBP6L0SyuFmKdpkaRx+qIbwP8Awq0+aEwAjPKWaWZnaVYJJyjOWyMHlC2e3uVqJcYgKiTgE87pjSNUOPupUDWuIaZaDg91MhPygDnfuqPpsoxwGfurIE+6TFOkRCGDGd0ecDcdlcBoiPMeFlYAg7KCdznungFxEtiMFU9sAxiUWtSFNcJicKwQXZ2VVtbtPliNsRKtjeFmlZgnGyWcHunBp3Qlp3R6aLIQkcI/lCGeeyEEtKsgRuZ5RFuUJCiWd1GgSNRgTkq4VRI9lmpb2gE6TI4KoDH7K9KhP/YQdQDfKvEKgZON1ZB5CEgQzlT02Kr0+yVqalc+qrIVcpAgRKhP0QgE7ZV7JCFWq3Ks75SqqfooBO2VYBOAmMbBCgtjYzCPjsrj1UicKSBFvn7ochE3KkvSCEp0zPK0QQAlvaVuVmgb+q6Ftlo7rAwZW+0dGOy2w7lr8gW2iDrELFZw5oAXUba3H4c16VGpUY3ctBMe649XHTma7nTKLWUDUfg+qydRuXXLXU6WKbdyOUh11Vr06VtSy90AwvS2XQX0qLBXYQ0+YkjdcOut9O/POM3wVbG2ti4jTqcSF7W0JfUa3uuQxjKZDaYhowF1+kDVXaey51qNl9aGk6Rzusr6FV7G+C4sfOCMLsXZFQDmE/p1rrrAx5RmSqezXT6BYj8MDWfUNQbnUV3DFNkDACy2UAOI24WfqN6yi0y7ZFMDfXQE5wuBdXRc4huyz3t+azyNUN4ErMHEqxNAdO+6IOJ2SmNndNwxhcdmqTz/AMT3ALmUgdvMVzem0jUqtEblB1Gt+IvHu4Jgey7PQaAjWRtssVu+nZotDWNbEABPAwltic4RyFpgQEogIKoIlITSjid0LR2RhSQNRsxg7KhKKO6k/FT6MfLkd0vSRuN1sfRNEyw629u3ulloqDH1C1iZHHPcoRMh2fcJumHf0QkduEI6jfOZ5anmA2WxlQVG6mOkchctxEEHf0Wnp7fMSBIMYSXTumkW1KBgDUVhkwtt/UIqFg2DQD6LEflQFlxiFRyqBH2VqSTyFEIIg5gqiYHcqAicRwhJP1Vg990JSUJU5UA7oSoCPI5VExsqJ55Un/dS0LigMo94QkHlOkpzZQkdk3TCHTODtwqAmJPohLTzK0hgn1TG0Z4VamRlIuGyc2jJ2yttKgYiIWmnbwJIRpefE0erUC7DXENP7L0r6QBMjEfquN161NOkyswRpMyu7YVBeWVKruXNz78o6M+iaQZhpEk7pdzbxLqYln6haHtNOpOzhsiouOozyqMuLUoljtbN+ydQrYxxuCurXsfGbro4fyOD7Lk1KJFQkAtc3BB/ZdeO8YvOt1OuAHaWgkwM7j2RsqFxzv6LDTc0mAYI4TqbjqgL089SuPXONjgCwRhVMNkDHrsoxriyRk7Kwwl4aTC6Oe+yyZORHZWW+XAknlG5oDs8IyALcOkaikVn0kN+uVc7AiTwrEacnlRomfTZSG5rmkaTBiSraAJ3nuha4meybzO+Fi1qRZJjdCT3yr1YJ/RDg7mMLDSqtQ1DmBGMKmtCoNAVtdMwMDlVUQ7x90O3qFRJBQhxn+iDFvEmNlUAbhEJ54UkFRVAVFspgAONgrgBZ0kFvoq087J4bOVRaZ9FaiNPdQt7BM0kHKEggoOALQo7bfZEQYQFSCcKgCQVZ22VTGxSlSe/0VEcqc+hUjBCQJriCYMKpKo+igBO26UIOKsNLirYw8pzRiI+iNCmNEbIw0Kx2V8xsgqGyuDJKmmFYyFoKgzj6q24KuO6gEbqAwJVPbKY3b32VluFqVlnY3MLVbYck6funUB5hK2xXf6S01arGNHmcYC+4fC1kyy6YxlSmCXNyeV80/h30k3d6K7x5Ke3uvrrYa0NGwXl+a/h6PijlXfwt024u/xVuz8PcTksGD7hems6dvSs2UuoM8RjOWjKyU/dbqYD6el3K4a7vPde6faXV613TKbqTY8wzBPeE3pdm63Ba4ST3XatbMtLnO+UZlNp021Hl5IDQkfbDVouY3UMjkJ1nWqEhrTDeStNzp8M8NAx6pFhRLttkfRZfiH4xsujW/gseKlxtobvPqvmPVvie/v6rnGoWNJwBwF9P6x8GdM6s81K1M0653q0jBPuvMXn8LLsS6w6jTe3gVWwfuEyz8n/AE8z0DrTLXqNJt88uFU6QXZAPEr6PToiq0Oo7/6T/QrxVL+GHUx1KnWvrikKVNwIFOSTmd19Jt7IUaTWk4AiSq4y5jaZa6HCCsXXq4t7JwB8zsBejrGiGRUh0fdeA+Jrtte8LKRljcBZv03zHNtmGrWA7leysKPhUGt5AXB6Ba66ms/K3Yr0pJAhu4RBbq4P9kQPBS6TnlxDwD2ITx6pAgUbY5QKwFIwRKLMJUxlG10qRoKucoQRCIR3Un49eD8w2HI2WarSBl7PK/twVGV3U9sjkHZPLmVT5AQ4iY7LreM9s+X7YiQ5uir5HcHukOaQ4tj6nsum5rNB1tl0YO+VlrSWhpEALDTKWgRz6rX05p1t9wEg0iTDZMroWFI0nDUO5RpLu36qzyO8JBPCZVMuJ7nZJMqgXIVElUJAwpJKakmFCcKuVWfdQXKk5UAH9lB9lJCq9EUKYKkGD2UhEFJUgQVenhX6qQTgKQNJ7omsz2Ca2kSVop0fRKIZRJzC1U6ELVStzI7HdbWW+AI90amOjb5lam24jaRytTaIEJhYAN47qTlX9q2tbPYRuFw/hy4NtcVbKrjzEtnvyF6qqBPeV5Tr9o+jWbd0JDmkEx+ib7UuV3LwAt1DPqsOvSZ5V2d2Lq0bUGT8rh2KXVbny59fRZVbrS5l0gp3UqLK9M1G+WsBM/6vQrk2z206hdAcPVbKlwCySY7BRc1zZzs4KMeR/VSq4ai7adwhBggjdb56xjrnW+2ugBpBiVqa0OyIM8rjAct35HZaresWGOOV6uO3DrhteO6ug2lqb40lhOQ0wUILnMEhMbTJAAE8ldvw4/RdQDXDduBzHqjazyxGSmspw4nnlXVEjS3ykLN/TUILRTdpiZ3TAJGOVLcmlULntD3EQCeCjJJfA3WK1ABoAzzshc2InbsmPaWjUMkKi4PAAGdoQmZ5JGBAUDiAQMTynmnHljPIQ6c7bILK9pB3+qmQAd1sFIPnUYCsUREdlHcYwCd+FZbHeFs8Eg+hVPZHCDKyQBmUQnkphEcIARkHPMIpTbKoPPIVwOMIYPuskRI3KAidhlWSI2goS4cHKkE491RE77KwQd1HEQlFlsoYR5hVBSAkDsqwU0U3O4lG2jCtTO1knO3dOa0BNDAgxMK1YkTjsoBGeyox9VYJjGytSw4k4RiUrmdijE7qqMHcKyBvt6IWnPdMAGUio0CIV6T/AGVgcq9xhTNWzfKYQCMbJYbCcEwEvblabGg64rU6dMS4kABKc2T6L3X8Neim6vfxVVvkZtjlbtyazOdr6P8ACPTG9N6VSZEPc0En1XdG6W0BrQBsOEQcBheHq7dezmZDmlO/EBjcZPZZHkhRoO8LLTSbqq4aS6G9lptHDJMk8Dhcx7iHBPo1iGkN53K1BTeo1g3zOfgDbsuf0/4mtrW40VhLDzyFpq2puretpPma0ke6+M9RNyzqFYVS9lVriCO2U5rWetfomy6pZXbA6jXYZ4la33bWDymV+dukdYvbau0ZqNO4GCve9P69VLBLi3HyvWbGde8ubovO659SoXHdcSn1xj8VDC1MumVGl7HAgcqwg6xdi3tXOnzHAC8QJrXE7uJXQ65em4rloMsGFPh+38W6DnCQFit/Uek6Zai3tWt05IyVr0K2OLRAzCueSIWmFaTgjEcqyScn7qOeGjO3KYGBwBGykFoCMZVBmfVQYJAUhhqsBUHQFbXSPZSG3siIQNnhMBUn4wkYJ3THNLGhzHGfTCW5ppu0vEH1R6y5oGwiF6NczqFYVAG1BpfwZwhqsLaml2Pfb6JTmEs1DBG6K3qkQysC9mYzse4ReZfa3FteKTpA+q00ahc2o876d0ipRIAc3zNO2OEyjItakjcgBcrMbl1mcZJ/dLKY8fSEBg4QQFqoojjCGD91JJwqAn090URtsqz2SEjturzCmZRQpBgqZ7Iw08fVWGGVRF6cKw3utFOidQJEwtFO3LnTESrVjGylKfStyYELo0bKeMLo29iIBj3Vqxy6FoTwttOyIyRBXYo27GAREoy0AHZGlz6dqWgEhNDQ3EJznACBss9R8ymDAudnsEio8b/ZVVd/4SXP+yktzpHrwsV3FRkHOIIWucHvGyyOHiOIkNCFjzpY/ptwX05NB2CPRb21mVKWqm7U13/eV0a9GiWFhbqkZnK49Szfbv1WxkH8hT9oTZDiRn2RClVqGHnSG+YhLpuq6wKlCo0u2IGFrLdDTI8xGZQWN7SZhEA4NEhPo0g9y0eGHBzDsNkwVgBc10j6+yNpE+m0Jj2acIWBofL8t57rfPWM9TWi0q+GSDkHELp0RrGMRuuWGBrhmWEyD6LoWLzrIPynuvXxdjzdQ+pDW437JYEjVwMIq7xPEDZKFaQW6QOYKazFyC6UWoMzMzulg8bDuh04/orCcytuDkHGUBcZxwhc2ABH1RMYR/RGLUDyc8qQJ/srDIBcdzwhBg5H0RItGQQAY3VippgxJVOfMA7BWC0kE7hWHTHVtbYLRHdJLinwIUgbDKyYxPcQkl8nIW6pSnss76O+FlqE6gRJU/6TlQsHdKdg7SrFphwfNuhLRxuhdXAwWk+6rxQTIEeisItJj+qhAGEQqF3srwdx9VHANbq+iY1gGSjY1objCLSCM7rOoOrGNkJdndW4EJbnZ9FIc4zugDd4OFC7sFYcQFFII9VUeiNjQ4DEFWWgKFLLSMSpTBkqz33UAMzK1ANrcpjJS2pjANlA4ARJQjBRh2ELnAZTBasSmME+yW0pgkLUjNarO1fdXVOjTy5xAX3P4Y6ezpnTKVJrYdGfdfPv4e9Mpip+NuiA0bTEL2PUPirp9nLGVPEeNgzK5fL1b6dfj5/L0+srsfCwoXdxU1AP0YJ4lfOqPWq99ag026HVTpY0br6r8GdK/wAM6TTa/NVw1OJ3JK4WO1rqu6daF2o0WSuV1+vZdOtoDB4h2A3XXvrltrQdUf7D3Xkruib+satXbjsESaWKhcMumaw3nYprq7LdzRUbLTuENnTYysW/lByub1CuKt68N+UGAnA9LZNZpe6mZY4YXkPjz4aNzRd1CyZNdg/mNAy5vf6Lt9JuTSOhxlh/RdvBGDIKLTHzr4F6AK1Tx7hmpg2BC9f1D4epPBdQbpMbLp2tJlvLaTQ1pOwXTABZPCvsY+dXHTTScQ5sFZq1Q2dB7WnzOwF7vqdGm6k5zoECZXznqdTxblwb8oMBHXqNSb7ZKbXVakDJJXsulWzKFuxoEO5K43RLOXeI4YGy9A0RssxW6eTxz3VgkSRkdkuUQPfZaBjQHA8HkI6fkAgY7JWrOE1r/wDwpGa2kbZ7ICIMg4KNoa7b6hUKRBOfZSUWmN4KjSRuodbXbamqQHYyD2UhtdhHIS2MLTPfdMhSfkzqNgADifVcZ1I0XEO2GxXuqraT2RBJ7rj33TtTCR8pXTnvfti844VGIOo57K3NbBwgLTSq6HbgwEbhjsOVsCp1XMAg47cppeDQaBuSSSszmkNk/ONuyEPLWBoz3nlHd2HmZTHs1AkcLO8Q6NinU21X03PY0lrcmNggd5snC540UQoCdkYAIwUQazQZJD/TaFIvSdlYYR7d0xokp7KROIQmTQTndNZSJWsURuDgbhOZSGE6mRtErRStlqpUx/Ra6bG6gAhM9K1kjC3UrQDJCNha3srdWAOD9lFpp02MEmFbntAwsTrg/wC6U6sTmVJudXAODlAapcQTieFz/F57qm1STj6pwa6GoNBnIPKzPIBMGUl1YnCTUqR/dGLRPP78pRJ5yOyrUTjshOJMqUMa6QZIjlU5zXQCQB2CzOGp25j0VGBsrFpjy0uIBlL0lvnaDA5Vaw0h2mRyClPrOeNIw3smRaJ1UklZ3Ak9xyn+G8twMqHQylDx5vRSKoFrXS7A3UrVhBDOeUlxJ4wEECZUhF2xkmFRfiZV/liYHZAKZqfLhvJOyZA3dKc2vNJ3zNOF1G25ZVDYIXP6RT8K4aKXmLiASeSutfXBNxDDlu5Xq+P1z7ef5MtIfbltUtcdsoNA+yt1QnJPmKFzi0ySndZwEgHA9Co0GSY9lQlx23TGDIjhbgFp/wB5TGtBaICZTpS0mJndOFKBI4VoxlLCBsqFKdwtmkEZ2TPCDaZc7I4TA55pAbom0WmDHKdTY0ulwW+nRZpBjCcZ3WJtGRDW5Kb+EcBLhAWzxG0j5YDhtKw3Ne4rVC2fK3bTysd3HTmWiZaB5gugIh0kPzJ0jlZw17XN1OzuU9929rXgPOk4A4XCzq/TtMVW6QGNLhBA3XMuLAtmDAXTpXz2sh/mnBUq3NJ5JIO0LM8oc5eeqUC3cexSSyF2LpoL4blJfQ4/MtysudJCovICe6kchKdTPCfS1GPJPZND+JWcgjHKrUnFrY0h2+FT2ncZCzh59kxtUoxSoPKf7ojueZ3Co1JEOEodQlGHTACcKye42VNI7qOjbnurFqpCoESh0kK2iFrGbRtAJRiWoAUe+d0jRajxzwra0n2V4MJlNMjNpjGAQmho3OyZaUXVXBjRLicAd19Hsv4T9V6nY0q1vc29PWAS2oDITepzFJtfL3XtzpNKnWqNpT8oMBbuj0atxXZTYx9WoTADQSSV9Z6X/A6sKgd1DqLA3kUm5+6+l/C/wN0b4daDa0A+sN6j8lefruO85v04H8PfhKrQo0bvqVPS8NBbTPC+kABoAH0Sq9anb0i+o4NaEuwr/iqRrD5XGGj0XG3XSTIdWpMrUnU3iWuEELx/WBVtHfhmCJ5HIXr7isKVMuO/C8lc3Iurh7wZDTCoXP0m3talV/5Wklec6dcsvQazDqDnHbK73xDW8PpVyRvoIH2Xzj4AvzTvK9lVOC7UwH9QtSC+o+h0Aupa1yGhrvoufSbhOGFmxR0vFggrpUauqjPC8+Kqur1IWdpUe84AwPVUP2y/FnUxTp/h6bvO7eOAvJ21M1agaMklLubl95dOqPySV2ek2hYPEcPMdli3a3fUx07aiKNFrB9U8f8AZQNkDKMElaYSUxpMeyDjZUcZCkc104TmMJ+XIWRj4K2UKwA3wdwpLb5XZwUzV9QkvqB7pJnshDoKUfr7fZTfOxSgZVme6gaHH/ZEDJ7JbHRumSCEF+cC4ewSnvLsRLe5TnNDsSgLRMTAQnC61atFMVaQh0mfZcqjBjVsvWXNv41B7YMEFeUrMdTcQcaTAC689emKJ+kmOEh9EOEH6EJhJwSMKBpcR2Oy0kt2voNPhOPqCcfUJDmVy4kkBvIIwtgaeTKcBIzlHqj2wU6NV2Rox9ETraqfM2mc9l0KbZOkQBuZ4WjU6k7T9jwVXk64oo1QZ0EFW11dhgtP2XbFTVkgEcpmtjmCRtujxWuH+IcM5EbyEQvH6ZG3quyHUJy0Hg4RXRs7hzSLemxoaGwwQD6lGU65Lb54zAPsnU+oQMt8yOraUDlrJHusrrOl/wD3B6AqyryaT1IAZGVQ6jTJmDjdKp2FIt8znifWUdTpLCRoqkBWYtEb6mdpAOyhvqR/NEJFTprwNArSOMfslu6Y8f8AECsWtQu6Z/OoLmlxUWBtjVnFQdkw2NVuk62EdoVitazXZEB4Q+MwtP8AMCyuta+ogBgVfg68x5CrBsahWaPzslUXtOS/CzOtK04YBG+U5rK7qPhEAN3AKsOja4PdDSXE7ABRzQCAQ8OPdUy2rMM6gCtFdjajaek6XAQSdvorKtZ3NDfyavWVTagpkHQPtMLSKbBBfVwPSFb22m7nF8cTCsq1mq3T3GODxsEk03P/AH+i1GrbCNFEOPrkq2uuKh002aW9sAJ8RrEKBdmD+yBzNPYD7rpixrPP82ppHpkrXT6A54aXayDkl2AtTnaL3jz5LP8Aqd6o7ejUuKgYxr3EmIaF3atp0yzxXcx7xuGmSo3rVGiwttLfQNgTuV0nMn2xerW20sWWNIg6DckYZy31K5tRnhPLqpEk5hI/FVKtVz5Oo7nsmNpBx1PcXHstb+GcgGNNSsdI8s4Kf4Djk5RMLW5aIVG4IfpaMHcpjOAbRLSC5aQ1ow1sHclL8UOIzhPY4RPHZa1HMA0AAZRkEMgRqUY4EQMJrWgRAlCSnSGAR7JddwPlAgDZOLodvACyXNRrZ55C1LjNiBo3KlW7IGhn3WF1w5+2BsqpkuPuq9/pc8GhznOlxlbbeGtwJKy02y4NBknK3NplrRj3XC3XaEV2gEudP0WMknByujXBMNiQsr2jUDG261GeiA0kjsN1IaX5wjqHM9+FneDJWs0CuG6HzE8hLbUOvU7ICshwGZMeqW4EZHKvFeQoZULi3HdJewj1HoiaRJ4KMPDCOQjMWsj6eElzCF0SG1AS3feEgtBMA5TFWODKJPfS9IKSWkGCPqn7CuFYHKrlE2fr6Kxav9lG7qwO26uB7KxagCIb+vZVCINzP3ViQNkowMhCPsiCcQ2tEBOpRMEbpbN534W/ptq66umUmDzOMK+oHuf4YdB/xDqTbisyaNMyJ5K/RnTWNpUWsaIaBAXzv4FtKXTLCnQIDXEAk7SV9AtarGtDi4AcleX5Otrv8fGOkst9eUrOnqqnPA5K5/UOu0aDS2j539+AvD/EHXW0WOr3VXzHDQSucjtmfbV8UdarXFSlRpnzVXhrWjYCV7zp7G2nTqLTs1gn3hfK/gsO671sXThNGhsTtK+iX93+Rp8owmxndrL1/qIp29Z5MNa0leS+Erw3fTX13GddRxB+qD45vzR6RWaD5nDSs3wY00vh+gDjVJVitN+MK+npNTMSYXyjp10KXxJQdSPmDoML6B/EirVp9B/kNLnF4EDsvnnwt0qu68/E3DSGtMjVutT6HX0+2WdQVbdj+4Ti5croNUus9J3aV0CVmmVH1AxpcTAG68v1W/N3W0NPkBx6lauvXxA8Gmc8lcayour1hAyMLn1fw6SZNdLpVqatUS2GjJK9M1oaABgdlmsaAoUQ2M8lagBwqRm1RxsqDu+yKD9CgLc4Wga0g4VkJbd/6pgJUgwUTZjO6LUOVWDspCEogShEjZEHTupCBI3RAnhBJVtOVDRF5YRIwU9hwlgghG2OCovgD7ZrCNWO5CXoa07z6jhaKzapaQ8HSO2ySNAAj5vTJQUBAkEEnYH0Xlut0PDuSYw4br1b6hGkeHqnAB3K5/ULfRpr1qXiBhksIxPErXP2z1+3jh5X+YGFopPEfLA9crY+hbXNQu1GlJkzkAqndMeGl1KvSewchwB+y9HjXLzjNqkidlYIPKU+jUD9IMjuq8Ko3BmDyjwqncrZTeKc4BPMqqlcvdnbgLGGwfPMcxuiota5/neWs4O5V407K2UWl/zCGTkrV4VKCQ8tjgrLUfSADaDaj45J47whuKhc0tpSWxJJwZ7LU5F6GXADP3CoOafzbrG4VWtHmwTPshdrMc9keNWtrnMA8rs9ks1ANslZQX8/dW57z8rf0V41acahJiYTBVOnc4WMNqkYaSiay4cIFMn1VeavKNIrmYBJKF1d2og/ZKp0bhoJFN+eVQtbo6iKRBd+yZxR5z9ip1PMASY5jdPNRwbiQIhBRsb3UHMpkOGxT29Hv6plzY9eEzijzjOKpKgrOGJA7re34frx56gaU6n8PN/4tyBG5V/FR/JHKNzG59EDbk6jmBwF3P8ABbBhHiV3vPMBNFr0qlnw3uI2JKZ8Q/k/TztSs7VGTIwr013+VlN2fReg/GWdLNG0ZI75SqnWXiBTpU2RtAWv4pBfkrnW/Sb2sP8AKflbafw7XiatVlMHfURhLqdWu3CPEIB4GFjqV6r5Lnkk7yU+Eg8q7FDp1haCa14NWxgSUb73pdH/AC6dSq7u4gD7LzjtRySSOSg0kgu4V4w67tf4gLGkW9GlTHcCSuRfdYubkwaj9MZystRvkL4ws8wY5QdN1F7i4hPpifTukMccN4K1UWw09+ELTmMEjK0tcBssrdXh/wDPyrovnLt+ysTcwB7TJhqWQG42wk+KS7S3dMcwuaAeeVqSs2owEmQVqZtJSKQawjU6O5T3uEQz6FNyCexOqim2Sip3ZLIA22WcsLsu+itrSCc4WL3+mpGltUvqAuO/CRdVWlwaCS7kdlQcWkxvwjFGHlziNRGFhskNEiREprGAYaM90YaMF3CsOALdLcpGDt6Lmvmcndb4OrzGZWemXkTpj2QVKrxgmY2lGa1Lgq3mJAMEbJHndMjCmsuOd04GRkey6TmsXuEObBEjCB4ETiU5zSTkZSXMMydlqcMXohwJn9kp7SPZa4IyRhA4Tx9E+I8owx5ojCJzY3C1imwnP2QvpgGVYZWZjC4+Ux2QPZpcSd1r0EfKgqtLz5hnZZw6Ck0uaQRIjBSKtKI3+q32Nanb1CKzNbDuNiPZdCla2nUGaKFUNqnZr8E+xWLcak15twaB6qgB9U27t321w+lVEOaYISsrf2FgIgEIMEfsiJBUlwJVtaTsoDlEHFuQihA3Yc9kYB5CEuJM8pjCU7hEwSQvafw+s21Oph7hluwXjmNgk7AL6B/C8a69V5EgYCx8nXo8c77fTaZ0gRhN8d8QXmO0rPqgbLF1S8faUC6nRqVah+VrBJJXlemeh9Y6tQ6dbOq13gHYDkleEf0/qXxR1Cm4ktoE4AyGhbaHwv1j4ivhX6kTbUAZDDwPZfU/hzolDplsyjREwMuO6YLb+Gj4e6bQ6D0ZtKkIdpAJ5JSa9YuklP6jcBz9DT5W4XHvrgUreo9xgNaSUX3TJjx/xlUq9QvWWVs0uI+Yjhek6XRNtYUKH+loBXlPhK9u7vqN9Xe0Otqj/KXDIMxgr2dDLvZP4H3Sur9Ofe2kUhLm5AOxXljRNJxa5uhzcEFfW+i2bX22p4kFc74l+GaV1RNa38tduw/1ehQft47oBIFQLT1S9bbUSAfMdgsdu49PbVFYaXgxBXIvK7rmq4uPmOwR1ca5n7Jq6q9QmfNOfVeh6PZ+GwPeIdwsPR7E1Hh1QYG/qvSNaAIAwFie/s9X8JlG0dkLRlGFpkUjkISBurhUJCkkcomu9MK1U5hSFqEShJEyMKaQo4R7KQ2uP0RjBSA7aE6SVJfOFbYQgwjwQoD04UBIVK2n0Tqx8Ncxzg4ueSwbDYFLApsO2p3ELUWU2yHHUe7jAWfSx7yKYLj/AMu0rJUQ8uBLWCNjwEFzRqvAJJeDvOBCup4zYFQ+UbBU5wqNaHOMk5JOAPQKLk3XS6VYl1OWP5A2XIuen16HOoL1wq02wwCXbdlnrkVG6XNhvZa57vLHXErx7tdM5Bn0RCu7R5gADv3XduOml+af2K5N1Y1KZ8zYPdd+fnrlfihLa1M4cGQmltsYAaFndRaRkR3SzR3gx2C6T5Z+mf4nQpWtFzomDxBTD04aZpukndckNeDhxlMZXr0tnbLXnzWfC/trqWNcOnSS302hOtbeo2RVZDTsSNllpdTqxpeYPBWy26q5zXMLdZ7Bbl5wePUCWAvhtMHiYT6NlUfl3kas/wDizKbocyEyn12hPno6x7kLU8Wc6rW23oUo1EuI4GUYAcfKyG+qS3r/AE2NJsZ9RUITmdf6YHea1fA41pl5Z8Ohsti90NBcScDkr1vRPhIVvDNeatRzpdQp4FNsbud69guJZ/FvR6EOZ0tj3AyC+oZBXRqfxHmmWUAy3ZERTEH7rHfVvqOnHxyfZvU7cULyozwWUtJ0tpM4HqVxrttUOg+WdgNlHfFFs8uecuJkuOSfqslfrdtU+YgDha5rHXFU8ua7S4nUguXPqNMYjEBC7qdo4gl220oKl/bPMioAt+mM6JIOnS4H3S305OMp/wCMoEf5rPqi/FWRgOeJ5KLikrD+GLsBQWQ3cZXR/F2nFQAD1Qm+tBtUZ7LLU5rBUtRp8uCNliqMLDDxldZ19af6x6JNW6st3OBJCDlcxzd9JwUtzDntytdS4s9WD9FmNxRMmZHCPTXv9EVGlwgHbYJIpQC7d0xC0OuqXaUBuKcYaSSjY1JVBoB2zwntBMY+iSKx3DPomNrPIxhGxZWpoIE91KdIN1OJ8s5Kzy45cTCtrjtOFTqfgeP7a2PosBc0y/gFKdXqPMDCUId7+ia1iL1VJFsE7/qtdMccJIboExKbS1uORAWK22MpgmSYaBlCDTJICJ1MOt8kykaS0Q0bbLDSnuDazAdyVie+tXvC1hJAOOwR1AH3I1zIWum8U2y0aQd/VbZtGyQNEy4ZJ9UynAjkrKypNQ+q6Framo6eO6ZzaLTaQJYQ3fsmMtXPMvwOy6FrahggDPddW16ZUrNDmths7ld+fjk+3Lvvfp58WLT+VH+CMYB9165nRDj+YJG4haqPSgyNTpHaF0yRz214V1mY2z3hCbHsCfRfR6VjQka2NPoRBWgdNsjH8kA+izbFJfy+WOsHjdh+yU60gbL7C2xtSzQaTHN9QsN18O2VcEsbocdo2WfOflqc18mNr5sBA+gQdo/VfRLz4UrMGqgGVAONiuHc9KqUSRVpFn/UE7KsryXhkEpVRp7L0VSwEmFlfYd1WHXCcwFpx5uEnSW+YYIXarWccLHcWpbT1TPELFjcuMtat+Jb/wDUGXtEB43+qxOYQYO3C0kaZgSgYC8Ec8BZzDukgFQDdG0ljwRgjgomgPJkgHeEWktX+qkRPZWB2UhNTWZISgSVt6bRNWsBGBui30pNrbWsgzpL6zhDiML2P8JRIqhcbqdOeiuaOG4XR/hJXDbt9M78heby16PHI+w2Fj+JLgTBAkDutdK1DMEbLX0sgXFMjYiCtNxT01nD1WZWmelTzsm3dcWtvpHzuRFzaFMvfiFw7q4NeqXnbgJtUC95OTuVyOtM/E25oaoa7BjsuoxpqvDGCSU676W5rQ478rK15/p9tStaTaVFoa1uwC69o2XNA5KQaGh20Qul0ekH3IJ2GU6nrbBwo2zWngLB1rqVK0oPfUcBAwFm6r1WlY0S5zsxgckr511jqda/rufUcdA2bwi+m+ef2X1i+dfXTqxw3YD0SbG1NxVbj6pVtTdVqDGDwvT2NqKFIYzyVz+2urh1tTFKkGARHKcJ4VmAAVbSIW3NAY3TGgEShBH1UEcKQ90D1ZJhQt1AQpI1wjKuBulaSN8JgBDf6qS5lU4GVcTlC4FSUN54TWOKU1MapGIgUEogRyoGagrlCrBUXxB9NtIgVCCeeUX4psQ1oaBgEYKzvJcDiSNgggMjUJJUjKxMZP0S6DwanmyBmIUAJOTujZRlwjJ/ohB1Elzg0A8AcIBqc7IB9F0GUiSO54A2WqnasAlw3xHKkwUKD3u2x3Wg0GA/zGjT2OZV3t0LVxp6CHN3Az7LmXFatXODoB7IIOoWVrUcfDpaXH/Rhcep0wGdDvuutTo6MlxM7kmURbMkAwmbBZHnq/T6rR5RJ4hYXUKjTDm5H0XrC3kYjeUqq0Oflu/dbnTN5eUfRMZwgaDTdqZg916OpQoE+ZsHuFnqdPacsMj1C1O8HjXnbp762Xu+iykH2H2Xo63T5Ehgkdlgr9PqNMlpH0K35xz8bHLnScFXrIG0ytLrct3CWWkSCMcpl04VJ9lashCcBOpRJiJlCXO2kxwijEn6ISPpCtV9ICYyUWo/VL9f0TQeOFJByo3MmSPRWNsIYVtKiSraATlW5wgYg+iXqOYwFewYI+U+ZvCW9wB7jaVJJGMeqp7ZaATPKkOAc90bQBGoAtPCFoAAEzhUXZxypCLQXHSIHATWUsTsqofMM/RbXMeWgtiOQoECiN0QZB3RBzxhwjuoNU9/VMVQiQFAII4RO82wiFA0Dn3WozTGNyAnhpkenKBjZyPNG6MZOfspk2i0ueexOAtQbsI25S6DgKpZGeCtRaPYLNah4ZFuNs8LI50OAOy1zLABsgdRDYeRJ2CpDawGk0vl3zu/RIfq+UZ4WxxPjNkQBKGhSD6u2XFb5n4c7TOm2bqz2tAkr3Fn0ajbW4rXbtDYkDv6Jvw50mnY2Rv70aWgS1p3juuV1jqrr6qTJaxp8rBtC9HM/Ec7+67nTrm3u7k02UQGNbgncrrtcGuLQIjaF4vo114HUKTj8rjpPtsvaFudX0T1MUGHog44z7pbXAiOQpEIFO1AqNLmDyGfQrNVrClTLzwuXW6nWaCWjynYrU51mvSUq7XGJ0u5BWltTC8d/ij3iHNBcMyN1sodZYPnD2kblV+OqfJHq2uVvYyq3TUYHg7yJXIteo06sFjw8HjYrpU6oeJB+i4dcY6zrWG56HZViXCnoceW4XMuPhZjgfCqwezl6Q7IXOI9YWN6jWSvnV90mtbue0wdP6rh3lsHNJDdLhwve/ETmB0s+Y7j1Xk7uoCxwxng9115trF5x4y4aWPKWwN1Akx3hdK/YC6d5xC5b2lriP3Wupolw66Yx1EVKbg4jDhz6FY5OyOJ25QRC5Zjpo2uIG0g8FVHbZW2A2OVEKLZM/svSdDt/DbrcMkLhWVE1aoAHuvYWjA0NbtDVw+XrJjt8XO3Wp9HxumERMghcP4Iuj074jayodLS7SvT9NIfbvZ2JleT+ILV9nftu6IiDJhefm+3os2P0h0eqKjKTgcghdq5IDy52AMlfOf4e9fpdQsKFQvEgBrx2K9P1vqYqvNOi7y8kLbBXUr41nljT5GrDqJSdXKR1GyuupdNurSxqGjcVaZY17XmmWgkB0OgwYnMYRf2Z79O70Lq3RbS6qtvuqWNK4pkNcypXaCwxs7ODnY7L1XUKDXs1CIIkFfJK/wt0To3wff0utdRFt1N1J9ZlOjWaS3llOnSLf5g8oBlpLs57L6B1nqXSv4XXVvSD6F3VvTa2YmRbMfoDy0zOhjzVA7aYGwXk5/qO+bny8yerfvcz9+o9d/puepvxdb7k+s/6e69L1bqnTqPUzYvvbZl2HBppOqAODnCWtInBPAOSrPVqfTaLhE1jgDkH1Xyq36cyr8NV3s1Mru13DKDyKlE02ToZUG7y5jZLi6Q5wyNMLp9Ae/8JXtX1X1HWlTw2F5JcKZaHMDjyQDE84V8f9Veupz1Mtmz3vr19+p79w/J/Tc8y9c3cuX1n/t2eoX1W7ql9Z5zsOyz0CanliSTAjcpZ/mRPHCyfErha9KYyp4obcFzqgp4Pg02l9QT6w1vB866fL8k+Pm936jlxzfk7nE+69D0etYOufw7Ly2fdyQKTagJkbgZyRyBkLvGo1jHOqENY1pc5ziAGgCSSeB6r5z1H4fZafBtre3NSoX0SyvcUmhopBlQgEU2gDQWamlpBkEGSZXSurW/+JvhTp1Ok+nVubatUpXdO6cWtqVGNLWl4DSHZLXkRGVz5+fubz1z/dmyS/f4/Oe5+W+vg4snXPXrcts+v/L1Np1bp17WZRtOoW1atUBdTYx4JqACSWjnGccZWxpIXzv4tsekWthb21HqD7i5pOdTqU3XLXva0U3F1QgCWObDYI0xMQV9A6eXv6faOql5qOoMLjU+YnSCS717+q38Xy99ddcdzLJL6uz3v+J+mfl+Lnnnn5OLsu/cz6z/AH+2psKVHso031Kz6dOkwanPqODWtHckmAra2F5n426FfddfY0rarRbaUtZqNqH5XktDagbpIcWt8SAcatJXXu3nm3mbXLjmddSW5HdsupWF/UdTsry3uKgbqLKbwXae8bx6rS+oyjSfUqPZTpU2lz3vIDWACSSeAvmfx106n06+sW9Hq3VW+p0DVaHva59Jwc1tJ7DAIe95LSPlcJxhdb49p3HV/ia16NbQy1Y5kOdlup7naqmnZ2im10NM+Z0ry3+pvE6nc/ulk9X1bfr9f+Hp/wCFnV5vN9WW+59Sfb2Nhf2fUWPdYXdG5DIL/DcCWg/KSN88HYrS1pOBmeF84+KemO+HurWfVel3FSKdN1Sbg+I9nhxqaSI1U3sc4FpBhwkRMLtfGtv1PrBoW3R3sHT30KrrltWroZMsNPWB53CA/DYk7mFvj57fLm8/3c56n+fr9Md/BzPHqdf2383/AB9/t6ehc21yHG1ura4AMONGs2oGnsdJMJVe/sqFQ0rm/saFQbsq3VOm4ciQXArxX8L2s/EX9SlRo0TVsbGo4UqYptkiqTAHuuz1X4I6R1Lqlz1C4detuLktdUFN1OCWtDRAdTcdmjlPxfN383xT5OOfd/G/+8v/AIXy/Dz8Xy34++vU/Ob/ANtjs0r+wq1Qyj1GwqvcYayndU3uJ7AB0lbG918u6B0m0qfGtOl05gqWdnd+MyrV8N1QeDhxDmMGHVCGgHhjjOwX1Jo7bJ+D5evllvUzLn3v1/8AU/0z8/xc/FZObuzfrP8A3RDO2EQ3VhpjCsNzld3BAYKMIIyjHZSfEBTc14bvzhFVow/z5ngLf4Yc9zdgOVbKAMkiSNiUJzjROABHYLVa2z9JcecLe2mxrdTyAOSVnr3rWjRQbqPc7JSO8K2YScEblYbi4dc+WkS1vflE9xq7tnuVNAYwxtGSgsD2Bp0iXHudyra0RJz6JukT6eqF5Ew3PYpAA0AH+iFxER3VucM743KWDqnJgbAd0JHkNHyzjMpJcXHbCJ+tzu/JTfCinqOOwUWYNGuQJIUeBADRnf2TNBnJwr3nkpRApgwdlZBMtIkBObMepwAh0wD/ANygANrQcw+LTZMYMLn1ul2zx5QWn0K3vc4kCMcoRt5ck7p0Y4dbopz4TwTyHYWGt0u4YY0ah/y5Xq/DHJg7+qW5siW4PKZ3YPGPG1KNWnIcwj6JJaeQvbPZAGoap35SXWdvWk1KQHsIWp8g8HjC2DKtpIGd+y9Wek2k5pkF22SkO6BSyW1SGjuJytTuM+NjgNqkU3MHKBrZOV063RrlsljQ9vBBysNW1r0j56b2kb4WpZRhD2jgoIIORgpha4CNlWyQBp7ojkbKtIJ9VC08HHZJ+zmup+GdTTr4KU5rSyYOoGfSEJL2tzujpulonfsoJTcNXIW+lWAaBOVg2PvsrDoG2e6k6JeDPZQO0gEFYWVT8spoce+6sTRq4VtHmCVq7LTQLWsdqEvOxWoK1suXhhDWsHBICuk0aws4cCRH1TmHMnHZLOH+CdYcxb2jDZyVmY8QI+yeHlxgfdX2jNQb7IrhwcA0bNHCWxj3EjadvdE22q+ad3AyVqcs651R81YBkBeu+B+jsuKrry+IZb0s+bElefsLWkbmKx911/iLqTXVhZ2VQMs6bA0BuJxmV0kz0P8AbqfFXXGXbxa2rpt6eAe5Xmw7O6Xb0HXD/I9k+phdOh0Kq/e6otxPzLfN8WOvbPQqaXtJ+WQcL6BRuWVbenUY7U0gQfVeUp/D+03dL6FdW3oM6YwRV8Qu/IDj3T11KuZY7UhUXwPRcqp1ehSdpqHSVot+oWdZmkVRrJ+gV9TVloOrVCLQwckwuVa1Jpmk8aiflPZdi5s3XFMtY9h5BB5WW0sa1GrrezU0CTC3x1zeXPvmypb9Nc9suMTsmM6TqrCnriRMro069OAJj0K0W8Pr6uwgBN7rE4jiV+l3FqdbMhvLStvTOqltUU7g6SdnH9iu61s4OZXM6v0gXFN1W3GmqMkDlY8pfVby8/Tt0nio2fuEu7rMoUS9xwF5bp/W32tM0q0l7RAJ5HYrmdT60+qHy4hu8Ll18ft256mD61fCpUcdgV5a/uNROccJd9fFxMH2XLq1XPO+eFuScxjq21dZ2qcrM95dEmYVlxBgqnATKL1q8VaRBKVzsmvdDYGyVIyudrciH0VDJxupqWzplua9cDgZWLcbk9t3TaJp09ZEOOxXfttb2hxOe6zPpBtMNG4WqxcNPtheTu+VevieMbenVfDuyw7PH6pvULQV9TKjfKdisNbUx7ajN2mQu3Qcy+tQ9p9xy0rlfV1uZXmOmi/+HeoGvY+ek7/MpOOHBfROlfEVl1CmPOaVXmnUwQVwTbDQA/zRiVmNpSDjDSCDlanYvL3rK1I/8Rn3Wm567ZdE6ZVuqn85zS0CmxwBcXODRkmPzSfReBFItDdJfB9VdS0FxSqUazQ+jUaWua7IcCMgq662ejzJL7+m/wCIeq9G61Rq9ZZUq9P6qyiWE1arYoupl+ltRuQYLjMHIPdecs7p9l0F1IkGzsq9CsWMBPgU6hDnt3k6S4kTmHCRha/8DosIfVunucwAMq1aFKpVaBt/Mc0uJHBJlarSjaUbJ1pbUtduZ8Q1POapdhznk/MTyT+y+ffg6+W2/JJNmXPz/wDj3/z8/HJPjtuWWb+P/wBYqd/RtugXDazmMrU6b7V1JzgX+JlrQB/zS0j0I9Vq6DD39Sqsdqa+4FM4wHU2NY4AznPP0WVvQ6QDW07u5Y1oDWEBhq0m8tZVLS8D6yAvUdH6Yyjb0m0aLKVvTGmnTbsBun4vh+S98995/bM9f/Xv/sx8vzcTjrnj/wCV3/8An/cHTKllU6t/h7rhn48NL/A0uBgAOJmNOzmmJmCs/wDEC0fUsrR1OAHeNZnVgA1qZDSTP+prRzOpd+3sbBnU/wDEW2lNvUC0t8fMkFoaRvGzWjbYLbf2Nr1OyrWl7RZWt6rdL2O+4IPBG4IyDkL0/L8X8vxdfHfy8/xfLPi+Tn5J+HlOt39rf/AVKjQuKQqXtOhbU2F4JDg5hcCAeNDp7cpfSeu0uh9HtK11b1ns6nVuL/XTjRRZraMmfN5P5mN2yQMLePgbpxqONevdVqTgGVAfDa+q3HlfUa0PcDGZOV2uq9GtOpdObaVGuo06cOom2d4TqBAhpYRtAxG0Yhcp8fy9dX5Lk6kyfn/N/wCv1/h0vyfFzzPjm2bt/H49f9Hj/jHovTjaNqWl4X/jrltKpQ8Vrm1WvJJcyBILI1iTENcDwvW/C/Ua/Vfh/pl9deavdUG1Kjh+Z2xd9Yn6rhU/gnpzKk1q1Z9J2KzKdOlR8Ycte6m0O0nkTlevohgY1rGhjWANaGgANAEAAfRa+D4rz313eZzuep+/2Pn+XnrjniW9Zvu+vX6Z+m9VsepeM7p9yK4ouDahDXANPG4E+4kLD8U9fZ0a2aykxlfqNZpdRovJDGtHzVKjvy02znknA9N/T+m2XThUbYW1O3FQhzwwmHEbbkrP1TolLqVdlZ9arTc2noPh6SCJJEgg9yt/L/NPjv8AHnl+P05/H/F/JP5N8f8Au8f8GWDOoXn+OdXvKVWm94rUjWc0VLuoJDazmz5KbZ/ls+sbLd1+9Z0346tq92C238OjWFTAApy+m95M7Nc9s+hXUd8I21RrmuurgtcC0+WnkRn8q6HVug2fU7K2oVhVY61aG29em6KlHyhuDyCAJBkHkLycf0/yX4vDrmSyyz3u2Xffqf6err+o+OfL5c9Wyyz6zJ/j3fp5r+JF7bVG0rJtUPrGhVDxSioafiFtNkgHJLiYG+CvY17VlKjU1NAqsolhI7hsH9lxejfB/Tum3tK6Lqtw+idVFjm06dOk/wD9wMY1oL+zjJHC9I9ge1zXfK4Fp9ogr1fD8XU66+Tr76z/AKR5/m+Tm88/HxdnO+/9vAfwr+a5/wD9d0//AP5qr1PxR1Gr0volavat1XlQi3txnFV5hrifTLv/ANVXQPh616F4n4SpWf4lOlRmoQYZTBDAIA/1GTymdd6LQ60LZtxWuKJty9zDRcBl7dJJERIGx3GVj4fi+T4f6fwn/NN/0183y8fL/Ued/wCW44P8OLBlHplW+adTbiKNB5YWk0acjVt+Z5e/GDghevEpdva0rS2o29u0U6NCmKdNowAAAB+yaJ5Xf4finxcTifhx+b5L8vd7v5NYTxujOclLZ3TAAV0c0iBlWByFfCoOAwpPltGi2m2au7t/RZru+oU3BlI6zsQ1Yqrri6/zKkT+UYH3U8FlKnuJUtSrVZVcdbnyNgOEltNwMg77JoaXDUBgc7ZU1AQJzyFDVwARBmOUqs4Egbgbq3uMwBpB3PolOIjGfVS0LiNJ7EJLgNxtwmmXEE4HCmgveGxJ47IpKxpHLp+iEDS2IzvKMtNJ+ckcKtRc8FwURamU6cFsv3JSK1V1R3bG3oicDqLokoW6nOJ2HJUtRsjcSFUjIOJ5QunVDZ91Huk+g3UtUSZwPRLc52qDsmQT5uOUVWBtukFaf9R3VyB8mI2lW1k7GXKwCSA0emcqOAkxJ+Y8Kg0AzGP2TnUtLJeM8IAwaCSd+EAuCSTvwELW+YTutLKILQCQOwQOYWEyM8BUOEwXPgbd01zWyGaxBOCUBaRTnk4A9EDKRcRO3ZQG5oa8BrpbzGyIsaZEAhEG4I7KAQ3CUyV7Og8EOpMJOBhZq3RrR8QwsMbtK6T8ERkqyM53TtGRwKnQWF5FKrHuFkqdEuaclpDgvVAQ48Sg0zI9Uzqjxjxtbp9yz5qR9xlZXUntEFpaZ7QveeGCED6NN2C0H6LX8g8Xhjtn5ghOV7OrZWzzBpMyeBCyv6LaukQWztBTPkg8a8oQMEbplN3C7tXoLMmnVO2AQs56DWH+W4GVrzlGVz2vgrUwh7Y2THdHvGCdGqN8pX4a5Z81J49gtTqMnBpGeE1rhgn6rO19VhDXNMHfCax4Bzt6rUrNjax5Alb7GmarvKCQVyhVYI5Wml1F9FrfBEO7rrPH8sdS/h7zpXRKTmCveVWU2b75XP67fWxqOt+ls1AjSXRme4Xn2dVvKtEse4lhP2TrSQNTT5nYWfe6vUmE9OtXh73VHEmTCG/tS1xeO0rtWts7TIGefdHe2pBEtxHK6aw8wxrhBEg88IajqrCYqGR6rqXTGA6B5XTgLBegNaGjLjupraG36hXpxpqER3Wqr1q4Jlx1FYhRLaWtw9llc7JhZ9Ha03N9Vru85V2F0+nWbNSAcSdlhy7YJrKTzgNJT5ZBltdav1i5puDaVd4jctKKl8QdQp7XLz7rBSsazxOmB6pwsHCC7dZ85G8ro2/Xr2q/SXB61f8A8QXdvpzE9lzLe1a14cH6HBaxY03EOcS5H8+L+K11rb4yumRqGpo7ro0vjsgQ6hledbY02yIA7KnW7IkNBWf+In6M+GmdQ60LutUqNYWa8wFybi6e+QJhbHsaz5RlIcwEE7Kv9R/hfwMLaT3nYlSpRe0AuEDglbre4NtVkt1N2goOpXQrhoYIHIWL81rU+KOfVt6gg6dxM+iz5GO24XRt7p9EBj/MwGQeQuqyjb3NEVGtZq5A7rP81n2f4pXlnTuggnIXqTYUHGH04HcLPd9NoUWh7J0cgrX88o/iscBjZgE54XqOl2Pg2japHmdkFYLbpjXu1sdqjzBvJHovQ9LcLi0NIGS3zN9e4XH5e9np0+PjL7Z6zogkSDyhovNN8gw0rRUozLTxt/ZZnMmGjBXLXb846AJcyeOyBjq9pXFW2dEjI4cOxCu3gM0uMJ7SA6NzCtWN1Hq9vUH85ppu55Cf+LtTkV2QuQ+2YRkeqX+FZMmYRkO12XdRtaY+fV6BZKvWZkUKeO5XKNNjSchMogOdpYJTkg2tVI17uoPEeS3kLq0nCnFOmNTjgAIOmWb63la0juV6Sw6bToZAl/JKM1XrCOndOJIqXHzbhvZd6k0BsDbslsYQjEt9FqTGN0zSGiAMIg4NEb9is9WsNJ0uGoJdJxquhxgpLfTqjIlMkLH4LoDmme4RUnGYcSCNgpNQpyM5VBhGyjKhxOU9mlwwcqBTXHlMGBgfRCWkHbCoGD6cKRgM7b8hG0Qe6BhBHuiEDE/VSWRmOVAcqg4h+Y0HY+qaNLxjdSBgHHKFE9vHZUI7p1KPeUBn3THAcfZVplVEUxx9k5jhsUktKg3wgtIdKhwUmTG6NpnfdSfHWMIcTuBygqtzqOAOE5ryZI+Y8pb3AiCZ5IUiS59SB8rAq8NweABLv0VlxJBIgcdlZqE+b7KBel5JJMd1bWgDuUW7STKtrQIicqRRZEz9FQncAydj6LVVYA2dWRwlhp04+VRI0jXDoLvdA9suj9FpZQ8RxbTcNfblXVsn0wNbw0xMcowaxnDTG2yzvAECSZ39FsdRJdAIj1V06BD/ADRpGSUlj0TkYb3RFrdMNH1TajfMQBLZwQh0FoHcyhE6CDB22EKCmd9yN5TtGBmCqIIEHGPupBc3S3SAY3x3SxOmYIATnatLZBkoGseTA54SYCCT5j9ELokDYJzmCmDrMu4WaT823cqAtQg6TB7lWWEtDi/UDujo0DUaXkagNgOSrd80aYCkU5muBOOAmU2lok/dE1ri4uIiNgrLhpwc7KRZaRJVRzwo5xgTyiZ8sdlIDWmZGCrDTJRPMugeiqMxypBBIJH3KHG/ZG1pz67qAb4+ikDEShAJcD6YTXNEGMgISMDtGVIBAkoY8/tsnEYHdQs54MYUi6bZfBGOU2AAQPoUTWwSPsj0hpz91AlrTqwcbqBo0kEZmUbQQ707o2085BzuEogUQ8GQDBQVLGjUaZZnkhbW08RtOFGNAlo3jdOjI4lfpQ+Zjvok/gXsaA5mrO7V6CnSOZ+yvSACBuMhandjN5lecHi06mgsIYdjHK7NuxlG3a+q7S52wG6doFdpBzGQqNuxwh7ct2K6T5cYvxOh06sx1Nzi75dwVmv+oh4qQJA27hIp09DTB33Cn4UEE6eJgrV+aD+OuLcvfVra2zvhbKbWObNSiS4x91tbRZEBsSrawQZ5WOvl36M+NmfS8WGtYAwZA9Ul3TaIqHlpXQI0jA3wVA0TH3WPOt+EYm2dJuQ0SnCk2NhhaGsGrJgIXgAw36o8rT4wst0iOEBbPrCeGmN5U0zhu6tJD6Qdkjzd02gXsAJPlRMbJg4d2W2hR8VzaTR5ic+yLTCtWs+UZMI6tMMpkn7LXWpstqmljZYMFD4Yqw4/LwEaXOFIRqIyUqpTAaeV130gNh7rO+iBOJTocU2xcZjy/wBEurQDRge67RomJhZK1InfZWhxqlP0+qK2qVLd+ph5yDsQug6hvHKptsYUpcaqFxTuMtMO5a5PNM1KTmPbIPPZc0W8Olu47LVb3D2GKmR35WLG5SqNLTckaizTkELdRcKFTxaRBY4yY/KfUICwVDrY4eo5VUop0iYlwMEcEIrTqaWXDPFo5j5gOCsde2Lna2bjgf0UtppVPEt3aSRlhXRpNFaC5pY459JWfr6NY6VI1GTU8h2lIgUnEl+rsupeU3mo1gZJOCdkH+Eh0F/7q2LGCldB5cCYAWSvdPqv0UQYHK7rOmUdURIK6Nl0ugwyxg9SmC9PNWfS7m5eNQLR3K9Z0jo1KlHiZB3PZdKhagZAldGhSjYJxjQW9q2i7SyNI2IWzSRCum3KeACO60CmxyqeAQcJkZVloPuouTVZB9imUYBz9CtVxRDthBWXSWbqOttKoQByOQqe8apiCs7HiMJzHanQVKNVMg57plIhrjwsZB4Kum97HQ8Y7o1Y6LXAn3ROp6hj9Eqk5paCE7nCQVpI4TB5sHCIOg+ZGWjBbkKRLm+Xu1VSBa4ZwmHHp6Kw0EYUdW+Cl6TONk4bQfoqxyoADVcfdMLQ1qWTjG6Qoj/woW4V7lVypatrYVkdlXI7qwYQXxdznOExDB9EVMgjSRk8pbmuIAP2VU2GcGTyOFI4w4SQSRsELKcg7mAoBkgbcp9JlRw0t+XmP7qBVKk+pAaPqdlpo2rtR8Q7ZkFGHsoS0DU4bngKMqh4gmJz6KKg2hTOp0vPKqs+lcNIpRTbykuqEOcxuZO6s+E0Cfm5hSPoOo27JYIcPzclBcua4aneaO5SGEbtBwZygq1NQOrDvRSKeORjVsOUqKoOifm7JpiQQfoqzBjc8qRWktGcwdlZaM5kgJmiQC7JKjNLGHHoFJn0+aSE3wp83PCMMAJmVNIiST6AKRTGl04k5VglmTEcqnuc0CBAIzHZIqefAkN5lSBUq+I4wMA4VFhdDQcco2UwRsSJjstIY1jXOG/qpBptOh2kw0eVC23JMprA55DWtxvCJ7HwNTgxhO6kzlo0uAPoSkuaAO37rS5wazSI0jlC5hjIypMxBgTxsrIAjuYTi0jG/p3VaZcOygBoHiSf0UaRqyi0uFTA8oOSmGj+ZuCpEgHgfRXnSTGUym3drhk8pvhg4iG91JkOW+UQZV+CYBdhaQ0NLmgSe6LcCRMKLL4fygDPdMDJGy0ATOI9FYIa0x9SpMxaNfuFCwuM8dlq8JppgDJHKttMluTgKDLogyNkTnHfuExzS4QMcKw2WjGyYgOnGPVVpAfMbpsDRjcYKgadIkKRboDwBxlLqNcHaiMLSWbHYjCY0a2w8YHKgyBmlwIHKNw07hOeWsZDPM4IBLh6qJdOnqfJOOU1zWuO8cIyNTYGO6FrDupFOocg/RU6iCDx2C1QBA57KFurHKg55aGDueVTGhzsiCP1WipQIMkSqNMgQB7FSK2wfuo1ue87KzTJK00qJMY+vZSZgwiTsjZSJMxutYoF0g7rVSohlPzZPEpLnfhyMnjK1dNYA99aSIGkKVAXVNI27rXSttUNY6BEz3PKyYzeC+u8udhk49VsFABoA42Ww0GhzGbNAkgKyzkbSpOe9gIj7lZ3sjEbrqvogEmPKefVYLqmQCRuEwVmfSGnOyy1KOqQAt9N2tsFMdRBZjcbKTlNtgaedwdlbKMrpeED5XYkZIVsoBpjcDlQc42smYQOtQRsuyaInCY23/8ACi4NO0c09vVN8FwHBHZdo2/EKG1CKpXGbQDohmfRbGCrp0jHquhRtYzEAIm0cmEYdZWNqu3dJG5WijReTJWmnRDYzIK2U2NIgKyLWelbntK3W9GI8uyOlTjY+61MogZD4SF0mARha6cTyltaB+bKayZkOUTGwMoyAdjuhyRwFATspLkwoCqc49kIJnKkdpMTys1duTjC0NdiJSaji4HlSZmN80BaBTIbJGO6luNbgCNsArTXhrIGIQdZZxP0TaJ1YWdrnF2mFqotUmymwBvYprW59kljvKtFNwgJC2tBBB39UDiWfKY9DsrqTOpuUAfJAITg+hNc1+Dhw4Kmkt9VAWOkR7q9D2iWnUOxQU1ZzhFAI/ZAHBxgjS7sVckEYkJSF+kaTkIWgSTsO6OZ3EqaSAYHlO4QkjeEKJkAxwo5pG2yUHMYVtk77qAYxwpqOyg+MGm7VAwD90bKTmTOARuVFEKI0idIwFoo1XMGM9hsFFFrFQ1GvedRwDurZTIaIMcqKLJQ04J14J2UFAR3HcqKJqIqQwO78ALM0SZd9FFECi06WzM4+ytjXESNgoomKCeIAM8RCBuZcQIGB2UUQRapB/7wlEEyfoAoopAqkucMTHZUaRMOgwcwoohDpsDGmck7She4hvf27KKJCHW46h5TsCic3yQ7JGw4UUTUjWaRJE4wrawvGAcYlRRBWKRf5QJI2RhmlpESVFFCI1hBzsh0Fzoj6KKKUE2mAZ9NlTZJ2gDZRRRVpg57ImNyQeyiiYhGGtd3SNZMgdlFEAyjJmN02NxEEqKJVAdQJB5RsAwO6iiksU5JxgpjGAFRRTMUWhrpO/dLfUaTAwooo0IYDgAzuj0xgDdRRSpjGz7conNAAxvwoohEPohzg87jsmaTGON1FEhbWua0zlp2CFtOTjnZRRRo6dAgaiJE5C10aTXEgDbdRRRhzWCMtykXIDm6Rv6KKKiDbUXOdp/LyVufTNA03MiDgj0UUQ1Gn5qRcG+aNlUSxoA3UUUqFzSAWn3Cx1z5YAnuoomM1i0w6RgdlpY7ykBRRIFTomZ3KfTokDPPCiiqIdRaGPkgHEEHZW2n2UURDRhk8KCiTMZUUVTIPTDS3nsibRjMZUUQTfBERz3RBugCRhRRQjVScx8ad+QtAkcKKIjVOpQcwmBwB2hRRIFIiRkIZIUUUha53CAlRRSHqxCEt1HG5UUUmqlS8Nsztv7pFRxec7KKKS2NHG6eBuoopIx0+hTWO4CiiUMPKt0GDyoooCa780ZCMVAQe6iikslrx5gPdQNLflMjsVFFUiEEzsUWQc/ooohAIBJn6FV5mnO3CiiktjhJkY9FbmgiQookP//Z"
}],
"parameters": {
"confidenceThreshold": 0.5,
"maxPredictions": 5
}
}
- Click File > Save.
For reference, the content you supplied is a Base64 string from the following image.
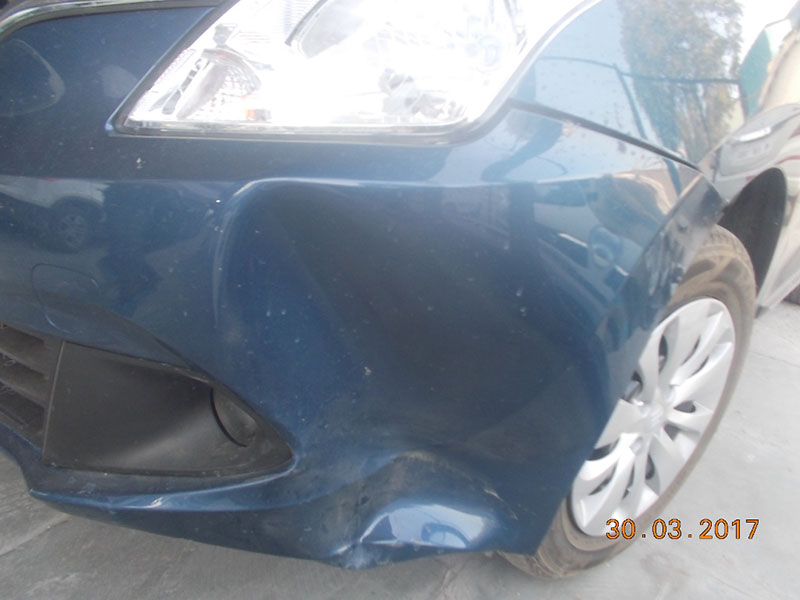
Now, you decide to ask Gemini Code Assist to help explain the structure and purpose of the JSON payload to a team member.
-
With the payload.json file open, click the Gemini Code Assist: Smart Actions icon on the toolbar, and select Explain this.
-
Gemini Code Assist opens a chat pane with the prefilled prompt of Explain this. In the inline text box of the Code Assist chat, replace the prefilled prompt with the following, and click Send:
You are a Machine Learning Engineer at Cymbal AI. A new team member needs help understanding the structure and purpose of the payload.json file. This payload is used to request a prediction from a deployed Vertex AI image classification model. Your explanation should cover:
* The overall purpose of the payload in the context of a Vertex AI prediction workflow.
* The role of the instances key, explaining the base64-encoded image data within it.
* The function of the parameters key, including the purpose of confidenceThreshold and maxPredictions.
* How this payload would be sent to the model's endpoint.
For the suggested improvements, don't make any changes to the file's content.
A detailed explanation for the JSON payload file payload.json appears in the Gemini Code Assist chat.
- Next, set the following environment variables. Copy in your AutoML Proxy URL you retrieved in earlier.
AUTOML_PROXY=<automl-proxy url>
INPUT_DATA_FILE=payload.json
- Run the following command to perform an API request to the AutoML Proxy endpoint to request the prediction from the hosted model:
curl -X POST -H "Content-Type: application/json" $AUTOML_PROXY/v1 -d "@${INPUT_DATA_FILE}"
If you ran a successful prediction, your output should resemble the following.
Output:
{"predictions":[{"confidences":[0.951557755],"displayNames":["bumper"],"ids":["1960986684719890432"]}],"deployedModelId":"4271461936421404672","model":"projects/1030115194620/locations/"{{{project_0.default_region | REGION}}}"/models/2143634257791156224","modelDisplayName":"damaged_car_parts_vertex","modelVersionId":"1"}
For this model, the prediction results are pretty self-explanatory. The displayNames field should correctly predict a bumper with a high confidence threshold. Now, you can change the Base64 encoded image value in the JSON file you created.
Click Check my progress to verify the objective.
Create the prediction request
-
Right-click on each image below, then select Save image As….
-
Follow the prompts to save each image with a unique name. (Hint: Assign a simple name like 'Image1' and 'Image2' to assist with uploading).
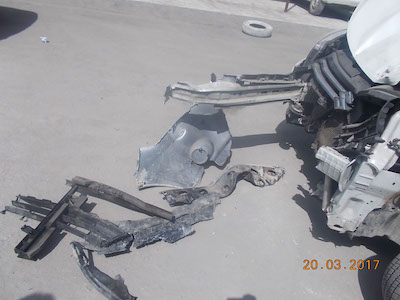

-
Open the Base64 Image Encoder and follow the instructions to upload and encode an image to a Base64 string.
-
Replace the Base64 encoded string value in the content field in your JSON payload file, and run the prediction again. Repeat for the other image(s).
How did your model do? Did it predict all three images correctly? You should see the following outputs, respectively:
{"predictions":[{"ids":["5419751198540431360"],"confidences":[0.985487759],"displayNames":["engine_compartment"]}],"deployedModelId":"4271461936421404672","model":"projects/1030115194620/locations/"{{{project_0.default_region | REGION}}}"/models/2143634257791156224","modelDisplayName":"damaged_car_parts_vertex","modelVersionId":"1"}
{"predictions":[{"displayNames":["hood"],"ids":["3113908189326737408"],"confidences":[0.962432086]}],"deployedModelId":"4271461936421404672","model":"projects/1030115194620/locations/"{{{project_0.default_region | REGION}}}"/models/2143634257791156224","modelDisplayName":"damaged_car_parts_vertex","modelVersionId":"1"}
Congratulations!
In this lab, you learned how to train your own custom machine learning model, with assistance from Gemini Code Assist, and generate predictions on a hosted model via an API request. You uploaded training images to Cloud Storage and used a CSV file for Vertex AI to find these images. You inspected the labeled images for any discrepancies before finally evaluating a trained model. Now you've got what it takes to train a model on your own image dataset!
Next steps / Learn more
Google Cloud training and certification
...helps you make the most of Google Cloud technologies. Our classes include technical skills and best practices to help you get up to speed quickly and continue your learning journey. We offer fundamental to advanced level training, with on-demand, live, and virtual options to suit your busy schedule. Certifications help you validate and prove your skill and expertise in Google Cloud technologies.
Manual Last Updated September 10, 2025
Lab Last Tested September 10, 2025
Copyright 2025 Google LLC. All rights reserved. Google and the Google logo are trademarks of Google LLC. All other company and product names may be trademarks of the respective companies with which they are associated.


