This lab was developed with our partner, Redis. Your personal information may be shared with Redis, the lab sponsor, if you have opted-in to receive product updates, announcements, and offers in your Account Profile.
GSP938

Overview
In this lab you will learn how to create Compute Engine VMs on Google Cloud with L2 connectivity through the use of vxlan built-in functionality in Linux. You'll be using the Compute Engine VMs to simulate Google Distributed Cloud Virtual (GDCV) on Bare Metal in high-availability mode which requires L2 connectivity. The deployment will consist of 4 VMs to deploy GDCV on Bare Metal, 1 x workstation, 1 x control plane nodes and 2 x worker nodes. Then you'll install Cloud Service Mesh and Knative on the GKE on Bare Metal cluster, followed by deploying Redis Enterprise for GKE and a Serverless application. Finally, this guide will show you how to run a simple load test on the serverless application to realize the elasticity of Knative backed by a Redis datastore.
What you'll learn
In this lab, you will:
- Create a GDCV for Bare Metal cluster
- Install Cloud Service Mesh and Knative
- Deploy Redis Enterprise cluster
- Create a Redis Enterprise database
- Create a Knative serverless service (incrementing a Redis counter)
- Run a load test against the Knative serverless application
Setup and requirements
Before you click the Start Lab button
Read these instructions. Labs are timed and you cannot pause them. The timer, which starts when you click Start Lab, shows how long Google Cloud resources are made available to you.
This hands-on lab lets you do the lab activities in a real cloud environment, not in a simulation or demo environment. It does so by giving you new, temporary credentials you use to sign in and access Google Cloud for the duration of the lab.
To complete this lab, you need:
- Access to a standard internet browser (Chrome browser recommended).
Note: Use an Incognito (recommended) or private browser window to run this lab. This prevents conflicts between your personal account and the student account, which may cause extra charges incurred to your personal account.
- Time to complete the lab—remember, once you start, you cannot pause a lab.
Note: Use only the student account for this lab. If you use a different Google Cloud account, you may incur charges to that account.
How to start your lab and sign in to the Google Cloud console
-
Click the Start Lab button. If you need to pay for the lab, a dialog opens for you to select your payment method.
On the left is the Lab Details pane with the following:
- The Open Google Cloud console button
- Time remaining
- The temporary credentials that you must use for this lab
- Other information, if needed, to step through this lab
-
Click Open Google Cloud console (or right-click and select Open Link in Incognito Window if you are running the Chrome browser).
The lab spins up resources, and then opens another tab that shows the Sign in page.
Tip: Arrange the tabs in separate windows, side-by-side.
Note: If you see the Choose an account dialog, click Use Another Account.
-
If necessary, copy the Username below and paste it into the Sign in dialog.
{{{user_0.username | "Username"}}}
You can also find the Username in the Lab Details pane.
-
Click Next.
-
Copy the Password below and paste it into the Welcome dialog.
{{{user_0.password | "Password"}}}
You can also find the Password in the Lab Details pane.
-
Click Next.
Important: You must use the credentials the lab provides you. Do not use your Google Cloud account credentials.
Note: Using your own Google Cloud account for this lab may incur extra charges.
-
Click through the subsequent pages:
- Accept the terms and conditions.
- Do not add recovery options or two-factor authentication (because this is a temporary account).
- Do not sign up for free trials.
After a few moments, the Google Cloud console opens in this tab.
Note: To access Google Cloud products and services, click the Navigation menu or type the service or product name in the Search field.

Activate Cloud Shell
Cloud Shell is a virtual machine that is loaded with development tools. It offers a persistent 5GB home directory and runs on the Google Cloud. Cloud Shell provides command-line access to your Google Cloud resources.
-
Click Activate Cloud Shell  at the top of the Google Cloud console.
-
Click through the following windows:
- Continue through the Cloud Shell information window.
- Authorize Cloud Shell to use your credentials to make Google Cloud API calls.
When you are connected, you are already authenticated, and the project is set to your Project_ID, . The output contains a line that declares the Project_ID for this session:
Your Cloud Platform project in this session is set to {{{project_0.project_id | "PROJECT_ID"}}}
gcloud is the command-line tool for Google Cloud. It comes pre-installed on Cloud Shell and supports tab-completion.
- (Optional) You can list the active account name with this command:
gcloud auth list
- Click Authorize.
Output:
ACTIVE: *
ACCOUNT: {{{user_0.username | "ACCOUNT"}}}
To set the active account, run:
$ gcloud config set account `ACCOUNT`
- (Optional) You can list the project ID with this command:
gcloud config list project
Output:
[core]
project = {{{project_0.project_id | "PROJECT_ID"}}}
Note: For full documentation of gcloud, in Google Cloud, refer to the gcloud CLI overview guide.
Task 1. Create an Anthos bare metal cluster
- In Cloud Shell, set the following environment variables for the scripts in this lab:
export PROJECT_ID=$(gcloud config get-value project)
export ZONE={{{ project_0.default_zone|(zone) }}}
export service_account="baremetal-gcr"
export cluster_name=anthos-bm-cluster-1
- Create the
baremetal-gcr account which will be used to authenticate from the Anthos bare metal cluster:
gcloud iam service-accounts create baremetal-gcr
gcloud iam service-accounts keys create bm-gcr.json \
--iam-account=baremetal-gcr@${PROJECT_ID}.iam.gserviceaccount.com
Click Check my progress to verify the objective.
Create service account and service account key
- Give additional permissions to
baremetal-gcr service account, so you do not have to create multiple SAs for stackdriver, connect agent etc.:
gcloud services enable \
anthos.googleapis.com \
anthosaudit.googleapis.com \
anthosgke.googleapis.com \
cloudresourcemanager.googleapis.com \
container.googleapis.com \
gkeconnect.googleapis.com \
gkehub.googleapis.com \
serviceusage.googleapis.com \
stackdriver.googleapis.com \
monitoring.googleapis.com \
logging.googleapis.com \
connectgateway.googleapis.com \
opsconfigmonitoring.googleapis.com
gcloud projects add-iam-policy-binding $PROJECT_ID \
--member="serviceAccount:baremetal-gcr@$PROJECT_ID.iam.gserviceaccount.com" \
--role="roles/gkehub.connect"
gcloud projects add-iam-policy-binding $PROJECT_ID \
--member="serviceAccount:baremetal-gcr@$PROJECT_ID.iam.gserviceaccount.com" \
--role="roles/gkehub.admin"
gcloud projects add-iam-policy-binding $PROJECT_ID \
--member="serviceAccount:baremetal-gcr@$PROJECT_ID.iam.gserviceaccount.com" \
--role="roles/logging.logWriter"
gcloud projects add-iam-policy-binding $PROJECT_ID \
--member="serviceAccount:baremetal-gcr@$PROJECT_ID.iam.gserviceaccount.com" \
--role="roles/monitoring.metricWriter"
gcloud projects add-iam-policy-binding $PROJECT_ID \
--member="serviceAccount:baremetal-gcr@$PROJECT_ID.iam.gserviceaccount.com" \
--role="roles/monitoring.dashboardEditor"
gcloud projects add-iam-policy-binding $PROJECT_ID \
--member="serviceAccount:baremetal-gcr@$PROJECT_ID.iam.gserviceaccount.com" \
--role="roles/stackdriver.resourceMetadata.writer"
gcloud projects add-iam-policy-binding $PROJECT_ID \
--member="serviceAccount:baremetal-gcr@$PROJECT_ID.iam.gserviceaccount.com" \
--role="roles/opsconfigmonitoring.resourceMetadata.writer"
Click Check my progress to verify the objective.
Enable APIs and add binding roles
- Define variables and arrays needed for the commands for this lab:
VM_PREFIX=abm
VM_WS=$VM_PREFIX-ws
VM_CP1=$VM_PREFIX-cp1
VM_W1=$VM_PREFIX-w1
VM_W2=$VM_PREFIX-w2
declare -a CP_W_VMs=("$VM_CP1" "$VM_W1" "$VM_W2")
declare -a VMs=("$VM_WS" "$VM_CP1" "$VM_W1" "$VM_W2")
declare -a IPs=()
- Create four VMs for the Anthos bare metal cluster:
- Admin workstation machine to execute scripts to create the Anthos bare metal cluster and rest of the scripts for this lab
- One control plane master machine of the Anthos bare metal cluster
- Two worker machines of the Anthos bare metal cluster for running workloads
- Create a vxlan with L2 connectivity between all VMs
gcloud compute instances create $VM_WS \
--image-family=ubuntu-2204-lts \
--image-project=ubuntu-os-cloud \
--zone=${ZONE} \
--boot-disk-size 50G \
--boot-disk-type pd-ssd \
--can-ip-forward \
--network default \
--tags http-server,https-server \
--scopes cloud-platform \
--custom-cpu=6 \
--custom-memory=16GB \
--custom-vm-type=e2 \
--metadata=enable-oslogin=FALSE
IP=$(gcloud compute instances describe $VM_WS --zone ${ZONE} \
--format='get(networkInterfaces[0].networkIP)')
IPs+=("$IP")
for vm in "${CP_W_VMs[@]}"
do
gcloud compute instances create $vm \
--image-family=ubuntu-2204-lts \
--image-project=ubuntu-os-cloud \
--zone=${ZONE} \
--boot-disk-size 150G \
--boot-disk-type pd-ssd \
--can-ip-forward \
--network default \
--tags http-server,https-server \
--scopes cloud-platform \
--custom-cpu=6 \
--custom-memory=16GB \
--custom-vm-type=e2 \
--metadata=enable-oslogin=FALSE
IP=$(gcloud compute instances describe $vm --zone ${ZONE} \
--format='get(networkInterfaces[0].networkIP)')
IPs+=("$IP")
done
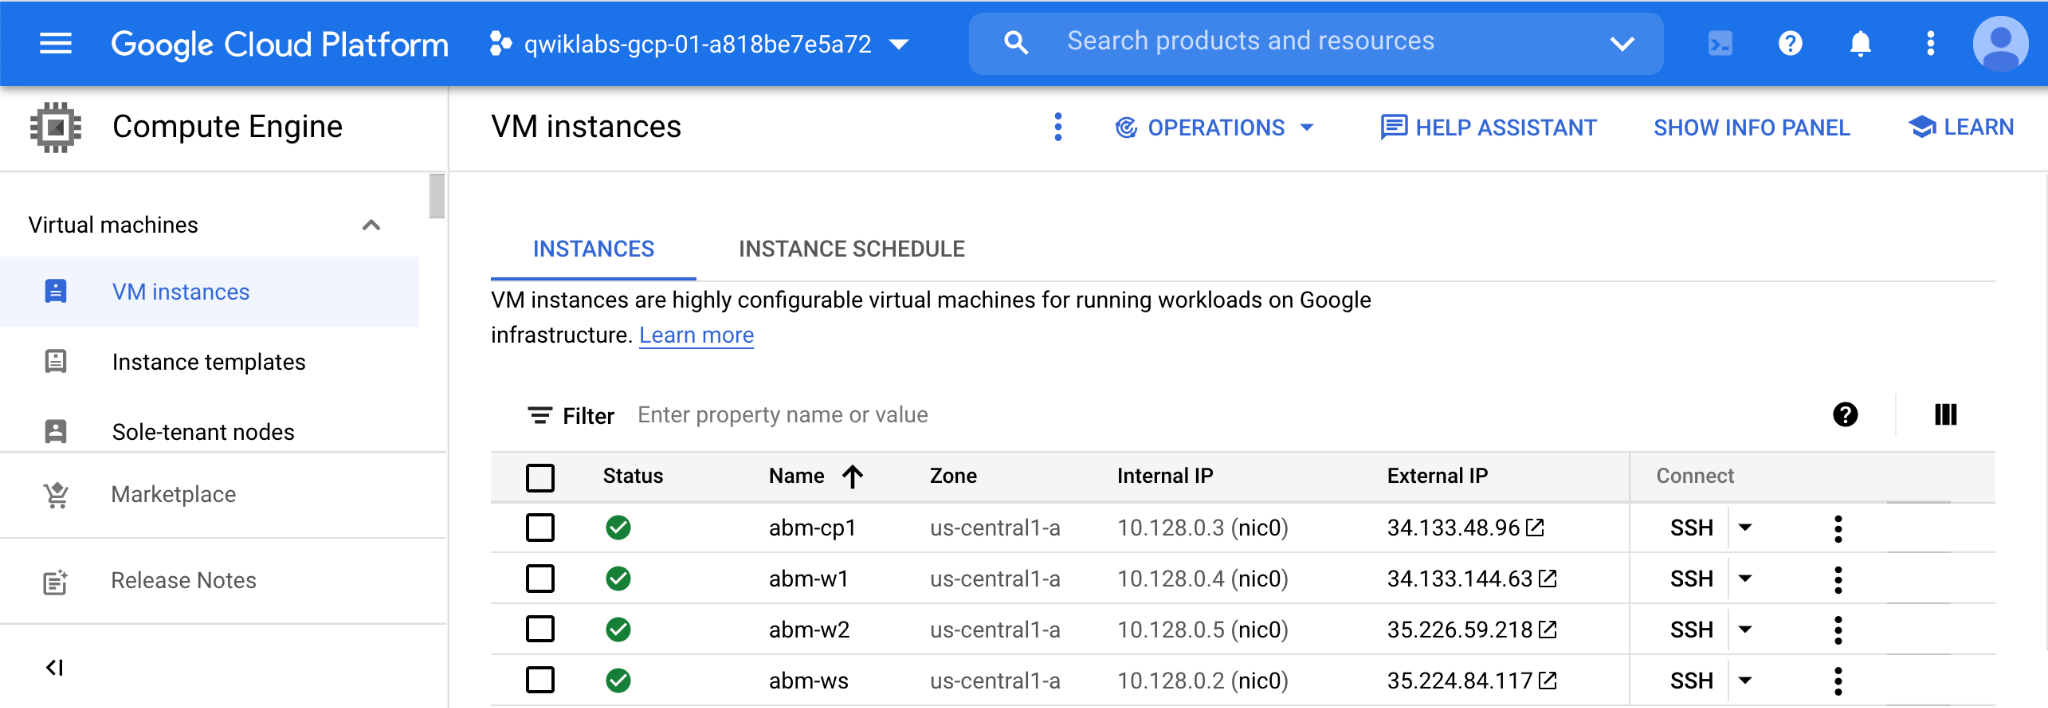
You should see 4 VMs have been provisioned in your Google Cloud console like the following:
Click Check my progress to verify the objective.
Create instances
- Wait for SSH to be ready on all VMs:
for vm in "${VMs[@]}"
do
while ! gcloud compute ssh root@$vm --zone={{{ project_0.default_zone|(zone) }}} --command "echo SSH to $vm succeeded"
do
echo "Trying to SSH into $vm failed. Sleeping for 5 seconds. zzzZZzzZZ"
sleep 5
done
done
-
At the prompt asking if you want to continue (Y/n), type Y.
-
Press Enter key a few times to set an empty passphrase.
-
Create a vxlan with L2 connectivity between all VMs:
i=2
for vm in "${VMs[@]}"
do
gcloud compute ssh root@$vm --zone ${ZONE} << EOF
apt-get -qq update > /dev/null
apt-get -qq install -y jq > /dev/null
set -x
ip link add vxlan0 type vxlan id 42 dev ens4 dstport 0
current_ip=\$(ip --json a show dev ens4 | jq '.[0].addr_info[0].local' -r)
echo "VM IP address is: \$current_ip"
for ip in ${IPs[@]}; do
if [ "\$ip" != "\$current_ip" ]; then
bridge fdb append to 00:00:00:00:00:00 dst \$ip dev vxlan0
fi
done
ip addr add 10.200.0.$i/24 dev vxlan0
ip link set up dev vxlan0
systemctl stop apparmor.service
systemctl disable apparmor.service
EOF
i=$((i+1))
done
After you are done you now have L2 connectivity when using the 10.200.0.0/24 network. The VMs will now have the following IP addresses:
- Admin Workstation: 10.200.0.2
- 3 x control plane: 10.200.0.3,4,5
- 3 x worker nodes: 10.200.0.6,7,8
Click Check my progress to verify the objective.
Add L2 connectivity
11. Prepare the workstation machine for needed software components for this lab:
- Create service key for the service account
- Install bare metal cluster kit
- Install docker
- Install Siege (load tester)
gcloud compute ssh root@$VM_WS --zone ${ZONE} << EOF
set -x
export PROJECT_ID=\$(gcloud config get-value project)
gcloud iam service-accounts keys create bm-gcr.json \
--iam-account=baremetal-gcr@\${PROJECT_ID}.iam.gserviceaccount.com
curl -LO "https://storage.googleapis.com/kubernetes-release/release/$(curl -s https://storage.googleapis.com/kubernetes-release/release/stable.txt)/bin/linux/amd64/kubectl"
chmod +x kubectl
mv kubectl /usr/local/sbin/
mkdir baremetal && cd baremetal
gsutil cp gs://anthos-baremetal-release/bmctl/1.16.2/linux-amd64/bmctl .
chmod a+x bmctl
mv bmctl /usr/local/sbin/
cd ~
echo "Installing docker"
curl -fsSL https://get.docker.com -o get-docker.sh
sh get-docker.sh
# Install siege
cd ~
apt install siege -y
siege -V
cat /root/.siege/siege.conf \
| sed -e "s:^\(connection \=\).*:connection \= keep-alive:" \
> /root/.siege/siege.conf.new
mv /root/.siege/siege.conf.new /root/.siege/siege.conf
EOF
Click Check my progress to verify the objective.
Install software components
12. Create SSH key for the Admin workstation machine and add corresponding public key to the rest of the VMs:
gcloud compute ssh root@$VM_WS --zone ${ZONE} << EOF
set -x
ssh-keygen -t rsa -N "" -f /root/.ssh/id_rsa
sed 's/ssh-rsa/root:ssh-rsa/' ~/.ssh/id_rsa.pub > ssh-metadata
for vm in ${VMs[@]}
do
gcloud compute instances add-metadata \$vm --zone ${ZONE} --metadata-from-file ssh-keys=ssh-metadata
done
EOF
Click Check my progress to verify the objective.
Create and add ssh keys
-
From the Navigation menu, find Operations section, and select Monitoring > Overview, this will create a monitoring workspace which is required by the script in the next step.
-
Create GDCV Bare Metal cluster:
gcloud compute ssh root@$VM_WS --zone ${ZONE} << EOF
set -x
export PROJECT_ID=$(gcloud config get-value project)
export clusterid=${cluster_name}
bmctl create config -c \$clusterid
cat > bmctl-workspace/\$clusterid/\$clusterid.yaml << EOB
---
gcrKeyPath: /root/bm-gcr.json
sshPrivateKeyPath: /root/.ssh/id_rsa
gkeConnectAgentServiceAccountKeyPath: /root/bm-gcr.json
gkeConnectRegisterServiceAccountKeyPath: /root/bm-gcr.json
cloudOperationsServiceAccountKeyPath: /root/bm-gcr.json
---
apiVersion: v1
kind: Namespace
metadata:
name: cluster-\$clusterid
---
apiVersion: baremetal.cluster.gke.io/v1
kind: Cluster
metadata:
name: \$clusterid
namespace: cluster-\$clusterid
spec:
type: hybrid
anthosBareMetalVersion: 1.16.2
gkeConnect:
projectID: \$PROJECT_ID
controlPlane:
nodePoolSpec:
clusterName: \$clusterid
nodes:
- address: 10.200.0.3
clusterNetwork:
pods:
cidrBlocks:
- 192.168.0.0/16
services:
cidrBlocks:
- 172.26.232.0/24
loadBalancer:
mode: bundled
ports:
controlPlaneLBPort: 443
vips:
controlPlaneVIP: 10.200.0.49
ingressVIP: 10.200.0.50
addressPools:
- name: pool1
addresses:
- 10.200.0.50-10.200.0.70
clusterOperations:
# might need to be this location
location: {{{ project_0.default_region|(region) }}}
projectID: \$PROJECT_ID
storage:
lvpNodeMounts:
path: /mnt/localpv-disk
storageClassName: node-disk
lvpShare:
numPVUnderSharedPath: 5
path: /mnt/localpv-share
storageClassName: standard
nodeConfig:
podDensity:
maxPodsPerNode: 250
containerRuntime: containerd
---
apiVersion: baremetal.cluster.gke.io/v1
kind: NodePool
metadata:
name: node-pool-1
namespace: cluster-\$clusterid
spec:
clusterName: \$clusterid
nodes:
- address: 10.200.0.4
- address: 10.200.0.5
EOB
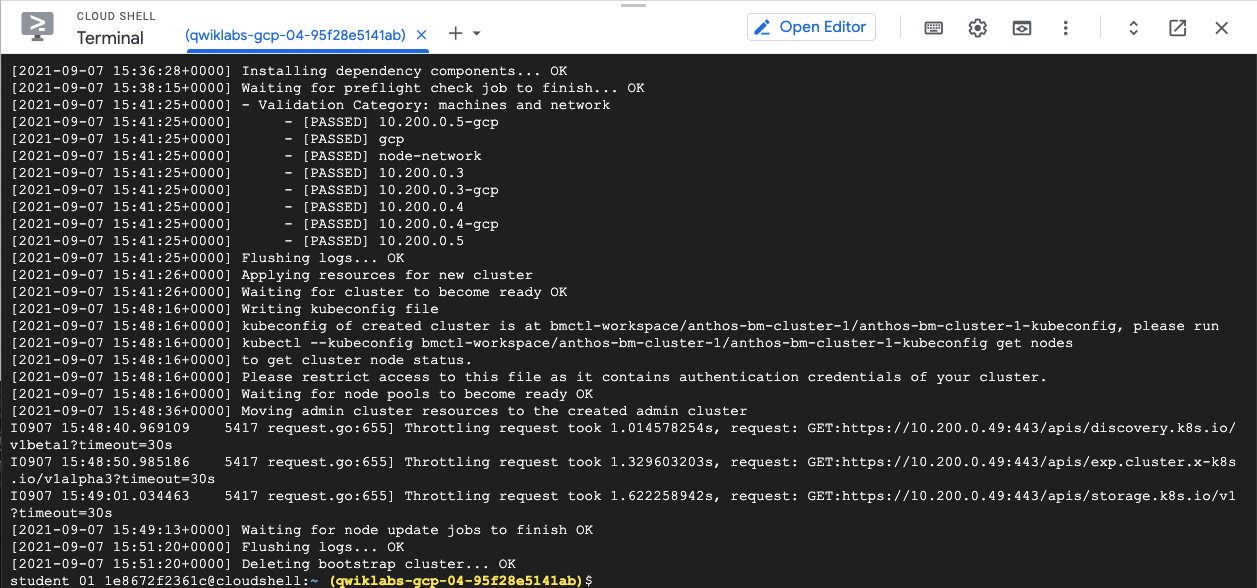
bmctl create cluster -c \$clusterid
EOF
The installation might take up to 30 minutes to complete. When complete, you would see a similar output as follows:
- Next you will configure RBAC policies on the Anthos bare metal cluster.
export user_account={{{user_0.username|Lab user name}}}
- Run the following script to configure RBAC for your Google Cloud login account:
gcloud compute ssh root@$VM_WS --zone ${ZONE} << EOF1
set -ex
export clusterid=${cluster_name}
export KUBECONFIG=/root/bmctl-workspace/\$clusterid/\$clusterid-kubeconfig
cat <<EOF2 > /tmp/impersonate.yaml
apiVersion: rbac.authorization.k8s.io/v1
kind: ClusterRole
metadata:
name: gateway-impersonate
rules:
- apiGroups:
- ""
resourceNames:
- ${user_account}
resources:
- users
verbs:
- impersonate
---
apiVersion: rbac.authorization.k8s.io/v1
kind: ClusterRoleBinding
metadata:
name: gateway-impersonate
roleRef:
kind: ClusterRole
name: gateway-impersonate
apiGroup: rbac.authorization.k8s.io
subjects:
- kind: ServiceAccount
name: connect-agent-sa
namespace: gke-connect
EOF2
kubectl apply -f /tmp/impersonate.yaml
cat <<EOF2 > /tmp/admin-permission.yaml
apiVersion: rbac.authorization.k8s.io/v1
kind: ClusterRoleBinding
metadata:
name: gateway-cluster-admin
subjects:
- kind: User
name: ${user_account}
roleRef:
kind: ClusterRole
name: cluster-admin
apiGroup: rbac.authorization.k8s.io
EOF2
kubectl apply -f /tmp/admin-permission.yaml
EOF1
- Go to Google Cloud Console and view the Anthos bare metal server under Compute > Kubernetes Engine > Clusters section. You should see the cluster has been authenticated and logged on using your Google Cloud login.
If not, follow the on-screen instructions below to log into the Anthos bare metal server:
-
Click on the three dots on the right side of your cluster.
-
Click Log in.
-
In the pop up window, select Use your Google identity to log-in and click Login.
-
Your cluster should now be authenticated.
Task 2. Install Cloud Service Mesh and Knative
In this section you will deploy Cloud Service Mesh on the bare metal cluster. You will:
- Install Cloud Service Mesh kit
- Configure certs
- Create cacerts secret
- Set network annotation for istio-system namespace
- Configure Cloud Service Mesh Configuration File
- Configure Validation Web Hook
- First, run the following script to install the Cloud Service Mesh:
gcloud compute ssh root@$VM_WS --zone ${ZONE} << EOF
set -ex
export clusterid=${cluster_name}
export KUBECONFIG=/root/bmctl-workspace/\$clusterid/\$clusterid-kubeconfig
apt install make -y
curl -LO https://storage.googleapis.com/gke-release/asm/istio-1.19.3-asm.0-linux-amd64.tar.gz
tar xzf istio-1.19.3-asm.0-linux-amd64.tar.gz
cd istio-1.19.3-asm.0
export PATH="/root/istio-1.19.3-asm.0/bin:/usr/local/sbin:/usr/local/bin:/usr/sbin:/usr/bin:/sbin:/bin:/usr/games:/usr/local/games:/snap/bin"
mkdir -p certs && \
pushd certs
make -f ../tools/certs/Makefile.selfsigned.mk root-ca
make -f ../tools/certs/Makefile.selfsigned.mk anthos-on-nucs-cacerts
kubectl create namespace istio-system
kubectl create secret generic cacerts -n istio-system \
--from-file=anthos-on-nucs/ca-cert.pem \
--from-file=anthos-on-nucs/ca-key.pem \
--from-file=anthos-on-nucs/root-cert.pem \
--from-file=anthos-on-nucs/cert-chain.pem
popd
kubectl label namespace istio-system topology.istio.io/network=anthos-on-nucs-network
cat <<EOF1 > cluster.yaml
apiVersion: install.istio.io/v1alpha1
kind: IstioOperator
spec:
profile: asm-multicloud
revision: asm-1193-0
values:
global:
meshID: anthos-on-nucs-mesh
multiCluster:
clusterName: $clusterid
network: anthos-on-nucs-network
EOF1
istioctl install -f cluster.yaml -y
cat <<EOF1 > istiod-service.yaml
apiVersion: v1
kind: Service
metadata:
name: istiod
namespace: istio-system
labels:
istio.io/rev: asm-1193-0
app: istiod
istio: pilot
release: istio
spec:
ports:
- port: 15010
name: grpc-xds # plaintext
protocol: TCP
- port: 15012
name: https-dns # mTLS with k8s-signed cert
protocol: TCP
- port: 443
name: https-webhook # validation and injection
targetPort: 15017
protocol: TCP
- port: 15014
name: http-monitoring # prometheus stats
protocol: TCP
selector:
app: istiod
istio.io/rev: asm-1193-0
EOF1
kubectl apply -f istiod-service.yaml
EOF
- Deploy and configure Knative:
- Install Knative
- Update Cloud Service Mesh configuration to add a new cluster-local-gateway
gcloud compute ssh root@$VM_WS --zone ${ZONE} << EOF
set -ex
export clusterid=${cluster_name}
export KUBECONFIG=/root/bmctl-workspace/\$clusterid/\$clusterid-kubeconfig
export PATH="/root/istio-1.19.3-asm.0/bin:/usr/local/sbin:/usr/local/bin:/usr/sbin:/usr/bin:/sbin:/bin:/usr/games:/usr/local/games:/snap/bin"
kubectl apply -f https://raw.githubusercontent.com/Redislabs-Solution-Architects/qwiklabs/main/Google/anthos-gke/serving-crds.yaml
kubectl apply -f https://raw.githubusercontent.com/Redislabs-Solution-Architects/qwiklabs/main/Google/anthos-gke/serving-core.yaml
kubectl apply -f https://raw.githubusercontent.com/Redislabs-Solution-Architects/qwiklabs/main/Google/anthos-gke/net-istio.yaml
kubectl --namespace istio-system get service istio-ingressgateway
kubectl apply -f https://raw.githubusercontent.com/Redislabs-Solution-Architects/qwiklabs/main/Google/anthos-gke/serving-default-domain.yaml
kubectl get pods --namespace knative-serving
cat > cluster.yaml <<EOF1
apiVersion: install.istio.io/v1alpha1
kind: IstioOperator
spec:
profile: asm-multicloud
revision: asm-1193-0
values:
global:
meshID: asm-multicloud
multiCluster:
clusterName: $clusterid
network: anthos-on-nucs-network
components:
ingressGateways:
- name: istio-ingressgateway
enabled: true
- name: cluster-local-gateway
enabled: true
label:
istio: cluster-local-gateway
app: cluster-local-gateway
k8s:
service:
type: ClusterIP
ports:
- port: 15020
name: status-port
- port: 80
targetPort: 8080
name: http2
- port: 443
targetPort: 8443
name: https
EOF1
istioctl install -f cluster.yaml -y
EOF
Task 3. Deploy Redis Enterprise cluster
Now you will deploy the Redis Enterprise Operator and Redis Enterprise cluster using the command line.
- Run the following script to deploy a Redis Enterprise cluster. First, it will deploy Redis Enterprise Operator for Kubernetes and then followed by Redis Enterprise cluster:
gcloud compute ssh root@$VM_WS --zone ${ZONE} << EOF
set -ex
export clusterid=${cluster_name}
export KUBECONFIG=/root/bmctl-workspace/\$clusterid/\$clusterid-kubeconfig
export PATH="/root/istio-1.19.3-asm.0/bin:/usr/local/sbin:/usr/local/bin:/usr/sbin:/usr/bin:/sbin:/bin:/usr/games:/usr/local/games:/snap/bin"
kubectl create clusterrolebinding my-cluster-admin-binding --clusterrole cluster-admin --user $(gcloud config get-value account)
kubectl create namespace redis
kubectl apply --filename "https://raw.githubusercontent.com/Redislabs-Solution-Architects/qwiklabs/main/Google/anthos-gke/bundle.yaml" -n redis
sleep 10
kubectl apply --filename "https://raw.githubusercontent.com/Redislabs-Solution-Architects/qwiklabs/main/Google/anthos-gke/rec.yaml" -n redis
EOF
- The deployment will take about 10 minutes to complete. Once it is complete, you should see this line:
statefulset.apps/redis-enterprise 1/1 5m after running the following script:
gcloud compute ssh root@$VM_WS --zone ${ZONE} << EOF
set -ex
export clusterid=${cluster_name}
export KUBECONFIG=/root/bmctl-workspace/\$clusterid/\$clusterid-kubeconfig
export PATH="/root/istio-1.19.3-asm.0/bin:/usr/local/sbin:/usr/local/bin:/usr/sbin:/usr/bin:/sbin:/bin:/usr/games:/usr/local/games:/snap/bin"
kubectl get sts -n redis
EOF
1/1 indicates a single-node Redis Enterprise cluster has been successfully created with 1 backing Kubernetes pod.
Task 4. Create a Redis Enterprise database
- Run the following script to create a Redis Enterprise database:
gcloud compute ssh root@$VM_WS --zone ${ZONE} << EOF1
set -ex
export clusterid=${cluster_name}
export KUBECONFIG=/root/bmctl-workspace/\$clusterid/\$clusterid-kubeconfig
cat <<EOF2 > /tmp/redis-enterprise-database.yaml
apiVersion: app.redislabs.com/v1alpha1
kind: RedisEnterpriseDatabase
metadata:
name: redis-enterprise-database
spec:
memorySize: 100MB
EOF2
kubectl apply -f /tmp/redis-enterprise-database.yaml -n redis
EOF1
Task 5. Create a Knative serverless service (incrementing a Redis counter)
- This Knative service is a web application counting number of visitors at RedisConf conference
- It uses Knative concurrency-based auto-scaling at 2 requests in-flight per pod
- It has a minimum of 1 pod and maximum of 5 pods. It scales based on current workload.
- Go inside the Admin workstation machine:
gcloud compute ssh root@$VM_WS --zone ${ZONE}
- Then run the following script to create the Knative service:
set -ex
export clusterid=${cluster_name}
export KUBECONFIG=/root/bmctl-workspace/anthos-bm-cluster-1/anthos-bm-cluster-1-kubeconfig
export redispassword=`kubectl get secrets -n redis redb-redis-enterprise-database -o json | jq '.data | {password}[] | @base64d'`
export redishost=`kubectl get svc -n redis | grep "redis-enterprise-database " | awk '{print $3}' | awk '{split($0,a,"/"); print a[1]}'`
export redisport=`kubectl get secrets -n redis redb-redis-enterprise-database -o json | jq -r '.data | {port}[] | @base64d'`
cat <<EOF2 > /tmp/redisconf.yaml
apiVersion: serving.knative.dev/v1
kind: Service
metadata:
name: redisconf
namespace: default
spec:
template:
metadata:
annotations:
# Knative concurrency-based autoscaling (default).
autoscaling.knative.dev/class: kpa.autoscaling.knative.dev
autoscaling.knative.dev/metric: concurrency
# Target 2 requests in-flight per pod.
autoscaling.knative.dev/target: "2"
# Disable scale to zero with a minScale of 1.
autoscaling.knative.dev/minScale: "1"
# Limit scaling to 5 pods.
autoscaling.knative.dev/maxScale: "5"
spec:
containers:
- name: redisconf-container
image: gcr.io/qwiklabs-resources/visit-count:latest
ports:
- containerPort: 80
env:
- name: REDISHOST
value: ${redishost}
- name: REDISPORT
value: '${redisport}'
- name: REDISPASSWORD
value: ${redispassword}
EOF2
kubectl apply -f /tmp/redisconf.yaml
- Remain inside the Admin workstation machine and run the following to verify the Knative service is up and running and view the status of the "redisconf" Knative service:
kubectl get ksvc redisconf
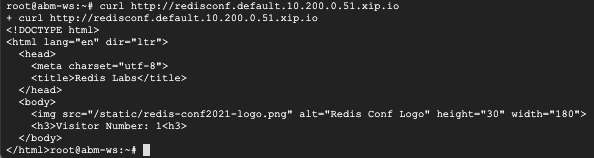
- Access the Knative service via a curl command:
curl http://redisconf.default.10.200.0.51.sslip.io
You should see a similar output like the following from the curl command:
Task 6. Run a load test against the Knative serverless application
- In the existing Cloud Shell terminal, run the following command to view the status of redisconf Knative service:
watch kubectl get deployment
You will notice the number of pods for redisconf deployment will increase when executing the load-test in a new terminal window.
- Open another terminal (Cloud Shell) by clicking (+) right after the current terminal tab and get inside the Admin workstation machine by running the following commands:
VM_WS=abm-ws
ZONE={{{ project_0.default_zone|(zone) }}}
gcloud compute ssh root@$VM_WS --zone ${ZONE}
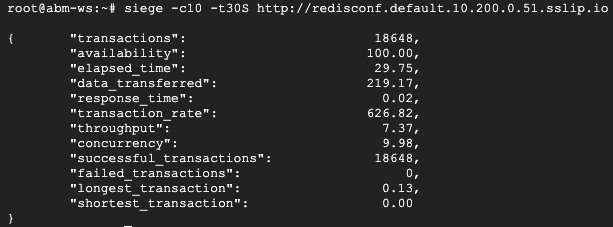
- Once inside the Admin workstation machine, run:
siege -c10 -t30S http://redisconf.default.10.200.0.51.sslip.io
- Go back to the first Cloud Shell, you should see the number of READY pods increase as follows:

The load test's result from Siege in the second Cloud Shell should look like the following:
Congratulations!
To summarize, you have the accomplished the following in the lab:
- Create an Anthos bare metal cluster on Compute Engine
- Create an Cloud Service Mesh and install Knative
- Install Redis Enterprise cluster for GKE on an Anthos bare metal cluster
- Create a Redis Enterprise database
- Install a Knative service serving a web-app endpoint using a Redis global counter
- Run a load-test using Siege to demonstrate the auto-scaling capability of Knative service on an Anthos bare metal cluster
Next steps / Learn more
Google Cloud training and certification
...helps you make the most of Google Cloud technologies. Our classes include technical skills and best practices to help you get up to speed quickly and continue your learning journey. We offer fundamental to advanced level training, with on-demand, live, and virtual options to suit your busy schedule. Certifications help you validate and prove your skill and expertise in Google Cloud technologies.
Manual Last Updated December 27, 2023
Lab Last Tested February 21, 2022
Copyright 2025 Google LLC. All rights reserved. Google and the Google logo are trademarks of Google LLC. All other company and product names may be trademarks of the respective companies with which they are associated.


