Checkpoints
Google Cloud Project Setup
/ 20
Launch CloudyCluster
/ 30
HPC Environment Setup
/ 20
HPC Job Execution
/ 30
Omnibond: Creating an HPC Environment in Google Cloud with CloudyCluster
This lab was developed with our partner, Omnibond. Your personal information may be shared with Omnibond, the lab sponsor, if you have opted-in to receive product updates, announcements, and offers in your Account Profile.
GSP862

Overview
In this lab, you create a complete turn-key High Performance Computing (HPC) environment in Google Cloud. This environment will provide the familiar look and feel of on-prem HPC systems but with the added elasticity and scalability of Google Cloud.
In this lab you see how CloudyCluster can easily create HPC/HTC jobs that will run on-prem or in CloudyCluster on Google Cloud. You can rely on the familiar look and feel of a standard HPC environment while embracing the capabilities and elasticity of Google Cloud. The HPC jobs can be easily configured to support many instance types including GPU, preemptible, and any number of memory & CPU configurations. You will always have the latest computational technology at your fingertips.
With CloudyCluster, users can now take advantage of the GUI developed by Open OnDemand. In this lab you will be able to experience many of the Open OnDemand HPC tools. Upload and download files with a file browser-like interface. Draft job scripts with the built-in web editor. Spin-up new computing instances and have them tear down automatically after your specified work window. The current release includes JupyterLab via JupyterHub and Cloudy desktop capabilities.
As part of Google Cloud and CloudyCluster you have a vast array of storage technologies available to you. In this lab you will take advantage of High Performance Parallel Storage for job execution.
What you'll learn
In this lab, you will learn how to perform the following tasks:
- Set up Cloud Firestore
- Create a project-wide SSH Key
- Use Cloud Shell to run a script to create a Service Account with the necessary permissions for the CloudyCluster Control Instance
- Launch CloudyCluster
- Launch the Control Instance from the Google Cloud Marketplace
- Configure the Control Instance
- HPC Environment Setup
- HPC Job Execution
- Setup Sample HPC Job
- Edit the Sample Job
- Launch the Sample Job
- Deleting CloudyCluster
- HPC Environment Deletion
- Control Instance Deletion
Prerequisites
Familiarity with HPC concepts and batch processes will help understand the goals. This lab can also be used in conjunction with courses and workshops that require an introduction to HPC.
The following labs will help provide the Google Cloud foundations for this lab:
Setup and requirements
Before you click the Start Lab button
Read these instructions. Labs are timed and you cannot pause them. The timer, which starts when you click Start Lab, shows how long Google Cloud resources will be made available to you.
This hands-on lab lets you do the lab activities yourself in a real cloud environment, not in a simulation or demo environment. It does so by giving you new, temporary credentials that you use to sign in and access Google Cloud for the duration of the lab.
To complete this lab, you need:
- Access to a standard internet browser (Chrome browser recommended).
- Time to complete the lab---remember, once you start, you cannot pause a lab.
How to start your lab and sign in to the Google Cloud console
-
Click the Start Lab button. If you need to pay for the lab, a pop-up opens for you to select your payment method. On the left is the Lab Details panel with the following:
- The Open Google Cloud console button
- Time remaining
- The temporary credentials that you must use for this lab
- Other information, if needed, to step through this lab
-
Click Open Google Cloud console (or right-click and select Open Link in Incognito Window if you are running the Chrome browser).
The lab spins up resources, and then opens another tab that shows the Sign in page.
Tip: Arrange the tabs in separate windows, side-by-side.
Note: If you see the Choose an account dialog, click Use Another Account. -
If necessary, copy the Username below and paste it into the Sign in dialog.
{{{user_0.username | "Username"}}} You can also find the Username in the Lab Details panel.
-
Click Next.
-
Copy the Password below and paste it into the Welcome dialog.
{{{user_0.password | "Password"}}} You can also find the Password in the Lab Details panel.
-
Click Next.
Important: You must use the credentials the lab provides you. Do not use your Google Cloud account credentials. Note: Using your own Google Cloud account for this lab may incur extra charges. -
Click through the subsequent pages:
- Accept the terms and conditions.
- Do not add recovery options or two-factor authentication (because this is a temporary account).
- Do not sign up for free trials.
After a few moments, the Google Cloud console opens in this tab.

Activate Cloud Shell
Cloud Shell is a virtual machine that is loaded with development tools. It offers a persistent 5GB home directory and runs on the Google Cloud. Cloud Shell provides command-line access to your Google Cloud resources.
- Click Activate Cloud Shell
at the top of the Google Cloud console.
When you are connected, you are already authenticated, and the project is set to your Project_ID,
gcloud is the command-line tool for Google Cloud. It comes pre-installed on Cloud Shell and supports tab-completion.
- (Optional) You can list the active account name with this command:
- Click Authorize.
Output:
- (Optional) You can list the project ID with this command:
Output:
gcloud, in Google Cloud, refer to the gcloud CLI overview guide.
Task 1. Google Cloud project setup
To start, you will set up the project for Native Cloud Firestore Mode. Follow these steps in the Google Cloud Console to activate it.
-
In the Navigation Menu (
), under Databases, click Firestore.
-
Click Create Database.
-
Click Select Native Mode.
-
Choose
region as your database location. -
Lastly, click Create Database. Once your database has been created, you are ready to continue to the next section.
Try the new query builder, click Close.Create a project-wide SSH Key
CloudyCluster uses project-wide SSH keys to provide debugging access to the instances. For more information on how to configure them, you can refer to the Managing SSH Keys in the Metadata page.
-
Open a new Cloud Shell window.
-
In Cloud Shell, use
ssh-keygento generate a new key pair. Replace[USERNAME]with your Google Cloud login. If you are unclear what your username is, use the output of thewhoamicommand in your Cloud Shell as your[USERNAME]. For the lab, it's okay to use an empty passphrase.
Import the public key to Google Cloud
- In Cloud Shell, register your public key with Google Cloud:
You can ignore the warning No host aliases were added... because the command also attempts to update Compute Engine VM instances, but no instances have been created yet.
-
In the Navigation Menu (
-
Click SSH Keys. Verify the SSH key exists with your student username.
Create a service account for the CloudyCluster control instance
- Back in Cloud Shell, run the following commands to first set some environment variables:
- Next, run the following commands to create and assign roles to the new service account:
- Navigate to IAM & Admin > Service account, copy the name of your service account it will look like
omnibond-sa@qwiklabs-gcp-xx-xxxx.iam.gserviceaccount.com. You will use this in the next task.
Click Check my progress to verify the objective.
Task 2. Launch CloudyCluster
-
In the Navigation Menu (
-
Search for CloudyCluster and click on the results:
-
From the CloudyCluster offering in the Google Cloud Marketplace, select Launch.
-
In the deployment setup page, Select a zone
. -
Put the service account name you just created into the Script Created SA field.
-
Under Machine Type, change the Series to E2, and select the
e2-standard-2Machine type. -
Select Allow CloudyCluster to use the Scopes of the Script Created SA.
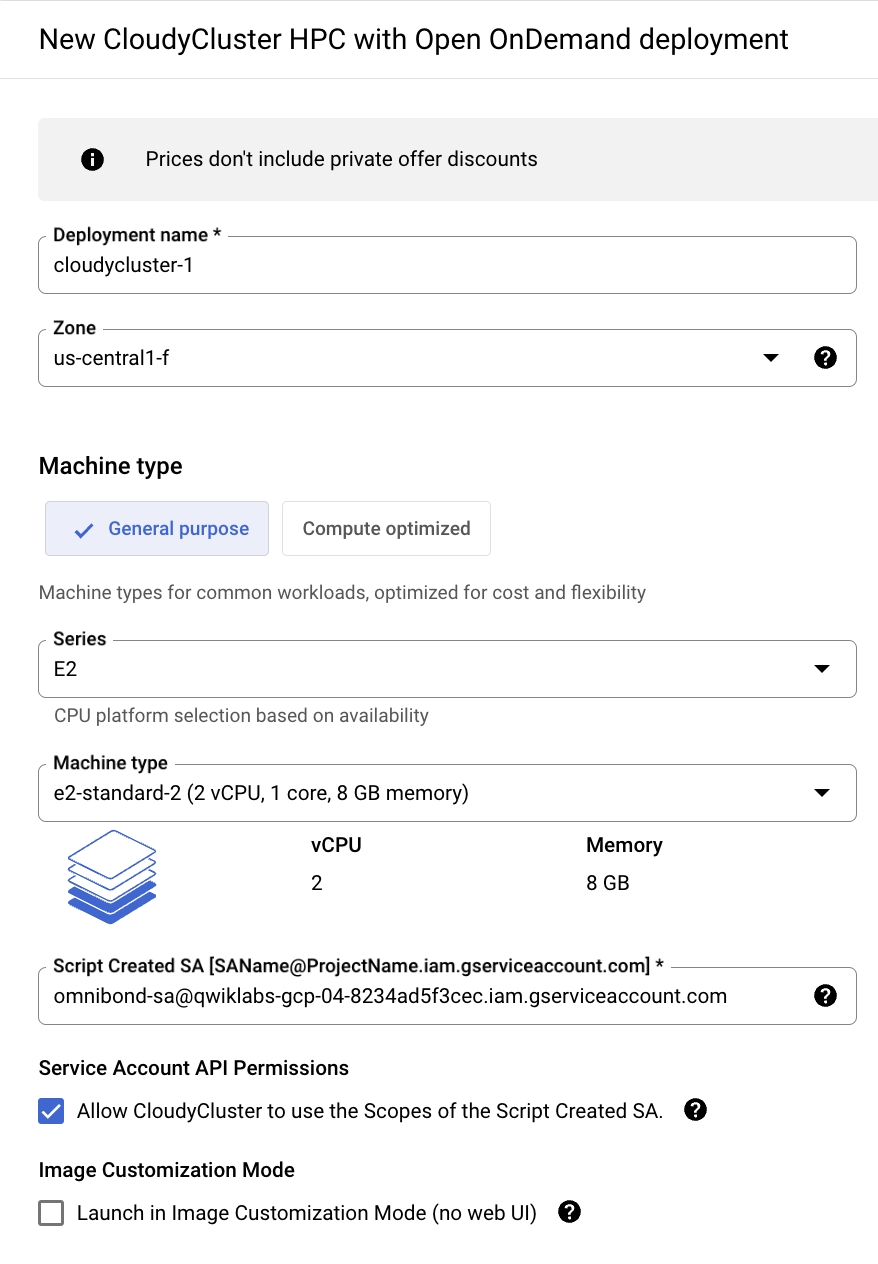
-
Leave all the other values as default, accept the GCP Terms of Service and click Deploy.
-
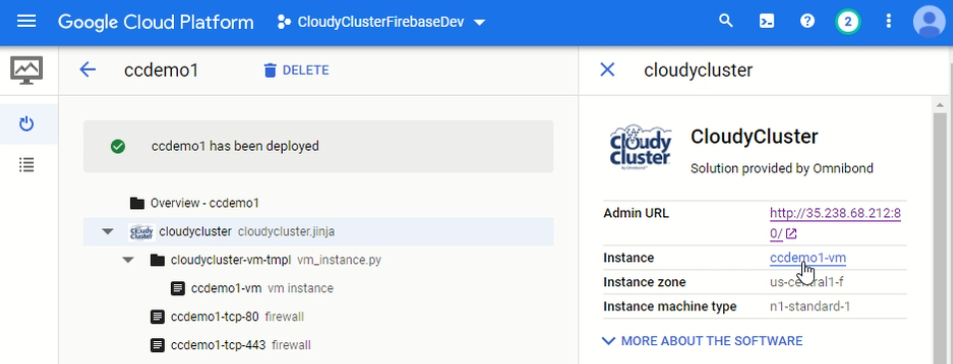
Once the deployment has finished, click on the Admin URL link.
Click Check my progress to verify the objective.
Task 3. Configure the control instance
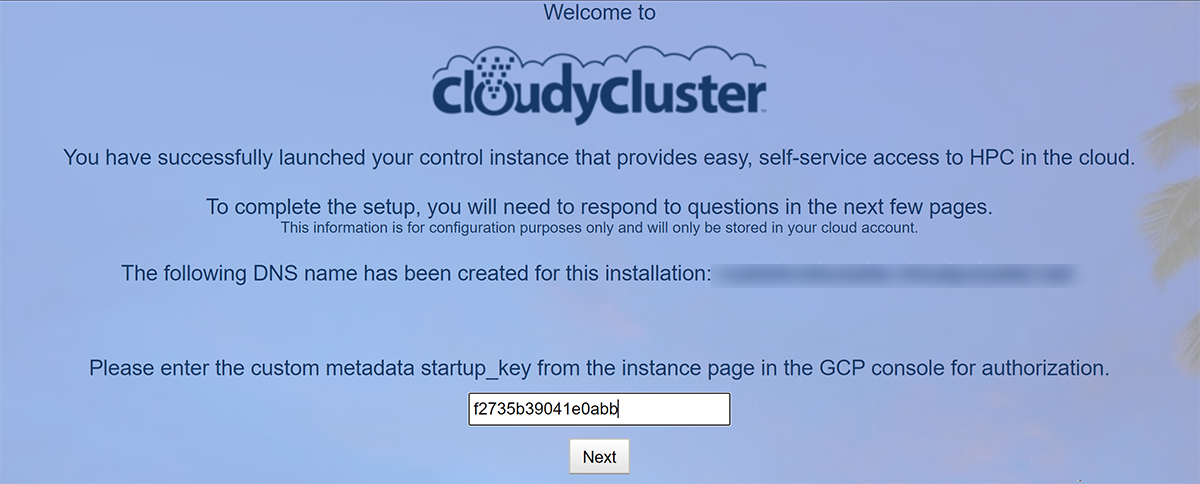
After you have launched the Image, you will complete the following initial setup tasks. It takes about 5 minutes for the instance to come up and fully self-configure. Once it does, you will see the following:

- Once DNS propagates, you will be taken to the following page and prompted to provide the custom metadata
startup_keyto authenticate that you launched the instance.
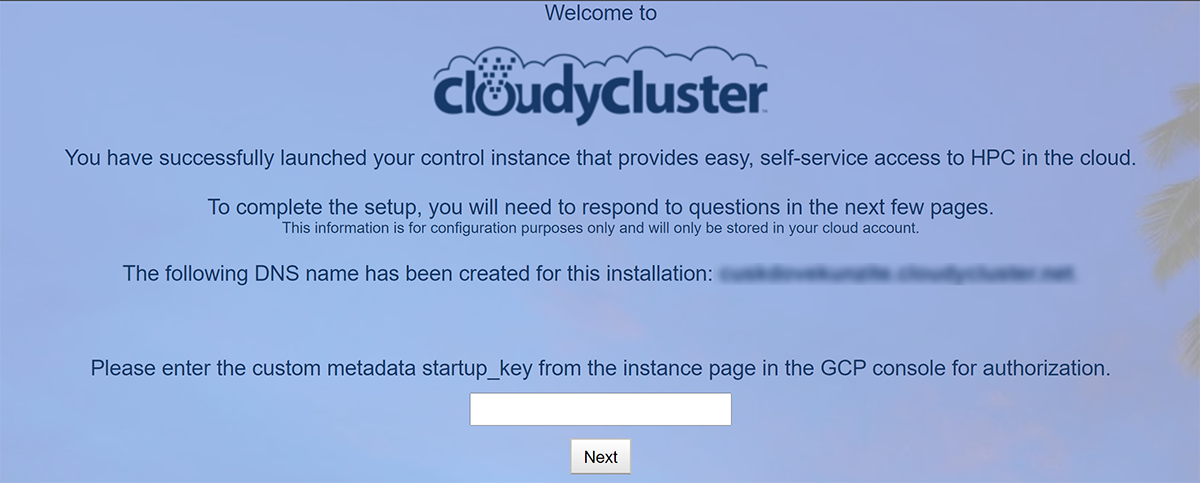
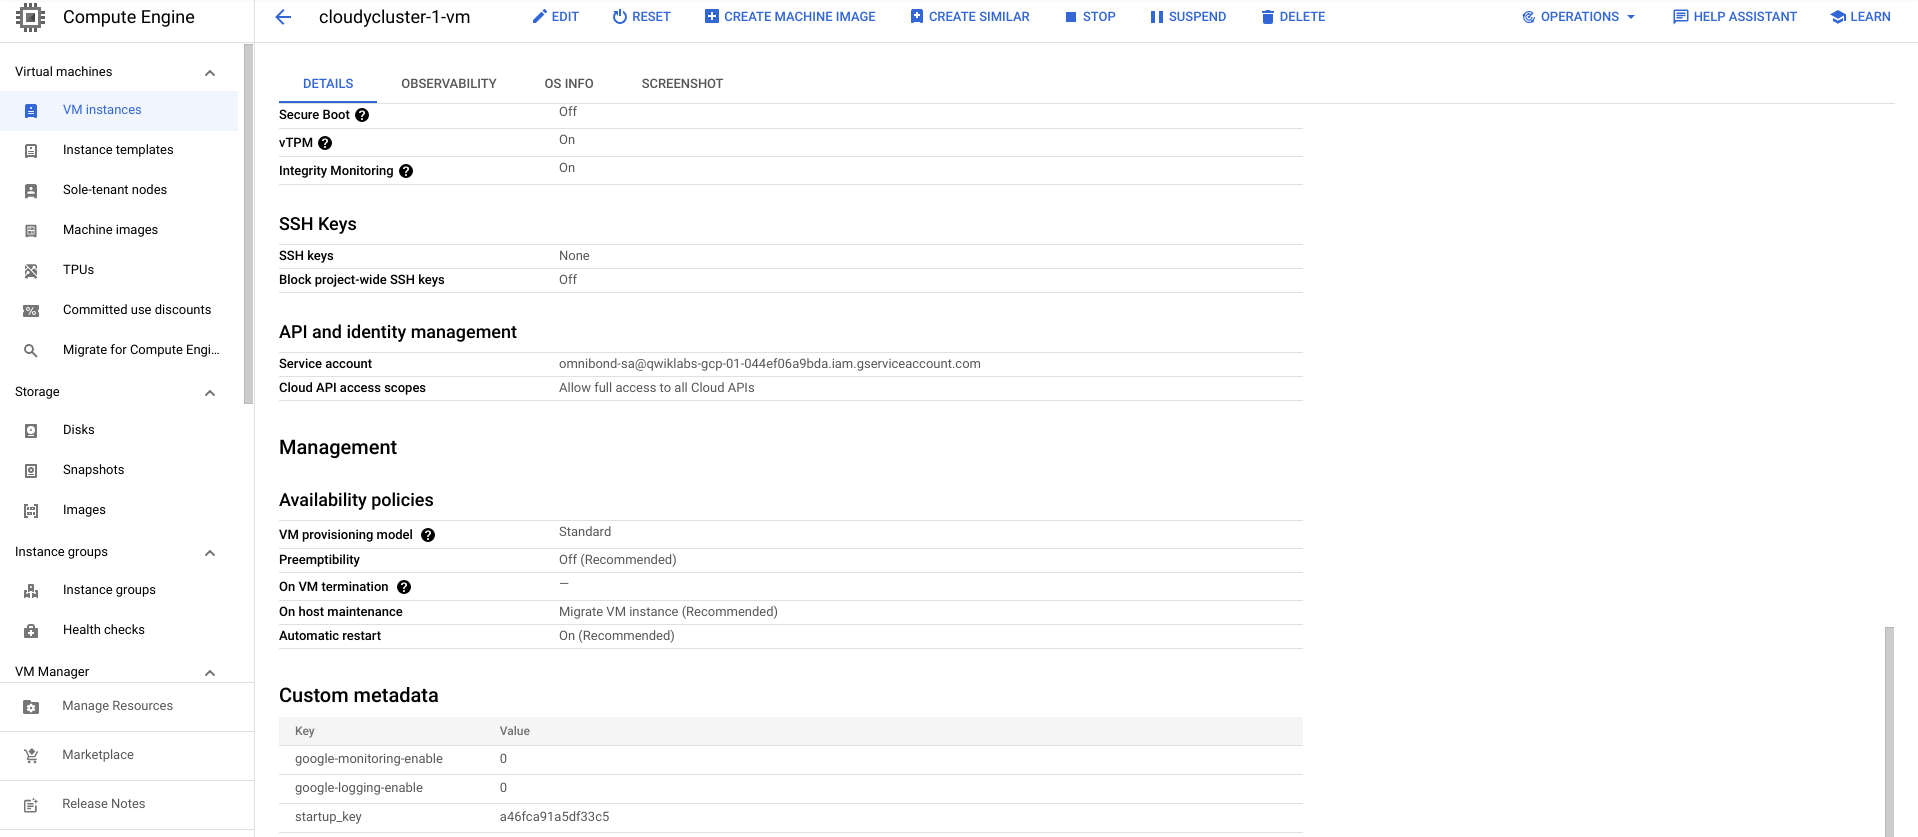
- Back in the Google Cloud console, click on the VM instance name.
- Scroll down and you will see the Custom Metadata Field. Copy and paste the unique value of startup_key into the CloudyCluster prompt.
-
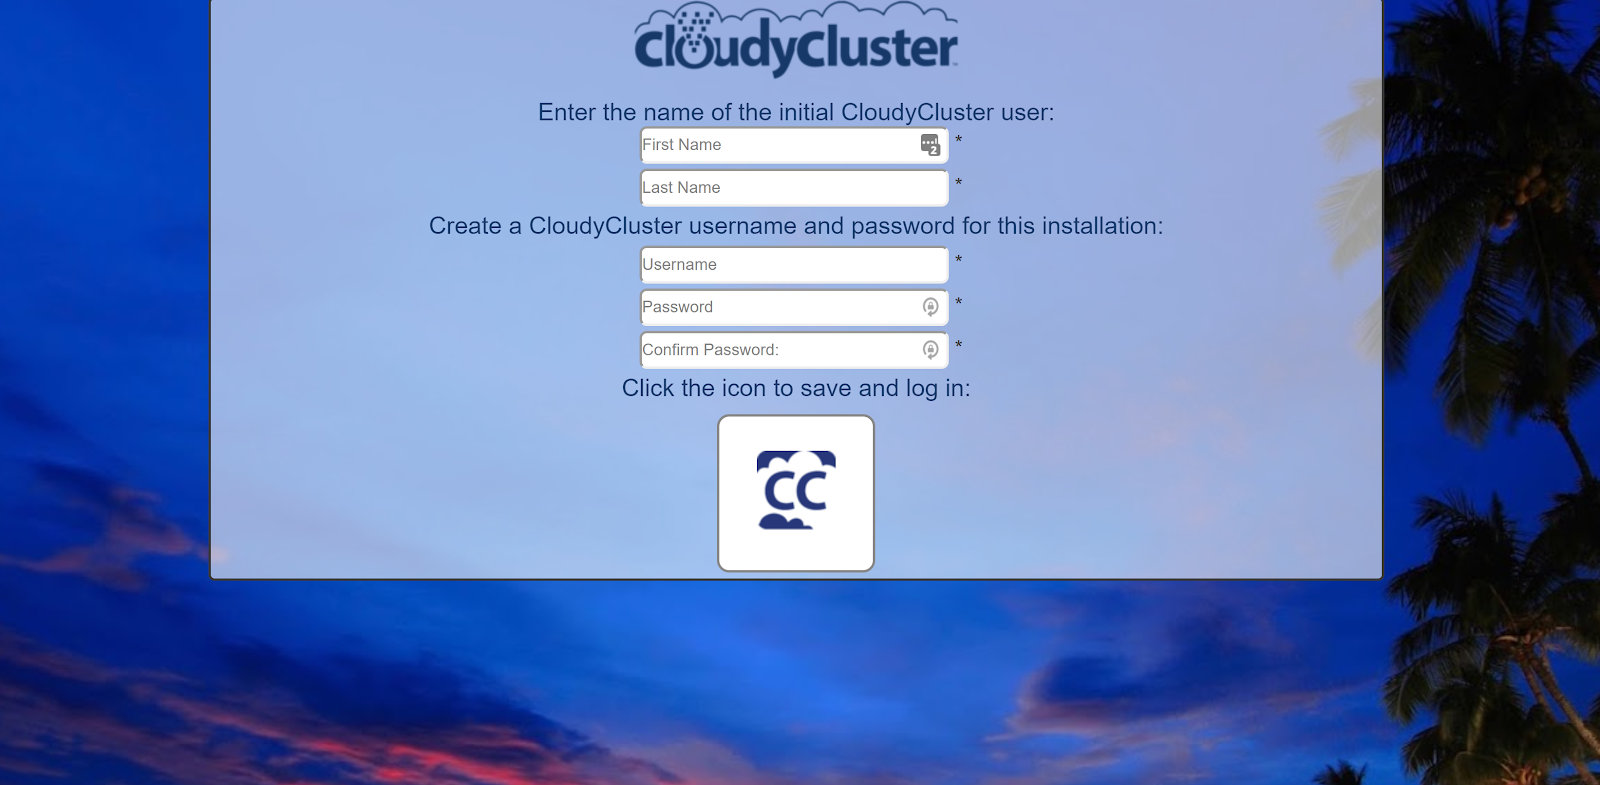
Next, provide the following Admin User information to complete the initial setup (all information you provide is used only in CloudyCluster and never leaves your Google Cloud project):
-
Create a CloudyCluster username and password to be encrypted and stored in the database in your Google Cloud project. Your password must contain at least 8 characters and include a capital letter and a number.
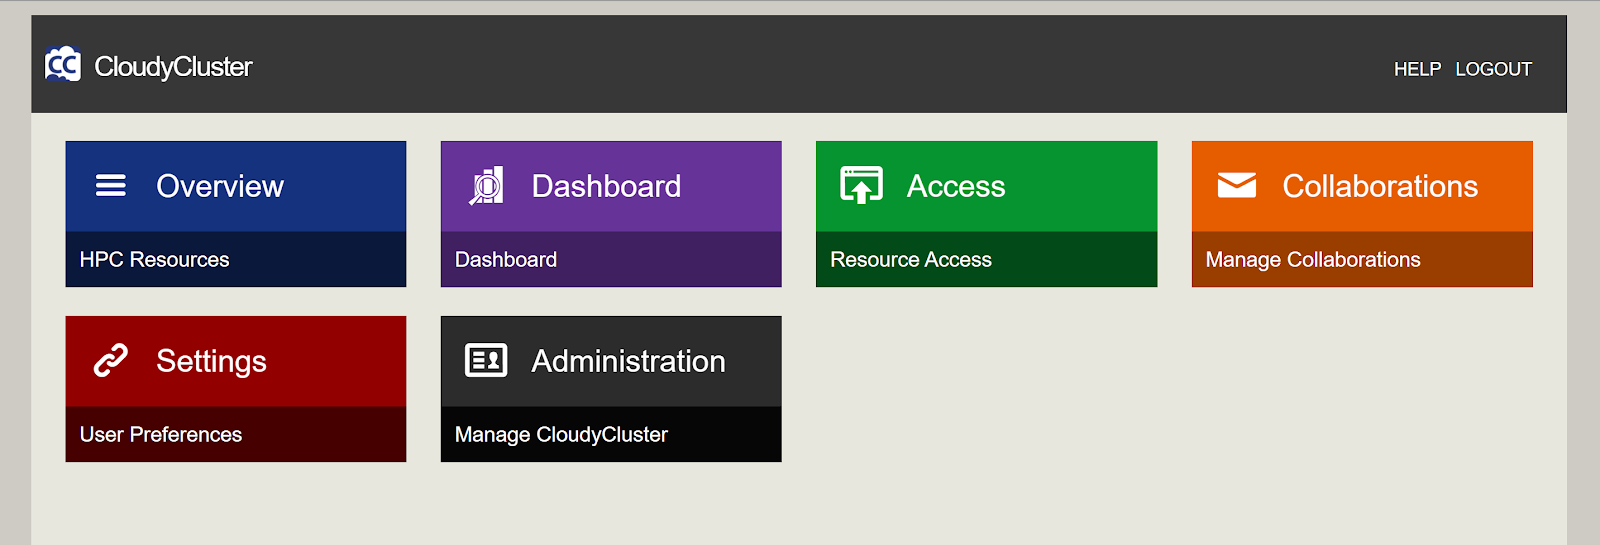
You have successfully completed the initial control instance configuration.
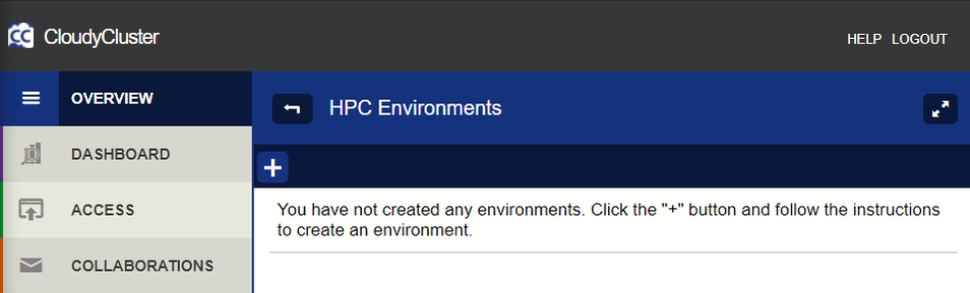
HPC Environment setup
In this section you will follow the steps below to create an HPC Environment.
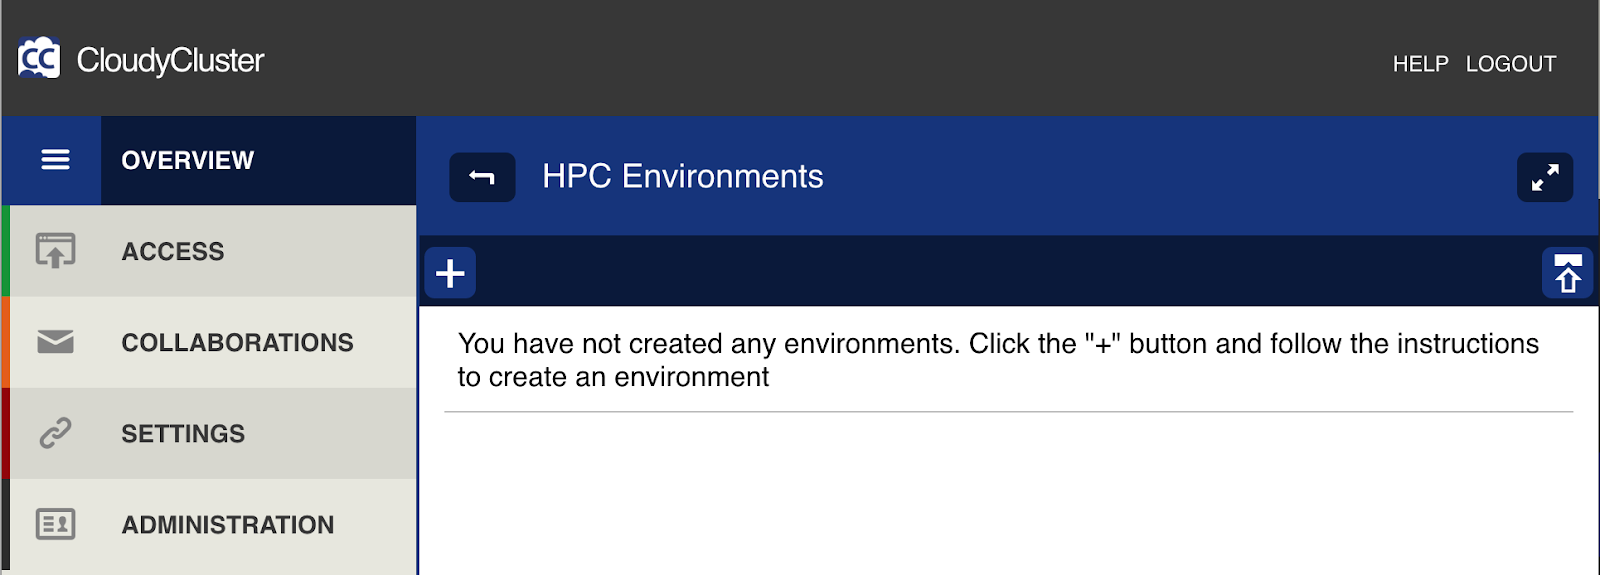
- Click Overview. On the Environment Overview page, click the + button at the top left to create a new environment.
-
Use the pulldown menu to select options for Availability Zone and Instance SSH Key. For these use the zone you created the Control Instance in (the default zone for the lab/project) and the SSH key you created earlier.
-
Enter a Name for your Environment. Environment names must be alphanumeric, between 3 and 30 characters long, and may not contain spaces or special characters. For this lab, you can use
envname.
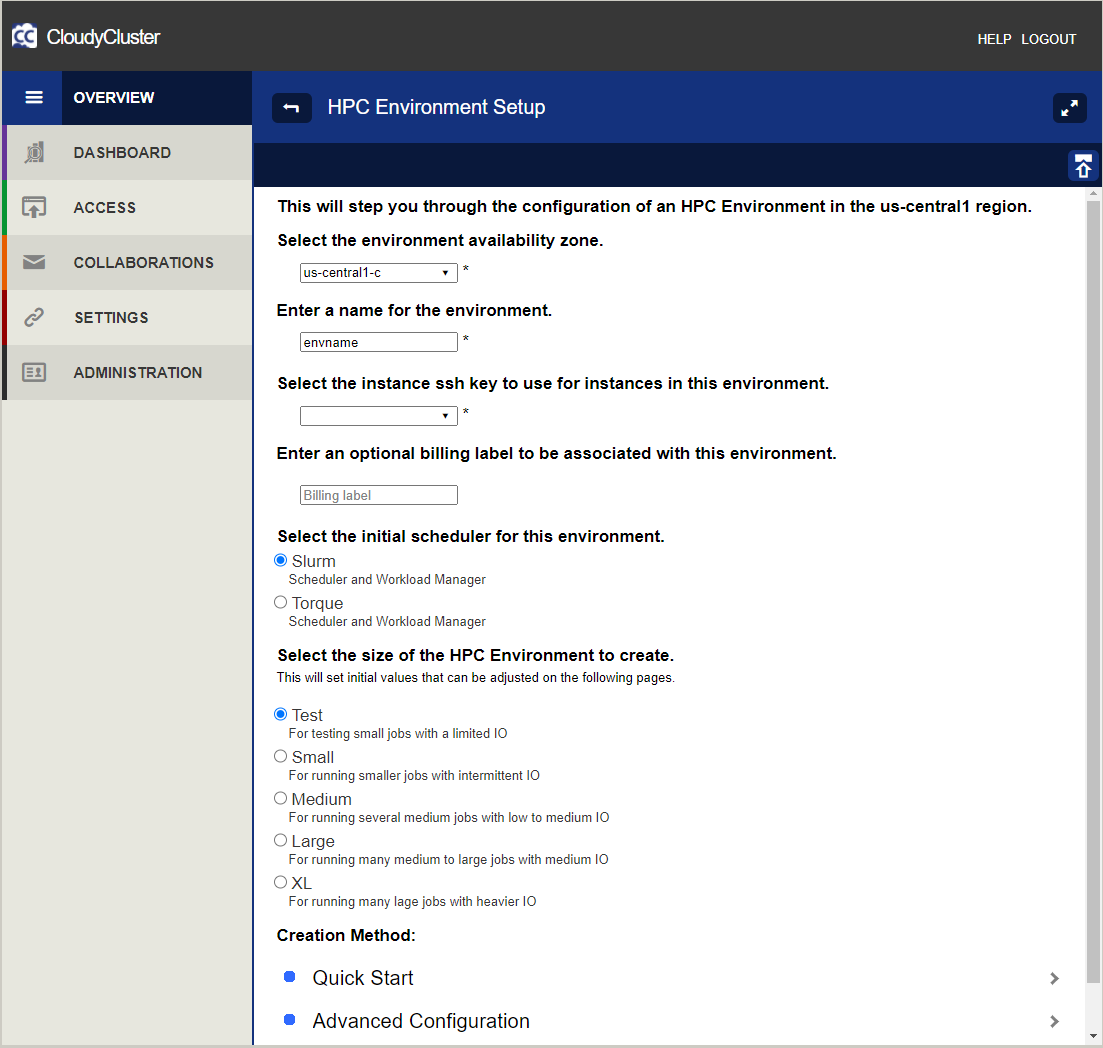
-
Select the radio button for one of the pre-configured setup options. For this lab you will use Slurm and Test.
-
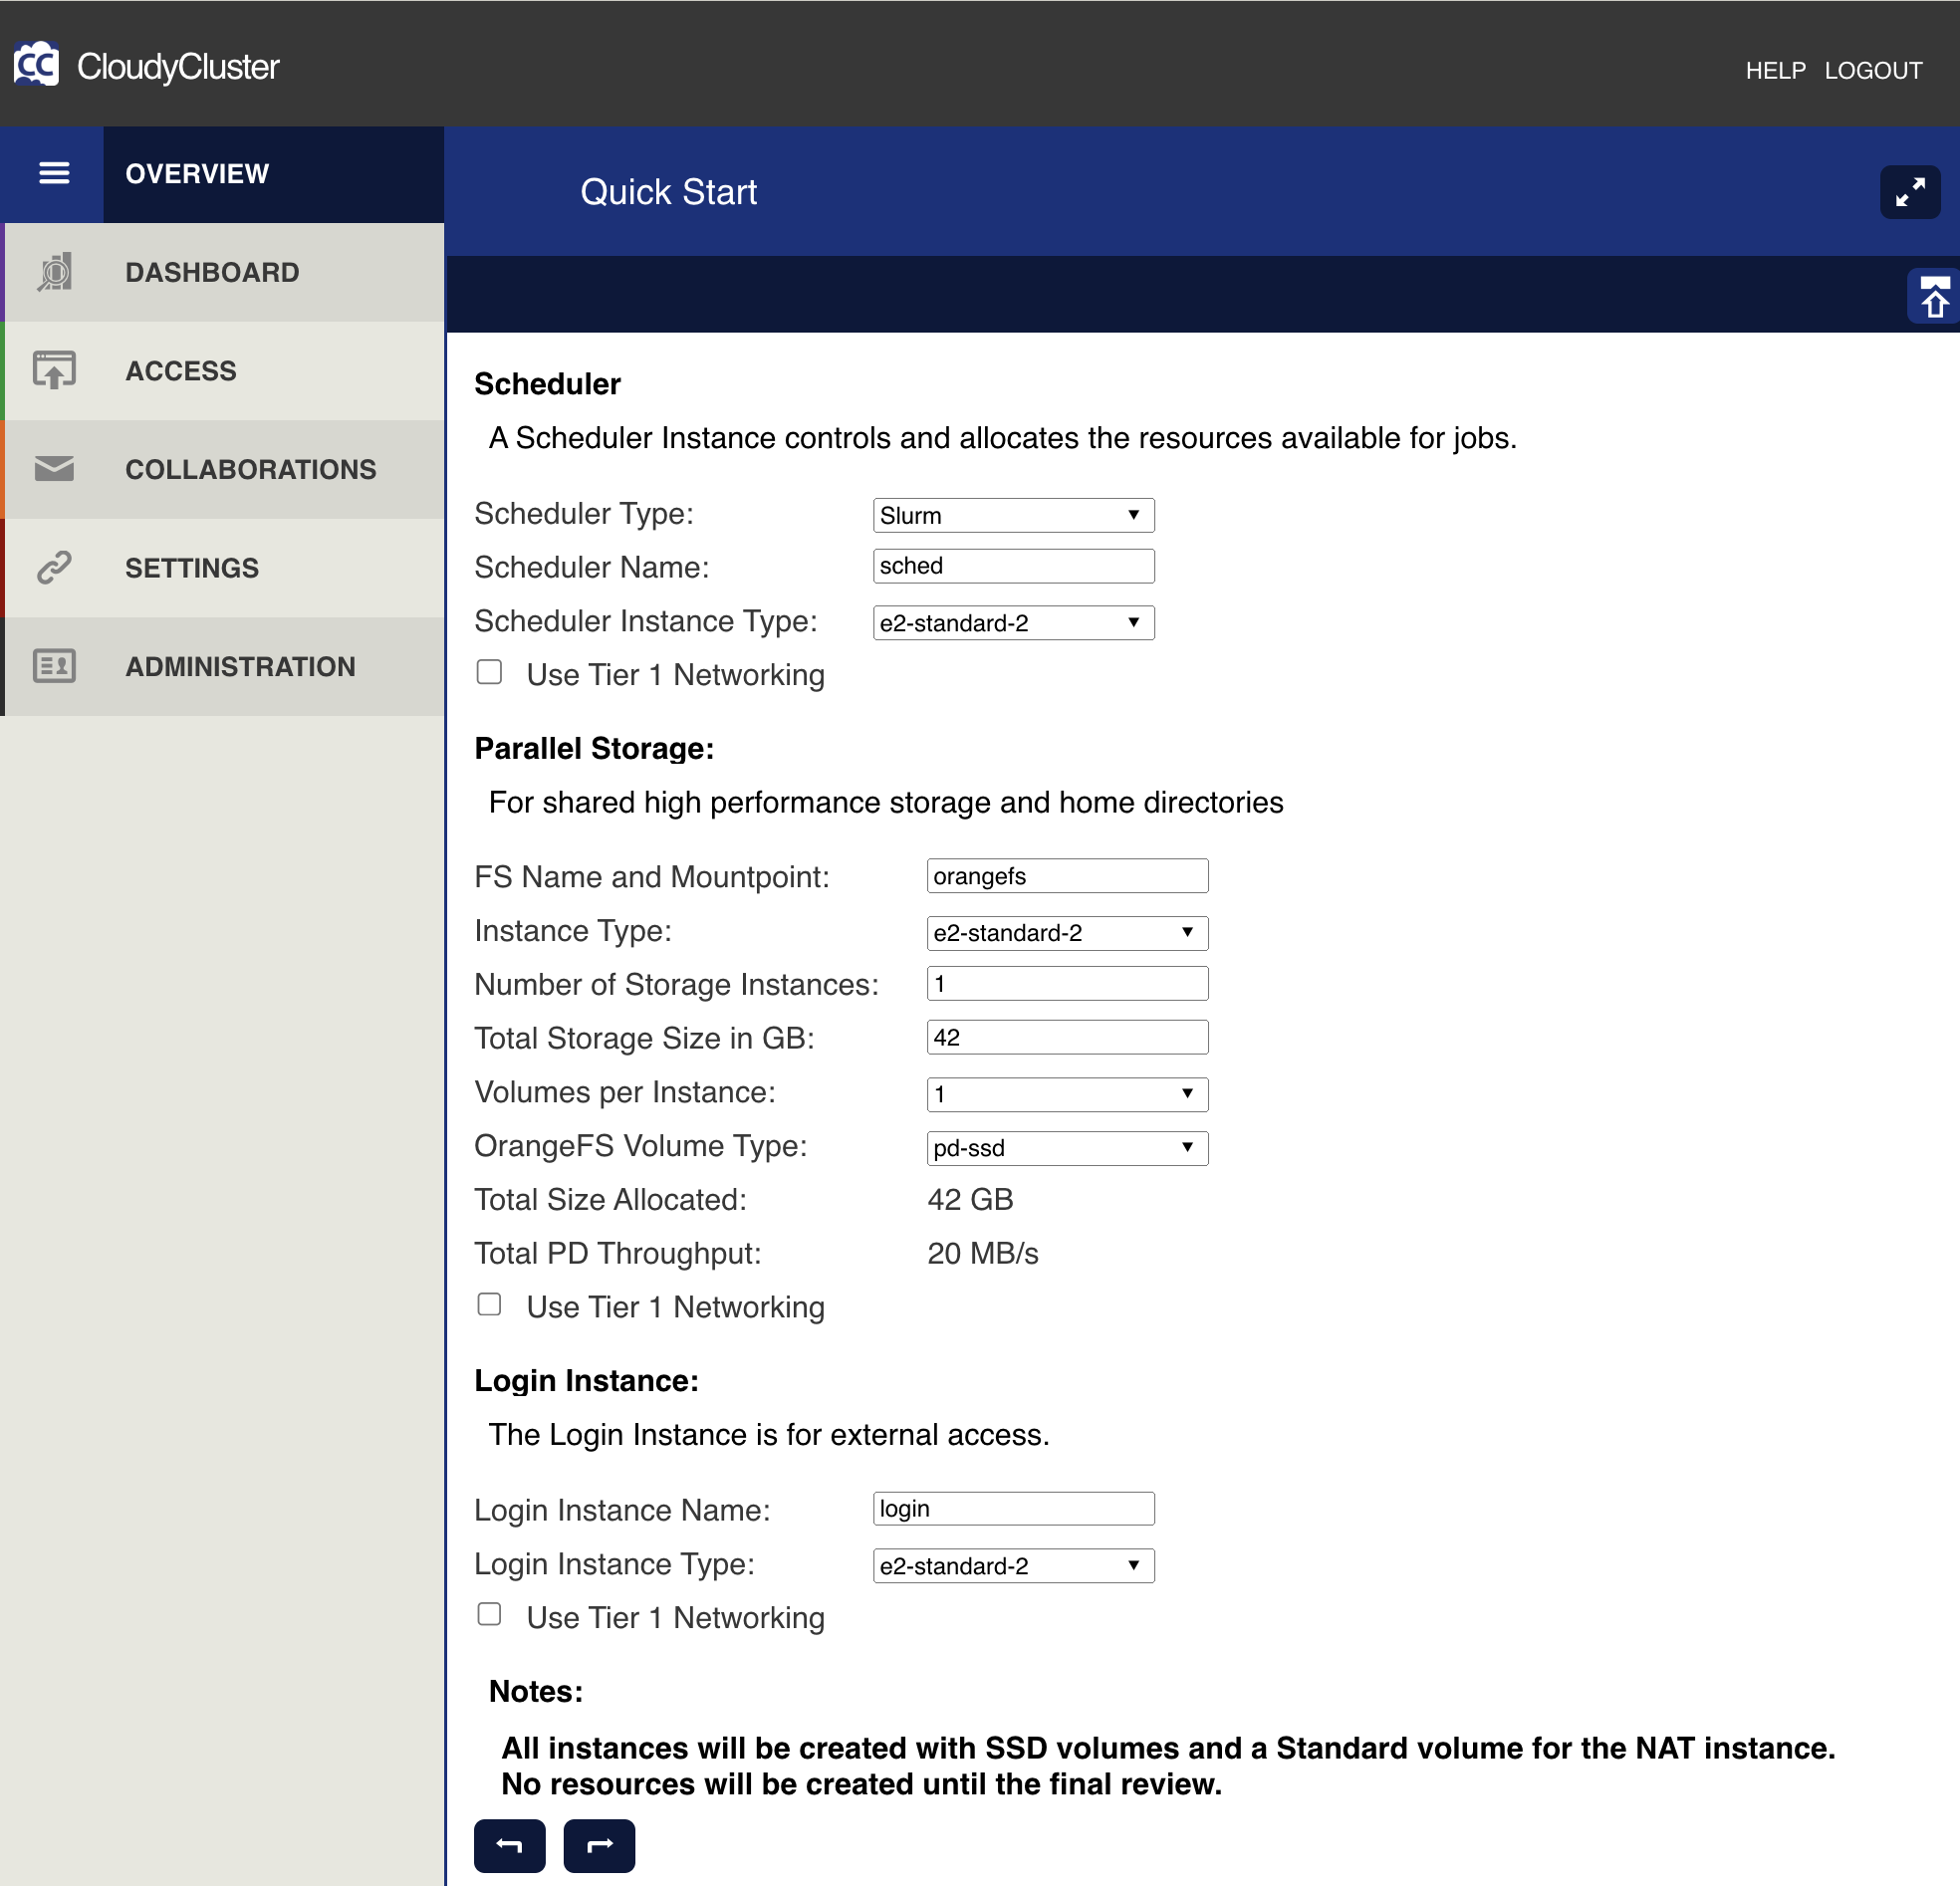
Select the Quick Start link at the bottom of the screen.
- Use the pre-populated Scheduler Name and Scheduler Type
- Select a Scheduler Instance Type of
e2-standard-2 - Accept the default file system name and mountpoint
- Select your storage Instance Type of
e2-standard-2 - For the number of storage instances, select 1.
- Accept the default total Parallel Storage size in gigabytes. This storage space will be divided among your file system instances
- Enter a Login Instance Name and Instance Type of
e2-standard-2 - Click the Next arrow button to proceed.
- The Final Review screen will display. You will see a summary of all instances to be created, with a cost per hour for each type and a total cost per hour for your HPC environment (not including charges for network egress).
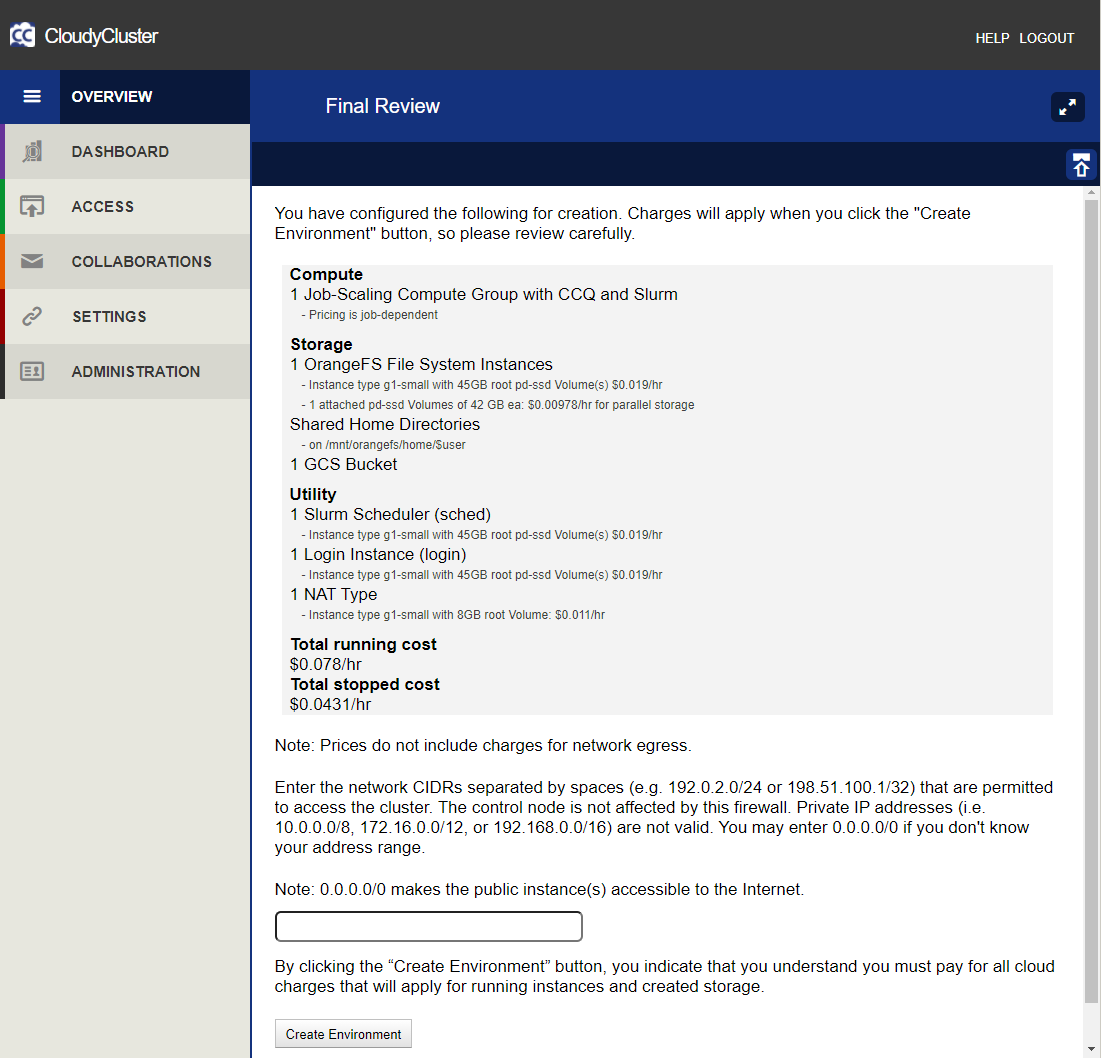
-
Enter a network CIDR representing an IP address range that is permitted to access your environment, for this lab enter
0.0.0.0/0. -
After you have carefully reviewed your environment configuration, making sure the
e2-standard-2is selected for all instance types (this lab is restricted to the types of instances that can be used), select Create Environment.

Click Check my progress to verify the objective.
Task 4. Behind the scenes
While you wait for the environment to deploy, you can watch the following video. This video goes behind the scenes and provides more details on the architecture behind CloudyCluster, including how it configures your own Private & Secure HPC/HTC environment in Google Cloud.
You can also check out the following resources, which are also linked in the Student Resources lab panel on the left.
Task 5. HPC job execution
Set up sample HPC job
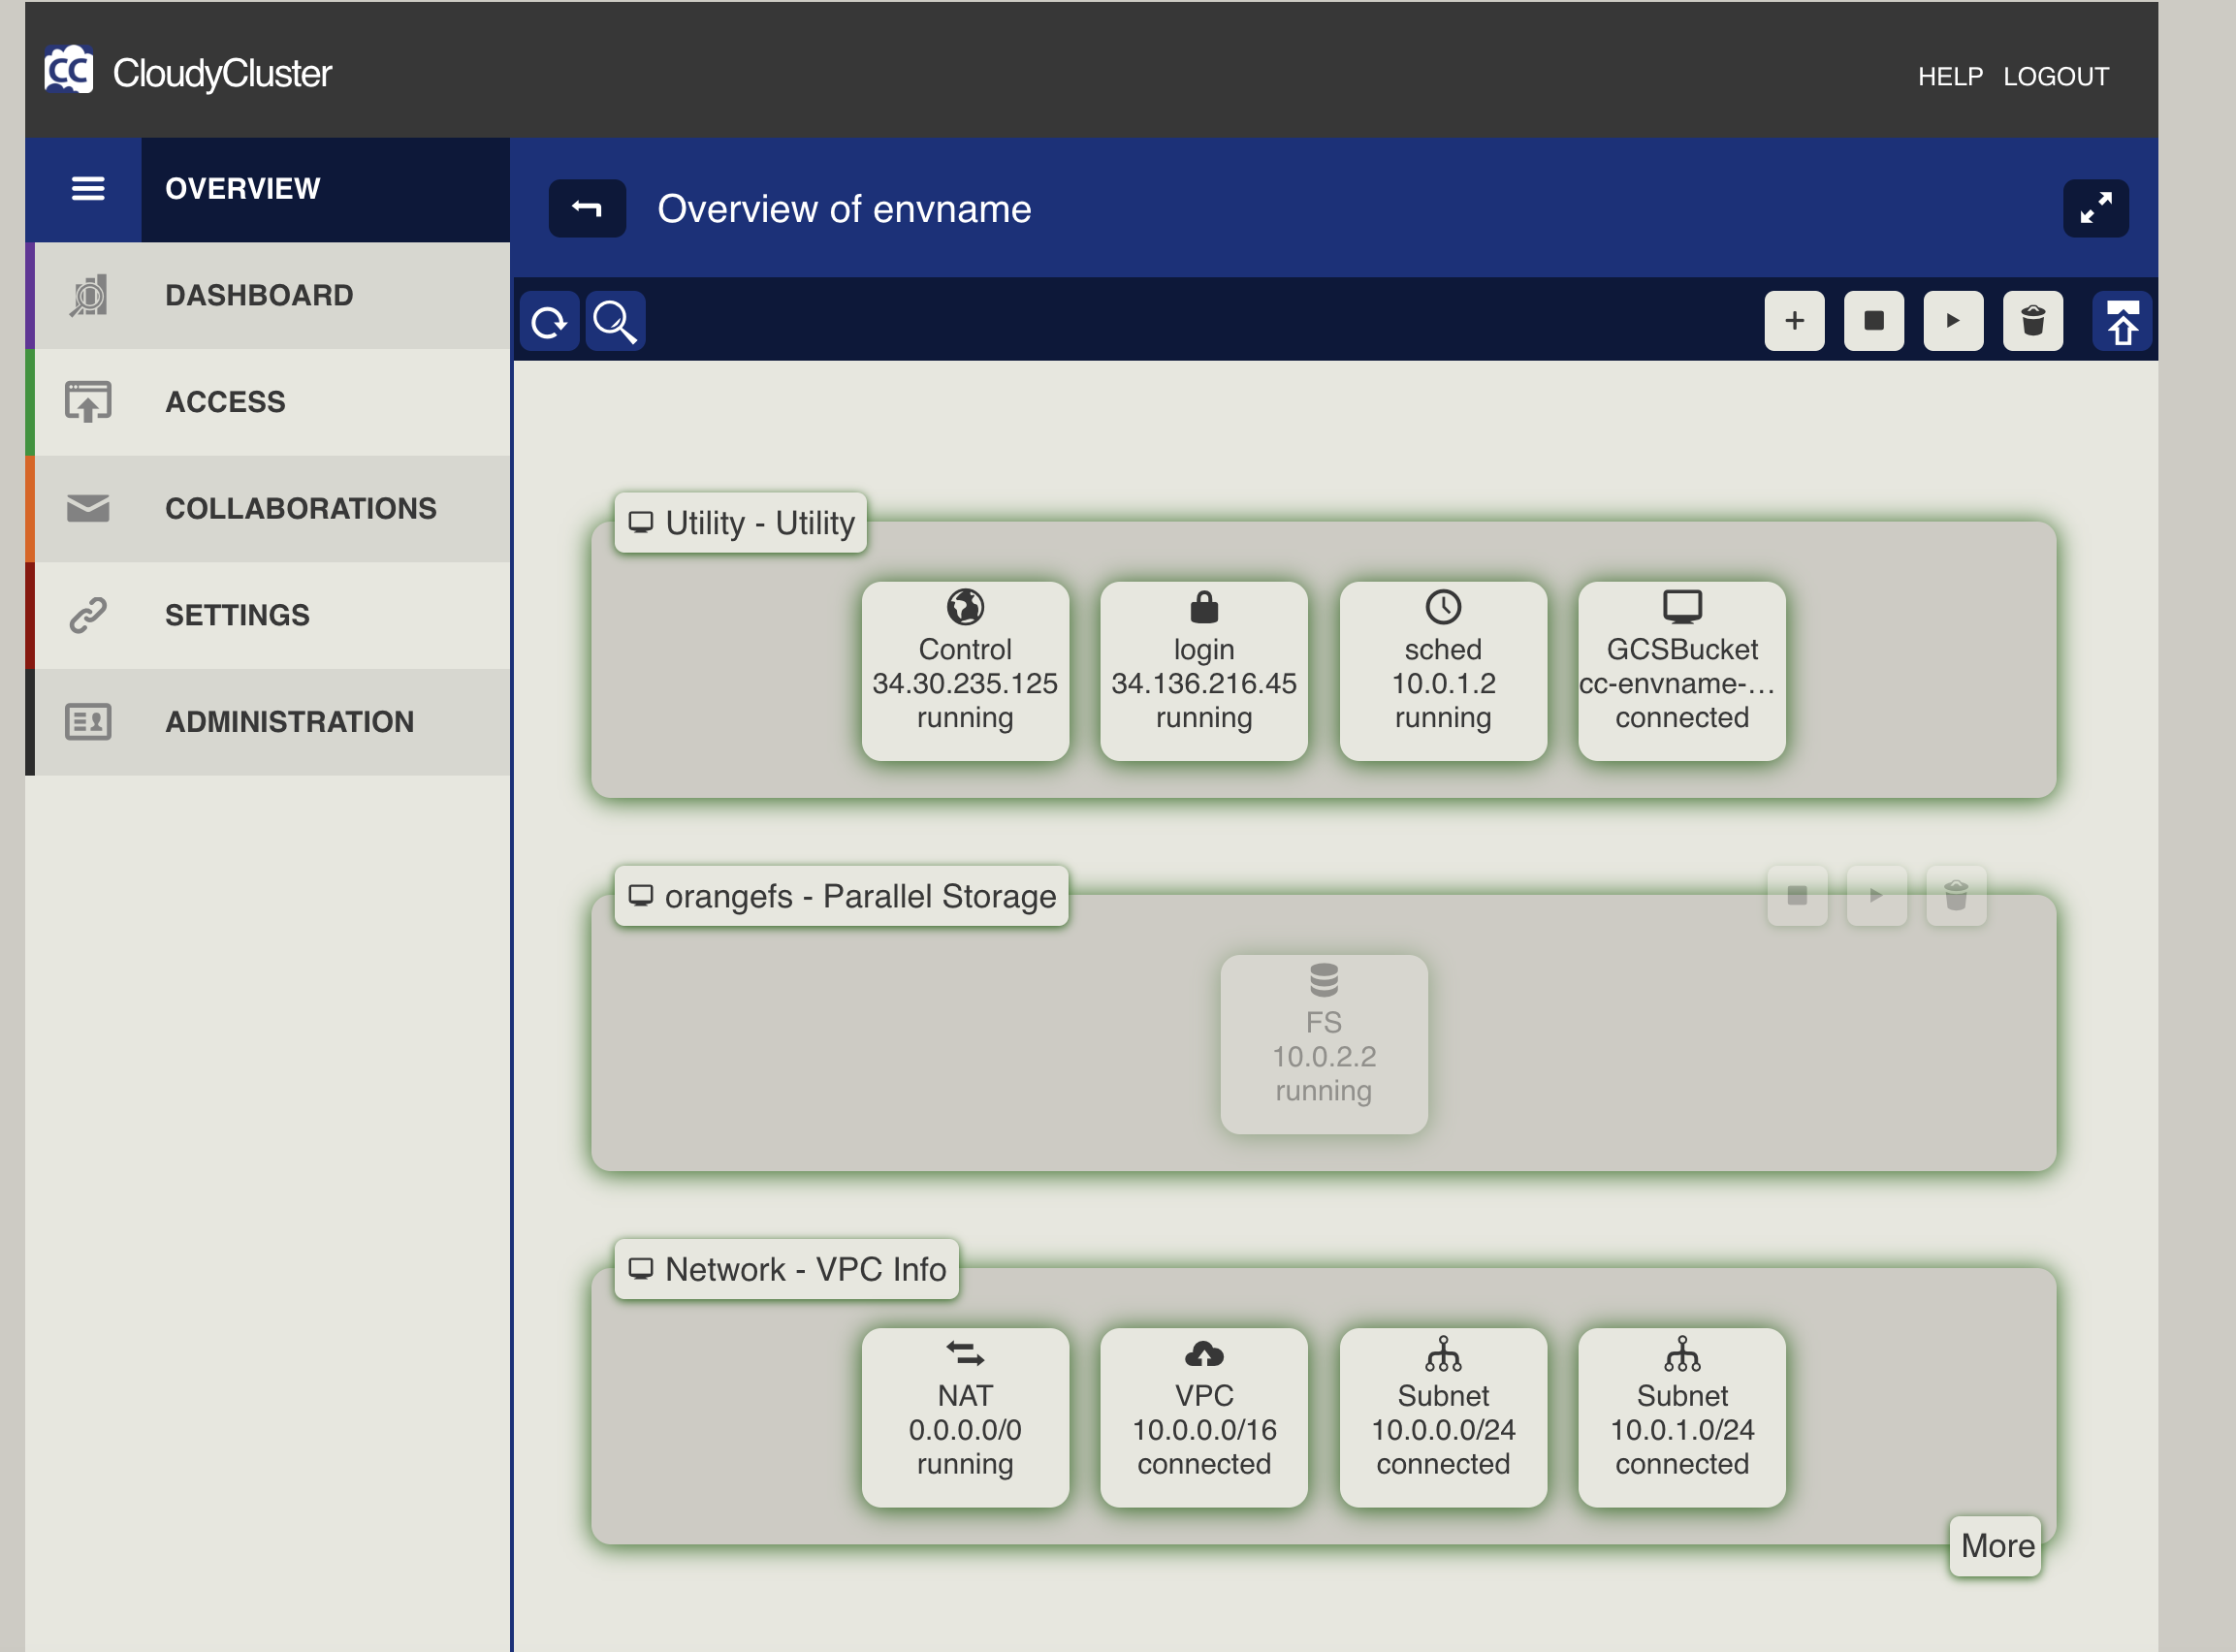
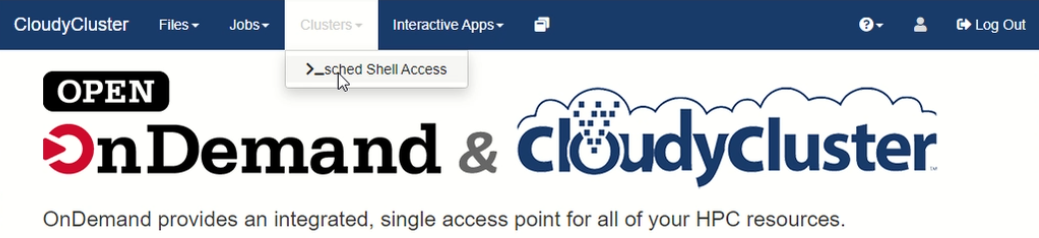
- After your environment has been created, click to the Access tab and select the link for Open OnDemand. Log in with the CloudyCluster credentials you created earlier.

- Proceed to Clusters and select sched Shell Access for a terminal session (sched was the scheduler name from the setup step).
- Enter Yes and then enter your password.

- To set up the sample job, copy the sample jobs to the shared file system and switch into the correct directory:
Edit the sample job
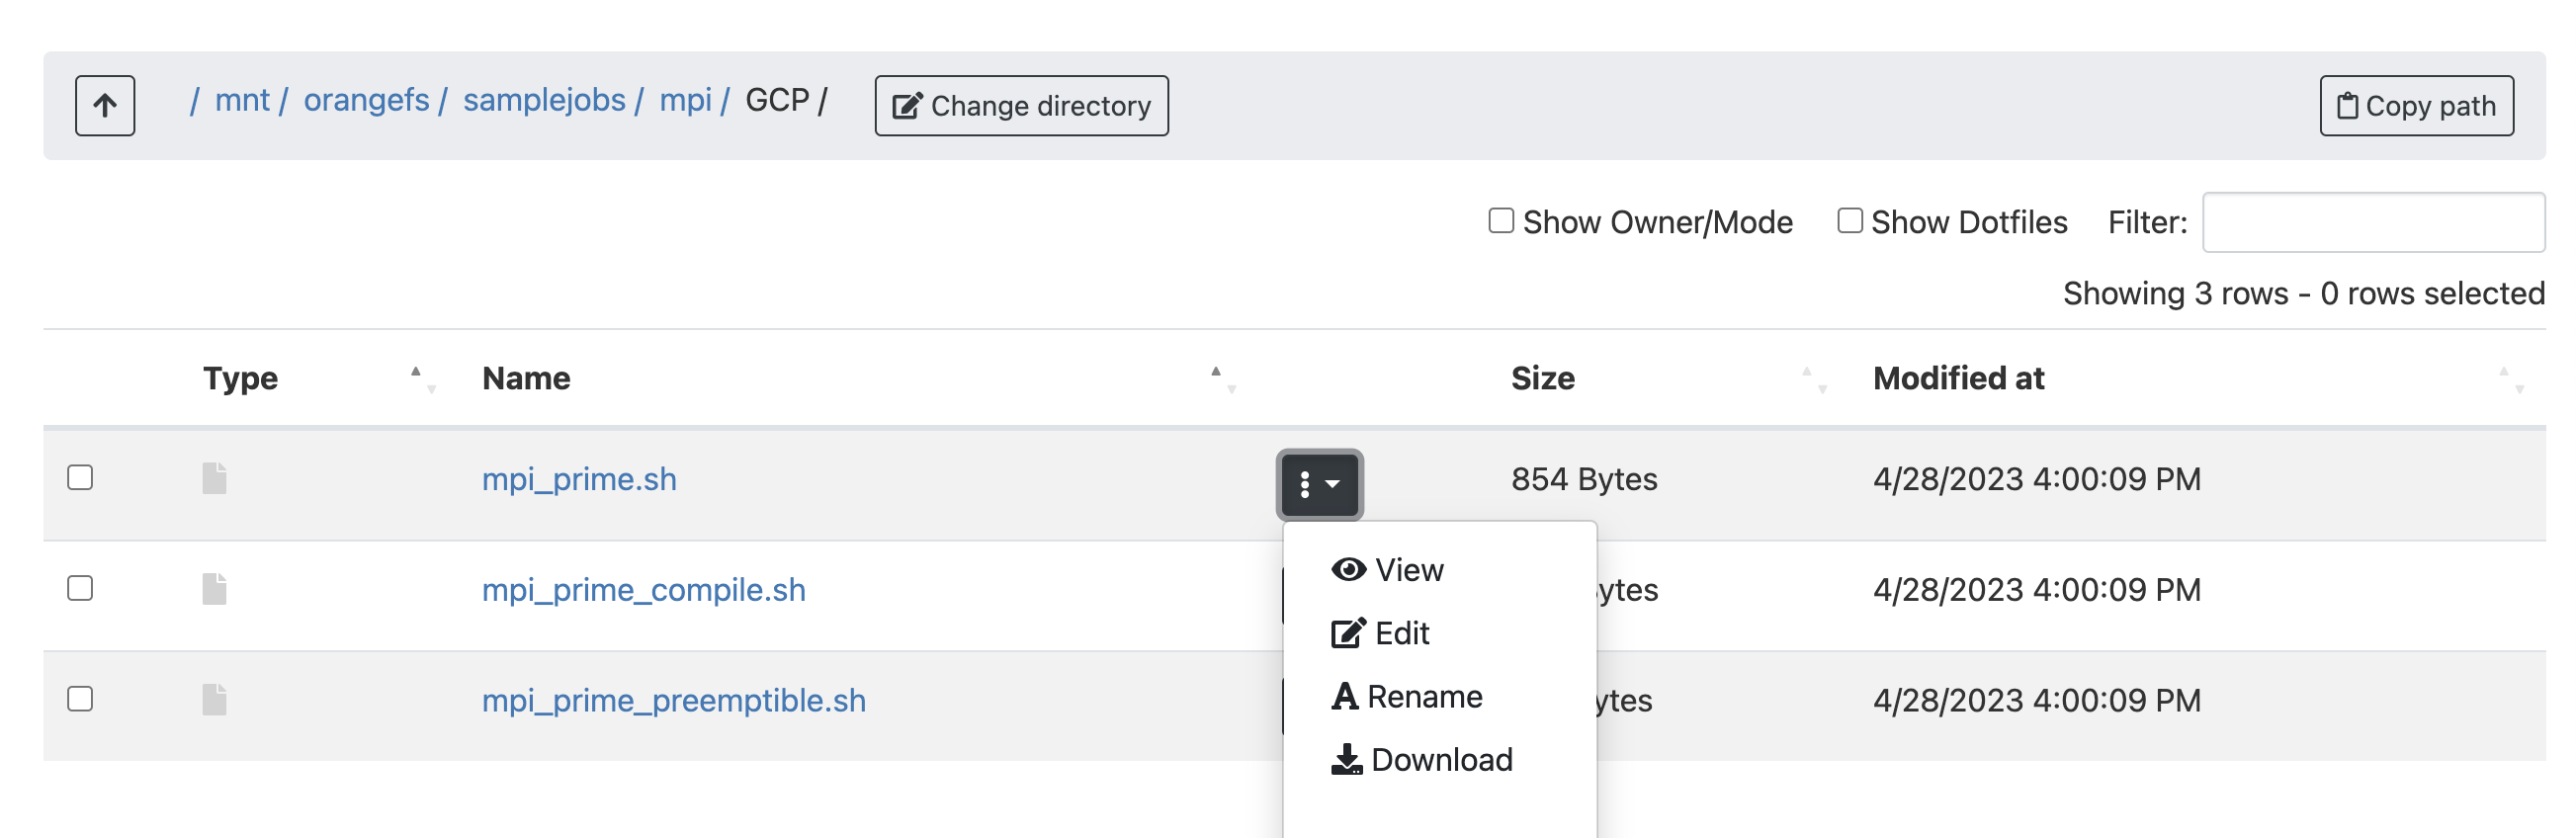
- Edit the sample job you would like to run, you can do this using vim, or the Open OnDemand file editor.

-
Click on Files > Home Directory.
-
Then click on Change directory and navigate to
/mnt/orangefs/samplejobs/mpi/GCP. Select three dot next tompi_prime.shthen click on Edit button:
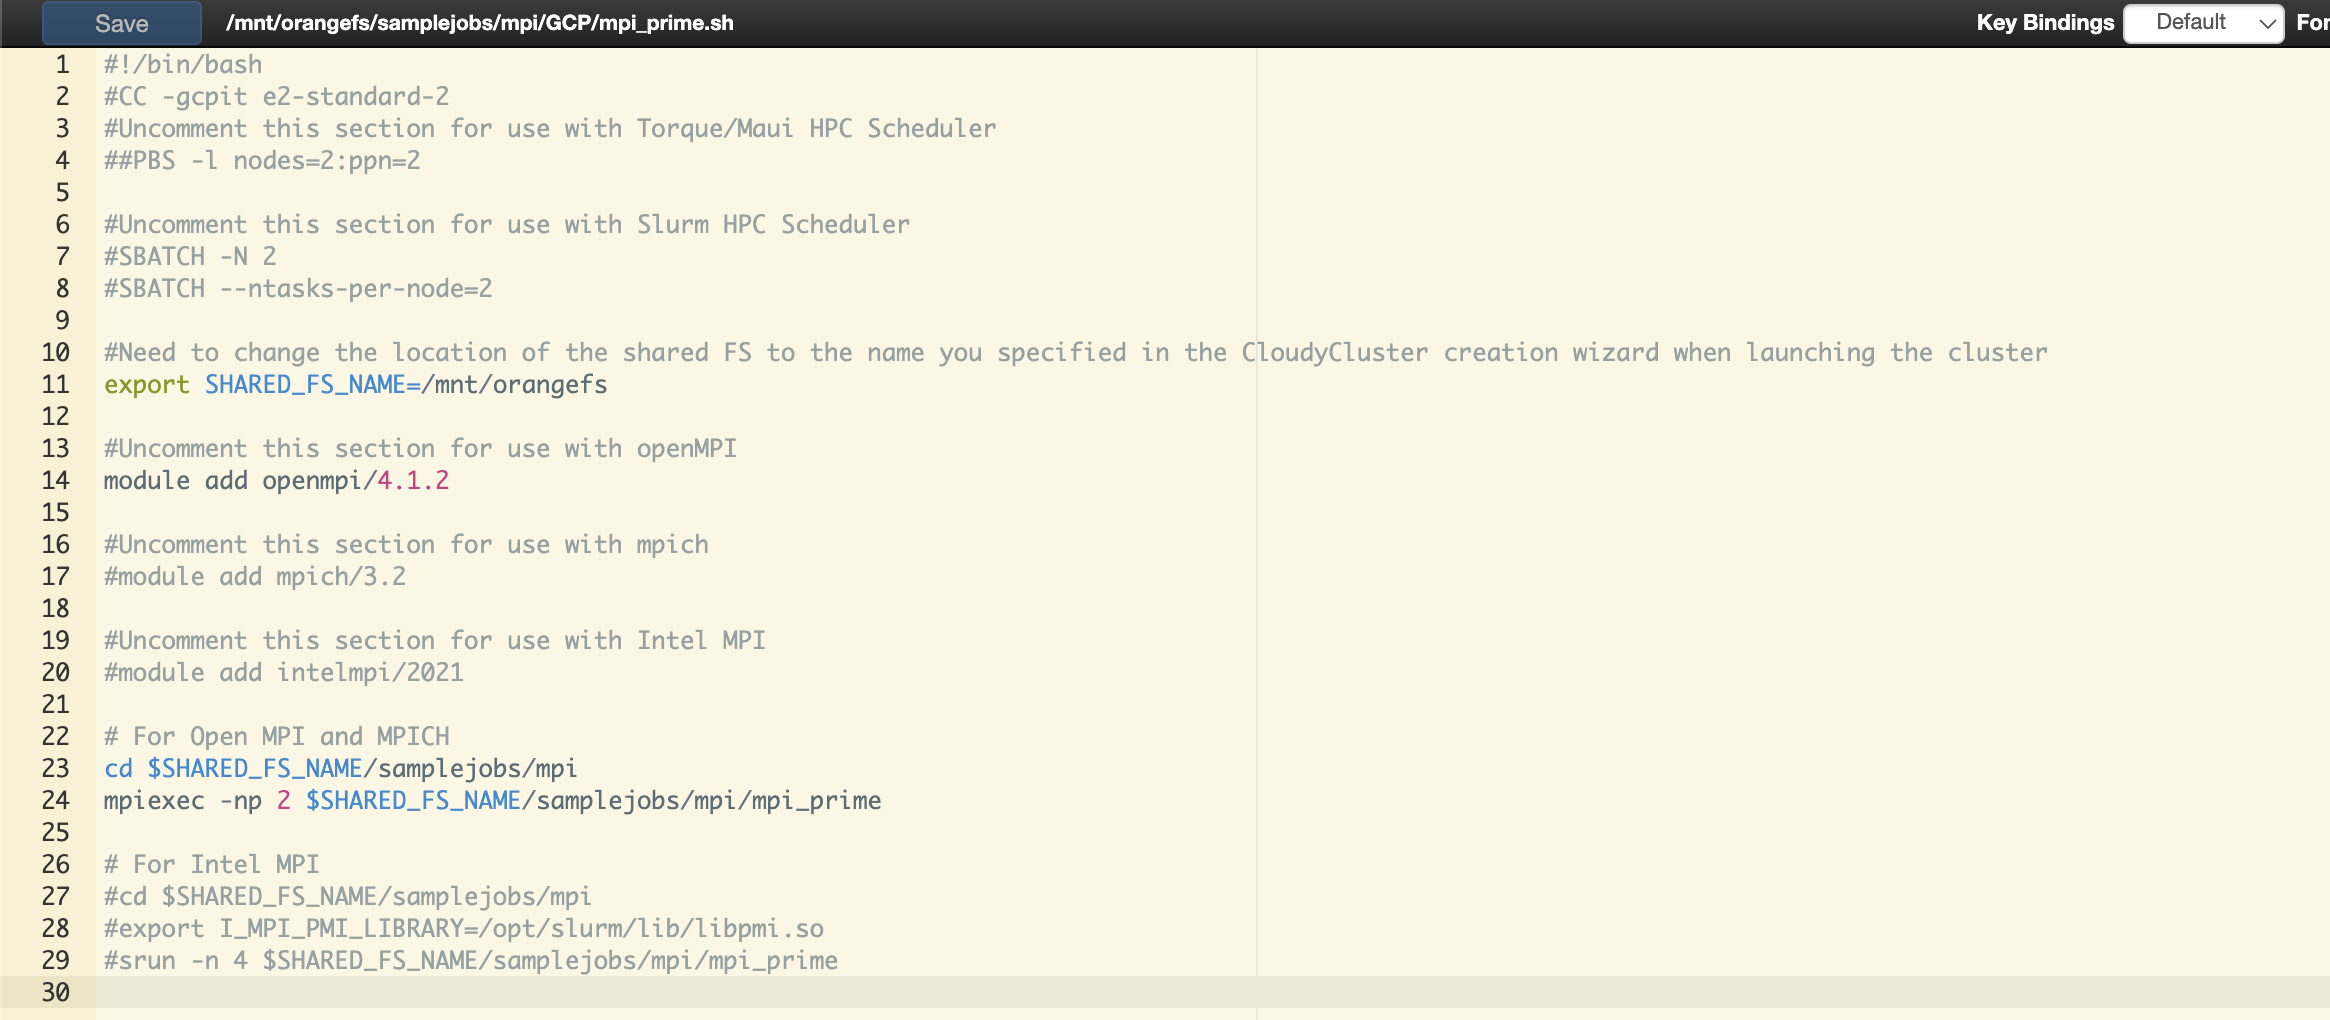
- Add the following command to the file below
#!./bin/bash:
This command is a ccq directive that sets the job to use a specific instance type. The other #CC directives can be found in the CloudyCluster documentation.
-
Remove the extra comment (#) from the scheduler you are running.
-
For this lab, change the following lines to match:
- The complete file will look like this, click Save.
Compile the mpi_prime binary
-
In the terminal window, navigate to
/mnt/orangefs/samplejobs/mpi/GCP/. -
Run the following command:
Launch the sample job
- In the same directory, launch the job by running the
ccqsubcommand:

- Check the status with
ccqstat:

You can also use the command watch ccqstat to see it go through the stages. You can use CTRL + C to stop that command.
Click Check my progress to verify the objective.
After job submission the job will go through the following states:
- Pending state the job is waiting to be processed by CCQ
- CreatingCG state it is Creating the instances
- Provisioning state it is doing final node setup
- CCQueued state the job is in the process of being submitted to the scheduler
- Running state when it is handed off to the scheduler, which is SLURM in this job
- Completed state it has finished running successfully and the instances will tear down automatically
- Error states the job encountered an error during execution. The error will be logged in the Administration > Errors tab within the CloudyCluster UI
When operating in your own project, you can pause your HPC Environment if you do not have any more jobs to run. Once everything is paused, you can also stop the control node from the Google Cloud Console and restart it when you are ready to run jobs again.
Task 6. Deleting CloudyCluster
HPC Environment Deletion
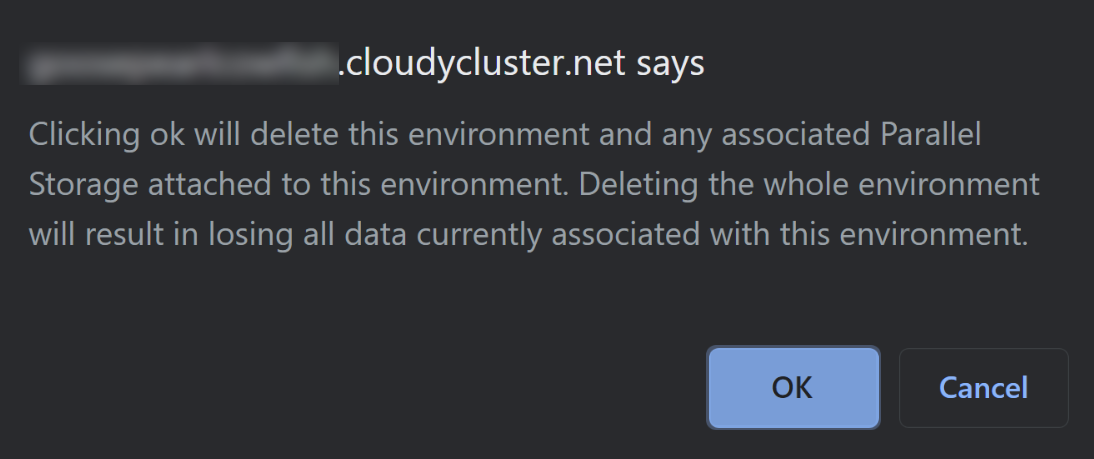
- Click on the Overview tab. Delete or terminate any HPC Environments you have running by selecting the trash can icon in the upper right corner and click Ok. This will delete the whole cluster.
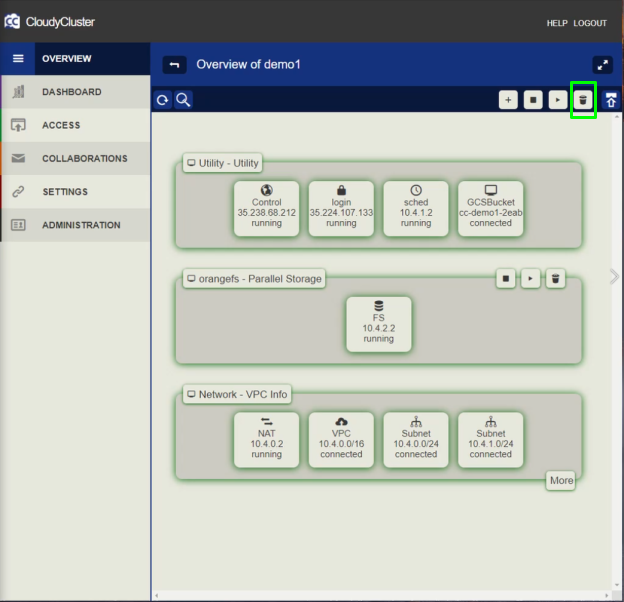
- All data associated with this cluster will be removed, including any Cloud Storage or OrangeFS Storage. Make sure you back up any needed data to a different location.
Control instance deletion
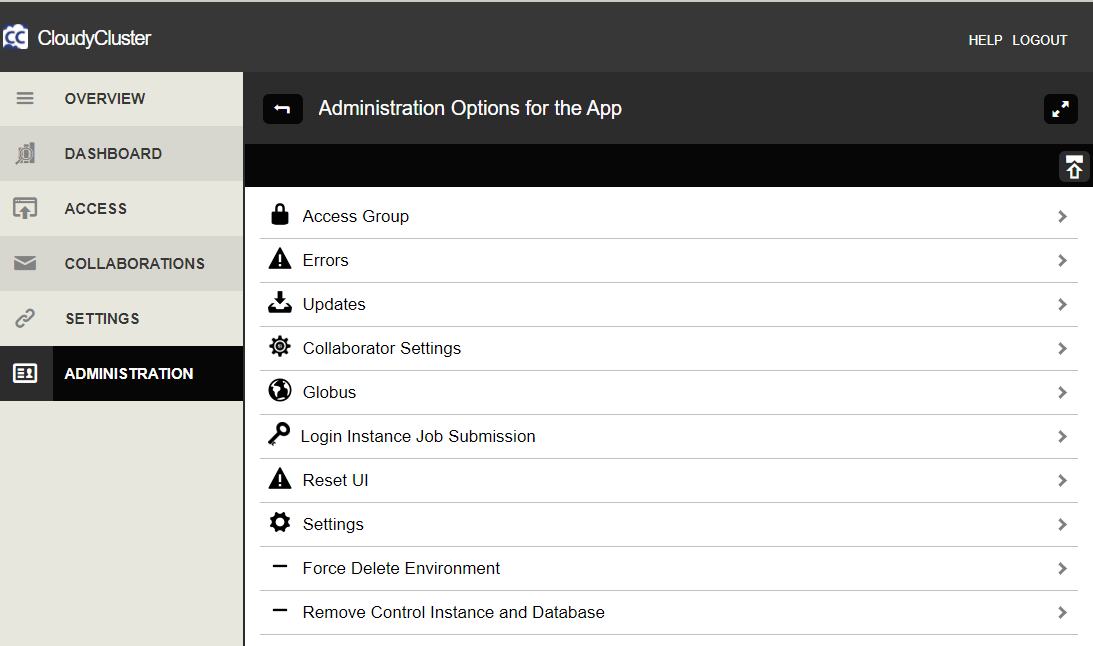
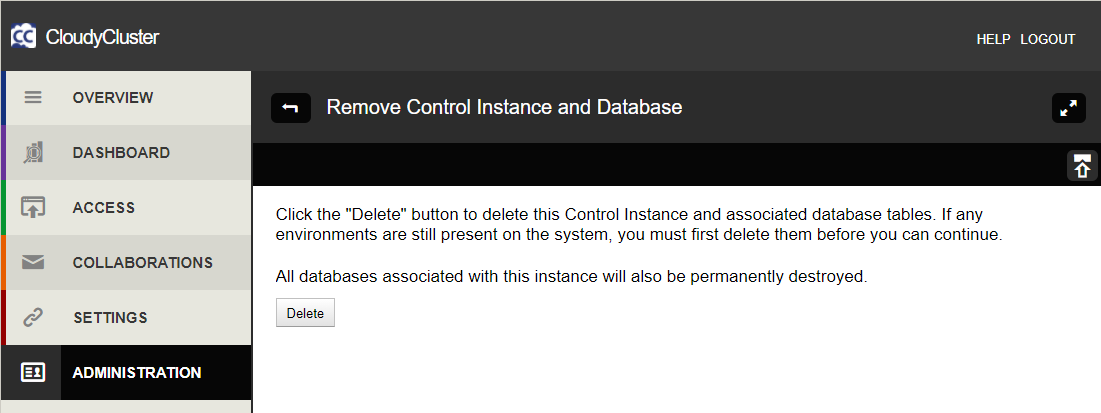
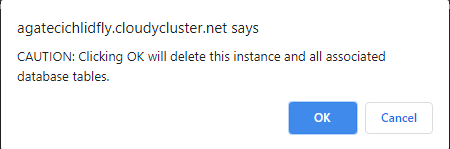
Navigate to Administration > Remove Control Instance and Database and click Delete. Finally click Ok.
Congratulations!
In this lab you launched CloudyCluster and the Control Instance from the Google Cloud Marketplace. You then configured the Control Instance, set up an HPC environment and executed a job, set up, edited and launched sample HPC jobs, and deleted the CloudyCluster, HPC environment, and Control Instance.
Next steps / Learn more
Be sure to check out the following for more practice with Omnibond:
- Omnibond website
- CloudyCluster Documentation
Google Cloud training and certification
...helps you make the most of Google Cloud technologies. Our classes include technical skills and best practices to help you get up to speed quickly and continue your learning journey. We offer fundamental to advanced level training, with on-demand, live, and virtual options to suit your busy schedule. Certifications help you validate and prove your skill and expertise in Google Cloud technologies.
Manual Last Updated October 09, 2023
Lab Last Tested October 09, 2023
Copyright 2024 Google LLC All rights reserved. Google and the Google logo are trademarks of Google LLC. All other company and product names may be trademarks of the respective companies with which they are associated.