Checkpoints
Execute monitoring script and wait for instance
/ 25
Create and deploy API proxy
/ 25
Create a NAT IP for the instance
/ 25
Activate the NAT IP
/ 25
Using NAT for Apigee X Backend Services
GSP907

Overview
In this lab, you enable a NAT (network address translation) IP address for requests from an Apigee instance to backend services, creating a predictable IP address that can be allow-listed.
Objectives
You will learn how to perform the following tasks:
- Call the Apigee API from the Apigee API documentation
- Create and activate a NAT IP address for Apigee requests coming from the Apigee runtime
- Confirm that requests to a backend server use the configured NAT IP address
Setup
Before you click the Start Lab button
Read these instructions. Labs are timed and you cannot pause them. The timer, which starts when you click Start Lab, shows how long Google Cloud resources will be made available to you.
This hands-on lab lets you do the lab activities yourself in a real cloud environment, not in a simulation or demo environment. It does so by giving you new, temporary credentials that you use to sign in and access Google Cloud for the duration of the lab.
To complete this lab, you need:
- Access to a standard internet browser (Chrome browser recommended).
- Time to complete the lab---remember, once you start, you cannot pause a lab.
How to start your lab and sign in to the Google Cloud console
-
Click the Start Lab button. If you need to pay for the lab, a pop-up opens for you to select your payment method. On the left is the Lab Details panel with the following:
- The Open Google Cloud console button
- Time remaining
- The temporary credentials that you must use for this lab
- Other information, if needed, to step through this lab
-
Click Open Google Cloud console (or right-click and select Open Link in Incognito Window if you are running the Chrome browser).
The lab spins up resources, and then opens another tab that shows the Sign in page.
Tip: Arrange the tabs in separate windows, side-by-side.
Note: If you see the Choose an account dialog, click Use Another Account. -
If necessary, copy the Username below and paste it into the Sign in dialog.
{{{user_0.username | "Username"}}} You can also find the Username in the Lab Details panel.
-
Click Next.
-
Copy the Password below and paste it into the Welcome dialog.
{{{user_0.password | "Password"}}} You can also find the Password in the Lab Details panel.
-
Click Next.
Important: You must use the credentials the lab provides you. Do not use your Google Cloud account credentials. Note: Using your own Google Cloud account for this lab may incur extra charges. -
Click through the subsequent pages:
- Accept the terms and conditions.
- Do not add recovery options or two-factor authentication (because this is a temporary account).
- Do not sign up for free trials.
After a few moments, the Google Cloud console opens in this tab.

Activate Cloud Shell
Cloud Shell is a virtual machine that is loaded with development tools. It offers a persistent 5GB home directory and runs on the Google Cloud. Cloud Shell provides command-line access to your Google Cloud resources.
- Click Activate Cloud Shell
at the top of the Google Cloud console.
When you are connected, you are already authenticated, and the project is set to your Project_ID,
gcloud is the command-line tool for Google Cloud. It comes pre-installed on Cloud Shell and supports tab-completion.
- (Optional) You can list the active account name with this command:
- Click Authorize.
Output:
- (Optional) You can list the project ID with this command:
Output:
gcloud, in Google Cloud, refer to the gcloud CLI overview guide.
Open the Apigee UI
The Apigee UI is accessed on a page separate from the Google Cloud Console. This lab has automatically created an Apigee organization that has the same name as the Google Cloud project.
-
Click to open the Apigee UI.
You may also open the Apigee UI from the Google Cloud Console by opening the Navigation menu (
) and selecting Apigee API Management > Apigee.
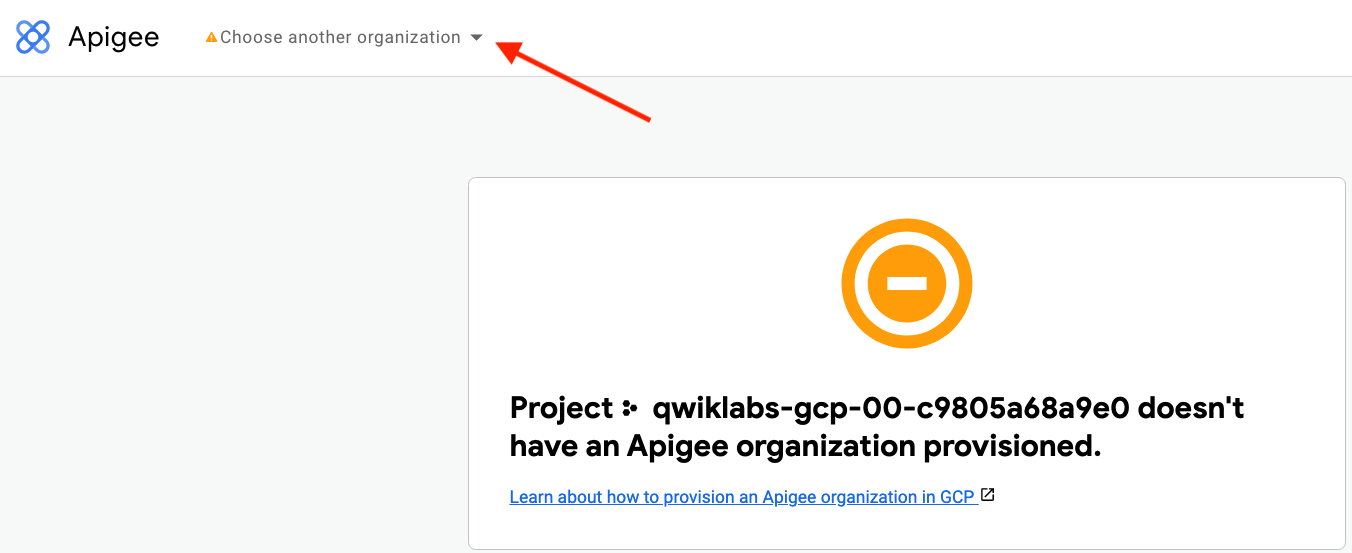
If you see an error indicating that the project does not have an organization provisioned, the tab might be trying to load the organization for a previous lab.
If you get this error:
-
Click on the organization dropdown.
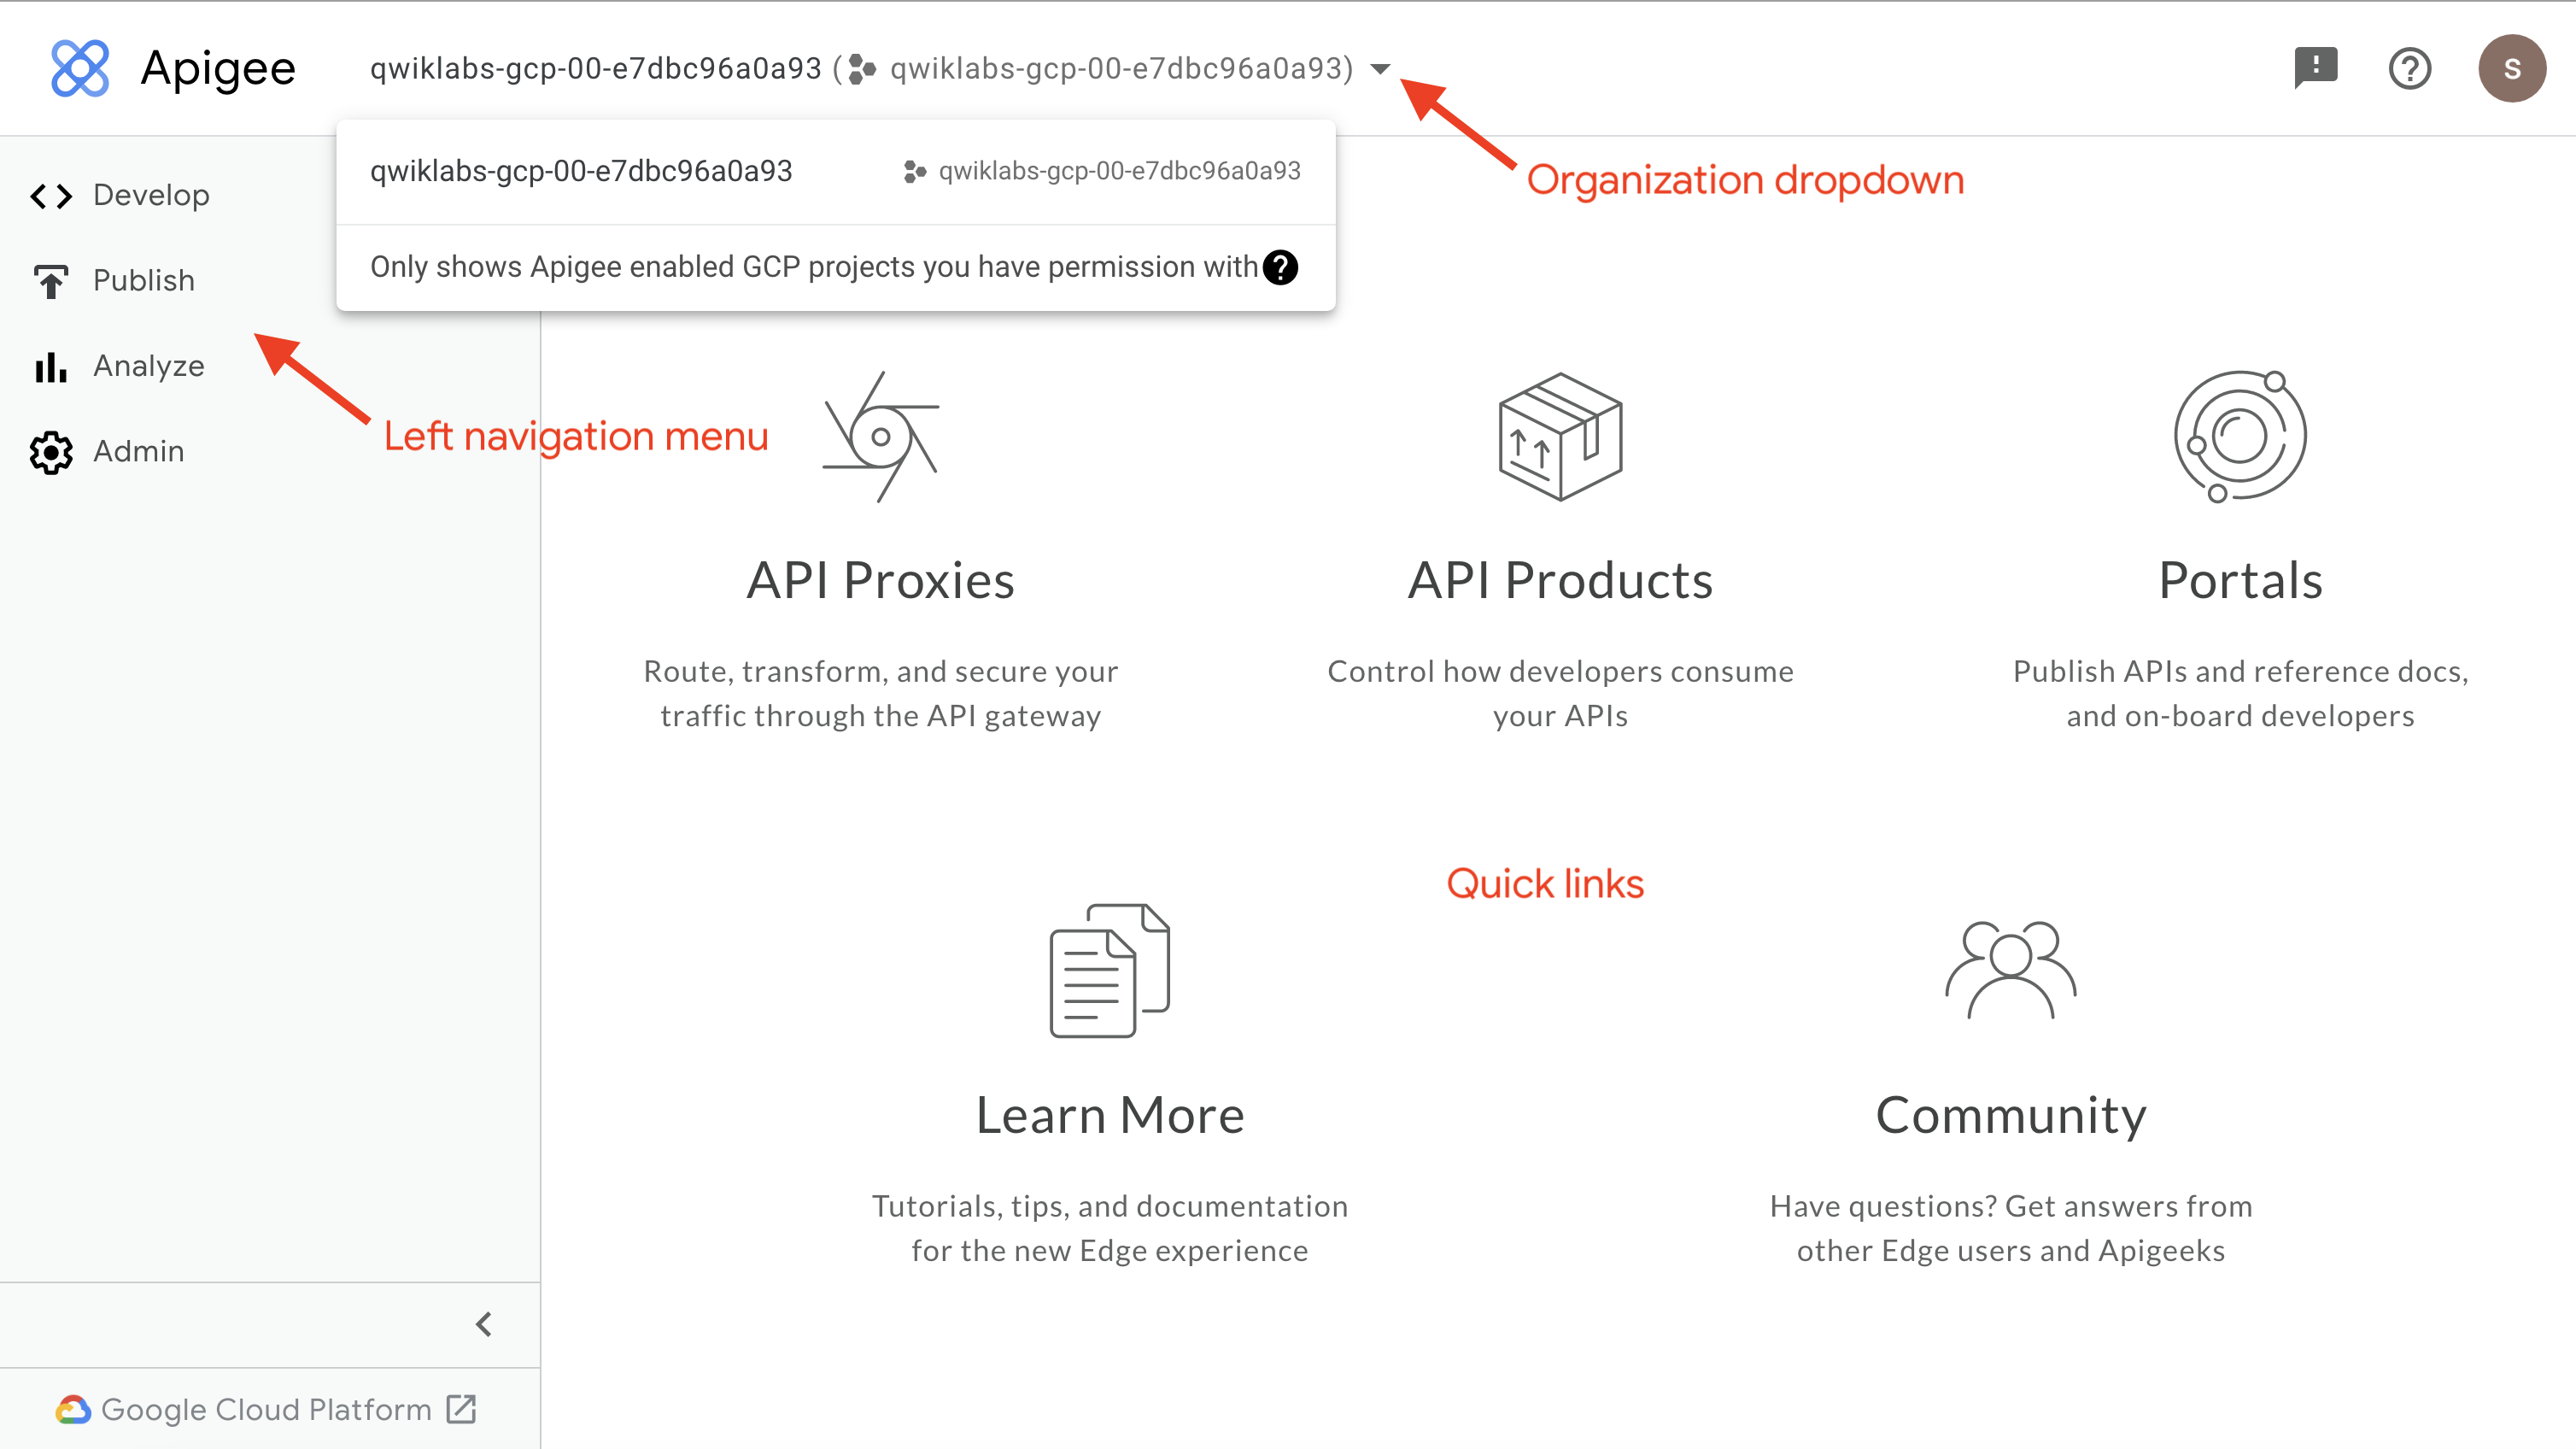
The organization dropdown should show an organization that has the same name as the Google Cloud project.
The organizations listed are those that are accessible by the logged-in user. For this lab, you should be logged in with the lab credentials provided in the Lab Details panel when you started the lab.
You can navigate the Apigee UI using its left navigation menu. The landing page also shows quick links for navigating to commonly used locations.
Task 1. Explore the Apigee API documentation
In this task, you explore the Apigee API documentation using the Google APIs Explorer.
- Copy the following Googgle API Explorer link and paste it in a new tab of your browser window for the Google Cloud Console: Google APIs Explorer for the Apigee API.
The Apigee API can be used to programmatically develop and manage your organization. The Apigee API can be called from the documentation pages directly.
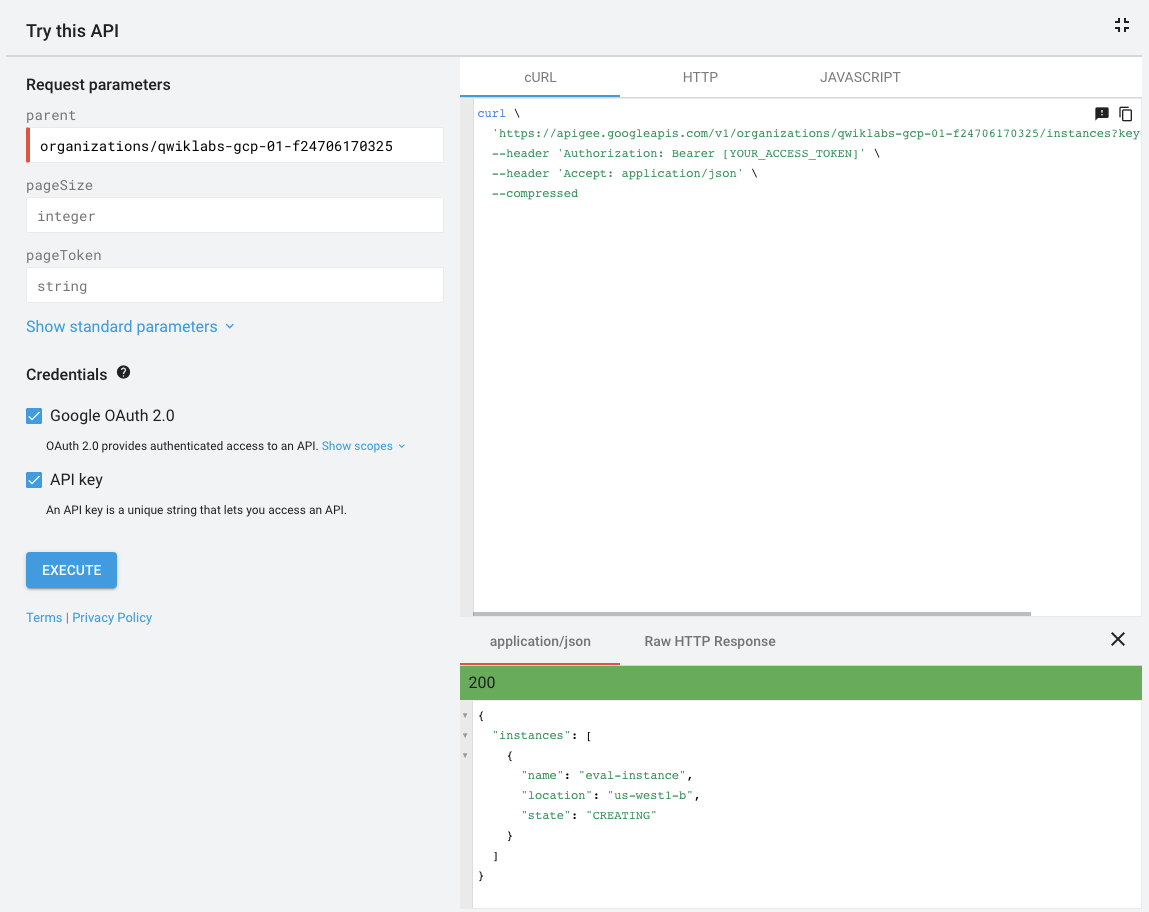
- In the right pane, navigate to the v1.organizations.instances REST resource.
- In the v1.organizations.instances section, click list.
This page describes the list instances method of the Apigee API.
- In the Try this API pane, set the parent to:
-
Click Execute.
-
If a window pops up and asks you to choose an account to continue to the Google API Explorer, select your lab username, and then click Allow.
Your API response should resemble this:
or this:
The instance's name is eval-instance. You create a NAT IP address for this instance.
- In the upper right corner of the Try this API pane, click Expand
.
The pane expands to show the cURL equivalent for the request and also provides the HTTP request and a JavaScript code snippet that can be used to make the request.
- To close the expanded pane, click Revert
.
Task 2. Wait for instance provisioning to complete
In this task, wait for the Apigee evaluation org provisioning to complete.
The Apigee organization provisioning may take quite a while to complete. The org provisioning progress can be monitored by using the Apigee API.
Start monitoring script
- Return to the Cloud Console tab.
- On the top-right toolbar, click the Activate Cloud Shell button.
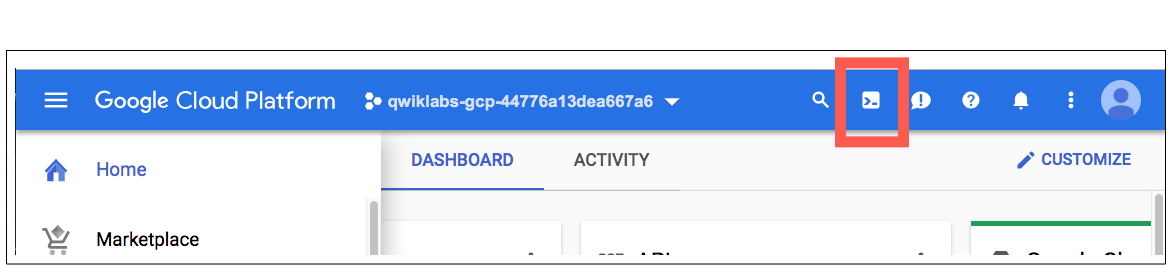
- If prompted, click Continue.
It takes a few moments to provision and connect to the Cloud Shell. When you are connected, you are already authenticated, and the project is set to your PROJECT_ID.
- In Cloud Shell, verify that the GOOGLE_CLOUD_PROJECT variable contains your project name by using the following command:
The variable GOOGLE_CLOUD_PROJECT should contain the name of your project, which is the same as your Apigee organization name.
- If the GOOGLE_CLOUD_PROJECT variable is not set, set the variable manually using a command that looks like this, replacing {project} with your project name:
- Paste the following command into the Cloud Shell:
This series of commands uses the Apigee API to determine when the runtime instance has been created and the eval environment has been attached.
- Wait until the instance is ready.
When the text ***ORG IS READY TO USE*** is printed, the instance is ready.
Click Check my progress to verify the objective.
Task 3. Create and deploy an API proxy
In this task, create an API proxy to test the IP address seen by a backend service.
- In your browser window, select the Apigee console tab.
- On the left navigation menu, select Develop > API Proxies.
- For the Select Environment dropdown, select eval.
- To start the proxy wizard, click Create New.
- Click Reverse proxy (most common).
-
Specify the following properties:
Property Value Name test-nat Base path /test-nat Target (Existing API) https://httpbin.org/ip
You are creating an API proxy for the httpbin request and response service. This service can be useful when testing APIs.
When a request travels through proxy servers, each server's IP address is added to the X-Forwarded-For header. The httpbin.org /ip endpoint returns the IP addresses in the X-Forwarded-For header plus the final IP address that made the connection to the httpbin.org server.
- Click Next.
- Leave the Common policies settings as their defaults, and click Next.
- On the Summary page, click eval.
- Click Create and deploy.
- Click Edit proxy.
- If a Switch to Classic link is in the upper right corner, click that link.
- On the Overview tab, wait for the deployment status to show that revision 1 is on eval.

Click Check my progress to verify the objective.
Task 4. Test the API proxy
In this task, make calls to the API proxy to see that the instance IP address used for backend services is dynamic.
A virtual machine named apigeex-test-vm was automatically created. Use this virtual machine to call the Apigee runtime using a private IP address.
Make calls to the Apigee runtime
- In Cloud Shell, open an SSH connection to the VM:
- For each question asked, click Enter or Return to specify the default input.
Your logged in identity is the owner of the project, so SSH to this machine is allowed.
Your Cloud Shell session is now running inside the VM.
- In the VM's shell, set required shell variables:
The EVAL_ENVGROUP_HOSTNAME contains the hostname that is associated with the eval-group environment group. A DNS entry for this hostname has been automatically created. It specifies the private IP address for an internal load balancer.
- Call the deployed test-nat API proxy in the eval environment:
The -k option tells curl to skip verification of the TLS certificate. The internal load balancer is using a self-signed certificate instead of a certificate that has been created by a trusted certificate authority (CA).
-k option to bypass certificate verification for production use cases.
Your curl command should return the response generated by the test-nat proxy, which should look similar to this:
The origin field response shows multiple IP addresses. The last IP address is from the final server that called the httpbin.org server. The first 3 IP addresses shown here are all internal IP addresses, and they document the other hops that the request took from the instance to httpbin.org.
If you repeat the call multiple times, you may see the same final IP address each time. However, unless you add a NAT address to your instance, the final IP address may change over time, making it difficult to allow-list.
Task 5. Create a NAT IP for the instance
In this task, create a NAT IP for use by the runtime instance when calling backend services.
A NAT IP is used to provide a predictable IP address for calls from the Apigee instance to a backend service.
- Return to the Apigee API browser tab.
- In the left pane, expand the organizations.instances.natAddresses section.
- Under organizations.instances.natAddresses, click create.
This page describes the create NAT address method of the Apigee API.
- In the Try this API pane, set the parent to:
- Click Add request body parameters, and then click name.
- Between the double quotes, set the string to:
- Click Execute.
If a window pops up and asks you to choose an account to continue to the Google API Explorer, select your lab username, and then click Allow.
The API response should resemble this:
The operation is asynchronous but should complete quickly.
- In the left pane, under organizations.instances.natAddresses, click get.
This page describes the get NAT address method of the Apigee API.
- In the Try this API pane, set the parent to:
- Click Execute.
If a window pops up and asks you to choose an account to continue to the Google API Explorer, select your lab user, and then click Allow.
The API response should resemble this:
The NAT address is reserved, but not yet active.
Click Check my progress to verify the objective.
Task 6. Activate the NAT IP
In this task, activate the NAT IP you created during the previous task.
- Under organizations.instances.natAddresses, click activate.
This page describes the activate NAT address method of the Apigee API.
- In the Try this API pane, set the parent to:
- Click Execute.
If a window pops up and asks you to choose an account to continue to the Google API Explorer, select your lab user, and then click Allow.
The API response should resemble this:
The operation is asynchronous but should complete quickly.
- In the left pane, under organizations.instances.natAddresses, click get.
This page describes the get NAT address method of the Apigee API.
- In the Try this API pane, set the parent to:
- Click Execute.
- If a window pops up and asks you to choose an account to continue to the Google API Explorer, select your lab username, and then click Allow.
The API response should resemble this:
The NAT address is now active.
Click Check my progress to verify the objective.
Task 7. Test the NAT address
In this task, make calls to the API proxy to verify that the NAT address is used for calls to a backend service.
Make calls to the Apigee runtime
- In Cloud Shell, if the SSH connection to the VM has dropped, open a new SSH connection to the VM:
- If necessary, click Enter or Return to specify the default input for each question.
Your Cloud Shell session is now running inside the VM.
- In the VM's shell, set required shell variables:
Note the NAT_IP_ADDRESS value.
The NAT_IP_ADDRESS is the NAT public IP address that is now used by the runtime instance when calling backend services. A backend service could allow-list this known IP address.
- Call the deployed test-nat API proxy in the eval environment:
The -k option tells curl to skip verification of the TLS certificate. The internal load balancer is using a self-signed certificate instead of a certificate that has been created by a trusted certificate authority (CA).
-k option to bypass certificate verification for production use cases.
Your curl command should return the response generated by the test-nat proxy, which should look similar to this:
The origin field still shows multiple IP addresses. The last IP address is now the NAT address that was dedicated to your runtime instance.
- Confirm the NAT IP address matches by using the following command to retrieve the NAT address using the Apigee API:
Congratulations!
You learned how to call the Apigee API from the API documentation. You used the Apigee API to create and activate a NAT IP address for your runtime instance. You created an API proxy that called the httpbin IP address service. Finally, you verified that the IP address visible to the backend was the configured NAT IP address.
Next steps / Learn more
Google Cloud training and certification
...helps you make the most of Google Cloud technologies. Our classes include technical skills and best practices to help you get up to speed quickly and continue your learning journey. We offer fundamental to advanced level training, with on-demand, live, and virtual options to suit your busy schedule. Certifications help you validate and prove your skill and expertise in Google Cloud technologies.
Manual Last Updated July 10, 2024
Lab Last Tested July 10, 2024
Copyright 2024 Google LLC All rights reserved. Google and the Google logo are trademarks of Google LLC. All other company and product names may be trademarks of the respective companies with which they are associated.