Checkpoints
Create a prod environment
/ 25
Create a prod-group environment group
/ 25
Attach the prod environment to the instance
/ 25
Create an API proxy
/ 25
Adding an Apigee X Environment and Group
- GSP906
- Overview
- Setup and requirements
- Task 1. Examine the eval environment and environment group
- Task 2. Create a prod environment
- Task 3. Create a prod-group environment group
- Task 4. Wait for instance provisioning to complete
- Task 5. Add the prod environment to the runtime instance
- Task 6. Create an API proxy
- Task 7. Test the prod and eval environments
- Congratulations!
GSP906

Overview
In this lab, you learn how to add a new environment and environment group to an Apigee X org.
An environment is a runtime execution context for API proxies. An API proxy must be deployed to an environment before the API it exposes is accessible over the network.
An environment group is a logical grouping of environments. Hostnames are defined on an environment group, and Apigee routes requests to the environments within a group based on the hostname. The request will then be handled by an API proxy that is deployed to one of the environments in the environment group and also has a matching basepath.
The instructions in this lab are also appropriate for adding environments and environment groups to paid orgs.
Objectives
In this lab, you learn how to perform the following tasks:
- Add a second environment to an Apigee X org
- Add a second environment group to an Apigee X org, assigning environments and hostnames
- Deploy an environment to a runtime instance
- Deploy and call an API proxy in each environment
Setup and requirements
Before you click the Start Lab button
Read these instructions. Labs are timed and you cannot pause them. The timer, which starts when you click Start Lab, shows how long Google Cloud resources will be made available to you.
This hands-on lab lets you do the lab activities yourself in a real cloud environment, not in a simulation or demo environment. It does so by giving you new, temporary credentials that you use to sign in and access Google Cloud for the duration of the lab.
To complete this lab, you need:
- Access to a standard internet browser (Chrome browser recommended).
- Time to complete the lab---remember, once you start, you cannot pause a lab.
How to start your lab and sign in to the Google Cloud console
-
Click the Start Lab button. If you need to pay for the lab, a pop-up opens for you to select your payment method. On the left is the Lab Details panel with the following:
- The Open Google Cloud console button
- Time remaining
- The temporary credentials that you must use for this lab
- Other information, if needed, to step through this lab
-
Click Open Google Cloud console (or right-click and select Open Link in Incognito Window if you are running the Chrome browser).
The lab spins up resources, and then opens another tab that shows the Sign in page.
Tip: Arrange the tabs in separate windows, side-by-side.
Note: If you see the Choose an account dialog, click Use Another Account. -
If necessary, copy the Username below and paste it into the Sign in dialog.
{{{user_0.username | "Username"}}} You can also find the Username in the Lab Details panel.
-
Click Next.
-
Copy the Password below and paste it into the Welcome dialog.
{{{user_0.password | "Password"}}} You can also find the Password in the Lab Details panel.
-
Click Next.
Important: You must use the credentials the lab provides you. Do not use your Google Cloud account credentials. Note: Using your own Google Cloud account for this lab may incur extra charges. -
Click through the subsequent pages:
- Accept the terms and conditions.
- Do not add recovery options or two-factor authentication (because this is a temporary account).
- Do not sign up for free trials.
After a few moments, the Google Cloud console opens in this tab.

Activate Cloud Shell
Cloud Shell is a virtual machine that is loaded with development tools. It offers a persistent 5GB home directory and runs on the Google Cloud. Cloud Shell provides command-line access to your Google Cloud resources.
- Click Activate Cloud Shell
at the top of the Google Cloud console.
When you are connected, you are already authenticated, and the project is set to your Project_ID,
gcloud is the command-line tool for Google Cloud. It comes pre-installed on Cloud Shell and supports tab-completion.
- (Optional) You can list the active account name with this command:
- Click Authorize.
Output:
- (Optional) You can list the project ID with this command:
Output:
gcloud, in Google Cloud, refer to the gcloud CLI overview guide.
Open the Apigee UI
The Apigee UI is accessed on a page separate from the Google Cloud Console. This lab has automatically created an Apigee organization that has the same name as the Google Cloud project.
-
Click to open the Apigee UI.
You may also open the Apigee UI from the Google Cloud Console by opening the Navigation menu (
) and selecting Apigee API Management > Apigee.
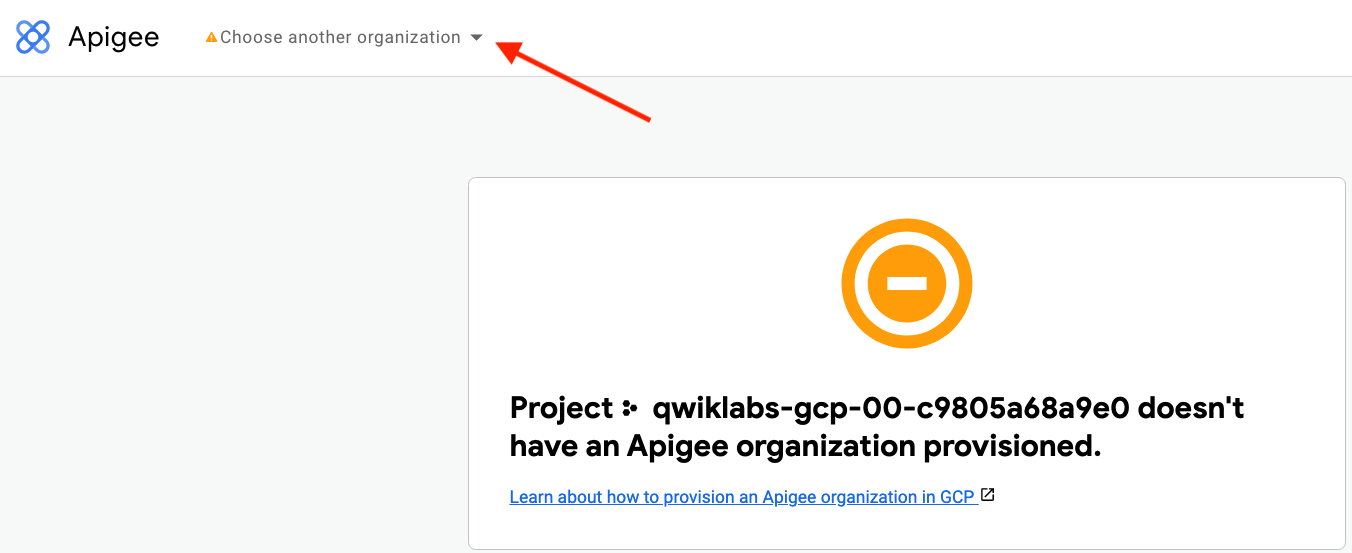
If you see an error indicating that the project does not have an organization provisioned, the tab might be trying to load the organization for a previous lab.
If you get this error:
-
Click on the organization dropdown.
The organization dropdown should show an organization that has the same name as the Google Cloud project.
The organizations listed are those that are accessible by the logged-in user. For this lab, you should be logged in with the lab credentials provided in the Lab Details panel when you started the lab.
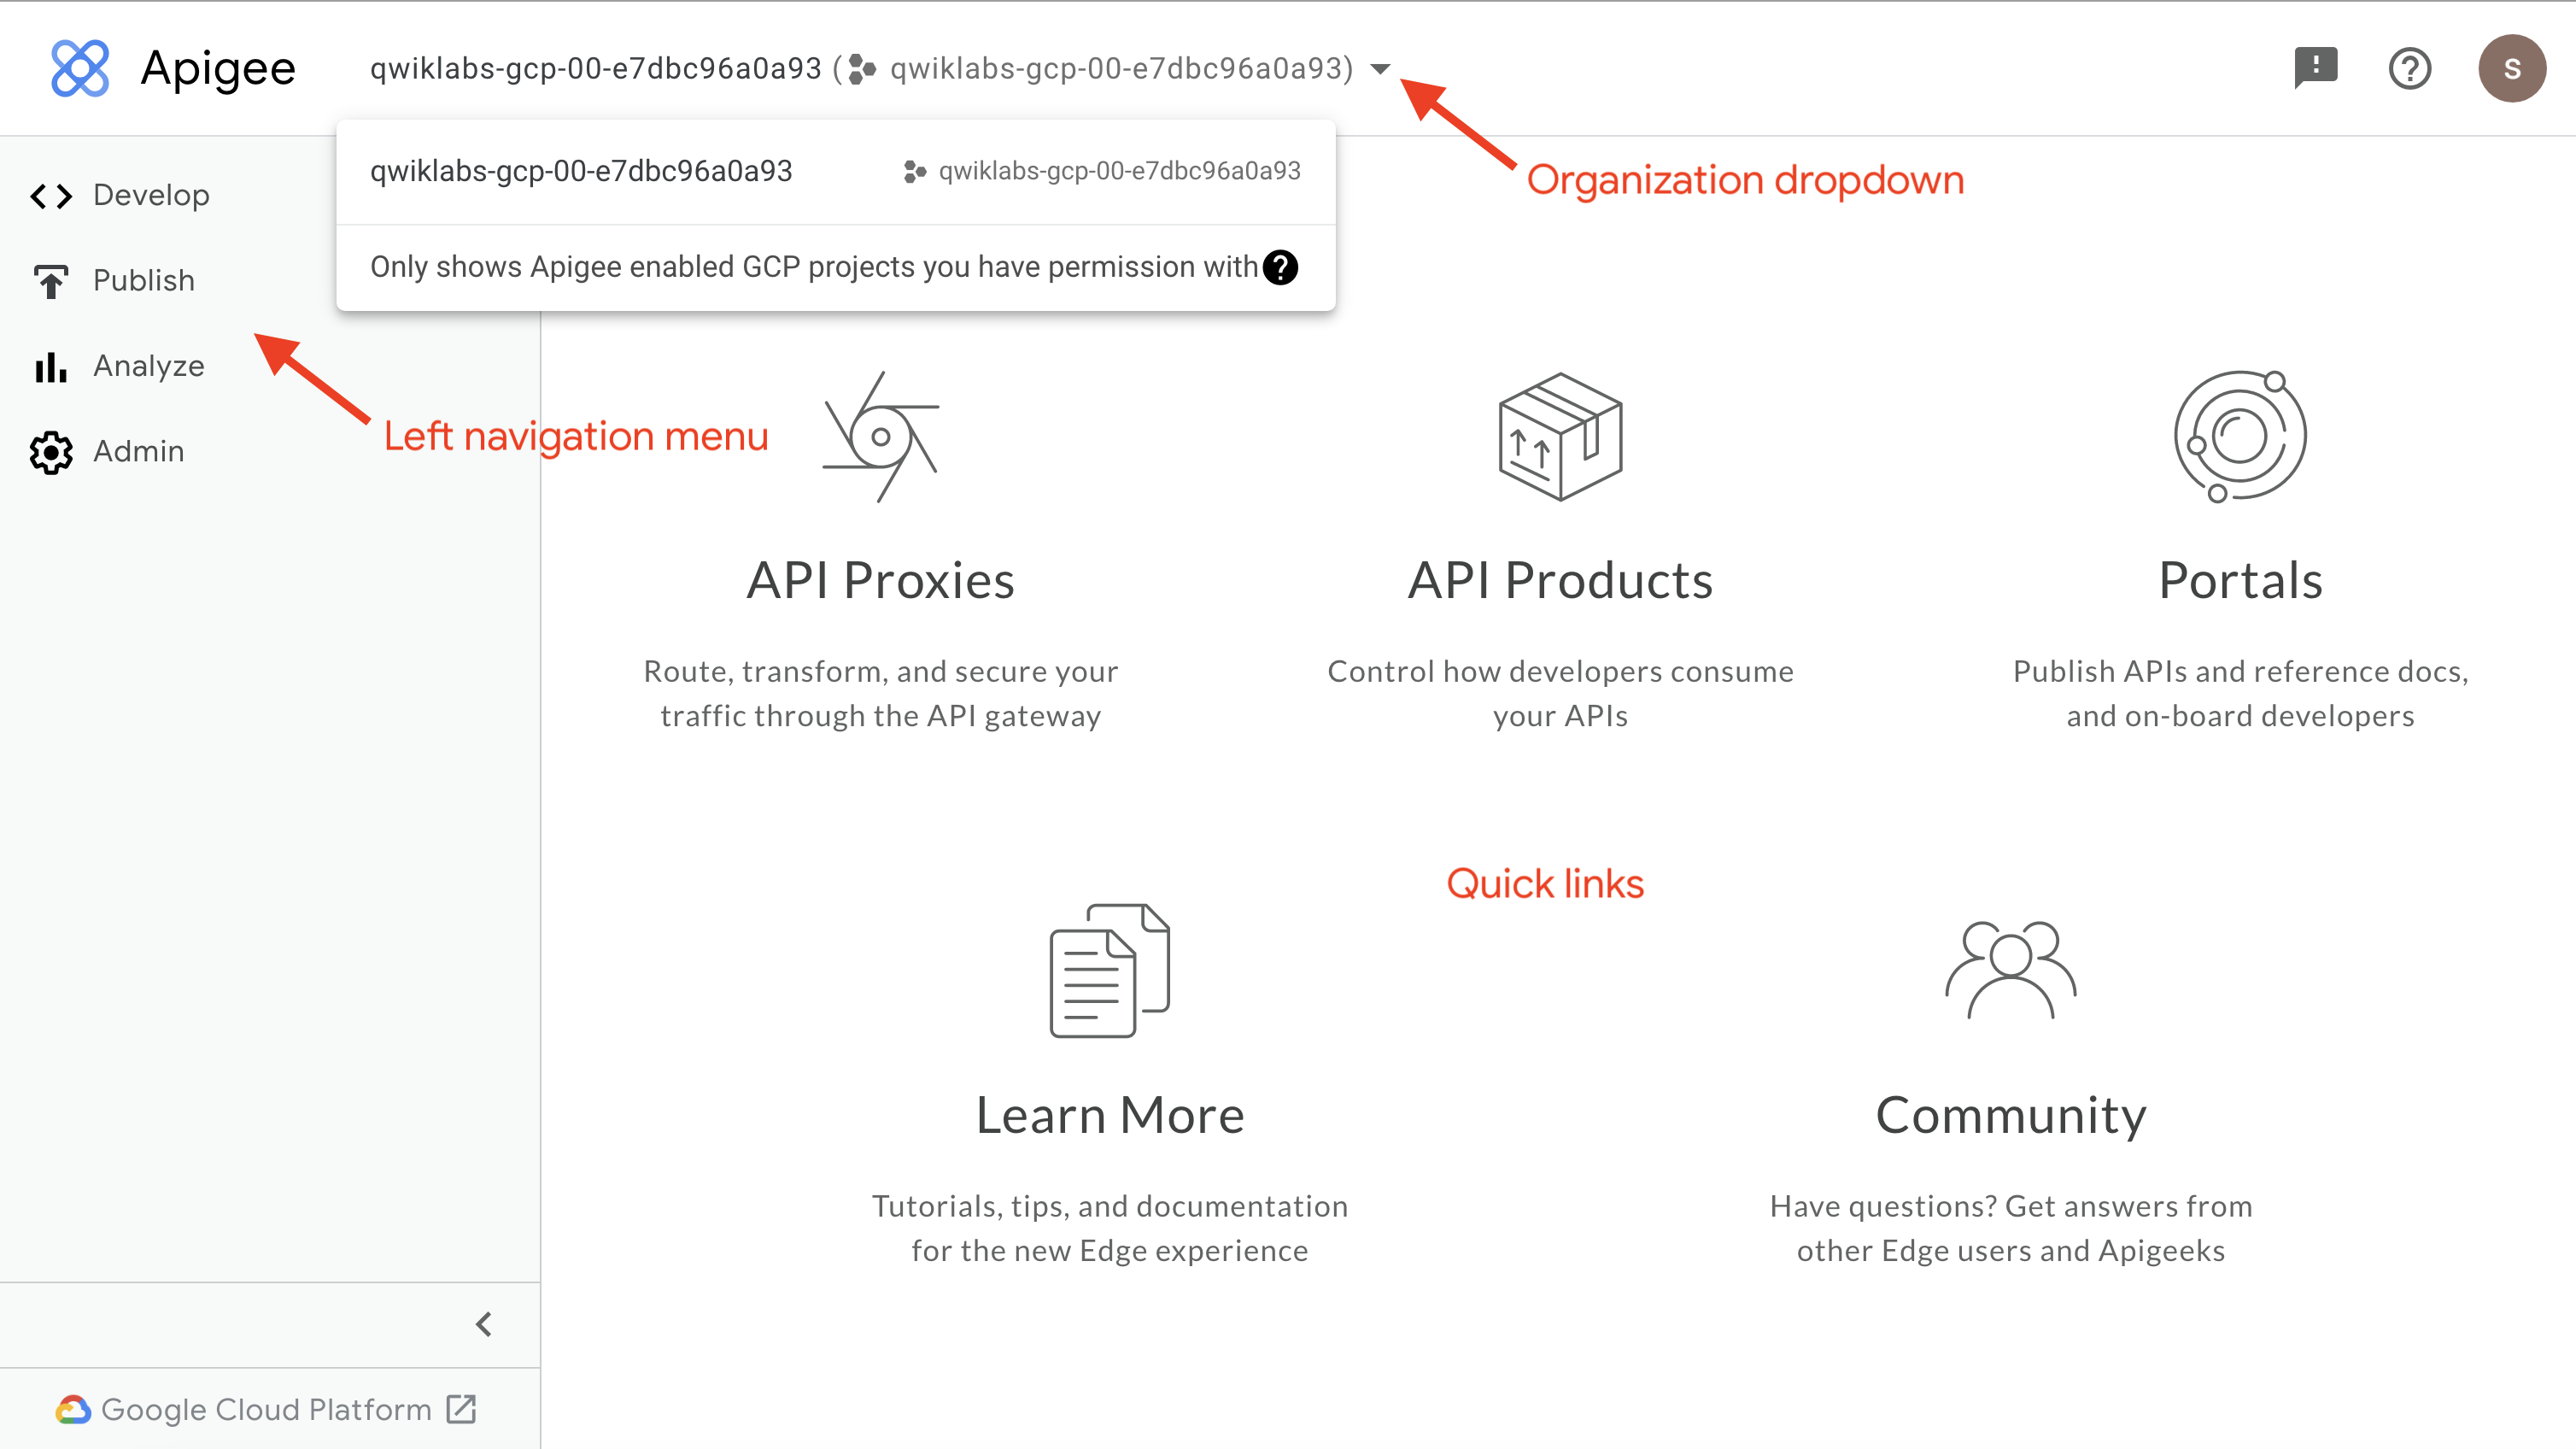
You can navigate the Apigee UI using its left navigation menu. The landing page also shows quick links for navigating to commonly used locations.
Task 1. Examine the eval environment and environment group
In this task, you explore environments and environment groups using the Apigee console.
An evaluation org for Apigee X initially contains a single environment named eval and a single environment group named eval-group. The eval environment is a member of the eval-group environment group.
- Select the Apigee Console tab in your browser window.
- Navigate to Admin > Environments > Overview.
- Click on the eval environment.
The eval environment has been configured as a member of the eval-group environment group.
The eval environment is marked "Ready for deployment," indicating that API proxies may be deployed to the environment.
- Navigate to Admin > Environments > Groups.
- On the eval-group environment group box, click Edit (
).
A single hostname (eval.example.com) is currently listed for the eval-group environment group, but more than one hostname may be used.
The eval-group environment group currently contains the eval environment as its only member, but more than one environment may be in an environment group.
- Click Cancel.
Task 2. Create a prod environment
In this task, you create a new environment.
- Navigate to Admin > Environments > Overview.
- In the upper right corner, click +Environment.
- Specify prod for Display name and Environment name. Other fields should remain unchanged.
- Click Create.
You should get a message that the environment has been defined. The new prod environment is marked Pending Provisioning.
Shortly after, you should see the message that the environment is ready for use, and the environment will no longer be marked Pending Provisioning.
Click Check my progress to verify the objective.
Task 3. Create a prod-group environment group
In this task, you create a new environment group.
- Navigate to Admin > Environments > Groups.
A warning indicates that the prod environment is not assigned to an environment group.
- In the upper right corner, click +Environment Group.
- Name the environment group prod-group, and then click Add.
- In the prod-group environment group box, click the edit (pencil) button (
).
- In the Environments box, click the + button.
- Select the prod environment, and then click Add.
- In the Hostnames box, replace the existing hostname with:
- Click Save.
Click Check my progress to verify the objective.
Task 4. Wait for instance provisioning to complete
In this task, you wait for the Apigee evaluation org provisioning to complete.
The Apigee organization provisioning takes quite a while to complete. The org provisioning progress can be monitored by using the Apigee API.
Start monitoring script
- Return to the Cloud Console tab.
- On the top-right toolbar, click Activate Cloud Shell (
- If prompted, click Continue.
It takes a few moments to provision and connect to Cloud Shell. When you are connected, you are already authenticated, and the project is set to your PROJECT_ID.
- In Cloud Shell, verify the variable with your Apigee org name:
The variable GOOGLE_CLOUD_PROJECT should contain the name of your project, which is the same as your Apigee organization name.
- If the GOOGLE_CLOUD_PROJECT variable is not set, set the variable manually using a command that looks like this, replacing {project} with your project name:
- Run the following commands in the Cloud Shell:
This series of commands uses the Apigee API to determine when the runtime instance has been created, and then waits for the eval environment to be attached to the instance.
When the text ***ORG IS READY TO USE*** is printed, proxies deployed to the eval environment can accept traffic.
Users and roles
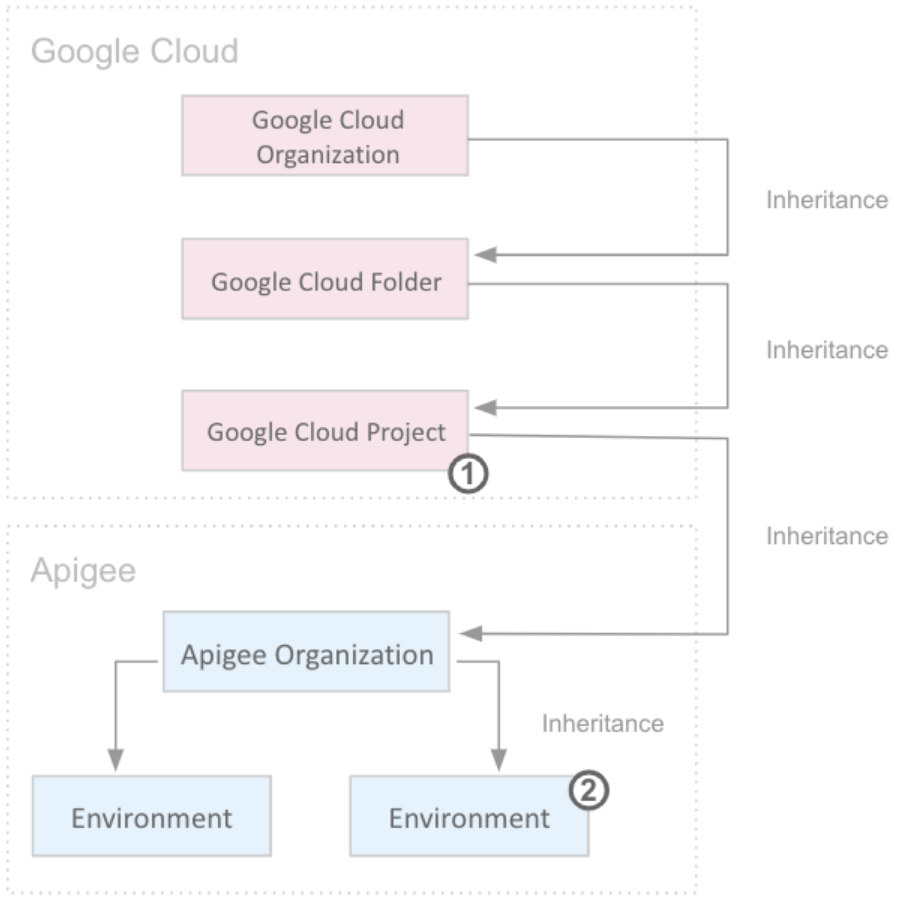
Access to Apigee is granted by using users and roles. A user represents an authenticated account that can access an Apigee organization and the entities within the organization, such as environments and API proxies. The capabilities that you grant to the user depend on the type of *role *assigned to them.
To add a new user to your Apigee organization, you grant access to the user's account, first in the Cloud project, and then optionally in the Apigee UI. Permissions granted on a resource in the Google Cloud resource hierarchy are inherited by resources contained within the resource.
If an Apigee role is assigned to a user on the Cloud project, then the user can access all Apigee resources within the organization (including all environments) in that role. Within the Apigee UI, an Apigee role can also be assigned to a user for a specific environment. This permission is in addition to the role set at the project level.
To adhere to the principle of least privilege, the minimum permissions for a given user should be specified at the project level, with expanded permissions given at the environment level.
This image shows how inheritance works for this access model:
Apigee roles
This table summarizes the pre-defined Apigee roles.
| Apigee role | Description |
|---|---|
| Apigee Org Admin | Full access to all Apigee resources in an Apigee organization. |
| Apigee Read Only Admin | Read-only access to all Apigee resources in an Apigee organization. |
| Apigee Analytics Editor | Creates and analyzes reports on API proxy traffic for an Apigee organization. Can edit queries and reports. |
| Apigee Analytics Viewer | User of Apigee Analytics. Cannot edit queries or reports. |
| Apigee API Admin | A developer who creates and tests API proxies. |
| Apigee Environment Admin | Deploys and undeploys API proxies in environments. |
| Apigee Developer Admin | Manages developer access to APIs. |
Learn more about API permissions for each Apigee role from the Apigee roles guide.
Task 5. Add the prod environment to the runtime instance
In this task, you add the prod environment to the runtime instance, allowing proxies deployed to prod to be run.
Attach the prod environment to the instance
- Confirm that the commands run in Cloud Shell returned
***ORG IS READY TO USE***. - To begin the process of attaching the prod environment to the runtime, run the following command:
If you get an error message, look at the details of the message:
- A NOT_FOUND error might indicate that the prod environment was not created successfully.
- A FAILED_PRECONDITION error with a message that "the resource is locked by another operation" indicates that the full provisioning of the eval environment may not have completed.
When you have successfully begun the process of attaching the prod environment to the runtime, you should see a return message with a state of IN_PROGRESS looking similar to this:
- Check the status of the prod attachment using this command:
This series of commands uses the Apigee API to determine when the prod environment is attached to the instance and proxies deployed to prod are ready to take traffic.
When the text ***prod ENVIRONMENT ATTACHED*** is printed, proxies deployed to the prod environment can accept traffic.
Leave the command running and continue with the next task.
Click Check my progress to verify the objective.
Task 6. Create an API proxy
In this task, you create an API proxy that uses flow variables to return the hostname and environment for the API call.
- Select the Apigee console tab in your browser window.
- On the left navigation menu, select Develop > API Proxies.
- To start the proxy wizard, click Create New.
- Click No Target.
-
Specify the following properties:
Property Value Name test-env Base path /test-env -
Click Next.
-
Leave the Common policies settings as their defaults, and click Next.
-
On the Summary page, click Create.
Your API proxy will be generated. You will deploy your proxy later.
- Click Edit proxy.
- If a Switch to Classic link is in the upper right corner, click that link.
- Click the Develop tab.
This tab is used to edit the API proxy. The Proxy Endpoint PreFlow is selected.
- In the Flow pane, click +Step on the lower left.

You will add a policy step to the PreFlow response. A policy implements a specific, limited management function.
- Select Assign Message, then specify AM-SetResponse as the Name and Display Name, and then click Add.
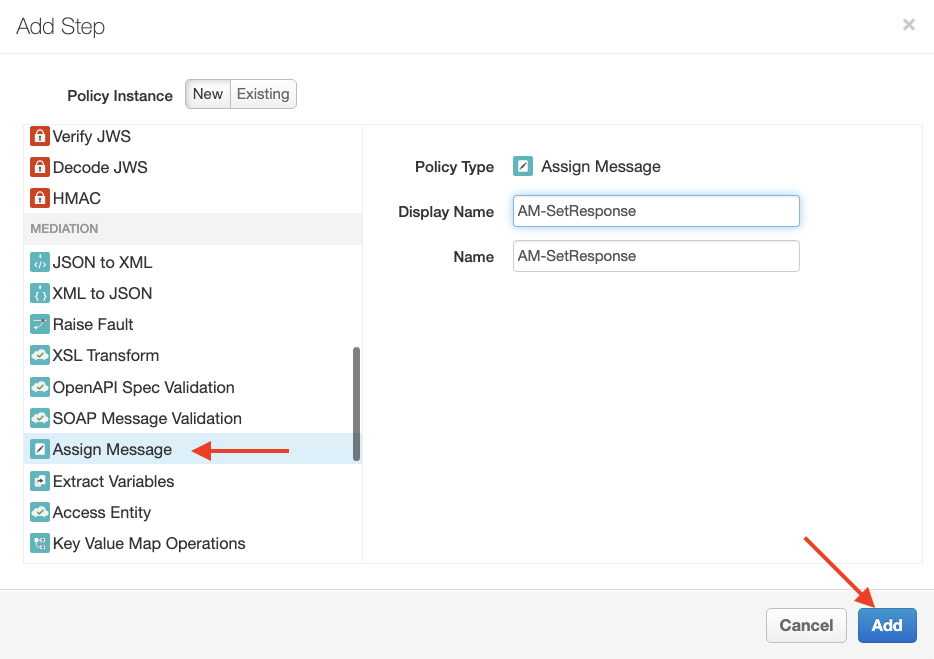
This attaches a new AssignMessage policy to the API proxy. You should see the AssignMessage code below the Flow pane:
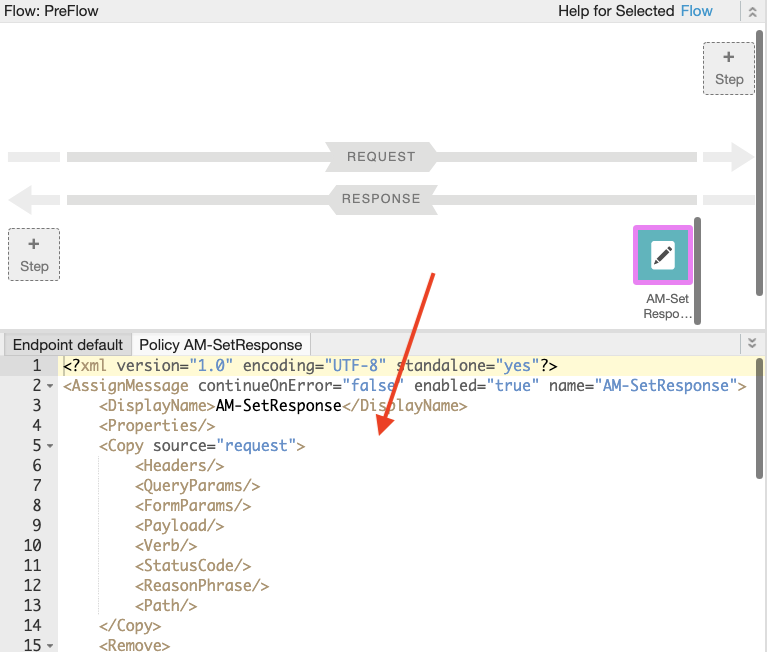
- Replace the AssignMessage code with the following:
This policy creates a response returning the environment name and hostname. The proxy flow variable environment.name contains the environment of the deployed proxy that has received the traffic, and the variable request.header.Host contains the Host header, which indicates the hostname used for the API call.
- Click Save.
- Click Deploy to eval, and then, in the message box, click Deploy.
This deploys the proxy to the eval environment.
- Expand the dropdown (
) next to Deploy to eval, and then click Deploy 1 for prod.
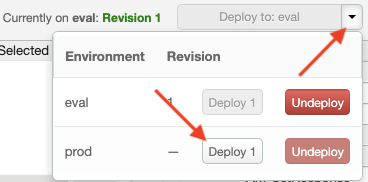
This deploys the proxy to the prod environment.
- In the message box, click Deploy.
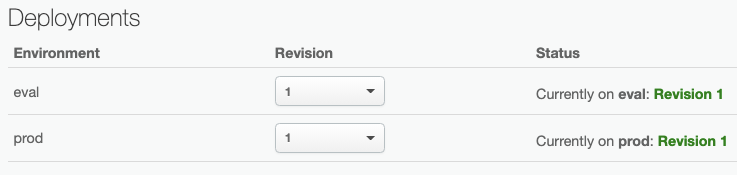
- Click the Overview tab.
- Wait for both deployments to complete.
When the proxy is deployed to both environments, the Deployments section of the Overview tab should look like this:
Click Check my progress to verify the objective.
Task 7. Test the prod and eval environments
In this task, you make calls to the test and prod environments.
A virtual machine named apigeex-test-vm was automatically created. Use this virtual machine to call the Apigee runtime using a private IP address.
Make calls to the Apigee runtime
- In Cloud Shell, run the following to open an SSH connection to the VM:
- For each question asked, click Enter or Return to specify the default input.
Your logged in identity is the owner of the project, so SSH to this machine is allowed.
Your Cloud Shell session is now running inside the VM.
- In the VM's shell, set required shell variables:
The PROD_ENVGROUP_HOSTNAME was retrieved from the prod-group environment group you created in a previous task.
- Call the deployed test-env API proxy in the eval environment:
The --resolve setting forces commands sent to the environment group hostname to resolve to the internal load balancer IP address instead of using DNS to resolve the IP address. The -k option skips verification of the TLS certificate of the internal load balancer, since the internal load balancer does not host a TLS certificate with the hostnames you are using.
Your curl command should return the response generated by the test-env proxy, which should look similar to this:
- Call the deployed test-env API proxy in the prod environment:
This time, the environment and hostname should both return prod instead of eval.
Congratulations!
In this lab, you created a new environment and environment group for your org, and attached the environment to your runtime instance. You then created and deployed an API proxy. Finally, you called the proxy using the eval and prod hostnames and the API proxy was able to detect the environment that was being called.
Next steps / learn more
Google Cloud training and certification
...helps you make the most of Google Cloud technologies. Our classes include technical skills and best practices to help you get up to speed quickly and continue your learning journey. We offer fundamental to advanced level training, with on-demand, live, and virtual options to suit your busy schedule. Certifications help you validate and prove your skill and expertise in Google Cloud technologies.
Manual Last Updated July 10, 2024
Lab Last Tested July 10, 2024
Copyright 2024 Google LLC All rights reserved. Google and the Google logo are trademarks of Google LLC. All other company and product names may be trademarks of the respective companies with which they are associated.