Checkpoints
Enable APIs and set up networking.
/ 25
Create the Apigee evaluation organization.
/ 25
Set up access routing.
/ 25
Test the Apigee evaluation organization using internal access.
/ 25
Provisioning an Apigee X Evaluation Organization
GSP904

Overview
In this lab, you learn how to create an Apigee X organization (org). You use the Apigee X provisioning wizard to create the Apigee X org. After installing and configuring the org, you install an API proxy and make API calls to verify that the org is operational.
An Apigee evaluation org created in your own Google Cloud project is typically available for 60 days. The org you provision for this lab is deleted when the lab ends, and you lose access to the org.
It is recommended that you read through the lab before you click Start Lab. After starting the lab, you will have 90 minutes to complete the lab. When the allowed time for the lab has expired, the lab ends and the Apigee evaluation org is deleted.
In this lab, you learn how to perform the following tasks:
- Create an Apigee X evaluation org using the provisioning wizard
- Understand the Apigee X architecture and how it integrates with a Google Cloud project
- Create a VM to call an Apigee proxy from an internal IP address
- Call an Apigee proxy from an external IP address
Setup
Before you click the Start Lab button
Read these instructions. Labs are timed and you cannot pause them. The timer, which starts when you click Start Lab, shows how long Google Cloud resources will be made available to you.
This hands-on lab lets you do the lab activities yourself in a real cloud environment, not in a simulation or demo environment. It does so by giving you new, temporary credentials that you use to sign in and access Google Cloud for the duration of the lab.
To complete this lab, you need:
- Access to a standard internet browser (Chrome browser recommended).
- Time to complete the lab---remember, once you start, you cannot pause a lab.
How to start your lab and sign in to the Google Cloud console
-
Click the Start Lab button. If you need to pay for the lab, a pop-up opens for you to select your payment method. On the left is the Lab Details panel with the following:
- The Open Google Cloud console button
- Time remaining
- The temporary credentials that you must use for this lab
- Other information, if needed, to step through this lab
-
Click Open Google Cloud console (or right-click and select Open Link in Incognito Window if you are running the Chrome browser).
The lab spins up resources, and then opens another tab that shows the Sign in page.
Tip: Arrange the tabs in separate windows, side-by-side.
Note: If you see the Choose an account dialog, click Use Another Account. -
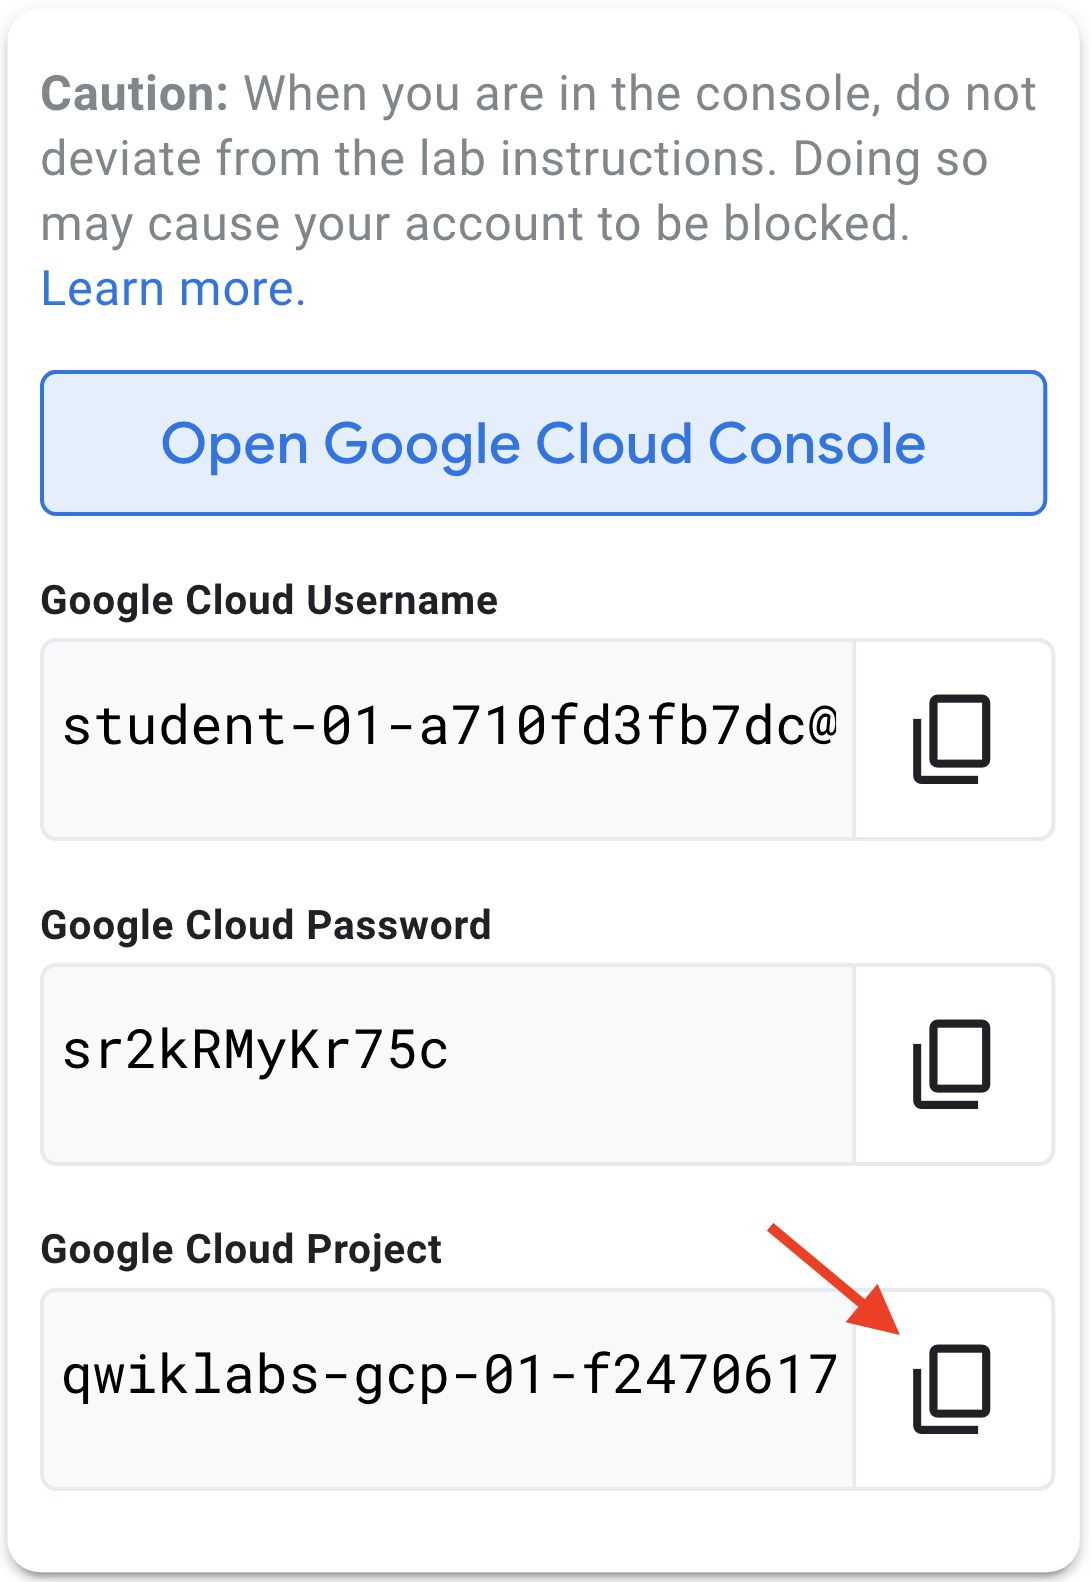
If necessary, copy the Username below and paste it into the Sign in dialog.
{{{user_0.username | "Username"}}} You can also find the Username in the Lab Details panel.
-
Click Next.
-
Copy the Password below and paste it into the Welcome dialog.
{{{user_0.password | "Password"}}} You can also find the Password in the Lab Details panel.
-
Click Next.
Important: You must use the credentials the lab provides you. Do not use your Google Cloud account credentials. Note: Using your own Google Cloud account for this lab may incur extra charges. -
Click through the subsequent pages:
- Accept the terms and conditions.
- Do not add recovery options or two-factor authentication (because this is a temporary account).
- Do not sign up for free trials.
After a few moments, the Google Cloud console opens in this tab.

Activate Cloud Shell
Cloud Shell is a virtual machine that is loaded with development tools. It offers a persistent 5GB home directory and runs on the Google Cloud. Cloud Shell provides command-line access to your Google Cloud resources.
- Click Activate Cloud Shell
at the top of the Google Cloud console.
When you are connected, you are already authenticated, and the project is set to your Project_ID,
gcloud is the command-line tool for Google Cloud. It comes pre-installed on Cloud Shell and supports tab-completion.
- (Optional) You can list the active account name with this command:
- Click Authorize.
Output:
- (Optional) You can list the project ID with this command:
Output:
gcloud, in Google Cloud, refer to the gcloud CLI overview guide.
Task 1. Provision an Apigee X org
In this task, you use the provisioning wizard to provision an Apigee X evaluation org.
An Apigee X org is attached to a customer-managed Google Cloud project.
Prerequisites
Before creating an Apigee X evaluation org, certain prerequisites must be met:
- With Apigee X, the name of your Apigee organization matches the name of the associated Google Cloud project. The project name must start with a lowercase letter, and the only allowed characters are lowercase letters (a-z), digits (0-9), and hyphens.
- A project used for Apigee X must be associated with a Google Cloud account with active billing. This requirement applies whether you are creating a paid or an evaluation Apigee X org. An evaluation org does not incur charges against your account, but some APIs used by the organization do.
- The Cloud SDK is used to install and interact with your Apigee organization.
The lab project adheres to these prerequisites.
Start the provisioning wizard
-
Open a new incognito tab and open the provisioning wizard at apigee.google.com/setup.
-
From the lab information on the left, copy your Google Cloud project name into the clipboard.
Note: When creating your own Apigee X evaluation org, use your own project name rather than the lab project name. -
Paste the project name into the Project text box.
A message is displayed indicating that an Apigee subscription is not enabled for this project.
Note: A warning may indicate that you do not have the correct permissions to configure the Apigee org. The permissions should propagate shortly. Refresh the page and try again until you are shown the subscription message. -
Click Start Evaluation.
Enable APIs
Apigee X organizations require that the Apigee, Service Networking, and Compute Engine APIs must be enabled in the Google Cloud project. The wizard enables the required APIs.
-
Next to Enable APIs, click Edit.
The list of APIs to be enabled is shown:
- The Apigee APIs are used to configure and interact with your Apigee organization.
- The Compute Engine APIs are used to create the managed instance group (MIG) that acts as a network bridge to connect to the Apigee instance private IP address.
- The Service Networking APIs are used to allow your Google Cloud project to communicate with the Apigee evaluation org that is managed by Google.
-
Click Enable APIs.
After a short wait, the APIs will be completed and a check mark will appear next to Enable APIs.
Set up networking
The provisioning wizard creates Virtual Private Cloud (VPC) network peering between the customer's Google Cloud project and the Google-managed project containing the Apigee runtime. The wizard also creates a private service connection for communication with the Apigee runtime.
-
Next to Networking, click Edit.
The Set up networking pane asks you to specify an authorized network. The default network is already available and can be used for an evaluation org, but it is typically not recommended to use the default network.
-
Click See VPC networks in your project.
The VPC Networks page in the console is opened in another tab.
-
Click +Create VPC Network.
-
Name the network
apigeex-vpc. -
In the New subnet pane, set the following values:
Property Value Name apigeex-vpc Region select IPv4 range 10.0.0.0/20 Private Google Access On The IP address range is specified in CIDR format. The decimal number specifies the size of the range, from /32 (a single IP address) to /8 (the largest private IP range, from 10.0.0.0 to 10.255.255.255).
Your subnet must use a range large enough to hold a /22 range. The /20 range being used here is 4 times larger than the /22 range which will be used by Apigee.
-
In the New subnet pane, click Done.
-
Click Create.
A new VPC network with a single subnet is created in your project. A circle spins next to the apigeex-vpc network until it has completed.
-
Wait for the apigeex-vpc network to be created, and then return to the wizard Setup tab.
-
Click Refresh authorized networks (
), and then select the apigeex-vpc authorized network.
-
Select Automatically allocate IP range.
A peering IP range named google-managed-services-apigeex-vpc with prefix length /22 will be created.
- Click Allocate and connect.
- Wait for the Networking configuration to finish.
A check mark appears next to Networking when the network configuration setup has completed.
- Return to the VPC networks tab, and then click Refresh.
- Click apigeex-vpc.
- Where the Subnets tab is selected, scroll to the right and select the Private Service Connection tab.
The google-managed-services-apigeex-vpc IP range has been created with a /22 internal IP range.
Click Check my progress to verify the objective.
Create the Apigee evaluation organization
The provisioning wizard creates an Apigee evaluation org.
-
Return to the wizard Setup tab.
-
Next to Apigee evaluation organization, click Edit.
The Create an Apigee evaluation organization pane lets you select the Google Cloud regions that are used for the Apigee runtime and Analytics hosting.
-
Select
for the Runtime location. You select a region for the runtime location. Apigee chooses a zone in the region in which to provision the evaluation org.
-
Select
for the Analytics hosting region. Note: If the chosen runtime region is not available as an analytics hosting region, choose a region that is geographically close to the runtime region. For example, if your runtime region is us-east4, you might select us-east1 as your analytics region. Note: An evaluation org can only have a single runtime instance hosted in a single Google Cloud zone. A paid org runtime instance runs in multiple zones within a region. More than one runtime instance may be created for an organization, with each being hosted in a different region. For a multi-region Apigee org, choose an analytics hosting region that is central to your runtime regions or close to your most important region or regions. -
Click Provision.
You will return to the provisioning wizard later to configure Access Routing.
Task 2. Wait for provisioning to complete
In this task, you wait for the Apigee evaluation org provisioning to complete.
The Apigee organization provisioning takes quite a while to complete. The org provisioning progress can be monitored by using the Apigee API.
Start monitoring script
-
Return to the console tab.
-
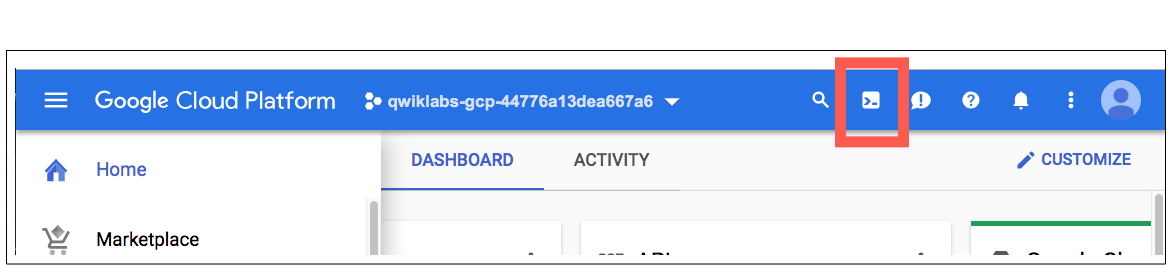
On the top-right toolbar, click the Activate Cloud Shell button.
-
If prompted, click Continue.
It takes a few moments to provision and connect to the Cloud Shell. When you are connected, you are already authenticated, and the project is set to your PROJECT_ID.
-
In the Cloud Shell, verify the variable with your Apigee org name:
echo ${GOOGLE_CLOUD_PROJECT} The variable GOOGLE_CLOUD_PROJECT should contain the name of your project, which is the same as your Apigee organization name.
-
If the GOOGLE_CLOUD_PROJECT variable is not set, set the variable manually using a command that looks like this, replacing with your project name:
export GOOGLE_CLOUD_PROJECT=<project> -
Paste the following command into Cloud Shell:
export INSTANCE_NAME=eval-instance; export ENV_NAME=eval; export PREV_INSTANCE_STATE=; echo "waiting for runtime instance ${INSTANCE_NAME} to be active"; while : ; do export INSTANCE_STATE=$(curl -s -H "Authorization: Bearer $(gcloud auth print-access-token)" -X GET "https://apigee.googleapis.com/v1/organizations/${GOOGLE_CLOUD_PROJECT}/instances/${INSTANCE_NAME}" | jq "select(.state != null) | .state" --raw-output); [[ "${INSTANCE_STATE}" == "${PREV_INSTANCE_STATE}" ]] || (echo; echo "INSTANCE_STATE=${INSTANCE_STATE}"); export PREV_INSTANCE_STATE=${INSTANCE_STATE}; [[ "${INSTANCE_STATE}" != "ACTIVE" ]] || break; echo -n "."; sleep 5; done; echo; echo "instance created, waiting for environment ${ENV_NAME} to be attached to instance"; while : ; do export ATTACHMENT_DONE=$(curl -s -H "Authorization: Bearer $(gcloud auth print-access-token)" -X GET "https://apigee.googleapis.com/v1/organizations/${GOOGLE_CLOUD_PROJECT}/instances/${INSTANCE_NAME}/attachments" | jq "select(.attachments != null) | .attachments[] | select(.environment == \"${ENV_NAME}\") | .environment" --join-output); [[ "${ATTACHMENT_DONE}" != "${ENV_NAME}" ]] || break; echo -n "."; sleep 5; done; echo; echo "${ENV_NAME} environment attached"; echo "***ORG IS READY TO USE***"; This series of commands uses the Apigee API to determine when the runtime instance has been created, and then waits for the eval environment to be attached to the instance.
-
Wait for the provisioning to complete.
When the text
***ORG IS READY TO USE***is printed, the org can be tested.Note: Continue reading this lab to learn about the Apigee X architecture, API proxy call lifecycle, and Apigee UI while you wait for the organization to be fully created.This process may take close to 30 minutes. Pay attention to the time remaining in the lab, and periodically check the Cloud Shell output to see when the org can be tested.Other labs in this quest will automatically create the Apigee org for you.
Apigee X architecture overview
An Apigee X organization requires two Google Cloud projects: one managed by the customer, and one managed by Google for the Apigee X runtime. Each project uses its own Virtual Private Cloud (VPC) network. By default, VPC networks in two separate projects cannot communicate with each other.
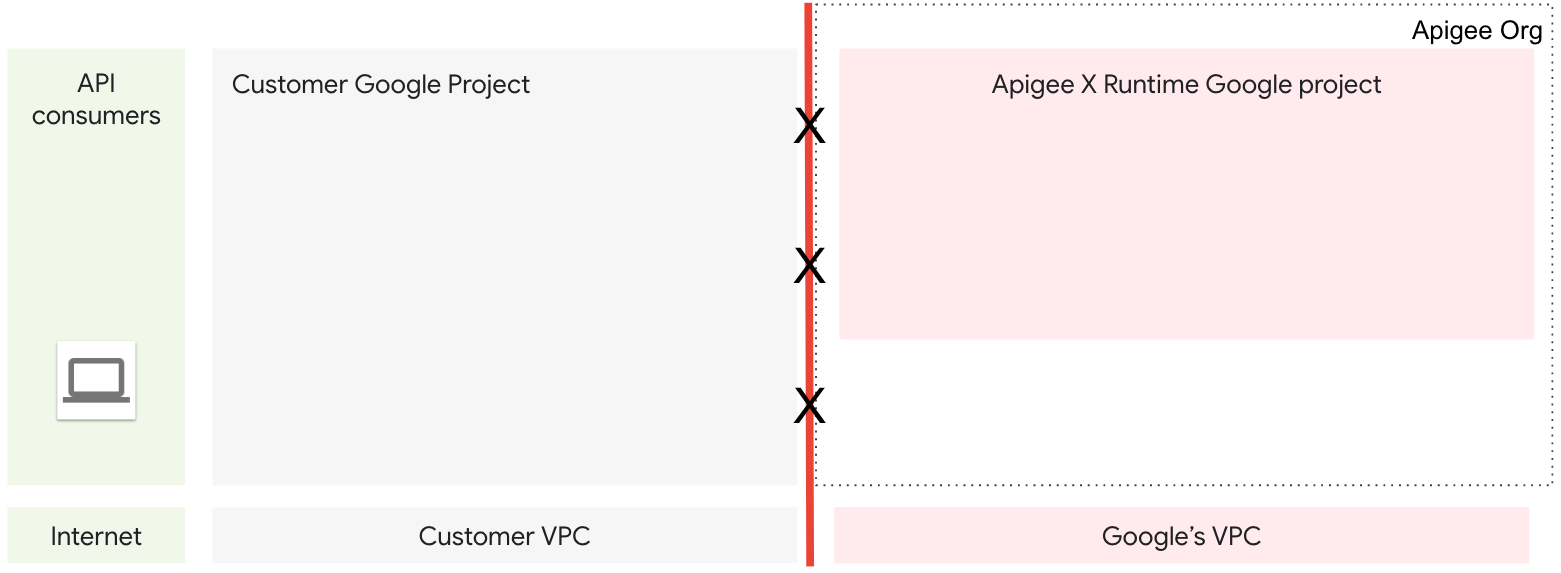
To enable communication between these VPCs, Apigee uses VPC network peering. Network peering allows internal IP address connectivity between the two networks.
The Apigee runtime runs your API proxies, and is provisioned in the Google-managed project. Incoming requests to the runtime are sent to an internal TCP load balancer which is accessible by using a private IP address in the peered network.
To route traffic from clients on the internet to the Apigee runtime, you can use a global external HTTPS load balancer (XLB). However, an XLB cannot communicate directly with an internal IP address in another project, even if the networks are peered. To solve this problem, a managed instance group (MIG) of virtual machines (VMs) serves as a network bridge.
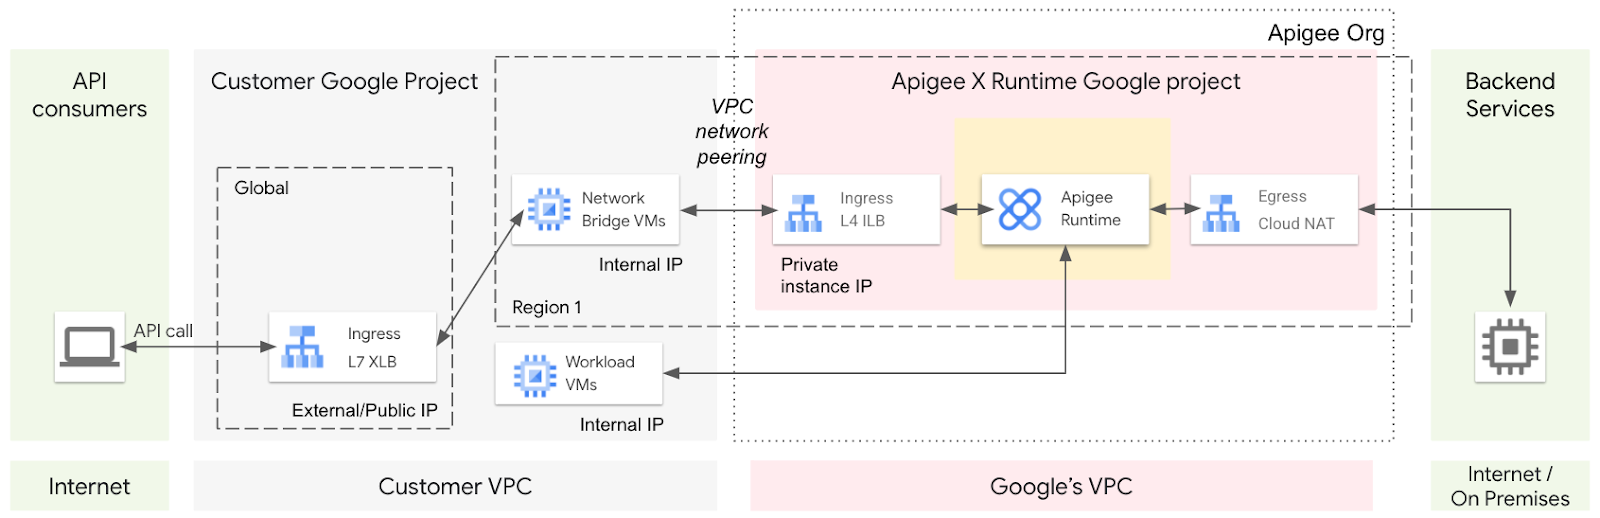
The VMs in the MIG can communicate bidirectionally across the peered networks. A request coming from the internet would flow through the XLB to a bridge VM in the MIG. The VM can call the private IP of the Apigee runtime's internal load balancer.
The runtime can also directly call internal IP addresses in the peered network in the customer project, or call external IPs through the Google-managed project's Cloud NAT (network address translation) gateway.
API proxy call lifecycle
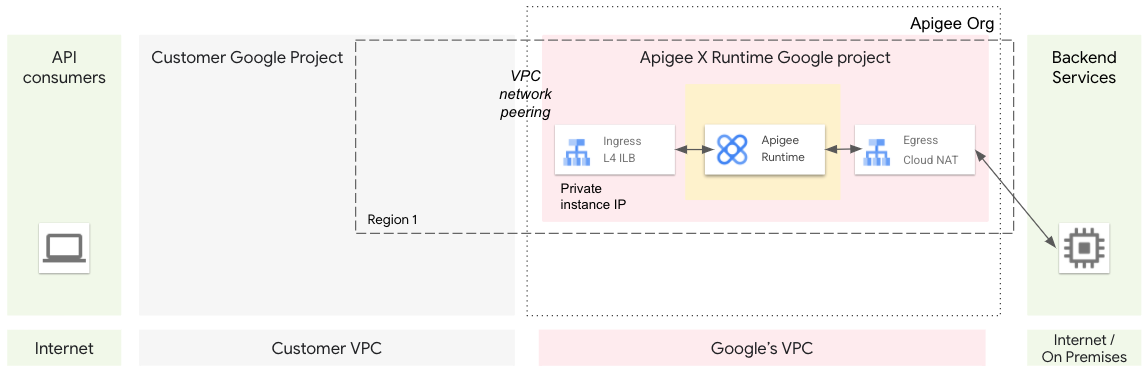
The following illustration shows the lifecycle of an API proxy call for a paid Apigee X org.
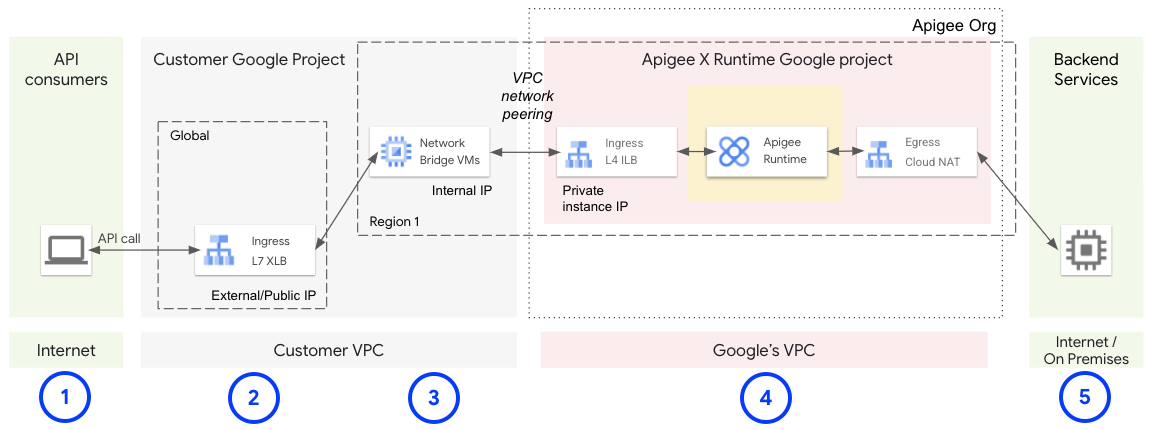
- A client calls an Apigee API proxy.
- The request lands on a global external HTTPS load balancer (XLB). The XLB is configured with an external public IP address and a TLS certificate.
- The XLB forwards the request to a VM in the MIG.
- The VM forwards the request to the internal load balancer private IP address which is routed to the Apigee runtime.
- After processing the request, the Apigee runtime sends the request to the backend service. The response returns along the same path.
Apigee UI
The Apigee UI is used to manage your org. You may explore your org in the UI by navigating to apigee.google.com.
Click Check my progress to verify the objective.
Task 3. Set up access routing
In this task, you use the provisioning wizard to create the infrastructure that allows API calls to be made from outside of the VPC network.
-
Return to the wizard Setup tab.
Note: If the previous progress checkpoint was completed successfully, the Apigee evaluation organization process (step 3) should be marked as completed, or will be marked as completed shortly. Wait for step 3 to complete. -
Next to Access routing, click Edit.
-
Select Enable internet access.
Note: The wizard mentions a cost for the Google Cloud Load Balancer. There is no cost for you when using this lab. -
Select Use wildcard DNS service.
A wildcard DNS service will automatically return a DNS entry based upon an IP address embedded in the hostname. For example, the hostname
eval-34.100.120.55.nip.iowould resolve to the IP address 34.100.120.55. -
To use the default wildcard DNS provider, nip.io, leave the domain unchanged.
-
For Subnetwork, select apigeex-vpc.
-
Click Set Access.
Wait until the access routing configuration has completed.
Click Check my progress to verify the objective.
External access for the evaluation org is being created. Creation of the apigee-ssl-cert used by the load balancer may take several minutes, so you'll start by testing internal access.
Task 4. Test the Apigee evaluation org using internal access
In this task, you test that a proxy in the Apigee evaluation org can be called from an internal IP address.
To call an API proxy on a runtime instance using an internal IP address, you will create a VM on the same network that has the ability to make a call to the instance.
Create a virtual machine that can make calls to the Apigee runtime
After provisioning, an Apigee evaluation org only allows internal IP addresses to communicate with the Apigee runtime. A Compute Engine VM within your cluster can send requests to the internal load balancer for the Apigee runtime.
-
Using Cloud Shell, set the following variables:
export ORG=${GOOGLE_CLOUD_PROJECT} export PROJECT_NUMBER=$(gcloud projects describe ${GOOGLE_CLOUD_PROJECT} --format="value(projectNumber)") export NETWORK=apigeex-vpc export SUBNET=apigeex-vpc export INSTANCE_NAME=eval-instance export VM_NAME=apigeex-test-vm export VM_ZONE={{{ project_0.default_zone | ZONE }}} export RUNTIME_IP=$(curl -s -H "Authorization: Bearer $(gcloud auth print-access-token)" -X GET "https://apigee.googleapis.com/v1/organizations/${ORG}/instances/${INSTANCE_NAME}" | jq ".host" --raw-output) echo "RUNTIME_IP=${RUNTIME_IP}" The runtime IP address is retrieved using the Apigee API that retrieves the details for a runtime instance. The tool jq is used to parse the JSON response and retrieve a specific field.
-
Create a virtual machine:
gcloud beta compute --project=${GOOGLE_CLOUD_PROJECT} \ instances create ${VM_NAME} \ --zone=${VM_ZONE} \ --machine-type=e2-micro \ --subnet=${SUBNET} \ --service-account=${PROJECT_NUMBER}-compute@developer.gserviceaccount.com \ --scopes=https://www.googleapis.com/auth/cloud-platform \ --tags=http-server,https-server \ --image-family=debian-10 \ --image-project=debian-cloud \ --boot-disk-size=10GB \ --boot-disk-device-name=${VM_NAME} \ --metadata=startup-script="sudo apt-get update -y && sudo apt-get install -y jq" This
gcloudcommand creates a new virtual machine using the following parameters:- zone: the zone for the VM instance
- machine-type: e2-micro is a cost-effective, shared core machine type
- subnet: the subnet you created in the apigeex-vpc network
- service-account: the identity attached to the instance
- scopes: the level of access that is provided to the service account on the VM
- tags: a list of tags that are applied to the instance; used to provide default firewall rules and routes
- image-family: the image family to use for the image; the latest non-deprecated image in the family will be used
- image-project: the Google Cloud project hosting the public image family
- boot-disk-size: size of the VM boot disk to be created
- boot-disk-device-name: the name of the created boot disk
- metadata: specifies the startup script to be run; this script installs jq which is used by the tests
For more information about the parameters, you can use the following command:
gcloud compute instances create --help -
Add a firewall rule to allow secure shell (ssh) access to VMs in the network:
gcloud compute --project=${GOOGLE_CLOUD_PROJECT} \ firewall-rules create ${NETWORK}-allow-ssh \ --direction=INGRESS \ --priority=65534 \ --network=${NETWORK} \ --action=ALLOW \ --rules=tcp:22 \ --source-ranges=0.0.0.0/0 This command specifies that incoming requests to SSH to the machine are allowed from any source. SSH sessions still require the user to be authenticated.
-
In Cloud Shell, open an SSH connection to the new VM:
gcloud compute ssh ${VM_NAME} --zone=${VM_ZONE} --force-key-file-overwrite -
For each question asked, click Enter or Return to specify the default input.
Your logged in identity is the owner of the project, so SSH to this machine is allowed.
Your Cloud Shell session is now running inside the VM.
Test the Apigee evaluation org
-
In the VM's shell, set required shell variables:
export PROJECT_NAME=$(gcloud config get-value project) export ORG=${PROJECT_NAME} export INSTANCE_NAME=eval-instance export INSTANCE_IP=$(curl -s -H "Authorization: Bearer $(gcloud auth print-access-token)" -X GET "https://apigee.googleapis.com/v1/organizations/${ORG}/instances/${INSTANCE_NAME}" | jq ".host" --raw-output) export ENV_GROUP_HOSTNAME=$(curl -s -H "Authorization: Bearer $(gcloud auth print-access-token)" -X GET "https://apigee.googleapis.com/v1/organizations/${ORG}/envgroups" | jq ".environmentGroups[0].hostnames[0]" --raw-output) echo "INSTANCE_IP=${INSTANCE_IP}" echo "ENV_GROUP_HOSTNAME=${ENV_GROUP_HOSTNAME}" The environment group hostname is used to route calls to API proxies deployed to an environment in the eval environment group.
-
Call the deployed hello-world API proxy using an internal IP address:
curl -i -k --resolve "${ENV_GROUP_HOSTNAME}:443:${INSTANCE_IP}" \ "https://${ENV_GROUP_HOSTNAME}/hello-world" The --resolve setting forces commands sent to the environment group hostname to resolve to the instance's load balancer IP address, since there is no DNS entry for the environment group hostname. The -k option skips verification of the TLS certificate presented by the instance's load balancer.
This
curlcommand uses a virtual machine connected to the peered network to call the internal IP address of the runtime's load balancer. Thecurlcommand returns the output from the hello-world proxy:Hello, Guest!
Click Check my progress to verify the objective.
Task 5. Test the Apigee evaluation org using external access
In this task, you test that a proxy in the Apigee evaluation org can be called from an external IP address.
The Access Routing step of the provisioning process creates the infrastructure necessary to call your API proxies from external IP addresses. The provisioning wizard creates an external load balancer that calls the runtime through a managed instance group.
Explore the created infrastructure
-
In the console, navigate to Network services > Load balancing.
A load balancer named apigee-proxy-url-map was created.
-
Click apigee-proxy-url-map.
The load balancer configuration sections includes the Frontend, Host and path rules, and the Backend.
The Frontend specifies details about incoming traffic. This load balancer should be accepting HTTPS traffic on port 443 of an external IP address. The certificate is named apigee-ssl-cert.
The Host and path rules specify which hostnames and URL paths can be used to call a specific backend. In this case, requests containing any hostname and path will be forwarded to the apigee-proxy-backend backend service.
The Backend specifies the service to be called by the load balancer. The apigee-proxy-
instance group contains 2 virtual machines to forward requests to the runtime instance. A global load balancer cannot forward requests to an internal IP address, but the instance group VMs can call an internal IP address. -
To access the certificate details, in the Frontend configuration, click apigee-ssl-cert.
The certificate used by the load balancer, when active, has a certificate chain that allows curl to call the load balancer without skipping certificate validation. The domain for the certificate is [IP_ADDRESS].nip.io, where the IP address is the frontend external IP address.
Google Cloud needs to provision the certificate, and it may take a significant period of time to complete the provisioning.
The configuration for an active certificate looks like this:
If the certificate's status is PROVISIONING, Google Cloud may have created the certificate but is still working with the Certificate Authority to sign it.
Provisioning typically takes under 10 minutes, but may take up to an hour. Refer to the Managed status troubleshooting guide for details.
-
In Cloud Shell, open a new tab by clicking Open a new tab (+).
The Cloud Shell cannot call private IP addresses in the Google Cloud project.
-
Call the deployed hello-world API proxy using an external IP address:
export PROJECT_NAME=$(gcloud config get-value project) export SSL_HOSTNAME=$(curl -s -H "Authorization: Bearer $(gcloud auth print-access-token)" -X GET "https://compute.googleapis.com/compute/v1/projects/${PROJECT_NAME}/global/sslCertificates/apigee-ssl-cert" | jq ".managed.domains[0]" --raw-output) echo "SSL_HOSTNAME=${SSL_HOSTNAME}" curl "https://${SSL_HOSTNAME}/hello-world" The sslCertificates.get method of the Compute Engine API is used to retrieve the nip.io hostname that is associated with the certificate.
If the certificate is fully provisioned, the curl command again returns the output from the hello-world proxy:
Hello, Guest!If the curl command returns a handshake failure, the SSL certificate is not yet configured for the load balancer.
-
Return to the certificate details page and check the status of the certificate. If the certificate's status is still not ACTIVE, wait for the certificate to become active and then retry the curl command.

Congratulations!
In this lab, you created a Virtual Private Cloud (VPC) network and an Apigee X evaluation org. You then created a virtual machine (VM) and used it to call the runtime directly, calling an API proxy running on the Apigee X org. Finally, you enabled internet access and called the proxy through a global load balancer.
Next steps / learn more
Google Cloud training and certification
...helps you make the most of Google Cloud technologies. Our classes include technical skills and best practices to help you get up to speed quickly and continue your learning journey. We offer fundamental to advanced level training, with on-demand, live, and virtual options to suit your busy schedule. Certifications help you validate and prove your skill and expertise in Google Cloud technologies.
Manual last updated February 16, 2024 Lab last tested November 01, 2022
Copyright 2024 Google LLC All rights reserved. Google and the Google logo are trademarks of Google LLC. All other company and product names may be trademarks of the respective companies with which they are associated.