Overview
In this lab, you set up a continuous integration/continuous
deployment (CI/CD) pipeline for processing data by implementing CI/CD methods
with managed products on Google Cloud. Data scientists and
engineers can adapt the methodologies from CI/CD practices to help ensure the
high quality, maintainability, and adaptability of data processes and
workflows. The methods that you can apply
are as follows:
- Version control of source code.
- Automatic building, testing, and deployment of apps.
- Environment isolation and separation from production.
- Replicable procedures for environment setup.
Deployment architecture
In this lab, you use the following Google Cloud products:
-
Cloud Build
to create a CI/CD pipeline for building, deploying, and testing a
data-processing workflow, and the data processing itself.
Cloud Build is a managed service that runs your build on
Google Cloud. A build is a series of build steps where each step is run
in a Docker container.
-
Cloud Composer
to define and run the steps of the workflow, such as starting the data
processing, testing, and verifying results. Cloud Composer is a managed
Apache Airflow
service, which offers an environment where you can create, schedule, monitor,
and manage complex workflows, such as the data-processing workflow in this
lab.
-
Dataflow
to run the Apache Beam
WordCount
example as a sample data process.
Setup and requirements
For each lab, you get a new Google Cloud project and set of resources for a fixed time at no cost.
-
Click the Start Lab button. If you need to pay for the lab, a pop-up opens for you to select your payment method.
On the left is the Lab Details panel with the following:
- The Open Google Cloud console button
- Time remaining
- The temporary credentials that you must use for this lab
- Other information, if needed, to step through this lab
-
Click Open Google Cloud console (or right-click and select Open Link in Incognito Window if you are running the Chrome browser).
The lab spins up resources, and then opens another tab that shows the Sign in page.
Tip: Arrange the tabs in separate windows, side-by-side.
Note: If you see the Choose an account dialog, click Use Another Account.
-
If necessary, copy the Username below and paste it into the Sign in dialog.
{{{user_0.username | "Username"}}}
You can also find the Username in the Lab Details panel.
-
Click Next.
-
Copy the Password below and paste it into the Welcome dialog.
{{{user_0.password | "Password"}}}
You can also find the Password in the Lab Details panel.
-
Click Next.
Important: You must use the credentials the lab provides you. Do not use your Google Cloud account credentials.
Note: Using your own Google Cloud account for this lab may incur extra charges.
-
Click through the subsequent pages:
- Accept the terms and conditions.
- Do not add recovery options or two-factor authentication (because this is a temporary account).
- Do not sign up for free trials.
After a few moments, the Google Cloud console opens in this tab.
Note: To view a menu with a list of Google Cloud products and services, click the Navigation menu at the top-left, or type the service or product name in the Search field.

Activate Google Cloud Shell
Google Cloud Shell is a virtual machine that is loaded with development tools. It offers a persistent 5GB home directory and runs on the Google Cloud.
Google Cloud Shell provides command-line access to your Google Cloud resources.
-
In Cloud console, on the top right toolbar, click the Open Cloud Shell button.

-
Click Continue.
It takes a few moments to provision and connect to the environment. When you are connected, you are already authenticated, and the project is set to your PROJECT_ID. For example:

gcloud is the command-line tool for Google Cloud. It comes pre-installed on Cloud Shell and supports tab-completion.
- You can list the active account name with this command:
gcloud auth list
Output:
Credentialed accounts:
- @.com (active)
Example output:
Credentialed accounts:
- google1623327_student@qwiklabs.net
- You can list the project ID with this command:
gcloud config list project
Output:
[core]
project =
Example output:
[core]
project = qwiklabs-gcp-44776a13dea667a6
Note:
Full documentation of gcloud is available in the
gcloud CLI overview guide
.
The CI/CD pipeline
At a high level, the CI/CD pipeline consists of the following steps:
- Cloud Build packages the WordCount sample into a
self-running Java Archive (JAR) file using the
Maven builder.
The Maven builder is a container with Maven installed in it. When a build step
is configured to use the Maven builder, Maven runs the tasks.
- Cloud Build uploads the JAR file to Cloud Storage.
- Cloud Build runs unit tests on the data-processing workflow
code and deploys the workflow code to Cloud Composer.
- Cloud Composer picks up the JAR file and runs the
data-processing job on Dataflow.
The following diagram shows a detailed view of the CI/CD pipeline steps.
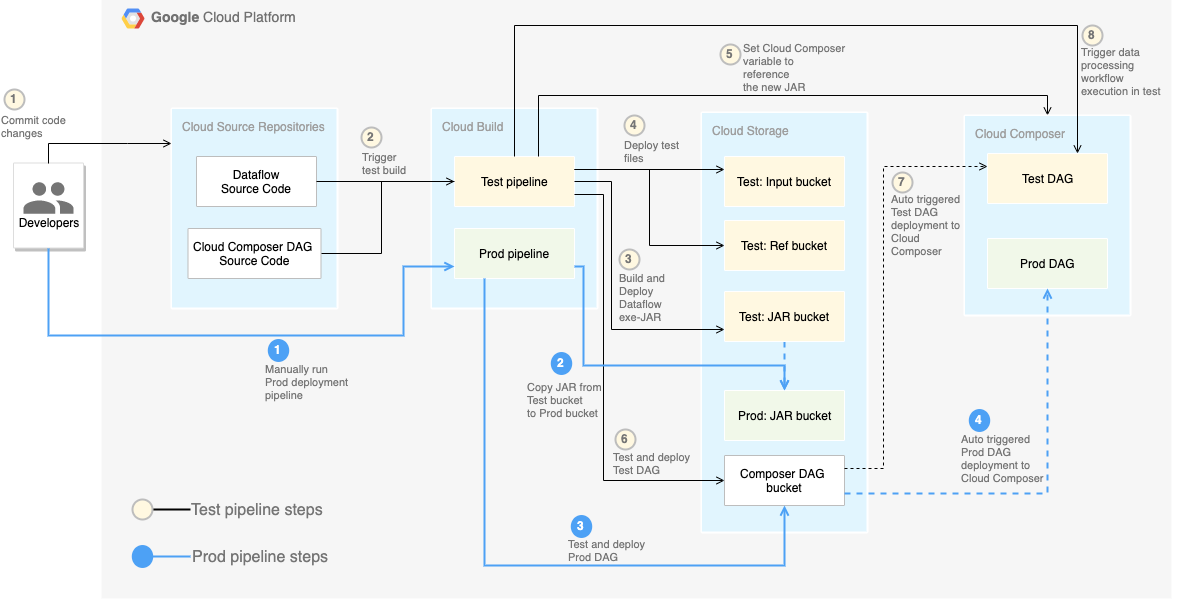
In this lab, the deployments to the test and production environments are
separated into two different Cloud Build pipelines: a test pipeline and a
production pipeline.
In the preceding diagram, the test pipeline consists of the following steps:
- A developer commits code changes to the Cloud Source Repositories.
- Code changes trigger a test build in Cloud Build.
- Cloud Build builds the self-executing JAR file and deploys it to
the test JAR bucket on Cloud Storage.
- Cloud Build deploys the test files to the test-file buckets on
Cloud Storage.
- Cloud Build sets the variable in Cloud Composer to
reference the newly deployed JAR file.
- Cloud Build tests the data-processing workflow
Directed acyclic graph
(DAG) and deploys it to the Cloud Composer bucket on
Cloud Storage.
- The workflow DAG file is deployed to Cloud Composer.
- Cloud Build triggers the newly deployed data-processing
workflow to run.
To completely separate the environments, you need multiple Cloud Composer
environments created in different projects, which are by default separated from
each other. This separation helps to secure your production environment. This
approach is outside the scope of this lab. For more information about how to access resources across multiple Google Cloud projects, see Setting service account permissions.
The data-processing workflow
The instructions for how Cloud Composer runs the data-processing
workflow are defined in a
Directed acyclic graph
(DAG) written in Python. In the DAG, all the steps of the data-processing
workflow are defined together with the dependencies between them.
The CI/CD pipeline automatically deploys the DAG definition from
Cloud Source Repositories to Cloud Composer in each build. This process
ensures that
Cloud Composer is always up to date with the latest workflow definition
without needing any human intervention.
In the DAG definition for the test environment, an end-to-end test step is
defined in addition to the data-processing workflow. The test step helps make sure that the
data-processing workflow runs correctly.
The data-processing workflow is illustrated in the following diagram.
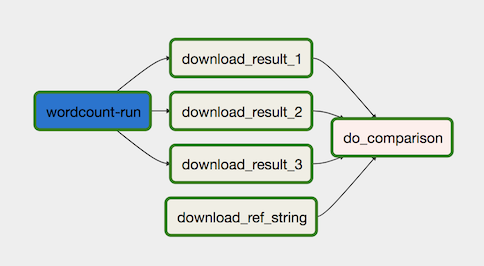
The data-processing workflow consists of the following steps:
-
Run the WordCount data process in Dataflow.
-
Download the output files from the WordCount process. The WordCount
process outputs three files:
download_result_1download_result_2download_result_3
-
Download the reference file, called download_ref_string.
-
Verify the result against the reference file. This integration test
aggregates all three results and compares the aggregated results with the
reference file.
Using a task-orchestration framework such as Cloud Composer to manage
the data-processing workflow helps alleviate the code complexity of the
workflow.
The tests
In addition to the integration test that verifies the data-processing workflow
from end to end, there are two unit tests in this lab. The unit tests are
automatic tests on the data-processing code and the data-processing workflow
code. The test on the data-processing code is written in Java and runs
automatically during the Maven build process. The test on the data-processing
workflow code is written in Python and runs as an independent build step.
Sample code
The sample code is in two folders:
-
The env-setup folder contains shell scripts for the initial setup of
the Google Cloud environment.
-
The source-code folder contains code that is developed over time,
needs to be source controlled, and triggers automatic build and test
processes. This folder contains the following subfolders:
- The
data-processing-code folder contains the Apache Beam
process source code.
- The
workflow-dag folder contains the composer DAG definitions
for the data-processing workflows with the steps to design, implement,
and test the Dataflow process.
- The
build-pipeline folder contains two Cloud Build
configurations — one for the test pipeline and the other for the
production pipeline. This folder also contains a support script for the
pipelines.
For the purpose of this lab, the source code files for data processing and
for DAG workflow are in different folders in the same source code repository.
In a production environment, the source code files are usually in their own
source code repositories and are managed by different teams.
Task 1. Setting up your environment
In this lab, you run all commands in
Cloud Shell.
Cloud Shell appears as a window at the bottom of the Google Cloud console.
-
In the Cloud console, open Cloud Shell.
-
Clone the sample code repository:
git clone https://github.com/GoogleCloudPlatform/ci-cd-for-data-processing-workflow.git
-
Navigate to the directory that contains the sample files for this lab:
cd ~/ci-cd-for-data-processing-workflow/env-setup
-
Update the region in the file set_env.sh using the sed command.
sed -i "s/us-central1-a/{{{project_0.default_zone|Zone}}}/g" set_env.sh
sed -i "s/us-central1/{{{project_0.default_region|Region}}}/g" set_env.sh
-
Run a script to set environment variables:
source set_env.sh
The script sets the following environment variables:
- Your Google Cloud project ID
- Your region and zone
- The name of your Cloud Storage buckets that are used by the
build pipeline and the data-processing workflow.
Because environment variables aren't retained between sessions, if your
Cloud Shell session shuts down or
disconnects while you are working through the lab, you need to reset
the environment variables.
-
Add the logging option to the yaml file:
echo -e "\noptions:\n logging: CLOUD_LOGGING_ONLY" >> ~/ci-cd-for-data-processing-workflow/source-code/build-pipeline/build_deploy_test.yaml
-
Update the pipeline script:
sed -i 's/project=project/project_id=project/' ~/ci-cd-for-data-processing-workflow/source-code/workflow-dag/data-pipeline-test.py
Task 2. Creating the Cloud Composer environment
Ensure that the Cloud Composer API is successfully enabled
To ensure access to the necessary APIs, restart the connection to the Cloud Composer API.
-
In the Google Cloud console, enter Cloud Composer API in the top search bar, then click on the result for Cloud Composer API.
-
Click Manage.
-
Click Disable API.
If asked to confirm, click Disable.
- Click Enable.
When the API has been enabled again, the page will show the option to disable.
Create a Cloud Composer environment
-
In Cloud Shell, run the following to create a Cloud Composer environment:
gcloud composer environments create $COMPOSER_ENV_NAME \
--location $COMPOSER_REGION \
--image-version composer-3-airflow-2
Note: It generally takes ~15 minutes for the command to complete creation of Cloud Composer. Please wait for Composer to be ready before proceeding.
When the command completes, you can verify it in Google Cloud.
-
Run a script to set the variables in the Cloud Composer
environment. The variables are needed for the data-processing DAGs.
cd ~/ci-cd-for-data-processing-workflow/env-setup
chmod +x set_composer_variables.sh
./set_composer_variables.sh
The script sets the following environment variables:
- Your Google Cloud project ID
- Your region and zone
- The name of your Cloud Storage buckets that are used by the
build pipeline and the data-processing workflow.
Extract the Cloud Composer environment properties
Cloud Composer uses a Cloud Storage bucket to store DAGs.
Moving a DAG definition file to the bucket triggers Cloud Composer to
automatically read the files. You created the Cloud Storage bucket
for Cloud Composer when you created the Cloud Composer
environment.
In the following procedure, you extract the URL for the buckets, and
then configure
your CI/CD pipeline to automatically deploy DAG definitions to the
Cloud Storage bucket.
-
In Cloud Shell, export the URL for the bucket as an environment
variable:
export COMPOSER_DAG_BUCKET=$(gcloud composer environments describe $COMPOSER_ENV_NAME \
--location $COMPOSER_REGION \
--format="get(config.dagGcsPrefix)")
-
Export the name of the service account that Cloud Composer uses
in order to have access to the Cloud Storage buckets:
export COMPOSER_SERVICE_ACCOUNT=$(gcloud composer environments describe $COMPOSER_ENV_NAME \
--location $COMPOSER_REGION \
--format="get(config.nodeConfig.serviceAccount)")
Task 3. Creating the Cloud Storage buckets
In this section, you create a set of Cloud Storage buckets to store the
following:
- Artifacts of the intermediate steps of the build process.
- The input and output files for the data-processing workflow.
- The staging location for the Dataflow jobs to store their
binary files.
To create the Cloud Storage buckets, complete the following step:
Click Check my progress to verify the objective.
Creating the Cloud Storage buckets
Task 4. Pushing the source code to Cloud Source Repositories
In this lab, you have one source code base that you need to put into
version control. The following step shows how a code base is developed and
changes over time. Whenever changes are pushed to the repository, the pipeline
to build, deploy, and test is triggered.
-
In Cloud Shell, push the source-code folder to
Cloud Source Repositories:
gcloud source repos create $SOURCE_CODE_REPO
cp -r ~/ci-cd-for-data-processing-workflow/source-code ~/$SOURCE_CODE_REPO
cd ~/$SOURCE_CODE_REPO
git config --global credential.'https://source.developers.google.com'.helper gcloud.sh
git config --global user.email $(gcloud config list --format 'value(core.account)')
git config --global user.name $(gcloud config list --format 'value(core.account)')
git init
git remote add google \
https://source.developers.google.com/p/$GCP_PROJECT_ID/r/$SOURCE_CODE_REPO
git add .
git commit -m 'initial commit'
git push google master
These are standard commands to initialize Git in a new directory and
push the content to a remote repository.
Click Check my progress to verify the objective.
Pushing the source code to Cloud Source Repositories
Task 5. Creating Cloud Build pipelines
In this section, you create the build pipelines that build, deploy, and test
the data-processing workflow.
Create the build and test pipeline
The build and test pipeline steps are configured in the
YAML configuration file.
In this lab, you use prebuilt
builder images
for git, maven, gsutil, and gcloud to run the tasks in each build step.
You use configuration variable
substitutions
to define the environment settings at build time. The source code repository
location is defined by variable substitutions, as well as the locations of
Cloud Storage buckets. The build needs this information to deploy the
JAR file, test files, and the DAG definition.
-
In Cloud Shell, submit the build pipeline configuration file to
create the pipeline in Cloud Build:
cd ~/ci-cd-for-data-processing-workflow/source-code/build-pipeline
gcloud builds submit --config=build_deploy_test.yaml --substitutions=\
REPO_NAME=$SOURCE_CODE_REPO,\
_DATAFLOW_JAR_BUCKET=$DATAFLOW_JAR_BUCKET_TEST,\
_COMPOSER_INPUT_BUCKET=$INPUT_BUCKET_TEST,\
_COMPOSER_REF_BUCKET=$REF_BUCKET_TEST,\
_COMPOSER_DAG_BUCKET=$COMPOSER_DAG_BUCKET,\
_COMPOSER_ENV_NAME=$COMPOSER_ENV_NAME,\
_COMPOSER_REGION=$COMPOSER_REGION,\
_COMPOSER_DAG_NAME_TEST=$COMPOSER_DAG_NAME_TEST
This command instructs Cloud Build to run a build with the
following steps:
-
Build and deploy the WordCount self-executing JAR file.
- Check out the source code.
- Compile the WordCount Beam source code into a self-executing JAR
file.
- Store the JAR file on Cloud Storage where it can be
picked up by Cloud Composer to run the WordCount processing
job.
-
Deploy and set up the data-processing workflow on
Cloud Composer.
- Run the unit test on the custom-operator code used by the workflow
DAG.
- Deploy the test input file and the test reference file on
Cloud Storage. The test input file is the input for the
WordCount processing job. The test reference file is used as a
reference to verify the output of the WordCount processing job.
- Set the Cloud Composer variables to point to the newly
built JAR file.
- Deploy the workflow DAG definition to the
Cloud Composer environment.
-
Run the data-processing workflow in the test environment to trigger the
test-processing workflow.
Verify the build and test pipeline
After you submit the build file, verify the build steps.
-
In the Cloud console, go to the Build History page to view
a list of all past and currently running builds.
-
Click the build that is currently running.
-
On the Build details page, verify that the build steps match the
previously described steps.

On the Build details page, the Status field of the build
says Build successful when the build finishes.
Note:
If the build fails, run the build again one more time.
-
In Cloud Shell, verify that the WordCount sample JAR file was
copied into the correct bucket:
gsutil ls gs://$DATAFLOW_JAR_BUCKET_TEST/dataflow_deployment*.jar
The output is similar to the following:
gs://…-composer-dataflow-source-test/dataflow_deployment_e88be61e-50a6-4aa0-beac-38d75871757e.jar
-
Get the URL to your Cloud Composer web interface. Make a note
of the URL because it's used in the next step.
gcloud composer environments describe $COMPOSER_ENV_NAME \
--location $COMPOSER_REGION \
--format="get(config.airflowUri)"
-
Use the URL from the previous step to go to the Cloud Composer
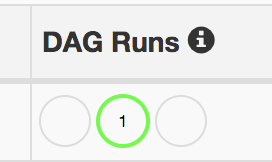
UI to verify a successful DAG run. You can also click on the Airflow Webserver link from the Composer page. If the Dag Runs column doesn't
display any information, wait a few minutes and reload the page.
-
To verify that the data-processing workflow DAG
test_word_count is deployed and is in running mode, hold the pointer
over the light-green circle below DAG Runs and verify that it
says Running.
-
To see the running data-processing workflow as a graph, click
the light-green circle, and then on the Dag Runs page, click Dag
Id: test_word_count.
-
Reload the Graph View page to update the state of the
current DAG run. It usually takes between three to five minutes for the
workflow to finish. To verify that the DAG run finishes successfully,
hold the pointer over each task to verify that the tooltip says
State: success. The last task, named do_comparison, is the
integration test that verifies the process output against the reference
file.
Note: Ignore the do_comparison or the publish_test_complete task issue in the test_word_count dag if you see the status of either of these tasks as failed.
If the DAG run fails, trigger another DAG run using the following steps:
- On the DAGs page, in the
test_word_count row, click Trigger Dag. 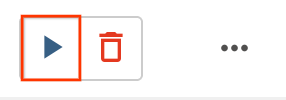
Click Check my progress to verify the objective.
Creating Cloud Build pipelines
Create the production pipeline
When the test processing workflow runs successfully, you can promote the
current version of the workflow to production. There are several ways to deploy
the workflow to production:
- Manually.
- Automatically triggered when all the tests pass in the test or staging
environments.
- Automatically triggered by a scheduled job.
The automatic approaches are beyond the scope of this lab. For more
information, refer to
Release Engineering.
In this lab, you do a manual deployment to production by running the
Cloud Build production deployment build. The production deployment
build follows these steps:
- Copy the WordCount JAR file from the test bucket to the production bucket.
- Set the Cloud Composer variables for the production workflow to
point to the newly promoted JAR file.
- Deploy the production workflow DAG definition on the
Cloud Composer environment and running the workflow.
Variable substitutions define the name of the latest JAR file that is
deployed to production with the Cloud Storage buckets used by the
production processing workflow. To create the Cloud Build pipeline
that deploys the production airflow workflow, complete the following steps:
-
In Cloud Shell, read the filename of the latest JAR file
by printing the Cloud Composer variable for the JAR filename:
export DATAFLOW_JAR_FILE_LATEST=$(gcloud composer environments run $COMPOSER_ENV_NAME \
--location $COMPOSER_REGION variables \
-- \
get dataflow_jar_file_test | grep -i '.jar')
-
Use the build pipeline configuration file, deploy_prod.yaml, to
create the pipeline in Cloud Build:
cd ~/ci-cd-for-data-processing-workflow/source-code/build-pipeline
gcloud builds submit --config=deploy_prod.yaml --substitutions=\
REPO_NAME=$SOURCE_CODE_REPO,\
_DATAFLOW_JAR_BUCKET_TEST=$DATAFLOW_JAR_BUCKET_TEST,\
_DATAFLOW_JAR_FILE_LATEST=$DATAFLOW_JAR_FILE_LATEST,\
_DATAFLOW_JAR_BUCKET_PROD=$DATAFLOW_JAR_BUCKET_PROD,\
_COMPOSER_INPUT_BUCKET=$INPUT_BUCKET_PROD,\
_COMPOSER_ENV_NAME=$COMPOSER_ENV_NAME,\
_COMPOSER_REGION=$COMPOSER_REGION,\
_COMPOSER_DAG_BUCKET=$COMPOSER_DAG_BUCKET,\
_COMPOSER_DAG_NAME_PROD=$COMPOSER_DAG_NAME_PROD
Verify the data-processing workflow created by the production pipeline
-
Get the URL for your Cloud Composer UI:
gcloud composer environments describe $COMPOSER_ENV_NAME \
--location $COMPOSER_REGION \
--format="get(config.airflowUri)"
-
To verify that the production data-processing workflow DAG is deployed,
go to the URL that you retrieved in the previous step and verify that
prod_word_count DAG is in the list of DAGs.
-
On the DAGs page, in the prod_word_count row, click Trigger Dag.
-
Reload the page to update the DAG run status. To verify that the production
data-processing workflow DAG is deployed and is in running mode, hold the
pointer over the light-green circle below DAG Runs and verify that it
says Running.
-
After the run succeeds, hold the pointer over the dark-green circle below the DAG runs
column and verify that it says Success.
-
In Cloud Shell, list the result files in the Cloud Storage
bucket:
gsutil ls gs://$RESULT_BUCKET_PROD
The output is similar to the following:
gs://…-composer-result-prod/output-00000-of-00003
gs://…-composer-result-prod/output-00001-of-00003
gs://…-composer-result-prod/output-00002-of-00003
Note: Typically, the production data workflow job execution is either
triggered by events, such as files being stored in buckets, or is scheduled to run on a regular basis. It's important that the deployment job ensures that production data workflow isn't currently running before you deploy.
In a production environment, you can use dags of the Airflow CLI commands to retrieve the status of a DAG run.
Click Check my progress to verify the objective.
Create the production pipeline
Task 6. Configuring a build trigger
You set up a
Cloud Build trigger
that triggers a new build when changes are pushed to the master branch of the
source repository.
-
In Cloud Shell, run the following command to get all the
substitution variables needed for the build. Make a note of these values
because they are needed in a later step.
echo "_DATAFLOW_JAR_BUCKET : ${DATAFLOW_JAR_BUCKET_TEST}
_COMPOSER_INPUT_BUCKET : ${INPUT_BUCKET_TEST}
_COMPOSER_REF_BUCKET : ${REF_BUCKET_TEST}
_COMPOSER_DAG_BUCKET : ${COMPOSER_DAG_BUCKET}
_COMPOSER_ENV_NAME : ${COMPOSER_ENV_NAME}
_COMPOSER_REGION : ${COMPOSER_REGION}
_COMPOSER_DAG_NAME_TEST : ${COMPOSER_DAG_NAME_TEST}"
-
In the Cloud console, go to the Build triggers page: Build Triggers page.
-
Click Create trigger.
-
To configure trigger settings, complete the following steps:
- In the Name field, enter
Trigger build in test environment.
- For Event, click Push to a branch.
- Select the Repository as
data-pipeline-source (Cloud Source Repositories).
- Select the Branch field as
^master$.
- For Configuration, click Cloud Build configuration
file (yaml or json).
- In the Cloud Build configuration file location field, enter
build-pipeline/build_deploy_test.yaml.
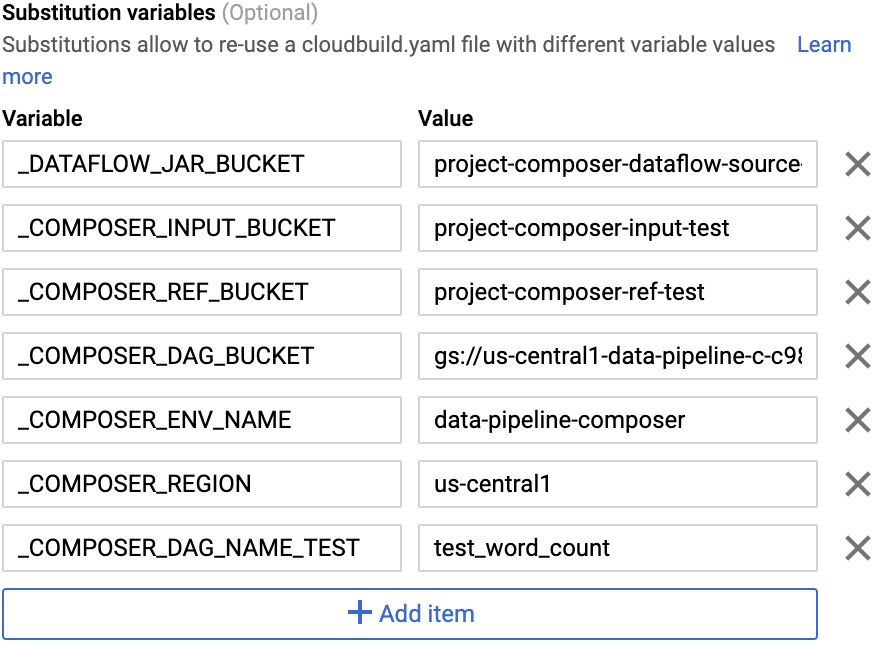
-
In the Advanced field, replace the
variables with the values from your environment that you got from the earlier
step. Add the following one at a time and click +ADD VARIABLE for each of
the name-value pairs:
-
_DATAFLOW_JAR_BUCKET
-
_COMPOSER_INPUT_BUCKET
-
_COMPOSER_REF_BUCKET
-
_COMPOSER_DAG_BUCKET
-
_COMPOSER_ENV_NAME
-
_COMPOSER_REGION
-
_COMPOSER_DAG_NAME_TEST
-
For Service account Select xxxxxxx-compute@developer.gserviceaccount.com.
-
Click Create.
Click Check my progress to verify the objective.
Configuring a build trigger
Test the trigger
To test the trigger, you add a new word to the test input file and make the
corresponding adjustment to the test reference file. You verify that the build
pipeline is triggered by a commit push to Cloud Source Repositories and that the
data-processing workflow runs correctly with the updated test files.
-
In Cloud Shell, add a test word at the end of the test file:
echo "testword" >> ~/$SOURCE_CODE_REPO/workflow-dag/support-files/input.txt
-
Update the test result reference file, ref.txt, to match the changes
done in the test input file:
echo "testword: 1" >> ~/$SOURCE_CODE_REPO/workflow-dag/support-files/ref.txt
-
Commit and push changes to Cloud Source Repositories:
cd ~/$SOURCE_CODE_REPO
git add .
git commit -m 'change in test files'
git push google master
-
In the Cloud console, go to the History page: History page.
-
To verify that a new build is triggered by the previous push to master
branch, on the current running build, the Trigger column says
Push to master branch.
-
In Cloud Shell, get the URL for your Cloud Composer web
interface:
gcloud composer environments describe $COMPOSER_ENV_NAME \
--location $COMPOSER_REGION --format="get(config.airflowUri)"
-
After the build finishes, go to the URL from the previous command to
verify that the test_word_count DAG is running.
Wait until the DAG run finishes, which is indicated when the light
green circle in the DAG runs column goes away. It usually takes between
three to five minutes for the process to finish.
Note: Ignore the do_comparison task issue in the test_word_count dag.
-
In Cloud Shell, download the test result files:
mkdir ~/result-download
cd ~/result-download
gsutil cp gs://$RESULT_BUCKET_TEST/output* .
-
Verify that the newly added word is in one of the result files:
grep testword output*
The output is similar to the following:
output-00000-of-00003:testword: 1
Click Check my progress to verify the objective.
Test the trigger
Congratulations
End your lab
When you have completed your lab, click End Lab. Google Cloud Skills Boost removes the resources you’ve used and cleans the account for you.
You will be given an opportunity to rate the lab experience. Select the applicable number of stars, type a comment, and then click Submit.
The number of stars indicates the following:
- 1 star = Very dissatisfied
- 2 stars = Dissatisfied
- 3 stars = Neutral
- 4 stars = Satisfied
- 5 stars = Very satisfied
You can close the dialog box if you don't want to provide feedback.
For feedback, suggestions, or corrections, please use the Support tab.
Copyright 2022 Google LLC All rights reserved. Google and the Google logo are trademarks of Google LLC. All other company and product names may be trademarks of the respective companies with which they are associated.


