JSON payloads can be crafted to cause problems when loaded into JSON parsers. In this lab, you learn how to protect against this type of payload.
Objectives
In this lab, you learn how to perform the following task:
Use the JSONThreatProtection policy to protect your API proxy against malicious JSON payloads.
Setup
For each lab, you get a new Google Cloud project and set of resources for a fixed time at no cost.
Sign in to Qwiklabs using an incognito window.
Note the lab's access time (for example, 1:15:00), and make sure you can finish within that time.
There is no pause feature. You can restart if needed, but you have to start at the beginning.
When ready, click Start lab.
Note your lab credentials (Username and Password). You will use them to sign in to the Google Cloud Console.
Click Open Google Console.
Click Use another account and copy/paste credentials for this lab into the prompts.
If you use other credentials, you'll receive errors or incur charges.
Accept the terms and skip the recovery resource page.
Activate Google Cloud Shell
Google Cloud Shell is a virtual machine that is loaded with development tools. It offers a persistent 5GB home directory and runs on the Google Cloud.
Google Cloud Shell provides command-line access to your Google Cloud resources.
In Cloud console, on the top right toolbar, click the Open Cloud Shell button.
Click Continue.
It takes a few moments to provision and connect to the environment. When you are connected, you are already authenticated, and the project is set to your PROJECT_ID. For example:
gcloud is the command-line tool for Google Cloud. It comes pre-installed on Cloud Shell and supports tab-completion.
You can list the active account name with this command:
[core]
project = qwiklabs-gcp-44776a13dea667a6
Note:
Full documentation of gcloud is available in the
gcloud CLI overview guide
.
Preloaded assets
These assets have already been added to the Apigee organization:
The retail-v1 API proxy
The oauth-v1 API proxy (for generating OAuth tokens)
The TS-Retail target server in the eval environment (used by retail-v1)
These assets will be added to the Apigee organization as soon as the runtime is available:
The API products, developer, and developer app (used by retail-v1)
The highlighted items are used during this lab.
Note:
Revision 1 of the retail-v1 proxy is marked as deployed, and is immutable. If you ever make a mistake in your proxy code that you can't recover from, you can select revision 1 and restart editing from there.
JSON payloads can be crafted to cause issues when they are parsed. The JSONThreatProtection policy can check a JSON payload against configured limits without loading the payload into a parser.
Note: The JSONThreatProtection policy in this API proxy will only be used to validate the JSON payload when an order is being created. In a typical API, you should consider using JSON threat protection any time you allow JSON as an input.
Pin the Apigee console page
In the Google Cloud console, on the Navigation menu (), look for Apigee in the Pinned Products section.
The Apigee console page will open.
If Apigee is not pinned, search for Apigee in the top search bar and navigate to the Apigee service.
Hover over the name, then click the pin icon ().
The Apigee console page will now be pinned to the Navigation menu.
Add the JSONThreatProtection policy
On the left navigation menu, select Proxy development > API proxies.
Select the retail-v1 proxy.
Click the Develop tab.
You are modifying the version of the retail-v1 proxy that was created during Labs 1 through 4.
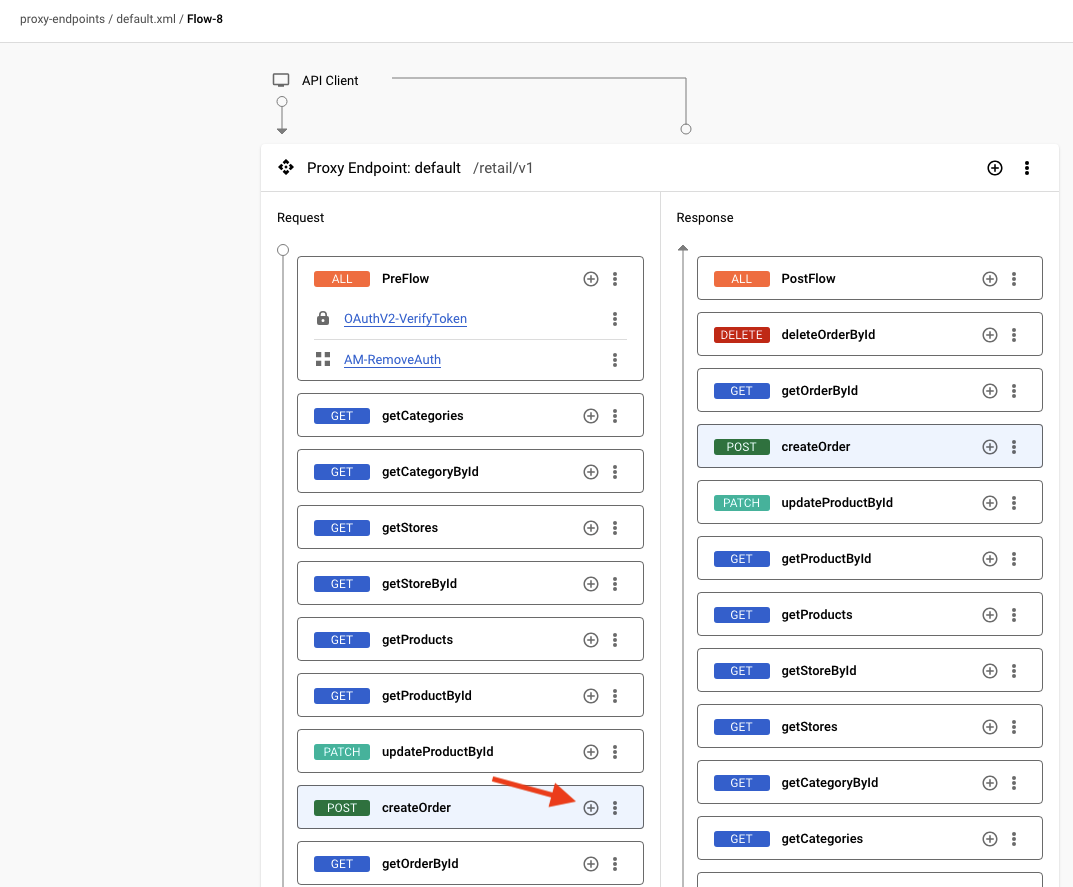
Select Proxy endpoints > default > createOrder.
The createOrder flow is selected.
On the Request createOrder flow, click Add Policy Step (+).
Note: The JSONThreatProtection policy checks payloads without loading the payload into a JSON parser. This policy should be run before any policies that use the JSON parser. For example, an ExtractVariables policy that uses JSONPath to retrieve information from the request should be placed later in the flow than the JSONThreatProtection policy.
In the Add policy step pane, select Create new policy, and then select Security > JSON Threat Protection.
The Source is set to request, so the incoming request's payload will be validated.
The numbers indicate limits that should be enforced for the structure of JSON payloads. For example, ContainerDepth indicates how many levels deep your objects and arrays can go. An object (1) containing an array (2) which contains objects (3) would have a ContainerDepth of 3. This policy configuration only allows a ContainerDepth of 2, so the request would be rejected.
Note: The values for this policy are set very low so that you can easily test JSON payloads against the limits. In practice, your values would be significantly higher.
To save the updates, click Save, and then click Save as New Revision.
Click Deploy.
To specify that you want the new revision deployed to the eval environment, select eval as the Environment, and then click Deploy.
Click Confirm.
Task 2. Store the API key in a shell variable
In this task, you store the application's API key in a shell variable.
Wait for app to be available
Navigate to Distribution > Apps.
Check runtime status
Certain assets, including API products, developers, developer apps, and KVMs, cannot be saved until the runtime is available.
For example, when navigating to the API products page, you might see an error message that reads "Products were not loaded successfully."
This is an error you should see when you are waiting for the runtime instance to be available. Once the runtime is available, refreshing the page will remove the error.
If you get this type of error, you can check the status of provisioning.
Check provisioning status
In Cloud Shell, to confirm that the runtime instance has been installed and the eval environment has been attached, run the following commands:
export INSTANCE_NAME=eval-instance; export ENV_NAME=eval; export PREV_INSTANCE_STATE=; echo "waiting for runtime instance ${INSTANCE_NAME} to be active"; while : ; do export INSTANCE_STATE=$(curl -s -H "Authorization: Bearer $(gcloud auth print-access-token)" -X GET "https://apigee.googleapis.com/v1/organizations/${GOOGLE_CLOUD_PROJECT}/instances/${INSTANCE_NAME}" | jq "select(.state != null) | .state" --raw-output); [[ "${INSTANCE_STATE}" == "${PREV_INSTANCE_STATE}" ]] || (echo; echo "INSTANCE_STATE=${INSTANCE_STATE}"); export PREV_INSTANCE_STATE=${INSTANCE_STATE}; [[ "${INSTANCE_STATE}" != "ACTIVE" ]] || break; echo -n "."; sleep 5; done; echo; echo "instance created, waiting for environment ${ENV_NAME} to be attached to instance"; while : ; do export ATTACHMENT_DONE=$(curl -s -H "Authorization: Bearer $(gcloud auth print-access-token)" -X GET "https://apigee.googleapis.com/v1/organizations/${GOOGLE_CLOUD_PROJECT}/instances/${INSTANCE_NAME}/attachments" | jq "select(.attachments != null) | .attachments[] | select(.environment == \"${ENV_NAME}\") | .environment" --join-output); [[ "${ATTACHMENT_DONE}" != "${ENV_NAME}" ]] || break; echo -n "."; sleep 5; done; echo "***ORG IS READY TO USE***";
When the script returns ORG IS READY TO USE, you can proceed to the next steps.
The eval environment in the Apigee organization can be called using the hostname eval.example.com. The DNS entry for this hostname has been created within your project, and it resolves to the IP address of the Apigee runtime instance. This DNS entry has been created in a private zone, which means it is only visible on the internal network.
Cloud Shell does not reside on the internal network, so Cloud Shell commands cannot resolve this DNS entry. A virtual machine (VM) within your project can access the private zone DNS. A virtual machine named apigeex-test-vm was automatically created for this purpose. You can make API proxy calls from this machine.
The curl command will be used to send API requests to an API proxy. The -k option for curl tells it to skip verification of the TLS certificate. For this lab, the Apigee runtime uses a self-signed certificate. For a production environment, you should use certificates that have been created by a trusted certificate authority (CA).
In Cloud Shell, open a new tab, and then open an SSH connection to your test VM:
This command retrieves a Google Cloud access token for the logged-in user, sending it as a Bearer token to the Apigee API call. It retrieves the retail-app app details as a JSON response, which is parsed by jq to retrieve the app's key. That key is then put into the API_KEY environment variable, and the export command is concatenated onto the .bashrc file which runs automatically when starting a the SSH session.
Note:
If you run the command and it shows API_KEY=null, the runtime instance is probably not yet available.
Task 3. Send requests and modify the limits
In this task, you send requests and relax the limits of your policy until the request is allowed past the JSONThreatProtection policy.
Send a request
To install the required package, you can use the following command:
sudo apt-get install perl -y
In the Cloud Shell SSH session, execute this curl command:
This returns the error message Invalid ApiKey for given resource.
Joe's app is associated with the read-only API product. We are now trying to do a POST, which requires the full access product.
Return to the Apigee console tab.
Navigate to Distribution > Apps.
Select Joe's retail app.
Update the app's API product
Click Edit.
In the Credentials section, for Credential, click the edit icon ().
In the Edit Credential pane, for Products, check retail-readonly and click Remove.
To update the credential, click Add Products and select retail (full access), click Add.
Click Save.
Update the policy configuration until the request passes
Navigate to Proxy development > API Proxies.
Select the retail-v1 proxy, and then click the Develop tab.
Click Policies > JSONTP-Protect.
In the Cloud Shell SSH session, resubmit this command:
curl -k -H "Content-Type: application/json" -H "apikey: ${API_KEY}" -X POST "https://eval.example.com/retail/v1/orders" -d \
'{
"orderNumber": 342345,
"lineItems": [
{ "productId": "ME089LLA", "quantity": 1 },
{ "productId": "MD388LLA", "quantity": 2 }
],
"promisedDeliveryDate": "30 Oct 2024",
"deliveryNotes": "If not home, please place inside backyard gate",
"destination": {
"addressType": "home",
"address": {
"streetAddr1": "1 Main St."
}
}
}' | jq
Note: If you continue to receive the "Invalid ApiKey for given resource" error, this may be because the allowed operations for an API key can be cached for about 3 minutes after they are used. If you have correctly updated the app, and you continue to try the request, you will eventually receive the error from the JSONTP-Protect policy.
You should see a 500 error that looks like this:
{
"fault": {
"detail": {
"errorcode": "steps.jsonthreatprotection.ExecutionFailed"
},
"faultstring": "JSONThreatProtection[JSONTP-Protect]: Execution failed. reason: JSONThreatProtection[JSONTP-Protect]: Exceeded object entry name length at line 2"
}
}
Note: The default status code for the error, 500 Internal Server Error, is typically not appropriate, because this error is not a server error.
The policy is generally used to validate incoming JSON payloads, so rewriting the status code to 400 Bad Request is usually appropriate.
The object entry name on line 2 is orderNumber, which is 11 characters long. Looking at the policy configuration, the ObjectEntryNameLength is set to 10. Note that only the first error is returned when a limit is exceeded, even though there might be multiple errors. The longest object entry name in the payload is promisedDeliveryDate, which is 20 characters long.
Note: You typically should not set limits based exactly on the maximum values that exist now. It is better to be less strict in the limits, so that future valid payloads are less likely to be rejected.
Set the ObjectEntryNameLength in the JSONThreatProtection policy to 30.
Click Save, and then click Save as New Revision.
Click Deploy.
To specify that you want the new revision deployed to the eval environment, click Deploy, and then click Confirm.
The maximum depth in the payload is 3 (object containing an array which contains objects), but the policy only allows a container depth of 2.
Set the ContainerDepth in the JSONThreatProtection policy to 5.
If you look at the payload, you can also see that the maximum string length of 20 is exceeded by the deliveryNotes field.
Set the StringValueLength to 100.
Click Save, and then click Save as New Revision.
Click Deploy.
To specify that you want the new revision deployed to the eval environment, click Deploy, and then click Confirm.
Wait for the updated proxy to be deployed.
Resubmit the curl command.
This time, you should receive a 200 response that resembles this:
{
"name": "-MXBcl-WqjD8tr_Z_9th"
}
The request successfully passed the JSONThreatProtection policy and was sent to the backend.
You can retrieve the order by sending the following curl call, with REPLACE set to the name that was returned by the previous request:
curl -k -H "apikey: ${API_KEY}" -X GET "https://eval.example.com/retail/v1/orders/REPLACE" | jq
Congratulations!
In this lab, you protected the createOrders resource against malicious JSON by using the JSONThreatProtection policy and configuring it with the correct limits.
End your lab
When you have completed your lab, click End Lab. Google Cloud Skills Boost removes the resources you’ve used and cleans the account for you.
You will be given an opportunity to rate the lab experience. Select the applicable number of stars, type a comment, and then click Submit.
The number of stars indicates the following:
1 star = Very dissatisfied
2 stars = Dissatisfied
3 stars = Neutral
4 stars = Satisfied
5 stars = Very satisfied
You can close the dialog box if you don't want to provide feedback.
For feedback, suggestions, or corrections, please use the Support tab.
Copyright 2022 Google LLC All rights reserved. Google and the Google logo are trademarks of Google LLC. All other company and product names may be trademarks of the respective companies with which they are associated.
Los labs crean un proyecto de Google Cloud y recursos por un tiempo determinado
.
Los labs tienen un límite de tiempo y no tienen la función de pausa. Si finalizas el lab, deberás reiniciarlo desde el principio.
En la parte superior izquierda de la pantalla, haz clic en Comenzar lab para empezar
Usa la navegación privada
Copia el nombre de usuario y la contraseña proporcionados para el lab
Haz clic en Abrir la consola en modo privado
Accede a la consola
Accede con tus credenciales del lab. Si usas otras credenciales, se generarán errores o se incurrirá en cargos.
Acepta las condiciones y omite la página de recursos de recuperación
No hagas clic en Finalizar lab, a menos que lo hayas terminado o quieras reiniciarlo, ya que se borrará tu trabajo y se quitará el proyecto
Este contenido no está disponible en este momento
Te enviaremos una notificación por correo electrónico cuando esté disponible
¡Genial!
Nos comunicaremos contigo por correo electrónico si está disponible
Un lab a la vez
Confirma para finalizar todos los labs existentes y comenzar este
Usa la navegación privada para ejecutar el lab
Usa una ventana de navegación privada o de Incógnito para ejecutar el lab. Así
evitarás cualquier conflicto entre tu cuenta personal y la cuenta
de estudiante, lo que podría generar cargos adicionales en tu cuenta personal.
In this lab, you'll protect your API against JSON payload attacks.
Duración:
14 min de configuración
·
Acceso por 90 min
·
90 min para completar


 ), look for Apigee in the Pinned Products section.
 ).
).
 ).
).


