An OpenAPI specification uses a standard format to describe a RESTful API. Written in either JSON or YAML format, an OpenAPI specification is machine readable, but is also easy for people to read and understand.
The specification describes elements of an API, including its base path, resource paths and verbs, operations, headers, query parameters, and responses. In addition, an OpenAPI specification is commonly used to generate API documentation.
In this lab, you will examine an OpenAPI specification for a retail backend service. You will then use this OpenAPI specification to create an API proxy that will be used to add features and security to the backend API.
Objectives
In this lab, you learn how to perform the following tasks:
Explore an OpenAPI specification and understand the different components.
Create an API proxy from an OpenAPI specification using the proxy wizard.
Trace an API proxy.
Setup
For each lab, you get a new Google Cloud project and set of resources for a fixed time at no cost.
Sign in to Qwiklabs using an incognito window.
Note the lab's access time (for example, 1:15:00), and make sure you can finish within that time.
There is no pause feature. You can restart if needed, but you have to start at the beginning.
When ready, click Start lab.
Note your lab credentials (Username and Password). You will use them to sign in to the Google Cloud Console.
Click Open Google Console.
Click Use another account and copy/paste credentials for this lab into the prompts.
If you use other credentials, you'll receive errors or incur charges.
Accept the terms and skip the recovery resource page.
Activate Google Cloud Shell
Google Cloud Shell is a virtual machine that is loaded with development tools. It offers a persistent 5GB home directory and runs on the Google Cloud.
Google Cloud Shell provides command-line access to your Google Cloud resources.
In Cloud console, on the top right toolbar, click the Open Cloud Shell button.
Click Continue.
It takes a few moments to provision and connect to the environment. When you are connected, you are already authenticated, and the project is set to your PROJECT_ID. For example:
gcloud is the command-line tool for Google Cloud. It comes pre-installed on Cloud Shell and supports tab-completion.
You can list the active account name with this command:
This curl command downloads a file named retail-backend.yaml and stores it in a file with the same name in the home directory. Later in the lab, you will use this same specification when creating an API proxy.
Note: "?$(date +%s)" adds a query parameter to the URL that is a string representation of the current date/time. This dynamically changing variable changes the URL and forces curl to retrieve the latest version of a file, even if a previous version is cached.
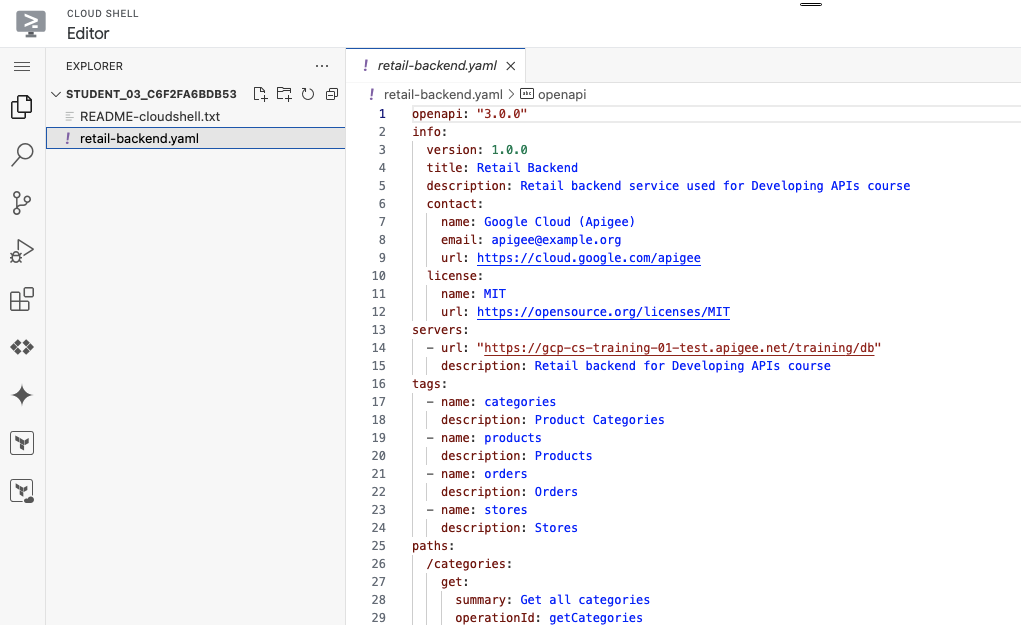
View the OpenAPI specification in Cloud Shell Editor
In Cloud Shell, click Open Editor.
In the editor, select the retail-backend.yaml file.
Explore the sections of the spec
Examine the OpenAPI specification.
This is the OpenAPI specification for the backend service that will be used in many of the course labs. Let's explore the sections of the OpenAPI spec.
The openapi field specifies the version of the OpenAPI specification. This is an OpenAPI version 3 spec, as indicated by the version number at the top of the file:
openapi: "3.0.0"
The info object provides metadata about the API itself. The version shown is the version of the Retail Backend specification:
info:
version: 1.0.0
title: Retail Backend
description: Retail backend database used for Developing APIs course
contact:
name: Google Cloud (Apigee)
email: apigee@example.org
url: https://cloud.google.com/apigee
license:
name: MIT
url: https://opensource.org/licenses/MIT
The servers array contains a list of server objects that specify connectivity information for target servers. This specification contains a single backend service, which your API proxy will call:
The tags array adds metadata to tags used in the operations, which are shown below. Tags may be shared by multiple operations, and tags can be used to provide verbose descriptions or links to external documentation.
The paths object holds the relative paths to individual endpoints and their operations. One such path, /categories/{categoryId}, is used to specify a single category. Shown here is a get operation specified to get a category by ID. The get object shows parameters and responses. For operations that contain a request body, like PATCH /products/{productId}, the request body will also be specified.
/categories/{categoryId}:
get:
summary: Get a specific category
operationId: getCategoryById
tags:
- categories
parameters:
- name: categoryId
in: path
required: true
description: category id
schema:
type: integer
responses:
'200':
description: Selected category
content:
application/json:
schema:
$ref: "#/components/schemas/Category"
'404':
description: Category not found
content:
application/json:
schema:
$ref: "#/components/schemas/Error"
default:
description: unexpected error
content:
application/json:
schema:
$ref: "#/components/schemas/Error"
The components object contains reusable objects for different portions of the OpenAPI spec. The securitySchemes component object contains definitions of different types of security schemes used by the operations. This spec defines a single Basic Authentication scheme, which is referenced in the PATCH /products/{productId} operation. The schemas component object contains input and output data types. Shown here is the Category object, which is returned when the GET /categories/{categoryId} operation returns successfully:
components:
securitySchemes:
basicAuth:
type: http
description: basic auth
scheme: basic
schemas:
Category:
type: object
description: product category
required:
- color
- id
- name
properties:
color:
description: use this color for displaying this category
type: string
id:
description: integer id (used for access)
type: integer
format: int32
minimum: 0
name:
description: category name
type: string
In OpenAPI specs, click Browse, select the retail-backend.yaml file you downloaded, and then click Open.
Click Next.
Specify the following for the Proxy details:
Property
Value
Proxy name
retail-v1
Base path
/retail/v1
Description
My retail API
The target was taken from the servers array in the OpenAPI spec. Leave the target unchanged.
Note: Confirm that you are using "/retail/v1" for the base path, and not "/retail-v1".
Click Next.
Operations that were found in the OpenAPI specification are listed.
In Flows, on the header row, click Select all rows.
All flows should now be selected.
Click Next.
For Deployment environments, select the eval environment, and then click OK.
Note: Leave the "Service Account" field empty.
Click Create.
Your proxy will be generated and marked for deployment.
Runtime availability may be delayed
The full provisioning of an Apigee organization typically takes 30 minutes or longer. Most of the time is spent provisioning the runtime cluster, runtime database, and services that are used to run your API proxies. When creating a long-lived Apigee organization, this delay to full provisioning is not an issue. You do not, however, want to wait half an hour before starting each lab.
You will sometimes find that the organization is already fully provisioned when you enter the lab. Sometimes the Apigee organization will only begin provisioning when you start the lab.
The management plane operations of the organization are available after a few minutes of the provisioning process. Instead of waiting for the runtime to be fully provisioned, these labs allow you to perform operations like proxy editing before the runtime is available. When you deploy a proxy to an environment before the runtime is available, it will not be able to take traffic until runtime provisioning is complete.
When you hold the pointer over the Status icon for a deployed proxy, as shown below, you might see that there are no instances reporting status. This is normal until the Apigee organization's runtime has been fully provisioned.
Check deployment status
A proxy that is deployed and ready to take traffic will show a green status on the Overview tab.
When a proxy is marked as deployed but the runtime is not yet available and the environment is not yet attached, you may see a red warning sign. Hold the pointer over the Status icon to see the current status.
If the proxy is deployed and shows as green, your proxy is ready for API traffic. If your proxy is not deployed because there are no runtime pods, you can check the provisioning status.
Check provisioning status
In Cloud Shell, to confirm that the runtime instance has been installed and the eval environment has been attached, run the following commands:
export PROJECT_ID=$(gcloud config list --format 'value(core.project)'); echo "PROJECT_ID=${PROJECT_ID}"; export INSTANCE_NAME=eval-instance; export ENV_NAME=eval; export PREV_INSTANCE_STATE=; echo "waiting for runtime instance ${INSTANCE_NAME} to be active"; while : ; do export INSTANCE_STATE=$(curl -s -H "Authorization: Bearer $(gcloud auth print-access-token)" -X GET "https://apigee.googleapis.com/v1/organizations/${PROJECT_ID}/instances/${INSTANCE_NAME}" | jq "select(.state != null) | .state" --raw-output); [[ "${INSTANCE_STATE}" == "${PREV_INSTANCE_STATE}" ]] || (echo; echo "INSTANCE_STATE=${INSTANCE_STATE}"); export PREV_INSTANCE_STATE=${INSTANCE_STATE}; [[ "${INSTANCE_STATE}" != "ACTIVE" ]] || break; echo -n "."; sleep 5; done; echo; echo "instance created, waiting for environment ${ENV_NAME} to be attached to instance"; while : ; do export ATTACHMENT_DONE=$(curl -s -H "Authorization: Bearer $(gcloud auth print-access-token)" -X GET "https://apigee.googleapis.com/v1/organizations/${PROJECT_ID}/instances/${INSTANCE_NAME}/attachments" | jq "select(.attachments != null) | .attachments[] | select(.environment == \"${ENV_NAME}\") | .environment" --join-output); [[ "${ATTACHMENT_DONE}" != "${ENV_NAME}" ]] || break; echo -n "."; sleep 5; done; echo "***ORG IS READY TO USE***";
When the script returns ORG IS READY TO USE, you can proceed to the next steps.
This tab is used to edit the proxy that has been generated. Conditional flows have been created for each of the operations in the OpenAPI specification. These conditional flows appear in the proxy endpoint in the Navigator on the left. When you click on a conditional flow, its request and response sections are selected in the visual editor pane. The default.xml code shown below is the code representation of the proxy endpoint flows.
You will update many of these conditional flows in later labs.
Select the Debug tab.
The debug tool is used to trace API requests that are handled by the proxy.
Click Start Debug Session.
In the Start debug session pane, on the Environment dropdown, select eval.
The deployed revision number will also show in the dropdown.
Click Start.
The debug session will run for 10 minutes.
Test the API proxy using private DNS
The eval environment in the Apigee organization can be called using the hostname eval.example.com. The DNS entry for this hostname has been created within your project, and it resolves to the IP address of the Apigee runtime instance. This DNS entry has been created in a private zone, which means it is only visible on the internal network.
Cloud Shell does not reside on the internal network, so Cloud Shell commands cannot resolve this DNS entry. A virtual machine (VM) within your project can access the private zone DNS. A virtual machine named apigeex-test-vm was automatically created for this purpose. You can make API proxy calls from this machine.
The curl command will be used to send API requests to an API proxy. The -k option for curl tells it to skip verification of the TLS certificate. For this lab, the Apigee runtime uses a self-signed certificate. For a production environment, you should use certificates that have been created by a trusted certificate authority (CA).
In Cloud Shell, open a new tab, and then open an SSH connection to your test VM:
The first gcloud command retrieves the zone of the test VM, and the second opens the SSH connection to the VM.
If asked to authorize, click Authorize.
For each question asked in the Cloud Shell, click Enter or Return to specify the default input.
Your logged in identity is the owner of the project, so SSH to this machine is allowed.
Your Cloud Shell session is now running inside the VM.
Call the API proxy
To make a call to proxy hosted in the eval environment, in the Cloud Shell SSH session, send a request to your API proxy by using this command:
curl -i -k -X GET https://eval.example.com/retail/v1/categories
A transaction for this request should appear in the Transactions pane on the left. When a transaction is selected, you'll see a trace of the request and response through Apigee. You should see a 200 status code if your backend URL was correctly set and you correctly updated the Send Requests URL.
Note: Apigee debug session traffic is retrieved by asynchronously polling for new API calls, so there may be a delay between when an API request is completed, and when it shows in the debug tool.
Click the Back and Next buttons to navigate through the steps of the transaction.
The request was GET /retail/v1/categories. This request was sent to the backend, which responded with a JSON array containing the categories.
Congratulations!
In this lab, you learned about OpenAPI specifications, and explored some of the features in OpenAPI specs. You used an OpenAPI specification for a retail backend service to create an API proxy, and you traced calls through that proxy.
End your lab
When you have completed your lab, click End Lab. Google Cloud Skills Boost removes the resources you’ve used and cleans the account for you.
You will be given an opportunity to rate the lab experience. Select the applicable number of stars, type a comment, and then click Submit.
The number of stars indicates the following:
1 star = Very dissatisfied
2 stars = Dissatisfied
3 stars = Neutral
4 stars = Satisfied
5 stars = Very satisfied
You can close the dialog box if you don't want to provide feedback.
For feedback, suggestions, or corrections, please use the Support tab.
Copyright 2022 Google LLC All rights reserved. Google and the Google logo are trademarks of Google LLC. All other company and product names may be trademarks of the respective companies with which they are associated.
Les ateliers créent un projet Google Cloud et des ressources pour une durée déterminée.
Les ateliers doivent être effectués dans le délai imparti et ne peuvent pas être mis en pause. Si vous quittez l'atelier, vous devrez le recommencer depuis le début.
En haut à gauche de l'écran, cliquez sur Démarrer l'atelier pour commencer.
Utilisez la navigation privée
Copiez le nom d'utilisateur et le mot de passe fournis pour l'atelier
Cliquez sur Ouvrir la console en navigation privée
Connectez-vous à la console
Connectez-vous à l'aide des identifiants qui vous ont été attribués pour l'atelier. L'utilisation d'autres identifiants peut entraîner des erreurs ou des frais.
Acceptez les conditions d'utilisation et ignorez la page concernant les ressources de récupération des données.
Ne cliquez pas sur Terminer l'atelier, à moins que vous n'ayez terminé l'atelier ou que vous ne vouliez le recommencer, car cela effacera votre travail et supprimera le projet.
Ce contenu n'est pas disponible pour le moment
Nous vous préviendrons par e-mail lorsqu'il sera disponible
Parfait !
Nous vous contacterons par e-mail s'il devient disponible
Un atelier à la fois
Confirmez pour mettre fin à tous les ateliers existants et démarrer celui-ci
Utilisez la navigation privée pour effectuer l'atelier
Ouvrez une fenêtre de navigateur en mode navigation privée pour effectuer cet atelier. Vous éviterez ainsi les conflits entre votre compte personnel et le compte temporaire de participant, qui pourraient entraîner des frais supplémentaires facturés sur votre compte personnel.
In this lab, you'll use an OpenAPI specification to create an API proxy for a retail API.
Durée :
10 min de configuration
·
Accessible pendant 90 min
·
Terminé après 90 min


 ), and then click Download.
 ), look for Apigee in the Pinned Products section.
 ).
).


