Overview
In this series of labs, you take a demo microservices Java application built with the Spring framework and modify it to use an external database server. You adopt some of the best practices for tracing, configuration management, and integration with other services using integration patterns.
Google Cloud has a bucket-based object storage solution called Cloud Storage. Cloud Storage is designed to store a large number of files and a large volume of binary data. You don't need to manage your own file systems or file sharing services. Cloud Storage can be used directly by many other Google Cloud products. For example, you can store data files on Cloud Storage and process those data files in a managed Hadoop (Dataproc) cluster. You can also import structured data stored on Cloud Storage directly into BigQuery for ad hoc data analytics using standard SQL.
Cloud Storage provides fast, low-cost, highly durable, global object storage for developers and enterprises that need to manage unstructured file data. In Cloud Storage, the consistent API, low latency, and speed across storage classes simplify development integration and reduce code complexity.
In this lab, you add the ability to upload an image associated with a message. You store the image in Cloud Storage.
Objectives
In this lab, you learn how to perform the following tasks:
- Add the Spring starter for Cloud Storage
- Create a Cloud Storage bucket
- Modify the HTML template of the frontend application to enable file uploads
- Modify the frontend application to process and store images on Cloud Storage
- Modify the frontend application to display uploaded message images
Setup and requirements
How to start your lab and sign in to the Console
-
Click the Start Lab button. If you need to pay for the lab, a pop-up opens for you to select your payment method.
On the left is a panel populated with the temporary credentials that you must use for this lab.

-
Copy the username, and then click Open Google Console.
The lab spins up resources, and then opens another tab that shows the Choose an account page.
Note: Open the tabs in separate windows, side-by-side.
-
On the Choose an account page, click Use Another Account. The Sign in page opens.

-
Paste the username that you copied from the Connection Details panel. Then copy and paste the password.
Note: You must use the credentials from the Connection Details panel. Do not use your Google Cloud Skills Boost credentials. If you have your own Google Cloud account, do not use it for this lab (avoids incurring charges).
- Click through the subsequent pages:
- Accept the terms and conditions.
- Do not add recovery options or two-factor authentication (because this is a temporary account).
- Do not sign up for free trials.
After a few moments, the Cloud console opens in this tab.
Note: You can view the menu with a list of Google Cloud Products and Services by clicking the Navigation menu at the top-left.

After you complete the initial sign-in steps, the project dashboard appears.
Task 1. Fetch the application source files
In this task, you clone the source repository files that are used throughout this lab.
-
To begin the lab, click the Activate Cloud Shell button at the top of the Google Cloud Console.
-
To activate the code editor, click the Open Editor button on the toolbar of the Cloud Shell window. Code editor opens in a new tab with continued access to Cloud Shell.
Note: A Cloud Storage bucket that is named using the project ID for this lab is automatically created for you by the lab setup. The source code for your applications is copied into this bucket when the Cloud SQL server is ready. You might have to wait a few minutes for this action to complete.
- In Cloud Shell, enter the following command to create an environment variable that contains the project ID for this lab:
export PROJECT_ID=$(gcloud config list --format 'value(core.project)')
- Verify that the demo application files were created:
gcloud storage ls gs://$PROJECT_ID
- Copy the application folders to Cloud Shell:
gcloud storage cp -r gs://$PROJECT_ID/* ~/
- Make the Maven wrapper scripts executable:
chmod +x ~/guestbook-frontend/mvnw
chmod +x ~/guestbook-service/mvnw
Now you're ready to go!
Task 2. Add the Cloud Storage starter
In this task, you add the Cloud Storage starter to the guestbook frontend application.
- In the Cloud Shell code editor, open
~/guestbook-frontend/pom.xml.
- Insert the following new dependency at the end of the
<dependencies> section, just before the closing </dependencies> tag:
<dependency>
<groupId>org.springframework.cloud</groupId>
<artifactId>spring-cloud-gcp-starter-storage</artifactId>
</dependency>
Task 3. Store the uploaded file
In this task, you update the home page to enable files to be uploaded with a message.
Modify the main.container class to allow file uploads
You edit the main.container class input form action to handle multi-part data encoding.
- In the Cloud Shell code editor, open
~/guestbook-frontend/src/main/resources/templates/index.html.
- Change this line:
<form action="/post" method="post">
To these lines:
<!-- Set form encoding type to multipart form data -->
<form action="/post" method="post" enctype="multipart/form-data">
- Insert the following tags before the
<input type="submit" value="Post"/> tag:
<!-- Add a file input -->
<span>File:</span>
<input type="file" name="file" accept=".jpg, image/jpeg"/>
Update FrontendController to accept the uploaded file
You update the FrontendController.java file to accept file data when you choose to upload an image with a message.
- In the Cloud Shell code editor, open the following file:
~/guestbook-frontend/src/main/java/com/example/frontend/FrontendController.java.
- Insert the following
import directives immediately below the existing import directives:
import org.springframework.cloud.gcp.core.GcpProjectIdProvider;
import org.springframework.web.multipart.MultipartFile;
import org.springframework.context.ApplicationContext;
import org.springframework.core.io.Resource;
import org.springframework.core.io.WritableResource;
import org.springframework.util.StreamUtils;
import java.io.*;
- Insert the following code near the beginning of the
FrontendController class definition, immediately before @GetMapping("/"):
// The ApplicationContext is needed to create a new Resource.
@Autowired
private ApplicationContext context;
// Get the Project ID, as its Cloud Storage bucket name here
@Autowired
private GcpProjectIdProvider projectIdProvider;
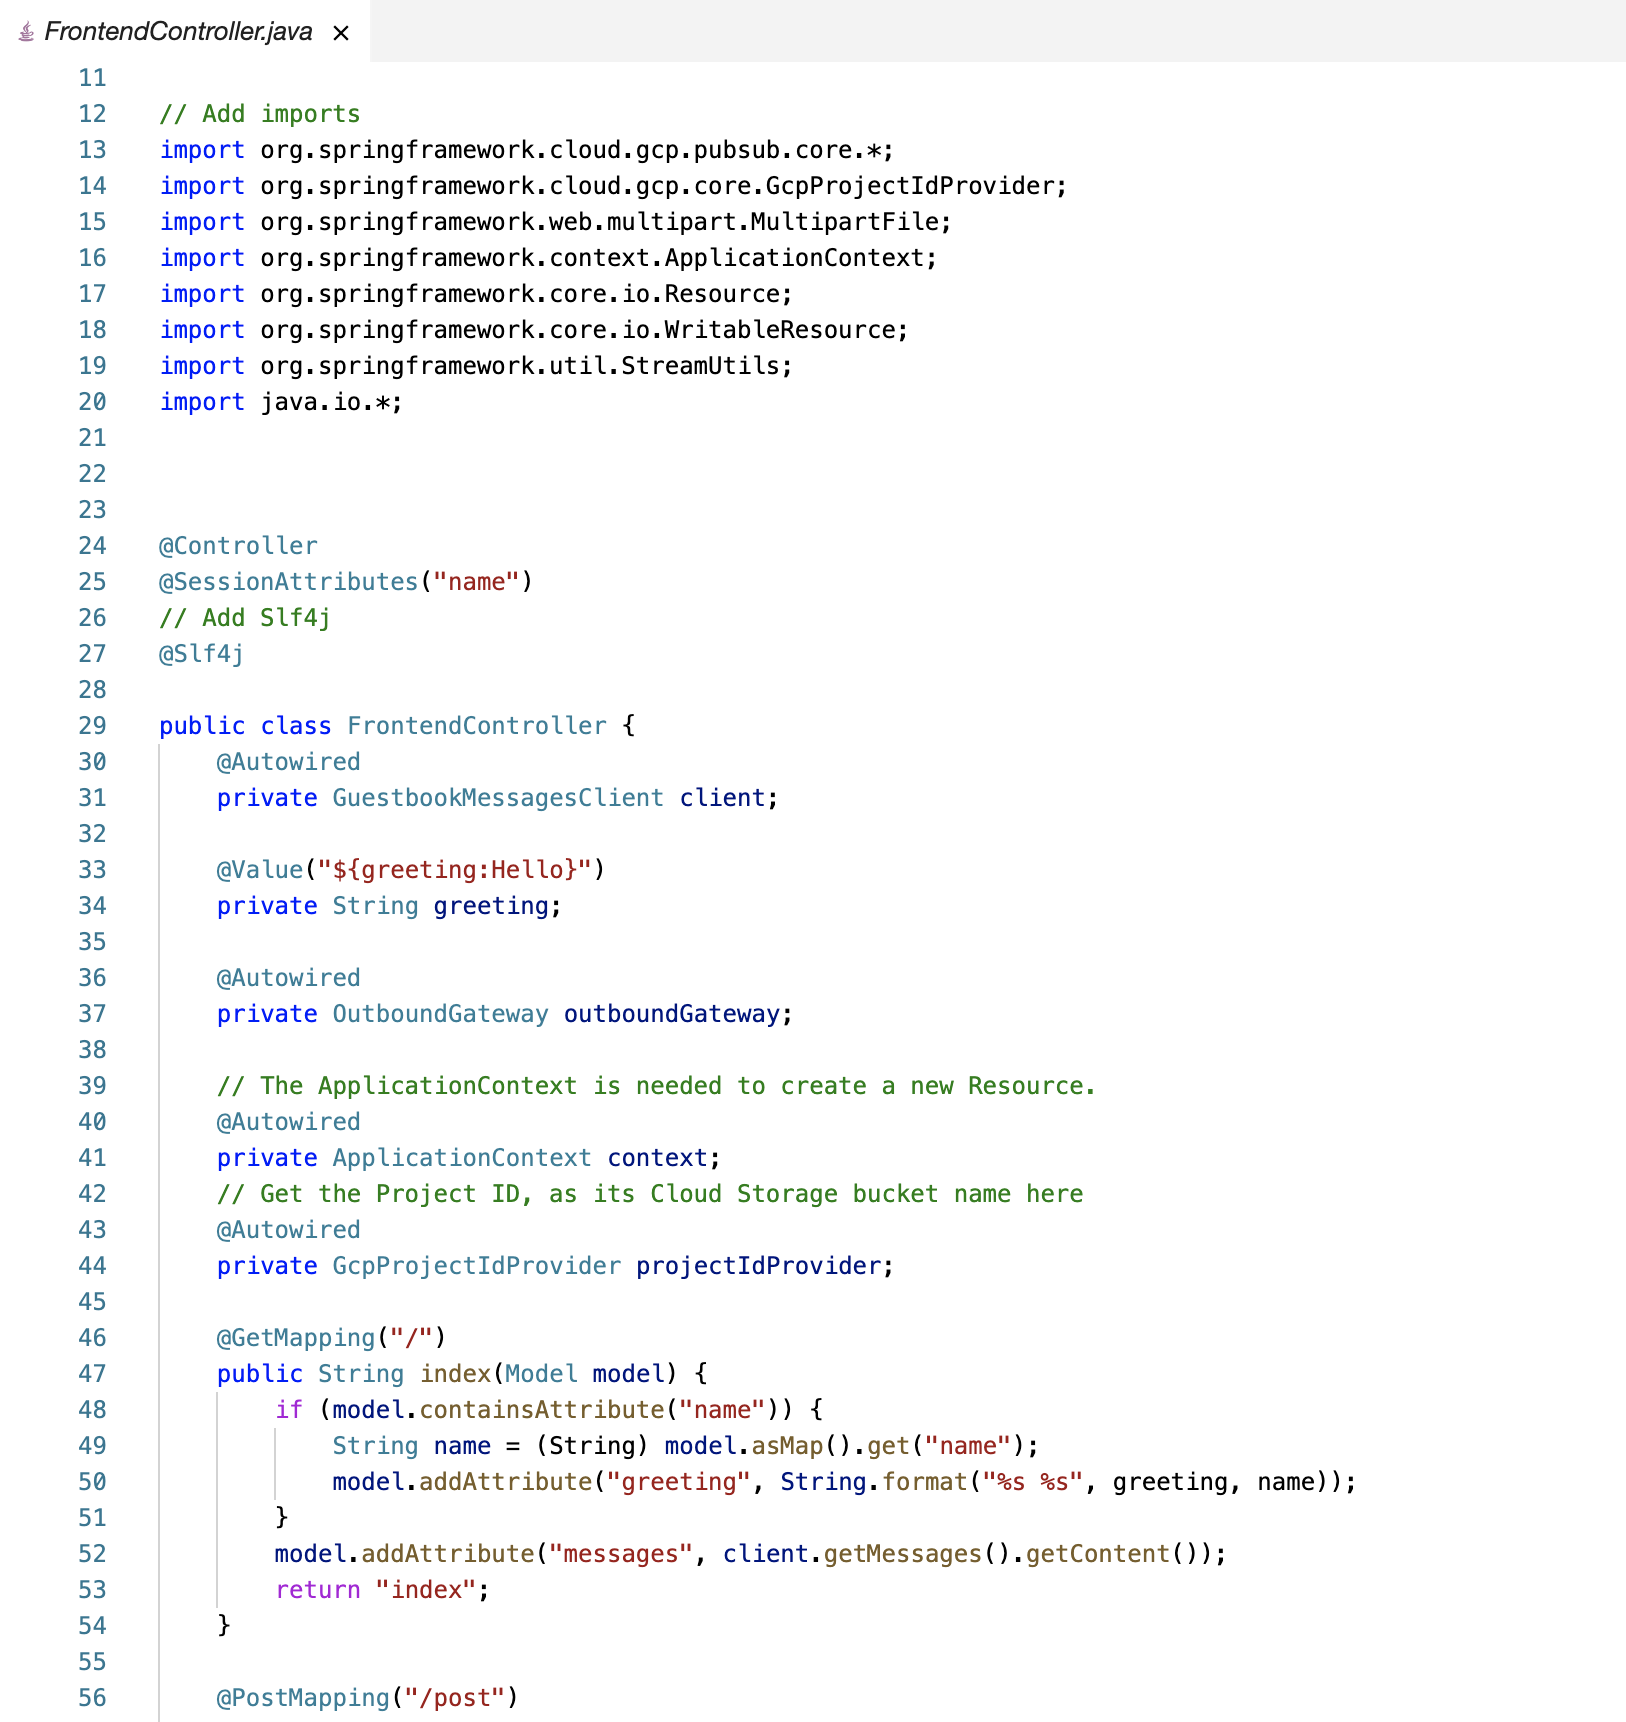
You need to get Applicationcontext in order to create a new resource. The project ID is required in order to access Cloud Storage because this demo application uses the project ID as the Cloud Storage bucket name.
The first part of FrontendController should look like the screenshot:
Note:
The uploaded files are stored in a Cloud Storage bucket that uses the lab project ID as its name. This bucket has been created automatically during the lab setup so you did not have to create it yourself. If you are replicating this lab in your own environment, you will have to create the storage bucket for the application.
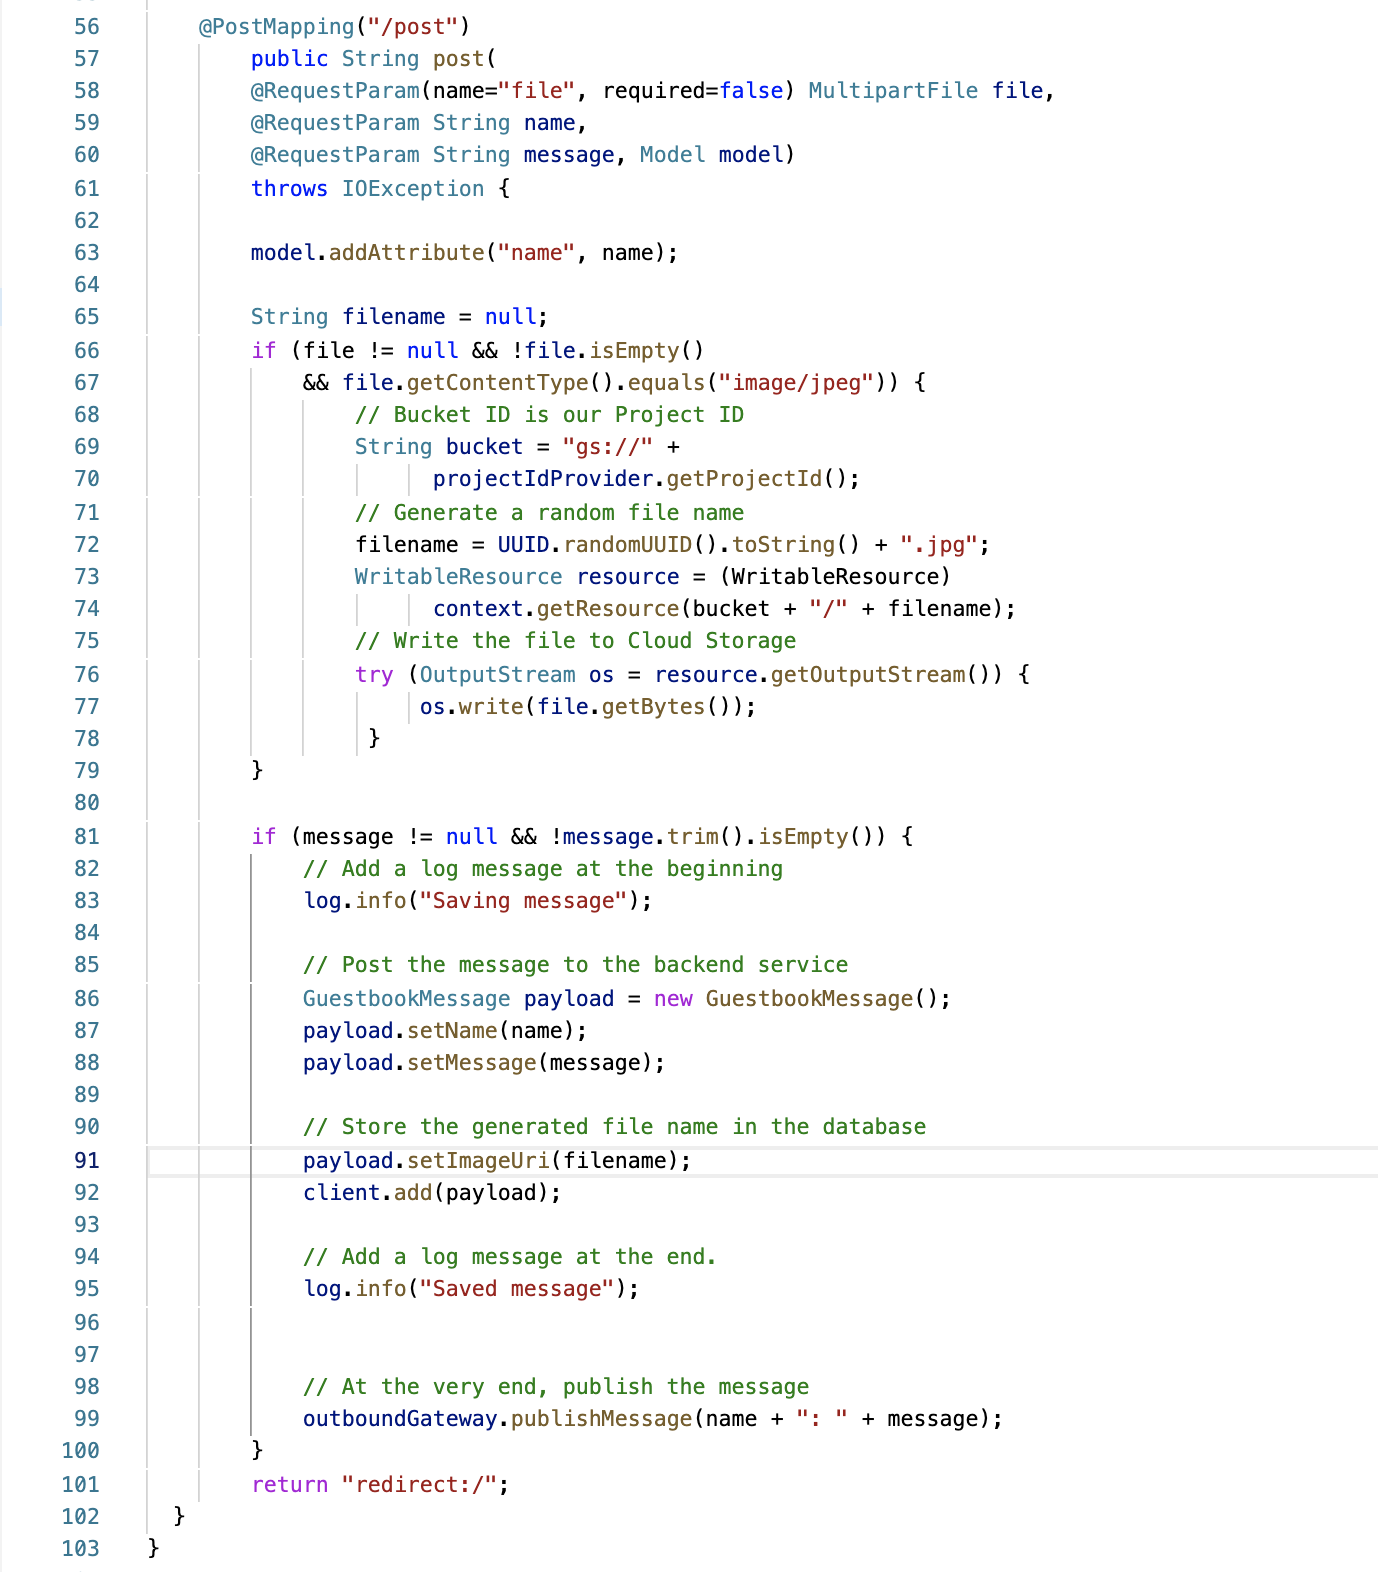
Change the definition for the post method
You modify the post method to save uploaded images to Cloud Storage.
- Near the end of the file, change this line:
public String post(@RequestParam String name, @RequestParam String message, Model model) {
to these lines:
public String post(
@RequestParam(name="file", required=false) MultipartFile file,
@RequestParam String name,
@RequestParam String message, Model model)
throws IOException {
- Insert the following code immediately after the line
model.addAttribute("name", name);:
String filename = null;
if (file != null && !file.isEmpty()
&& file.getContentType().equals("image/jpeg")) {
// Bucket ID is our Project ID
String bucket = "gs://" +
projectIdProvider.getProjectId();
// Generate a random file name
filename = UUID.randomUUID().toString() + ".jpg";
WritableResource resource = (WritableResource)
context.getResource(bucket + "/" + filename);
// Write the file to Cloud Storage
try (OutputStream os = resource.getOutputStream()) {
os.write(file.getBytes());
}
}
- Add the following code to insert the location of the uploaded file immediately before the
client.add(payload); line:
// Store the generated file name in the database
payload.setImageUri(filename);
The complete post method definition should look like the screenshot:
Task 4. Test the application in Cloud Shell
In this task, you run the application in Cloud Shell to test the new image upload functionality.
- In Cloud Shell, change to the
guestbook-service directory:
cd ~/guestbook-service
- Run the backend service application:
./mvnw spring-boot:run -Dspring-boot.run.jvmArguments="-Dspring.profiles.active=cloud"
The backend service application launches on port 8081.This takes a minute or two to complete. Wait until you see that the GuestbookApplication is running.
Started GuestbookApplication in 20.399 seconds (JVM running...)
- To open a new Cloud Shell session tab to run the frontend application, click the plus (+) icon to the right of the title tab for the initial Cloud Shell session.
- Change to the
guestbook-frontend directory:
cd ~/guestbook-frontend
- Start the frontend application with the
cloud profile:
./mvnw spring-boot:run -Dspring.profiles.active=cloud
-
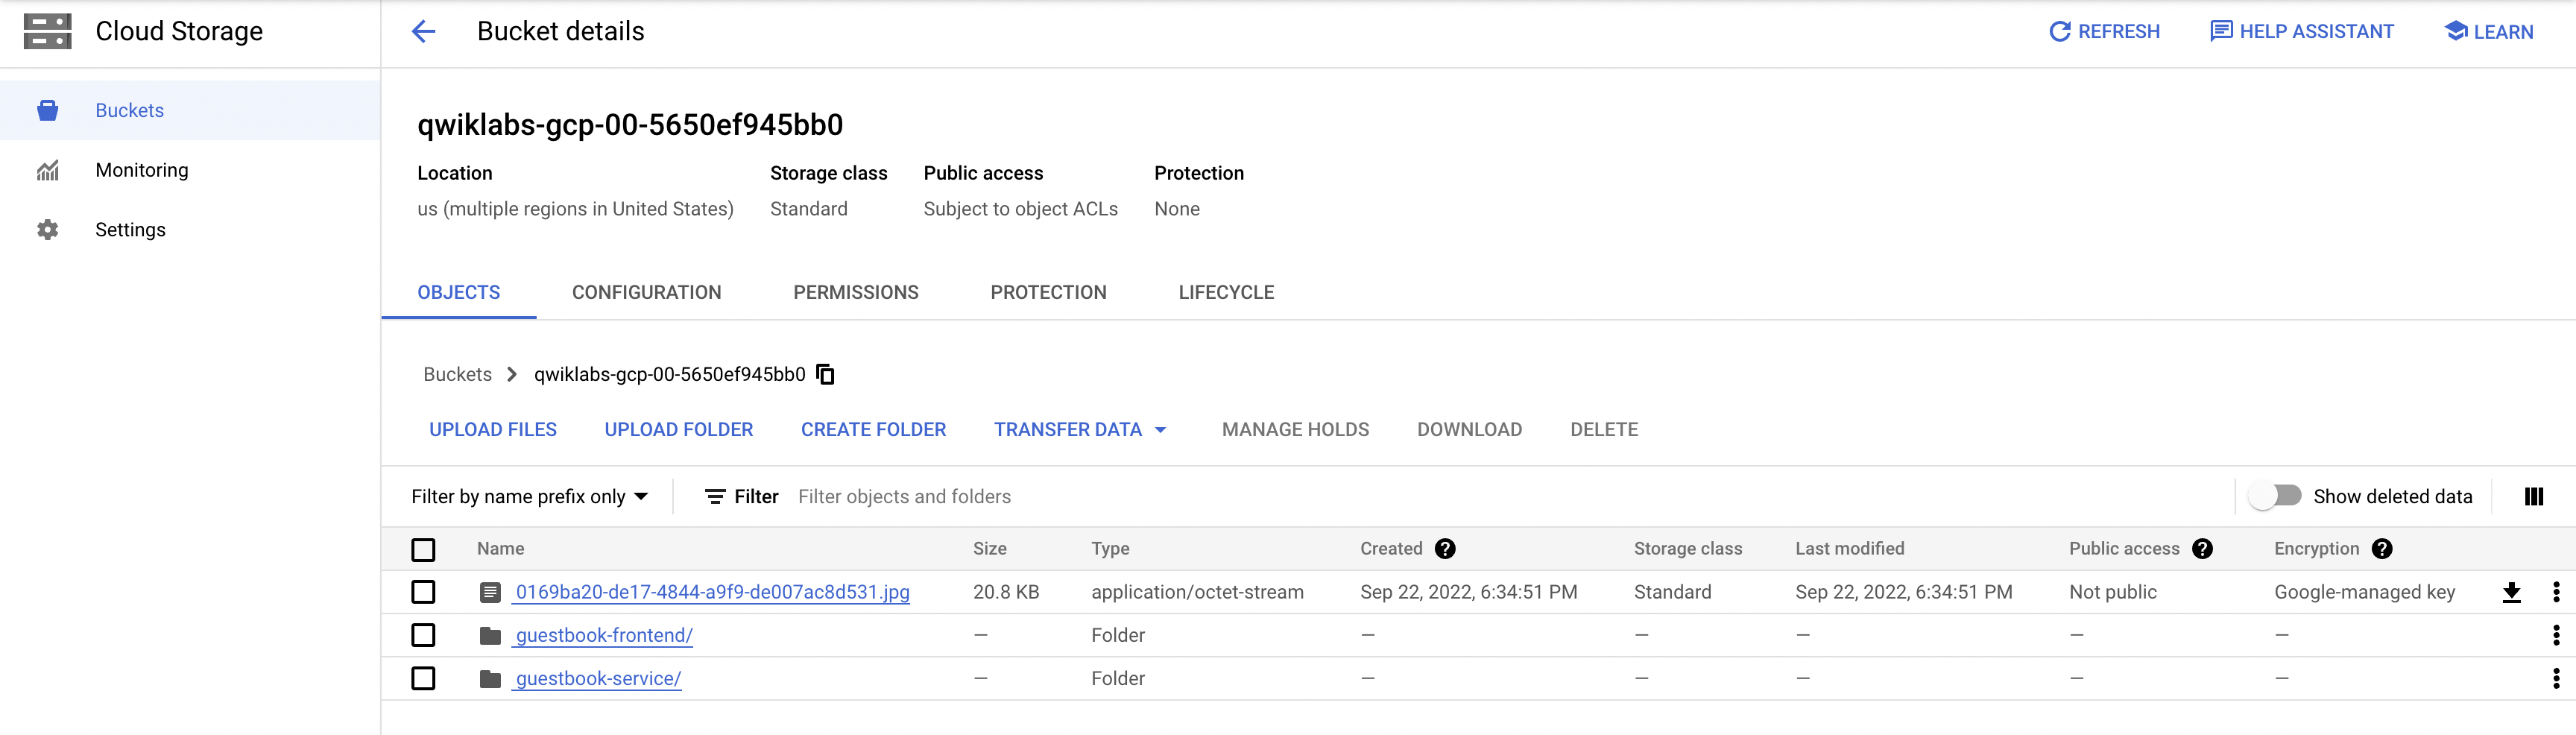
Open the Cloud Shell web preview on port 8080 and post a message with a small JPEG image.
-
From the Google Cloud console, navigate to Cloud Storage > Buckets.
-
Navigate to your bucket.
The uploaded file should appear as in the screenshot. There will also be two folders that were created during the lab startup that contain the demo application source files.
Task 5. Serve the image from Cloud Storage
In this task, you update the frontend application to retrieve and display images associated with guestbook messages.
Add a method to FrontendController to retrieve the requested image and send it to the browser
You edit FrontendController.java so that it fetches image files associated with messages if they are found.
- In the Cloud Shell code editor, open
~/guestbook-frontend/src/main/java/com/example/frontend/FrontendController.java.
- Add the following
import directive immediately below the existing import directives:
import org.springframework.http.*;
- Insert the following code at the end of the
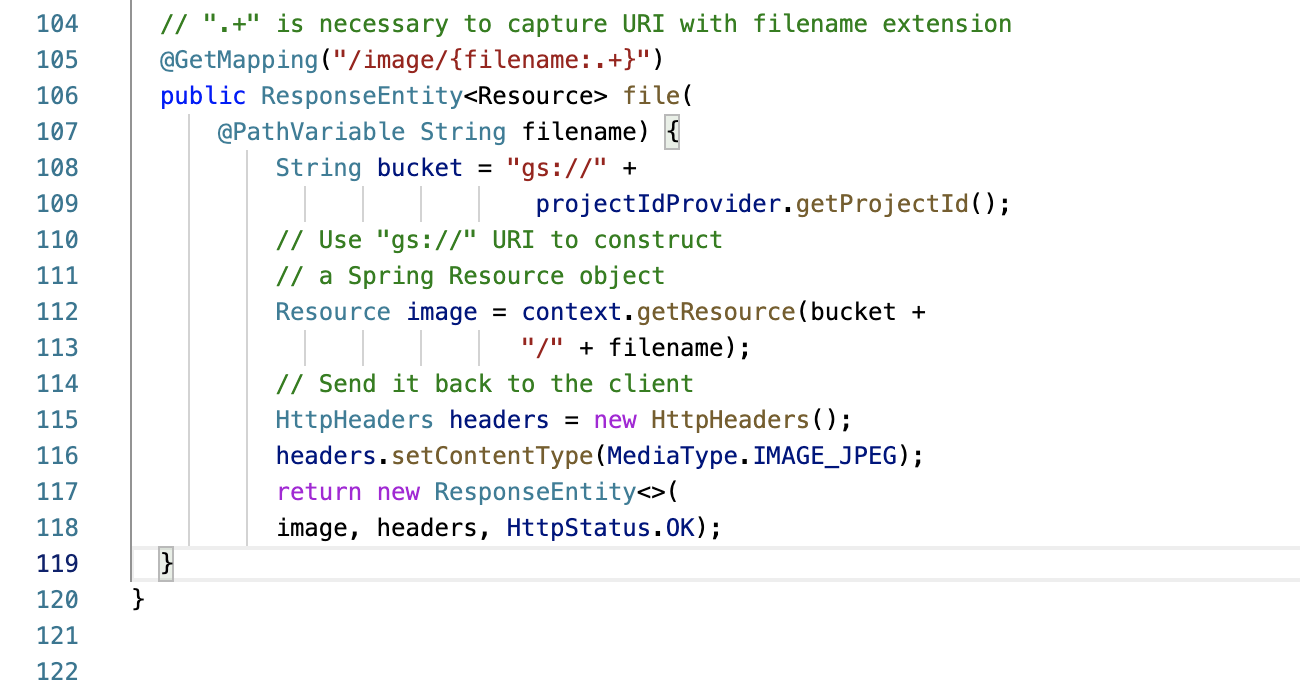
FrontEndController class definition. Place the code after the closing brace for the post method definition and immediately before the final closing brace:
// ".+" is necessary to capture URI with filename extension
@GetMapping("/image/{filename:.+}")
public ResponseEntity<Resource> file(
@PathVariable String filename) {
String bucket = "gs://" +
projectIdProvider.getProjectId();
// Use "gs://" URI to construct
// a Spring Resource object
Resource image = context.getResource(bucket +
"/" + filename);
// Send it back to the client
HttpHeaders headers = new HttpHeaders();
headers.setContentType(MediaType.IMAGE_JPEG);
return new ResponseEntity<>(
image, headers, HttpStatus.OK);
}
The end of the FrontendController.java file should look like the screenshot:
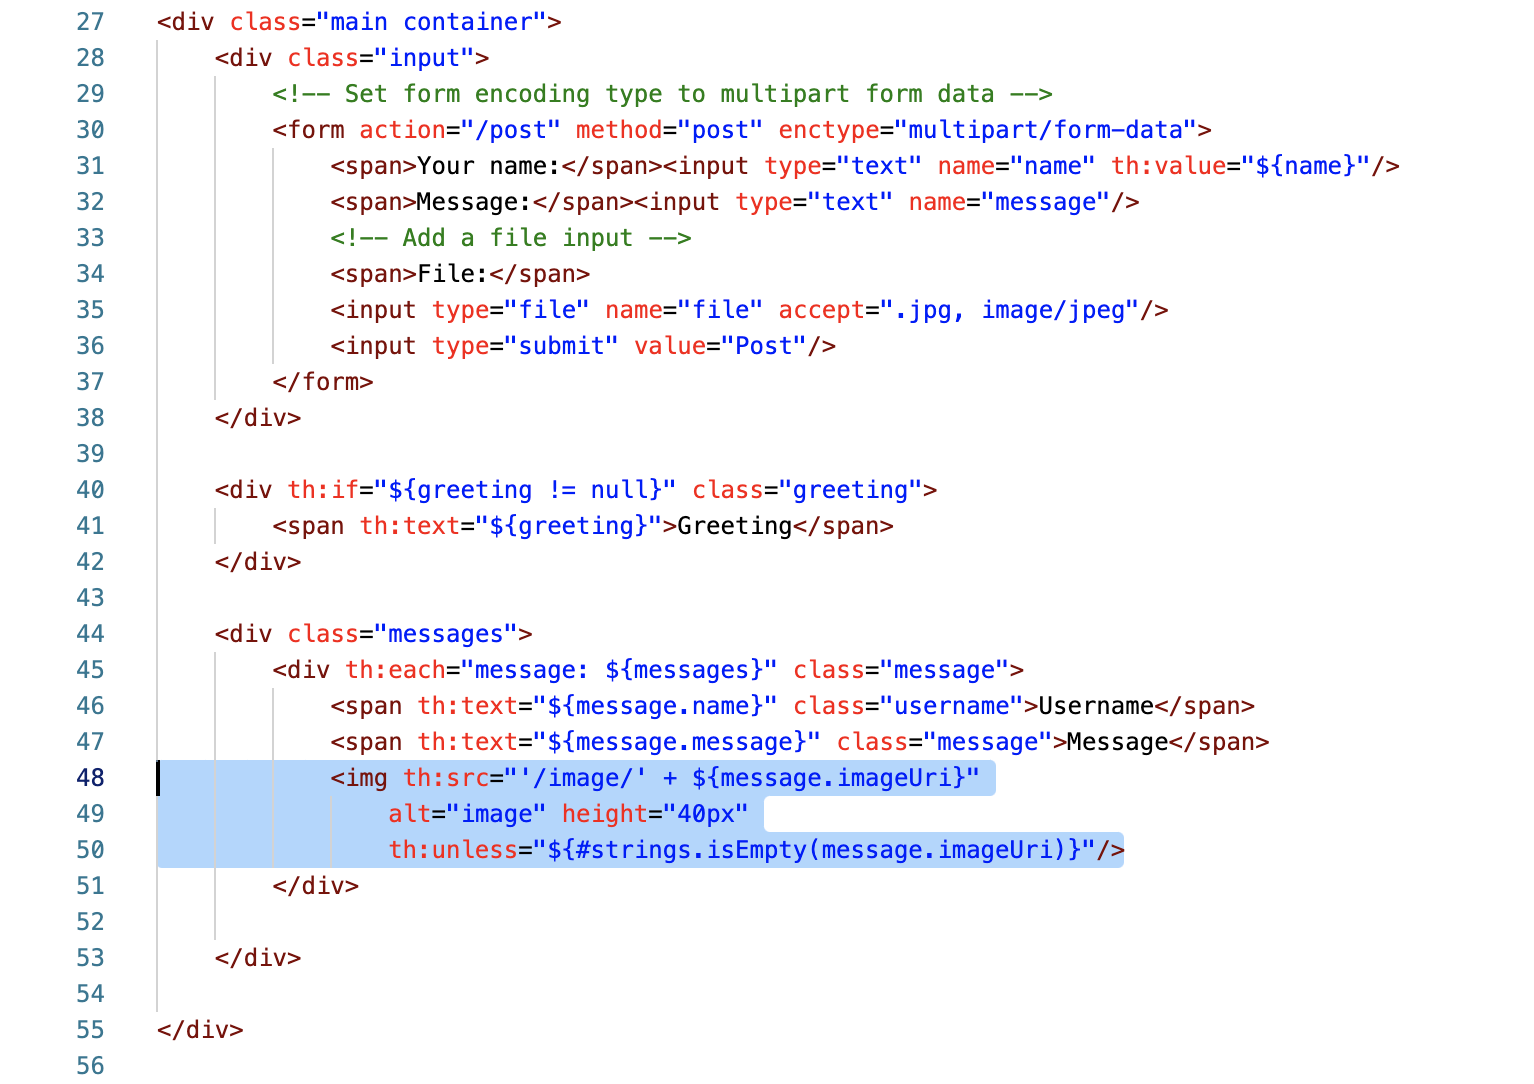
Update the home page so that it loads the image if present
You edit the main.container class to load and display images for messages if they are present.
- In the Cloud Shell code editor, open
~/guestbook-frontend/src/main/resources/templates/index.html.
In the next step, you insert an <image> tag in the messages class.
- Add the following
<img> tag after the second <span> tag:
<img th:src="'/image/' + ${message.imageUri}"
alt="image" height="40px"
th:unless="${#strings.isEmpty(message.imageUri)}"/>
The main container div class should look like the screenshot:
Task 6. Restart the frontend application to test image retrieval
In this task, you restart the frontend application to activate the new image retrieval and display functionality.
- Switch to the interactive Cloud Shell tab that is running the frontend application. You should see the following status message on screen.
Started FrontendApplication in 24.349 seconds (JVM running for 78.449)
- Press CTRL+C to terminate the running application.
- Restart the frontend application:
cd ~/guestbook-frontend
./mvnw spring-boot:run -Dspring.profiles.active=cloud
- Switch to the web preview browser tab, and refresh the view to verify that messages with uploaded images now display image thumbnails properly.
Task 7. Review
In this lab, you added the Spring starter for Cloud Storage and created a Cloud Storage bucket. Next, you modified the HTML template of the frontend application to enable file uploads. You then modified the frontend application to process and store images on Cloud Storage. Finally, you modified the frontend application to display uploaded message images.
End your lab
When you have completed your lab, click End Lab. Google Cloud Skills Boost removes the resources you’ve used and cleans the account for you.
You will be given an opportunity to rate the lab experience. Select the applicable number of stars, type a comment, and then click Submit.
The number of stars indicates the following:
- 1 star = Very dissatisfied
- 2 stars = Dissatisfied
- 3 stars = Neutral
- 4 stars = Satisfied
- 5 stars = Very satisfied
You can close the dialog box if you don't want to provide feedback.
For feedback, suggestions, or corrections, please use the Support tab.
Copyright 2022 Google LLC All rights reserved. Google and the Google logo are trademarks of Google LLC. All other company and product names may be trademarks of the respective companies with which they are associated.


