Overview
In this series of labs, you take a demo microservices Java application built with the Spring framework and modify it to use an external database server. You adopt some of the best practices for tracing, configuration management, and integration with other services using integration patterns.
In this lab, you use Spring Integration to create a message gateway interface. This interface abstracts from the underlying messaging system rather than using direct integration with Pub/Sub.
Using this approach, you can swap messaging middleware that works with on-premises applications for messaging middleware that works with cloud-based applications. This approach also makes it easy to migrate between messaging middleware.
In this lab, you use Spring Integration to add the message gateway interface and then refactor the code to use this interface rather than implementing direct integration with Pub/Sub.
Objectives
In this lab, you learn how to perform the following tasks:
- Add Spring Integration Core to an application
- Create an outbound message gateway in your application
- Configure an application to publish messages through a gateway
- Bind the output channel of a message gateway to Pub/Sub
Setup and requirements
How to start your lab and sign in to the Console
-
Click the Start Lab button. If you need to pay for the lab, a pop-up opens for you to select your payment method.
On the left is a panel populated with the temporary credentials that you must use for this lab.

-
Copy the username, and then click Open Google Console.
The lab spins up resources, and then opens another tab that shows the Choose an account page.
Note: Open the tabs in separate windows, side-by-side.
-
On the Choose an account page, click Use Another Account. The Sign in page opens.

-
Paste the username that you copied from the Connection Details panel. Then copy and paste the password.
Note: You must use the credentials from the Connection Details panel. Do not use your Google Cloud Skills Boost credentials. If you have your own Google Cloud account, do not use it for this lab (avoids incurring charges).
- Click through the subsequent pages:
- Accept the terms and conditions.
- Do not add recovery options or two-factor authentication (because this is a temporary account).
- Do not sign up for free trials.
After a few moments, the Cloud console opens in this tab.
Note: You can view the menu with a list of Google Cloud Products and Services by clicking the Navigation menu at the top-left.

After you complete the initial sign-in steps, the project dashboard appears.
Task 1. Fetch the application source files
In this task, you clone the source repository files that are used throughout this lab.
-
To begin the lab, click the Activate Cloud Shell button at the top of the Google Cloud Console and if prompted click Continue.
-
To activate the code editor, click the Open Editor button on the toolbar of the Cloud Shell window.
-
Click Open in a new window to set up the editor in a new tab with continued access to Cloud Shell.
Note: A Cloud Storage bucket that is named using the project ID for this lab is automatically created for you by the lab setup. The source code for your applications is copied into this bucket when the Cloud SQL server is ready. You might have to wait a few minutes for this action to complete.
- In Cloud Shell, click
Open Terminal and then enter the following command to create an environment variable that contains the project ID for this lab:
export PROJECT_ID=$(gcloud config list --format 'value(core.project)')
- Verify that the demo application files were created:
gcloud storage ls gs://$PROJECT_ID
- Copy the application folders to Cloud Shell:
gcloud storage cp -r gs://$PROJECT_ID/* ~/
- Make the Maven wrapper scripts executable:
chmod +x ~/guestbook-frontend/mvnw
chmod +x ~/guestbook-service/mvnw
Now you're ready to go!
Task 2. Add the Spring Integration core
In this task, you add the Spring Cloud Integration starter to the frontend application so that you can refactor the code to use a messaging gateway interface instead of using direct integration with Pub/Sub.
Spring Integration core provides a framework for you to add a message gateway interface that can abstract from the underlying messaging system used.
- In the Cloud Shell code editor, open
~/guestbook-frontend/pom.xml.
- Insert the following new dependency at the end of the
<dependencies> section, just before the closing </dependencies> tag:
<dependency>
<groupId>org.springframework.integration</groupId>
<artifactId>spring-integration-core</artifactId>
</dependency>
Note: This dependency is in the standalone <dependencies> section, not in the dependencyManagement section.
Task 3. Create an outbound message gateway
In this task, you create an OutboundGateway.java file in the frontend application. The file contains a single method to send a text message.
- In the Cloud Shell code editor, create a file named
OutboundGateway.java in the ~/guestbook-frontend/src/main/java/com/example/frontend directory.
- Open
~/guestbook-frontend/src/main/java/com/example/frontend/OutboundGateway.java.
- Add the following code to the new file:
package com.example.frontend;
import org.springframework.integration.annotation.MessagingGateway;
@MessagingGateway(defaultRequestChannel = "messagesOutputChannel")
public interface OutboundGateway {
void publishMessage(String message);
}
Task 4. Publish the message
In this task, you modify the application to publish the message with the FrontendController.post method. This method enables you to use OutboundGateway to publish messages.
Whenever someone posts a new guestbook message, OutboundGateway also sends it to a messaging system. At this point, the application does not know what messaging system is being used.
- In the Cloud Shell code editor, open
~/guestbook-frontend/src/main/java/com/example/frontend/FrontendController.java.
- Replace the code that references
pubSubTemplate with references to outboundGateway:
Replace these lines:
@Autowired
private PubSubTemplate pubSubTemplate;
With these lines:
@Autowired
private OutboundGateway outboundGateway;
- Replace this line:
pubSubTemplate.publish("messages", name + ": " + message);
with this line:
outboundGateway.publishMessage(name + ": " + message);
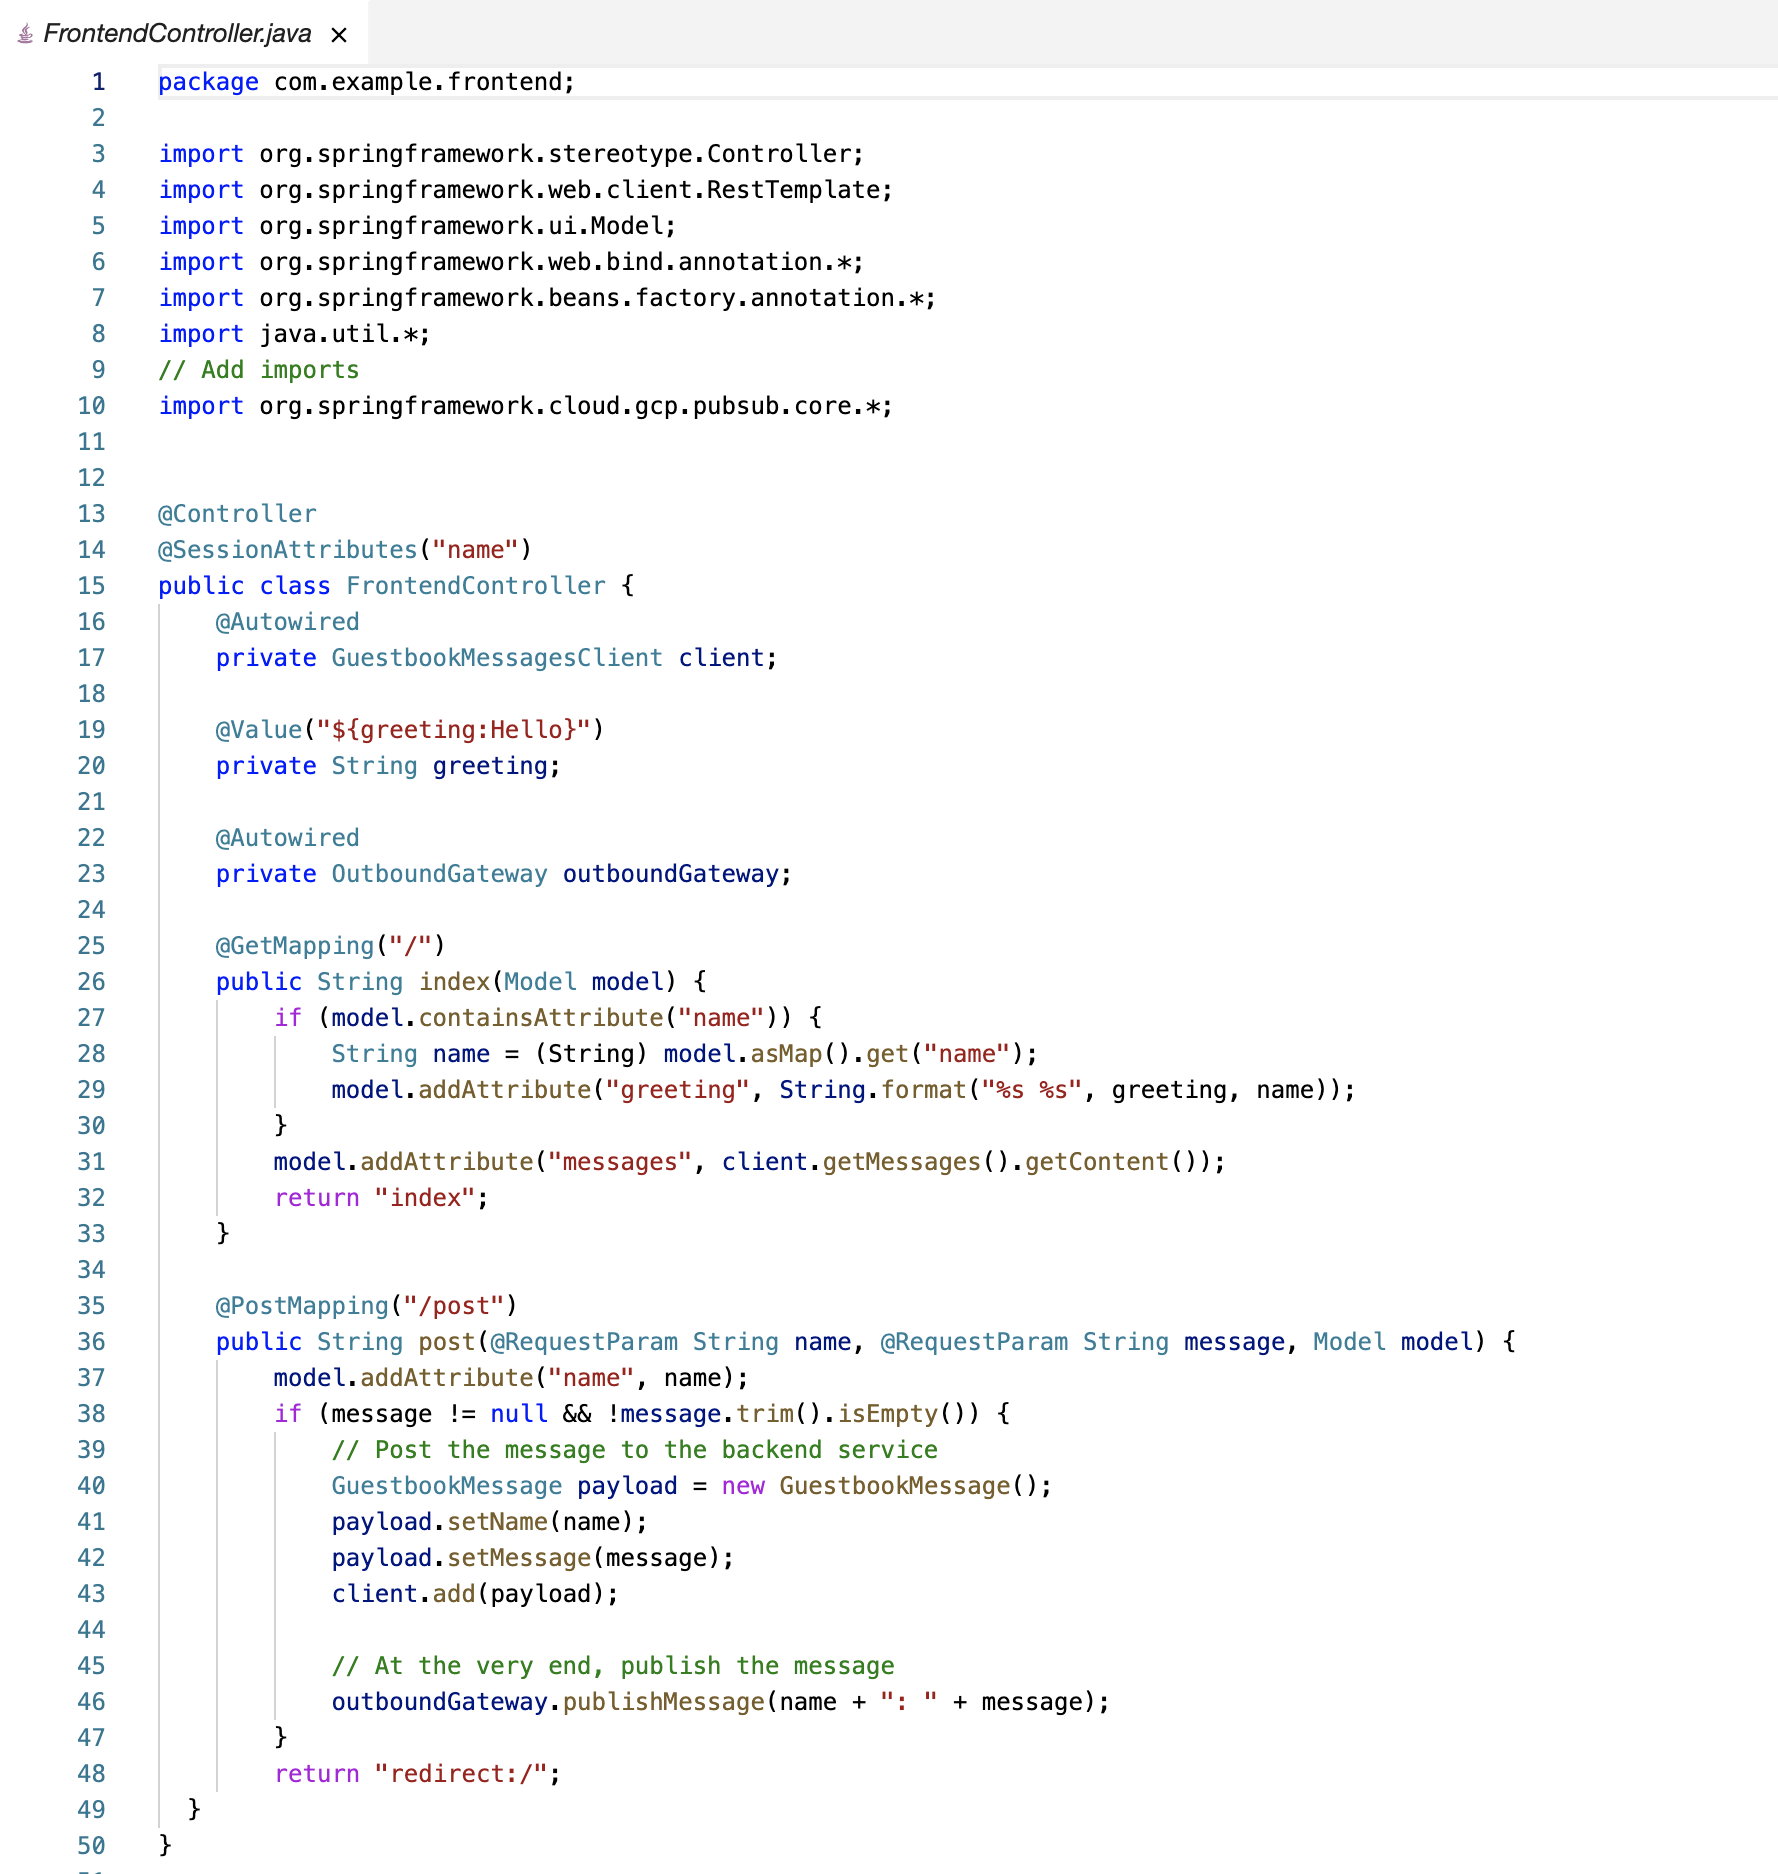
FrontendController.java should now look like the screenshot:
Task 5. Bind the output channel to the Pub/Sub topic
In this task, you configure a service activator to bind messagesOutputChannel to use Pub/Sub.
In the outbound gateway, you specified messagesOutputChannel as the default request channel. To define that channel to send the message to the Pub/Sub topic, you must create a new bean for that action in FrontendApplication.java.
- In the Cloud Shell code editor, open
~/guestbook-frontend/src/main/java/com/example/frontend/FrontendApplication.java.
- Add the following
import directives below the existing import directives:
import org.springframework.context.annotation.*;
import org.springframework.cloud.gcp.pubsub.core.*;
import org.springframework.cloud.gcp.pubsub.integration.outbound.*;
import org.springframework.integration.annotation.*;
import org.springframework.messaging.*;
- Add the following code just before the closing brace at the end of the
FrontEndApplication class definition:
@Bean
@ServiceActivator(inputChannel = "messagesOutputChannel")
public MessageHandler messageSender(PubSubTemplate pubsubTemplate) {
return new PubSubMessageHandler(pubsubTemplate, "messages");
}
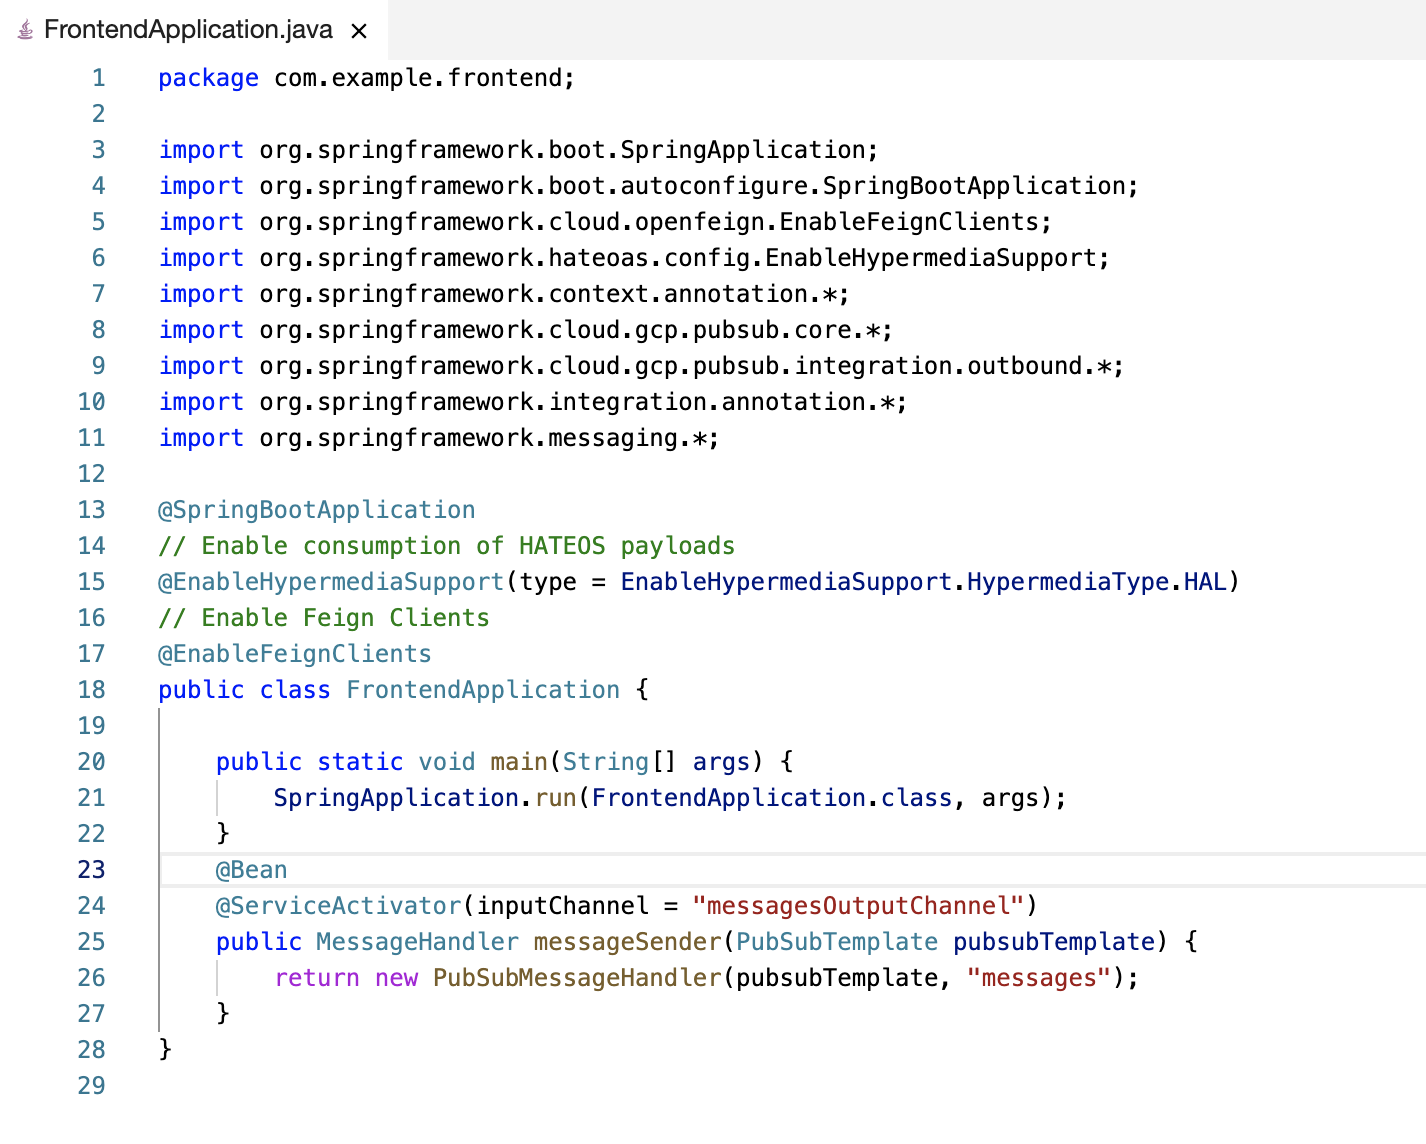
FrontendApplication.java now looks like the following:
Task 6. Test the application in Cloud Shell
In this task, you run the application in Cloud Shell to test the new message gateway interface.
- In Cloud Shell, change to the
guestbook-service directory:
cd ~/guestbook-service
- Run the backend service application:
./mvnw spring-boot:run -Dspring-boot.run.jvmArguments="-Dspring.profiles.active=cloud"
The backend service application launches on port 8081.This takes a minute or two to complete. You should wait until you see that the GuestbookApplication is running.
Started GuestbookApplication in 20.399 seconds (JVM running...)
- Open a new Cloud Shell session tab. Run the frontend application by clicking the plus (+) icon to the right of the title tab for the initial Cloud Shell session.
- Change to the
guestbook-frontend directory:
cd ~/guestbook-frontend
- Start the frontend application with the
cloud profile:
./mvnw spring-boot:run -Dspring.profiles.active=cloud
- Open the Cloud Shell web preview and post a message.
- Open a new Cloud Shell session tab and check the Pub/Sub subscription for the published messages:
gcloud pubsub subscriptions pull messages-subscription-1 --auto-ack
Note: Spring Integration for Pub/Sub works for both inbound messages and outbound messages. Pub/Sub also supports Spring Cloud Stream to create reactive microservices.
Review
In this lab, you added Spring Integration Core to an application. You also created an outbound message gateway in your application and configured an application to publish messages through a gateway. Finally, you bound the output channel of a message gateway to Pub/Sub.
End your lab
When you have completed your lab, click End Lab. Google Cloud Skills Boost removes the resources you’ve used and cleans the account for you.
You will be given an opportunity to rate the lab experience. Select the applicable number of stars, type a comment, and then click Submit.
The number of stars indicates the following:
- 1 star = Very dissatisfied
- 2 stars = Dissatisfied
- 3 stars = Neutral
- 4 stars = Satisfied
- 5 stars = Very satisfied
You can close the dialog box if you don't want to provide feedback.
For feedback, suggestions, or corrections, please use the Support tab.
Copyright 2022 Google LLC All rights reserved. Google and the Google logo are trademarks of Google LLC. All other company and product names may be trademarks of the respective companies with which they are associated.


