arrow_back

App Dev - Developing a Backend Service: Java

로그인 가입
700개 이상의 실습 및 과정 이용하기

App Dev - Developing a Backend Service: Java

실습 2시간 universal_currency_alt 크레딧 5개 show_chart 고급
info 이 실습에는 학습을 지원하는 AI 도구가 통합되어 있을 수 있습니다.
700개 이상의 실습 및 과정 이용하기

Overview

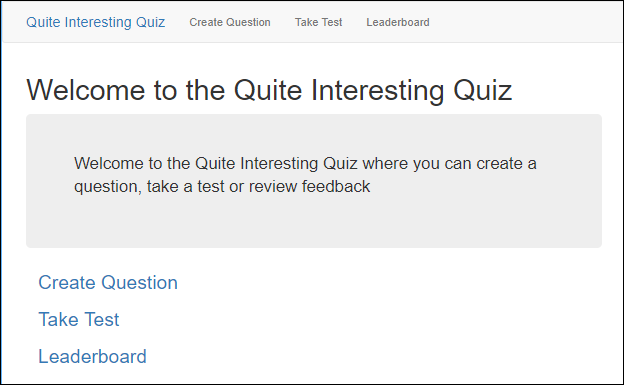
In this lab, you develop a backend service for an online Quiz application to process user feedback and save scores.

The Quiz application has two parts, the web application that will run in the first Cloud shell window and the worker application that runs in the second Cloud Shell window.

  • Web application: manages the logic of sending the user's feedback to a pub/sub topic.
  • Worker application: listens to the feedback provided by the user to eventually perform sentiment analysis and store them in a database (Cloud Spanner).

This process takes advantage of Google Cloud Platform (GCP) products and services:

  • Cloud Pub/Sub: The Topic alerts and provides the subscribing worker application to new scores and feedback for analysis.
  • Cloud Natural Language: Provides sentiment analysis on the feedback.
  • Cloud Spanner: Database for the Quiz application.

Objectives

In this lab, you will learn how to perform the following tasks:

  • Create and publish messages to a Cloud Pub/Sub topic.
  • Subscribe to the topic to receive messages in a separate worker application.
  • Perform sentiment analysis on feedback.
  • Create a Cloud Spanner database instance and schema, then insert data into the database.

Setup and requirements

For each lab, you get a new Google Cloud project and set of resources for a fixed time at no cost.

  1. Sign in to Qwiklabs using an incognito window.

  2. Note the lab's access time (for example, 1:15:00), and make sure you can finish within that time.
    There is no pause feature. You can restart if needed, but you have to start at the beginning.

  3. When ready, click Start lab.

  4. Note your lab credentials (Username and Password). You will use them to sign in to the Google Cloud Console.

  5. Click Open Google Console.

  6. Click Use another account and copy/paste credentials for this lab into the prompts.
    If you use other credentials, you'll receive errors or incur charges.

  7. Accept the terms and skip the recovery resource page.

Activate Google Cloud Shell

Google Cloud Shell is a virtual machine that is loaded with development tools. It offers a persistent 5GB home directory and runs on the Google Cloud.

Google Cloud Shell provides command-line access to your Google Cloud resources.

  1. In Cloud console, on the top right toolbar, click the Open Cloud Shell button.

    Highlighted Cloud Shell icon

  2. Click Continue.

It takes a few moments to provision and connect to the environment. When you are connected, you are already authenticated, and the project is set to your PROJECT_ID. For example:

Project ID highlighted in the Cloud Shell Terminal

gcloud is the command-line tool for Google Cloud. It comes pre-installed on Cloud Shell and supports tab-completion.

  • You can list the active account name with this command:
gcloud auth list

Output:

Credentialed accounts: - @.com (active)

Example output:

Credentialed accounts: - google1623327_student@qwiklabs.net
  • You can list the project ID with this command:
gcloud config list project

Output:

[core] project =

Example output:

[core] project = qwiklabs-gcp-44776a13dea667a6 Note: Full documentation of gcloud is available in the gcloud CLI overview guide .

Task 1. Prepare the Quiz application

In this section, you access Cloud Shell, clone the git repository containing the Quiz application, configure environment variables, and run the application.

Clone source code in Cloud Shell

  1. Enter the following command to clone the repository for the class:
git clone --depth=1 https://github.com/GoogleCloudPlatform/training-data-analyst
  1. Create a soft link to your working directory:
ln -s ~/training-data-analyst/courses/developingapps/v1.3/java/pubsub-languageapi-spanner ~/pubsub-languageapi-spanner

Set up the web application

In this section you'll configure dependencies and run the web application.

  1. Navigate to the directory that contains the sample files for this lab:

    cd ~/pubsub-languageapi-spanner/start
  2. Update the App Engine region using the sed command.

    export REGION={{{project_0.startup_script.app_region|REGION}}} sed -i "s/us-central/$REGION/g" prepare_web_environment.sh
  3. Configure the web application:

    . prepare_web_environment.sh

    This script file:

    • Creates an App Engine application.
    • Exports environment variables: GCLOUD_PROJECT and GCLOUD_BUCKET.
    • Runs mvn clean install.
    • Creates entities in Cloud Datastore.
    • Prints out the GCP Project ID.

    You can run this application when you see output similar to the following:

    [INFO] ------------------------------------------------------------------------ [INFO] BUILD SUCCESS [INFO] ------------------------------------------------------------------------ [INFO] Total time: 14.111 s [INFO] Finished at: 2021-12-06T20:54:09Z [INFO] ------------------------------------------------------------------------ Project ID: qwiklabs-gcp-02-6c9b7cfe44c0
  4. Run the web application:

    mvn spring-boot:run

    The application is running when you see output similar to the following:

    20:55:20.756 [restartedMain] INFO c.g.training.appdev.QuizApplication - Started QuizApplication in 20:55:20.756

Set up the worker application

  1. Click Open a new tab on the right of the Cloud Shell tab to open a second Cloud Shell window.

  2. Enter the following command to change the working directory:

    cd ~/pubsub-languageapi-spanner/start
  3. Prepare the environment in the second Cloud Shell window:

    . prepare_worker_environment.sh

    This script file:

    • Exports environment variables GCLOUD_PROJECT and GCLOUD_BUCKET.
    • Creates and configures a GCP Service Account.
    • Prints out the Google Cloud Platform Project ID.
  4. Now start the worker application:

    mvn exec:java@worker

Review the Quiz application

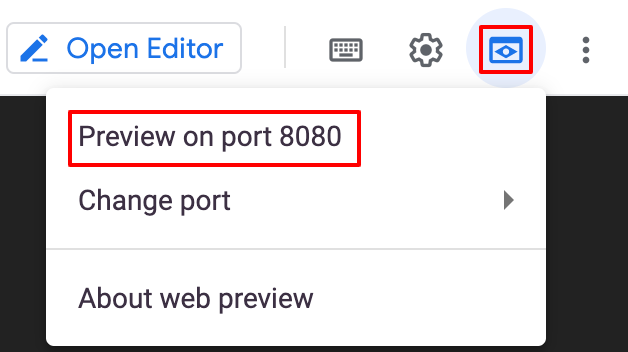
  1. Still in the second Cloud Shell window, click Web preview > Preview on port 8080 to preview the Quiz application.

    The Web preview drop-down menu, wherein the option Preview on port 8080 is highlighted.

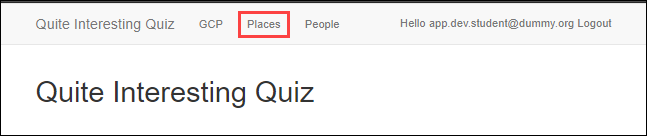
  2. In the navigation bar, click Take Test.

    The Quite Interesting Quiz welcome page, which includes the options Create Question, Take Test, and Leaderboard.

  3. Click Places.

    The Task Test page, which includes the highlighted Places tab.

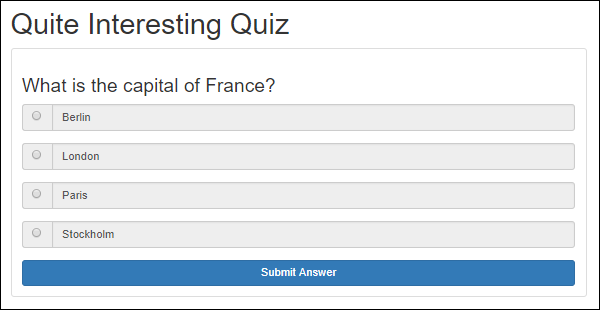
  4. Answer the question.

    A quiz question and several options, along with a Submit Answer button.

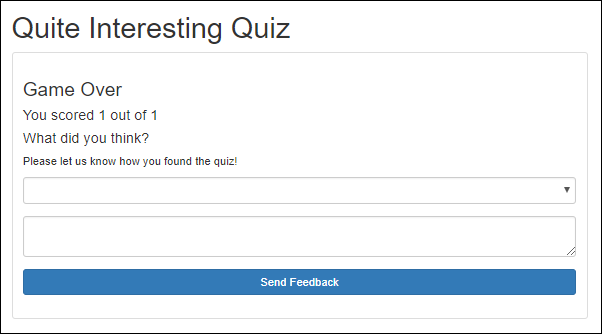
    After you answer the question, you should see a final screen inviting you to submit feedback.

    Two text fields on the final quiz page, along with the Send Feedback button.

    Quiz takers can select a rating and enter feedback.

  5. Return Cloud Shell. Press Ctrl+C in the first and second windows to stop the web and worker applications.

Task 2. Examine the Quiz application code

In this section you examine the file structure and the files that impact the Quiz application.

In this lab you'll view and edit files. You can use the shell editors that are installed on Cloud Shell, such as nano or vim, or use the Cloud Shell code editor. This lab uses the Cloud Shell code editor.

Launch the Cloud Shell Editor

  • In the Cloud Shell, click Open Editor.

Review the GCP application code structure

  1. Navigate to the /pubsub-languageapi-spanner/start folder using the file browser panel on the left side of the editor.

  2. Now expand the /src/main/java/com/google/training/appdev folder. All Java code paths are relative to this folder.

  3. Select the Feedback.java file in the .../services/gcp/domain folder.

This file contains a model class that represents the feedback submitted by quiz takers.

  1. Select the PublishService.java file in the .../services/gcp/pubsub folder.

This file contains a service class that allows applications to publish feedback messages to a Cloud Pub/Sub topic.

  1. Select the LanguageService.java file in the .../services/gcp/languageapi folder.

This file contains a service class that allows users to send text to the Cloud Natural Language ML API and to receive the sentiment score from the API.

  1. Select the SpannerService.java file in the .../services/gcp/spanner folder.

This file contains a service class that allows users to save the feedback and Natural Language API response data in a Cloud Spanner database instance.

Review the web and backend application code

  1. Select the QuizEndpoint.java file in the .../apifolder.

The handler for POST messages sent to the /api/quizzes/feedback/:quiz route publishes the feedback data received from the client to Pub/Sub.

  1. Select the ConsoleApp.java file in the .../backend folder.

This file runs as a separate console application to consume the messages delivered to a Pub/Sub subscription.

Task 3. Working with Cloud Pub/Sub

The Quiz application uses a Pub/Sub function to retrieve answers and feedback that a user inputs through the quiz interface.

In this section, you create a Cloud Pub/Sub topic and subscription in your GCP project, then publish and retrieve a message.

Create a Cloud Pub/Sub topic

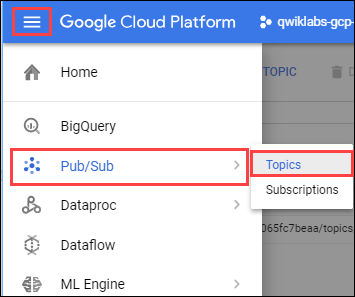
  1. In the Console, open the Navigation menu > View All Products. In the Analytics section, click Pub/Sub > Topics, and then click Create topic.

    The navigation path to the option Topics.

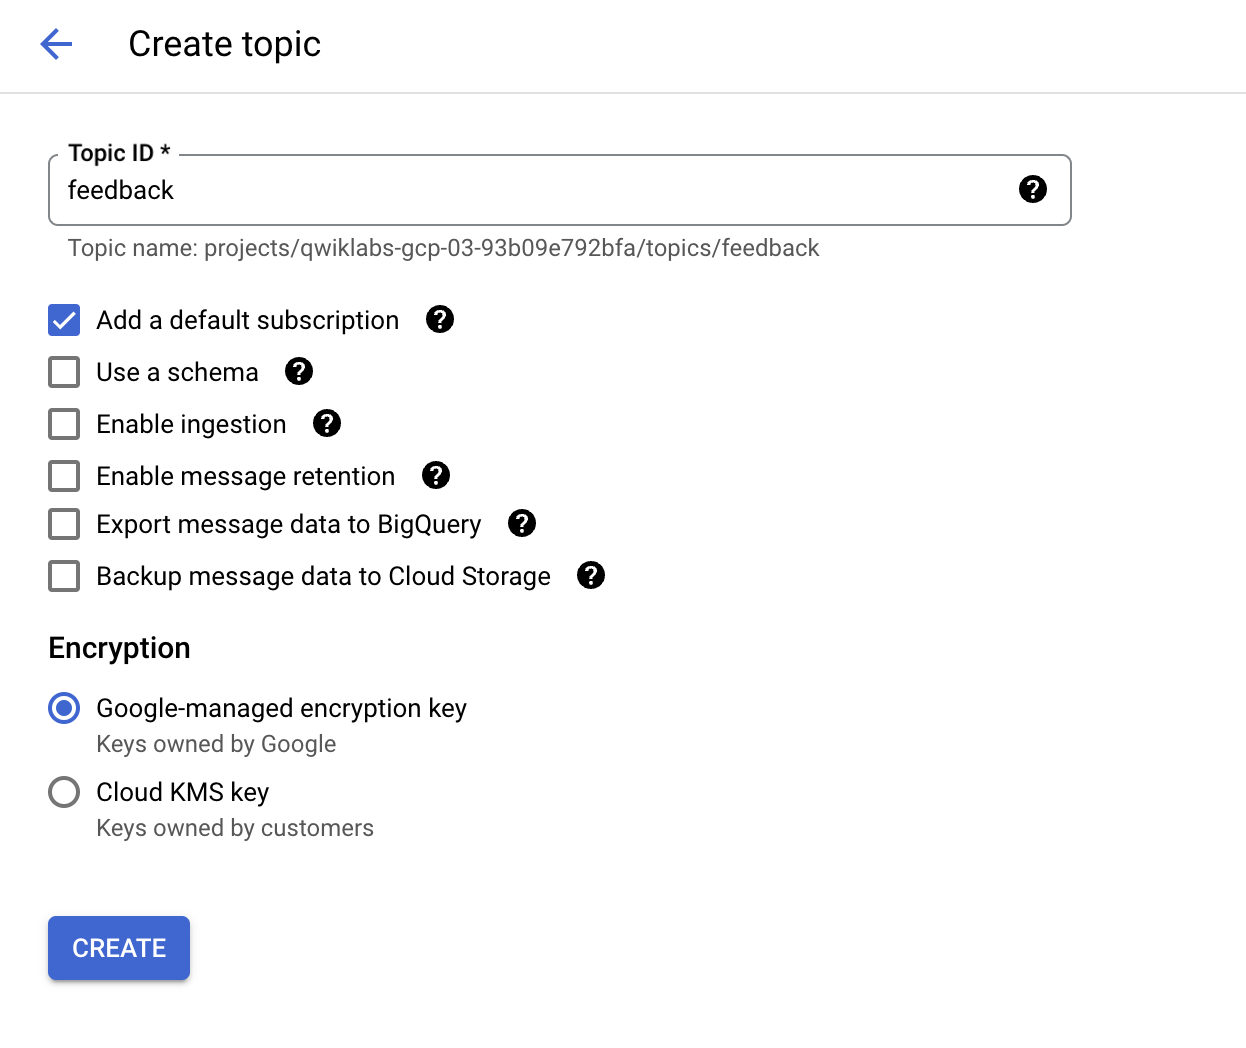
  2. Set the Topic ID to feedback, and then click Create.

    The Create a topic page, which includes the Topic ID 'feedback', along with the Create Topic and Cancel buttons.

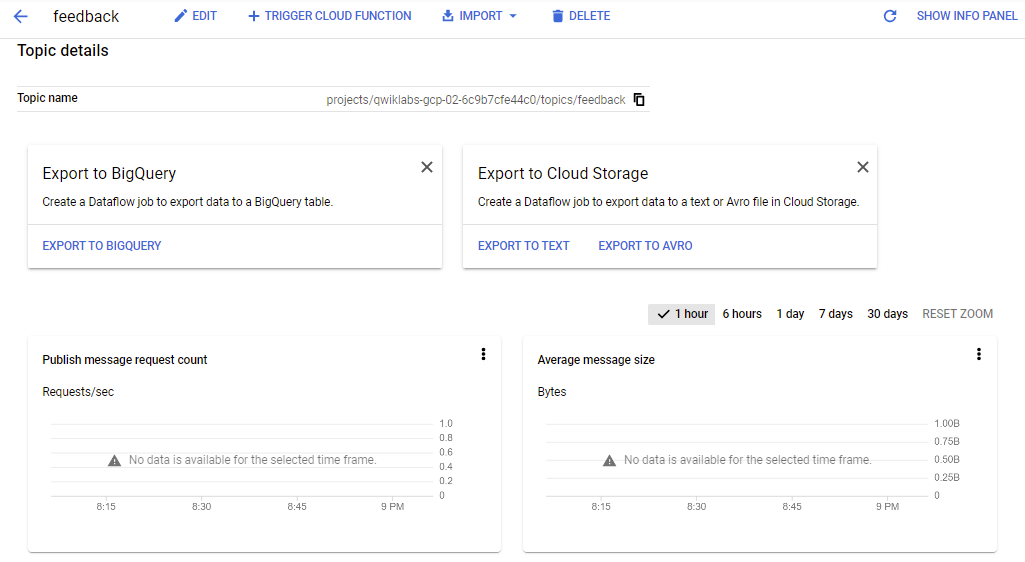
    The Topic details view opens:

    The Topic details page, which includes options such as Export to BigQuery and Publish message request report.

Create a Cloud Pub/Sub subscription

  1. Return to the second Cloud Shell window.

  2. Enter the following command to create a Cloud Pub/Sub subscription named cloud-shell-subscription against the feedback topic:

gcloud pubsub subscriptions create cloud-shell-subscription --topic feedback Note: If you receive an error about the active account not having valid credentials, wait for a minute and try the command again.

Publish a message to a Cloud Pub/Sub topic

  • Publish a "Hello World" message into the feedback topic in the second Cloud Shell window: gcloud pubsub topics publish feedback --message="Hello World"

Retrieve a message from a Cloud Pub/Sub subscription

  • To pull the message from the feedback topic with automatic acknowledgement of the message in the second Cloud Shell window:
gcloud pubsub subscriptions pull cloud-shell-subscription --auto-ack

Output:

The feedback topic's output, which includes information such as the data, message ID, and attributes.

Task 4. Publish messages to Cloud Pub/Sub programmatically

In this section, you write code to publish messages to Cloud Pub/Sub.

Note: Update code within the sections marked as follows:

// TODO

// END TODO

To maximize your learning, review the code, inline comments, and related API documentation.

Publish a Pub/Sub message

  1. Open the .../services/gcp/pubsub/PublishService.java file in the code editor. Update the file by adding code as directed.

  2. Declare two static final strings for the PROJECT_ID and TOPIC_NAME:

    // TODO: Declare and initialize two Strings, // PROJECT_ID and TOPIC_NAME private static final String PROJECT_ID = ServiceOptions.getDefaultProjectId(); private static final String TOPIC_NAME = "feedback"; // END TODO
  3. Move to the publishFeedback(...) methodand create a TopicName object using the PROJECT_ID and TOPIC_NAME strings.

    The topic name references the Cloud Pub/Sub topic you just created:

    // TODO: Create a TopicName object // for the feedback topic in the project TopicName topicName = TopicName.of(PROJECT_ID, TOPIC_NAME); // END TODO
  4. Declare a Publisher object and set it to null:

    // TODO: Declare a publisher for the topic Publisher publisher = null; // END TODO

    It will be initialized in the try block that follows.

  5. Move to the try block, and initialize the publisher object using its builder:

    // TODO: Initialize the publisher // using a builder and the topicName publisher = Publisher.newBuilder(topicName).build(); // END TODO
  6. Copy the JSON serialized feedbackMessage string to a ByteString:

    // TODO: Copy the serialized message // to a byte string ByteString data = ByteString.copyFromUtf8(feedbackMessage); // END TODO
  7. Declare a PubsubMessage object; initialize the message using its builder:

    // TODO: Create a Pub/Sub message using a // builder; set the message data PubsubMessage pubsubMessage = PubsubMessage.newBuilder().setData(data).build(); // END TODO
  8. Use the publisher to publish the message, assign the return value to the message ID future object:

    // TODO: Publish the message, // assign to the messageIdFuture messageIdFuture = publisher.publish(pubsubMessage); // END TODO
  9. Move to the finally block and retrieve the Pub/Sub messageId from the message ID future object:

    // TODO: Get the messageId from // the messageIdFuture String messageId = messageIdFuture.get(); // END TODO
  10. Complete the publishing code by shutting down the publisher:

    // TODO: Shutdown the publisher // to free up resources if (publisher != null) { publisher.shutdown(); } // END TODO
  11. Save services/gcp/pubsub/PublishService.java .

Write code to use the Pub/Sub publish functionality

  1. In the .../api/QuizEndpoint.java file, declare a new PublishService field named publishService.

  2. Apply the Spring @Autowired annotation:

    // TODO: Declare the publishService @Autowired private PublishService publishService; // END TODO
  3. In the processFeedback(...) method that handles POST requests to the '/feedback/:quiz' route, invoke the publishService.publishFeedback(feedback) method:

    // TODO: Publish the feedback to Pub/Sub publishService.publishFeedback(feedback); // END TODO
  4. Save /api/QuizEndpoint.java.

Run the application and create a Pub/Sub message

  1. In the first Cloud Shell window, restart the web application (if it is running, stop and start it):

    mvn spring-boot:run
  2. Preview the web application, click Take Test > Places.

  3. Answer the question, select the rating, enter some feedback text, and click Send Feedback.

  4. In the second Cloud Shell window, to pull a message from the cloud-shell-subscription:

    gcloud pubsub subscriptions pull cloud-shell-subscription --auto-ack

Task 5. Subscribing to Cloud Pub/Sub topics programmatically

In this section you write the code to create a subscription and receive message notifications from a Cloud Pub/Sub topic to the worker application.

Write code to create a Cloud Pub/Sub subscription and receive messages

  1. In the code editor open the ...backend/ConsoleApp.java file.

    • Update the file by adding code as directed.

    • Skip over the TODO blocks for languageService and spannerService. You'll return for those later.

  2. In the main()method, create a SubscriptionName object representing a new subscription named "worker1-subscription":

    // TODO: Create the Pub/Sub subscription name ProjectSubscriptionName subscription = ProjectSubscriptionName.of(projectId, "worker1-subscription"); // END TODO
  3. Create a SubscriptionAdminClient object using a try block:

    // TODO: Create the subscriptionAdminClient try (SubscriptionAdminClient subscriptionAdminClient = SubscriptionAdminClient.create()) { // TODO: create the Pub/Sub subscription // using the subscription name and topic subscriptionAdminClient.createSubscription( subscription, topic, PushConfig.getDefaultInstance(), 0); // END TODO } // END TODO
Note: Also in the try block, use the subscription admin client to create a new subscription against the feedback topic. Don't forget the closing brace.
  1. Move to the code that creates a MessageReceiver, and in the receiveMessage(...) override, extract the message data into a String:

    // TODO: Extract the message data as a JSON String String fb = message.getData().toStringUtf8(); // END TODO
  2. Use the consumer to acknowledge the message:

    // TODO: Ack the message consumer.ack(); // END TODO
  3. After the code that initializes an ObjectMapper, deserialize the JSON String message data into a feedback object:

    // TODO: Deserialize the JSON String // representing the feedback // Print out the feedback Feedback feedback = mapper.readValue( fb, Feedback.class); System.out.println("Feedback received: " + feedback); // END TODO
  4. After the block that creates the MessageReceiver, declare a Subscriber and initialize it to null.

    • Skip over a few TODO blocks and look for this one:
    // TODO: Declare a subscriber Subscriber subscriber = null; // END TODO
  5. Move to the try block, and initialize the Subscriber using its default builder. This requires the subscription and receiver:

    // TODO: Initialize the subscriber using // its default builder // with a subscription and receiver subscriber = Subscriber.newBuilder( subscription, receiver).build(); // END TODO
  6. Add a listener to the subscriber to display errors:

    // TODO: Add a listener to the subscriber subscriber.addListener( new Subscriber.Listener() { @Override public void failed( Subscriber.State from, Throwable failure) { System.err.println(failure); } }, MoreExecutors.directExecutor()); // END TODO
  7. Start the subscriber:

    // TODO: Start subscribing subscriber.startAsync().awaitRunning(); // END TODO
  8. Move to the final block. Write the code to stop the subscriber, and delete the subscription:

    // TODO: Stop subscribing if (subscriber != null) { subscriber.stopAsync().awaitTerminated(); } // END TODO // TODO: Delete the subscription try (SubscriptionAdminClient subscriptionAdminClient = SubscriptionAdminClient.create()) { subscriptionAdminClient.deleteSubscription( subscription); } // END TODO
  9. Save backend/ConsoleApp.java.

Run the web and worker application and create a Pub/Sub message

  1. In the first Cloud Shell window, stop and start the web application:

    mvn spring-boot:run
  2. In the second Cloud Shell window, start the worker application:

    mvn compile exec:java@worker
  3. In Cloud Shell, click Web preview > Preview on port 8080 to preview the quiz application.

  4. Click Take Test.

  5. Click Places.

  6. Answer the question, select the rating, enter some feedback text, and then click Send Feedback.

  7. Return to the second Cloud Shell window.

You should see that the worker application has received the feedback message via its handler and displayed it in the second Cloud Shell window. An example of a feedback message is as follows:

Feedback received: Feedback{email='app.dev.student@dummy.org', quiz='places', feedback='love the test', rating=5, timestamp=1527564677609, sentimentScore=0.0} Note: You can safely ignore WARNING output related to An illegal reflective access operation.
  1. Stop the web and console applications.

Task 6. Use the Cloud Natural Language API

In this section you write the code to perform sentiment analysis on the feedback text submitted by the user. For more information refer to Google Cloud Natural Language API.

Write code to invoke the Cloud Natural Language API

  1. Return to the editor and open the LanguageService.java file in the services/gcp/languageapi folder.

  2. Move to the analyzeSentiment(...) method, and create a LanguageServiceClient object in a try block.

    • In this step note that there is not a // END TODO in the content that you copy into the file:
    // TODO: Create the LanguageServiceClient object try (LanguageServiceClient language = LanguageServiceClient.create()) {
  3. Create a new Document object using its builder, and configure this object with the document content and type:

    // TODO: Create a new Document object // using the builder // Set the content and type Document doc = Document.newBuilder() .setContent(feedback) .setType(Document.Type.PLAIN_TEXT) .build(); // END TODO
  4. Use the Natural Language client object to analyze the sentiment of the document, assigning the result to a Sentiment object:

    // TODO: Use the client to analyze // the sentiment of the feedback Sentiment sentiment = language .analyzeSentiment(doc) .getDocumentSentiment(); // END TODO
  5. Then, return the sentiment score from the sentiment object:

    // TODO: Return the sentiment score return sentiment.getScore(); // END TODO }

    Don't forget the closing brace.

  6. Save the file.

Write code to use the Natural Language API functionality

  1. Return to the backend/ConsoleApp.java file.

  2. Move to the main(...) method.

  3. In the main()method, create a SubscriptionName object representing a new subscription named "worker2-subscription".

    • This replaces the "worker1-subscription".
    // TODO: Create the Pub/Sub subscription name ProjectSubscriptionName subscription = ProjectSubscriptionName.of(projectId, "worker2-subscription"); // END TODO
  4. At the point indicated by the comments, create the LanguageService instance using its static create() method:

    // TODO: Create the languageService LanguageService languageService = LanguageService.create(); // END TODO
  5. At the point indicated by the comments, use the languageService object to perform sentiment detection on the feedback:

    // TODO: Use the Natural Language API to analyze sentiment float sentimentScore = languageService.analyzeSentiment( feedback.getFeedback()); // END TODO
  6. Then, log the score to the console and assign a new score property to the feedback object:

    // TODO: Set the feedback object sentiment score feedback.setSentimentScore(sentimentScore); System.out.println("Score is: " + sentimentScore); // END TODO
  7. Save the file.

Run the web and worker application and test the Natural Language API

  1. Return to the first Cloud Shell window and restart the web application.

  2. Switch to the second Cloud Shell window and restart the worker application.

  3. Preview the web application, then click Take Test > Places.

  4. Answer the questions, select the rating, enter some feedback text, and then click Send Feedback.

  5. Return to the second Cloud Shell window.

    The output shows the worker application invoked the Cloud Natural Language API and displays the sentiment score in the console next to Score is:.

    For example:

    Feedback received: Feedback{email='app.dev.student@dummy.org', quiz='places', feedback='loved the test', rating=1, timestamp=1570116062687, sentimentScore=0.0} Score is: 0.8
  6. Stop the web and worker applications.

Task 7. Persist data to Cloud Spanner

In this section you create a Cloud Spanner instance, database, and table. You then write the code to persist the feedback data into the database.

Create a Cloud Spanner instance

  1. Return to the Cloud Console.
  2. Open the Navigation menu > View All Products. In the Databases section, click Spanner.
  3. Click CREATE A PROVISIONED INSTANCE.
  4. Set Instance name to quiz-instance.
  5. In the Choose a configuration section, select Region from the select a configuration dropdown menu.
  6. Click Create.

Create a Cloud Spanner database and table

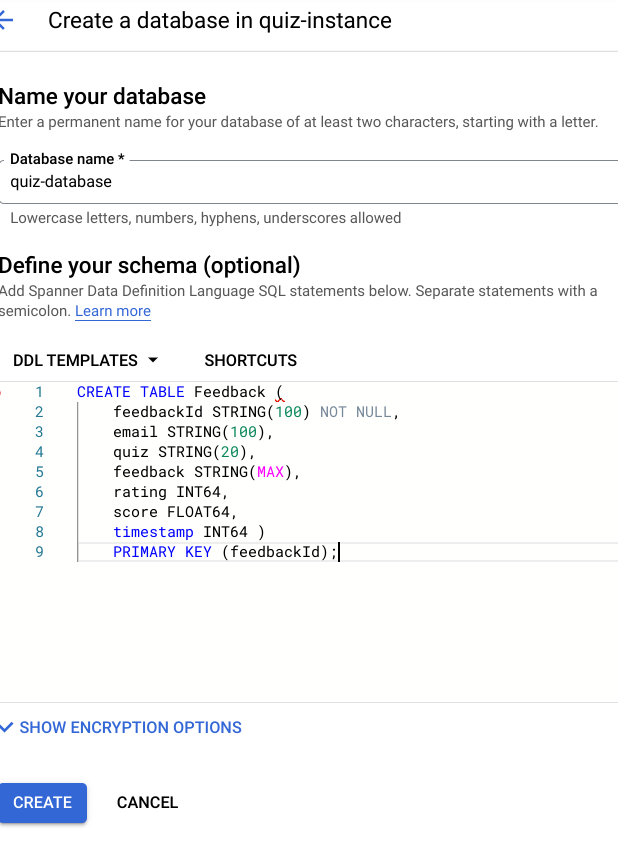
  1. On the Instance details page for quiz-instance, click CREATE DATABASE.

  2. For Database name, type quiz-database.

  3. Under Define your schema in the text box, type the following SQL statement:

    CREATE TABLE Feedback ( feedbackId STRING(100) NOT NULL, email STRING(100), quiz STRING(20), feedback STRING(MAX), rating INT64, score FLOAT64, timestamp INT64 ) PRIMARY KEY (feedbackId);

    The Name your database page, with the code added to the Define your schema field.

  4. Click Create.

Write code to persist data into Cloud Spanner

Note: Learn more about Cloud Spanner APIs from the APIs & reference reference.

For information about the specific APIs used in this section, on the left pane of the APIs & reference page, in the APIs and reference section, click Client libraries > Java reference.
  1. Return to the code editor, and move to the insertFeedback(...) method in the ...services/gcp/spanner/SpannerService.java file.

  2. Get a reference to Cloud Spanner:

    // TODO: Get a reference to the Spanner API SpannerOptions options = SpannerOptions.newBuilder().build(); Spanner spanner = options.getService(); // END TODO
  3. Get a reference to the Spanner database via the Database Id:

    // TODO: Get a reference to the quiz-instance // and its quiz-database DatabaseId db = DatabaseId.of( options.getProjectId(), "quiz-instance", "quiz-database"); // END TODO
  4. Get a reference to the Cloud Spanner Database client:

    // TODO: Get a client for the quiz-database DatabaseClient dbClient = spanner.getDatabaseClient(db); // END TODO
  5. Create a new List<Mutation> to reference all the changes that will be made to the database:

    // TODO: Create a list to hold mutations // against the database List<Mutation> mutations = new ArrayList<>(); // END TODO // END TODO
  6. Add the Mutation that represents an insert against the feedback table, using data from the feedback object:

    // TODO: Add an insert mutation mutations.add( // TODO: Build a new insert mutation Mutation.newInsertBuilder("Feedback") .set("feedbackId") .to(feedback.getEmail() + '_' + feedback.getQuiz() + "_" + feedback.getTimestamp()) .set("email") .to(feedback.getEmail()) .set("quiz") .to(feedback.getQuiz()) .set("feedback") .to(feedback.getFeedback()) .set("rating") .to(feedback.getRating()) .set("score") .to( feedback.getSentimentScore()) .set("timestamp") .to(feedback.getTimestamp()) .build()); // END TODO
  7. Use the database client to write the mutations:

    // TODO: Write the change to Spanner dbClient.write(mutations); // END TODO
  8. Save the file.

Write code to use the Cloud Spanner functionality

  1. Move to the main(...) method in the backend/ConsoleApp.java file.

  2. In the main()method, create a SubscriptionName object representing a new subscription named "worker3-subscription".

    • This replaces the "worker2-subscription":
    // TODO: Create the Pub/Sub subscription name ProjectSubscriptionName subscription = ProjectSubscriptionName.of(projectId, "worker3-subscription"); // END TODO
  3. At the point indicated by the comments, create the SpannerService instance:

    // TODO: Create the spannerService SpannerService spannerService = SpannerService.create(); // END TODO
  4. At the point indicated by the comments, use the spannerService object to insert the feedback into the database and print out a message to the console:

    // TODO: Insert the feedback into Cloud Spanner spannerService.insertFeedback(feedback); System.out.println("Feedback saved"); // END TODO
  5. Save the file.

Run the web and worker application and test Cloud Spanner

  1. Return to the first Cloud Shell window, start the web application.

  2. Switch to the second Cloud Shell window, restart the worker application.

  3. Preview the Quiz application, click Take Test > Places.

  4. Answer the questions, select the rating, enter some feedback text, and then click Send Feedback.

  5. Return to the second Cloud Shell window.

    You should see that the worker application has invoked the Cloud Spanner API and displayed the message in the console window.

  6. Return to the Console. Click Navigation menu > Spanner.

  7. Select quiz-instance > quiz-database and click Spanner Studio from the left pane .

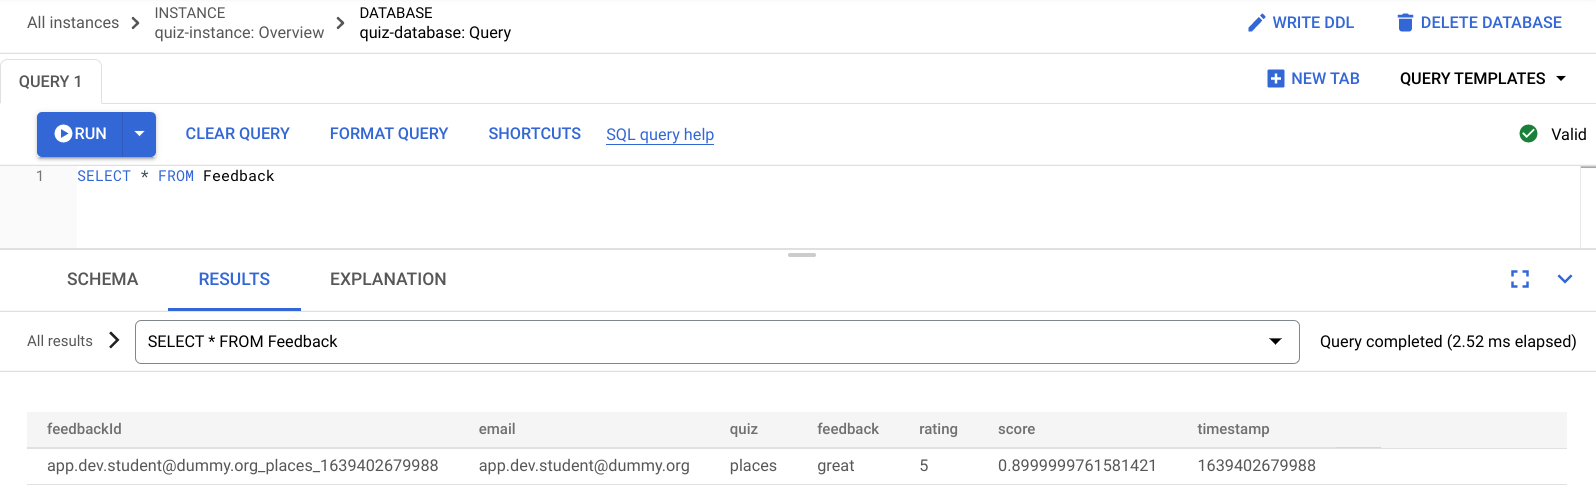
  8. To execute a query, in the Query dialog, type SELECT * FROM Feedback, and then click Run:

SELECT * FROM Feedback

You should see the new feedback record in the Cloud Spanner database, including the message data from Cloud Pub/Sub and the Quiz score from the Cloud Natural Language API.

The quiz-database query page, with the Results tabbed page displaying the feedbackID along with its score, rating, and feedback.

End your lab

When you have completed your lab, click End Lab. Google Cloud Skills Boost removes the resources you’ve used and cleans the account for you.

You will be given an opportunity to rate the lab experience. Select the applicable number of stars, type a comment, and then click Submit.

The number of stars indicates the following:

  • 1 star = Very dissatisfied
  • 2 stars = Dissatisfied
  • 3 stars = Neutral
  • 4 stars = Satisfied
  • 5 stars = Very satisfied

You can close the dialog box if you don't want to provide feedback.

For feedback, suggestions, or corrections, please use the Support tab.

Copyright 2022 Google LLC All rights reserved. Google and the Google logo are trademarks of Google LLC. All other company and product names may be trademarks of the respective companies with which they are associated.

시작하기 전에

  1. 실습에서는 정해진 기간 동안 Google Cloud 프로젝트와 리소스를 만듭니다.
  2. 실습에는 시간 제한이 있으며 일시중지 기능이 없습니다. 실습을 종료하면 처음부터 다시 시작해야 합니다.
  3. 화면 왼쪽 상단에서 실습 시작을 클릭하여 시작합니다.

시크릿 브라우징 사용

  1. 실습에 입력한 사용자 이름비밀번호를 복사합니다.
  2. 비공개 모드에서 콘솔 열기를 클릭합니다.

콘솔에 로그인

    실습 사용자 인증 정보를 사용하여
  1. 로그인합니다. 다른 사용자 인증 정보를 사용하면 오류가 발생하거나 요금이 부과될 수 있습니다.
  2. 약관에 동의하고 리소스 복구 페이지를 건너뜁니다.
  3. 실습을 완료했거나 다시 시작하려고 하는 경우가 아니면 실습 종료를 클릭하지 마세요. 이 버튼을 클릭하면 작업 내용이 지워지고 프로젝트가 삭제됩니다.

현재 이 콘텐츠를 이용할 수 없습니다

이용할 수 있게 되면 이메일로 알려드리겠습니다.

감사합니다

이용할 수 있게 되면 이메일로 알려드리겠습니다.

한 번에 실습 1개만 가능

모든 기존 실습을 종료하고 이 실습을 시작할지 확인하세요.

시크릿 브라우징을 사용하여 실습 실행하기

이 실습을 실행하려면 시크릿 모드 또는 시크릿 브라우저 창을 사용하세요. 개인 계정과 학생 계정 간의 충돌로 개인 계정에 추가 요금이 발생하는 일을 방지해 줍니다.