Google Cloud Datastore is a NoSQL document database built for automatic scaling, high performance, and ease of application development. In this lab, you use Datastore to store application data for an online Quiz application. You also configure the application to retrieve from Datastore and display the data in the quiz.
The Quiz application skeleton has already been written. You clone the repository that contains the skeleton using Google Cloud Shell, review the code using the Cloud Shell editor, and view it using the Cloud Shell web preview feature. You then modify the code that stores data to use Cloud Datastore.
Objectives
In this lab, you learn how to perform the following tasks:
Harness Cloud Shell as your development environment
Preview the application
Update the application code to integrate Cloud Datastore
Setup and requirements
For each lab, you get a new Google Cloud project and set of resources for a fixed time at no cost.
Sign in to Qwiklabs using an incognito window.
Note the lab's access time (for example, 1:15:00), and make sure you can finish within that time.
There is no pause feature. You can restart if needed, but you have to start at the beginning.
When ready, click Start lab.
Note your lab credentials (Username and Password). You will use them to sign in to the Google Cloud Console.
Click Open Google Console.
Click Use another account and copy/paste credentials for this lab into the prompts.
If you use other credentials, you'll receive errors or incur charges.
Accept the terms and skip the recovery resource page.
Activate Google Cloud Shell
Google Cloud Shell is a virtual machine that is loaded with development tools. It offers a persistent 5GB home directory and runs on the Google Cloud.
Google Cloud Shell provides command-line access to your Google Cloud resources.
In Cloud console, on the top right toolbar, click the Open Cloud Shell button.
Click Continue.
It takes a few moments to provision and connect to the environment. When you are connected, you are already authenticated, and the project is set to your PROJECT_ID. For example:
gcloud is the command-line tool for Google Cloud. It comes pre-installed on Cloud Shell and supports tab-completion.
You can list the active account name with this command:
Change the directory that contains the files for this lab:
cd ~/datastore/start
Export an environment variable, GCLOUD_PROJECT that references the GCP Project ID:
export GCLOUD_PROJECT=$DEVSHELL_PROJECT_ID
Note: GCP Project ID in Cloud Shell.
While working in Cloud Shell, you will have access to the Project ID in the $DEVSHELL_PROJECT_ID environment variable.
Install the application dependencies:
python3 -m pip install -r requirements.txt
Run the application:
python3 run_server.py
The application is running when you see a message similar to the following:
* Running on http://127.0.0.1:8080/ (Press CTRL+C to quit)
* Restarting with stat
* Debugger is active!
* Debugger PIN: 179-313-240
Review the Quiz application
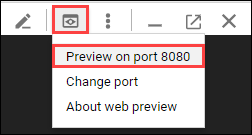
In Cloud Shell, click Web preview > Preview on port 8080 to preview the quiz application.
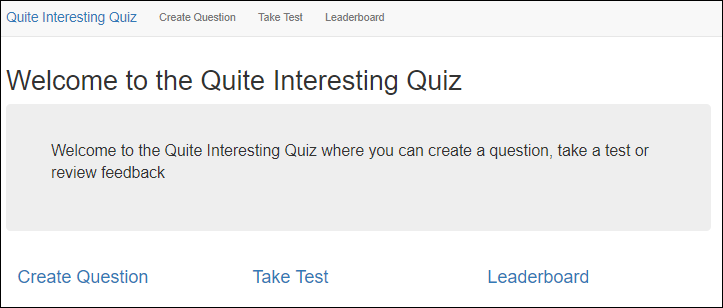
You should see the user interface for the web application. The three main parts to the application are:
Create Question
Take Test
Leaderboard
In the navigation bar, click Create Question.
You should see a simple form that contains textboxes for the question and answers with radio buttons to select the correct answer.
Note: Quiz authors can add questions in this part of the application.
This part of the application is written as a server-side web application using the popular Python web application framework Flask.
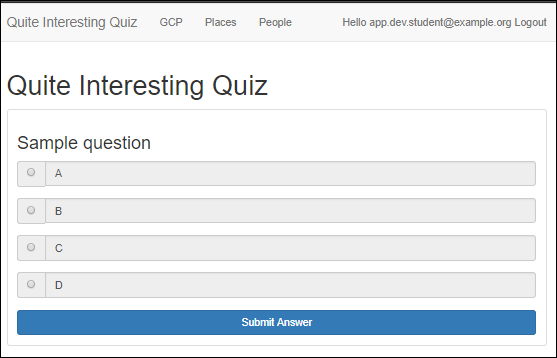
In the navigation bar, click Take Test, and then GCP to access the GCP questions.
You should see a sample question.
Quiz takers answer questions in this part of the application.
Note: This part of the application is written as a client-side web application.
To return to the server-side application, click on the Quite Interesting Quiz link in the navigation bar.
Task 3. Examine the Quiz application code
In this lab you'll view and edit files. You can use the shell editors that are installed on Cloud Shell, such as nano or vim or the Cloud Shell code editor.
This lab uses the Cloud Shell code editor to review the Quiz application code.
Launch the Cloud Shell code editor
In Cloud Shell, click Open Editor, and then click Open in a new window to launch the Cloud Editor.
Note: The code editor launches in a separate tab of your browser. In the original tab, click Open Terminal to reopen Cloud Shell.
Review the Flask Web application
Navigate to the /datastore/start folder using the file browser panel on the left side of the editor.
Note: Paths will be relative to this folder.
This application is a standard Python application written using the popular Flask application framework.
Select the ...run-server.py file.
This file contains the entrypoint for the application, and runs it on port 8080.
Select the ...quiz/__init__.py file.
This file imports routes for the web application and REST API.
Select the ...quiz/webapp/questions.py and ...quiz/webapp/routes.py file.
These files contain the routes that map URIs to handlers that display the form and collect form data posted by quiz authors in the web application.
Select the ...quiz/webapp/templates folder.
This folder contains templates for the web application user interface using Jinja2 templates.
View the ...quiz/webapp/templates/add.html file.
This file contains the Jinja2 template for the Create Question form.
Notice how there is a select list to pick a quiz, textboxes where an author can enter the question and answers, and radio buttons to select the correct answer.
Select the ...quiz/api/api.py file.
This file contains the handler that sends JSON data to students taking a test.
Select the ...quiz/gcp/datastore.py file.
This is the file where you write Datastore code to save and load quiz questions to and from Cloud Datastore.
This module will be imported into the web application and API.
Task 4. Adding entities to Cloud Datastore
In this section, you write code to save form data in Cloud Datastore.
Note: Update or add code between the following comments:
// TODO // END TODO
To maximize your learning, review the code, inline comments, and related API documentation.
Create an App Engine application to provision Cloud Datastore
Return to Cloud Shell and stop the application by pressing Ctrl+C.
To create an App Engine application in your project, use the following command:
gcloud app create --region "us-central"
You'll see this message when the App Engine has been created:
Creating App Engine application in project [qwiklabs-gcp-f67238775c00cfaa] and region [us-central]....done.
Success! The app is now created. Please use `gcloud app deploy` to deploy your first app.
Note: You aren't using App Engine for your web application yet. However, Cloud Datastore requires you to create an App Engine application in your project.
Import and use the Python Datastore module
Open the ...quiz/gcp/datastore.py file in the Cloud Shell editor and add the following code to perform the following:
Import the os module.
Use the os module to get the GCLOUD_PROJECT environment variable.
Import the datastore module from the google.cloud package.
Declare a datastore.Client client object named datastore_client.
Updated datastore.py
# TODO: Import the os module
import os
# END TODO
# TODO: Get the GCLOUD_PROJECT environment variable
project_id = os.getenv('GCLOUD_PROJECT')
# END TODO
from flask import current_app
# TODO: Import the datastore module from the google.cloud package
from google.cloud import datastore
# END TODO
# TODO: Create a Cloud Datastore client object
# The datastore client object requires the Project ID.
# Pass through the Project ID you looked up from the
# environment variable earlier
datastore_client = datastore.Client(project_id)
# END TODO
Write code to create a Cloud Datastore entity
Still in ...quiz/gcp/datastore.py, move to the save_question() function and remove the existing pass placeholder statement.
Perform the following by adding the code:
Use the Datastore client object to create a key for a Datastore entity whose kind is 'Question'.
Use Datastore to create a Datastore question entity with the key.
Iterate over the items in the dictionary of values supplied from the Web application form.
In the body of the loop, assign each key and value to the Datastore entity object.
Use the Datastore client to save the data.
datastore.py - save_question() function
"""
Create and persist and entity for each question
The Datastore key is the equivalent of a primary key in a relational database.
There are two main ways of writing a key:
1. Specify the kind, and let Datastore generate a unique numeric id
2. Specify the kind and a unique string id
"""
def save_question(question):
# TODO: Create a key for a Datastore entity
# whose kind is Question
key = datastore_client.key('Question')
# END TODO
# TODO: Create a Datastore entity object using the key
q_entity = datastore.Entity(key=key)
# END TODO
# TODO: Iterate over the form values supplied to the function
for q_prop, q_val in question.items():
# END TODO
# TODO: Assign each key and value to the Datastore entity
q_entity[q_prop] = q_val
# END TODO
# TODO: Save the entity
datastore_client.put(q_entity)
# END TODO
Save datastore.py.
Run the application and create a Cloud Datastore entity
Save the ...quiz/gcp/datastore.py file and then return to the Cloud Shell command prompt.
To run the application, execute the following command:
python3 run_server.py
In Cloud Shell, click Web preview > Preview on port 8080 to preview the quiz application.
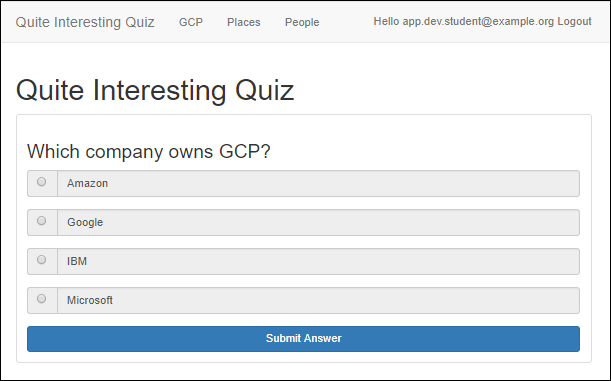
Click Create Question.
Complete the form with the following values, and then click Save:
Form Field
Value
Author
Your Name
Quiz
Google Cloud Platform
Title
Which company owns GCP?
Answer 1
Amazon
Answer 2
Google (select the Answer 2 radio button!)
Answer 3
IBM
Answer 4
Microsoft
You should returned to the application home page.
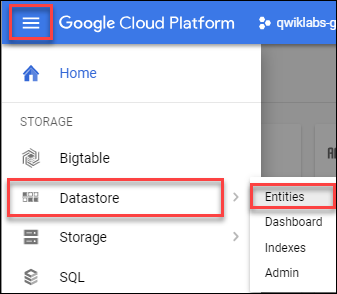
Return to the Console, click Navigation menu > Datastore > Entities.
You should see your new question!
Task 5. Retrieve Cloud Datastore entities
In this section, you write code to retrieve entity data from Cloud Datastore to view your question in the application.
Write code to retrieve Cloud Datastore entities
In the code editor, in the ...quiz/gcp/datastore.py file, remove the code for the list_entities(quiz, redact) function and replace it with a query that:
Retrieves Question entities for a specific quiz from Cloud Datastore.
Uses the Datastore client to fetch the query, and uses the returned data to create a list.
Enumerate the list of items, and promote each entity's Key identifier to a top level property.
Return the results.
Replace this code:
"""
Returns a list of question entities for a given quiz
- filter by quiz name, defaulting to gcp
- no paging
- add in the entity key as the id property
- if redact is true, remove the correctAnswer property from each entity
"""
def list_entities(quiz='gcp', redact=True):
return [{'quiz':'gcp', 'title':'Sample question', 'answer1': 'A', 'answer2': 'B', 'answer3': 'C', 'answer4': 'D', 'correctAnswer': 1, 'author': 'Nigel'}]
"""
With this code:
"""
Returns a list of question entities for a given quiz
- filter by quiz name, defaulting to gcp
- no paging
- add in the entity key as the id property
- if redact is true, remove the correctAnswer property from each entity
"""
def list_entities(quiz='gcp', redact=True):
query = datastore_client.query(kind='Question')
query.add_filter('quiz', '=', quiz)
results =list(query.fetch())
for result in results:
result['id'] = result.key.id
if redact:
for result in results:
del result['correctAnswer']
return results
"""
Save datastore.py.
Run the application and test the Cloud Datastore query
Now to test if your question is retrieved from Datastore and loaded into your Quiz application.
In Cloud Shell, press Ctrl+c to stop the application, then restart the application:
python3 run_server.py
Preview the quiz. If the browser running the quiz is still open, reload the browser. Otherwise, click Web preview > Preview on port 8080.
Click Take Test > GCP.
You should see the questions you created.
End your lab
When you have completed your lab, click End Lab. Google Cloud Skills Boost removes the resources you’ve used and cleans the account for you.
You will be given an opportunity to rate the lab experience. Select the applicable number of stars, type a comment, and then click Submit.
The number of stars indicates the following:
1 star = Very dissatisfied
2 stars = Dissatisfied
3 stars = Neutral
4 stars = Satisfied
5 stars = Very satisfied
You can close the dialog box if you don't want to provide feedback.
For feedback, suggestions, or corrections, please use the Support tab.
Copyright 2022 Google LLC All rights reserved. Google and the Google logo are trademarks of Google LLC. All other company and product names may be trademarks of the respective companies with which they are associated.
I lab creano un progetto e risorse Google Cloud per un periodo di tempo prestabilito
I lab hanno un limite di tempo e non possono essere messi in pausa. Se termini il lab, dovrai ricominciare dall'inizio.
In alto a sinistra dello schermo, fai clic su Inizia il lab per iniziare
Utilizza la navigazione privata
Copia il nome utente e la password forniti per il lab
Fai clic su Apri console in modalità privata
Accedi alla console
Accedi utilizzando le tue credenziali del lab. L'utilizzo di altre credenziali potrebbe causare errori oppure l'addebito di costi.
Accetta i termini e salta la pagina di ripristino delle risorse
Non fare clic su Termina lab a meno che tu non abbia terminato il lab o non voglia riavviarlo, perché il tuo lavoro verrà eliminato e il progetto verrà rimosso
Questi contenuti non sono al momento disponibili
Ti invieremo una notifica via email quando sarà disponibile
Bene.
Ti contatteremo via email non appena sarà disponibile
Un lab alla volta
Conferma per terminare tutti i lab esistenti e iniziare questo
Utilizza la navigazione privata per eseguire il lab
Utilizza una finestra del browser in incognito o privata per eseguire questo lab. In questo modo eviterai eventuali conflitti tra il tuo account personale e l'account Studente, che potrebbero causare addebiti aggiuntivi sul tuo account personale.
In this lab, you review the case study application, an online Quiz, and then store application data for the Quiz application in Cloud Datastore.
Durata:
Configurazione in 0 m
·
Accesso da 120 m
·
Completamento in 120 m