In this lab, you set up a Java development environment on Google Cloud. You use Google Compute Engine to create a virtual machine (VM) and install software libraries for software development.
Objectives
You perform the following tasks:
Provision a Google Compute Engine instance.
Connect to the instance using SSH.
Install a Java library on the instance.
Verify the software installation.
Google Cloud
Google Cloud consists of a set of physical assets, such as computers and hard disk drives, and virtual resources, such as virtual machines (VMs), that are contained in Google's data centers around the globe. Each data center location is in a global region. Regions include Central US, Western Europe, and East Asia. Each region is a collection of zones, which are isolated from each other within the region. Each zone is identified by a name that combines a letter identifier with the name of the region. For example, zone a in the East Asia region is named asia-east1-a.
This distribution of resources provides several benefits, including redundancy in case of failure and reduced latency by locating resources closer to clients. This distribution also introduces some rules about how resources can be used together.
Projects
Any Google Cloud resources that you allocate and use must belong to a project. You can think of a project as the organizing entity for what you're building.
A project is made up of the settings, permissions, and other metadata that describe your applications.
Resources within a single project can work together easily, for example by communicating through an internal network, subject to the regions-and-zones rules. The resources that each project contains remain separate across project boundaries; you can only interconnect them through an external network connection.
Each Google Cloud project has a:
Project name, which you provide;
Project ID, which you can provide or Google Cloud can provide for you; and
Project number, which Google Cloud provides.
As you work with Google Cloud, you'll use these identifiers in certain command lines and API calls.
The Google Cloud Console displays project name, ID and number under
Home > Dashboard.
Each project ID is unique across Google Cloud. Once you have created a project, you can delete the project but its ID can never be used again.
When billing is enabled, each project is associated with one billing account. Multiple projects can have their resource usage billed to the same account.
A project serves as a namespace. This means every resource within each project must have a unique name, but you can usually reuse resource names if they are in separate projects. Some resource names must be globally unique. Refer to the documentation for the resource for details.
In this lab, you provision a Google Compute Engine virtual machine (VM) and install software libraries for Java software development on Google Cloud.
Ways to interact with the services
Google Cloud gives you three basic ways to interact with the services and resources:
Google Cloud Console: a web-based, graphical user interface that you can use to manage your Google Cloud projects and resources.
Command-line interface:
Google Cloud SDK: provides the gcloud command-line tool, which gives you access to the commands you need.
Cloud Shell: a browser-based, interactive shell environment for Google Cloud. You can access Cloud Shell from the Google Cloud console.
If you prefer to work in a terminal window, the Google Cloud SDK provides the gcloud command-line tool, which gives you access to the commands you need. The gcloud tool can be used to manage both your development workflow and your Google Cloud resources. See the gcloud reference for the complete list of available commands.
Client libraries: The Cloud SDK includes client libraries that enable you to easily create and manage resources. Google Cloud client libraries expose APIs to provide access to services and resource management functions. You also can use the Google API client libraries to access APIs for products such as Google Maps, Google Drive, and YouTube.
Setup and requirements
Lab setup
For each lab, you get a new Google Cloud project and set of resources for a fixed time at no cost.
Sign in to Qwiklabs using an incognito window.
Note the lab's access time (for example, 1:15:00), and make sure you can finish within that time.
There is no pause feature. You can restart if needed, but you have to start at the beginning.
When ready, click Start lab.
Note your lab credentials (Username and Password). You will use them to sign in to the Google Cloud Console.
Click Open Google Console.
Click Use another account and copy/paste credentials for this lab into the prompts.
If you use other credentials, you'll receive errors or incur charges.
Accept the terms and skip the recovery resource page.
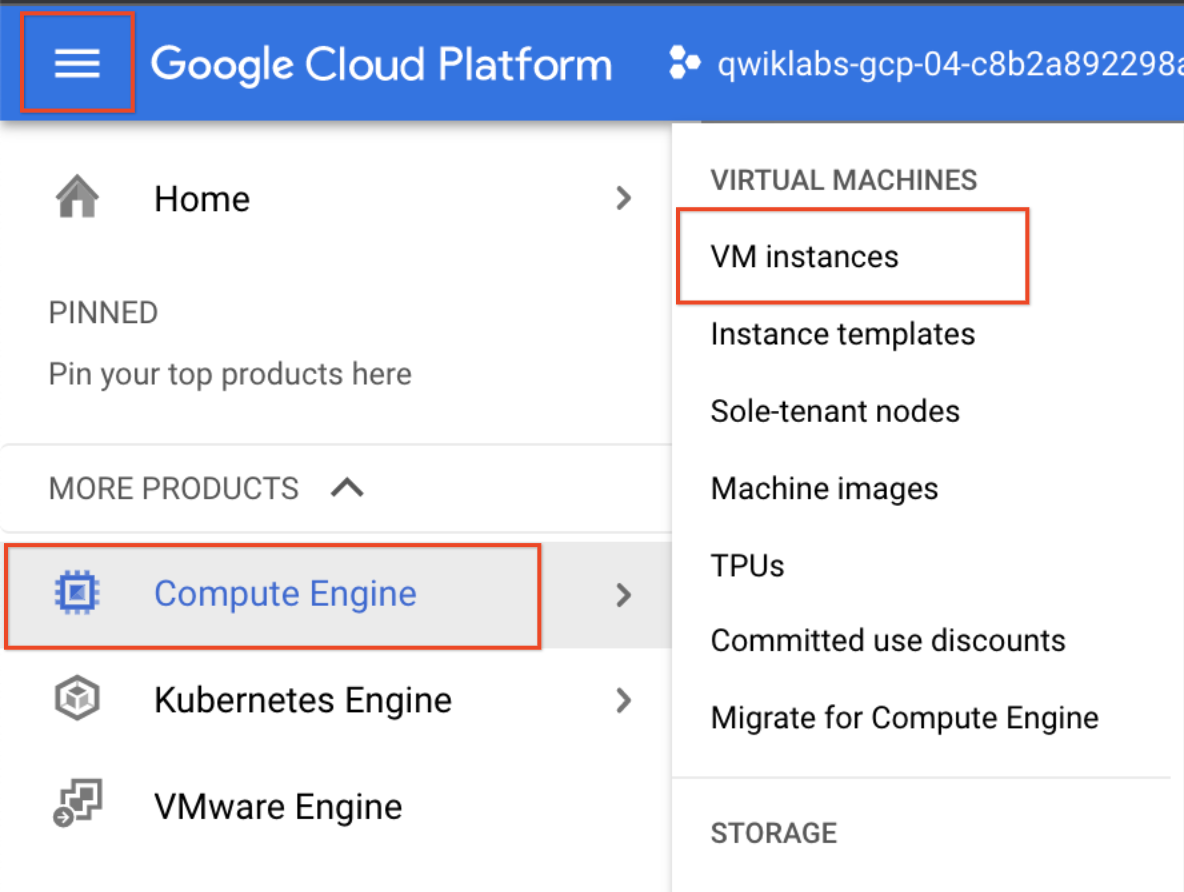
Task 1. Create a Compute Engine virtual machine instance
In this section, you use the Google Cloud Console to provision a new Google Compute Engine virtual machine (VM) instance.
Create and connect to a VM
In the console, click Navigation menu > Compute Engine > VM instances.
On the VM Instances page, click Create Instance.
For the Machine configuration page, specify the following:
Name:dev-instance
Region:us-central1
Zone:us-central1-f
Note: Google Cloud offers products and services in multiple distinct geographic locations, called regions. Each region has multiple distinct zones. Each zone is isolated from other zones in terms of power and internet connectivity.
Click Networking.
For Firewall, enable Allow HTTP traffic.
Click Security.
For Access scopes, enable Allow full access to all Cloud APIs.
Leave the remaining settings as their defaults, and click Create.
It takes about 20 seconds for the virtual machine to be provisioned and started.
On the VM instances page, in the row for the dev-instance, click SSH (in the Connect column).
This launches a browser-hosted SSH session. If you have a popup blocker, you may need to click twice.
There's no need to configure or manage SSH keys.
Test completed task
Click Check my progress to verify your performed task. If you have completed the task successfully you will granted with an assessment score.
Create a Compute Engine Virtual Machine Instance (zone: us-central1-f)
Install software and configure the VM instance
In the SSH session, to update the Debian package list, enter the following command:
sudo apt-get update
Install Java 17:
sudo apt-get install -yq openjdk-17-jdk
Apply workaround for certificate issue in OpenJDK 17:
Change to the directory that contains the sample files:
cd ~/devenv
Run a simple web application:
mvn clean install
Wait for the project to build. When the project successfully finishes you will see output similar to this:
[INFO] -------------------------------------------------------
[INFO] BUILD SUCCESS
[INFO] -------------------------------------------------------
[INFO] Total time: 26.429 s
[INFO] Finished at: 2021-12-06T09:46:15Z
[INFO] -------------------------------------------------------
Run the application:
mvn spring-boot:run
You may see a number of warnings, but the project is running when you can see
an INFO message in the output similar to the following:
09:48:00.374 [restartedMain] INFO c.g.training.appdev.DemoApplication - Started DemoApplication in 2.491 seconds (JVM running for 3.28)
Return to the Cloud Console VM instances list, and click on the External IP address for the dev-instance.
A browser opens to display a Hello GCP dev! message from Java.
Test completed task
Click Check my progress to verify your performed task. If you have completed the task successfully you will granted with an assessment score.
Run application software to get success response
Return to the SSH window, and stop the application by pressing Ctrl+C.
To run a simple Java application that lists Compute Engine instances, execute the following command:
mvn exec:java@list-gce
The terminal window outputs VM details.
Task 3. Test your understanding
Below is a multiple-choice question to reinforce your understanding of this lab's concepts.
End your lab
When you have completed your lab, click End Lab. Google Cloud Skills Boost removes the resources you’ve used and cleans the account for you.
You will be given an opportunity to rate the lab experience. Select the applicable number of stars, type a comment, and then click Submit.
The number of stars indicates the following:
1 star = Very dissatisfied
2 stars = Dissatisfied
3 stars = Neutral
4 stars = Satisfied
5 stars = Very satisfied
You can close the dialog box if you don't want to provide feedback.
For feedback, suggestions, or corrections, please use the Support tab.
Copyright 2022 Google LLC All rights reserved. Google and the Google logo are trademarks of Google LLC. All other company and product names may be trademarks of the respective companies with which they are associated.
I lab creano un progetto e risorse Google Cloud per un periodo di tempo prestabilito
I lab hanno un limite di tempo e non possono essere messi in pausa. Se termini il lab, dovrai ricominciare dall'inizio.
In alto a sinistra dello schermo, fai clic su Inizia il lab per iniziare
Utilizza la navigazione privata
Copia il nome utente e la password forniti per il lab
Fai clic su Apri console in modalità privata
Accedi alla console
Accedi utilizzando le tue credenziali del lab. L'utilizzo di altre credenziali potrebbe causare errori oppure l'addebito di costi.
Accetta i termini e salta la pagina di ripristino delle risorse
Non fare clic su Termina lab a meno che tu non abbia terminato il lab o non voglia riavviarlo, perché il tuo lavoro verrà eliminato e il progetto verrà rimosso
Questi contenuti non sono al momento disponibili
Ti invieremo una notifica via email quando sarà disponibile
Bene.
Ti contatteremo via email non appena sarà disponibile
Un lab alla volta
Conferma per terminare tutti i lab esistenti e iniziare questo
Utilizza la navigazione privata per eseguire il lab
Utilizza una finestra del browser in incognito o privata per eseguire questo lab. In questo modo eviterai eventuali conflitti tra il tuo account personale e l'account Studente, che potrebbero causare addebiti aggiuntivi sul tuo account personale.
In this lab, you will provision a Google Compute Engine virtual machine and install software libraries for software development.
Durata:
Configurazione in 0 m
·
Accesso da 120 m
·
Completamento in 120 m