Many applications will eventually need to be distributed and have services
running across multiple Anthos clusters. Anthos Service Mesh enables this with
multi-cluster meshes.
A multi-cluster service mesh is a mesh composed of services running on more
than one cluster.
A multi-cluster service mesh has the advantage that all the services look the
same to clients, regardless of where the workloads are actually running. It’s
transparent to the application whether a service is deployed in a single or
multi-cluster service mesh.
In this lab, you build a service mesh encompassing two clusters, west and
east. You deploy an application comprised of services, some running on
west and some on east. You test the application to make sure that
services can communicate across clusters without problem.
Objectives
In this lab, you learn how to perform the following tasks:
Install and configure a multi-cluster mesh
Deploy and use Online Boutique in multiple configurations
Review the deployments in each cluster
Understand service-to-service flow between clusters
Migrate workloads from one cluster to another
Setup
In this task, you use Qwiklabs and perform initialization steps for your lab.
For each lab, you get a new Google Cloud project and set of resources for a fixed time at no cost.
Sign in to Qwiklabs using an incognito window.
Note the lab's access time (for example, 1:15:00), and make sure you can finish within that time.
There is no pause feature. You can restart if needed, but you have to start at the beginning.
When ready, click Start lab.
Note your lab credentials (Username and Password). You will use them to sign in to the Google Cloud Console.
Click Open Google Console.
Click Use another account and copy/paste credentials for this lab into the prompts.
If you use other credentials, you'll receive errors or incur charges.
Accept the terms and skip the recovery resource page.
After you complete the initial sign-in steps, the project dashboard opens.
Click Select a project, highlight your Google Cloud Project ID, and click
OPEN to select your project.
Activate Google Cloud Shell
Google Cloud Shell is a virtual machine that is loaded with development tools. It offers a persistent 5GB home directory and runs on the Google Cloud.
Google Cloud Shell provides command-line access to your Google Cloud resources.
In Cloud console, on the top right toolbar, click the Open Cloud Shell button.
Click Continue.
It takes a few moments to provision and connect to the environment. When you are connected, you are already authenticated, and the project is set to your PROJECT_ID. For example:
gcloud is the command-line tool for Google Cloud. It comes pre-installed on Cloud Shell and supports tab-completion.
You can list the active account name with this command:
[core]
project = qwiklabs-gcp-44776a13dea667a6
Note:
Full documentation of gcloud is available in the
gcloud CLI overview guide
.
Task 1. Prepare to install Anthos Service Mesh
Confirm that you have two GKE clusters already created (use either the
Navigation menu > Kubernetes Engine > Clusters page or run the command
gcloud container clusters list).
Confirm that both clusters have been registered with the Anthos Connect Hub
by visiting Navigation menu > Anthos > Clusters.
Set the zone environment variable for the west cluster:
Add the context info for each cluster to your kubeconfig file, and
create an easy context to remember alias for each context:
# configure the west cluster context
gcloud container clusters get-credentials $C1_NAME --zone $C1_LOCATION --project $PROJECT_ID
kubectx $C1_NAME=.
# configure the east cluster context
gcloud container clusters get-credentials $C2_NAME --zone $C2_LOCATION --project $PROJECT_ID
kubectx $C2_NAME=.
You can verify that the two aliased contexts exist, and that the currently
selected context is east, by using the following command:
kubectx
The result should look like this:
east
west
Task 2. Install Anthos Service Mesh on both clusters
Install Anthos Service Mesh on the west cluster using this command:
# switch to west context
kubectx west
# install Anthos Service Mesh
./asmcli install \
--project_id $PROJECT_ID \
--cluster_name $C1_NAME \
--cluster_location $C1_LOCATION \
--fleet_id $FLEET_PROJECT_ID \
--output_dir $DIR_PATH \
--enable_all \
--ca mesh_ca
Note: Prior to installation, asmcli does the following if you use the enable_all switch:
Grants necessary permissions on project
Enables necessary APIs
Labels the cluster to identify the mesh
Creates a service account that allows components
to securely access resources
Registers the cluster if it's not already registered
It then downloads the needed installation files, generates the required configuration files, and installs the software on your cluster.
When installing Anthos Service Mesh, you will need to choose a certificate authority. In this lab, you are using Mesh CA, Google's managed CA service. This CA is available for GKE clusters, Anthos on VMware clusters, and Anthos on bare metal clusters.
If you were creating a multi-cluster mesh that included Anthos on AWS clusters or attached clusters, you would install using Istio CA. This process is similar, but with a few extra steps you can find in the online documentation.
Install an ingress gateway on your west cluster:
# create the gateway namespace
kubectl create namespace $GATEWAY_NAMESPACE
# enable sidecar injection on the gateway namespace
kubectl label ns $GATEWAY_NAMESPACE \
istio.io/rev=$(kubectl -n istio-system get pods -l app=istiod -o json | jq -r '.items[0].metadata.labels["istio.io/rev"]') \
--overwrite
# Apply the configurations
kubectl apply -n $GATEWAY_NAMESPACE \
-f $DIR_PATH/samples/gateways/istio-ingressgateway
Note: Anthos Service Mesh gives you the option to deploy and manage gateways as part of your service mesh. A gateway describes a load balancer operating at the edge of the mesh receiving incoming or outgoing HTTP/TCP connections. Gateways are Envoy proxies that provide you with fine-grained control over traffic entering and leaving the mesh.
To set up your ingress gateway, you create a namespace for the gateway
components, then apply the manifests in the ingress-gateway directory to create the necessary resources on your cluster.
You can take a few minutes to view the contents of the manifests in the
ingress-gateway directory to better understand what's being deployed. You should see:
A deployment for the gateway pods, along with autoscaling and disruption budget configurations.
A service that exposes the deployment.
A service account, a customer role, and a rolebinding granting the role
to the new service account.
Switch to the east context and install Anthos Service Mesh on the
east cluster using these commands:
# switch to the east context
kubectx east
# install Anthos Service Mesh
./asmcli install \
--project_id $PROJECT_ID \
--cluster_name $C2_NAME \
--cluster_location $C2_LOCATION \
--fleet_id $FLEET_PROJECT_ID \
--output_dir $DIR_PATH \
--enable_all \
--ca mesh_ca
# create the gateway namespace
kubectl create namespace $GATEWAY_NAMESPACE
# enable sidecar injection on the gateway namespace
kubectl label ns $GATEWAY_NAMESPACE \
istio.io/rev=$(kubectl -n istio-system get pods -l app=istiod -o json | jq -r '.items[0].metadata.labels["istio.io/rev"]') \
--overwrite
# Apply the configurations
kubectl apply -n $GATEWAY_NAMESPACE \
-f $DIR_PATH/samples/gateways/istio-ingressgateway
Task 3. Configure the mesh to span both clusters
GKE automatically adds firewall rules to each node to allow traffic within the
same subnet. If your mesh contains multiple subnets, you must explicitly set up
the firewall rules to allow cross-subnet traffic. You must add a new firewall
rule for each subnet to allow the source IP CIDR blocks and targets ports of
all the incoming traffic.
Create a firewall rule that allows all traffic between the
two clusters in your mesh:
function join_by { local IFS="$1"; shift; echo "$*"; }
# get the service IP CIDRs for each cluster
ALL_CLUSTER_CIDRS=$(gcloud container clusters list \
--filter="name:($C1_NAME,$C2_NAME)" \
--format='value(clusterIpv4Cidr)' | sort | uniq)
ALL_CLUSTER_CIDRS=$(join_by , $(echo "${ALL_CLUSTER_CIDRS}"))
# get the network tags for each cluster
ALL_CLUSTER_NETTAGS=$(gcloud compute instances list \
--filter="name:($C1_NAME,$C2_NAME)" \
--format='value(tags.items.[0])' | sort | uniq)
ALL_CLUSTER_NETTAGS=$(join_by , $(echo "${ALL_CLUSTER_NETTAGS}"))
# create the firewall rule allowing traffic between the clusters
gcloud compute firewall-rules create istio-multi-cluster-pods \
--allow=tcp,udp,icmp,esp,ah,sctp \
--direction=INGRESS \
--priority=900 \
--source-ranges="${ALL_CLUSTER_CIDRS}" \
--target-tags="${ALL_CLUSTER_NETTAGS}" --quiet
In order for each cluster to discover endpoints in the other cluster, the
clusters must all be registered in the same fleet, and each cluster must be
configured with a secret that can be used to gain access to the other cluster's
API server for endpoint enumeration. The asmcli utility will set this up
for you.
Configure the clusters for multi-cluster mesh operation using asmcli:
./asmcli create-mesh \
$FLEET_PROJECT_ID \
${PROJECT_ID}/${C1_LOCATION}/${C1_NAME} \
${PROJECT_ID}/${C2_LOCATION}/${C2_NAME}
Note: Because your two Anthos GKE clusters are VPC-native clusters and they are on
the same VPC network, traffic can flow from one to the other without any
special configuration.
However, if you were creating a multi-cluster mesh using clusters on different
networks, as would be the case if you had one GKE cluster and one Anthos on
bare metal cluster, there are a couple of additional steps required to enable
mesh functionality
The first step would be to install east-west gateways on each cluster. Traffic
flowing from the west cluster to the east
cluster would exit through a gateway on the west cluster, and
vice versa.
Once the gateways are in place, you need to expose all services on the
gateway to both clusters. That is done by applying the expose-services.yaml
configuration provided as part of the Anthos Service Mesh distribution.
For more details, see the Set up a multi-cluster mesh outside Google Cloud documentation.
Task 4. Review Service Mesh control planes
Let's verify that all Anthos Service Mesh resources have been created correctly
on both clusters.
Verify the required namespaces were created on the west cluster:
kubectx west
kubectl get namespaces
NAME STATUS AGE
asm-gateways Active 31m
asm-system Active 37m
default Active 127m
istio-system Active 38m
kube-node-lease Active 127m
kube-public Active 127m
kube-system Active 127m
Note: The istio-system namespace is where Istiod will be running. The asm-gateways namespace is where your gateway pods will be running. And the asm-system namespace will be used by the Canonical Service controller (see the documentation on Canonical Service for more details).
Check to make sure the same namespaces exist on the east cluster.
Check the deployments running in each of the three new namespaces to verify
that the expected features are up and running.
Task 5. Deploy the Online Boutique application across multiple clusters
Using the console or Cloud Shell, review the deployments and the services
on your east cluster.
Task 6. Evaluate your multi-cluster application
Get a URL to access the istio-ingressgateway service on each cluster:
# get the IP address for the west cluster service
kubectx west
export WEST_GATEWAY_URL=http://$(kubectl get svc istio-ingressgateway \
-o=jsonpath='{.status.loadBalancer.ingress[0].ip}' -n asm-gateways)
# get the IP address for the east cluster service
kubectx east
export EAST_GATEWAY_URL=http://$(kubectl get svc istio-ingressgateway \
-o=jsonpath='{.status.loadBalancer.ingress[0].ip}' -n asm-gateways)
# compose and output the URLs for each service
echo "The gateway address for west is $WEST_GATEWAY_URL
The gateway address for east is $EAST_GATEWAY_URL
"
Click on each of the provided URLs and verify that the Online Boutique
applications loads.
Note: The user connects to the istio-ingressgateway service, where
the proxies have been configured by both the Gateway and Virtual Service
configurations. The incoming request is parsed by the proxy, which then
connects to the frontend service which presents the store UI.
Each cluster has an istio-ingressgateway service and an
istio-ingressgateway deployment, so the user can connect to
either of the clusters. The frontend service and workload,
though, are only running on the west cluster. So when you
connect to the east cluster gateway, the proxy will receive
your inbound request, but will connect through the mesh to the frontend
service running on the west cluster. We'll see this traffic
flow in more detail shortly.
Try browsing products, adding items to your cart, and checking out.
Everything should work even though half the services run on one cluster
and half on the other.
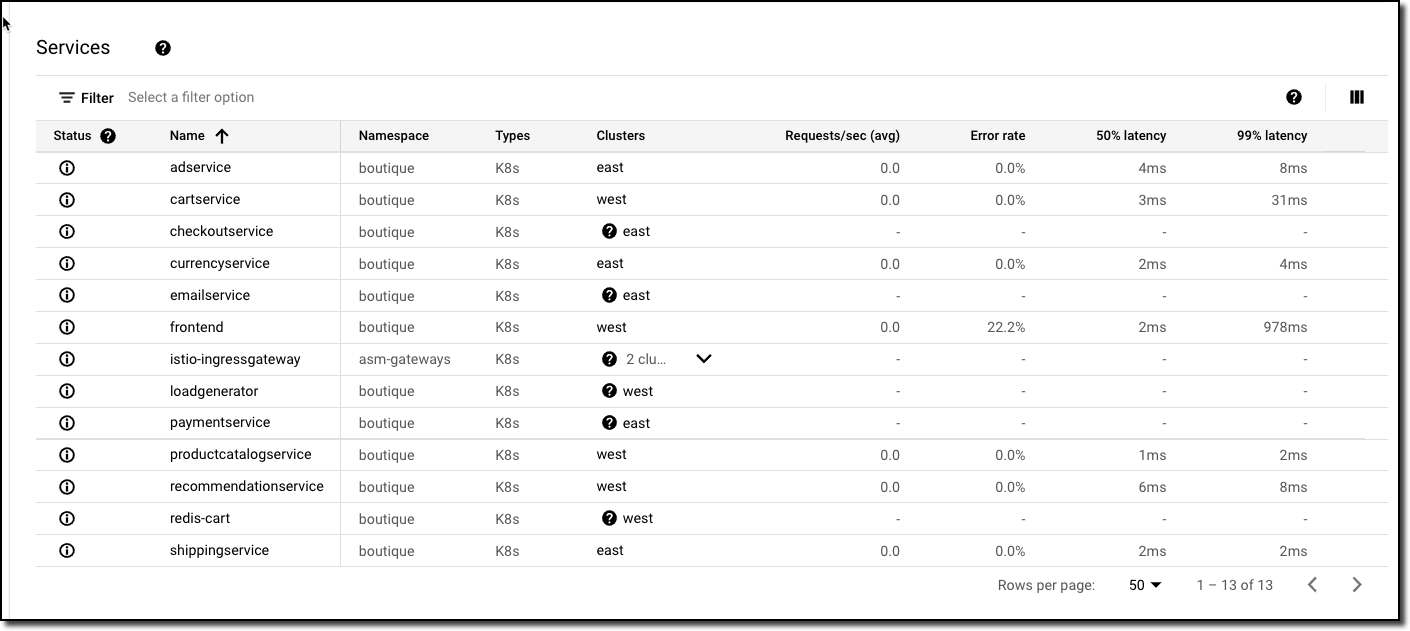
In the console, visit Navigation menu > Anthos > Service Mesh.
You should see 13 services deployed within your mesh, split across your clusters. If you see a read Action Required banner, try refreshing the page in your browser. That warning should go away.
If you want to view services running on a single cluster, you can filter the display.
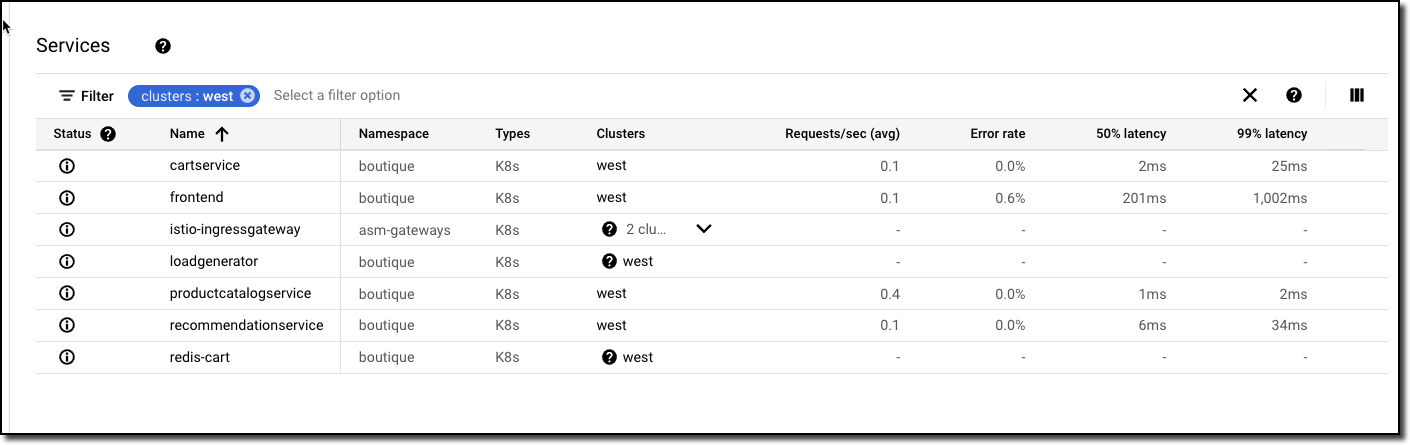
Navigate to Monitoring, then click View All for Kubernetes services
Try filtering to see only the services running on the west cluster.
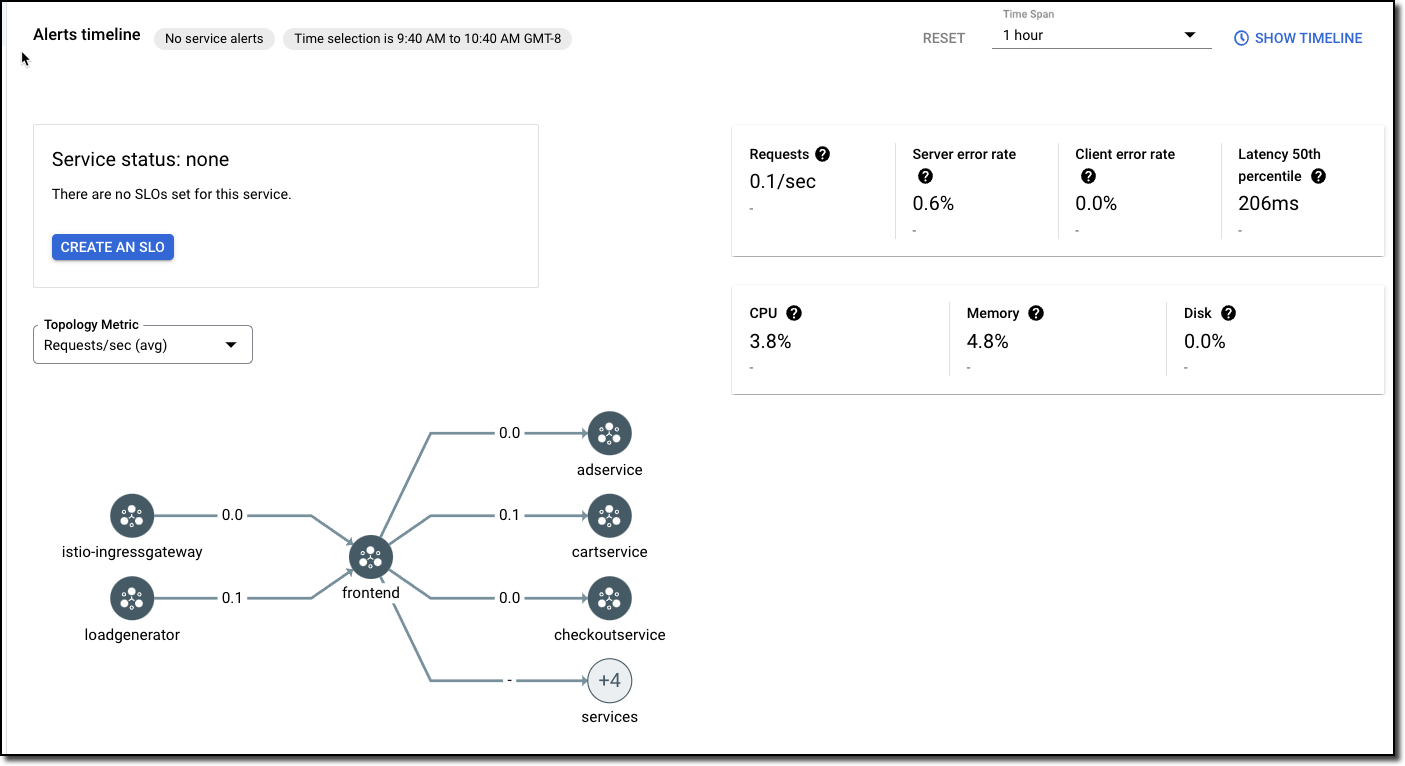
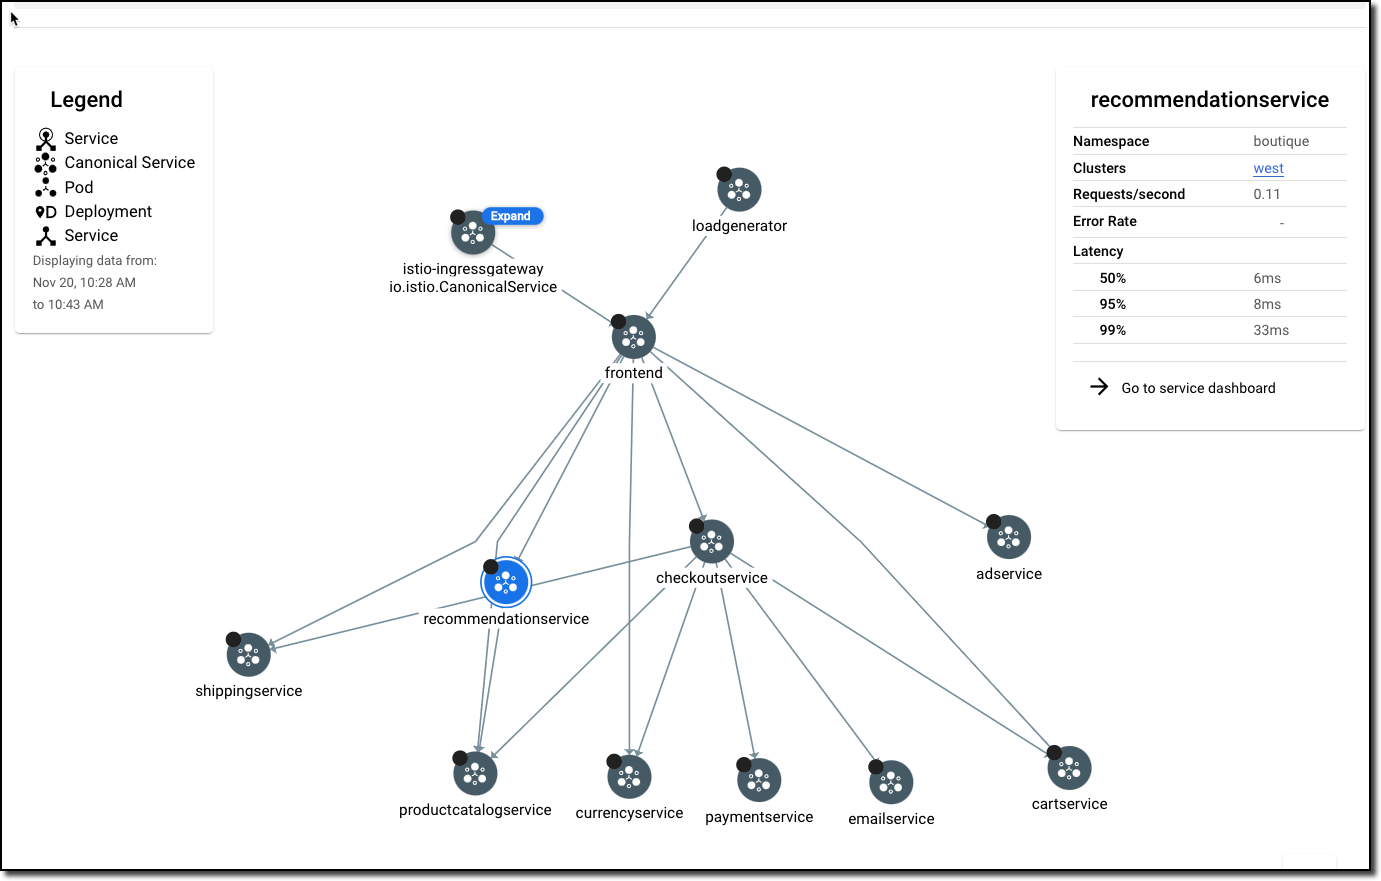
Navigate back to Anthos > Service Mesh and click on the frontend service entry in your list to see details
Note that the frontend service is receiving traffic from the istio-ingressgateway service and the loadgenerator service.
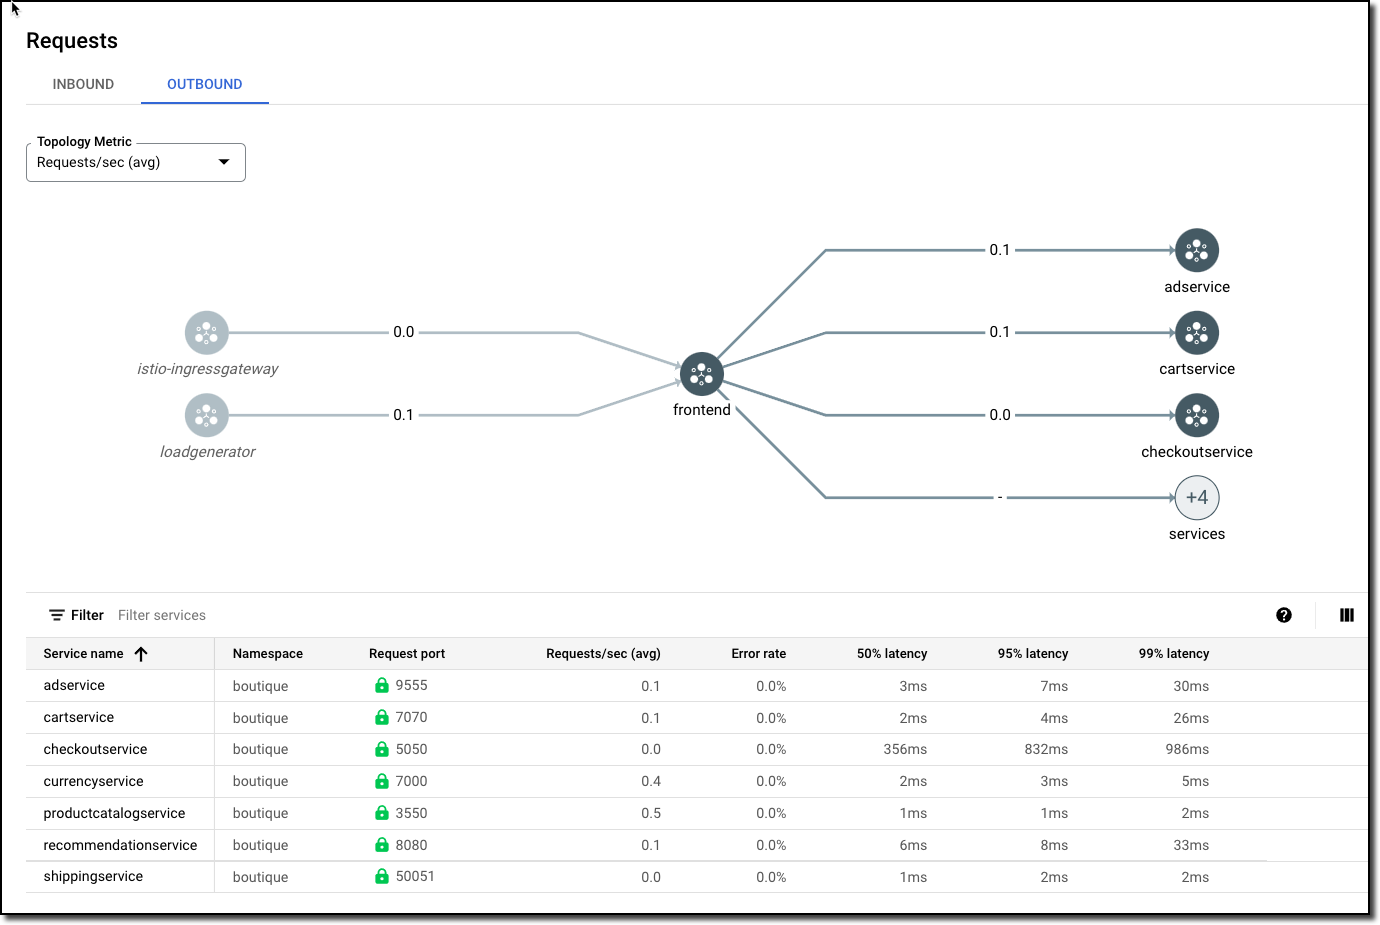
On the left, click on Connected Services. Then select the Outbound
tab in the Requests section.
Note that connections from the frontend service to utility services are all using mTLS, regardless of which cluster the target services are running on. Click on some of the services in the table at the bottom of the window and note where each service is running (the information is displayed in the slideout on the right).
Return to Navigation menu > Anthos > Service Mesh.
Click on each node and note where the service is running.
Task 7. Distribute one service across both clusters
In the console, go to
Navigation menu > Kubernetes Engine > Gateways, Services & Ingress.
Look at the recommendationservice entries in the table. Each cluster
has a recommendationservice entry, but while the west cluster has 1 pod
behind the service, the east cluster has 0 pods.
The actual workload is deployed on the west cluster and not on the
east cluster. You're going to deploy the workload to the east
cluster as well.
Take a moment to review the deployment manifest for the recommendationservice workload
Apply the manifest to the east cluster using the following command in
Cloud Shell:
kubectl apply -n boutique -f east/rec-east.yaml
Return to Navigation menu > Kubernetes Engine > Gateways, Services & Ingress and click on Services Note that the
east entry for the recommendationservice service now shows 1 pod
running on the east cluster.
Return to Navigation menu > Anthos > Service Mesh. Note that the
recommendationservice entry now shows the service on both clusters.
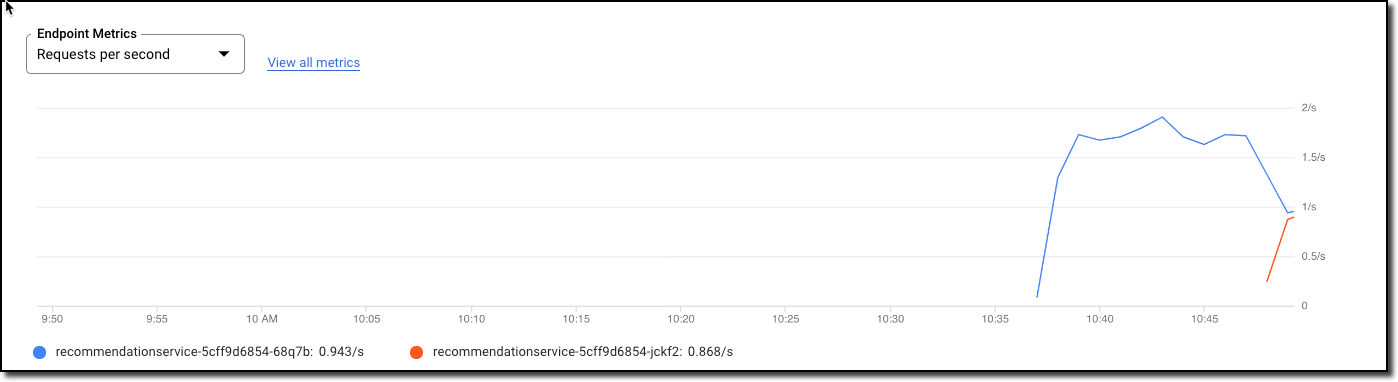
Click on the recommendationservice entry, then click on the
Infrastructure option on the left. Note you now have metrics for the
service running on both clusters.
If you don't see metrics for the second workload, wait a minute then
refresh the page.
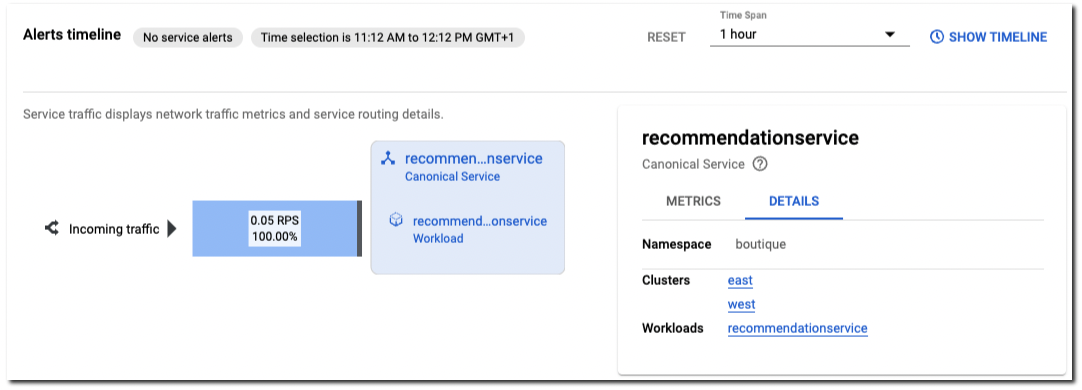
Click on Traffic on the left.
Click on the recommendationservice entry, which opens an info area on the right.
In the info area, click on the DETAILS tab and note the workloads running on both clusters.
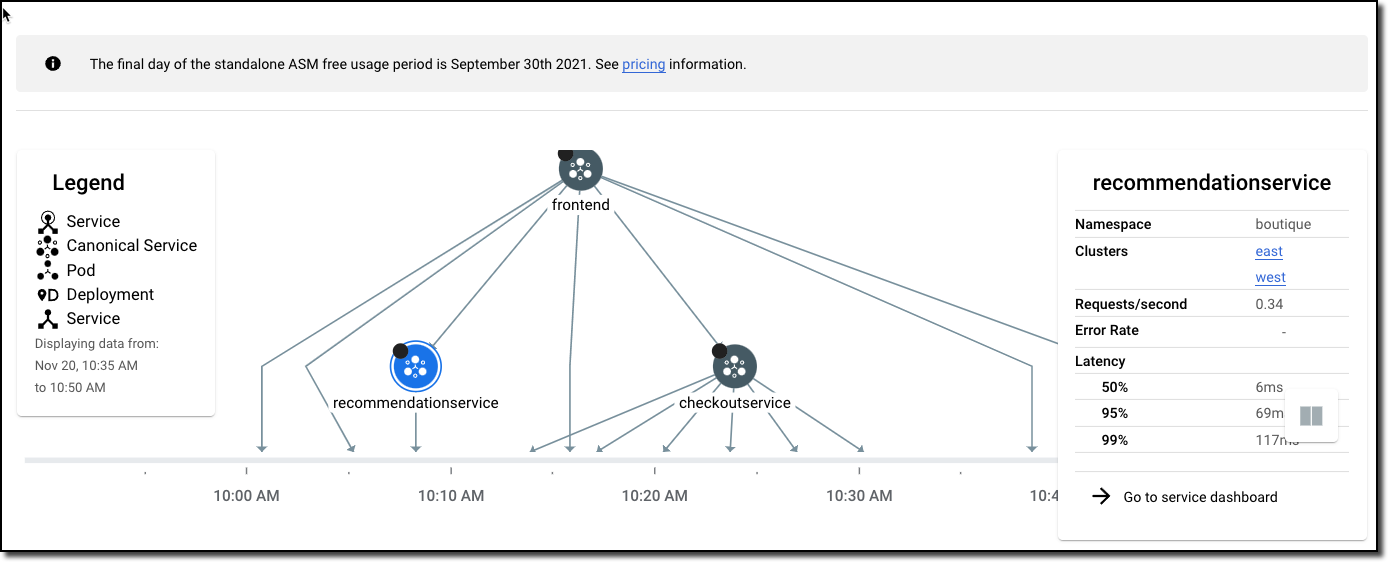
Return to Navigation menu > Anthos > Service Mesh.
Click on the recommendationservice node in the graph and note that the info area on the right is the service that is running on both clusters.
Congratulations!
In this lab, you deployed Anthos Service Mesh to 2 clusters, configured the two clusters to participate in a single mesh, deployed an application with services split across both clusters, and made one service a distributed service running on both clusters.
End your lab
When you have completed your lab, click End Lab. Google Cloud Skills Boost removes the resources you’ve used and cleans the account for you.
You will be given an opportunity to rate the lab experience. Select the applicable number of stars, type a comment, and then click Submit.
The number of stars indicates the following:
1 star = Very dissatisfied
2 stars = Dissatisfied
3 stars = Neutral
4 stars = Satisfied
5 stars = Very satisfied
You can close the dialog box if you don't want to provide feedback.
For feedback, suggestions, or corrections, please use the Support tab.
Copyright 2022 Google LLC All rights reserved. Google and the Google logo are trademarks of Google LLC. All other company and product names may be trademarks of the respective companies with which they are associated.
Moduły tworzą projekt Google Cloud i zasoby na określony czas.
Moduły mają ograniczenie czasowe i nie mają funkcji wstrzymywania. Jeśli zakończysz moduł, musisz go zacząć od początku.
Aby rozpocząć, w lewym górnym rogu ekranu kliknij Rozpocznij moduł.
Użyj przeglądania prywatnego
Skopiuj podaną nazwę użytkownika i hasło do modułu.
Kliknij Otwórz konsolę w trybie prywatnym.
Zaloguj się w konsoli
Zaloguj się z użyciem danych logowania do modułu. Użycie innych danych logowania może spowodować błędy lub naliczanie opłat.
Zaakceptuj warunki i pomiń stronę zasobów przywracania.
Nie klikaj Zakończ moduł, chyba że właśnie został przez Ciebie zakończony lub chcesz go uruchomić ponownie, ponieważ spowoduje to usunięcie wyników i projektu.
Ta treść jest obecnie niedostępna
Kiedy dostępność się zmieni, wyślemy Ci e-maila z powiadomieniem
Świetnie
Kiedy dostępność się zmieni, skontaktujemy się z Tobą e-mailem
Jeden moduł, a potem drugi
Potwierdź, aby zakończyć wszystkie istniejące moduły i rozpocząć ten
Aby uruchomić moduł, użyj przeglądania prywatnego
Uruchom ten moduł w oknie incognito lub przeglądania prywatnego. Dzięki temu unikniesz konfliktu między swoim kontem osobistym a kontem do nauki, co mogłoby spowodować naliczanie dodatkowych opłat na koncie osobistym.
Configure a multi-service application across multiple clusters within a mesh using Anthos Service.
Czas trwania:
Konfiguracja: 14 min
·
Dostęp na 240 min
·
Ukończono w 120 min