Anthos Service Mesh security helps you mitigate insider threats and reduce the risk of a data breach by ensuring that all communications between workloads are encrypted, mutually authenticated, and authorized.
In this lab, you learn how PERMISSIVE mode mTLS allows services to receive both plaintext and mTLS traffic from clients, allowing you to incrementally adopt mTLS. You also enabled STRICT mode mTLS across your service mesh effectively blocking plaintext traffic to all your Istio injected services and then you scoped STRICT mode mTLS down to a single namespace
Objectives
In this lab, you learn how to perform the following tasks:
Enforce STRICT mTLS mode across the service mesh
Enforce STRICT mTLS mode on a single namespace
Explore the security configurations in the Anthos Service Mesh Dashboard
Add authorization policies to enforce access based on a JSON Web Token (JWT)
Add authorization policies for HTTP traffic in an Istio mesh
Setup and requirements
In this task, you use Qwiklabs and perform initialization steps for your lab.
For each lab, you get a new Google Cloud project and set of resources for a fixed time at no cost.
Sign in to Qwiklabs using an incognito window.
Note the lab's access time (for example, 1:15:00), and make sure you can finish within that time.
There is no pause feature. You can restart if needed, but you have to start at the beginning.
When ready, click Start lab.
Note your lab credentials (Username and Password). You will use them to sign in to the Google Cloud Console.
Click Open Google Console.
Click Use another account and copy/paste credentials for this lab into the prompts.
If you use other credentials, you'll receive errors or incur charges.
Accept the terms and skip the recovery resource page.
After you complete the initial sign-in steps, the project dashboard appears.
Activate Google Cloud Shell
Google Cloud Shell is a virtual machine that is loaded with development tools. It offers a persistent 5GB home directory and runs on the Google Cloud.
Google Cloud Shell provides command-line access to your Google Cloud resources.
In Cloud console, on the top right toolbar, click the Open Cloud Shell button.
Click Continue.
It takes a few moments to provision and connect to the environment. When you are connected, you are already authenticated, and the project is set to your PROJECT_ID. For example:
gcloud is the command-line tool for Google Cloud. It comes pre-installed on Cloud Shell and supports tab-completion.
You can list the active account name with this command:
[core]
project = qwiklabs-gcp-44776a13dea667a6
Note:
Full documentation of gcloud is available in the
gcloud CLI overview guide
.
Task 1. Confirm Anthos Service Mesh setup
This lab environment has already been partially configured. A GKE cluster with
2 nodes has been provisioned for you. If you would like to investigate how the
cluster creation process happened, look at the setup-vm startup-script.
Configure cluster access for kubectl
Set the Zone environment variable:
CLUSTER_ZONE={{{ project_0.default_zone| "Zone added at lab start" }}}
Set environment variables for the zone and cluster name:
export CLUSTER_NAME=gke
In Cloud Shell, configure kubectl command line access by running:
# get the project id
export GCLOUD_PROJECT=$(gcloud config get-value project)
# configure kubectl
gcloud container clusters get-credentials $CLUSTER_NAME \
--zone $CLUSTER_ZONE --project $GCLOUD_PROJECT
Verify cluster and Anthos Service Mesh installation
Ensure the following Kubernetes istiod services are deployed:
kubectl get service -n istio-system
Output:
NAME TYPE CLUSTER-IP
istiod-asm-1153-6 ClusterIP 10.7.249.134
istiod ClusterIP 10.7.249.95
Ensure the corresponding Kubernetes istiod-* pods are deployed and all
containers are up and running:
kubectl get pods -n istio-system
Output:
NAME READY STATUS
istiod-asm-1153-6-6d66584796-865d8 1/1 Running
istiod-asm-1153-6-6d66584796-bph5h 1/1 Running
...
Task 2. Deploy sleep and httpbin services
In this task, you create a set of namespaces to host the
httpbin,
and sleep
services. You will use those services to explore the impact of mTLS on
traffic. The sleep service acts as the client and will call the
httpbin service, which acts as a server.
Setup the authentication example
You will deploy this example configuration and then use it to explore the
authentication options that Istio offers:
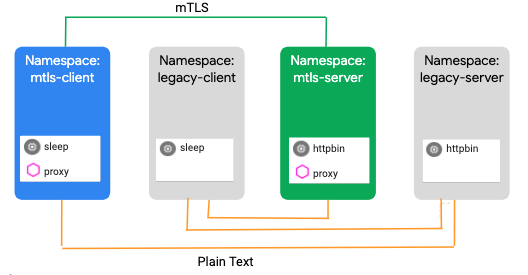
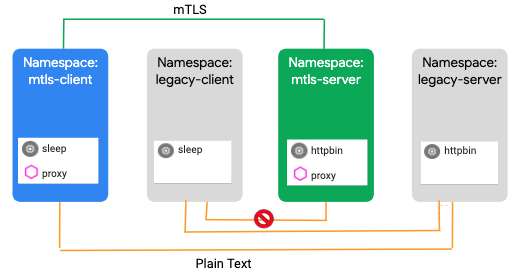
In Cloud Shell, create namespaces for the example clients and services.
Traffic in the legacy-* namespaces takes place over plain text, while
traffic in the mtls-* namespaces happens over mTLS:
Verify that a sleep pod is running in the mtls-client and
legacy-client namespaces and that an httpbin pod is running in the
mtls-service and legacy-service namespaces:
Verify that the two sleep clients can communicate with the two httpbin services
Use Cloud Shell to run this nested command loop:
for from in "mtls-client" "legacy-client"; do
for to in "mtls-service" "legacy-service"; do
kubectl exec $(kubectl get pod -l app=sleep -n ${from} -o jsonpath={.items..metadata.name}) -c sleep -n ${from} -- curl "http://httpbin.${to}:8000/ip" -s -o /dev/null -w "sleep.${from} to httpbin.${to}: %{http_code}\n"
done
done
Output:
sleep.mtls-client to httpbin.mtls-service: 200
sleep.mtls-client to httpbin.legacy-service: 200
sleep.legacy-client to httpbin.mtls-service: 200
sleep.legacy-client to httpbin.legacy-service: 200
Now you're ready to enforce security policies for this application.
Task 3. Understand authentication and enable service to service authentication with mTLS
Anthos Service Mesh
In the console, go to Navigation Menu > Kubernetes Engine > Service Mesh.
In the Anthos Service Mesh dashboard, you will see the 2 services that were created in the mtls-service and mtls-client/sleep namespaces. You don't see the legacy services because you did not label their namespace, and therefore they remain outside of the mesh.
In the list view section Click on > icon next to httpbin (mtls-service/httpbin) namespace.
Click on Go to dashboard
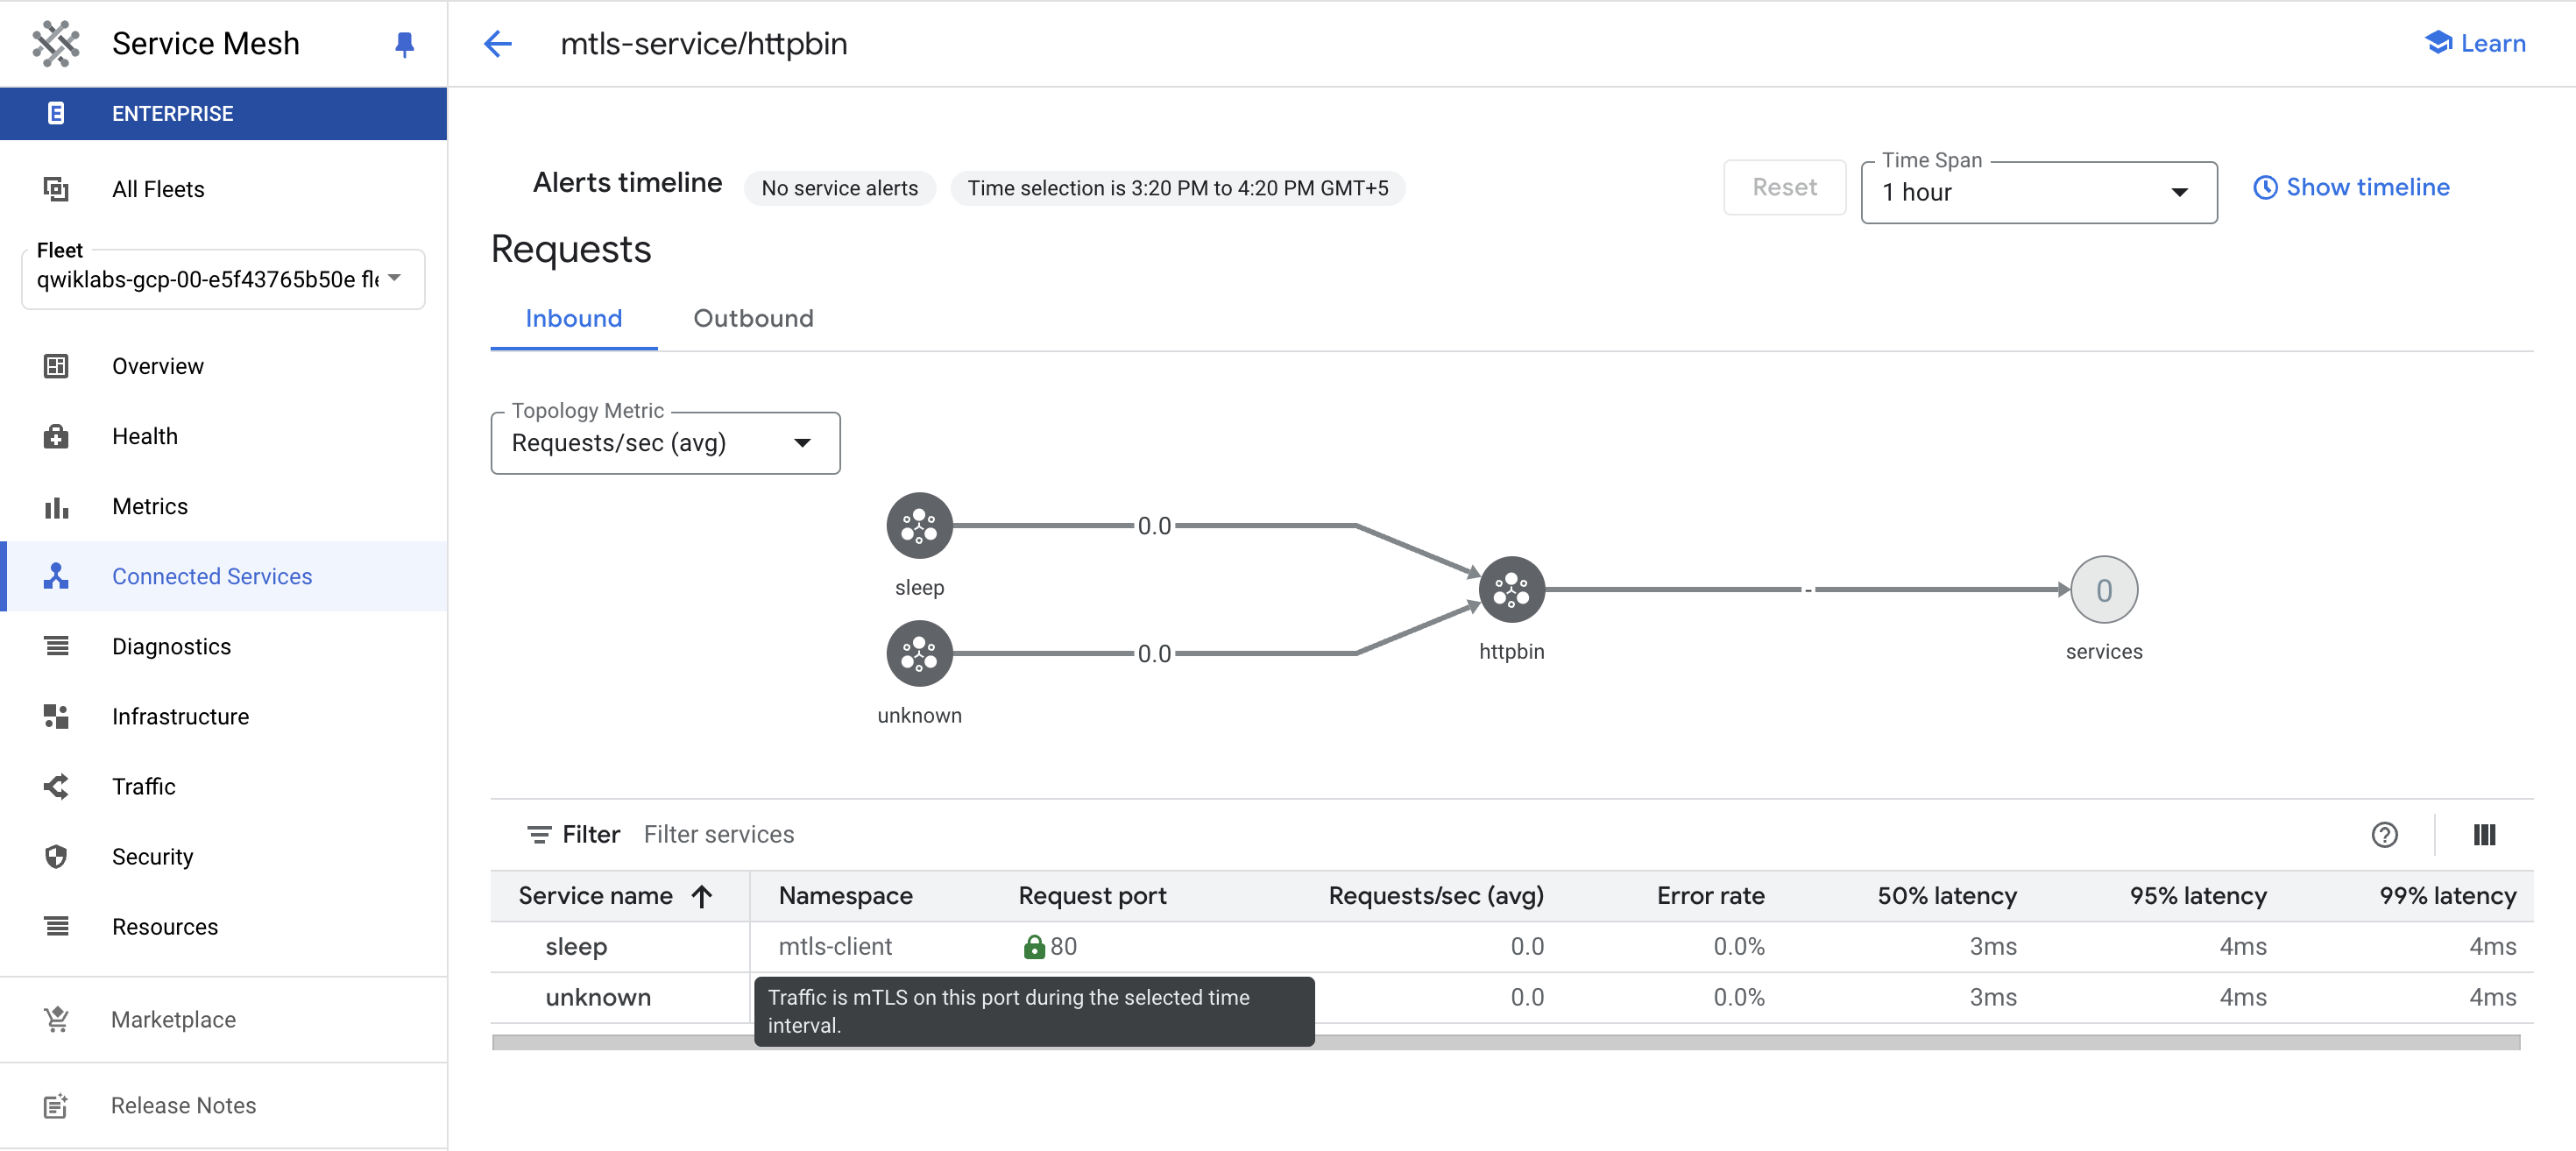
In the left side panel, go to Connected Services.
Notice that you have 2 services:
The sleep service in the mtls-client namespace, which is part of the
mesh and has a sidecar proxy. Therefore you see the real name and
communication goes over mTLS, as it's the default behavior in Istio.
An unknown service, which represents the sleep service in the
legacy-client, which is not part of the mesh and has no sidecar proxy.
Therefore you do not see the real name and the communication goes over plain
text.
Use your mouse to hover over the lock symbol in the Request port column,
and verify that green means mTLS and red means plain text.
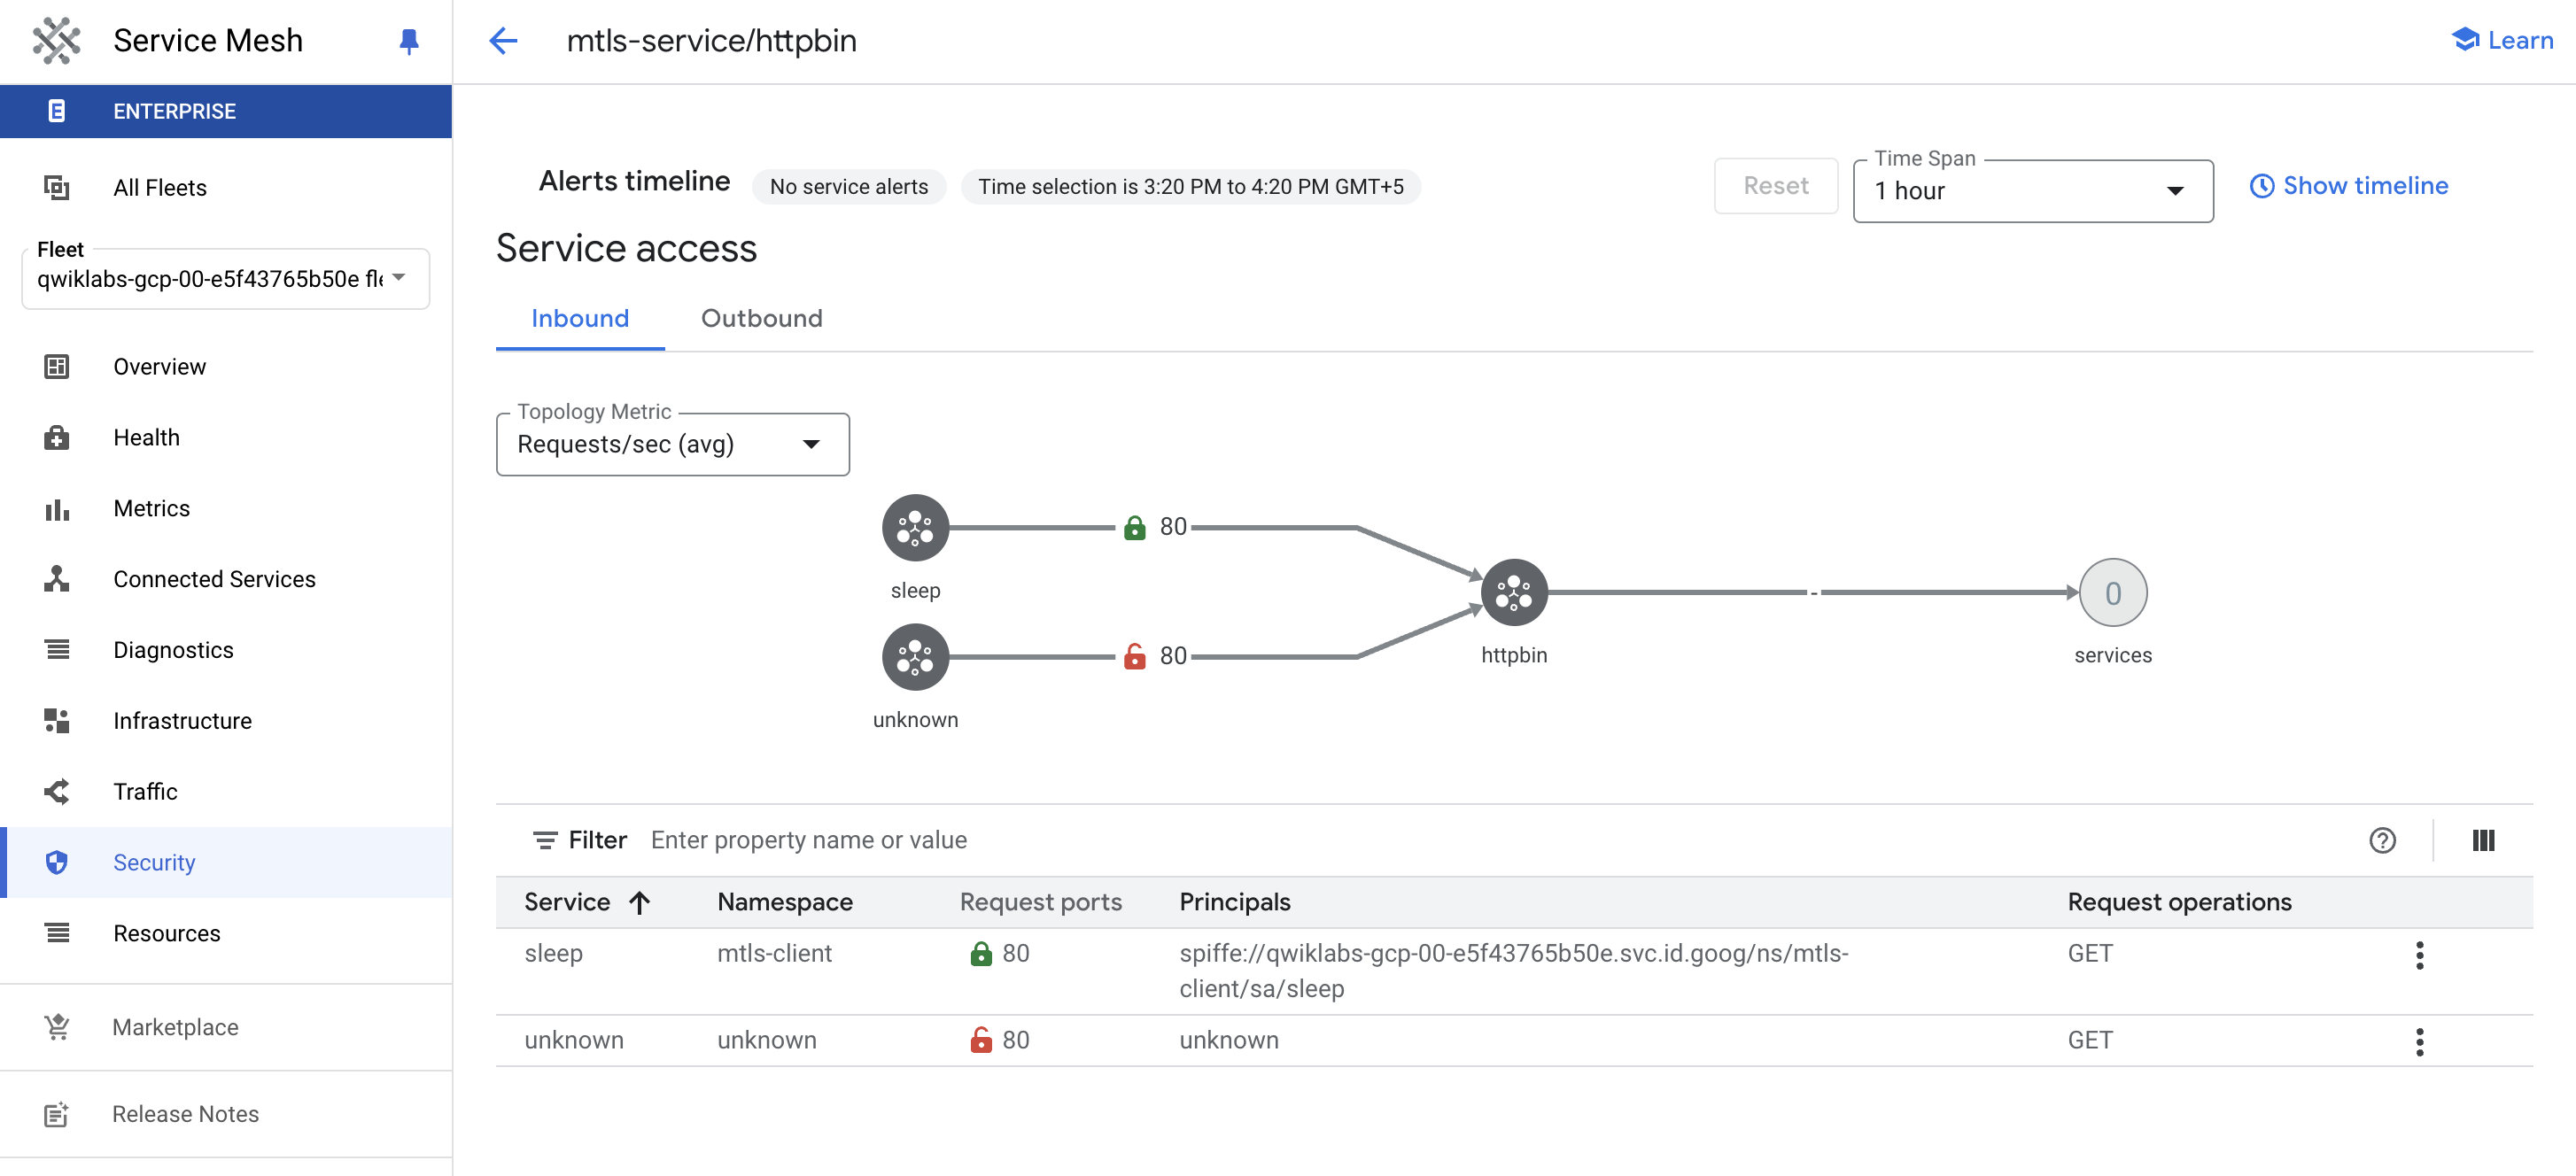
Now check out the Security tab in the left side panel. It shows
you that the httpbin service has received both plaintext and mTLS traffic.
Test auto mutual TLS
By default, Istio configures destination workloads in PERMISSIVE mode. When
PERMISSIVE mode is enabled a service can accept both plaintext and mTLS
traffic. mTLS is used when the request contains the X-Forwarded-Client-Cert
header.
Use the Cloud Shell to send a request from the sleep service in the
mtls-client namespace to the httpbin service in the mtls-service
namespace:
The X-Forwarded-Client-Cert header isn't present so the traffic was sent
and received in plaintext
Note: The httpbin service in the mtls-service namespace accepted
mTLS traffic from the sleep service in the mtls-client namespace and
plaintext from the sleep service in the legacy-client namespace.
Enforce STRICT mTLS mode across the service mesh
In STRICT mode, services injected with the Istio proxy will not accept
plaintext traffic and will mutually authenticate with their clients.
You can enforce STRICT mTLS mode across the whole mesh or on a per-namespace
basis by creating PeerAuthentication resources.
Create a Peer Authentication resources for the entire Service Mesh:
for from in "mtls-client" "legacy-client"; do
for to in "mtls-service" "legacy-service"; do
kubectl exec $(kubectl get pod -l app=sleep -n ${from} -o jsonpath={.items..metadata.name}) -c sleep -n ${from} -- curl "http://httpbin.${to}:8000/ip" -s -o /dev/null -w "sleep.${from} to httpbin.${to}: %{http_code}\n"
done
done
Output:
sleep.mtls-client to httpbin.mtls-service: 200
sleep.mtls-client to httpbin.legacy-service: 200
sleep.legacy-client to httpbin.mtls-service: 000
command terminated with exit code 56
sleep.legacy-client to httpbin.legacy-service: 200
Note: The httpbin service in the mtls-service namespace now rejects the
plaintext traffic it receives from the sleep client in the
legacy-client namespace.
Remove the mesh wide mTLS PeerAuthentication resource by running this
command in Cloud Shell:
kubectl delete pa mesh-wide-mtls -n istio-system
Enforce STRICT mTLS mode on a single namespace
In Cloud Shell create a namespace for STRICT mTLS:
kubectl create ns strict-mtls-service
Enable auto-injection of the Istio sidecar proxy on the new namespace:
# get the revision label
export DEPLOYMENT=$(kubectl get deployments -n istio-system | grep istiod)
export VERSION=asm-$(echo $DEPLOYMENT | cut -d'-' -f 3)-$(echo $DEPLOYMENT \
| cut -d'-' -f 4 | cut -d' ' -f 1)
# enable auto-injection on the namespaces
kubectl label namespace strict-mtls-service istio.io/rev=${VERSION} --overwrite
Use Cloud Shell to deploy another instance of the httpbin service in
the strict-mtls-service namespace:
Verify that the httpbin service in the mtls-service namespace still
accepts plaintext traffic:
kubectl exec $(kubectl get pod -l app=sleep -n legacy-client -o jsonpath={.items..metadata.name}) -c sleep -n legacy-client -- curl "http://httpbin.mtls-service:8000/ip" -s -o /dev/null -w "sleep.legacy-client to httpbin.mtls-service: %{http_code}\n"
Output:
sleep.legacy-client to httpbin.mtls-service: 200
Now check to see that the strict-mtls-service namespace httpbin
service does not accept plaintext traffic:
kubectl exec $(kubectl get pod -l app=sleep -n legacy-client -o jsonpath={.items..metadata.name}) -c sleep -n legacy-client -- curl "http://httpbin.strict-mtls-service:8000/ip" -s -o /dev/null -w "sleep.legacy-client to httpbin.strict-mtls-service: %{http_code}\n"
Output:
sleep.legacy-client to httpbin.strict-mtls-service: 000
command terminated with exit code 56
Verify that the httpbin service in the strict-mtls-service namespace
does accept mTLS traffic:
kubectl exec $(kubectl get pod -l app=sleep -n mtls-client -o jsonpath={.items..metadata.name}) -c sleep -n mtls-client -- curl "http://httpbin.strict-mtls-service:8000/ip" -s -o /dev/null -w "sleep.mtls-client to httpbin.strict-mtls-service: %{http_code}\n"
Output:
sleep.mtls-client to httpbin.strict-mtls-service: 200
In the Google Cloud console, select Navigation Menu > Kubernetes Engine > > Service Mesh.
In Anthos Service Mesh dashboard, you will see that you have 3 services now.
In the list view section Click on > icon next to strict-mtls-service/httpbin namespace.
Click on Go to dashboard
In the left side panel, click on Connected Services.
Use your mouse to hover over the lock symbol in the Request Port column
to see that only mTLS traffic has been received. Traffic might take a
couple of minutes to be reflected in the dashboard. If you don't see the
sleep service, wait 1-2 minutes and refresh the dashboard.
Now check out the Security tab in the left side panel. Again only
mTLS traffic has been received.
Remove the strict-mtls-service peer authentication policy by running
this command in Cloud Shell:
kubectl delete pa restricted-mtls -n strict-mtls-service
Task 4. Leverage RequestAuthentication and AuthorizationPolicy resources
This task shows you how to set up and use RequestAuthentication and
AuthorizationPolicy resources. Ultimately, you will allow requests that
have an approved JWT, and deny requests that don't.
RequestAuthentication
A RequestAuthentication resource defines the request authentication methods
that are supported by a workload. Requests with invalid authentication
information will be rejected. Requests with no authentication credentials will
be accepted but will not have any authenticated identity.
Create a RequestAuthentication resource for the httpbin workload in the
mtls-service namespace. This policy allows the workload to accept requests
with a JWT issued by testing@secure.istio.io.
The policy requires all requests to the httpbin workload to have a valid
JWT with requestPrincipal set to testing@secure.istio.io/testing@secure.istio.io.
Istio constructs the requestPrincipal by combining the iss and sub of
the JWT token with a / separator as shown:
Download a legitimate JWT that can be used to send accepted requests:
Note that the iss and sub keys are set to testing@secure.istio.io.
This causes Istio to generate the attribute requestPrincipal with the
value testing@secure.istio.io/testing@secure.istio.io:
Verify that a request with a valid JWT is allowed:
Task 5. Authorizing requests based on method and path
This task shows you how to control access to workloads by using an
AuthorizationPolicy that evaluates the request type and URL.
Update the require-jwt authorization policy for the httpbin workload in
the mtls-service namespace. The new policy will still have the JWT
requirement that you set up in the previous task. In addition, you are going
to limit the type of HTTP requests, so that clients can only perform GET
requests to the /ip endpoint:
In this lab, you explored mutual TLS authentication in Istio. You saw how
PERMISSIVE mode mTLS allows services to receive both plaintext and mTLS
traffic from clients, allowing you to incrementally adopt mTLS. You also
enabled STRICT mode mTLS across your service mesh effectively blocking
plaintext traffic to all your Istio injected services and then you scoped
STRICT mode mTLS down to a single namespace.
In addition, you explored RequestAuthentication and AuthorizationPolicy
resources in Istio.
When you have completed your lab, click End Lab. Google Cloud Skills Boost removes the resources you’ve used and cleans the account for you.
You will be given an opportunity to rate the lab experience. Select the applicable number of stars, type a comment, and then click Submit.
The number of stars indicates the following:
1 star = Very dissatisfied
2 stars = Dissatisfied
3 stars = Neutral
4 stars = Satisfied
5 stars = Very satisfied
You can close the dialog box if you don't want to provide feedback.
For feedback, suggestions, or corrections, please use the Support tab.
Copyright 2022 Google LLC All rights reserved. Google and the Google logo are trademarks of Google LLC. All other company and product names may be trademarks of the respective companies with which they are associated.
Les ateliers créent un projet Google Cloud et des ressources pour une durée déterminée.
Les ateliers doivent être effectués dans le délai imparti et ne peuvent pas être mis en pause. Si vous quittez l'atelier, vous devrez le recommencer depuis le début.
En haut à gauche de l'écran, cliquez sur Démarrer l'atelier pour commencer.
Utilisez la navigation privée
Copiez le nom d'utilisateur et le mot de passe fournis pour l'atelier
Cliquez sur Ouvrir la console en navigation privée
Connectez-vous à la console
Connectez-vous à l'aide des identifiants qui vous ont été attribués pour l'atelier. L'utilisation d'autres identifiants peut entraîner des erreurs ou des frais.
Acceptez les conditions d'utilisation et ignorez la page concernant les ressources de récupération des données.
Ne cliquez pas sur Terminer l'atelier, à moins que vous n'ayez terminé l'atelier ou que vous ne vouliez le recommencer, car cela effacera votre travail et supprimera le projet.
Ce contenu n'est pas disponible pour le moment
Nous vous préviendrons par e-mail lorsqu'il sera disponible
Parfait !
Nous vous contacterons par e-mail s'il devient disponible
Un atelier à la fois
Confirmez pour mettre fin à tous les ateliers existants et démarrer celui-ci
Utilisez la navigation privée pour effectuer l'atelier
Ouvrez une fenêtre de navigateur en mode navigation privée pour effectuer cet atelier. Vous éviterez ainsi les conflits entre votre compte personnel et le compte temporaire de participant, qui pourraient entraîner des frais supplémentaires facturés sur votre compte personnel.
Secure mesh traffic using Authenication and Authorization policies
Durée :
24 min de configuration
·
Accessible pendant 90 min
·
Terminé après 45 min