Kubernetes is the de-facto standard for container
orchestration, and
Google Kubernetes Engine (GKE)
is a leader in the field of managed Kubernetes offerings. In 2018, Google
brought Kubernetes to data centers with a new offering called Anthos,
a certified and managed extension of
the cloud-based GKE platform.
Responding to significant early successes and listening to customer needs,
Google has expanded its efforts to enable your modernization effort.
Anthos is a
modern application management platform
announced by Google at Next '19. Anthos provides the tools and technology you
need for modern, hybrid, and multi-cloud solutions, all built on the foundations
of GKE. Anthos enables several features, including:
Infrastructure provisioning in both cloud and on-premises
Infrastructure management tooling, security, policies and compliance
solutions
Streamlined application development, service discovery and telemetry,
service management, and workload migration from on-premises to cloud
In this lab, you will deploy Anthos clusters on AWS. Note that Anthos has a number of other deployment options, such as Anthos clusters on bare metal, Anthos clusters on VMware, and Anthos clusters on Azure. In addition, you use Attached clusters, which are third-party Kubernetes clusters registered to your fleet.
Objectives
In this lab, you learn how to perform the following tasks:
Create and register an Anthos GKE cluster on Google Cloud.
Create and register an Anthos cluster on AWS.
Access the Anthos cluster on AWS via Connect Gateway.
Review cluster configurations for AWS and Google Cloud with the GKE interface on the Google Cloud Console.
Deploy workloads and services to Anthos clusters on Google Cloud and AWS.
Get information about your multi-cloud deployment using the Anthos dashboard on the Google Cloud Console.
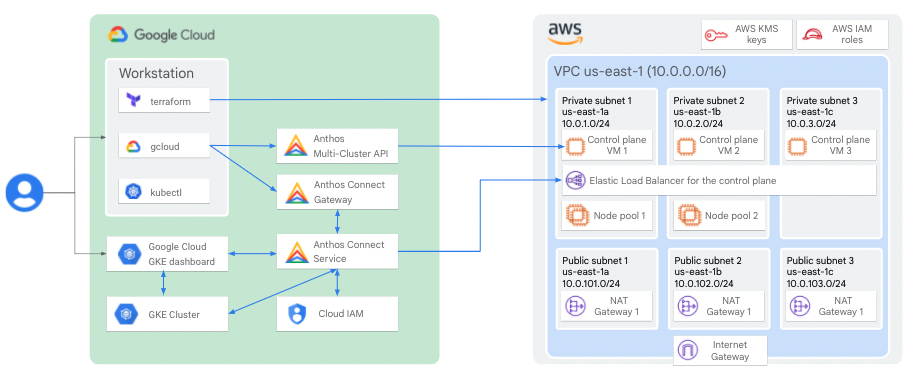
Lab architecture
Setup and requirements
In this task, you use Qwiklabs and perform initialization steps for your lab.
For each lab, you get a new Google Cloud project and set of resources for a fixed time at no cost.
Sign in to Qwiklabs using an incognito window.
Note the lab's access time (for example, 1:15:00), and make sure you can finish within that time.
There is no pause feature. You can restart if needed, but you have to start at the beginning.
When ready, click Start lab.
Note your lab credentials (Username and Password). You will use them to sign in to the Google Cloud Console.
Click Open Google Console.
Click Use another account and copy/paste credentials for this lab into the prompts.
If you use other credentials, you'll receive errors or incur charges.
Accept the terms and skip the recovery resource page.
After you complete the initial sign-in steps, the project dashboard appears.
Click Select a project, highlight your Google Cloud Project ID, and click
Open to select your project.
Activate Google Cloud Shell
Google Cloud Shell is a virtual machine that is loaded with development tools. It offers a persistent 5GB home directory and runs on the Google Cloud.
Google Cloud Shell provides command-line access to your Google Cloud resources.
In Cloud console, on the top right toolbar, click the Open Cloud Shell button.
Click Continue.
It takes a few moments to provision and connect to the environment. When you are connected, you are already authenticated, and the project is set to your PROJECT_ID. For example:
gcloud is the command-line tool for Google Cloud. It comes pre-installed on Cloud Shell and supports tab-completion.
You can list the active account name with this command:
[core]
project = qwiklabs-gcp-44776a13dea667a6
Note:
Full documentation of gcloud is available in the
gcloud CLI overview guide
.
Task 1. Set up your project
To access some of the resource types within Google Cloud, you first need to
enable a few APIs. These are enabled automatically when you first access a
service through the UI or command line. To simplify the process and reduce user
prompts, you explicitly enable the APIs needed.
In the Cloud Shell, set up the following environment variables, which will be
used in scripts throughout the lab:
This should begin the installation of your GKE cluster. Cluster creation will take about
five minutes, so continue to the next
task while installation continues in the background.
Task 3. Review the provisioned AWS resources and prepare the environment
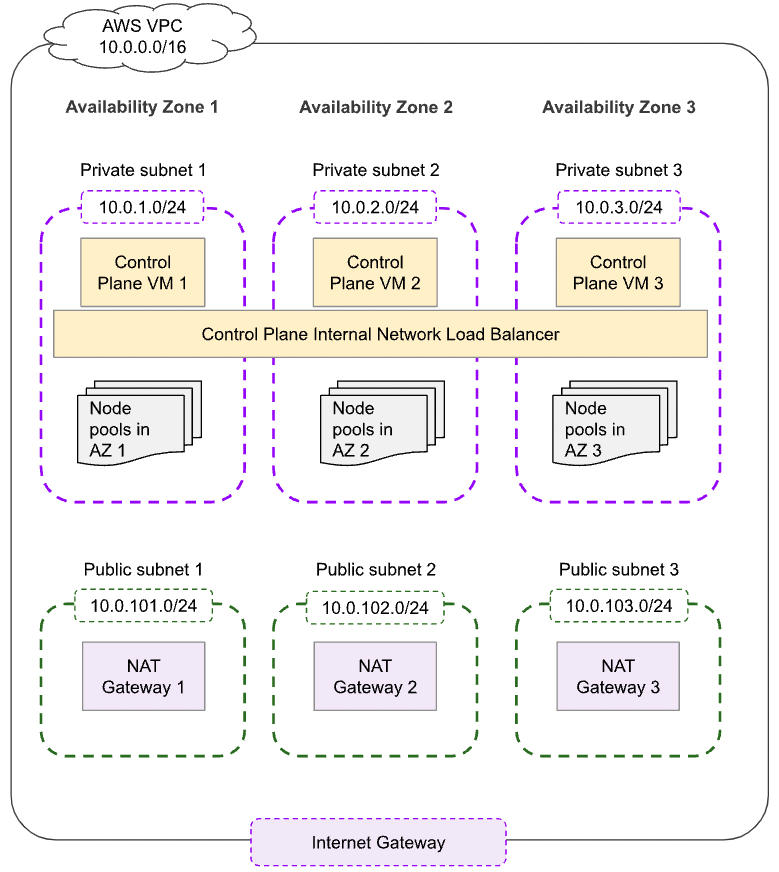
This lab has provisioned the following AWS Virtual Private Cloud (VPC)
architecture for you to be able to run Anthos clusters on AWS. Refer to the
Create an AWS VPC documentation
to reproduce the setup steps.
The AWS VPC has been deployed in us-east-1 and uses the IP CIDR range
10.0.0.0/16. It contains the following resources:
Three private subnets in three different availability zones: us-east-1a,
us-east-1b, us-east-1c
Later, you deploy the control plane nodes, load balancer endpoints, and the worker nodes of your cluster in these subnets.
Three public subnets in the same availability zones as the private subnets
A NAT Gateway in each public subnet to provide outbound internet access for
the private subnets and public load balancer endpoints
An Internet Gateway to allow a route from the public subnets to allow
internet connectivity
All subnets are tagged for subnet auto-discovery so that when you create a
Kubernetes Service, an AWS Load Balancer can be provisioned in those networks.
Internal load balancers will be provisioned in the private subnets, and
internet-facing load balancers will be provisioned in the public subnets. The tag used dictates the
type of load balancer.
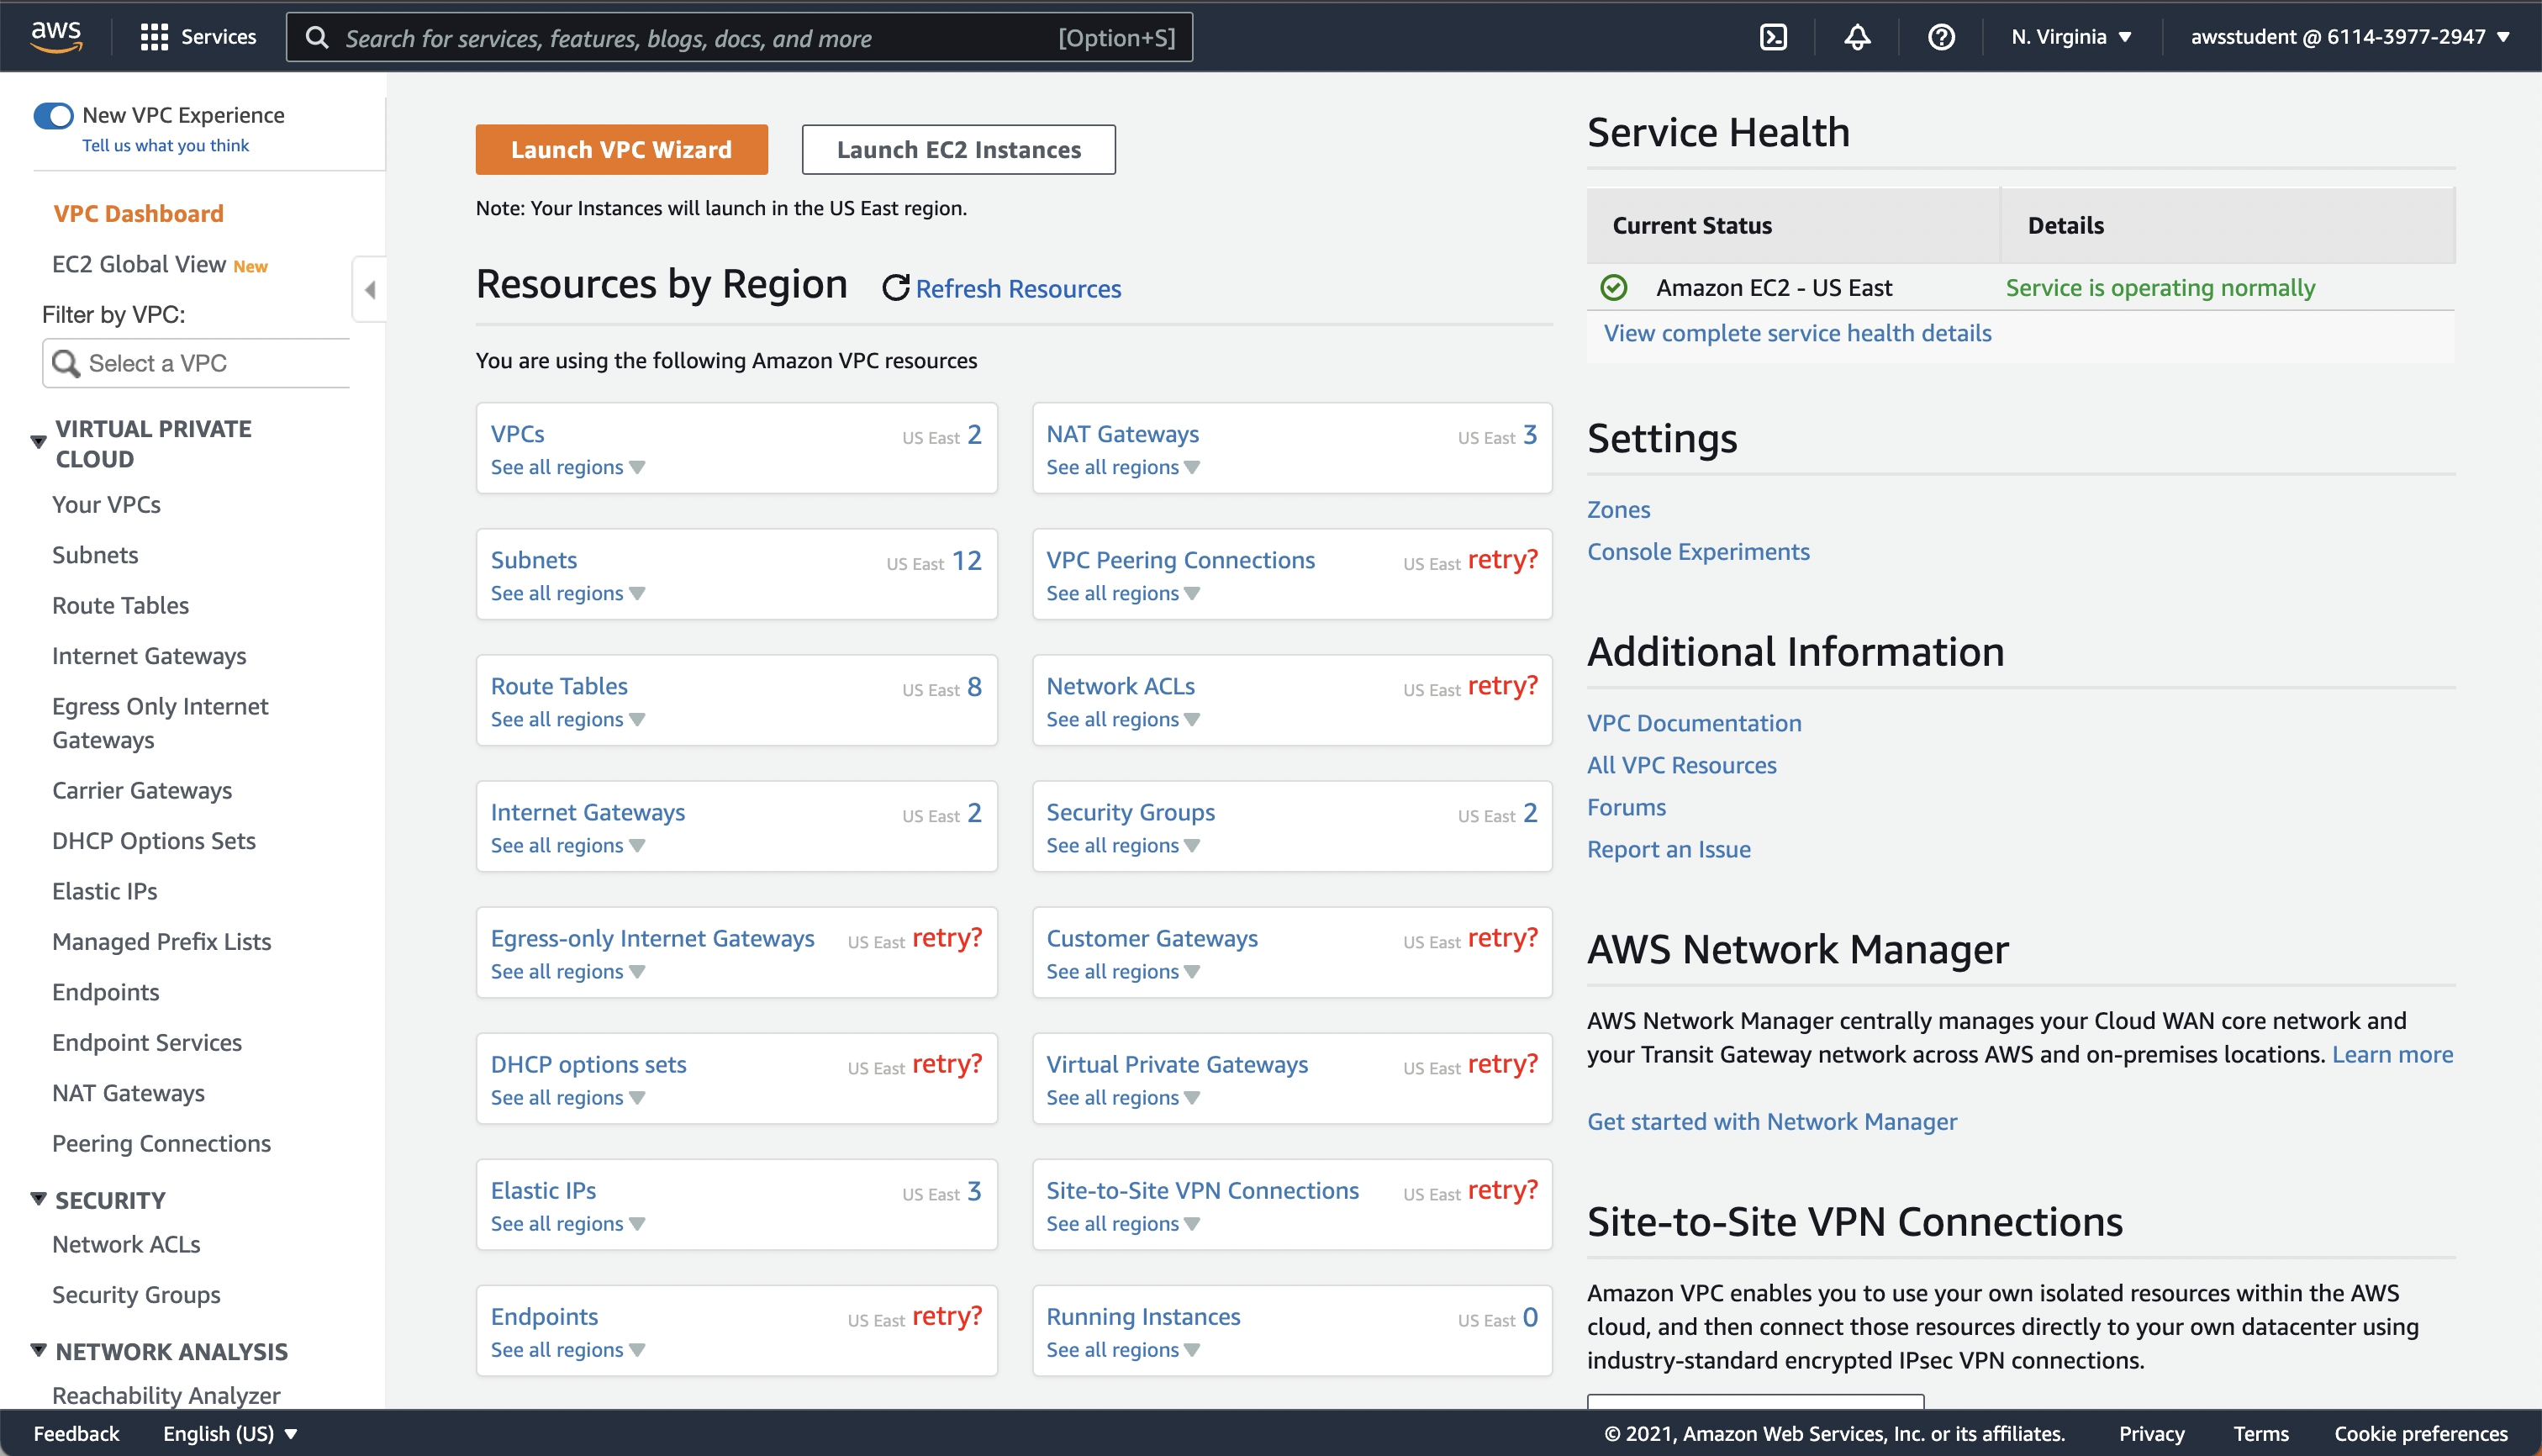
Review the bootstrapped resources in the AWS Console
Right-click on the AWS Console URL button on
the Qwiklabs instructions page, and select Open Link in Incognito Window
(or whatever the equivalent is in your browser).
Log in using the AWS Username and AWS Password provided by Qwiklabs.
In the search bar of the console window, enter vpc and press ENTER.
A dashboard displays all the AWS networking resources that have been deployed.
(Optional) Investigate the resources created and verify that they match
the lab architecture diagram in the Objectives section of this lab guide. There might be some additional
resources that AWS creates in every new account, but you can ignore them.
Note:
What IP CIDR ranges are associated with the private subnets?
What tags are associated with the subnets?
What Elastic IP addresses are associated with the NAT Gateways?
Configure the AWS CLI
In the Google Cloud Console, open a new Cloud Shell tab.
In the new tab, set the project ID as an environment variable:
export PROJECT_ID=$(gcloud config get-value project)
gcloud config set project $PROJECT_ID
Get the AWS API Roles
that will be used by the Anthos Multi-Cloud API to create and manage your
clusters and node pools:
API_ROLE_ARN=$(aws iam list-roles \
--query 'Roles[?RoleName==`aws-cluster-anthos-api-role`].Arn' \
--output text)
This role has a policy associated with permissions to manage AWS Key
Management Service (KMS), Elastic Compute Cloud (EC2), Autoscaling,
Elastic Load Balancer (ELB), and Identity and Access Management (IAM).
Notice that the 10.1.0.0/16 IP CIDR range is used for Kubernetes
ClusterIP Services and the 10.2.0.0/16 IP CIDR is used for Kubernetes Pods. Those
CIDR ranges are part of the AWS VPC that you created but are not part of the
subnets. The subnets host the cluster nodes.
Congratulations! You have started the Anthos cluster on AWS creation
process. This process will take approximately 5 minutes to
complete.
While you are waiting for the cluster to be provisioned, switch
to the AWS console tab in your browser and note the newly created VMs.
Note:
How many VMs are created for the control plane of your user cluster (you
may need to wait for a minute and refresh before you see the VMs)?
What zones are your control plane nodes located in?
On the left side of the AWS console, scroll down to Load Balancing and
select Load Balancers.
Note:
How many load balancers have been created?
What is each one used for?
Switch back to the browser tab with Cloud Shell open, and when the
command returns, generate an asymmetric private key and import its public
key into AWS:
Kubernetes control plane is running at https://connectgateway.googleapis.com...
CoreDNS is running at https://connectgateway.googleapis.com...
Metrics-server is running at https://connectgateway.googleapis.com...
Notice that you are not connecting directly to your Anthos cluster on AWS.
Instead, you are connecting through the
Anthos Connect Gateway,
which then securely forwards the requests via the connect agent to the
Kubernetes API server.
Verify that you can see your worker nodes:
kubectl get nodes
To authorize the Kubernetes workload identity gke-system/gke-telemetry-agent to write logs
to Cloud Logging and write metrics to Cloud Monitoring, run this command:
While registering the cluster, you can configure the Connect Agent to use
either Workload Identity or a Google Cloud Service Account. In this
lab, you use Workload Identity.
Register the GKE cluster on the Anthos Hub:
gcloud beta container fleet memberships register $GCP_CLUSTER_NAME \
--gke-cluster=$GCP_CLUSTER_ZONE/$GCP_CLUSTER_NAME \
--enable-workload-identity
Note:
If an error says PERMISSION_DENIED: fleet default service
account does not have access, wait for one minute and try
re-running the command. If it fails a second time, repeat the wait/retry
cycle 1-2 more times.
There is a known issue with registering GKE clusters using Workload
Identity where the first effort fails, but then it will work 1-3 minutes
later.
In the Cloud Console, on the Navigation menu, click Anthos > Overview. Cluster Status should now list two available clusters.
Click View all clusters. A list displays your GKE on Google Cloud cluster.
Click on the gcp-cluster entry to see cluster details.
Note: What does the Manage features button in the Detail pane do?
Task 7. Deploy applications to your clusters
Doing a simple deployment to your Anthos on Google Cloud cluster
In your browser, return to the Cloud Shell tab. Switch to the first
Cloud Shell terminal tab, where you originally created the cluster
on Google Cloud.
Ensure that kubectl is configured in this terminal window to point to your
Google Cloud cluster:
kubectx gcp
Create a manifest for a Kubernetes Deployment of a simple application:
In the Cloud Console, go to
Kubernetes Engine > Services & Ingress, and verify that the Service has been
created and the external IP address has been assigned. It make take a minute
or two until the service is ready.
You can also check the pods from the command-line:
kubectl get service my-lb-service
When the service is ready, get the External IP address of the load balancer
and load that address in a new browser tab. You should see output
like this:
Confirm that the deployment was successfully created:
kubectl get pods
Confirm that the service was successfully created:
kubectl get services
You can also check both via GKE management UI in the console.
Switch to the browser tab with the Google Cloud Console.
On the Navigation menu, click Kubernetes Engine > Workloads.
A second my-deployment-50001 entry is displayed, this time for aws-cluster.
In the menu pane, click Services & Ingress.
Two my-lb-service entries, one for each cluster, are displayed.
Click the link in the Endpoints column for the aws-clustermy-lb-service.
The same hello world message you saw with
the gcp-cluster deployment should be displayed. If you see an error, wait a minute or two
until the load balancer in AWS has finished setting up, and then try again.
Task 8. Clean up the environment
Delete the Kubernetes resources on the Anthos cluster on AWS:
In this lab, you created and registered Anthos GKE clusters on Google Cloud and
AWS. You managed clusters using both the CLI and the Google Cloud Console. You
deployed workloads using standard kubectl commands on both clusters.
End your lab
When you have completed your lab, click End Lab. Google Cloud Skills Boost removes the resources you’ve used and cleans the account for you.
You will be given an opportunity to rate the lab experience. Select the applicable number of stars, type a comment, and then click Submit.
The number of stars indicates the following:
1 star = Very dissatisfied
2 stars = Dissatisfied
3 stars = Neutral
4 stars = Satisfied
5 stars = Very satisfied
You can close the dialog box if you don't want to provide feedback.
For feedback, suggestions, or corrections, please use the Support tab.
Copyright 2022 Google LLC All rights reserved. Google and the Google logo are trademarks of Google LLC. All other company and product names may be trademarks of the respective companies with which they are associated.
Lab membuat project dan resource Google Cloud untuk jangka waktu tertentu
Lab memiliki batas waktu dan tidak memiliki fitur jeda. Jika lab diakhiri, Anda harus memulainya lagi dari awal.
Di kiri atas layar, klik Start lab untuk memulai
Gunakan penjelajahan rahasia
Salin Nama Pengguna dan Sandi yang diberikan untuk lab tersebut
Klik Open console dalam mode pribadi
Login ke Konsol
Login menggunakan kredensial lab Anda. Menggunakan kredensial lain mungkin menyebabkan error atau dikenai biaya.
Setujui persyaratan, dan lewati halaman resource pemulihan
Jangan klik End lab kecuali jika Anda sudah menyelesaikan lab atau ingin mengulanginya, karena tindakan ini akan menghapus pekerjaan Anda dan menghapus project
Konten ini tidak tersedia untuk saat ini
Kami akan memberi tahu Anda melalui email saat konten tersedia
Bagus!
Kami akan menghubungi Anda melalui email saat konten tersedia
Satu lab dalam satu waktu
Konfirmasi untuk mengakhiri semua lab yang ada dan memulai lab ini
Gunakan penjelajahan rahasia untuk menjalankan lab
Gunakan jendela Samaran atau browser pribadi untuk menjalankan lab ini. Langkah ini akan mencegah konflik antara akun pribadi Anda dan akun Siswa yang dapat menyebabkan tagihan ekstra pada akun pribadi Anda.
Build and use Anthos Clusters in GCP and AWS environments


 ), click
APIs & Services.
), click
APIs & Services.