GSP041

Overview
The internal Application Load Balancer is essential for building robust, secure, and easily manageable internal applications that power your business operations. This lab explores how to distribute network traffic within your private cloud network without exposing your virtual machines (VMs) directly to the public internet, which keeps your services secure and efficient.
In this lab you build a simplified, but very common, architectural pattern:
- A "Web Tier" (public-facing website) that needs to ask another internal service for help.
- An "Internal Service Tier" (a prime number calculator) that performs specific tasks and is distributed across multiple machines.
This setup ensures that even if one part of your internal service gets busy or goes down, the overall system keeps running smoothly, because the load balancer automatically directs requests to healthy machines.
What you'll do
In this lab, you learn how to perform the following tasks:
- Learn about the components that make up an Internal Load Balancer.
- Create a group of backend machines (prime number calculator).
- Set up internal load balancer to direct internal traffic to the backend machines.
- Test the internal load balancer from another internal machine.
- Set up a public-facing web server that uses the internal load balancer to get results from the internal "prime number calculator" service.
Prerequisites
- Basic familiarity with Google Cloud Compute Engine: Understanding what a Virtual Machine (VM) instance is.
- Basic concepts of networking: What an IP address is.
- Basic Unix/Linux command line: How to type commands in a terminal.
- Some knowledge about VPCs (Virtual Private Clouds): Understanding that your Google Cloud resources live in a private network.
Setup and requirements
Before you click the Start Lab button
Read these instructions. Labs are timed and you cannot pause them. The timer, which starts when you click Start Lab, shows how long Google Cloud resources are made available to you.
This hands-on lab lets you do the lab activities in a real cloud environment, not in a simulation or demo environment. It does so by giving you new, temporary credentials you use to sign in and access Google Cloud for the duration of the lab.
To complete this lab, you need:
- Access to a standard internet browser (Chrome browser recommended).
Note: Use an Incognito (recommended) or private browser window to run this lab. This prevents conflicts between your personal account and the student account, which may cause extra charges incurred to your personal account.
- Time to complete the lab—remember, once you start, you cannot pause a lab.
Note: Use only the student account for this lab. If you use a different Google Cloud account, you may incur charges to that account.
How to start your lab and sign in to the Google Cloud console
-
Click the Start Lab button. If you need to pay for the lab, a dialog opens for you to select your payment method.
On the left is the Lab Details pane with the following:
- The Open Google Cloud console button
- Time remaining
- The temporary credentials that you must use for this lab
- Other information, if needed, to step through this lab
-
Click Open Google Cloud console (or right-click and select Open Link in Incognito Window if you are running the Chrome browser).
The lab spins up resources, and then opens another tab that shows the Sign in page.
Tip: Arrange the tabs in separate windows, side-by-side.
Note: If you see the Choose an account dialog, click Use Another Account.
-
If necessary, copy the Username below and paste it into the Sign in dialog.
{{{user_0.username | "Username"}}}
You can also find the Username in the Lab Details pane.
-
Click Next.
-
Copy the Password below and paste it into the Welcome dialog.
{{{user_0.password | "Password"}}}
You can also find the Password in the Lab Details pane.
-
Click Next.
Important: You must use the credentials the lab provides you. Do not use your Google Cloud account credentials.
Note: Using your own Google Cloud account for this lab may incur extra charges.
-
Click through the subsequent pages:
- Accept the terms and conditions.
- Do not add recovery options or two-factor authentication (because this is a temporary account).
- Do not sign up for free trials.
After a few moments, the Google Cloud console opens in this tab.
Note: To access Google Cloud products and services, click the Navigation menu or type the service or product name in the Search field.

Activate Cloud Shell
Cloud Shell is a virtual machine that is loaded with development tools. It offers a persistent 5GB home directory and runs on the Google Cloud. Cloud Shell provides command-line access to your Google Cloud resources.
-
Click Activate Cloud Shell  at the top of the Google Cloud console.
-
Click through the following windows:
- Continue through the Cloud Shell information window.
- Authorize Cloud Shell to use your credentials to make Google Cloud API calls.
When you are connected, you are already authenticated, and the project is set to your Project_ID, . The output contains a line that declares the Project_ID for this session:
Your Cloud Platform project in this session is set to {{{project_0.project_id | "PROJECT_ID"}}}
gcloud is the command-line tool for Google Cloud. It comes pre-installed on Cloud Shell and supports tab-completion.
- (Optional) You can list the active account name with this command:
gcloud auth list
- Click Authorize.
Output:
ACTIVE: *
ACCOUNT: {{{user_0.username | "ACCOUNT"}}}
To set the active account, run:
$ gcloud config set account `ACCOUNT`
- (Optional) You can list the project ID with this command:
gcloud config list project
Output:
[core]
project = {{{project_0.project_id | "PROJECT_ID"}}}
Note: For full documentation of gcloud, in Google Cloud, refer to the gcloud CLI overview guide.
Set the region and zone
- Set the project region and zone for this lab:
gcloud config set compute/region {{{project_0.default_region | Region}}}
gcloud config set compute/zone {{{project_0.default_zone | Zone}}}
Learn more from the Regions & Zones documentation.
Note: When you run gcloud on your own machine, the config settings are persisted across sessions. But in Cloud Shell, you need to set this for every new session or reconnection.
Task 1. Create a virtual environment
A virtual environment keeps your project's software tidy and makes sure your code always runs with the specific versions of tools it needs.
Python virtual environments are used to isolate package installation from the system.
- Install the
virtualenv environment:
sudo apt-get install -y virtualenv
- Build the virtual environment:
python3 -m venv venv
- Activate the virtual environment:
source venv/bin/activate
Enable Gemini Code Assist in the Cloud Shell IDE
You can use Gemini Code Assist in an integrated development environment (IDE) such as Cloud Shell to receive guidance on code or solve problems with your code. Before you can start using Gemini Code Assist, however, you need to enable it.
- In Cloud Shell, enable the Gemini for Google Cloud API with the following command:
gcloud services enable cloudaicompanion.googleapis.com
- Click Open Editor on the Cloud Shell toolbar.
Note: To open the Cloud Shell Editor, click Open Editor on the Cloud Shell toolbar. You can switch between Cloud Shell and the code Editor by clicking Open Editor or Open Terminal, as required.
-
In the Cloud Shell Editor, navigate to Cloud Code > Help and Feedback > Change Settings.
-
In the Settings, search for Gemini Code Assist.
-
Locate and ensure that the checkbox is selected for Geminicodeassist: Enable, and close the Settings.
-
Click Cloud Code - No Project in the status bar at the bottom of the screen.
-
Authorize the plugin as instructed. If a project is not automatically selected, click Select a Google Cloud Project, and choose .
-
Verify that your Google Cloud project () displays in the Cloud Code status message in the status bar.
Task 2. Create a backend managed instance group
By using a "managed instance group", Google Cloud can automatically create and maintain identical copies of your service. If one copy fails, Google Cloud replaces it, making your service more reliable.
Create the startup script
This script is like a set of instructions that each new VM in your group follows when it starts up. Your script includes a small web server written in Python that can tell you if a number is prime (True) or not (False).
- In the Cloud Shell terminal, run the following command to create your
backend.sh script in the home directory:
touch ~/backend.sh
- Click the Open Editor icon at the top of the Cloud Shell toolbar. If prompted, click Open in a new window.

Note: If you don't see the Code Editor icon, close the left panel by clicking the Navigation menu (☰) icon.
After a few seconds the workspace displays.
-
Select the backend.sh file in the file Explorer pane.
-
Now add the following script into the Editor:
sudo chmod -R 777 /usr/local/sbin/
sudo cat << EOF > /usr/local/sbin/serveprimes.py
import http.server
def is_prime(a): return a!=1 and all(a % i for i in range(2,int(a**0.5)+1))
class myHandler(http.server.BaseHTTPRequestHandler):
def do_GET(s):
s.send_response(200)
s.send_header("Content-type", "text/plain")
s.end_headers()
s.wfile.write(bytes(str(is_prime(int(s.path[1:]))).encode('utf-8')))
http.server.HTTPServer(("",80),myHandler).serve_forever()
EOF
nohup python3 /usr/local/sbin/serveprimes.py >/dev/null 2>&1 &
-
Click File > Save but do not close the file.
-
With Gemini Code Assist enabled in the IDE, when you open a file in the Editor, such as backend.sh, notice the  icon in the upper-right corner of the toolbar, which denotes that Gemini Code Assist is ready for use.
Gemini Code Assist enhances productivity and reduces context switching by providing AI-powered smart actions directly within your code editor. Next, you use Gemini Code Assist to explain the purpose and functionality of a VM startup script within the Managed Instance Group to a team member.
-
Click the Gemini Code Assist: Smart Actions icon and select Explain this.
-
Gemini Code Assist opens a chat pane with the prefilled prompt of Explain this. In the inline text box of the Code Assist chat, replace the prefilled prompt with the following, and click Send:
As an Application Developer at Cymbal AI, explain the backend.sh startup script to a new team member. This script is used to run a small Python web server written in a Python file serveprimes.py. Provide a detailed breakdown of the script's key components and explain the function of each command.
For the suggested improvements, don't make any changes to the file's content.
A detailed explanation for the startup script backend.sh that's used to run a small web server appears in the Gemini Code Assist chat.
Create the instance template
- Click Open Terminal on the toolbar of Cloud Shell. Run the following command to create the instance template
primecalc:
gcloud compute instance-templates create primecalc \
--metadata-from-file startup-script=backend.sh \
--no-address --tags backend --machine-type=e2-medium
This is the "blueprint" for the backend VMs. Notice it has --no-address, meaning these backend VMs won't have public internet access for security reasons.
Open the firewall
You need to create a firewall rule to allow traffic on port 80 (standard HTTP traffic) to reach the backend VMs. This is crucial for the internal Application Load Balancer and health checks to communicate with them.
- Run the following command to open the firewall to port
80:
gcloud compute firewall-rules create http --network default --allow=tcp:80 \
--source-ranges {{{project_0.startup_script.selected_cidr | IP}}} --target-tags backend
Click Check my progress to verify you're on track in this lab.
Create an instance template and open the firewall on port 80
Create the instance group
- Next, run the following command to create the managed instance group named
backend. Start off with 3 instances:
gcloud compute instance-groups managed create backend \
--size 3 \
--template primecalc \
--zone {{{project_0.default_zone | ZONE }}}
- When this finishes running, go back to the console tab. Navigate to Compute Engine > VM instances. You should now see three backend VMs being created by your instance group.

The backends are now ready to serve traffic.
Click Check my progress to verify you're on track in this lab.
Create the instance group
Task 3. Set up the internal load balancer
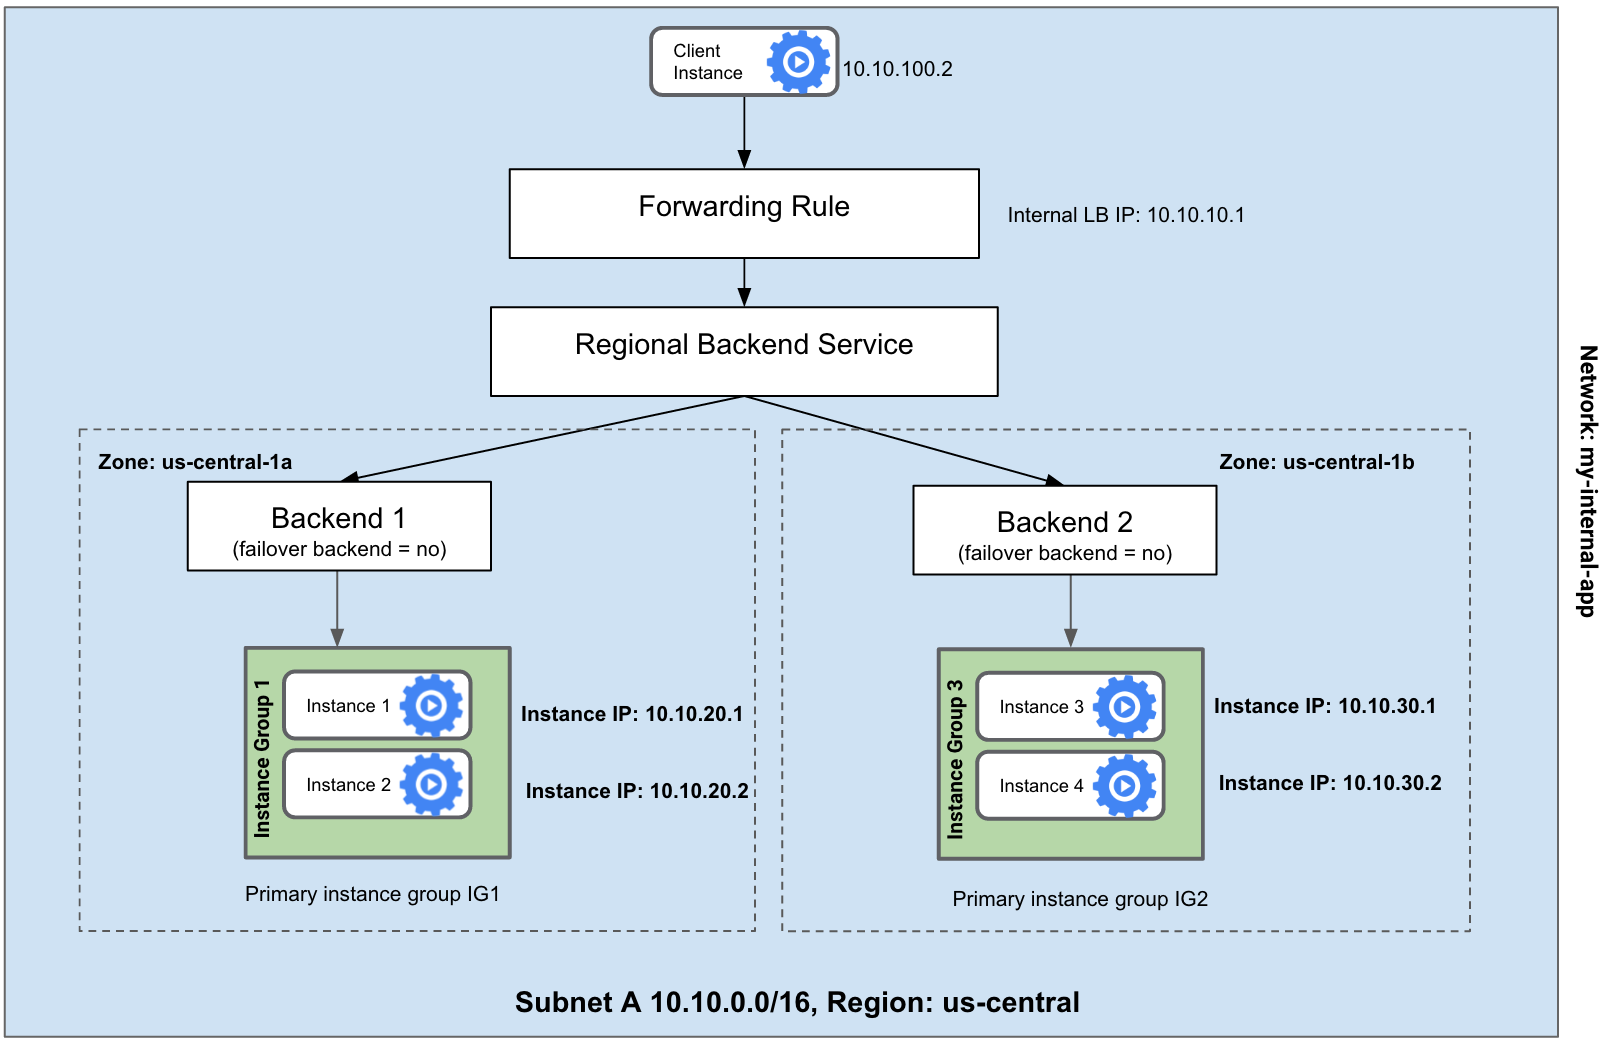
You're creating that single, private VIP entrance for your internal service. It allows other internal applications to reach your "prime number calculator" reliably, without needing to know which specific backend VM is active or available.
In this task, you set up the Internal Load Balancer and connect it to the instance group you have just created.
An Internal Load Balancer consists of three main parts:
-
Forwarding Rule: This is the actual private IP address that other internal services send requests to. It "forwards" traffic to your backend service.
-
Backend Service: This defines how the load balancer distributes traffic to your VM instances. It also includes the health check.
-
Health Check: This is a continuous check that monitors the "health" of your backend VMs. The load balancer only sends traffic to machines that are passing their health checks, ensuring your service is always available.
The following diagram shows how instances are load balanced using multiple instances in multiple backend groups in different zones.
Create a health check
- A health check is needed to make sure the load balancer only sends traffic to healthy instances. Your backend service is an HTTP server, so run the following command to check if it responds with a "200 OK" on a specific URL path (in this case,
/2 to check if 2 is prime):
gcloud compute health-checks create http ilb-health --request-path /2
Since the HTTP service is provided, see if a 200 response on a specific URL path (in this case /2 to check if 2 is prime) is populated.
Create a backend service
- Now, run the following command to create the backend service named
prime-service:
gcloud compute backend-services create prime-service \
--load-balancing-scheme internal --region={{{project_0.default_region | REGION}}} \
--protocol tcp --health-checks ilb-health
This service ties the health check to the instance group.
Add the instance group to the backend service
- Run the following command to connect your backend instance group to the prime-service backend service. This tells the load balancer which machines it should manage:
gcloud compute backend-services add-backend prime-service \
--instance-group backend --instance-group-zone={{{project_0.default_zone | ZONE }}} \
--region={{{project_0.default_region | REGION}}}
Create the forwarding rule
- Finally, run the following command to create a forwarding rule named
prime-lb with a static IP of :
gcloud compute forwarding-rules create prime-lb \
--load-balancing-scheme internal \
--ports 80 --network default \
--region={{{project_0.default_region | REGION}}} --address {{{project_0.startup_script.selected_forwarding_rule_cidr | IP}}} \
--backend-service prime-service
Your internal "prime number calculation" service is now fully set up and ready to be queried via its internal IP address.
Click Check my progress to verify you're on track in this lab.
Set up the internal load balancer
Task 4. Test the load balancer
This step is crucial to confirm that your internal Application Load Balancer is correctly directing traffic to the backend services. It proves that other internal applications can now reliably reach your service through a single, stable IP address, ensuring continuous operation.
To test the load balancer, you need to create a new VM instance in the same network as your internal Application Load Balancer. It's only accessible from within your private cloud network, not directly from Cloud Shell (which lives outside this specific network).
- In Cloud Shell, run the following
gcloud command to create a simple test instance:
gcloud compute instances create testinstance \
--machine-type=e2-standard-2 --zone {{{project_0.default_zone | ZONE }}}
- Then run the following command to SSH into it:
gcloud compute ssh testinstance --zone {{{project_0.default_zone | ZONE }}}
If prompted, type Y and press Enter twice to proceed.
Query the load balancer
- From inside the test instance, run the following
curl commands to ask your internal Application Load Balancer's IP address if a few numbers are prime:
curl {{{project_0.startup_script.selected_forwarding_rule_cidr | IP}}}/2
curl {{{project_0.startup_script.selected_forwarding_rule_cidr | IP}}}/4
curl {{{project_0.startup_script.selected_forwarding_rule_cidr | IP}}}/5
The output shows True or False right next to your command line.
Output:
user@testinstance:~$ curl {{{project_0.startup_script.selected_forwarding_rule_cidr | IP}}}/2
Trueuser@testinstance:~$ curl {{{project_0.startup_script.selected_forwarding_rule_cidr | IP}}}/4
Falseuser@testinstance:~$ curl {{{project_0.startup_script.selected_forwarding_rule_cidr | IP}}}/5
Trueuser@testinstance:~$ exit
You should see that 2 and 5 are correctly identified as prime numbers, but 4 is not. This confirms that the internal Application Load Balancer is working! It received the requests and successfully forwarded them to one of your backend "prime calculation" VMs.
The service responded correctly: that 2 and 5 are prime numbers, but 4 is not.
- Run the following command to leave the test instance:
exit
- Then run the following command to delete it because it's not needed any more:
gcloud compute instances delete testinstance --zone={{{project_0.default_zone | ZONE }}}
- Type in Y to confirm the deletion.
Task 5. Create a public-facing web server
Now you can see how a public-facing application (like a website) can leverage your internal services.
In this task, you create a public-facing web server that uses the internal "prime number calculator" service (via the internal Application Load Balancer) to display a matrix of prime numbers.
- First, run the following command to create the startup script for this public-facing "frontend" in the home directory:
touch ~/frontend.sh
- You should still see the Code Editor open. But if not, launch the Code Editor by selecting it in the shell:
After a few seconds the workspace opens.
-
Select the frontend.sh file in the file Explorer pane.
-
Now add the following script into the Editor:
sudo chmod -R 777 /usr/local/sbin/
sudo cat << EOF > /usr/local/sbin/getprimes.py
import urllib.request
from multiprocessing.dummy import Pool as ThreadPool
import http.server
PREFIX="http://{{{project_0.startup_script.selected_forwarding_rule_cidr | IP}}}/" #HTTP Load Balancer
def get_url(number):
return urllib.request.urlopen(PREFIX+str(number)).read().decode('utf-8')
class myHandler(http.server.BaseHTTPRequestHandler):
def do_GET(s):
s.send_response(200)
s.send_header("Content-type", "text/html")
s.end_headers()
i = int(s.path[1:]) if (len(s.path)>1) else 1
s.wfile.write("<html><body><table>".encode('utf-8'))
pool = ThreadPool(10)
results = pool.map(get_url,range(i,i+100))
for x in range(0,100):
if not (x % 10): s.wfile.write("<tr>".encode('utf-8'))
if results[x]=="True":
s.wfile.write("<td bgcolor='#00ff00'>".encode('utf-8'))
else:
s.wfile.write("<td bgcolor='#ff0000'>".encode('utf-8'))
s.wfile.write(str(x+i).encode('utf-8')+"</td> ".encode('utf-8'))
if not ((x+1) % 10): s.wfile.write("</tr>".encode('utf-8'))
s.wfile.write("</table></body></html>".encode('utf-8'))
http.server.HTTPServer(("",80),myHandler).serve_forever()
EOF
nohup python3 /usr/local/sbin/getprimes.py >/dev/null 2>&1 &
-
Click File > Save but do not close the file.
As before, you next want to ask Gemini Code Assist to explain the startup script for a public-facing web server to a team member.
-
With the frontend.sh file open and Gemini Code Assist enabled in the IDE, notice the presence of the icon in the upper-right corner of the editor.
-
Click the Gemini Code Assist: Smart Actions icon and select Explain this.
-
Gemini Code Assist opens a chat pane with the prefilled prompt of Explain this. In the inline text box of the Code Assist chat, replace the prefilled prompt with the following, and click Send:
You are an Application Developer at Cymbal AI. A new team member needs help understanding this startup script, which is used to run a public-facing web server written in the Python file getprimes.py. Explain the frontend.sh script in detail. Break down its key components, the commands used, and their function within the script.
For suggested improvements, do not make any changes to the file's content.
A detailed explanation for the startup script frontend.sh that's used to run a public-facing web server appears in the Gemini Code Assist chat.
Create the frontend instance
- In the Cloud Shell terminal, run the following code to create an instance named
frontend that runs this web server:
gcloud compute instances create frontend --zone={{{project_0.default_zone | ZONE }}} \
--metadata-from-file startup-script=frontend.sh \
--tags frontend --machine-type=e2-standard-2
Open the firewall for the frontend
- This is a public-facing server, so you need to run the following command to open its firewall to allow traffic from anywhere on the internet (0.0.0.0/0) on port 80:
gcloud compute firewall-rules create http2 --network default --allow=tcp:80 \
--source-ranges 0.0.0.0/0 --target-tags frontend
-
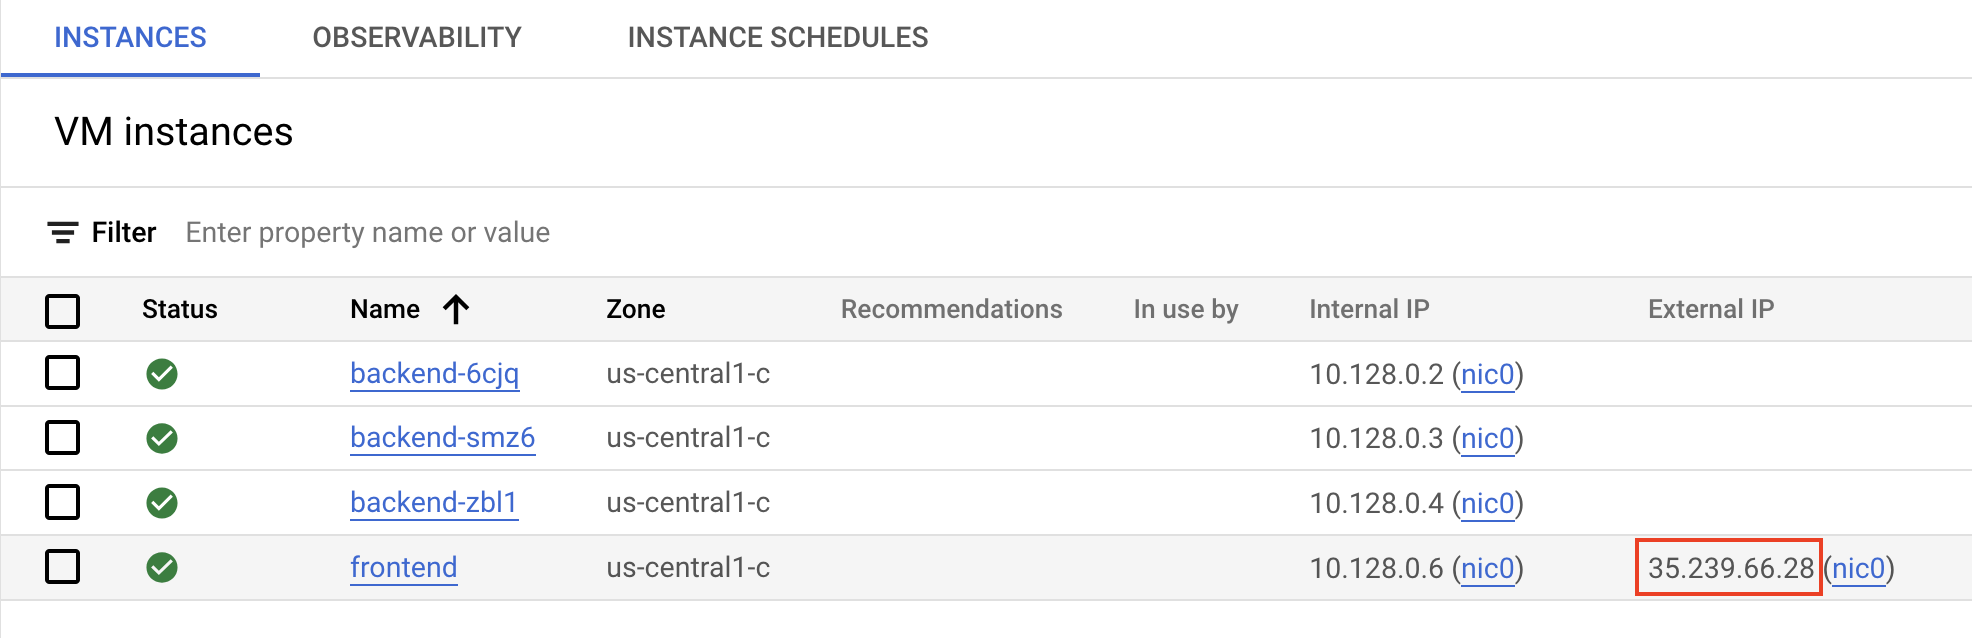
In the Navigation menu, click Compute Engine > VM instances. Refresh your browser if you don't see the frontend instance.
-
Open the External IP for the frontend in your browser:
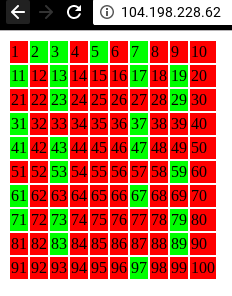
You should see a matrix like this, showing all prime numbers, up to 100, in green:
- Try adding a number to the path, like http://your-ip/10000, to see all prime numbers starting from that number.
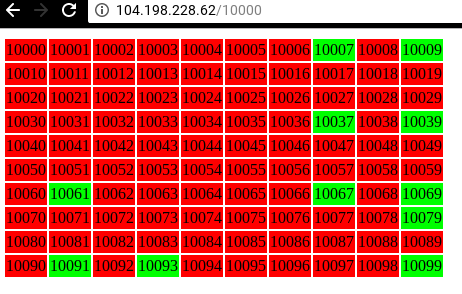
Note: The example startup script is not effectively calculating prime numbers. It also doesn't have error detection or correction algorithms. Adding large numbers to the path makes the service time out.
Click Check my progress to verify you're on track in this lab.
Create a public-facing web server
Congratulations!
You've successfully built a reliable internal service using Google Cloud's internal Application Load Balancer with the help from Gemini Code Assist and demonstrated how a public application can securely leverage it.
Next steps / Learn more
Google Cloud training and certification
...helps you make the most of Google Cloud technologies. Our classes include technical skills and best practices to help you get up to speed quickly and continue your learning journey. We offer fundamental to advanced level training, with on-demand, live, and virtual options to suit your busy schedule. Certifications help you validate and prove your skill and expertise in Google Cloud technologies.
Manual Last Updated Date August 22, 2025
Lab Last Tested Date August 22, 2025
Copyright 2025 Google LLC. All rights reserved. Google and the Google logo are trademarks of Google LLC. All other company and product names may be trademarks of the respective companies with which they are associated.


