


Before you begin
- Labs create a Google Cloud project and resources for a fixed time
- Labs have a time limit and no pause feature. If you end the lab, you'll have to restart from the beginning.
- On the top left of your screen, click Start lab to begin
Create a view file for the SQL derived table
/ 35
Create a view file for the native derived table
/ 35
Join the view for the SQL derived table
/ 30
Looker is a modern data platform in Google Cloud that lets business users analyze and visualize data interactively. LookML developers curate the data used by business users by creating new fields, tables, and views to customize and organize data.
In Looker, LookML developers can use derived tables to create new tables that are not already defined in the underlying database. For example, as a LookML developer, you can create derived tables to summarize details from existing tables, such as order details for each order in an e-commerce dataset.
In this lab, you learn how to create both types of derived tables in LookML: SQL derived and native derived tables.
For this lab, a project called qwiklabs-ecommerce has been created for you in LookML. This project is based on a mock e-commerce dataset containing information on orders, products, and users. You can learn more about LookML modeling in the Looker documentation.
In this lab, you learn how to:
qwiklabs-ecommerce) published by a Looker adminRead these instructions. Labs are timed and you cannot pause them. The timer, which starts when you click Start Lab, shows how long Google Cloud resources are made available to you.
This hands-on lab lets you do the lab activities yourself in a real cloud environment, not in a simulation or demo environment. It does so by giving you new, temporary credentials that you use to sign in and access Google Cloud for the duration of the lab.
To complete this lab, you need:
When ready, click Start Lab.
The Lab Details pane appears with the temporary credentials that you must use for this lab.
If you need to pay for the lab, a pop-up opens for you to select your payment method.
Notice your lab credentials in the Lab details pane. You use them to sign in to the Looker instance for this lab.
Click Open Looker.
Enter the provided Username and Password in the Email and Password fields.
Username:
Password:
Click Log In.
After a successful login, you see the Looker instance for this lab.
In LookML, you can define derived tables using either SQL queries to define a SQL derived table or Explore queries to define a native derived table.
In this task, you write a SQL query to define a new SQL derived table that summarizes details for each order: order ID, user ID, number of items, and the total cost of items ordered. Then, you create a new view file for the SQL derived table in the qwiklabs-ecommerce project.
On the Looker navigation menu, click Develop > SQL Runner.
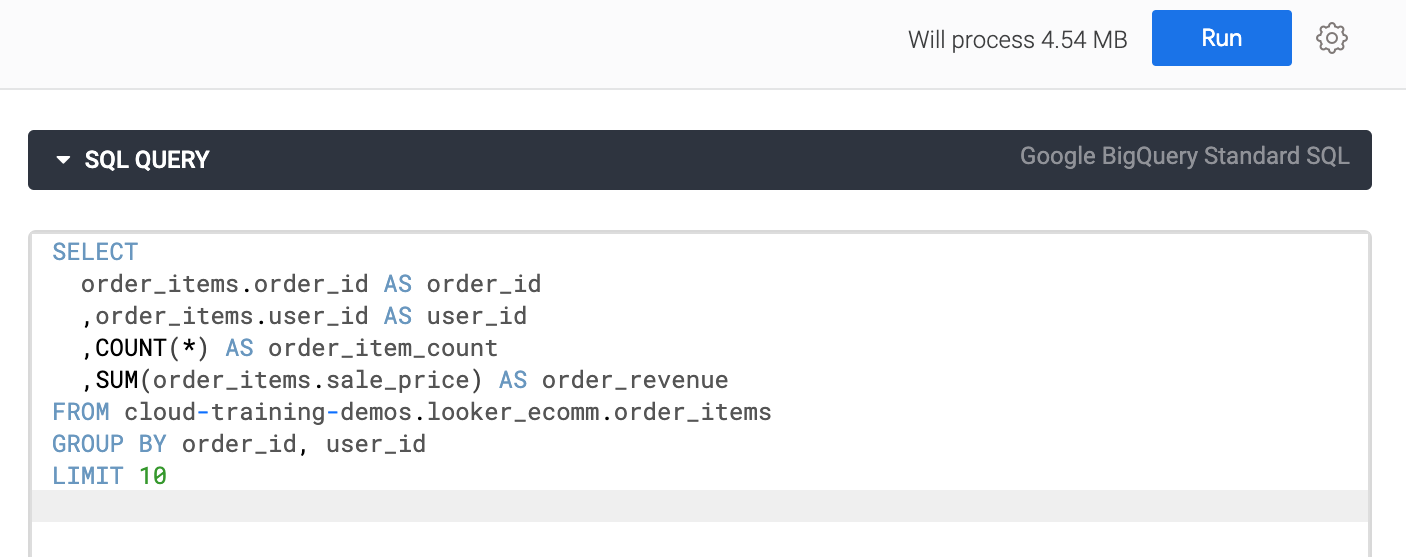
In the SQL Query window, add the following query:
In this example, the desired query selects the order_id and user_id, counts the number of items associated with each order, and then sums the price of those items.
Specifically, the COUNT clause is counting the number of individual order item IDs (the primary key of the order_items table), and the SUM clause is totaling the sale_price of the order item IDs.
The GROUP BY clause is used to group the results by order_id and user_id, and the LIMIT clause is used to limit the results, as we only need to review a subset of records to ensure that our query is working successfully.
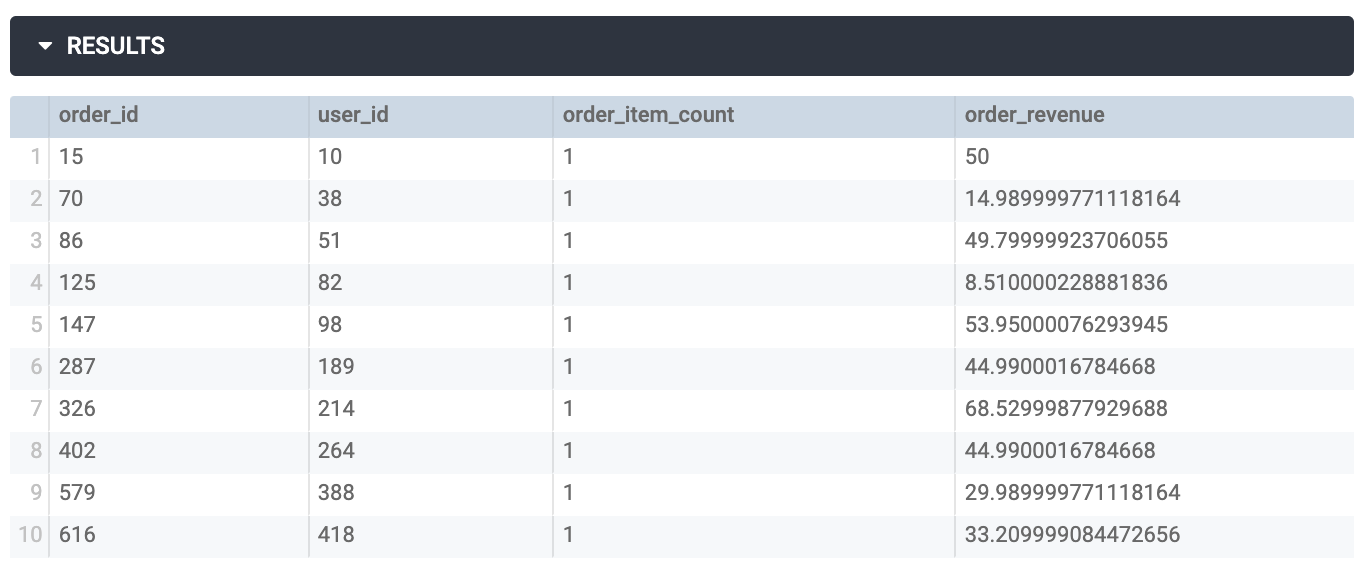
In this example, the query is indeed returning the order ID, user ID, and number of items associated with each order as well as the total revenue from each order.
Notice that the LIMIT clause is used to reduce the amount of data returned during this test; you will remove the LIMIT clause in an upcoming step when you create a new view file for the SQL derived table.
Click Settings (
For Project, select qwiklabs-ecommerce.
For View Name, type: order_details.
Click Add.
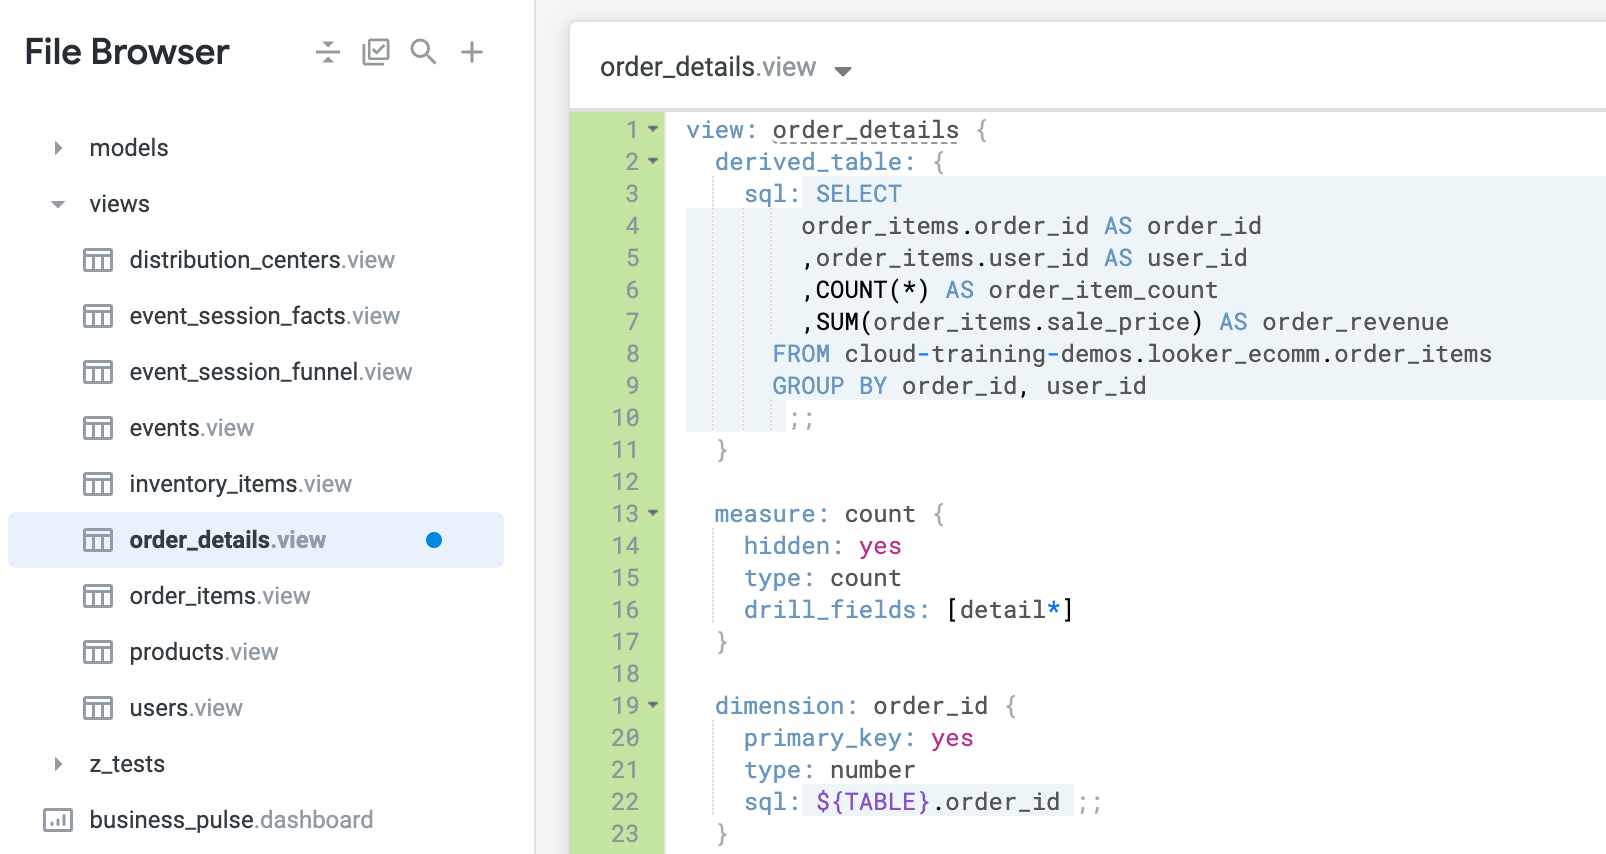
You are redirected to the Looker IDE to review the newly created view file for your SQL derived table.
Notice that the new view file for the order_details view has been created outside of the views folder. It is a best practice to keep the view files organized in the project.
Click on the arrow next to views to see the list of views.
Click order_details.view and drag it under the views folder.
Click order_details.view to see the view file for the SQL derived table.
Looker auto-generates a dimension for each column in the SELECT clause of the SQL query as well as a new count measure. In the next steps, you modify the view file to remove the LIMIT clause which is no longer desired, hide the new count measure, and add a primary key for the view.
LIMIT 10 from the sql parameter.As highlighted previously, Looker auto-generates a count measure along with the dimensions used in the derived table. Sometimes this auto-generated count measure is not valuable, if you already have a count in another view that provides the same number.
In this example, the auto-generated count measure is counting the order IDs, and there is already a count of orders in the order_items view.
You can delete or hide the count measure using the hidden: yes parameter. Hiding the measure is a good idea if you would like to retain it for validation if this count is the same as another count.
type: count, and type: hidden: yes.A final best practice is to make sure that the new view has a primary key.
In this example, you can add the primary_key: yes parameter to the order_id dimension, which is the central organizing ID of this view that provides details about each individual order.
type: number, and type: primary_key: yes.The new view called order_details is now ready for you to create new dimensions and measures, join it to the explore in the model file, and/or finish out the Git workflow to send your changes to production.
Click Validate LookML and then click Commit Changes & Push.
Add a commit message and click Commit.
Lastly, click Deploy to Production.
Click Check my progress to verify the objective.
In contrast to SQL derived tables, native derived tables, or NDTs, are expressed entirely in LookML. Native derived tables are useful because they embody that essential LookML principle of reusability. They allow you to inherit already existing dimensions, measures, and even Explores and join logic.
Since you’re minimizing the number of “hard-coded” database references, this makes your code much more maintainable in the long run.
For example, think about the order_details SQL derived table from the previous section. The SQL included a COUNT of order_items and a SUM of sale_price. However, your order_items view already has measures for order_item_count and total_revenue. Rather than creating a new SQL derived table, you can use existing dimensions and measures to easily define a new NDT.
In this section, you will recreate the SQL derived table from the previous example, now as a native derived table. The easiest way to create a native derived table is through an Explore. You will use the Order Items Explore to create your desired native derived table that contains the details for each order: order ID, user ID, number of items, and the total cost of items ordered.
On the Looker navigation menu, click Explore.
Under E-Commerce Training, click Order Items.
Click the arrow next to Order Items.
The available dimensions and measures will be listed in the data panel for Order Items. Remember that the Explore will automatically generate a valid, performant SQL query for you.
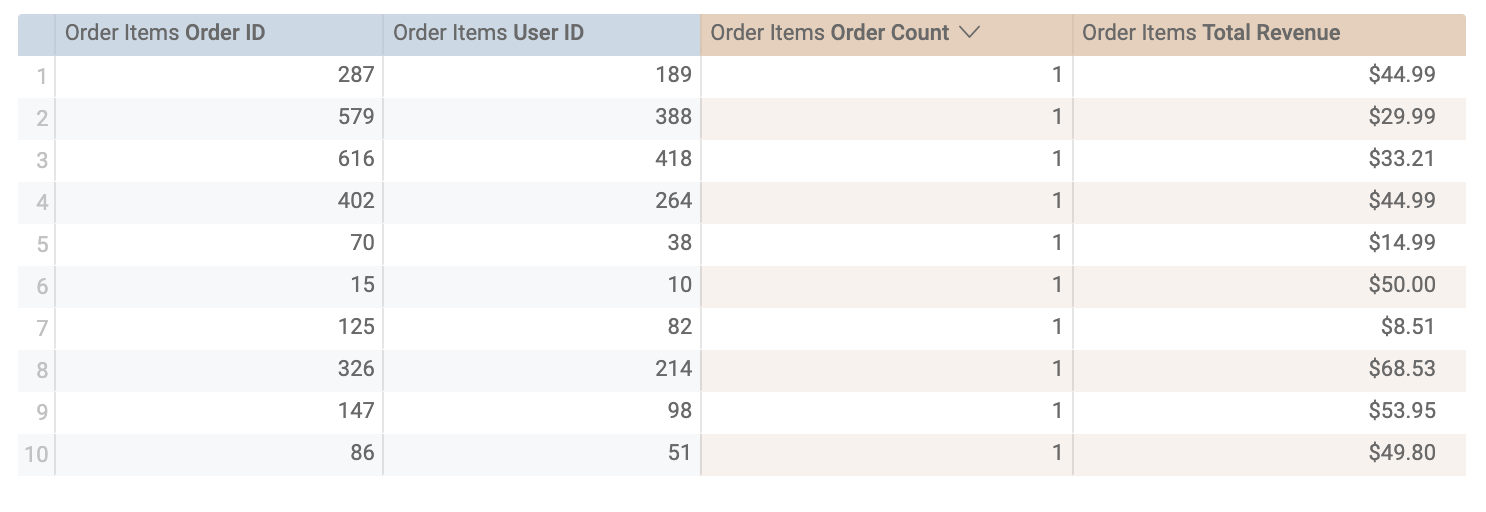
Under Order Items > Dimensions, click Order ID and User ID.
Under Order Items > Measures, click Order Count and Total Revenue.
Click Run to see the results.
Take a moment to review the results of the query to ensure that it is returning the desired results. In this example, the request is correctly returning the Order ID, User ID, and number of items associated with each order, as well as the total revenue from each order.
Click Settings (
Click on Derived Table and copy the LookML code to your computer clipboard. You will paste this LookML code into a new view file for this native derived table.
Open a new Looker window in a new tab.
On the Looker navigation menu, click the Develop tab and then select the qwiklabs-ecommerce LookML project.
Next to File Browser, click Add file or folder (
Select Create View.
For file name, type: order_details_summary.
Click Create.
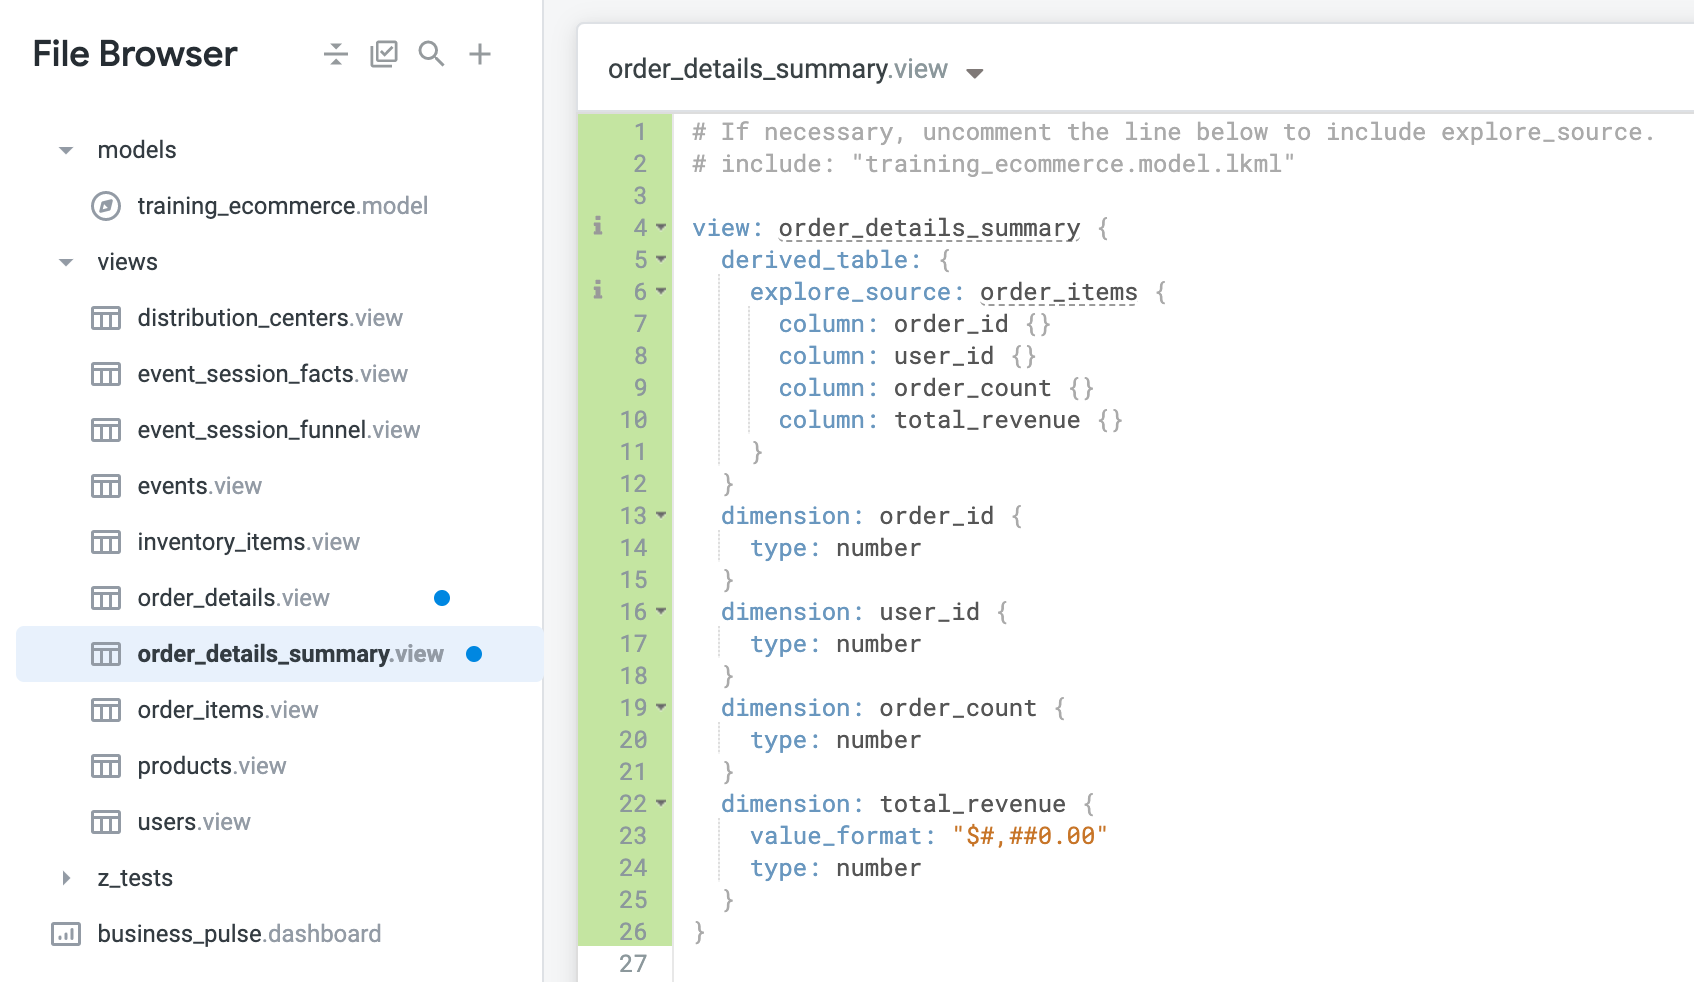
Notice again that the new view file for the order_details_summary view has been created outside of the views folder.
Click on the arrow next to views to see the list of views.
Click order_details_summary.view and drag it under the views folder.
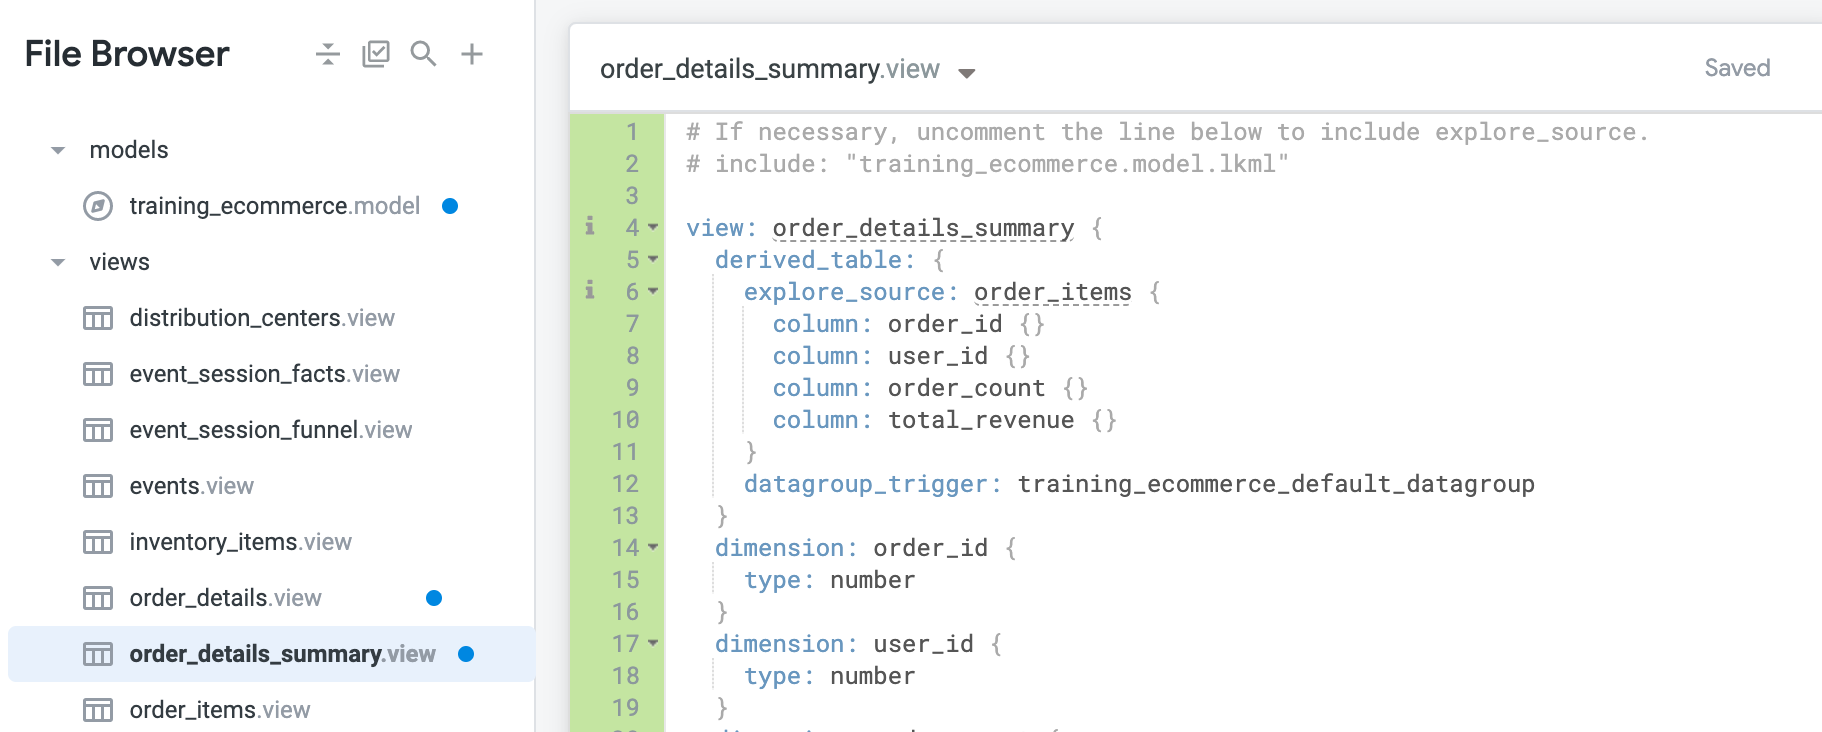
Click order_details_summary.view to see the view file for the native derived table.
Delete all of the auto-generated LookML in the view file.
Paste the LookML code you copied for the native derived table.
Replace the auto-generated view name (e.g. add_a_unique_name_1623275538) with: order_details_summary. Your file should resemble the following:
Notice that Looker makes a suggestion to include the model file but the lines are commented out. It is best practice to leave the line for the model file commented out. The reason is that model files almost always include other files, so if you have lots of files including each other, then you risk creating circular dependencies in your model. This can cause syntax validation errors.
The new view called order_details_summary is now ready for you to create new dimensions and measures, join it to the explore in the model file, and/or finish out the Git workflow to send your changes to production.
For now, you will not join it to the explore, you will do this for the SQL derived table.
Click Validate LookML and then click Commit Changes & Push.
Add a commit message and click Commit.
Lastly, click Deploy to Production.
Click Check my progress to verify the objective.
In this section, review and test the new derived table. You will first join it to the order_items explore definition in the model file, and then use the Order Items Explore to review what business users would see if you pushed the changes to production.
Note that while you will not complete these last steps for the native derived table, the process of joining the view to an explore is the same whether the view is created for a SQL derived or native derived table.
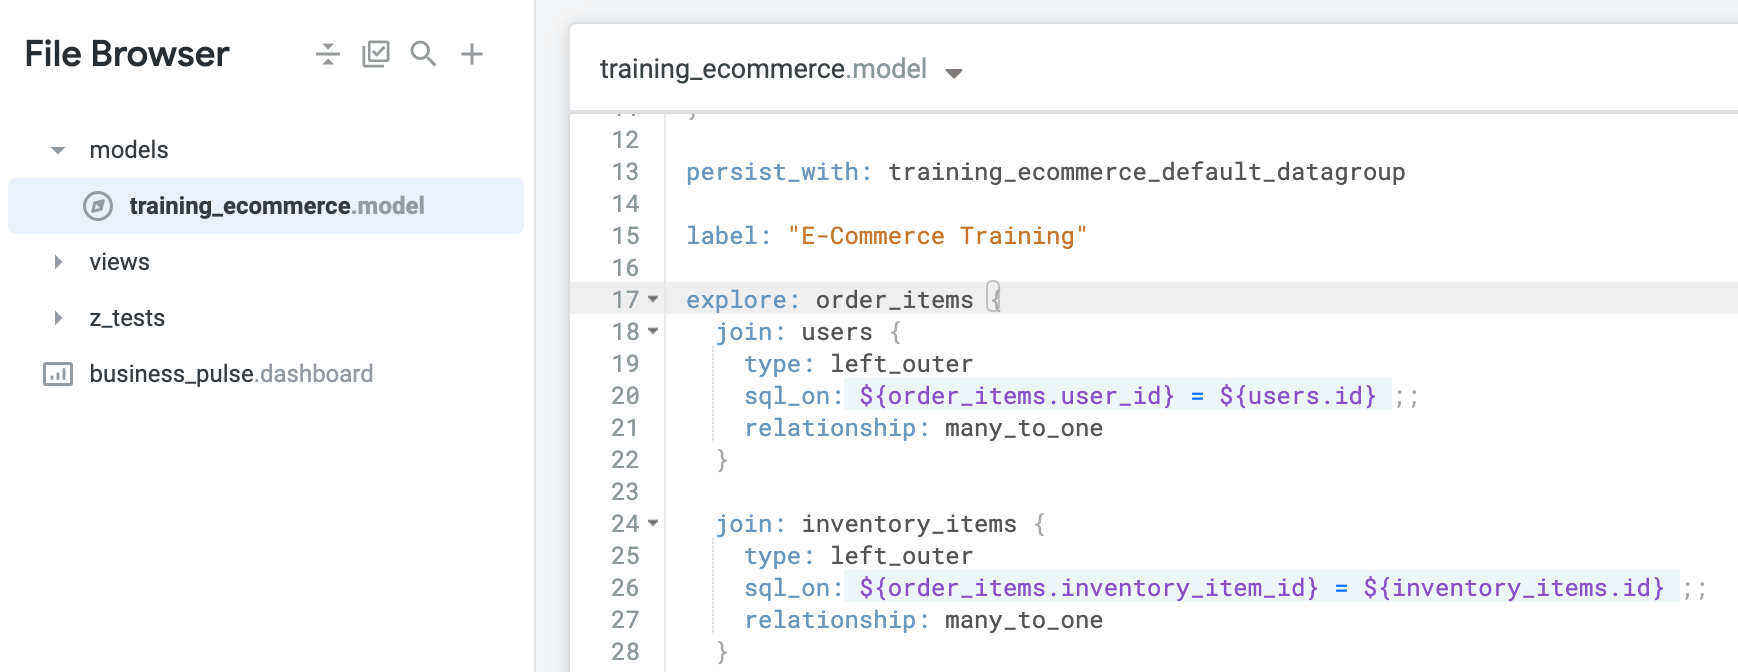
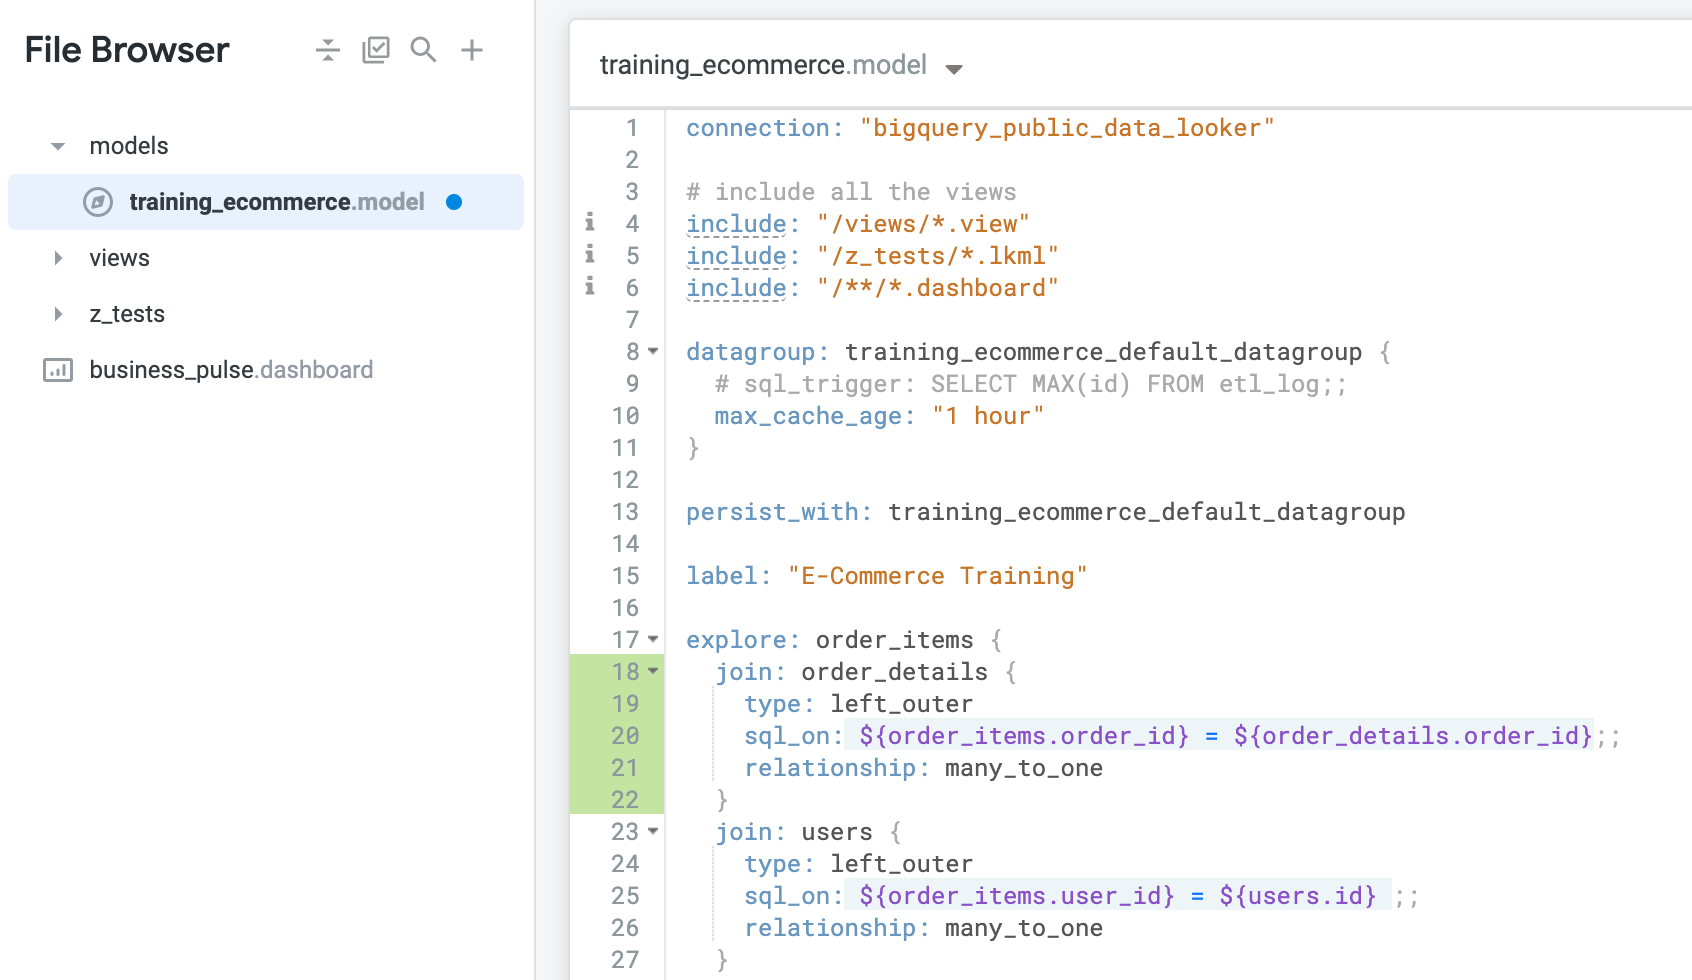
From the same page, click on the training_ecommerce.model file inside of the model folder to modify its contents.
Locate the explore: order_items definition. Notice that there are several joins already defined such as the one for the users view.
explore: order_items definition, above the existing join for users, add a new join for order_details by specifying:The sql_on parameter identifies the join field as order_id. The relationship parameter identifies that there are potentially many instances of an order_id in order_items but only one instance of each order_id in order_details, which is organized as one summary row for each order.
On the Looker navigation menu, click Explore.
Under E-Commerce Training, click Order Items.
Click the arrow next to Order Details.
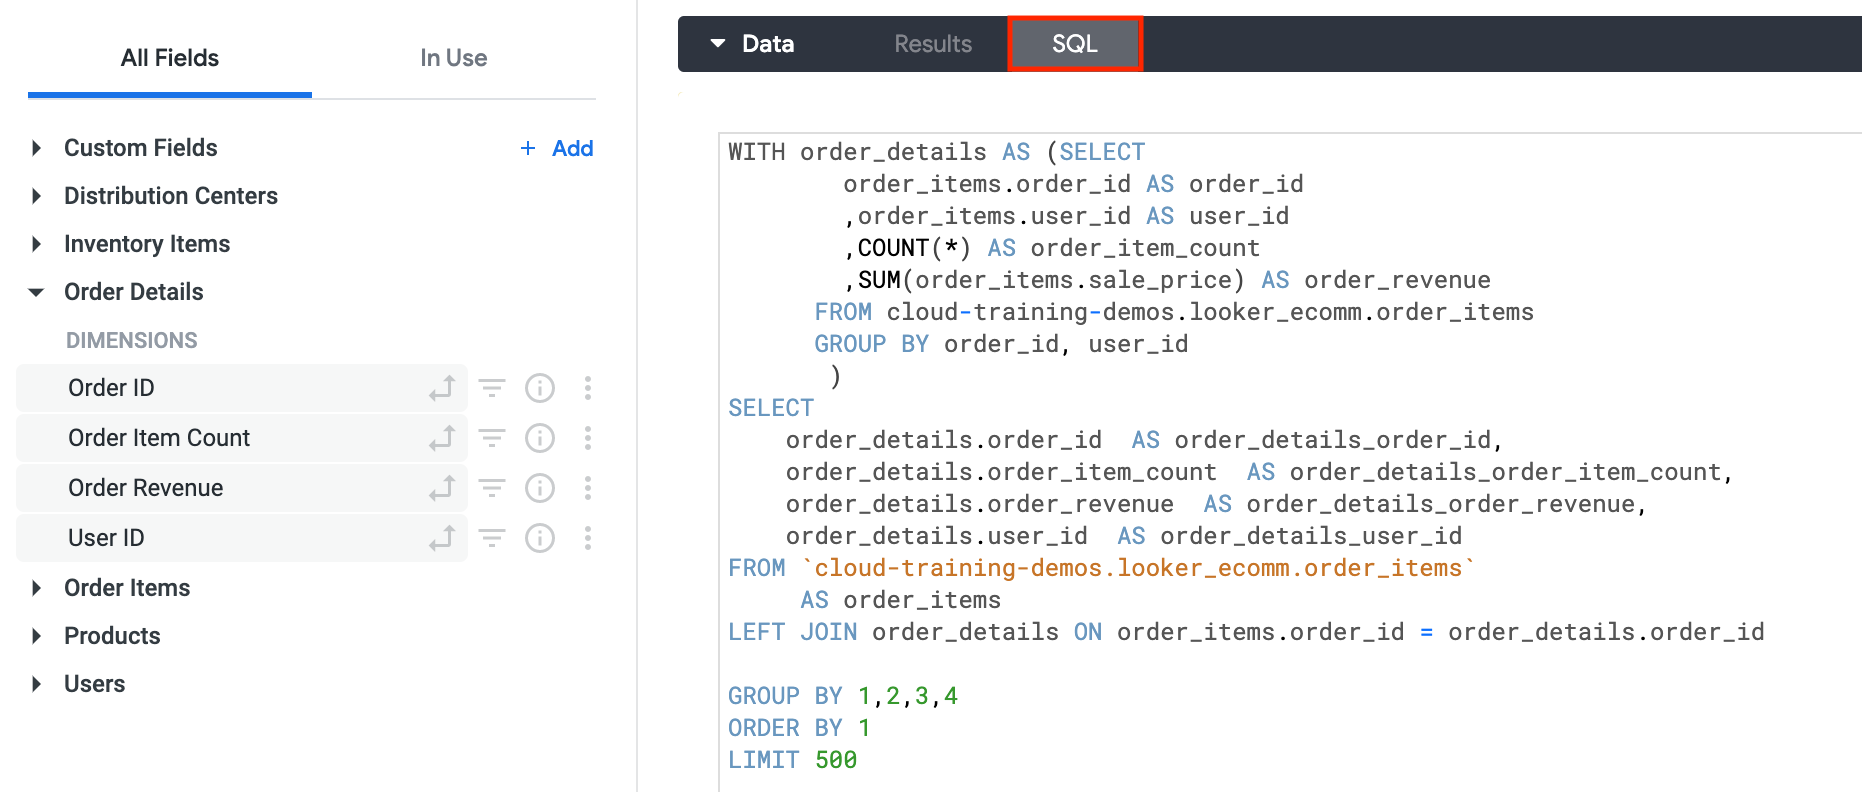
Under Order Details > Dimensions, click Order ID, Order Item Count, Order Revenue, and User ID.
Click Run to see the results.
Click on the SQL tab to see the SQL query generated by Looker.
Notice the common table expression (CTE) identified by a WITH clause. This native derived table is considered ephemeral because it is generated at run-time as a CTE, rather than stored in the underlying database.
Derived tables can also be persisted, which means that they are stored in the underlying database. For more information on persistent derived tables, review the Creating persistent derived tables (PDTs) documentation.
In the next section, we will explore how to persist derived tables, so that they can be written back to the database.
training_ecommerce.model file.Click Validate LookML and then click Commit Changes & Push.
Add a commit message and click Commit.
Lastly, click Deploy to Production.
Click Check my progress to verify the objective.
So far, the derived tables that you have explored in the examples have been ephemeral, meaning that Looker produces CTEs (or temp tables) for them in the Explore queries.
Now you will learn about the other type of existence for derived tables: persistent. Persistent derived tables, or PDTs, are written to and stored in the connected database. The steps to persist a derived table are the same whether it is a SQL derived or native derived table.
As mentioned previously, the benefit in persisting derived tables is that they are ready to go when business users need them, and therefore reduce query runtimes. The downsides are that they take up storage space in your database (which may correlate to cost), and they are more rigid.
To persist a derived table, you must use one or two of these parameters in the definition:
datagroup_trigger uses a datagroup, or caching policy configured in the model. If datagroups are defined in the model, then this is the best practice for persisting derived tables.sql_trigger_value uses a pre-written SELECT statement that returns one value. Looker sends that SELECT statement to the database repeatedly, and when it discovers the result has changed, it takes this as a cue to rebuild the PDT.persist_for instructs the PDT to stay up for a set duration, such as “1 hour” or “4 hours”.However, it is important to note that persist_for does not have any rebuild logic, so the PDT would not get updated during that time. In addition, once time is up, the PDT is dropped, and it doesn’t come back until a business user needs it for a query.
Because the primary benefit of PDTs is having data readily available to minimize query runtimes, it is recommended that you use persist_for in conjunction with sql_trigger_value to ensure that data updates are captured in the PDT, or simply use datagroup_trigger or sql_trigger_value.
In this task, you persist the native derived table using the parameter datagroup_trigger, which rebuilds a persistent derived table based on a pre-defined datagroup (cache policy) in the model file.
For the native derived table named order_details_summary, you add training_ecommerce_default_datagroup as the datagroup_trigger, so that the persistent derived table will rebuild using the rule provided in training_ecommerce_default_datagroup within training_ecommerce.model to rebuild all objects defined in the model every hour.
On the Looker navigation menu, click the Develop tab and then select the qwiklabs-ecommerce LookML project.
Click on the arrow next to views to see the list of views.
Click order_details_summary.view to see the view file for the native derived table.
In the derived_table definition, add a new line after the closing bracket (}) for explore_source: order_items, and paste:
On the Looker navigation menu, click Explore.
Under E-Commerce Training, click Order Items.
Click the arrow next to Order Details.
Under Order Details > Dimensions, click Order ID, Order Item Count, Order Revenue, and User ID.
Click Run to see the results.
Click on the SQL tab to see the SQL query generated by Looker.
Now that the derived table has been persisted, the previous CTE identified by the WITH clause is no longer present and has been replaced by a SELECT statement querying fields from the order_details_summary persistent derived table.
order_details_summary file.Click Validate LookML and then click Commit Changes & Push.
Add a commit message and click Commit.
Lastly, click Deploy to Production.
In this lab, you learned how to create SQL derived and native derived tables in LookML to define new tables that do not already exist in an underlying database.
...helps you make the most of Google Cloud technologies. Our classes include technical skills and best practices to help you get up to speed quickly and continue your learning journey. We offer fundamental to advanced level training, with on-demand, live, and virtual options to suit your busy schedule. Certifications help you validate and prove your skill and expertise in Google Cloud technologies.
Manual Last Updated April 22, 2024
Lab Last Tested October 11, 2021
Copyright 2025 Google LLC. All rights reserved. Google and the Google logo are trademarks of Google LLC. All other company and product names may be trademarks of the respective companies with which they are associated.


This content is not currently available
We will notify you via email when it becomes available

Great!
We will contact you via email if it becomes available

One lab at a time
Confirm to end all existing labs and start this one