

准备工作
- 实验会创建一个 Google Cloud 项目和一些资源,供您使用限定的一段时间
- 实验有时间限制,并且没有暂停功能。如果您中途结束实验,则必须重新开始。
- 在屏幕左上角,点击开始实验即可开始
Create Compute Engine instance with the necessary API access
/ 20
Install software
/ 20
Ingest USGS data
/ 20
Transform the data
/ 20
Create bucket and Store data
/ 20
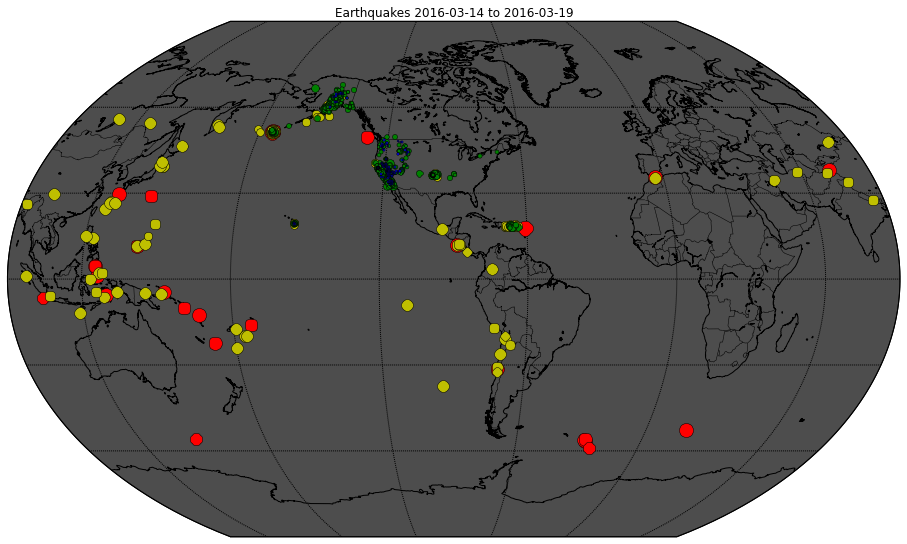
Using Google Cloud to set up a virtual machine to process earthquake data frees you from IT minutia to focus on your scientific goals. You can ingest and process data, then present the results in various formats. In this lab, you will ingest real-time earthquake data published by the United States Geological Survey (USGS) and create maps that look like the following:
In this lab you will spin up a virtual machine, access it remotely, and then manually create a pipeline to retrieve, process and publish the data.
In this lab, you will learn how to do the following:
Read these instructions. Labs are timed and you cannot pause them. The timer, which starts when you click Start Lab, shows how long Google Cloud resources are made available to you.
This hands-on lab lets you do the lab activities in a real cloud environment, not in a simulation or demo environment. It does so by giving you new, temporary credentials you use to sign in and access Google Cloud for the duration of the lab.
To complete this lab, you need:
Click the Start Lab button. If you need to pay for the lab, a dialog opens for you to select your payment method. On the left is the Lab Details pane with the following:
Click Open Google Cloud console (or right-click and select Open Link in Incognito Window if you are running the Chrome browser).
The lab spins up resources, and then opens another tab that shows the Sign in page.
Tip: Arrange the tabs in separate windows, side-by-side.
If necessary, copy the Username below and paste it into the Sign in dialog.
You can also find the Username in the Lab Details pane.
Click Next.
Copy the Password below and paste it into the Welcome dialog.
You can also find the Password in the Lab Details pane.
Click Next.
Click through the subsequent pages:
After a few moments, the Google Cloud console opens in this tab.

To create a Compute Engine instance, from the Navigation menu click on Compute Engine > VM instances.
Click Create Instance and wait for the "Create an instance" form to load.
In the Machine configuration.
Use default Region and Zone for creating the instance.
Click OS and storage.
Click Change and select the following values:
Debian
Debian GNU/Linux 11 (bullseye) x86/64
Click Select.
Click Security.
Click Create.
You'll see a green circle with a check when the instance is created.
Click Check my progress below to verify you're on track in this lab.
You can remotely access your Compute Engine instance using Secure Shell (SSH):
The VM instance details displays.
SSH keys are automatically transferred; no extra software is needed to ssh directly from the browser.
You should see a similar output:
You should see a similar output:
Click Check my progress below to verify you're on track in this lab.
ingest code using less:The less command allows you to view the file (Press the spacebar to scroll down; the letter b to back up a page; the letter q to quit).
The program ingest.sh downloads a dataset of earthquakes in the past 7 days from the US Geological Survey. Notice where the file is downloaded to (disk or Cloud Storage.)
ingest code:Click Check my progress below to verify you're on track in this lab.
You will use a Python program to transform the raw data into a map of earthquake activity:
The transformation code is explained in detail in this notebook.
Feel free to read the narrative to understand what the transformation code does. The notebook itself was written in Datalab, a Google Cloud product that you will use later in this set of labs.
earthquakes.png in your current directory if you enter the following command:Click Check my progress below to verify you're on track in this lab.
Return to the Cloud Console for this step.
From the Navigation menu select Cloud Storage:
Click on + Create, then create your bucket with the following characteristics:
Choose how to control access to objects, uncheck the box for Enforce public access prevention on this bucket and select Fine-grained for Access control.Take note of your bucket name. You will insert its name whenever the instructions ask for <YOUR-BUCKET>.
You will now learn how to store the original and transformed data in Cloud Storage.
<YOUR-BUCKET> to the bucket name you created earlier:This command copies the files to your bucket in Cloud Storage.
/earthquakes folder.You should now see the following three files in the earthquakes folder:
Click Check my progress below to verify you're on track in this lab.
You will now publish the files in your bucket to the web.
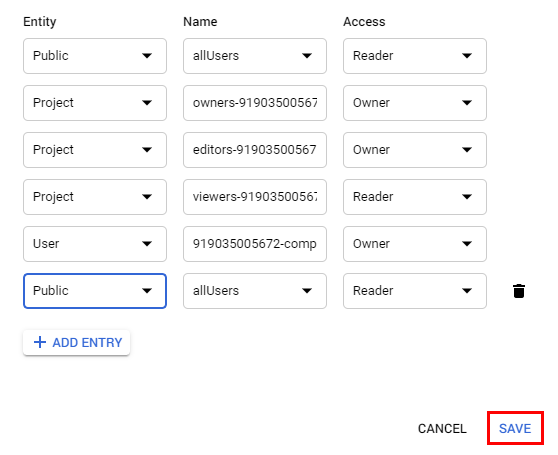
To create a publicly accessible URL for the files, click the three dots at the end of the earthquakes.htm file and select Edit access from the dropdown menu.
In the overlay that appears, click the + Add entry button.
Add a permission for all users by entering in the following:
Repeat the above steps for earthquakes.png.
Click on the name of a file and notice the URL of the published Cloud Storage file and how it relates to your bucket name and content. It should resemble the following:
earthquakes.png image file and then on the public URL, a new tab will be opened with the following image loaded:You have completed this lab and learned how to spin up a compute engine instance, access it remotely, then manually create a pipeline to retrieve, process and publish the data.
Here are some follow-up steps:
...helps you make the most of Google Cloud technologies. Our classes include technical skills and best practices to help you get up to speed quickly and continue your learning journey. We offer fundamental to advanced level training, with on-demand, live, and virtual options to suit your busy schedule. Certifications help you validate and prove your skill and expertise in Google Cloud technologies.
Manual Last Updated July 1, 2025
Lab Last Tested July 1, 2025
Copyright 2025 Google LLC. All rights reserved. Google and the Google logo are trademarks of Google LLC. All other company and product names may be trademarks of the respective companies with which they are associated.


此内容目前不可用
一旦可用,我们会通过电子邮件告知您

太好了!
一旦可用,我们会通过电子邮件告知您

一次一个实验
确认结束所有现有实验并开始此实验