arrow_back

Scanning User-Generated Content using the Cloud Video Intelligence and Cloud Vision APIs

로그인 가입
700개 이상의 실습 및 과정 이용하기

Scanning User-Generated Content using the Cloud Video Intelligence and Cloud Vision APIs

실습 1시간 universal_currency_alt 크레딧 5개 show_chart 중급
info 이 실습에는 학습을 지원하는 AI 도구가 통합되어 있을 수 있습니다.
700개 이상의 실습 및 과정 이용하기

GSP138

Google Cloud self-paced labs logo

Overview

This lab will show you how to deploy a set of Cloud Run functions in order to process images and videos with the Cloud Vision API and Cloud Video Intelligence API.

Social marketing campaigns often invite consumers to submit user-generated images and videos. Campaigns that solicit videos and images often use them for contest submissions, product testimonials, or as user-generated content for public campaign websites. Processing these submissions at scale requires considerable resources.

The Cloud Video Intelligence and Cloud Vision APIs offer you a scalable and serverless way to implement intelligent image and video filtering, accelerating submission processing. If you use the safe-search feature in the Vision API solution and the explicit content detection feature in the Video Intelligence API, you can eliminate images and videos that are identified as unsafe or undesirable content before further processing.

Objectives

Setup and requirements

You'll need image and video files that you can upload into the lab for analysis. Ideally they would be of different types - with people whose faces can be seen, no people, landscape, close-ups - so you can see how the image analysis treats the image. You can also just use a single image or video.

Before you click the Start Lab button

Read these instructions. Labs are timed and you cannot pause them. The timer, which starts when you click Start Lab, shows how long Google Cloud resources are made available to you.

This hands-on lab lets you do the lab activities in a real cloud environment, not in a simulation or demo environment. It does so by giving you new, temporary credentials you use to sign in and access Google Cloud for the duration of the lab.

To complete this lab, you need:

  • Access to a standard internet browser (Chrome browser recommended).
Note: Use an Incognito (recommended) or private browser window to run this lab. This prevents conflicts between your personal account and the student account, which may cause extra charges incurred to your personal account.
  • Time to complete the lab—remember, once you start, you cannot pause a lab.
Note: Use only the student account for this lab. If you use a different Google Cloud account, you may incur charges to that account.

How to start your lab and sign in to the Google Cloud console

  1. Click the Start Lab button. If you need to pay for the lab, a dialog opens for you to select your payment method. On the left is the Lab Details pane with the following:

    • The Open Google Cloud console button
    • Time remaining
    • The temporary credentials that you must use for this lab
    • Other information, if needed, to step through this lab
  2. Click Open Google Cloud console (or right-click and select Open Link in Incognito Window if you are running the Chrome browser).

    The lab spins up resources, and then opens another tab that shows the Sign in page.

    Tip: Arrange the tabs in separate windows, side-by-side.

    Note: If you see the Choose an account dialog, click Use Another Account.
  3. If necessary, copy the Username below and paste it into the Sign in dialog.

    {{{user_0.username | "Username"}}}

    You can also find the Username in the Lab Details pane.

  4. Click Next.

  5. Copy the Password below and paste it into the Welcome dialog.

    {{{user_0.password | "Password"}}}

    You can also find the Password in the Lab Details pane.

  6. Click Next.

    Important: You must use the credentials the lab provides you. Do not use your Google Cloud account credentials. Note: Using your own Google Cloud account for this lab may incur extra charges.
  7. Click through the subsequent pages:

    • Accept the terms and conditions.
    • Do not add recovery options or two-factor authentication (because this is a temporary account).
    • Do not sign up for free trials.

After a few moments, the Google Cloud console opens in this tab.

Note: To access Google Cloud products and services, click the Navigation menu or type the service or product name in the Search field. Navigation menu icon and Search field

Activate Cloud Shell

Cloud Shell is a virtual machine that is loaded with development tools. It offers a persistent 5GB home directory and runs on the Google Cloud. Cloud Shell provides command-line access to your Google Cloud resources.

  1. Click Activate Cloud Shell Activate Cloud Shell icon at the top of the Google Cloud console.

  2. Click through the following windows:

    • Continue through the Cloud Shell information window.
    • Authorize Cloud Shell to use your credentials to make Google Cloud API calls.

When you are connected, you are already authenticated, and the project is set to your Project_ID, . The output contains a line that declares the Project_ID for this session:

Your Cloud Platform project in this session is set to {{{project_0.project_id | "PROJECT_ID"}}}

gcloud is the command-line tool for Google Cloud. It comes pre-installed on Cloud Shell and supports tab-completion.

  1. (Optional) You can list the active account name with this command:
gcloud auth list
  1. Click Authorize.

Output:

ACTIVE: * ACCOUNT: {{{user_0.username | "ACCOUNT"}}} To set the active account, run: $ gcloud config set account `ACCOUNT`
  1. (Optional) You can list the project ID with this command:
gcloud config list project

Output:

[core] project = {{{project_0.project_id | "PROJECT_ID"}}} Note: For full documentation of gcloud, in Google Cloud, refer to the gcloud CLI overview guide.

Architecture

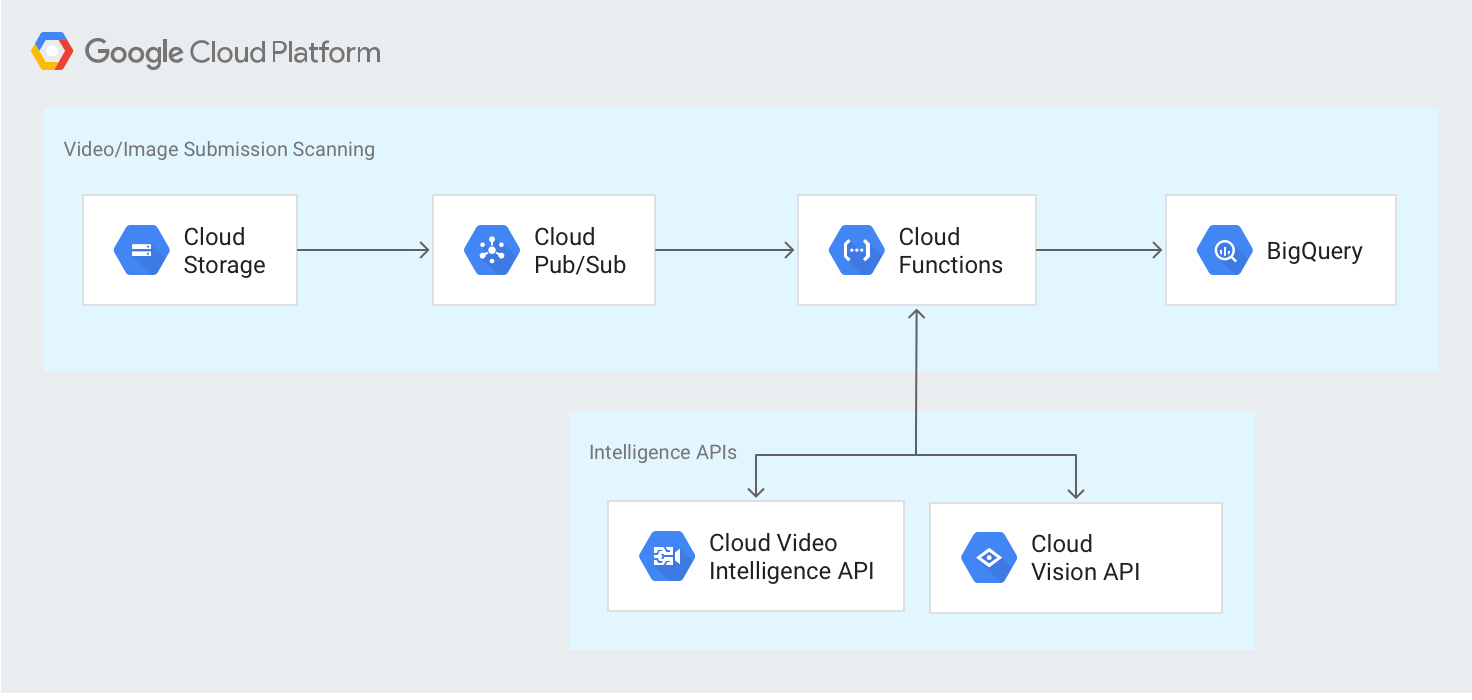
The following diagram outlines the high-level architecture:

Architecture diagram

Task 1. Initializing your environment

Prepare for the lab by setting up some environment variables that you'll need in the lab.

  • Enter the following command in the Cloud Shell to the variables that are used later in the lab:
export PROJECT_ID=$(gcloud info --format='value(config.project)') export IV_BUCKET_NAME=${PROJECT_ID}-upload export FILTERED_BUCKET_NAME=${PROJECT_ID}-filtered export FLAGGED_BUCKET_NAME=${PROJECT_ID}-flagged export STAGING_BUCKET_NAME=${PROJECT_ID}-staging Note: The lab's projectID is used and the four storage bucket names are created for you by appending the suffixes -upload, -filtered, -flagged, and -staging to the project ID in order to create a set of globally unique and valid Cloud Storage bucket names that will be used by the lab to process and store the uploaded image and video files. You can override these values with any valid storage bucket names if you prefer.

Task 2. Creating Cloud Storage buckets

Cloud Storage buckets provide a storage location for uploading your images and videos. Now you will create four different Cloud Storage buckets.

  1. Create a bucket for storing your uploaded images and video files using the IV_BUCKET_NAME environment variable:
gcloud storage buckets create gs://${IV_BUCKET_NAME}
  1. Create a bucket for storing your filtered image and video files using the FILTERED_BUCKET_NAME environment variable:
gcloud storage buckets create gs://${FILTERED_BUCKET_NAME}
  1. Create a bucket for storing your flagged image and video files using the FLAGGED_BUCKET_NAME environment variable:
gcloud storage buckets create gs://${FLAGGED_BUCKET_NAME}
  1. Create a bucket for your Cloud Run functions to use as a staging location using the STAGING_BUCKET_NAME environment variable:
gcloud storage buckets create gs://${STAGING_BUCKET_NAME}
  1. Check that the four storage buckets have been created:
gcloud storage ls

You should see the names of the four storage buckets listed in the output. These will be be in the format [PROJECT-ID]-upload, -filtered, -flagged, and -staging.

Click Check my progress to verify the objective. Creating Cloud Storage buckets

Task 3. Creating Cloud Pub/Sub topics

Cloud Pub/Sub topics is used for Cloud Storage notification messages and for messages between your Cloud Run functions. This lab has some of the topic names preset to specific defaults which are used in this section for the topic names.

Note: You can change the values in this section to any other valid Cloud Pub/Sub topic name, but if you do you must also make those changes in the config.json file that is downloaded later as part of the solution.
  1. Create a topic to receive Cloud Storage notifications whenever one of your files is uploaded to Cloud Storage. You set the default value to upload_notification and save it in an environment variable since it will be used later:
export UPLOAD_NOTIFICATION_TOPIC=upload_notification gcloud pubsub topics create ${UPLOAD_NOTIFICATION_TOPIC}
  1. Create a topic to receive your messages from the Vision API. The default value in the config.json file is visionapiservice:
gcloud pubsub topics create visionapiservice
  1. Next, create a topic to receive your messages from the Video Intelligence API. The default value in the config.json file is videointelligenceservice:
gcloud pubsub topics create videointelligenceservice
  1. Create a topic to receive your messages to store in BigQuery. The default value in the config.json file is bqinsert:
gcloud pubsub topics create bqinsert
  1. Check that the four pubsub topics have been created:
gcloud pubsub topics list

You should see the names of the four topics listed in the output: upload_notification, visionapiservice, videointelligenceservice and bqinsert.

Click Check my progress to verify the objective. Creating Cloud Pub/Sub topics

Task 4. Creating Cloud Storage notifications

  1. Create a notification that is triggered only when one of your new objects is placed in the Cloud Storage file upload bucket:
gcloud storage buckets notifications create -t upload_notification -f json -e OBJECT_FINALIZE gs://${IV_BUCKET_NAME}
  1. Confirm that your notification has been created for the bucket:
gcloud storage buckets notifications list gs://${IV_BUCKET_NAME}

You'll see this output, if the function succeeds:

Filters: Event Types: OBJECT_FINALIZE

Click Check my progress to verify the objective. Creating Cloud Storage notifications

Task 5. Preparing the Cloud Run functions for deployment

The code for the Cloud Run functions used in this lab are available in a public Cloud Storage bucket, defined in the index.js file.

  1. Download the code from the bucket using the following command:
gcloud storage cp -r gs://spls/gsp138/cloud-functions-intelligentcontent-nodejs .
  1. Change directory to the application directory:
cd cloud-functions-intelligentcontent-nodejs

You can examine the source in detail by opening index.js with the editor of your choice to see how each of the functions is implemented.

Create the BigQuery dataset and table

The results of the Vision and Video Intelligence APIs are stored in BigQuery. The demo solution used in this Qwiklab has default dataset and table names set to intelligentcontentfilter and filtered_content. You can change these values, but if you do you must also make those changes in the config.json file that is downloaded later as part of the solution.

  1. Create your BigQuery dataset:
export DATASET_ID=intelligentcontentfilter export TABLE_NAME=filtered_content bq --project_id ${PROJECT_ID} mk ${DATASET_ID}

The dataset name is set to intelligentcontentfilter to match the default value in the config.json file.

Now you'll create your BigQuery table from the schema file that is included with the lab. The dataset and table name is set to filtered_content to match the default values in the config.json file and the schema is defined in the file intelligent_content_bq_schema.json.

  1. Run the following to create the BigQuery table:
bq --project_id ${PROJECT_ID} mk --schema intelligent_content_bq_schema.json -t ${DATASET_ID}.${TABLE_NAME}
  1. Verify that your BigQuery table has been created by running:
bq --project_id ${PROJECT_ID} show ${DATASET_ID}.${TABLE_NAME}

Resulting output should contain the following:

Last modified Schema ----------------- --------------------------------------- 08 Feb 19:22:43 |- gcsUrl: string (required) |- contentUrl: string (required) |- contentType: string (required) |- insertTimestamp: timestamp (required) +- labels: record (repeated) | |- name: string +- safeSearch: record (repeated) | |- flaggedType: string | |- likelihood: string

Click Check my progress to verify the objective. Create the BigQuery dataset and table

Edit your JSON configuration file

Before you can deploy the Cloud Run functions defined in the source code, you must modify the config.json file to use your specific Cloud Storage buckets, Cloud Pub/Sub topic names, and BigQuery dataset ID and table name.

  • Enter these sed commands in the Google Cloud shell to make the changes for you:
sed -i "s/\[PROJECT-ID\]/$PROJECT_ID/g" config.json sed -i "s/\[FLAGGED_BUCKET_NAME\]/$FLAGGED_BUCKET_NAME/g" config.json sed -i "s/\[FILTERED_BUCKET_NAME\]/$FILTERED_BUCKET_NAME/g" config.json sed -i "s/\[DATASET_ID\]/$DATASET_ID/g" config.json sed -i "s/\[TABLE_NAME\]/$TABLE_NAME/g" config.json Note: Alternative method: You can manually edit the config.json file to replace the placeholders for [PROJECT-ID], [FLAGGED_BUCKET_NAME], [FILTERED_BUCKET_NAME], [DATASET_ID] and [TABLE_NAME] that you can see here with the appropriate values. { "VISION_TOPIC": "projects/[PROJECT-ID]/topics/visionapiservice", "VIDEOINTELLIGENCE_TOPIC": "projects/[PROJECT-ID]/topics/videointelligenceservice", "BIGQUERY_TOPIC": "projects/[PROJECT-ID]/topics/bqinsert", "REJECTED_BUCKET": "[FLAGGED_BUCKET_NAME]", "RESULT_BUCKET": "[FILTERED_BUCKET_NAME]", "DATASET_ID": "[DATASET_ID]", "TABLE_NAME": "[TABLE_NAME]", "GCS_AUTH_BROWSER_URL_BASE": "https://storage.cloud.google.com/" , "API_Constants": { "ADULT" : "adult", "VIOLENCE" : "violence", "SPOOF" : "spoof", "MEDICAL" : "medical" } } Note: [FLAGGED_BUCKET_NAME] and [FILTERED_BUCKET_NAME] here must not include the leading gs:// prefix.

Task 6. Deploying the Cloud Run functions

The code for the Cloud Run functions used in this lab are available on GitHub, defined in the index.js file. You can examine the source in detail on Github to see how each of the functions is implemented. The deployments can each take a few minutes to complete.

Deploy the GCStoPubsub function

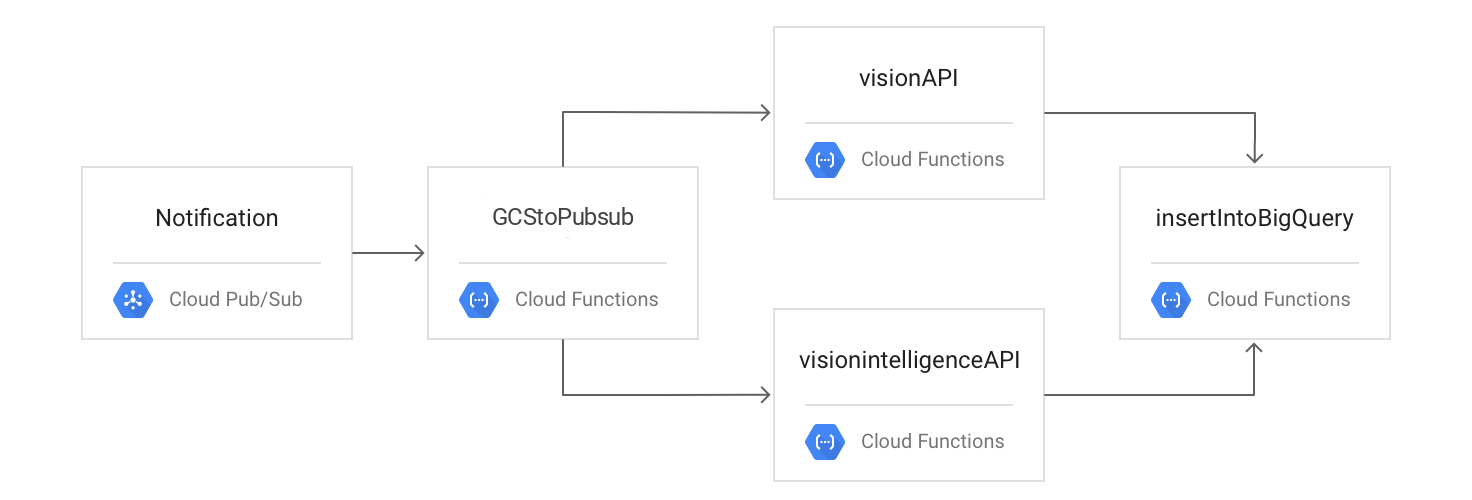
Next you will deploy the GCStoPubsub Cloud Run Function, which contains the logic to receive a Cloud Storage notification message from Cloud Pub/Sub and forward the message to the appropriate function with another Cloud Pub/Sub message.

  1. Run the following:
gcloud functions deploy GCStoPubsub --runtime nodejs20 --stage-bucket gs://${STAGING_BUCKET_NAME} --trigger-topic ${UPLOAD_NOTIFICATION_TOPIC} --entry-point GCStoPubsub --region {{{project_0.default_region | Region}}}
  1. Type "n" if asked Bind the role to service account [GCStoPubsub]?

  2. Type "Y" if asked Allow unauthenticated invocations of new function [GCStoPubsub]?

The command-line output is similar to the following for each of the four Cloud Run functions:

Deploying function (may take a while - up to 2 minutes)...done. availableMemoryMb: 256 entryPoint: GCStoPubsub eventTrigger: eventType: providers/cloud.pubsub/eventTypes/topic.publish failurePolicy: {} resource: projects/qwiklabs-gcp-8bbedd7d3dd97468/topics/qwiklabs-gcp-8bbedd7d3dd97468-upload service: pubsub.googleapis.com labels: deployment-tool: cli-gcloud name: projects/qwiklabs-gcp-8bbedd7d3dd97468/locations/{{{project_0.default_region | Region}}}/functions/GCStoPubsub serviceAccountEmail: qwiklabs-gcp-8bbedd7d3dd97468@appspot.gserviceaccount.com sourceArchiveUrl: gs://qwiklabs-gcp-8bbedd7d3dd97468-staging/{{{project_0.default_region | Region}}}-projects/qwiklabs-gcp-8bbedd7d3dd97468/locations/{{{project_0.default_region | Region}}}/functions/GCStoPubsub-xeejkketibhf.zip status: ACTIVE timeout: 60s updateTime: '2018-02-08T21:39:42Z' versionId: '1'

Deploy the visionAPI function

Deploy your visionAPI Cloud Run Function, which contains the logic to receive a message with Cloud Pub/Sub, call the Vision API, and forward the message to the insertIntoBigQuery Cloud Run Function with another Cloud Pub/Sub message. If you chose to use a different Vision API topic name then change that name here as well.

  1. Run the following:
gcloud functions deploy visionAPI --runtime nodejs20 --stage-bucket gs://${STAGING_BUCKET_NAME} --trigger-topic visionapiservice --entry-point visionAPI --region {{{project_0.default_region | Region}}}
  1. Type "Y" if asked to Allow unauthenticated invocations of new function [GCStoPubsub]?.

Deploy the videoIntelligenceAPI function

Deploy your videoIntelligenceAPI Cloud Run Function, which contains the logic to receive a message with Cloud Pub/Sub, call the Video Intelligence API, and forward the message to the insertIntoBigQuery Cloud Run Function with another Cloud Pub/Sub message. If you chose to use a different Video Intelligence API topic name then change that name here as well.

  1. Run the following:
gcloud functions deploy videoIntelligenceAPI --runtime nodejs20 --stage-bucket gs://${STAGING_BUCKET_NAME} --trigger-topic videointelligenceservice --entry-point videoIntelligenceAPI --timeout 540 --region {{{project_0.default_region | Region}}}
  1. Type "Y" when asked to Allow unauthenticated invocations of new function [videoIntelligenceAPI]?

Deploy the insertIntoBigQuery function

Deploy your insertIntoBigQuery Cloud Run Function, which contains the logic to receive a message with Cloud Pub/Sub and call the BigQuery API to insert the data into your BigQuery table. If you chose to use a different BigQuery topic name then change that name here as well.

  1. Run the following:
gcloud functions deploy insertIntoBigQuery --runtime nodejs20 --stage-bucket gs://${STAGING_BUCKET_NAME} --trigger-topic bqinsert --entry-point insertIntoBigQuery --region {{{project_0.default_region | Region}}}
  1. Type "Y" when asked Allow unauthenticated invocations of new function [insertIntoBigQuery]?

Confirm that the Cloud Run functions have been deployed

  • Run the following:
gcloud beta functions list

You should see the names of the four, Cloud Run functions listed in the output: GCStoPubsub, visionAPI, videoIntelligenceAPI and insertintobigquery.

Click Check my progress to verify the objective. Deploying the Cloud Run functions

Task 7. Testing the flow

The following diagram outlines the processing flow:

The process flow from Notification to insertIntoBigQuery

You test the process by uploading your files to Cloud Storage, checking your logs, and viewing your results in BigQuery.

Upload an image and a video file to the upload storage bucket

  1. On the Navigation menu (Navigation menu icon), click Cloud Storage > Buckets.

  2. Click the name of the bucket with the -upload suffix and then click Upload > Upload Files.

  3. Upload some image files and/or video files from your local machine.

Monitor log activity

Switch back to Cloud Shell to verify that your Cloud Run functions were triggered and ran successfully by viewing the Cloud Run functions logs captured in Cloud Logging.

  1. Run the following to test GCStoPubsub:
gcloud logging read "resource.type=cloud_run_revision AND resource.labels.service_name=GCStoPubsub AND httpRequest.status=200" --limit 100

This command may take a minute or two to complete.

Resulting output:

httpRequest: latency: 2.375614844s protocol: HTTP/1.1 remoteIp: 66.249.81.104 requestMethod: POST requestSize: '3286' requestUrl: https://gcstopubsub-oylh3yp2tq-ez.a.run.app/?__GCP_CloudEventsMode=CUSTOM_PUBSUB_projects%2Fqwiklabs-gcp-02-72b67d05070c%2Ftopics%2Fupload_notification responseSize: '82' serverIp: 216.239.34.53 status: 200 userAgent: APIs-Google; (+https://developers.google.com/webmasters/APIs-Google.html) insertId: 672005260001a64dbd83155e ... ...

You will also notice that your uploaded image has been moved to the next bucket as well.

Note: If you get "Listed 0 items." or an empty list in the output, wait a second and try running the command again.
  1. Run the following to test insertIntoBigQuery:
gcloud logging read "resource.type=cloud_run_revision AND resource.labels.service_name=insertIntoBigQuery AND httpRequest.status=200" --limit 100

Resulting output:

httpRequest: latency: 1.094609515s protocol: HTTP/1.1 remoteIp: 74.125.208.108 requestMethod: POST requestSize: '2618' requestUrl: https://insertintobigquery-oylh3yp2tq-ez.a.run.app/?__GCP_CloudEventsMode=CUSTOM_PUBSUB_projects%2Fqwiklabs-gcp-02-72b67d05070c%2Ftopics%2Fbqinsert responseSize: '82' serverIp: 216.239.36.53 status: 200 userAgent: APIs-Google; (+https://developers.google.com/webmasters/APIs-Google.html) insertId: 6720052d000cc2adfd562256 ... ...

View results in BigQuery

To see your results in BigQuery, you'll create SQL commands to query BigQuery.

  1. Run the following, replacing [PROJECT_ID], [DATASET_ID], and [TABLE_NAME] with your project ID, dataset ID, and BigQuery table name if you found out that variables created for above doesn't contain correct value:
echo " #standardSql SELECT insertTimestamp, contentUrl, flattenedSafeSearch.flaggedType, flattenedSafeSearch.likelihood FROM \`$PROJECT_ID.$DATASET_ID.$TABLE_NAME\` CROSS JOIN UNNEST(safeSearch) AS flattenedSafeSearch ORDER BY insertTimestamp DESC, contentUrl, flattenedSafeSearch.flaggedType LIMIT 1000 " > sql.txt
  1. View your BigQuery results with the following command. Replace [PROJECT_ID]with your project ID:
bq --project_id ${PROJECT_ID} query < sql.txt

Resulting output:

Output displaying current status as done

Click Check my progress to verify the objective. Testing the flow

Congratulations!

Congratulations! You have now successfully completed the Scanning User-Generated Content using the Cloud Video Intelligence and Cloud Vision APIs lab.

Next steps / Learn more

Google Cloud training and certification

...helps you make the most of Google Cloud technologies. Our classes include technical skills and best practices to help you get up to speed quickly and continue your learning journey. We offer fundamental to advanced level training, with on-demand, live, and virtual options to suit your busy schedule. Certifications help you validate and prove your skill and expertise in Google Cloud technologies.

Manual Last Updated November 07, 2024

Lab Last Tested November 07, 2024

Copyright 2025 Google LLC. All rights reserved. Google and the Google logo are trademarks of Google LLC. All other company and product names may be trademarks of the respective companies with which they are associated.

시작하기 전에

  1. 실습에서는 정해진 기간 동안 Google Cloud 프로젝트와 리소스를 만듭니다.
  2. 실습에는 시간 제한이 있으며 일시중지 기능이 없습니다. 실습을 종료하면 처음부터 다시 시작해야 합니다.
  3. 화면 왼쪽 상단에서 실습 시작을 클릭하여 시작합니다.

시크릿 브라우징 사용

  1. 실습에 입력한 사용자 이름비밀번호를 복사합니다.
  2. 비공개 모드에서 콘솔 열기를 클릭합니다.

콘솔에 로그인

    실습 사용자 인증 정보를 사용하여
  1. 로그인합니다. 다른 사용자 인증 정보를 사용하면 오류가 발생하거나 요금이 부과될 수 있습니다.
  2. 약관에 동의하고 리소스 복구 페이지를 건너뜁니다.
  3. 실습을 완료했거나 다시 시작하려고 하는 경우가 아니면 실습 종료를 클릭하지 마세요. 이 버튼을 클릭하면 작업 내용이 지워지고 프로젝트가 삭제됩니다.

현재 이 콘텐츠를 이용할 수 없습니다

이용할 수 있게 되면 이메일로 알려드리겠습니다.

감사합니다

이용할 수 있게 되면 이메일로 알려드리겠습니다.

한 번에 실습 1개만 가능

모든 기존 실습을 종료하고 이 실습을 시작할지 확인하세요.

시크릿 브라우징을 사용하여 실습 실행하기

이 실습을 실행하려면 시크릿 모드 또는 시크릿 브라우저 창을 사용하세요. 개인 계정과 학생 계정 간의 충돌로 개인 계정에 추가 요금이 발생하는 일을 방지해 줍니다.