In this lab, you will set up the Cloud Data Loss Prevention API (DLP API) and use the API to inspect a string of data for sensitive information. The DLP API helps you better understand and manage sensitive data.
It provides fast, scalable classification and redaction for sensitive data elements like credit card numbers, names, social security numbers, US and selected international identifier numbers, phone numbers and Google Cloud credentials.
Objectives
In this lab, you will learn how to do the following:
Enable the DLP API.
Install the Node JS DLP API and sample.
Inspect string data for sensitive data.
Redact sensitive data from string data and images.
Setup and requirements
For each lab, you get a new Google Cloud project and set of resources for a fixed time at no cost.
Sign in to Qwiklabs using an incognito window.
Note the lab's access time (for example, 1:15:00), and make sure you can finish within that time.
There is no pause feature. You can restart if needed, but you have to start at the beginning.
When ready, click Start lab.
Note your lab credentials (Username and Password). You will use them to sign in to the Google Cloud Console.
Click Open Google Console.
Click Use another account and copy/paste credentials for this lab into the prompts.
If you use other credentials, you'll receive errors or incur charges.
Accept the terms and skip the recovery resource page.
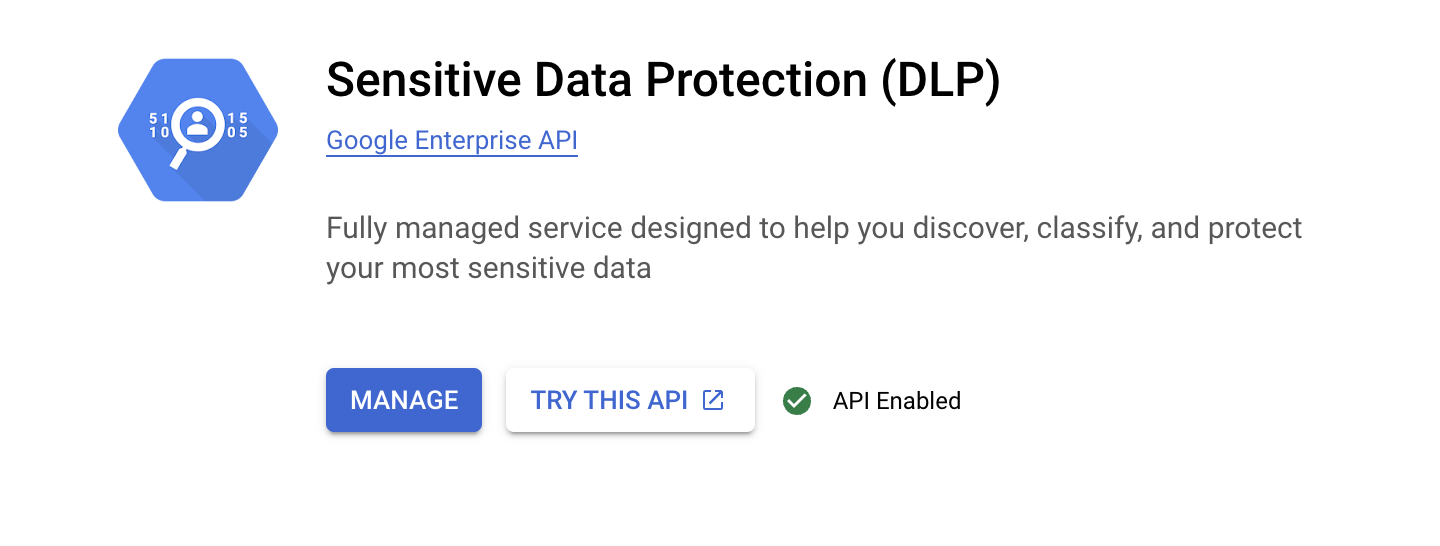
Task 1. Enable the DLP API
In this task, you enable the DLP API through APIs & Services.
Go to Navigation menu > APIs & Services.
Click the Enable APIs and Services button.
In the Search for APIs & Services field, enter DLP and then click on the Sensitive Data Protection (DLP) title.
Click the Enable button to enable the DLP API.
If the API is already enabled, you will see a Manage button instead, along with an API enabled message. In that case you do not need to do anything.
Task 2. Install the DLP API and Node JS samples
In this task, you download the Node JS DLP API and samples and install the required dependencies.
On the Google Cloud Console tile bar, click Activate Cloud Shell () to open Cloud Shell. When prompted, click Continue. After a moment, in the lower part of the browser window, the Terminal appears.
Run the following command to create the GCLOUD_PROJECT environment variable and set it to the project ID:
export GCLOUD_PROJECT=$DEVSHELL_PROJECT_ID
Run the following command in Cloud Shell to download the Node JS DLP API and samples:
In this task, you inspect and mask sensitive information from the string also use the DLP API to redact sensitive data from an image.
Inspect a string for sensitive information
In Cloud Shell run the command below. (If prompted, click Authorize.)
node inspectString.js $GCLOUD_PROJECT "My email address is joe@example.com."
You should receive the following output.
Output:
Findings:
Info type: EMAIL_ADDRESS
Likelihood: LIKELY
The result shows what sensitive data was found, what type of information it is, and how certain the API is about that info type.
In Cloud Shell, run the following command:
node inspectString.js $GCLOUD_PROJECT "My phone number is 555-555-5555."
You should receive the following output.
Output:
Findings:
Info type: PHONE_NUMBER
Likelihood: VERY_LIKELY
Feel free to experiment with different input to the inspectString.js program. For example, try passing in values like 1234-5678-9876-5432 or 123-45-6789.
Mask sensitive information from a string
In Cloud Shell, run the following command:
node deidentifyWithMask.js $GCLOUD_PROJECT "My phone number is 555-555-5555."
You should receive the following output.
Output:
My phone number is ************.
Redact sensitive data from images
You will now use the DLP API to redact sensitive data from an image.
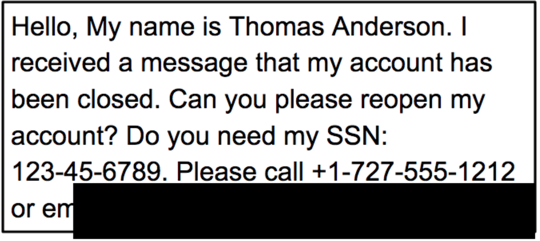
Right-click on the image below and select Save image as. Save it locally on your computer as dlp-input.png.
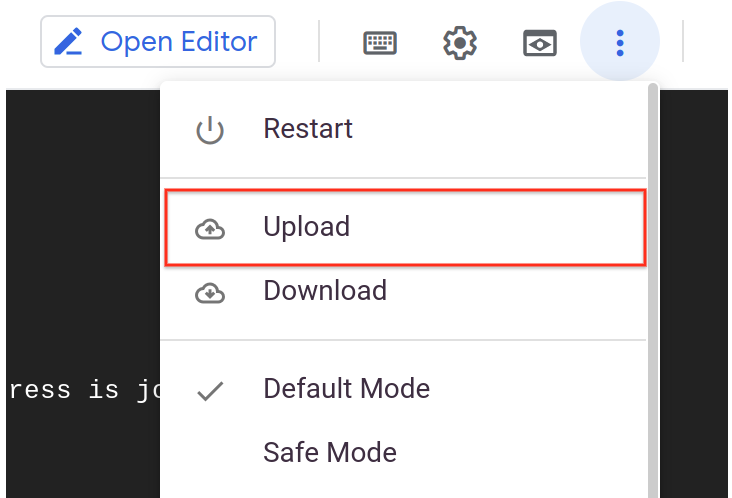
In the bar above the terminal, click the button at the top right with three vertical dots and select Upload.
If Upload is not clickable ("grayed out"), then click Restart. After the Cloud Shell environment is restarted, the Upload Link should be active.
Execute these commands commands before starting the next step in the lab.
export GCLOUD_PROJECT=$DEVSHELL_PROJECT_ID
Click Choose Files, select the downloaded dlp-input.png image file, and Upload it to Cloud Shell.
From Cloud Shell, click Open Editor . This will launch the Cloud Shell code editor, which includes a file browser.
In the Cloud Shell code editor, on the left, you should see the dlp-input.png file.
Click the dlp-input.png file to display the image and verify it was uploaded.
From Cloud Shell, click Open Terminal to return to the terminal window.
In the terminal, run the following command to redact the email address values from the image:
In the Cloud Shell code editor, on the left, click the dlp-redacted.png file.
You will see the image with the domain name redacted.
When calling the redact API, you specified EMAIL_ADDRESS as the infotype to redact. In the image, you should notice that the email address is no longer visible.
Congratulations!
In this lab, you did the following:
Enabled the DLP API.
Installed the Node JS DLP API, and sample.
Inspected string data for sensitive data.
Redacted sensitive data from string data and images.
End your lab
When you have completed your lab, click End Lab. Google Cloud Skills Boost removes the resources you’ve used and cleans the account for you.
You will be given an opportunity to rate the lab experience. Select the applicable number of stars, type a comment, and then click Submit.
The number of stars indicates the following:
1 star = Very dissatisfied
2 stars = Dissatisfied
3 stars = Neutral
4 stars = Satisfied
5 stars = Very satisfied
You can close the dialog box if you don't want to provide feedback.
For feedback, suggestions, or corrections, please use the Support tab.
Copyright 2022 Google LLC All rights reserved. Google and the Google logo are trademarks of Google LLC. All other company and product names may be trademarks of the respective companies with which they are associated.
Lab membuat project dan resource Google Cloud untuk jangka waktu tertentu
Lab memiliki batas waktu dan tidak memiliki fitur jeda. Jika lab diakhiri, Anda harus memulainya lagi dari awal.
Di kiri atas layar, klik Start lab untuk memulai
Gunakan penjelajahan rahasia
Salin Nama Pengguna dan Sandi yang diberikan untuk lab tersebut
Klik Open console dalam mode pribadi
Login ke Konsol
Login menggunakan kredensial lab Anda. Menggunakan kredensial lain mungkin menyebabkan error atau dikenai biaya.
Setujui persyaratan, dan lewati halaman resource pemulihan
Jangan klik End lab kecuali jika Anda sudah menyelesaikan lab atau ingin mengulanginya, karena tindakan ini akan menghapus pekerjaan Anda dan menghapus project
Konten ini tidak tersedia untuk saat ini
Kami akan memberi tahu Anda melalui email saat konten tersedia
Bagus!
Kami akan menghubungi Anda melalui email saat konten tersedia
Satu lab dalam satu waktu
Konfirmasi untuk mengakhiri semua lab yang ada dan memulai lab ini
Gunakan penjelajahan rahasia untuk menjalankan lab
Gunakan jendela Samaran atau browser pribadi untuk menjalankan lab ini. Langkah ini akan mencegah konflik antara akun pribadi Anda dan akun Siswa yang dapat menyebabkan tagihan ekstra pada akun pribadi Anda.
 ) to open Cloud Shell. When prompted, click Continue. After a moment, in the lower part of the browser window, the Terminal appears.