


Before you begin
- Labs create a Google Cloud project and resources for a fixed time
- Labs have a time limit and no pause feature. If you end the lab, you'll have to restart from the beginning.
- On the top left of your screen, click Start lab to begin
Create Namespaces
/ 10
Access Control in Namespaces
/ 25
Resource Quotas
/ 25
Monitoring GKE and GKE Usage Metering
/ 40
When considering cost optimization solutions for any Google Cloud infrastructure built around Google Kubernetes Engine (GKE) clusters, it's important to ensure that you're making effective use of the resources that are being billed. A common misstep is assigning a one to one ratio of users or teams to clusters, resulting in cluster proliferation.
A multi-tenancy cluster allows for multiple users or teams to share one cluster for their workloads while maintaining isolation and fair resource sharing. This is achieved by creating namespaces. Namespaces allow multiple virtual clusters to exist on the same physical cluster.
In this lab you will learn how to set up a multi-tenant cluster using multiple namespaces to optimize resource utilization and, in effect, optimize costs.
In this lab, you will learn how to:
Read these instructions. Labs are timed and you cannot pause them. The timer, which starts when you click Start Lab, shows how long Google Cloud resources are made available to you.
This hands-on lab lets you do the lab activities in a real cloud environment, not in a simulation or demo environment. It does so by giving you new, temporary credentials you use to sign in and access Google Cloud for the duration of the lab.
To complete this lab, you need:
Click the Start Lab button. If you need to pay for the lab, a dialog opens for you to select your payment method. On the left is the Lab Details pane with the following:
Click Open Google Cloud console (or right-click and select Open Link in Incognito Window if you are running the Chrome browser).
The lab spins up resources, and then opens another tab that shows the Sign in page.
Tip: Arrange the tabs in separate windows, side-by-side.
If necessary, copy the Username below and paste it into the Sign in dialog.
You can also find the Username in the Lab Details pane.
Click Next.
Copy the Password below and paste it into the Welcome dialog.
You can also find the Password in the Lab Details pane.
Click Next.
Click through the subsequent pages:
After a few moments, the Google Cloud console opens in this tab.

After pressing the Start Lab button, you will see a blue Provisioning Lab Resources message with an estimated time remaining. It is creating and configuring the environment you will use to test managing a multi-tenant cluster. in about 5 minutes a cluster is created, BigQuery datasets are copied, and service accounts which will represent teams are generated.
Once finished, the message will no longer be displayed.
Please wait for this start up process to complete and the message to be removed before proceeding with the lab.
Cloud Shell is a virtual machine that is loaded with development tools. It offers a persistent 5GB home directory and runs on the Google Cloud. Cloud Shell provides command-line access to your Google Cloud resources.
Click Activate Cloud Shell 
Click through the following windows:
When you are connected, you are already authenticated, and the project is set to your Project_ID,
gcloud is the command-line tool for Google Cloud. It comes pre-installed on Cloud Shell and supports tab-completion.
Output:
Output:
gcloud, in Google Cloud, refer to the gcloud CLI overview guide.
yaml files to configure your Kubernetes cluster. In your Cloud Shell, download these files from a Cloud Storage bucket:gke-qwiklab:
multi-tenant-cluster:By default, Kubernetes clusters have 4 system namespaces.
The output should be similar to:
Not everything belongs to a namespace. For example, nodes, persistent volumes, and namespaces themselves do not belong to a namespace.
When they are created, namespaced resources must be associated with a namespace. This is done by including the --namespace flag or indicating a namespace in the yaml's metadata field.
kubectl get subcommand to display a namespace's resources. For example:This will output all services in the kube-system namespace.
team-a and team-b:The output for kubectl get namespace should now include your 2 new namespaces:
By specifying the --namespace tag, you can create cluster resources in the provided namespace. Names for resources, such as deployments or pods, only need to be unique within their respective namespaces.
kubectl get pods -A to see there are 2 pods named app-server, one for each team namespace:Output:
Click Check my progress to verify that you've performed the above task.
kubectl describe to see additional details for each of the newly created pods by specifying the namespace with the --namespace tag:kubectl context instead of using the --namespace flag for every command:--namespace flag:In the next section, you will configure role-based access control for your namespaces to help organize the cluster.
Provisioning access to namespaced resources in a cluster is accomplished by granting a combination of IAM roles and Kubernetes' built-in role-based access control (RBAC). An IAM role will give an account initial access to the project while the RBAC permissions will grant granular access to a cluster's namespaced resources (pods, deployments, services, etc).
When managing access control for Kubernetes, Identity and Access Management (IAM) is used to manage access and permissions on a higher organization and project levels.
There are several roles that can be assigned to users and service accounts in IAM that govern their level of access with GKE. RBAC's granular permissions build on the access already provided by IAM and cannot restrict access granted by it. As a result, for multi-tenant namespaced clusters, the assigned IAM role should grant minimal access.
Here's a table of common GKE IAM roles you can assign:
| Role | Description |
|---|---|
Kubernetes Engine Admin |
Provides access to full management of clusters and their Kubernetes API objects. A user with this role will be able to create, edit and delete any resource in any cluster and subsequent namespaces. |
Kubernetes Engine Developer |
Provides access to Kubernetes API objects inside clusters. A user with this role will be able to create, edit, and delete resources in any cluster and subsequent namespaces. |
Kubernetes Engine Cluster Admin |
Provides access to management of clusters. A user with this role will not have access to create or edit resources within any cluster or subsequent namespaces directly, but will be able to create, modify, and delete any cluster. |
Kubernetes Engine Viewer |
Provides read-only access to GKE resources. A user with this role will have read-only access to namespaces and their resources. |
Kubernetes Engine Cluster Viewer |
Get and list access to GKE Clusters. This is the minimal role required for anyone who needs to access resources within a cluster's namespaces. |
While most of these roles grant too much access to restrict with RBAC, the IAM role Kubernetes Engine Cluster Viewer gives users just enough permissions to access the cluster and namespaced resources.
Your lab project has a service account that will represent a developer that will use the team-a namespace.
Within a cluster, access to any resource type (pods, services, deployments, etc) is defined by either a role or a cluster role. Only roles are allowed to be scoped to a namespace. While a role will indicate the resources and the action allowed for each resource, a role binding will indicate to what user accounts or groups to assign that access to.
To create a role in the current namespace, specify the resource type as well as the verbs that will indicate what type of action that will be allowed.
kubectl create:Roles with multiple rules can be created using a yaml file. An example file is provided within the files you downloaded earlier in the lab.
yaml file:Sample output:
Click Check my progress to verify that you've performed the above task.
In Cloud Shell click the + to open a new tab in your terminal.
Here, run the following to activate the service account. This will allow you to run the commands as the account:
Output:
Output:
Return to your first Cloud Shell tab or open a new one.
Renew the cluster credentials and reset your context to the team-a namespace:
When a cluster is shared in a multi-tenant set up, it's important to make sure that users are not able to use more than their fair share of the cluster resources. A resource quota object (ResourceQuota) will define constraints that will limit resource consumption in a namespace. A resource quota can specify a limit to object counts (pods, services, stateful sets, etc), total sum of storage resources (persistent volume claims, ephemeral storage, storage classes ), or total sum of compute resources. (cpu and memory).
team-a to 2, and the number of loadbalancers to 1:You should receive the following error:
kubectl describe:Output:
Here you can see a list of resources restricted by the resource quota, along with the hard limit configured and the quantity currently used.
test-quota to have a limit of 6 pods by running:You'll be able to edit a yaml file that kubectl will use to update the quota. The hard quota is the value for count/pods under spec.
count/pods under spec to 6:The updated quota should now be reflected in the output:
Output:
CPU and memory quotas
When setting quotas for CPU and memory, you can indicate a quota for the sum of requests (a value that a container is guaranteed to get) or the sum of limits (a value that a container will never be allowed to pass).
In this lab, your cluster has 4 e2-standard-2 machines, with 2 core and 8GB memory each. You have been provided with a sample resource quota yaml file for your cluster:
cpu-mem-quota.yaml
With this quota in place, the sum of all pods' CPU and memory requests will be capped at 2cpu and 8GiB, and their limits at 4cpu and 12GiB, respectively.
cpu-mem-demo-pod.yaml:cpu-mem-demo-pod.yaml:
Output:
Click Check my progress to verify that you've performed the above task.
For most multi-tenant clusters, it's likely that the workloads and resource requirements of each of the tenants will change and resource quotas might need to be adjusted. By using Monitoring you can get a general view of the resources each namespace is using.
With GKE usage metering, you're able to get a more granular view of that resource usage and subsequently a better idea of costs associated with each tenant.
Monitoring Dashboard
 ) > View All Products. Under Observability section, click Monitoring.
Wait a minute while your workspace for your project is constructed.
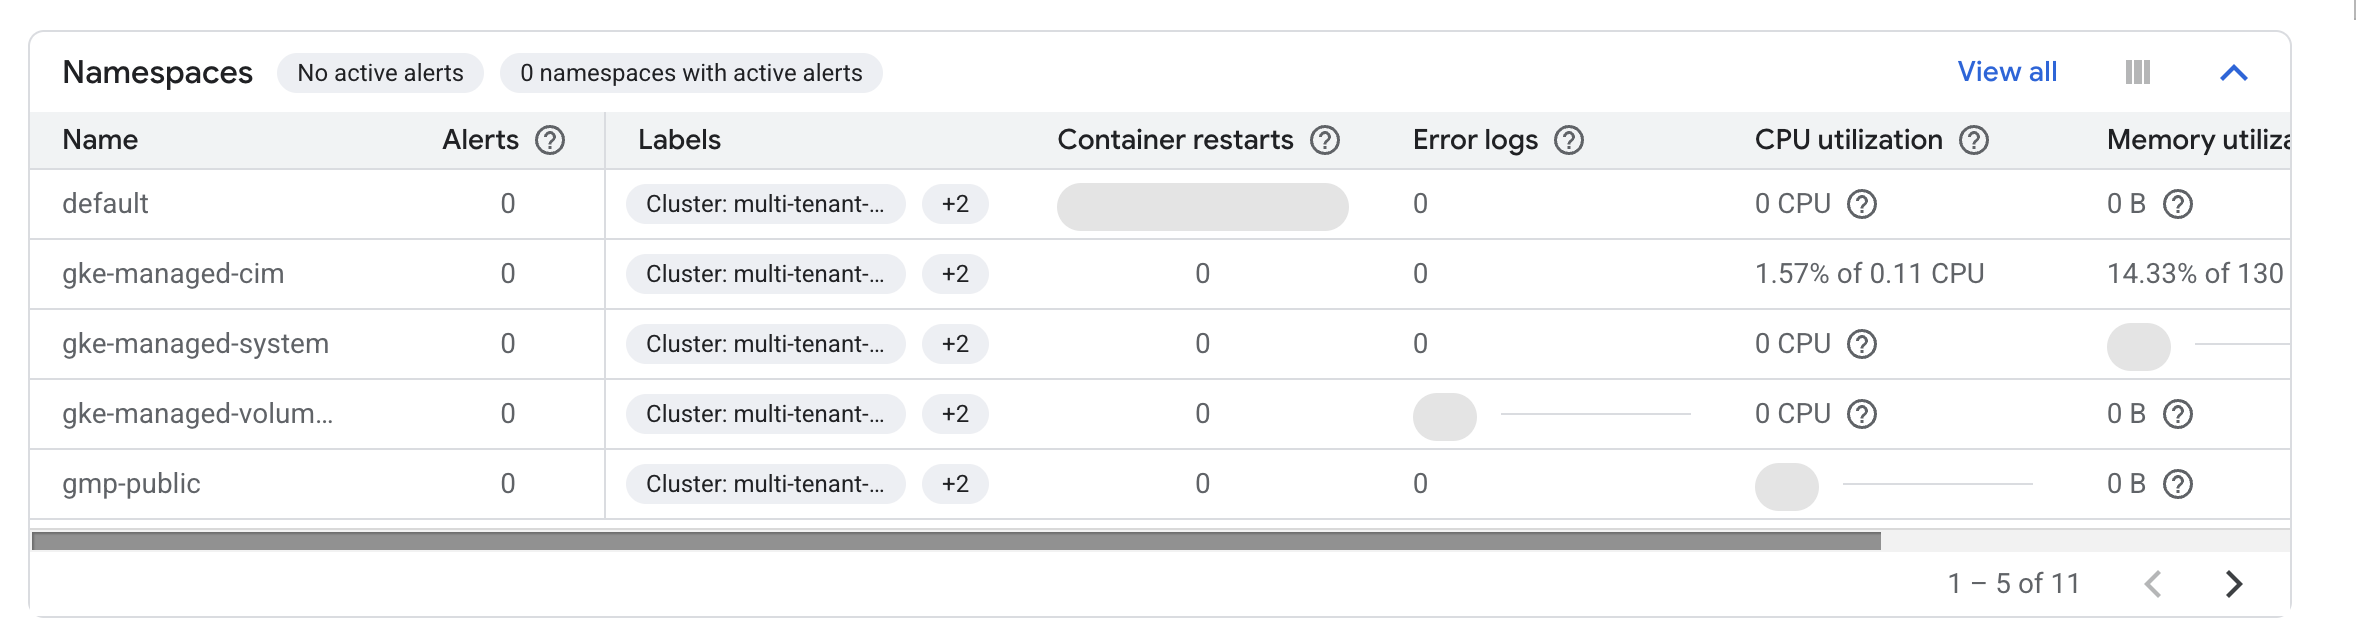
The GKE Dashboard presents you with a collection of tables detailing CPU, memory, and disk utilization aggregated by several resources.
For example, the Namespaces table will show you utilization for each of your clusters' namespaces:
You can also get a look at the utilization data for the workloads running on your cluster in the Workloads table.
Click View All.
In the ADD FILTER box select Namespaces > team-a.
Then click Apply.
This will filter workloads to include only those running on the team-a namespace:
Metrics Explorer
From the left-side pane select Metrics Explorer.
In the Select a metric field, click on Metric dropdown.
Type Kubernetes Container in filter by resource and metric name.
Click on Kubernetes Container > Container.
Select CPU usage time.
Click Apply.
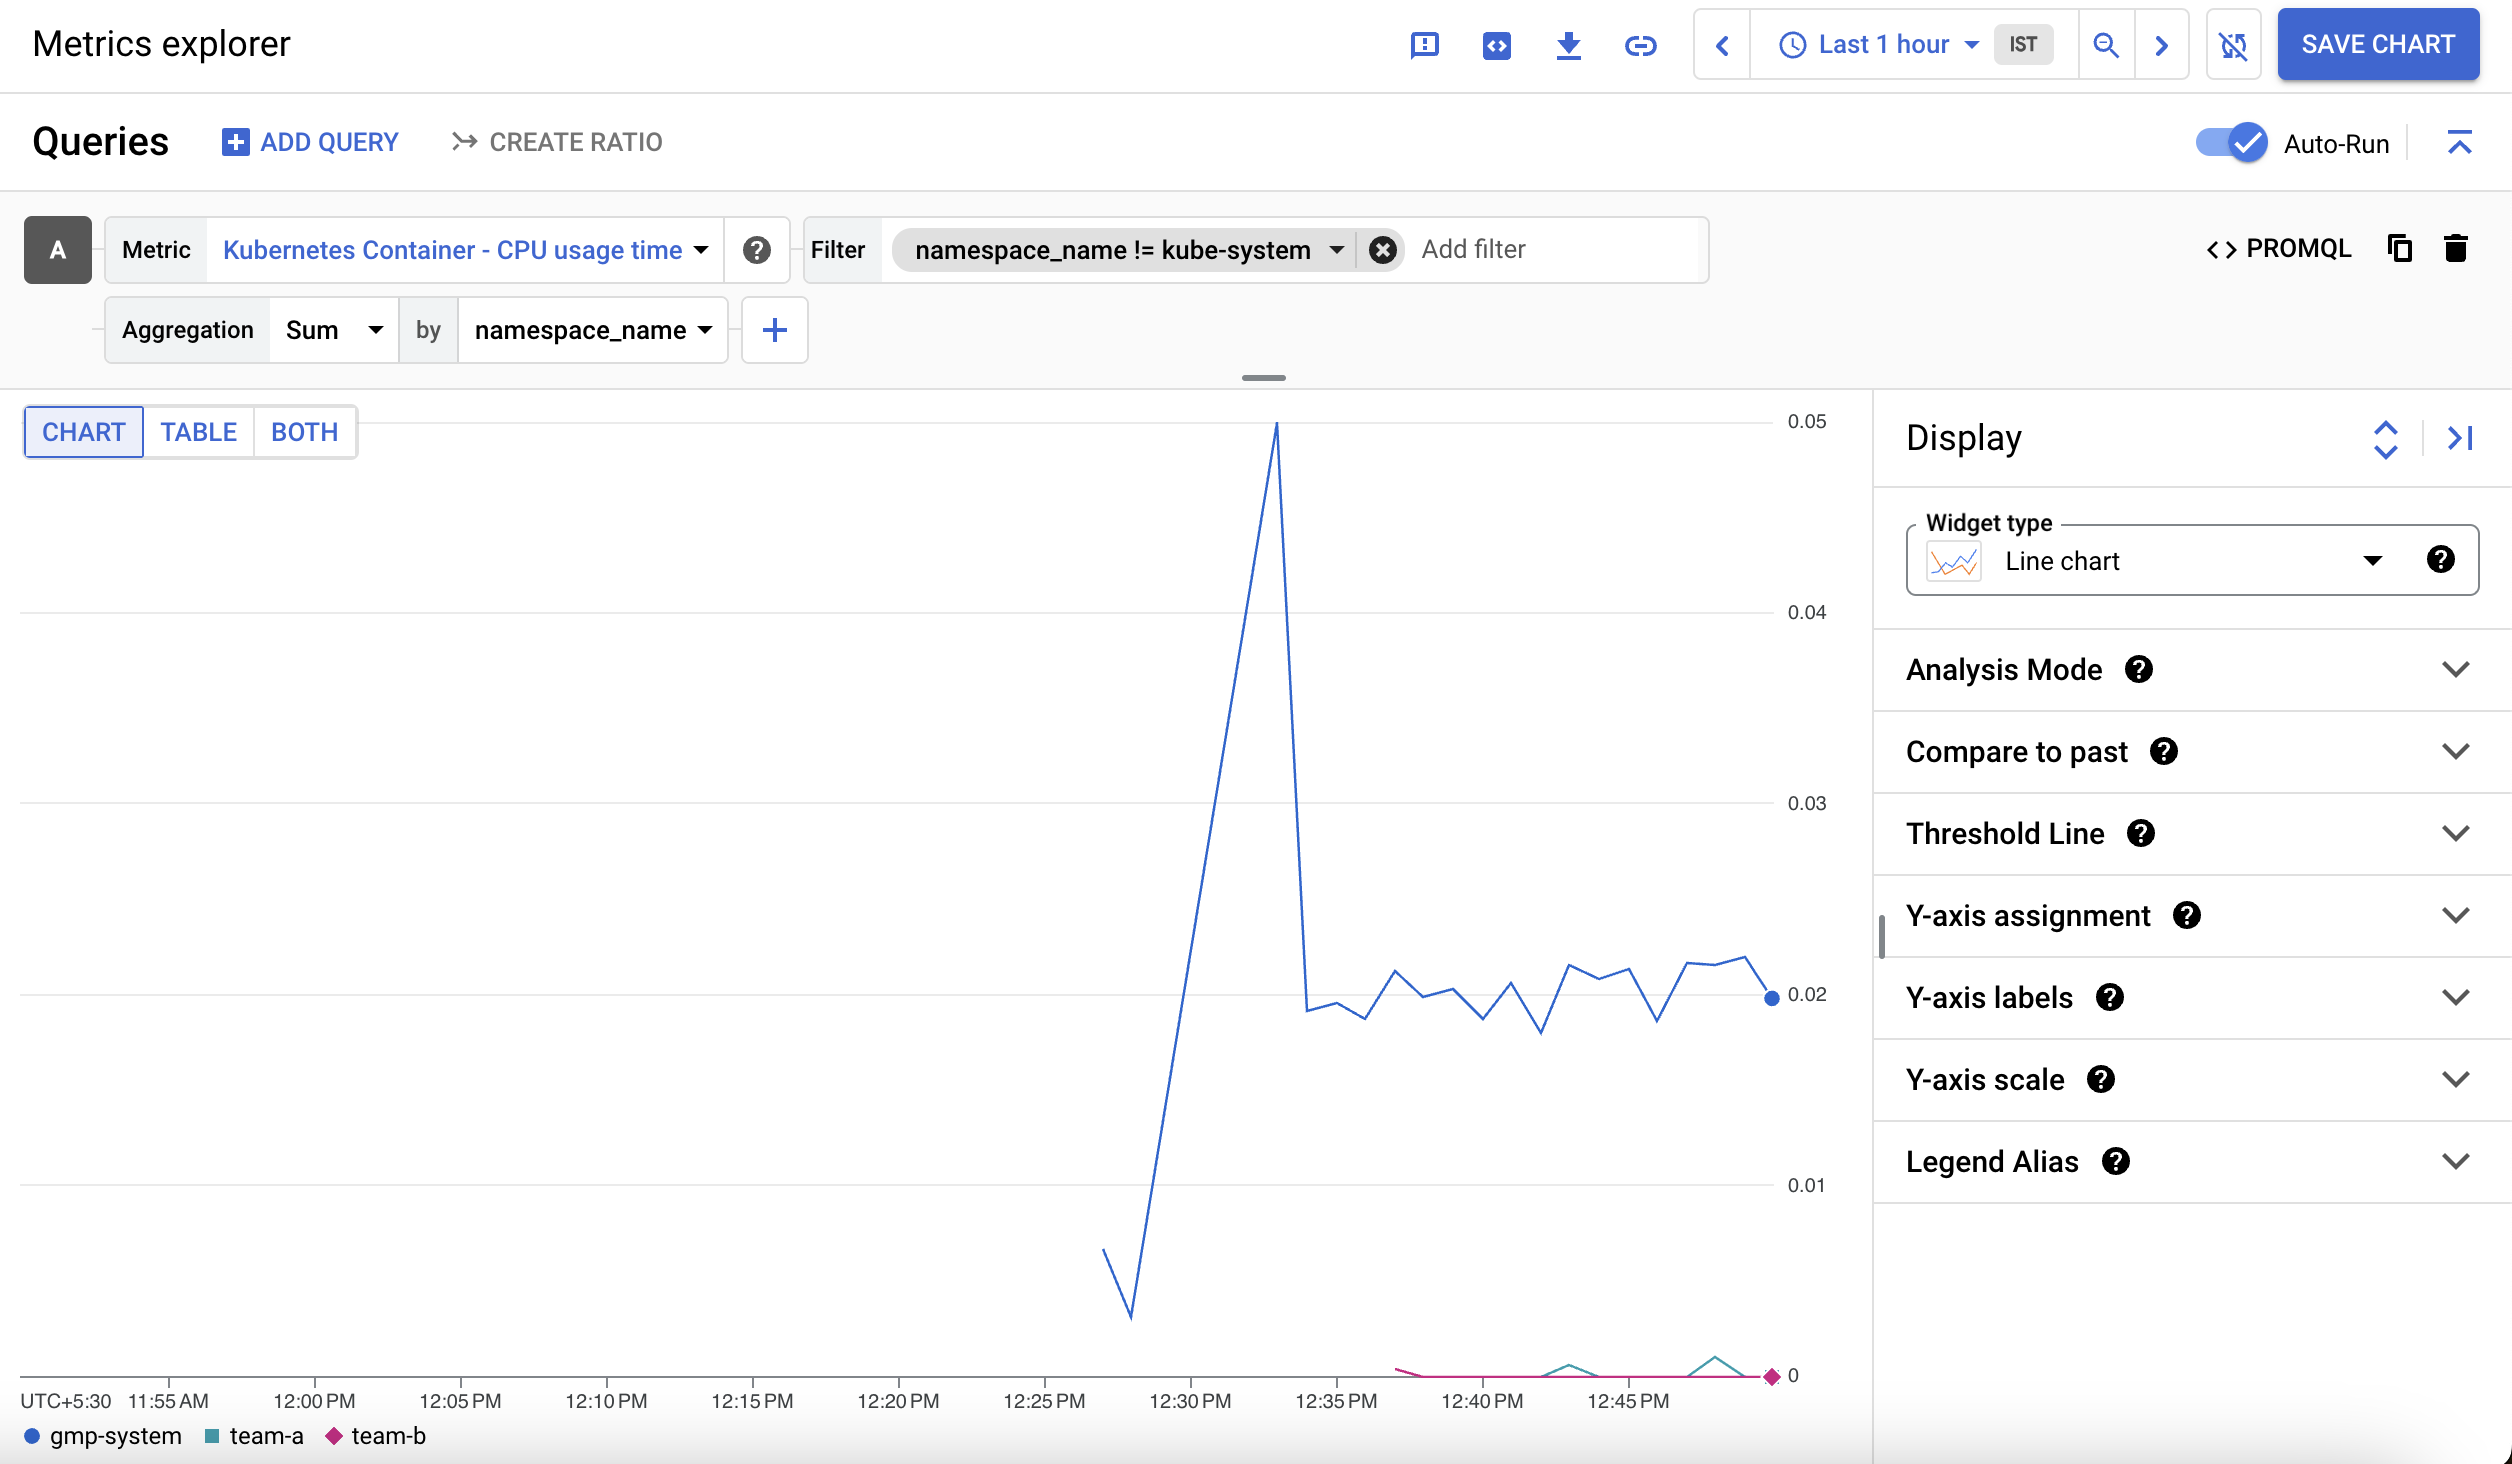
To exclude the kube-system namespace, click Add filter in the filter section.
Select namespace_name as a Label.
Select != (does not equal) as the comparison and kube-system as the value.
Next, for the Aggregation dropdown select Sum and for by dropdown select namespace_name and click OK.
What you'll see is a graph showing container CPU usage time by namespace:
GKE usage metering
GKE usage metering allows you to export your GKE cluster resource utilization and consumption to a BigQuery dataset where you can visualize it using Looker Studio. It allows for a more granular view of resource usage. By using usage metering, you are able to make more informed decisions on resource quotas and efficient cluster configuration.
The following two datasets have been added to your project:
cluster_dataset - this is a dataset manually created before enabling GKE usage metering on the cluster. This dataset contains 2 tables generated by GKE (gke_cluster_resource_consumption and gke_cluster_resource_usage) and is continuously updated with cluster usage metrics.
billing_dataset- this is a dataset manually created before enabling BigQuery export for billing. This dataset contains 1 table (gcp_billing_export_v1_xxxx) and is updated each day with daily costs of a project.
cluster_dataset:A cost_breakdown table can be generated from the billing and resource usage tables in your project. You'll generate this table in the cluster dataset using the file usage_metering_query_template.sql. This template is available through Understanding cluster resource usage.
First, in Cloud Shell, set some environment variables.
version_info back in your Cloud Shell.Afterwards, this should return a message indicating that the transfer configuration has been successfully created.
Open the Looker Studio Data Sources page.
On the top left click Create > Data Source to add a new data source.
You'll first be presented with the To get started, let's complete your account setup window.
Select country, enter the company name and check the acknowledgement box and then click Continue.
Select No for each Set up your email preferences, as this is a temporary lab/account.
Click Continue.
You'll be presented with a list of Google Connectors that are supported by Looker Studio.
Click the Authorize button to allow Looker Studio to access your BigQuery project.
At the top left of the page, rename your data source from Untitled Data Source to GKE Usage.
From the first column, select CUSTOM QUERY.
Select your project ID from the projects column.
Enter the following query in the custom query box and replace [PROJECT-ID] with your Qwiklabs project id:
Click Check my progress to verify that you've performed the above task.
Now that the data source has been added, it's time to use it to create a report.
When creating a new report from a data source, you'll be prompted to add data to your report.
The report will be where you'll be able to visualize the usage metrics from the data source based on your BigQuery table.
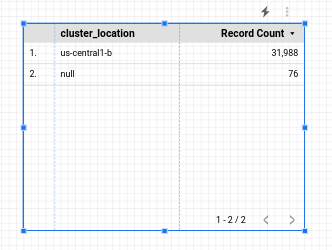
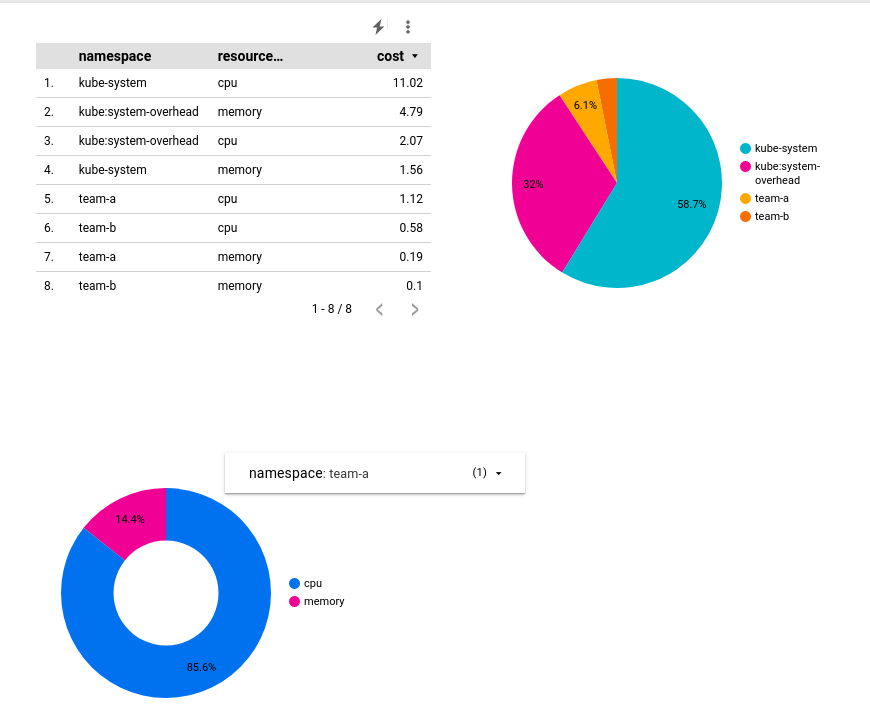
You'll start out with a simple table:
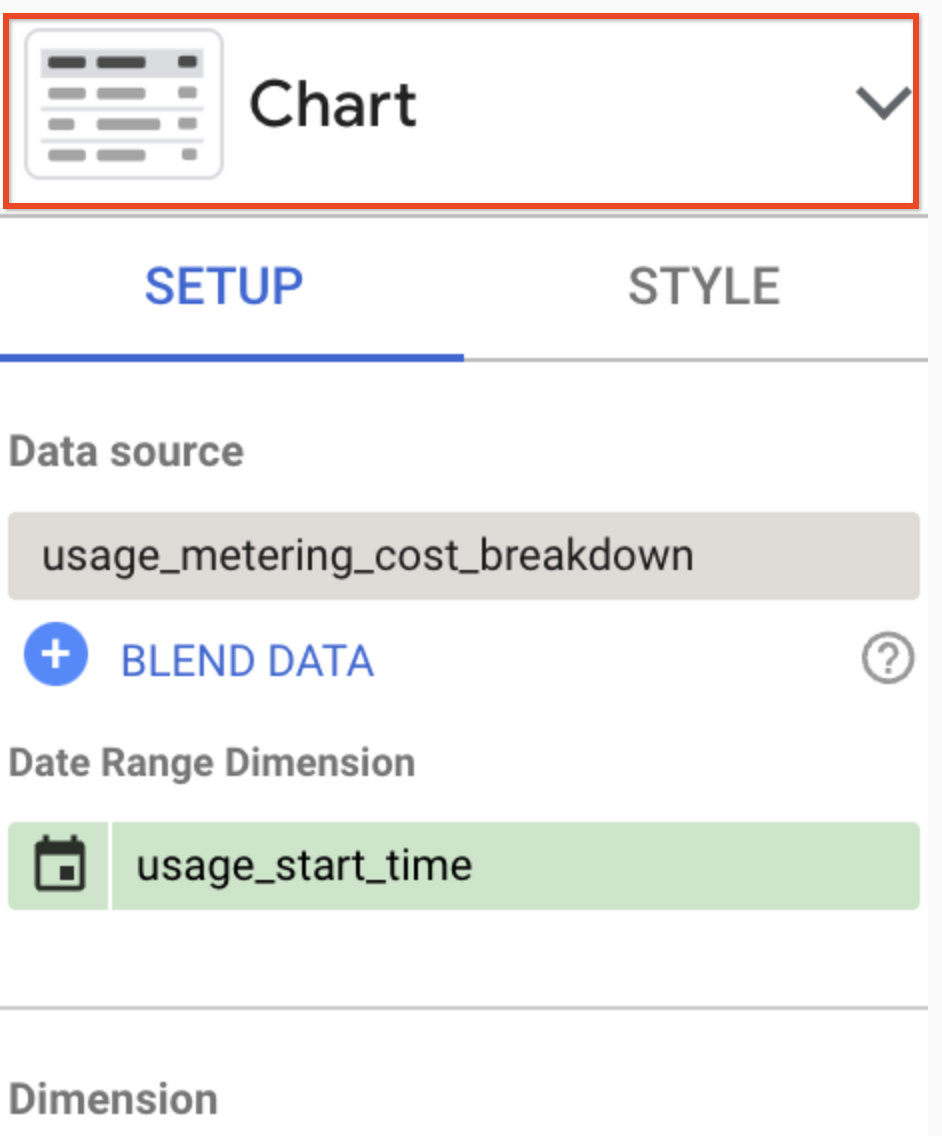
You'll configure this table to show a cost breakdown by namespace. With the table selected, you'll see data related to it on the panel to the right.
usage_start_time
namespace
cost
Leave all other fields with their default values.
To limit your table to namespaced resources you can apply a filter.
Click Save.
Click Add a Filter again and Create a Filter to create a second filter which will limit the data to requests:
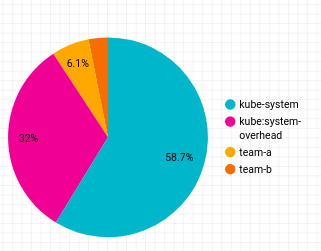
Next, you'll add a pie chart to your report that shows the cost breakdown by namespace.
Right click the table you created and select Duplicate.
Drag the duplicate table object anywhere on your report.
Next, click the header of the configuration panel:
The resulting pie chart will look like this:
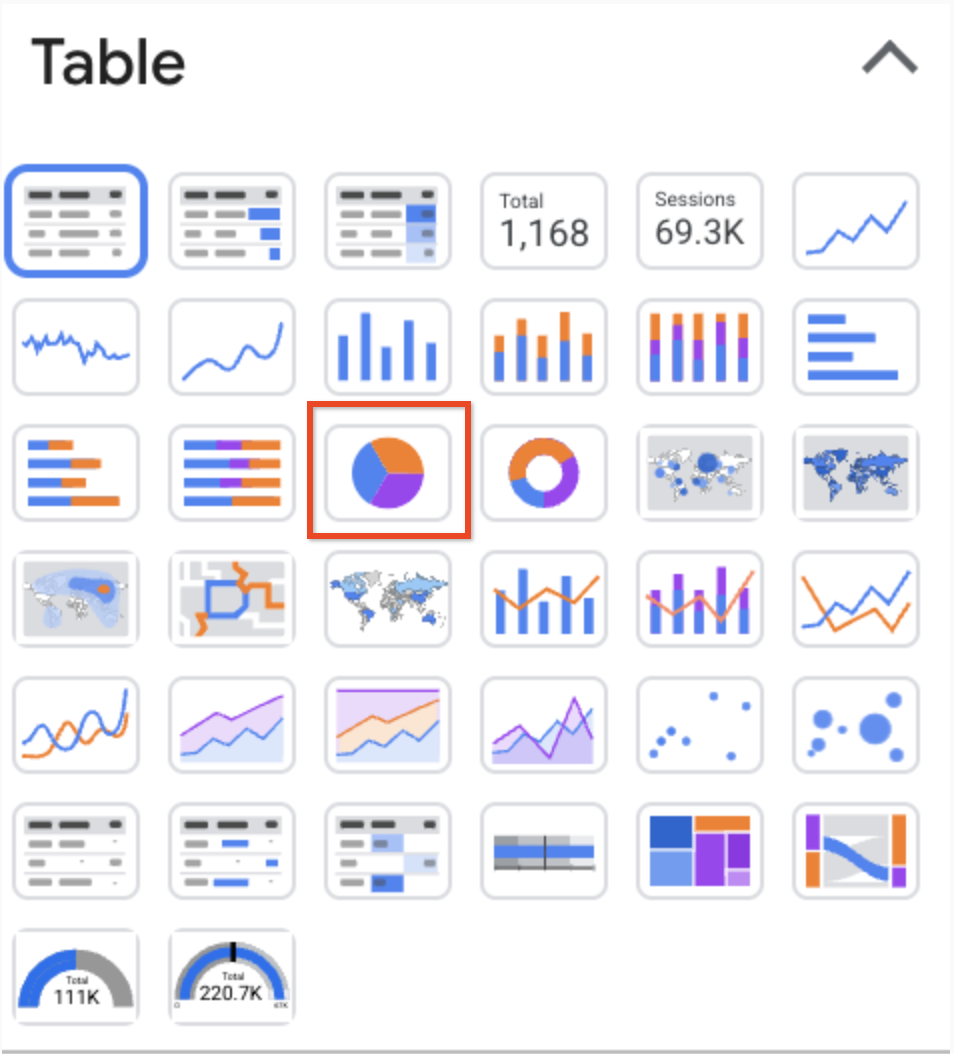
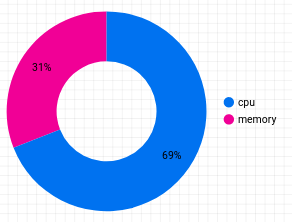
Next, you'll add a donut chart that will show the cost breakdown by resource type.
From the top toolbar click Add a chart and select 
Drag the chart anywhere on your report, and configure it with the following:
usage_start_time
resource_name
cost
To add a breakdown by namespace, from the top toolbar click Add a control and select Drop-down list.
Drag it next to your donut chart and configure it with the following:
usage_start_time
namespace
None
Click Add a filter.
Select unallocated (namespace filter) from the list.
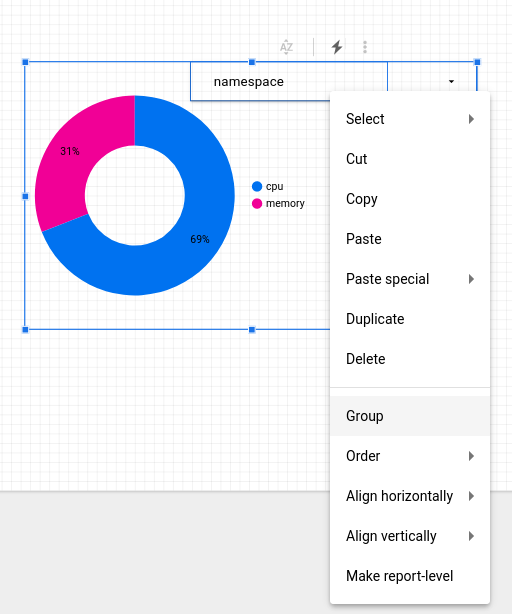
In order to configure the control to affect only the donut chart, select both the control object and the donut chart using the selector cursor to draw a rectangle around both objects.
Right click and select Group to bind them into a group:
In view mode, you'll be able to adjust the view of your donut chart to a particular namespace:
By utilizing namespaces, you're able to configure clusters as multi-tenant, minimizing risk of under utilization of resources and cluster proliferation, and avoiding incurring additional costs. By using monitoring and GKE metering, you're also able to visualize resource utilization by namespaces in order to make better informed decisions on resource quotas and cluster configuration.
...helps you make the most of Google Cloud technologies. Our classes include technical skills and best practices to help you get up to speed quickly and continue your learning journey. We offer fundamental to advanced level training, with on-demand, live, and virtual options to suit your busy schedule. Certifications help you validate and prove your skill and expertise in Google Cloud technologies.
Manual Last Updated August 25, 2025
Lab Last Tested August 25, 2025
Copyright 2025 Google LLC. All rights reserved. Google and the Google logo are trademarks of Google LLC. All other company and product names may be trademarks of the respective companies with which they are associated.


This content is not currently available
We will notify you via email when it becomes available

Great!
We will contact you via email if it becomes available

One lab at a time
Confirm to end all existing labs and start this one