GSP762

總覽
在本研究室中,您將於 Cloud Run 建構無伺服器的 PDF 轉換器網頁應用程式,可自動將 Google 雲端硬碟中的檔案轉換為 PDF 檔,並儲存在個別的 Google 雲端硬碟資料夾。
目標
本研究室的學習內容如下:
- 將 Go 應用程式轉換至容器
- 瞭解如何使用 Google Cloud Build 建構容器
- 建構可將雲端中檔案轉換為 PDF 檔的 Cloud Run 服務。
- 瞭解如何建立服務帳戶並新增權限
- 透過 Cloud Storage 使用事件處理功能
設定和需求
瞭解以下事項後,再點選「Start Lab」按鈕
請詳閱以下操作說明。實驗室活動會計時,且中途無法暫停。點選「Start Lab」後就會開始計時,顯示可使用 Google Cloud 資源的時間。
您將在真正的雲端環境完成實作實驗室活動,而不是模擬或示範環境。為此,我們會提供新的暫時憑證,供您在實驗室活動期間登入及存取 Google Cloud。
為了順利完成這個實驗室,請先確認:
- 可以使用標準的網際網路瀏覽器 (Chrome 瀏覽器為佳)。
注意事項:請使用無痕模式 (建議選項) 或私密瀏覽視窗執行此實驗室,這可以防止個人帳戶和學員帳戶之間的衝突,避免個人帳戶產生額外費用。
- 是時候完成實驗室活動了!別忘了,活動一旦開始將無法暫停。
注意事項:務必使用實驗室專用的學員帳戶。如果使用其他 Google Cloud 帳戶,可能會產生額外費用。
如何開始研究室及登入 Google Cloud 控制台
-
點選「Start Lab」按鈕。如果實驗室會產生費用,畫面上會出現選擇付款方式的對話方塊。左側的「Lab Details」窗格會顯示下列項目:
- 「Open Google Cloud console」按鈕
- 剩餘時間
- 必須在這個研究室中使用的臨時憑證
- 完成這個實驗室所需的其他資訊 (如有)
-
點選「Open Google Cloud console」;如果使用 Chrome 瀏覽器,也能按一下滑鼠右鍵,選取「在無痕視窗中開啟連結」。
接著,實驗室會啟動相關資源,並開啟另一個分頁,顯示「登入」頁面。
提示:您可以在不同的視窗中並排開啟分頁。
注意:如果頁面中顯示「選擇帳戶」對話方塊,請點選「使用其他帳戶」。
-
如有必要,請將下方的 Username 貼到「登入」對話方塊。
{{{user_0.username | "Username"}}}
您也可以在「Lab Details」窗格找到 Username。
-
點選「下一步」。
-
複製下方的 Password,並貼到「歡迎使用」對話方塊。
{{{user_0.password | "Password"}}}
您也可以在「Lab Details」窗格找到 Password。
-
點選「下一步」。
重要事項:請務必使用實驗室提供的憑證,而非自己的 Google Cloud 帳戶憑證。
注意:如果使用自己的 Google Cloud 帳戶來進行這個實驗室,可能會產生額外費用。
-
按過後續的所有頁面:
- 接受條款及細則。
- 由於這是臨時帳戶,請勿新增救援選項或雙重驗證機制。
- 請勿申請免費試用。
Google Cloud 控制台稍後會在這個分頁開啟。
注意:如要使用 Google Cloud 產品和服務,請點選「導覽選單」,或在「搜尋」欄位輸入服務或產品名稱。
啟動 Cloud Shell
Cloud Shell 是搭載多項開發工具的虛擬機器,提供永久的 5 GB 主目錄,而且在 Google Cloud 中運作。Cloud Shell 提供指令列存取權,方便您使用 Google Cloud 資源。
-
點按 Google Cloud 控制台頂端的「啟用 Cloud Shell」圖示  。
。
-
系統顯示視窗時,請按照下列步驟操作:
- 繼續操作 Cloud Shell 視窗。
- 授權 Cloud Shell 使用您的憑證發出 Google Cloud API 呼叫。
連線建立完成即代表已通過驗證,而且專案已設為您的 Project_ID:。輸出內容中有一行文字,宣告本工作階段的 Project_ID:
Your Cloud Platform project in this session is set to {{{project_0.project_id | "PROJECT_ID"}}}
gcloud 是 Google Cloud 的指令列工具,已預先安裝於 Cloud Shell,並支援 Tab 鍵自動完成功能。
- (選用) 您可以執行下列指令來列出使用中的帳戶:
gcloud auth list
- 點按「授權」。
輸出內容:
ACTIVE: *
ACCOUNT: {{{user_0.username | "ACCOUNT"}}}
To set the active account, run:
$ gcloud config set account `ACCOUNT`
- (選用) 您可以使用下列指令來列出專案 ID:
gcloud config list project
輸出內容:
[core]
project = {{{project_0.project_id | "PROJECT_ID"}}}
注意:如需 gcloud 的完整說明,請前往 Google Cloud 參閱 gcloud CLI 總覽指南。
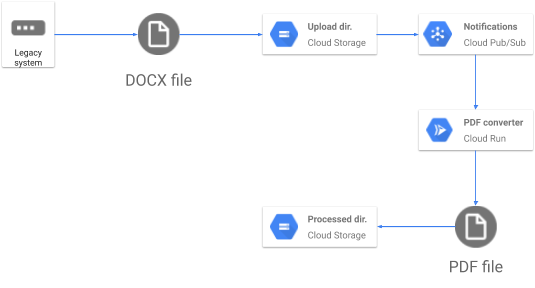
架構
在本研究室中,您將輔助 Pet Theory 獸醫,練習將帳單自動轉換為 PDF 檔,方便顧客開啟檔案。
使用 Google API
在本研究室中,您將使用 Google API。我們已為您啟用以下的必要 API:
| 名稱 |
API |
| Cloud Build |
cloudbuild.googleapis.com |
| Cloud Storage |
storage-component.googleapis.com |
| Cloud Run |
run.googleapis.com |
工作 1:取得原始碼
首先,請下載本研究室所需的程式碼。
-
啟用研究室帳戶:
gcloud auth list --filter=status:ACTIVE --format="value(account)"
-
執行下列指令,複製 Pet Theory 存放區:
git clone https://github.com/Deleplace/pet-theory.git
-
移至正確的目錄:
cd pet-theory/lab03
工作 2:建立帳單微服務
在本節中,您將建立 Go 應用程式來處理要求。如架構圖所示,您要將 Cloud Storage 也融入解決方案。
-
按一下「開啟編輯器」圖示,然後點選「在新視窗中開啟」連結。
-
依序前往「pet-theory」>「lab03」>「server.go」。
-
開啟並編輯 server.go 原始碼,使其符合以下內容:
package main
import (
"fmt"
"io/ioutil"
"log"
"net/http"
"os"
"os/exec"
"regexp"
"strings"
)
func main() {
http.HandleFunc("/", process)
port := os.Getenv("PORT")
if port == "" {
port = "8080"
log.Printf("Defaulting to port %s", port)
}
log.Printf("Listening on port %s", port)
err := http.ListenAndServe(fmt.Sprintf(":%s", port), nil)
log.Fatal(err)
}
func process(w http.ResponseWriter, r *http.Request) {
log.Println("Serving request")
if r.Method == "GET" {
fmt.Fprintln(w, "Ready to process POST requests from Cloud Storage trigger")
return
}
//
// Read request body containing Cloud Storage object metadata
//
gcsInputFile, err1 := readBody(r)
if err1 != nil {
log.Printf("Error reading POST data: %v", err1)
w.WriteHeader(http.StatusBadRequest)
fmt.Fprintf(w, "Problem with POST data: %v \n", err1)
return
}
//
// Working directory (concurrency-safe)
//
localDir, errDir := ioutil.TempDir("", "")
if errDir != nil {
log.Printf("Error creating local temp dir: %v", errDir)
w.WriteHeader(http.StatusInternalServerError)
fmt.Fprintf(w, "Could not create a temp directory on server. \n")
return
}
defer os.RemoveAll(localDir)
//
// Download input file from Cloud Storage
//
localInputFile, err2 := download(gcsInputFile, localDir)
if err2 != nil {
log.Printf("Error downloading Cloud Storage file [%s] from bucket [%s]: %v",
gcsInputFile.Name, gcsInputFile.Bucket, err2)
w.WriteHeader(http.StatusInternalServerError)
fmt.Fprintf(w, "Error downloading Cloud Storage file [%s] from bucket [%s]",
gcsInputFile.Name, gcsInputFile.Bucket)
return
}
//
// Use LibreOffice to convert local input file to local PDF file.
//
localPDFFilePath, err3 := convertToPDF(localInputFile.Name(), localDir)
if err3 != nil {
log.Printf("Error converting to PDF: %v", err3)
w.WriteHeader(http.StatusInternalServerError)
fmt.Fprintf(w, "Error converting to PDF.")
return
}
//
// Upload the freshly generated PDF to Cloud Storage
//
targetBucket := os.Getenv("PDF_BUCKET")
err4 := upload(localPDFFilePath, targetBucket)
if err4 != nil {
log.Printf("Error uploading PDF file to bucket [%s]: %v", targetBucket, err4)
w.WriteHeader(http.StatusInternalServerError)
fmt.Fprintf(w, "Error downloading Cloud Storage file [%s] from bucket [%s]",
gcsInputFile.Name, gcsInputFile.Bucket)
return
}
//
// Delete the original input file from Cloud Storage.
//
err5 := deleteGCSFile(gcsInputFile.Bucket, gcsInputFile.Name)
if err5 != nil {
log.Printf("Error deleting file [%s] from bucket [%s]: %v", gcsInputFile.Name,
gcsInputFile.Bucket, err5)
// This is not a blocking error.
// The PDF was successfully generated and uploaded.
}
log.Println("Successfully produced PDF")
fmt.Fprintln(w, "Successfully produced PDF")
}
func convertToPDF(localFilePath string, localDir string) (resultFilePath string, err error) {
log.Printf("Converting [%s] to PDF", localFilePath)
cmd := exec.Command("libreoffice", "--headless", "--convert-to", "pdf",
"--outdir", localDir,
localFilePath)
cmd.Stdout, cmd.Stderr = os.Stdout, os.Stderr
log.Println(cmd)
err = cmd.Run()
if err != nil {
return "", err
}
pdfFilePath := regexp.MustCompile(`\.\w+$`).ReplaceAllString(localFilePath, ".pdf")
if !strings.HasSuffix(pdfFilePath, ".pdf") {
pdfFilePath += ".pdf"
}
log.Printf("Converted %s to %s", localFilePath, pdfFilePath)
return pdfFilePath, nil
}
-
接著執行下列指令,建構應用程式:
go build -o server
預期的輸出內容如下:
go: downloading cloud.google.com/go/storage v1.6.0
go: downloading cloud.google.com/go v0.53.0
go: downloading github.com/googleapis/gax-go/v2 v2.0.5
go: downloading google.golang.org/api v0.18.0
go: downloading google.golang.org/genproto v0.0.0-20200224152610-e50cd9704f63
go: downloading google.golang.org/grpc v1.27.1
go: downloading go.opencensus.io v0.22.3
go: downloading golang.org/x/oauth2 v0.0.0-20200107190931-bf48bf16ab8d
go: downloading github.com/golang/protobuf v1.3.3
go: downloading golang.org/x/net v0.0.0-20200222125558-5a598a2470a0
go: downloading github.com/golang/groupcache v0.0.0-20200121045136-8c9f03a8e57e
go: downloading golang.org/x/sys v0.0.0-20200223170610-d5e6a3e2c0ae
go: downloading golang.org/x/text v0.3.2
此頂層程式碼呼叫的函式位於下列來源檔案:
- server.go
- notification.go
- gcs.go
應用程式建構成功後,您可以建立 PDF 檔轉換服務。
工作 3:建立 PDF 檔轉換服務
PDF 服務會使用 Cloud Run 和 Cloud Storage,在每次有檔案上傳至指定儲存空間時啟動程序。
如要這麼做,請將事件通知的常見模式與 Cloud Pub/Sub 搭配使用。這麼做可讓應用程式僅專注於處理資訊。由其他服務來傳遞資訊,可讓應用程式保持簡單架構。
建構需要整合兩項元件的帳單模組:
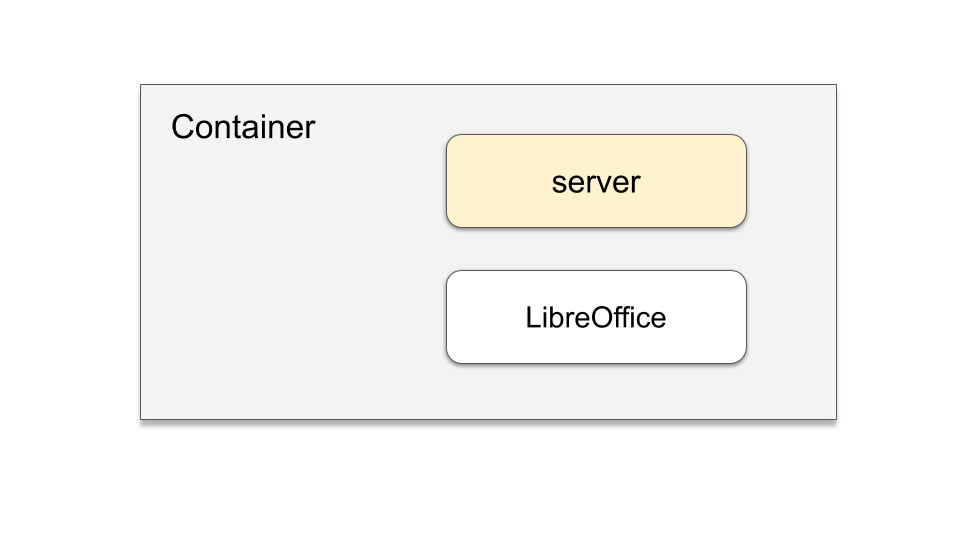
新增 LibreOffice 套件,即可在應用程式中使用這項套件。
-
在「開啟編輯器」中,開啟現有的 Dockerfile 資訊清單,然後按照下列程式碼更新檔案:
FROM amd64/debian
RUN apt-get update -y \
&& apt-get install -y libreoffice \
&& apt-get clean
WORKDIR /usr/src/app
COPY server .
CMD [ "./server" ]
-
「儲存」更新後的 Dockerfile。
-
使用 Cloud Build 重新建構 pdf-converter 映像檔:
gcloud builds submit \
--tag gcr.io/$GOOGLE_CLOUD_PROJECT/pdf-converter
點選「Check my progress」,確認上述工作已完成。
使用 Cloud Build 建構映像檔
-
部署更新後的 pdf-converter 服務。
注意:建議您將 2 GB RAM 分配給 LibreOffice 處理工作,請參閱 --memory 選項一行。
-
執行以下指令,建構並部署容器:
gcloud run deploy pdf-converter \
--image gcr.io/$GOOGLE_CLOUD_PROJECT/pdf-converter \
--platform managed \
--region {{{ project_0.default_region | "REGION" }}} \
--memory=2Gi \
--no-allow-unauthenticated \
--set-env-vars PDF_BUCKET=$GOOGLE_CLOUD_PROJECT-processed \
--max-instances=3
點選「Check my progress」,確認上述工作已完成。
已部署 PDF 轉換器服務
Cloud Run 服務現已成功部署。不過,需要有適合權限才能存取部署的服務。
工作 4:建立服務帳戶
服務帳戶是可存取 Google API 的特殊帳戶類型。
本研究室會在處理 Cloud Storage 事件時,使用服務帳戶存取 Cloud Run。Cloud Storage 支援一系列豐富的通知,可用於觸發事件。
接著更新程式碼,在檔案上傳後通知應用程式。
-
依序點選「導覽選單」>「Cloud Storage」,確認已建立下列兩個值區。如下所示:
-
建立 Pub/Sub 通知,指出新檔案已上傳至文件值區 (「uploaded」)。通知會加上「new-doc」主題的標籤。
gsutil notification create -t new-doc -f json -e OBJECT_FINALIZE gs://$GOOGLE_CLOUD_PROJECT-upload
預期的輸出內容如下:
Created Cloud Pub/Sub topic projects/{{{project_0.project_id | "PROJECT_ID"}}}/topics/new-doc
Created notification config projects/_/buckets/{{{project_0.project_id | "PROJECT_ID"}}}-upload/notificationConfigs/1
-
建立新的服務帳戶,用於觸發 Cloud Run 服務:
gcloud iam service-accounts create pubsub-cloud-run-invoker --display-name "PubSub Cloud Run Invoker"
預期的輸出內容如下:
Created service account [pubsub-cloud-run-invoker].
-
將可叫用 PDF 轉換器服務的權限,授予服務帳戶:
gcloud run services add-iam-policy-binding pdf-converter \
--member=serviceAccount:pubsub-cloud-run-invoker@$GOOGLE_CLOUD_PROJECT.iam.gserviceaccount.com \
--role=roles/run.invoker \
--region {{{ project_0.default_region | "REGION" }}} \
--platform managed
預期的輸出內容如下:
Updated IAM policy for service [pdf-converter].
bindings:
- members:
- serviceAccount:pubsub-cloud-run-invoker@{{{project_0.project_id | "PROJECT_ID"}}}.iam.gserviceaccount.com
role: roles/run.invoker
etag: BwYYfbXS240=
version: 1
-
執行下列指令,找出專案編號:
PROJECT_NUMBER=$(gcloud projects list \
--format="value(PROJECT_NUMBER)" \
--filter="$GOOGLE_CLOUD_PROJECT")
-
啟用您的專案以建立 Cloud Pub/Sub 驗證權杖:
gcloud projects add-iam-policy-binding $GOOGLE_CLOUD_PROJECT \
--member=serviceAccount:{{{ project_0.project_id | "PROJECT_ID" }}}@{{{ project_0.project_id | "PROJECT_ID" }}}.iam.gserviceaccount.com \
--role=roles/iam.serviceAccountTokenCreator
點選「Check my progress」,確認上述工作已完成。
已建立服務帳戶
建立服務帳戶後,即可使用該帳戶叫用 Cloud Run 服務。
工作 5:測試 Cloud Run 服務
繼續操作之前,請先測試已部署的服務。提醒您,服務需要經過驗證,因此這項測試是為了確保服務並未公開。
-
在 $SERVICE_URL 環境變數中,儲存服務網址:
SERVICE_URL=$(gcloud run services describe pdf-converter \
--platform managed \
--region {{{ project_0.default_region | "REGION" }}} \
--format "value(status.url)")
-
顯示 SERVICE URL:
echo $SERVICE_URL
-
對新服務提出匿名的 GET 要求:
curl -X GET $SERVICE_URL
預期的輸出內容如下:
<html><head>
<meta http-equiv="content-type" content="text/html;charset=utf-8">
<title>403 Forbidden</title>
</head>
<body text=#000000 bgcolor=#ffffff>
<h1>Error: Forbidden</h1>
<h2>Your client does not have permission to get URL <code>/</code> from this server.</h2>
<h2></h2>
注意:
匿名 GET 要求會導致系統產生錯誤訊息:「Your client does not have permission to get URL」。
這樣很好,因為您不會希望服務可供匿名使用者呼叫。
-
現在嘗試以授權使用者的身分叫用服務:
curl -X GET -H "Authorization: Bearer $(gcloud auth print-identity-token)" $SERVICE_URL
預期的輸出內容如下:
Ready to process POST requests from Cloud Storage trigger
太棒了,您已成功部署經過驗證的 Cloud Run 服務。
工作 6:Cloud Storage 觸發條件
如要在有新內容上傳至 Cloud Storage 時啟動通知,請將訂閱新增至現有的 Pub/Sub 主題。
注意:Cloud Storage 通知功能會在有新內容上傳時,自動將訊息推送至主題佇列。使用通知功能可讓您不需編寫額外程式碼,就能建構強大的應用程式來回應事件。
現在只要上傳檔案,Pub/Sub 訂閱就會與服務帳戶互動。接著,服務帳戶會啟動 PDF 轉換器 Cloud Run 服務。
工作 7:測試 Cloud Storage 通知
如要測試 Cloud Run 服務,請使用可用的範例檔案。
-
將測試檔案複製到上傳值區:
gsutil -m cp -r gs://spls/gsp762/* gs://$GOOGLE_CLOUD_PROJECT-upload
預期的輸出內容如下:
Copying gs://spls/gsp762/cat-and-mouse.jpg [Content-Type=image/jpeg]...
Copying gs://spls/gsp762/file-sample_100kB.doc [Content-Type=application/msword]...
Copying gs://spls/gsp762/file-sample_500kB.docx [Content-Type=application/vnd.openxmlformats-officedocument.wordprocessingml.document]...
Copying gs://spls/gsp762/file_example_XLS_10.xls [Content-Type=application/vnd.ms-excel]...
Copying gs://spls/gsp762/file-sample_1MB.docx [Content-Type=application/vnd.openxmlformats-officedocument.wordprocessingml.document]...
Copying gs://spls/gsp762/file_example_XLSX_50.xlsx [Content-Type=application/vnd.openxmlformats-officedocument.spreadsheetml.sheet]...
Copying gs://spls/gsp762/file_example_XLS_100.xls [Content-Type=application/vnd.ms-excel]...
Copying gs://spls/gsp762/file_example_XLS_50.xls [Content-Type=application/vnd.ms-excel]...
Copying gs://spls/gsp762//Copy of cat-and-mouse.jpg [Content-Type=image/jpeg]...
-
在 Cloud 控制台中,依序按一下「Cloud Storage」>「值區」,然後點選名稱結尾為「-upload」的值區。
-
按幾下「重新整理」按鈕,查看系統如何在將檔案轉換成 PDF 檔時,將檔案逐個刪除。
-
接著按一下「值區」,然後點選名稱結尾為「-processed」的值區。其中應該包含所有檔案的 PDF 版本。
注意:檔案處理作業可能需要幾分鐘才能完成。請使用值區的「重新整理」選項,檢查處理程序的完成狀態。
-
您可以開啟 PDF 檔案,確認已順利完成轉換。
-
上傳作業完成後,請依序按一下「導覽選單」>「Cloud Run」,然後點選「pdf-converter」服務。
-
點選「記錄檔」分頁標籤,然後新增「轉換中」篩選器來查看已轉換的檔案。
-
依序前往「導覽選單」>「Cloud Storage」,開啟名稱結尾為「-upload」的值區,確認所有上傳檔案皆已處理完畢。
太棒了!您已成功建構新服務,可使用上傳至 Cloud Storage 的檔案建立 PDF 檔案。
恭喜!
在本研究室中,您已瞭解如何將 Go 應用程式轉換為容器、如何使用 Google Cloud Build 建構容器,並且發布了 Cloud Run 服務。
您也學到如何透過服務帳戶啟用權限,以及使用 Cloud Storage 的事件處理功能。在您需要透過 pdf-converter 服務將文件轉換為 PDF 檔案,並儲存至「已處理」值區時,這些都是重要的知識。
Google Cloud 教育訓練與認證
協助您瞭解如何充分運用 Google Cloud 的技術。我們的課程會介紹專業技能和最佳做法,讓您可以快速掌握要領並持續進修。我們提供從基本到進階等級的訓練課程,並有隨選、線上和虛擬課程等選項,方便您抽空參加。認證可協助您驗證及證明自己在 Google Cloud 技術方面的技能和專業知識。
使用手冊上次更新日期:2024 年 5 月 15 日
研究室上次測試日期:2024 年 5 月 15 日
Copyright 2025 Google LLC 保留所有權利。Google 和 Google 標誌是 Google LLC 的商標,其他公司和產品名稱則有可能是其關聯公司的商標。


