GSP762

概览
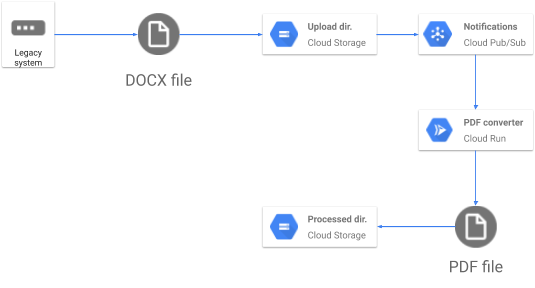
在本实验中,您将利用 Cloud Run 无服务器服务,在其上构建一个 Web 应用,自动将存储在 Google 云端硬盘中的文件转换为 PDF 文件,并存储在另一个 Google 云端硬盘文件夹中。
场景
您帮助 Pet Theory 宠物医院将账单自动转换为 PDF 文件,方便客户使用。
本实验需要使用 Google API。已为您启用以下 API:
| 名称 |
API |
| Cloud Build |
cloudbuild.googleapis.com |
| Cloud Storage |
storage-component.googleapis.com |
| Cloud Run Admin |
run.googleapis.com |
目标
在本实验中,您将学习如何执行以下任务:
- 下载本实验的源代码。
- 将 Go 应用转换为容器。
- 使用 Google Cloud Build 构建容器。
- 创建一个在云中将文件转换为 PDF 文件的 Cloud Run 服务。
- 创建服务账号并添加权限。
- 为 Cloud Storage 通知启动触发器。
- 将事件处理与 Cloud Storage 结合使用。
设置和要求
点击“开始实验”按钮前的注意事项
请阅读以下说明。实验是计时的,并且您无法暂停实验。计时器在您点击开始实验后即开始计时,显示 Google Cloud 资源可供您使用多长时间。
此实操实验可让您在真实的云环境中开展实验活动,免受模拟或演示环境的局限。为此,我们会向您提供新的临时凭据,您可以在该实验的规定时间内通过此凭据登录和访问 Google Cloud。
为完成此实验,您需要:
- 能够使用标准的互联网浏览器(建议使用 Chrome 浏览器)。
注意:请使用无痕模式(推荐)或无痕浏览器窗口运行此实验。这可以避免您的个人账号与学生账号之间发生冲突,这种冲突可能导致您的个人账号产生额外费用。
注意:请仅使用学生账号完成本实验。如果您使用其他 Google Cloud 账号,则可能会向该账号收取费用。
如何开始实验并登录 Google Cloud 控制台
-
点击开始实验按钮。如果该实验需要付费,系统会打开一个对话框供您选择支付方式。左侧是“实验详细信息”窗格,其中包含以下各项:
- “打开 Google Cloud 控制台”按钮
- 剩余时间
- 进行该实验时必须使用的临时凭据
- 帮助您逐步完成本实验所需的其他信息(如果需要)
-
点击打开 Google Cloud 控制台(如果您使用的是 Chrome 浏览器,请右键点击并选择在无痕式窗口中打开链接)。
该实验会启动资源并打开另一个标签页,显示“登录”页面。
提示:将这些标签页安排在不同的窗口中,并排显示。
注意:如果您看见选择账号对话框,请点击使用其他账号。
-
如有必要,请复制下方的用户名,然后将其粘贴到登录对话框中。
{{{user_0.username | "<用户名>"}}}
您也可以在“实验详细信息”窗格中找到“用户名”。
-
点击下一步。
-
复制下面的密码,然后将其粘贴到欢迎对话框中。
{{{user_0.password | "<密码>"}}}
您也可以在“实验详细信息”窗格中找到“密码”。
-
点击下一步。
重要提示:您必须使用实验提供的凭据。请勿使用您的 Google Cloud 账号凭据。
注意:在本实验中使用您自己的 Google Cloud 账号可能会产生额外费用。
-
继续在后续页面中点击以完成相应操作:
- 接受条款及条件。
- 由于这是临时账号,请勿添加账号恢复选项或双重验证。
- 请勿注册免费试用。
片刻之后,系统会在此标签页中打开 Google Cloud 控制台。
注意:如需访问 Google Cloud 产品和服务,请点击导航菜单,或在搜索字段中输入服务或产品的名称。

激活 Cloud Shell
Cloud Shell 是一种装有开发者工具的虚拟机。它提供了一个永久性的 5GB 主目录,并且在 Google Cloud 上运行。Cloud Shell 提供可用于访问您的 Google Cloud 资源的命令行工具。
-
点击 Google Cloud 控制台顶部的激活 Cloud Shell  。
。
-
在弹出的窗口中执行以下操作:
- 继续完成 Cloud Shell 信息窗口中的设置。
- 授权 Cloud Shell 使用您的凭据进行 Google Cloud API 调用。
如果您连接成功,即表示您已通过身份验证,且项目 ID 会被设为您的 Project_ID 。输出内容中有一行说明了此会话的 Project_ID:
Your Cloud Platform project in this session is set to {{{project_0.project_id | "PROJECT_ID"}}}
gcloud 是 Google Cloud 的命令行工具。它已预先安装在 Cloud Shell 上,且支持 Tab 自动补全功能。
- (可选)您可以通过此命令列出活跃账号名称:
gcloud auth list
- 点击授权。
输出:
ACTIVE: *
ACCOUNT: {{{user_0.username | "ACCOUNT"}}}
To set the active account, run:
$ gcloud config set account `ACCOUNT`
- (可选)您可以通过此命令列出项目 ID:
gcloud config list project
输出:
[core]
project = {{{project_0.project_id | "PROJECT_ID"}}}
注意:如需查看在 Google Cloud 中使用 gcloud 的完整文档,请参阅 gcloud CLI 概览指南。
任务 1. 获取源代码
在此任务中,您首先要下载本实验必需的代码。
-
在 Cloud Shell 中运行以下命令,激活您的实验账号:
gcloud auth list --filter=status:ACTIVE --format="value(account)"
-
运行以下命令,克隆 Pet Theory 代码库:
git clone https://github.com/Deleplace/pet-theory.git
-
运行以下命令,切换到正确的目录:
cd pet-theory/lab03
在 Cloud Shell IDE 中启用 Gemini Code Assist
您可以在集成开发环境 (IDE)(例如 Cloud Shell)中使用 Gemini Code Assist,以获取代码方面的指导或解决代码问题。您需要先启用 Gemini Code Assist,然后才能使用该功能。
- 在 Cloud Shell 中,使用以下命令启用 Gemini for Google Cloud API:
gcloud services enable cloudaicompanion.googleapis.com
- 点击 Cloud Shell 工具栏上的打开编辑器。
注意:如需打开 Cloud Shell 编辑器,请点击 Cloud Shell 工具栏上的打开编辑器。您可以根据需要点击打开编辑器或打开终端,在 Cloud Shell 和代码编辑器之间切换。
-
在左侧窗格中,点击设置图标,然后在设置视图中搜索 Gemini Code Assist。
-
找到Geminicodeassist: Enable(Geminicodeassist:启用)并确保选中了该复选框,然后关闭设置。
-
点击屏幕底部状态栏中的 Cloud Code - 无项目。
-
按照说明对插件进行授权。如果系统未自动选择项目,请点击选择 Google Cloud 项目,然后选择 。
-
检查您的 Google Cloud 项目 () 是否显示在状态栏的 Cloud Code 状态消息中。
任务 2. 创建账单微服务
在此任务中,您将创建一个 Go 应用来处理请求。如架构图所示,您打算在解决方案中集成 Cloud Storage。
-
在 Cloud Shell 编辑器的文件探索器中,前往 pet-theory > lab03 > server.go。
-
打开 server.go 文件。此操作会启用 Gemini Code Assist,编辑器右上角会显示  图标。
图标。
-
打开 server.go 源代码并进行编辑,使之与以下内容相同:
package main
import (
"fmt"
"io/ioutil"
"log"
"net/http"
"os"
"os/exec"
"regexp"
"strings"
)
func main() {
http.HandleFunc("/", process)
port := os.Getenv("PORT")
if port == "" {
port = "8080"
log.Printf("Defaulting to port %s", port)
}
log.Printf("Listening on port %s", port)
err := http.ListenAndServe(fmt.Sprintf(":%s", port), nil)
log.Fatal(err)
}
func process(w http.ResponseWriter, r *http.Request) {
log.Println("Serving request")
if r.Method == "GET" {
fmt.Fprintln(w, "Ready to process POST requests from Cloud Storage trigger")
return
}
//
// 读取包含 Cloud Storage 对象元数据的请求正文
//
gcsInputFile, err1 := readBody(r)
if err1 != nil {
log.Printf("Error reading POST data: %v", err1)
w.WriteHeader(http.StatusBadRequest)
fmt.Fprintf(w, "Problem with POST data: %v \n", err1)
return
}
//
// 工作目录(并发安全)
localDir, errDir := ioutil.TempDir("", "")
if errDir != nil {
log.Printf("Error creating local temp dir: %v", errDir)
w.WriteHeader(http.StatusInternalServerError)
fmt.Fprintf(w, "Could not create a temp directory on server. \n")
return
}
defer os.RemoveAll(localDir)
//
// 从 Cloud Storage 下载输入文件
//
localInputFile, err2 := download(gcsInputFile, localDir)
if err2 != nil {
log.Printf("Error downloading Cloud Storage file [%s] from bucket [%s]: %v",
gcsInputFile.Name, gcsInputFile.Bucket, err2)
w.WriteHeader(http.StatusInternalServerError)
fmt.Fprintf(w, "Error downloading Cloud Storage file [%s] from bucket [%s]",
gcsInputFile.Name, gcsInputFile.Bucket)
return
}
//
// 使用 LibreOffice 将本地输入文件转换为本地 PDF 文件。
//
localPDFFilePath, err3 := convertToPDF(localInputFile.Name(), localDir)
if err3 != nil {
log.Printf("Error converting to PDF: %v", err3)
w.WriteHeader(http.StatusInternalServerError)
fmt.Fprintf(w, "Error converting to PDF.")
return
}
//
// 将新生成的 PDF 上传到 Cloud Storage
//
targetBucket := os.Getenv("PDF_BUCKET")
err4 := upload(localPDFFilePath, targetBucket)
if err4 != nil {
log.Printf("Error uploading PDF file to bucket [%s]: %v", targetBucket, err4)
w.WriteHeader(http.StatusInternalServerError)
fmt.Fprintf(w, "Error downloading Cloud Storage file [%s] from bucket [%s]",
gcsInputFile.Name, gcsInputFile.Bucket)
return
}
//
// 从 Cloud Storage 删除原始输入文件。
//
err5 := deleteGCSFile(gcsInputFile.Bucket, gcsInputFile.Name)
if err5 != nil {
log.Printf("Error deleting file [%s] from bucket [%s]: %v", gcsInputFile.Name,
gcsInputFile.Bucket, err5)
// 并非阻止性错误。
// 现在已成功生成并上传 PDF。
}
log.Println("Successfully produced PDF")
fmt.Fprintln(w, "Successfully produced PDF")
}
func convertToPDF(localFilePath string, localDir string) (resultFilePath string, err error) {
log.Printf("Converting [%s] to PDF", localFilePath)
cmd := exec.Command("libreoffice", "--headless", "--convert-to", "pdf",
"--outdir", localDir,
localFilePath)
cmd.Stdout, cmd.Stderr = os.Stdout, os.Stderr
log.Println(cmd)
err = cmd.Run()
if err != nil {
return "", err
}
pdfFilePath := regexp.MustCompile(`\.\w+$`).ReplaceAllString(localFilePath, ".pdf")
if !strings.HasSuffix(pdfFilePath, ".pdf") {
pdfFilePath += ".pdf"
}
log.Printf("Converted %s to %s", localFilePath, pdfFilePath)
return pdfFilePath, nil
}
-
点击 Gemini Code Assist:智能操作 图标,然后选择 Explain this(解释此内容)。
-
Gemini Code Assist 会打开一个聊天窗格,其中预填充了 Explain this 提示。在 Code Assist 聊天窗格的内嵌文本框中,将预填充的提示替换为以下内容,然后点击发送:
You are an expert Go developer at Cymbal AI. A new team member is unfamiliar with this server implementation. Explain this "server.go" file in detail, breaking down its key components used in the code.
For the suggested improvements, don't update this file.
server.go 文件中的代码说明会显示在 Gemini Code Assist 对话中。
-
在 Cloud Shell 终端中,运行以下命令以构建应用:
go build -o server
该顶级代码所调用的函数位于以下源文件中:
- server.go
- notification.go
- gcs.go
成功构建应用后,您就可以创建 PDF 转换服务了。
任务 3. 创建 PDF 转换服务
只要有文件上传到指定存储位置,该 PDF 服务就会使用 Cloud Run 和 Cloud Storage 来启动处理进程。
为了实现这一目标,您决定使用一种常见模式的事件通知以及 Cloud Pub/Sub。这样能让该应用仅专注于处理信息。信息的传输和传递工作则由其他服务来完成,从而使应用保持简单。
构建账单模块需要集成两个组件:
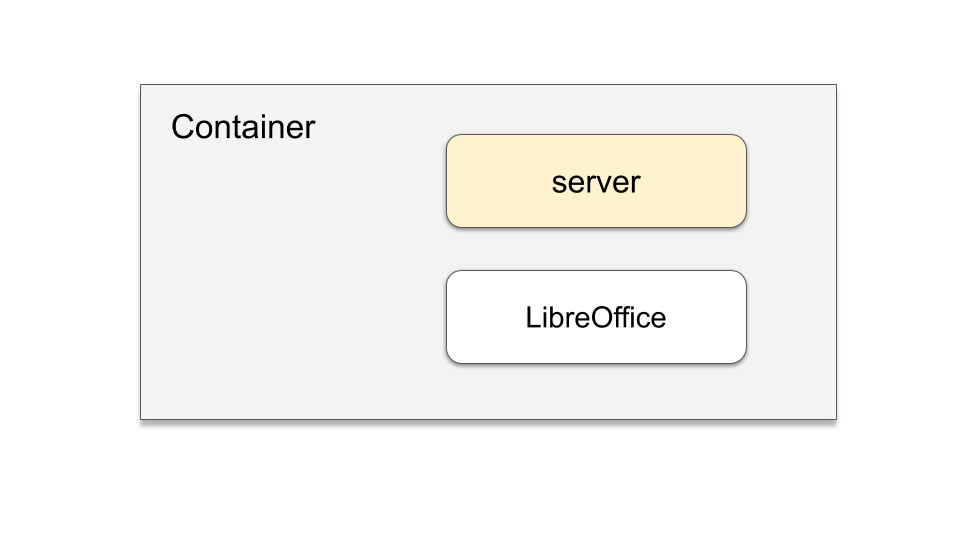
添加 LibreOffice 软件包后,您就可以在应用中使用该软件包。
-
在打开编辑器中,打开现有的 Dockerfile 清单并更新该文件,如下所示:
FROM amd64/debian
RUN apt-get update -y \
&& apt-get install -y libreoffice \
&& apt-get clean
WORKDIR /usr/src/app
COPY server .
CMD [ "./server" ]
-
保存更新后的 Dockerfile。
-
点击 Gemini Code Assist:智能操作 图标,然后选择 Explain this(解释此内容)。
-
Gemini Code Assist 会打开一个聊天窗格,其中预填充了 Explain this 提示。在 Code Assist 聊天窗格的内嵌文本框中,将预填充的提示替换为以下内容,然后点击发送:
You are a Senior DevOps Engineer at Cymbal AI. A new team member has asked you to explain the Dockerfile. Provide a comprehensive explanation of the contents and structure of this Dockerfile, including key instructions and best practices.
For the suggested improvements, don't update this Dockerfile.
针对 Dockerfile 文件中代码的说明会显示在 Gemini Code Assist 聊天中。
-
使用 Cloud Build 启动 pdf-converter 映像的重建:
gcloud builds submit \
--tag gcr.io/$GOOGLE_CLOUD_PROJECT/pdf-converter
点击检查我的进度,验证您已完成上述任务。
使用 Cloud Build 创建映像
-
部署更新后的 PDF 转换器服务。
注意:最好为 LibreOffice 提供 2 GB RAM,请参阅带有 --memory 选项的命令行。
-
运行以下命令,构建并部署容器:
gcloud run deploy pdf-converter \
--image gcr.io/$GOOGLE_CLOUD_PROJECT/pdf-converter \
--platform managed \
--region {{{ project_0.default_region | "REGION" }}} \
--memory=2Gi \
--no-allow-unauthenticated \
--set-env-vars PDF_BUCKET=$GOOGLE_CLOUD_PROJECT-processed \
--max-instances=3
点击检查我的进度,验证您已完成以下任务。
部署 PDF 转换器服务
Cloud Run 服务现已成功部署。但是,您部署的应用需要正确的权限才能访问。
任务 4. 创建服务账号
服务账号是一类能访问 Google API 的特殊账号。
在本实验中处理 Cloud Storage 事件时,使用服务账号访问 Cloud Run。Cloud Storage 支持一组丰富的通知,可用于触发事件。
在此任务中,您将更新代码,在有文件上传时通知应用。
-
依次点击导航菜单 > Cloud Storage,并验证已创建有两个存储桶。您应该会看到:
-
创建一个 Pub/Sub 通知,以指示新文件已上传到文档存储桶(“uploaded”)。此通知的主题带有“new-doc”标签。
gsutil notification create -t new-doc -f json -e OBJECT_FINALIZE gs://$GOOGLE_CLOUD_PROJECT-upload
预期输出:
Created Cloud Pub/Sub topic projects/{{{project_0.project_id | "PROJECT_ID"}}}/topics/new-doc
Created notification config projects/_/buckets/{{{project_0.project_id | "PROJECT_ID"}}}-upload/notificationConfigs/1
-
创建一个新的服务账号来触发 Cloud Run 服务:
gcloud iam service-accounts create pubsub-cloud-run-invoker --display-name "PubSub Cloud Run Invoker"
预期输出:
Created service account [pubsub-cloud-run-invoker].
-
授予该服务账号调用 PDF 转换器服务的权限:
gcloud run services add-iam-policy-binding pdf-converter \
--member=serviceAccount:pubsub-cloud-run-invoker@$GOOGLE_CLOUD_PROJECT.iam.gserviceaccount.com \
--role=roles/run.invoker \
--region {{{ project_0.default_region | "REGION" }}} \
--platform managed
预期输出:
Updated IAM policy for service [pdf-converter].
bindings:
- members:
- serviceAccount:pubsub-cloud-run-invoker@{{{project_0.project_id | "PROJECT_ID"}}}.iam.gserviceaccount.com
role: roles/run.invoker
etag: BwYYfbXS240=
version: 1
-
运行以下命令来查找您的项目编号:
PROJECT_NUMBER=$(gcloud projects list \
--format="value(PROJECT_NUMBER)" \
--filter="$GOOGLE_CLOUD_PROJECT")
-
允许您的项目创建 Cloud Pub/Sub 身份验证令牌:
gcloud projects add-iam-policy-binding $GOOGLE_CLOUD_PROJECT \
--member=serviceAccount:{{{ project_0.project_id | "PROJECT_ID" }}}@{{{ project_0.project_id | "PROJECT_ID" }}}.iam.gserviceaccount.com \
--role=roles/iam.serviceAccountTokenCreator
点击检查我的进度,验证您已完成以下任务。
创建服务账号
服务账号创建后,即可用于调用 Cloud Run 服务。
任务 5. 测试 Cloud Run 服务
在进一步处理之前,您需要测试已部署的服务。由于该服务需要身份验证,测试有助于确保它确实是私有服务。
-
在环境变量 $SERVICE_URL 中保存服务网址:
SERVICE_URL=$(gcloud run services describe pdf-converter \
--platform managed \
--region {{{ project_0.default_region | "REGION" }}} \
--format "value(status.url)")
-
显示服务网址:
echo $SERVICE_URL
-
向您的新服务发出匿名的 GET 请求:
curl -X GET $SERVICE_URL
预期输出:
<html><head>
<meta http-equiv="content-type" content="text/html;charset=utf-8">
<title>403 Forbidden</title>
</head>
<body text=#000000 bgcolor=#ffffff>
<h1>Error: Forbidden</h1>
<h2>Your client does not have permission to get URL <code>/</code> from this server.</h2>
<h2></h2>
注意:
该匿名的 GET 请求会导致出现以下错误消息:
“您的客户端没有权限,无法获取网址”。
这是正常的,因为您不希望匿名用户能调用该服务。
-
现在尝试以授权用户的身份调用该服务:
curl -X GET -H "Authorization: Bearer $(gcloud auth print-identity-token)" $SERVICE_URL
预期输出:
已准备好从 Cloud Storage 触发器处理 POST 请求
太棒了!您已成功部署了一项进行过身份验证的 Cloud Run 服务。
任务 6. 配置 Cloud Storage 触发器
要在有新内容上传到 Cloud Storage 时启动通知,应为现有的 Pub/Sub 主题添加订阅。
注意:有新内容上传时,Cloud Storage 通知将自动向您的主题队列推送消息。使用通知,您可以创建功能强大的应用,无需额外编写代码即可响应事件。
现在,只要有文件上传,Pub/Sub 订阅就会与您的服务账号进行互动。然后,服务账号会启动 PDF 转换器 Cloud Run 服务。
任务 7. 测试 Cloud Storage 通知
若要测试 Cloud Run 服务,使用提供的样本文件。
-
将测试文件复制到上传存储桶中:
gsutil -m cp -r gs://spls/gsp762/* gs://$GOOGLE_CLOUD_PROJECT-upload
预期输出:
Copying gs://spls/gsp762/cat-and-mouse.jpg [Content-Type=image/jpeg]...
Copying gs://spls/gsp762/file-sample_100kB.doc [Content-Type=application/msword]...
Copying gs://spls/gsp762/file-sample_500kB.docx [Content-Type=application/vnd.openxmlformats-officedocument.wordprocessingml.document]...
Copying gs://spls/gsp762/file_example_XLS_10.xls [Content-Type=application/vnd.ms-excel]...
Copying gs://spls/gsp762/file-sample_1MB.docx [Content-Type=application/vnd.openxmlformats-officedocument.wordprocessingml.document]...
Copying gs://spls/gsp762/file_example_XLSX_50.xlsx [Content-Type=application/vnd.openxmlformats-officedocument.spreadsheetml.sheet]...
Copying gs://spls/gsp762/file_example_XLS_100.xls [Content-Type=application/vnd.ms-excel]...
Copying gs://spls/gsp762/file_example_XLS_50.xls [Content-Type=application/vnd.ms-excel]...
Copying gs://spls/gsp762//Copy of cat-and-mouse.jpg [Content-Type=image/jpeg]...
-
在 Cloud 控制台中,依次点击 Cloud Storage > 存储桶,然后点击名称以“-upload”结尾的存储桶
-
点击刷新按钮几次,查看文件在转换为 PDF 后,是如何逐一删除原始文件的。
-
然后点击存储桶,再点击名称以“-processed”结尾的存储桶。该存储桶应包含所有文件的 PDF 版本。
注意:
文件处理可能需要几分钟时间。使用存储桶刷新选项来检查处理完成状态。
-
可随意打开某个 PDF 文件,确保其已正确转换。
-
上传完成后,依次点击导航菜单 > Cloud Run,然后点击 pdf-converter 服务。
-
选择日志标签页并添加一个“转换”过滤器,以便查看转换的文件。
-
前往导航菜单 > Cloud Storage 并打开名称以“-upload”结尾的存储桶,确认所有上传的文件都已处理。
太棒了!您已成功构建一项新服务,会使用上传到 Cloud Storage 的文件来创建 PDF 文件。
恭喜!
在本实验中,您探索了如何将 Go 应用转换为容器,以及如何利用 Google Cloud Build 构建容器,以及如何启用 Cloud Run 服务。
您还掌握了通过服务账号启用权限和利用 Cloud Storage 事件处理的技能,这些都是 PDF 转换器服务运行不可或缺的一部分,该服务可将文档转换为 PDF 文件并存储到“processed”存储桶中。
Google Cloud 培训和认证
…可帮助您充分利用 Google Cloud 技术。我们的课程会讲解各项技能与最佳实践,可帮助您迅速上手使用并继续学习更深入的知识。我们提供从基础到高级的全方位培训,并有点播、直播和虚拟三种方式选择,让您可以按照自己的日程安排学习时间。各项认证可以帮助您核实并证明您在 Google Cloud 技术方面的技能与专业知识。
上次更新手册的时间:2025 年 8 月 18 日
上次测试实验的时间:2025 年 8 月 11 日
版权所有 2025 Google LLC 保留所有权利。Google 和 Google 徽标是 Google LLC 的商标。其他所有公司名和产品名可能是其各自相关公司的商标。


