GSP762

Overview
In this lab, you build a PDF converter web app on Cloud Run, a serverless service, to automatically convert files stored in Google Drive into PDFs stored in segregated Google Drive folders.
Scenario
You assist the Pet Theory Veterinary practice to automatically convert their invoices into PDFs for customer ease of use.
This lab requires the use of Google APIs. The following APIs have been enabled for you:
| Name |
API |
| Cloud Build |
cloudbuild.googleapis.com |
| Cloud Storage |
storage-component.googleapis.com |
| Cloud Run Admin |
run.googleapis.com |
Objectives
In this lab, you learn how to perform the following tasks:
- Obtain the source code for the lab.
- Convert a Go application to a container.
- Build containers with Google Cloud Build.
- Create a Cloud Run service that converts files to PDF files in the cloud.
- Create a service account and add permissions.
- Initiate a trigger for Cloud Storage notifications.
- Use event processing with Cloud Storage.
Setup and requirements
Before you click the Start Lab button
Read these instructions. Labs are timed and you cannot pause them. The timer, which starts when you click Start Lab, shows how long Google Cloud resources are made available to you.
This hands-on lab lets you do the lab activities in a real cloud environment, not in a simulation or demo environment. It does so by giving you new, temporary credentials you use to sign in and access Google Cloud for the duration of the lab.
To complete this lab, you need:
- Access to a standard internet browser (Chrome browser recommended).
Note: Use an Incognito (recommended) or private browser window to run this lab. This prevents conflicts between your personal account and the student account, which may cause extra charges incurred to your personal account.
- Time to complete the lab—remember, once you start, you cannot pause a lab.
Note: Use only the student account for this lab. If you use a different Google Cloud account, you may incur charges to that account.
How to start your lab and sign in to the Google Cloud console
-
Click the Start Lab button. If you need to pay for the lab, a dialog opens for you to select your payment method.
On the left is the Lab Details pane with the following:
- The Open Google Cloud console button
- Time remaining
- The temporary credentials that you must use for this lab
- Other information, if needed, to step through this lab
-
Click Open Google Cloud console (or right-click and select Open Link in Incognito Window if you are running the Chrome browser).
The lab spins up resources, and then opens another tab that shows the Sign in page.
Tip: Arrange the tabs in separate windows, side-by-side.
Note: If you see the Choose an account dialog, click Use Another Account.
-
If necessary, copy the Username below and paste it into the Sign in dialog.
{{{user_0.username | "Username"}}}
You can also find the Username in the Lab Details pane.
-
Click Next.
-
Copy the Password below and paste it into the Welcome dialog.
{{{user_0.password | "Password"}}}
You can also find the Password in the Lab Details pane.
-
Click Next.
Important: You must use the credentials the lab provides you. Do not use your Google Cloud account credentials.
Note: Using your own Google Cloud account for this lab may incur extra charges.
-
Click through the subsequent pages:
- Accept the terms and conditions.
- Do not add recovery options or two-factor authentication (because this is a temporary account).
- Do not sign up for free trials.
After a few moments, the Google Cloud console opens in this tab.
Note: To access Google Cloud products and services, click the Navigation menu or type the service or product name in the Search field.

Activate Cloud Shell
Cloud Shell is a virtual machine that is loaded with development tools. It offers a persistent 5GB home directory and runs on the Google Cloud. Cloud Shell provides command-line access to your Google Cloud resources.
-
Click Activate Cloud Shell  at the top of the Google Cloud console.
-
Click through the following windows:
- Continue through the Cloud Shell information window.
- Authorize Cloud Shell to use your credentials to make Google Cloud API calls.
When you are connected, you are already authenticated, and the project is set to your Project_ID, . The output contains a line that declares the Project_ID for this session:
Your Cloud Platform project in this session is set to {{{project_0.project_id | "PROJECT_ID"}}}
gcloud is the command-line tool for Google Cloud. It comes pre-installed on Cloud Shell and supports tab-completion.
- (Optional) You can list the active account name with this command:
gcloud auth list
- Click Authorize.
Output:
ACTIVE: *
ACCOUNT: {{{user_0.username | "ACCOUNT"}}}
To set the active account, run:
$ gcloud config set account `ACCOUNT`
- (Optional) You can list the project ID with this command:
gcloud config list project
Output:
[core]
project = {{{project_0.project_id | "PROJECT_ID"}}}
Note: For full documentation of gcloud, in Google Cloud, refer to the gcloud CLI overview guide.
Task 1. Get the source code
In this task, you get started by downloading the code that's necessary for this lab.
-
Run the following command in Cloud Shell to activate your lab account:
gcloud auth list --filter=status:ACTIVE --format="value(account)"
-
Run the following command to clone the Pet Theory repository:
git clone https://github.com/Deleplace/pet-theory.git
-
Run the following command to change to the correct directory:
cd pet-theory/lab03
Enable Gemini Code Assist in the Cloud Shell IDE
You can use Gemini Code Assist in an integrated development environment (IDE) such as Cloud Shell to receive guidance on code or solve problems with your code. Before you can start using Gemini Code Assist, however, you need to enable it.
- In Cloud Shell, enable the Gemini for Google Cloud API with the following command:
gcloud services enable cloudaicompanion.googleapis.com
- Click Open Editor on the Cloud Shell toolbar.
Note: To open the Cloud Shell Editor, click Open Editor on the Cloud Shell toolbar. You can switch between Cloud Shell and the code Editor by clicking Open Editor or Open Terminal, as required.
-
In the Cloud Shell Editor, navigate to Cloud Code > Help and Feedback > Change Settings.
-
In the Settings, search for Gemini Code Assist.
-
Locate and ensure that the checkbox is selected for Geminicodeassist: Enable, and close the Settings.
-
Click Cloud Code - No Project in the status bar at the bottom of the screen.
-
Authorize the plugin as instructed. If a project is not automatically selected, click Select a Google Cloud Project, and choose .
-
Verify that your Google Cloud project () displays in the Cloud Code status message in the status bar.
Task 2. Create an invoice microservice
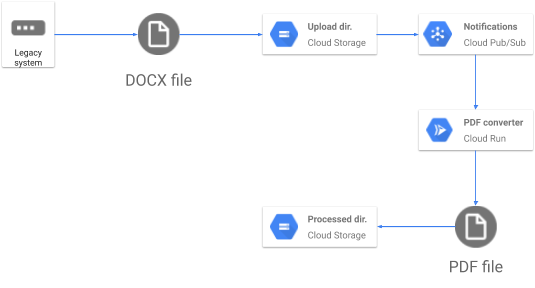
In this task, you create a Go application to process requests. As outlined in the architecture diagram, you intend to integrate Cloud Storage as part of the solution.
-
In the Cloud Shell Editor's File Explorer, navigate to pet-theory > lab03 > server.go.
-
Open the server.go file. This action enables Gemini Code Assist, as indicated by the presence of the  icon in the upper-right corner of the editor.
-
Open the server.go source code and edit it to match the following:
package main
import (
"fmt"
"log"
"net/http"
"os"
"os/exec"
"regexp"
"strings"
)
func main() {
http.HandleFunc("/", process)
port := os.Getenv("PORT")
if port == "" {
port = "8080"
log.Printf("Defaulting to port %s", port)
}
log.Printf("Listening on port %s", port)
err := http.ListenAndServe(fmt.Sprintf(":%s", port), nil)
log.Fatal(err)
}
func process(w http.ResponseWriter, r *http.Request) {
log.Println("Serving request")
if r.Method == "GET" {
fmt.Fprintln(w, "Ready to process POST requests from Cloud Storage trigger")
return
}
//
// Read request body containing Cloud Storage object metadata
//
gcsInputFile, err1 := readBody(r)
if err1 != nil {
log.Printf("Error reading POST data: %v", err1)
w.WriteHeader(http.StatusBadRequest)
fmt.Fprintf(w, "Problem with POST data: %v \n", err1)
return
}
//
// Working directory (concurrency-safe)
localDir, err := os.MkdirTemp("", "")
if err != nil {
log.Printf("Error creating local temp dir: %v", err)
w.WriteHeader(http.StatusInternalServerError)
fmt.Fprintf(w, "Could not create a temp directory on server. \n")
return
}
defer os.RemoveAll(localDir)
//
// Download input file from Cloud Storage
//
localInputFile, err2 := download(gcsInputFile, localDir)
if err2 != nil {
log.Printf("Error downloading Cloud Storage file [%s] from bucket [%s]: %v",
gcsInputFile.Name, gcsInputFile.Bucket, err2)
w.WriteHeader(http.StatusInternalServerError)
fmt.Fprintf(w, "Error downloading Cloud Storage file [%s] from bucket [%s]",
gcsInputFile.Name, gcsInputFile.Bucket)
return
}
//
// Use LibreOffice to convert local input file to local PDF file.
//
localPDFFilePath, err3 := convertToPDF(localInputFile.Name(), localDir)
if err3 != nil {
log.Printf("Error converting to PDF: %v", err3)
w.WriteHeader(http.StatusInternalServerError)
fmt.Fprintf(w, "Error converting to PDF.")
return
}
//
// Upload the freshly generated PDF to Cloud Storage
//
targetBucket := os.Getenv("PDF_BUCKET")
err4 := upload(localPDFFilePath, targetBucket)
if err4 != nil {
log.Printf("Error uploading PDF file to bucket [%s]: %v", targetBucket, err4)
w.WriteHeader(http.StatusInternalServerError)
fmt.Fprintf(w, "Error downloading Cloud Storage file [%s] from bucket [%s]",
gcsInputFile.Name, gcsInputFile.Bucket)
return
}
//
// Delete the original input file from Cloud Storage.
//
err5 := deleteGCSFile(gcsInputFile.Bucket, gcsInputFile.Name)
if err5 != nil {
log.Printf("Error deleting file [%s] from bucket [%s]: %v", gcsInputFile.Name,
gcsInputFile.Bucket, err5)
// This is not a blocking error.
// The PDF was successfully generated and uploaded.
}
log.Println("Successfully produced PDF")
fmt.Fprintln(w, "Successfully produced PDF")
}
func convertToPDF(localFilePath string, localDir string) (resultFilePath string, err error) {
log.Printf("Converting [%s] to PDF", localFilePath)
cmd := exec.Command("libreoffice", "--headless", "--convert-to", "pdf",
"--outdir", localDir,
localFilePath)
cmd.Stdout, cmd.Stderr = os.Stdout, os.Stderr
log.Println(cmd)
err = cmd.Run()
if err != nil {
return "", err
}
pdfFilePath := regexp.MustCompile(`\.\w+$`).ReplaceAllString(localFilePath, ".pdf")
if !strings.HasSuffix(pdfFilePath, ".pdf") {
pdfFilePath += ".pdf"
}
log.Printf("Converted %s to %s", localFilePath, pdfFilePath)
return pdfFilePath, nil
}
-
Click the Gemini Code Assist: Smart Actions icon and select Explain this.
-
Gemini Code Assist opens a chat pane with the prefilled prompt of Explain this. In the inline text box of the Code Assist chat, replace the prefilled prompt with the following, and click Send:
You are an expert Go developer at Cymbal AI. A new team member is unfamiliar with this server implementation. Explain this "server.go" file in detail, breaking down its key components used in the code.
For the suggested improvements, don't update this file.
The explanation for the code in the server.go file appears in the Gemini Code Assist chat.
-
In the Cloud Shell terminal, run the following command to build the application:
go build -o server
The functions called by this top-level code are in source files:
- server.go
- notification.go
- gcs.go
With the application successfully built, you can create the PDF conversion service.
Task 3. Create a PDF conversion service
The PDF service uses Cloud Run and Cloud Storage to initiate a process each time a file is uploaded to the designated storage.
To achieve this, you decide to use a common pattern of event notifications together with Cloud Pub/Sub. Doing this enables the application to concentrate only on processing information. Transporting and passing information is performed by other services, which allows you to keep the application simple.
Building the invoice module requires the integration of two components:
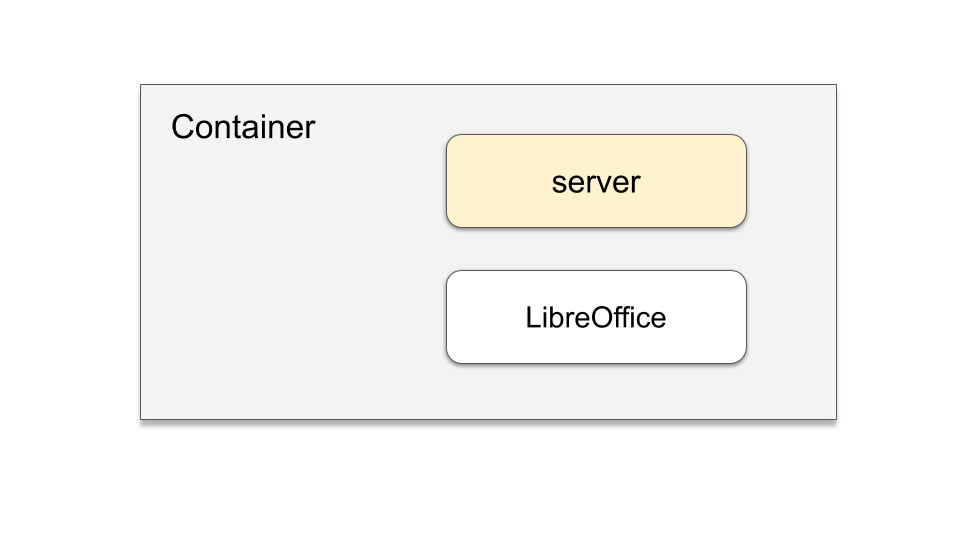
Adding the LibreOffice package means it can be used in your application.
-
In the Open editor, open the existing Dockerfile manifest and update the file as follows:
FROM amd64/debian
RUN apt-get update -y \
&& apt-get install -y libreoffice \
&& apt-get clean
WORKDIR /usr/src/app
COPY server .
CMD [ "./server" ]
-
Save the updated Dockerfile.
-
Click the Gemini Code Assist: Smart Actions icon and select Explain this.
-
Gemini Code Assist opens a chat pane with the prefilled prompt of Explain this. In the inline text box of the Code Assist chat, replace the prefilled prompt with the following, and click Send:
You are a Senior DevOps Engineer at Cymbal AI. A new team member has asked you to explain the Dockerfile. Provide a comprehensive explanation of the contents and structure of this Dockerfile, including key instructions and best practices.
For the suggested improvements, don't update this Dockerfile.
The explanation for the code in the Dockerfile file appears in the Gemini Code Assist chat.
-
Initiate a rebuild of the pdf-converter image using Cloud Build:
gcloud builds submit \
--tag gcr.io/$GOOGLE_CLOUD_PROJECT/pdf-converter
Click Check my progress to verify that you've performed the above task.
Build an image with Cloud Build
-
Deploy the updated PDF converter service.
Note: It's a good idea to give LibreOffice 2GB of RAM to work with, see the line with the --memory option.
-
Run the following commands to build the container and deploy it:
gcloud run deploy pdf-converter \
--image gcr.io/$GOOGLE_CLOUD_PROJECT/pdf-converter \
--platform managed \
--region {{{ project_0.default_region | "REGION" }}} \
--memory=2Gi \
--no-allow-unauthenticated \
--set-env-vars PDF_BUCKET=$GOOGLE_CLOUD_PROJECT-processed \
--max-instances=3
Click Check my progress to verify that you've performed this task.
Deploy the PDF converter service
The Cloud Run service has now been deployed successfully. However, you deployed an application that requires the correct permissions to access it.
Task 4. Create a service account
A service account is a special type of account with access to Google APIs.
This lab uses a service account to access Cloud Run when a Cloud Storage event is processed. Cloud Storage supports a rich set of notifications that can be used to trigger events.
In this task, you update the code to notify the application when a file has been uploaded.
-
Click the Navigation menu > Cloud Storage, and verify that two buckets have been created. You should see:
-
Create a Pub/Sub notification to indicate that a new file has been uploaded to the docs bucket ("uploaded"). The notification is labeled with the topic "new-doc".
gsutil notification create -t new-doc -f json -e OBJECT_FINALIZE gs://$GOOGLE_CLOUD_PROJECT-upload
Expected output:
Created Cloud Pub/Sub topic projects/{{{project_0.project_id | "PROJECT_ID"}}}/topics/new-doc
Created notification config projects/_/buckets/{{{project_0.project_id | "PROJECT_ID"}}}-upload/notificationConfigs/1
-
Create a new service account to trigger the Cloud Run services:
gcloud iam service-accounts create pubsub-cloud-run-invoker --display-name "PubSub Cloud Run Invoker"
Expected output:
Created service account [pubsub-cloud-run-invoker].
-
Give the service account permission to invoke the PDF converter service:
gcloud run services add-iam-policy-binding pdf-converter \
--member=serviceAccount:pubsub-cloud-run-invoker@$GOOGLE_CLOUD_PROJECT.iam.gserviceaccount.com \
--role=roles/run.invoker \
--region {{{ project_0.default_region | "REGION" }}} \
--platform managed
Expected output:
Updated IAM policy for service [pdf-converter].
bindings:
- members:
- serviceAccount:pubsub-cloud-run-invoker@{{{project_0.project_id | "PROJECT_ID"}}}.iam.gserviceaccount.com
role: roles/run.invoker
etag: BwYYfbXS240=
version: 1
-
Find your project number by running this command:
PROJECT_NUMBER=$(gcloud projects list \
--format="value(PROJECT_NUMBER)" \
--filter="$GOOGLE_CLOUD_PROJECT")
-
Enable your project to create Cloud Pub/Sub authentication tokens:
gcloud projects add-iam-policy-binding $GOOGLE_CLOUD_PROJECT \
--member=serviceAccount:{{{ project_0.project_id | "PROJECT_ID" }}}@{{{ project_0.project_id | "PROJECT_ID" }}}.iam.gserviceaccount.com \
--role=roles/iam.serviceAccountTokenCreator
Click Check my progress to verify that you've performed this task.
Create a service account
With the service account created, it can be used to invoke the Cloud Run Service.
Task 5. Test the Cloud Run service
Before progressing further, you need to test the deployed service. Since the service requires authentication, testing it helps ensure that it is actually private.
-
Save the URL of your service in the environment variable $SERVICE_URL:
SERVICE_URL=$(gcloud run services describe pdf-converter \
--platform managed \
--region {{{ project_0.default_region | "REGION" }}} \
--format "value(status.url)")
-
Display the SERVICE URL:
echo $SERVICE_URL
-
Make an anonymous GET request to your new service:
curl -X GET $SERVICE_URL
Expected output:
<html><head>
<meta http-equiv="content-type" content="text/html;charset=utf-8">
<title>403 Forbidden</title>
</head>
<body text=#000000 bgcolor=#ffffff>
<h1>Error: Forbidden</h1>
<h2>Your client does not have permission to get URL <code>/</code> from this server.</h2>
<h2></h2>
Note:
The anonymous GET request results in an error message:
"Your client does not have permission to get URL".
This is good; you don't want the service to be callable by anonymous users.
-
Now try invoking the service as an authorized user:
curl -X GET -H "Authorization: Bearer $(gcloud auth print-identity-token)" $SERVICE_URL
Expected output:
Ready to process POST requests from Cloud Storage trigger
Great work, you have successfully deployed an authenticated Cloud Run service.
Task 6. Configure a Cloud Storage trigger
To initiate a notification when new content is uploaded to Cloud Storage, add a subscription to your existing Pub/Sub Topic.
Note: Cloud Storage notifications automatically push a message to your Topic queue when new content is uploaded. Using notifications allows you to create powerful applications that respond to events without needing to write additional code.
Now whenever a file is uploaded, the Pub/Sub subscription interacts with your service account. The service account then initiates your PDF Converter Cloud Run service.
Task 7. Test the Cloud Storage notification
To test the Cloud Run service, use the example files available.
-
Copy the test files into your upload bucket:
gsutil -m cp -r gs://spls/gsp762/* gs://$GOOGLE_CLOUD_PROJECT-upload
Expected output:
Copying gs://spls/gsp762/cat-and-mouse.jpg [Content-Type=image/jpeg]...
Copying gs://spls/gsp762/file-sample_100kB.doc [Content-Type=application/msword]...
Copying gs://spls/gsp762/file-sample_500kB.docx [Content-Type=application/vnd.openxmlformats-officedocument.wordprocessingml.document]...
Copying gs://spls/gsp762/file_example_XLS_10.xls [Content-Type=application/vnd.ms-excel]...
Copying gs://spls/gsp762/file-sample_1MB.docx [Content-Type=application/vnd.openxmlformats-officedocument.wordprocessingml.document]...
Copying gs://spls/gsp762/file_example_XLSX_50.xlsx [Content-Type=application/vnd.openxmlformats-officedocument.spreadsheetml.sheet]...
Copying gs://spls/gsp762/file_example_XLS_100.xls [Content-Type=application/vnd.ms-excel]...
Copying gs://spls/gsp762/file_example_XLS_50.xls [Content-Type=application/vnd.ms-excel]...
Copying gs://spls/gsp762//Copy of cat-and-mouse.jpg [Content-Type=image/jpeg]...
-
In the Cloud Console, click Cloud Storage > Buckets followed by the bucket name ending in "-upload"
-
Click the Refresh button a few times and see how the files are deleted, one by one, as they are converted to PDFs.
-
Then click Buckets, followed by the bucket name ending in "-processed". It should contain PDF versions of all files.
Note:
It can take a few minutes for files to be processed. Use the Bucket refresh option to check the processing completion state.
-
Feel free to open the PDF files to make sure they were properly converted.
-
Once the upload is done, click Navigation menu > Cloud Run, and click on the pdf-converter service.
-
Select the LOGS tab and add a filter of "Converting" to see the converted files.
-
Navigate to Navigation menu > Cloud Storage and open the bucket name ending in "-upload" to confirm all files uploaded have been processed.
Excellent work, you have successfully built a new service that creates PDFs from files uploaded to Cloud Storage.
Congratulations!
In this lab, you've explored how to convert a Go application into a container, constructed containers utilizing Google Cloud Build, and launched a Cloud Run service.
You've also gained skills in enabling permissions through a service account and leveraging Cloud Storage event processing, all of which are integral to the operation of the PDF converter service that transforms documents into PDFs and stores them in the "processed" bucket.
Google Cloud training and certification
...helps you make the most of Google Cloud technologies. Our classes include technical skills and best practices to help you get up to speed quickly and continue your learning journey. We offer fundamental to advanced level training, with on-demand, live, and virtual options to suit your busy schedule. Certifications help you validate and prove your skill and expertise in Google Cloud technologies.
Manual Last Updated August 18, 2025
Lab Last Tested August 11, 2025
Copyright 2025 Google LLC. All rights reserved. Google and the Google logo are trademarks of Google LLC. All other company and product names may be trademarks of the respective companies with which they are associated.


