

Before you begin
- Labs create a Google Cloud project and resources for a fixed time
- Labs have a time limit and no pause feature. If you end the lab, you'll have to restart from the beginning.
- On the top left of your screen, click Start lab to begin
Create the AI Notebook instance
/ 25
Gather Audio Files and Ground Truth
/ 25
Get the Machine Transcript
/ 25
Compute the WER
/ 25
Automated Speech Recognition (ASR), also known as machine transcription or Speech-to-Text, uses machine learning to turn spoken audio into text. ASR has many applications, from subtitling, to virtual assistants, to IVRs, to dictation, and more. However, machine learning systems are rarely 100% accurate and ASR is no exception. If you plan to rely on ASR for critical systems it's important to measure its accuracy or overall quality to understand how it will perform in your broader system.
In this lab, you use Speech-to-Text to transcribe an audio file and then measure the quality of the transcription.
In this lab, you learn the following:
The following are some key concepts and steps involved in evaluating the quality and accuracy of Automated Speech Recognition (ASR) systems.
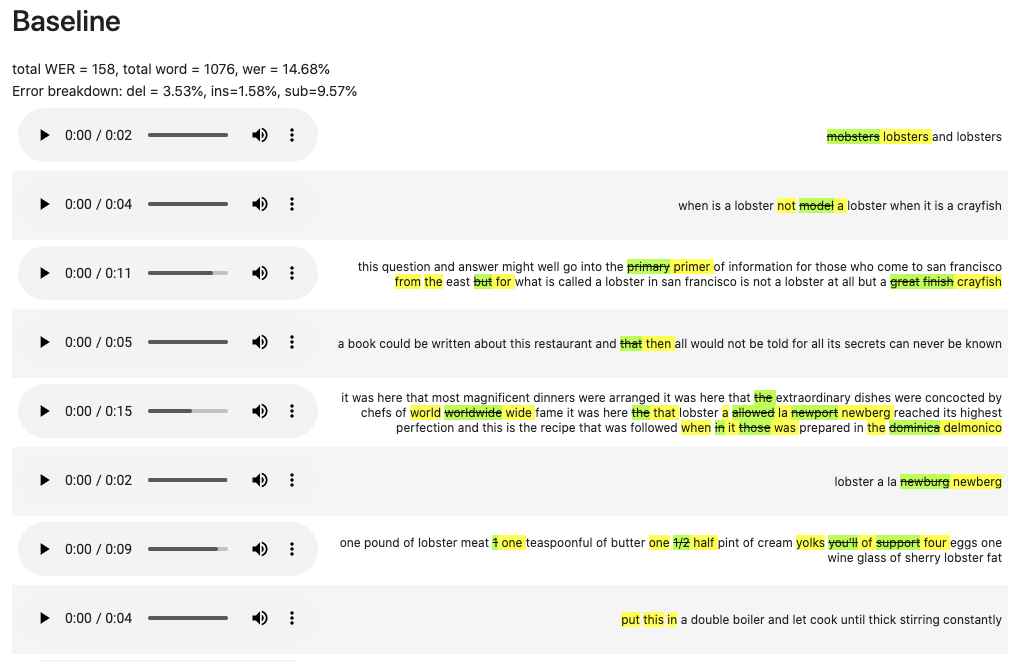
Although speech accuracy can be measured in many ways, the industry standard method is word error rate (WER). WER measures the percentage of incorrect transcriptions in an entire set. A lower WER indicates a more accurate system.
The ground truth is the 100% accurate (typically human) transcription you compare a Speech-to-Text or hypothesis transcript against to measure the accuracy.
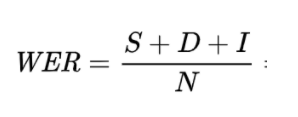
Word error rate is the combination of three types of transcription errors which can occur:
The formula below calculates WER:
You add the total number of each error (S plus I plus D), and then divide that by the total number of words (N) in the ground truth transcript to find the WER. In situations with very low accuracy, it's possible that the WER can be greater than 100%.
Other metrics are useful for tracking things like readability or measuring how many of your most important terms were transcribed correctly. Examples are:
Now that you you're familiar with accuracy metrics, the following provides generic steps to follow when measuring accuracy on your own audio transcript.
You should gather a representative sample of the audio files for which you want to measure quality. This sample should be random and as close to the target environment as possible. For example, to transcribe conversations from a call center to aid in quality assurance, you would randomly select a few actual calls recorded on the same equipment that your production audio would come through, not recorded on your cell phone or computer microphone.
You need at least 30 min of audio to get a statistically significant accuracy metric. Using between 30 min and 3 hours of audio is recommended. This lab provides the audio.
Next you need an accurate transcription of the audio. This usually involves a single or double pass of a human transcription of the target audio. The goal is a 100% accurate transcription to measure against the automated results.
It’s important when doing this to match the transcription conventions of your target ASR system as closely as possible. For example, ensure that punctuation, numbers, and capitalization are consistent. This lab provides the ground truth.
Send the audio to the Google Speech-to-Text API and get your hypothesis transcription. You can do this using one of Google Cloud’s many libraries or command line tools. This lab provides the code to do this.
Now you would count the insertions, substitutions, deletions, and total words using the ground truth and the machine transcription.
This lab uses code, created by Google, to normalize output and calculate the WER.
Read these instructions. Labs are timed and you cannot pause them. The timer, which starts when you click Start Lab, shows how long Google Cloud resources are made available to you.
This hands-on lab lets you do the lab activities in a real cloud environment, not in a simulation or demo environment. It does so by giving you new, temporary credentials you use to sign in and access Google Cloud for the duration of the lab.
To complete this lab, you need:
Click the Start Lab button. If you need to pay for the lab, a dialog opens for you to select your payment method. On the left is the Lab Details pane with the following:
Click Open Google Cloud console (or right-click and select Open Link in Incognito Window if you are running the Chrome browser).
The lab spins up resources, and then opens another tab that shows the Sign in page.
Tip: Arrange the tabs in separate windows, side-by-side.
If necessary, copy the Username below and paste it into the Sign in dialog.
You can also find the Username in the Lab Details pane.
Click Next.
Copy the Password below and paste it into the Welcome dialog.
You can also find the Password in the Lab Details pane.
Click Next.
Click through the subsequent pages:
After a few moments, the Google Cloud console opens in this tab.

This lab has curated and created a focused dataset based on public domain books and audio from the LibriSpeech project. This lab also provides all the code you need to measure the accuracy of Cloud Speech-to-Text API’s accuracy on this dataset.
In this task, you learn how to set up and use this code.
In the Google Cloud console, from the Navigation menu (
Click Enable All Recommended APIs.
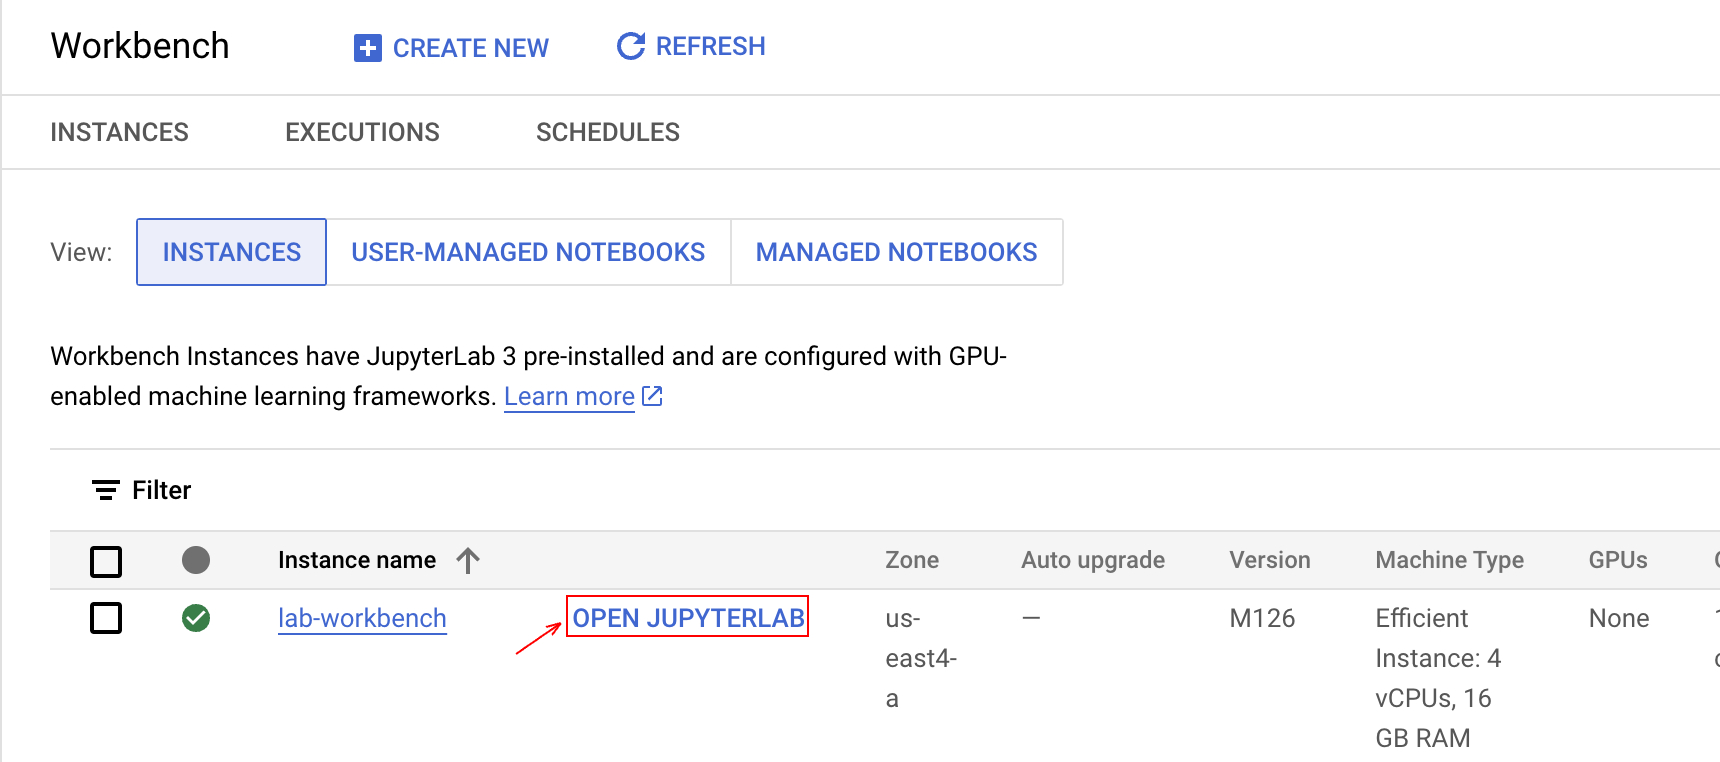
On the left-hand side, click Workbench.
At the top of the Workbench page, ensure you are in the Instances view.
Click 
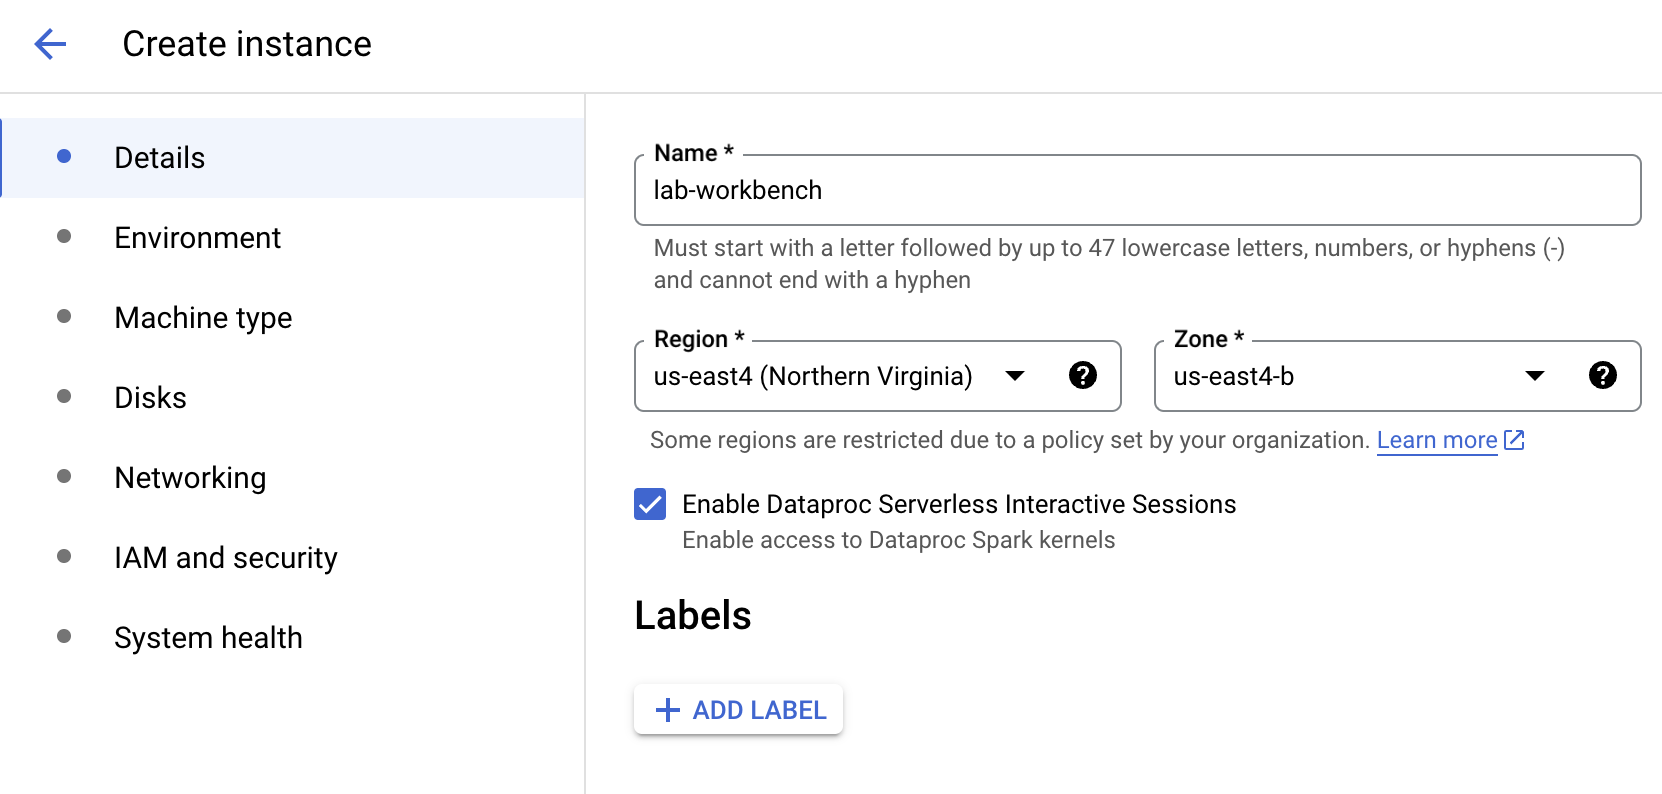
Configure the Instance:
Your terminal window will open in a new tab. You can now run commands in the terminal to interact with your Workbench instance.
https.It should be something like:
You can now continue to the notebook.
measuring-accuracy.ipynb notebook to follow the instructions inside to compute the WER on the provided dataset.Click Check my progress to verify the objective.
In the following sections, you run the notebook cells to measure the quality and accuracy of Automated Speech Recognition (ASR) systems.
Click Check my progress to verify the objective.
Click Check my progress to verify the objective.
Click Check my progress to verify the objective.
You successfully measured the accuracy of using the Cloud Speech-to-Text API on a real dataset. You learned how to talk about and compare accuracy metrics and how to approach measuring accuracy. You also successfully set up Python tools for performing automated speech recognition and measuring accuracy.
Take the next lab, Improving Speech-to-Text Accuracy to learn how to improve on the results of this lab.
Manual Last Updated September 09, 2025
Manual Last Tested September 09, 2025
Copyright 2025 Google LLC. All rights reserved. Google and the Google logo are trademarks of Google LLC. All other company and product names may be trademarks of the respective companies with which they are associated.


This content is not currently available
We will notify you via email when it becomes available

Great!
We will contact you via email if it becomes available

One lab at a time
Confirm to end all existing labs and start this one