GSP1336

Overview
In this lab, you'll explore the powerful multimodal capabilities of Google AI Studio, focusing on generative AI and spatial understanding. Through practical exercises, you will gain hands-on experience with cutting-edge AI models and learn how to integrate them into your applications. As a Museum Curator and Exhibit Designer, you'll use these tools to brainstorm and prototype elements for a new museum exhibit.
What you'll learn
In this lab, you will learn how to:
- Prompt models to generate images and video clips.
- Prompt a model to analyze a long-format video.
- Build a spatial understanding app from a template.
- Prompt the spatial understanding app prototype to identify items in an image.
Setup and requirements
Before you click the Start Lab button
Read these instructions. Labs are timed and you cannot pause them. The timer, which starts when you click Start Lab, shows how long Google Cloud resources are made available to you.
This hands-on lab lets you do the lab activities in a real cloud environment, not in a simulation or demo environment. It does so by giving you new, temporary credentials you use to sign in and access Google Cloud for the duration of the lab.
To complete this lab, you need:
- Access to a standard internet browser (Chrome browser recommended).
Note: Use an Incognito (recommended) or private browser window to run this lab. This prevents conflicts between your personal account and the student account, which may cause extra charges incurred to your personal account.
- Time to complete the lab—remember, once you start, you cannot pause a lab.
Note: Use only the student account for this lab. If you use a different Google Cloud account, you may incur charges to that account.
Open Google AI Studio
-
Click Start Lab. The lab panel will display the temporary credentials for this lab.
-
Note: If this is a paid lab, you will be prompted to select a payment method.
-
Open Google AI Studio in an Incognito window. The Google sign-in page will appear.
-
Tip: For easier access, arrange the lab and AI Studio tabs in separate, side-by-side windows.
-
Copy the Username below and paste it into the Email field, then click Next.
{{{user_0.username | "Username"}}}
-
Copy the Password below and paste it into the Enter your password field, then click Next.
{{{user_0.password | "Password"}}}
-
Accept any on-screen terms and conditions to proceed.
You are now logged into Google AI Studio using your temporary student account.
Task 1. Generate images and video clips
In this task, you'll act as the curator generating concept art and a short promotional video for a new dinosaur exhibit. This involves using models designed specifically for media generation.
Generate concept art with Gemini image generation
-
In the left navigation menu, click Generate Media.
-
From the options, select Gemini image generation.
-
In the prompt input field, enter a request for your concept art:
A photorealistic image of a futuristic natural history museum lobby, with a giant T-Rex skeleton made of glowing blue crystals.
-
Click Run and review the generated image. This image could serve as the cornerstone for your new exhibit's design.
-
Save your prompts and responses by clicking the save prompt icon  to edit the title and description of the prompt.
-
A new pop-up window will open. Choose your student account (e.g., student-XX-YYYY@qwiklabs.net) and grant any necessary permissions to continue.
- For Prompt name, type Futuristic Museum Lobby.
-
Click Save.
Generate a promotional video clip with Veo
-
Navigate back to the main Generate Media page.
-
From the options, select Veo to generate a video.
-
In the right-hand panel, find the Video duration setting and adjust it to 8s. Set the Aspect Ratio to 9:16.
-
In the prompt input field, describe a short, dynamic clip for social media:
A cinematic, slow-motion video of a detailed, animatronic Triceratops turning its head and blinking its eye.
- Click Run.
Note: If dialog titled Allow Drive access will appear, click the Allow access button. A new pop-up window will open. Choose your student account (e.g., student-XX-YYYY@qwiklabs.net) and grant any necessary permissions to continue.
- The model will begin generating your video. Review the clip once it appears.
Click Check my progress to verify the objective.
Generate images and video clips
Task 2. Prompt a model to analyze a long-format video
In this task, you'll research existing successful exhibits by asking Gemini to analyze a video tour of the American Museum of Natural History.
-
In the left navigation menu, click Chat to return to the main chat interface.
-
In the right-hand panel, click the model selector. From the dropdown menu, select the model, as this is designed to handle large inputs like videos.
-
Click the attachment icon (a plus sign inside a circle) inside of the prompt bar and select Sample Media.
-
From the list of videos, select the American Museum of Natural History Tour - 10 Min and click Add to prompt.
-
Wait for the video to process. You will see the video appear in the prompt area with its token count displayed.
Note: You'll notice a large token count appears after adding the video. A language model "sees" a video as a sequence of thousands of individual frames. Each frame is converted into numerical data called tokens for the model to analyze. The processing time you see is the model 'reading' all of these tokens before it can answer your question about the video.
- In the text field above the video, enter the following prompt:
Please provide a summary of the main exhibits shown in this video tour. List each distinct hall or section and give a one-sentence description of each.
- Click Run and review the model's text summary of the video's content.
Click Check my progress to verify the objective.
Prompt a model to analyze a long-format video
Task 3. Build a spatial understanding app from a template
In this task, you'll rapidly prototype an interactive "Ask the Exhibit" feature for museum visitors by building an app from a template without writing any code.
-
In the left navigation menu, click Build.
-
Scroll through the gallery of app templates to find the Spatial Understanding card.
-
Click the Spatial Understanding template to instantly generate the app prototype.
- The interface will load with the application's code in the center and a live Preview of the app on the right.
Click Check my progress to verify the objective.
Build a spatial understanding app from a template
Task 4. Prompt the spatial understanding app prototype
In this task, you'll test the prototype you just built. You'll simulate a visitor interaction by asking the app to identify objects within a sample image from a harvest festival exhibit, and modify the code to change the bounding box color.
Explore the app's features
-
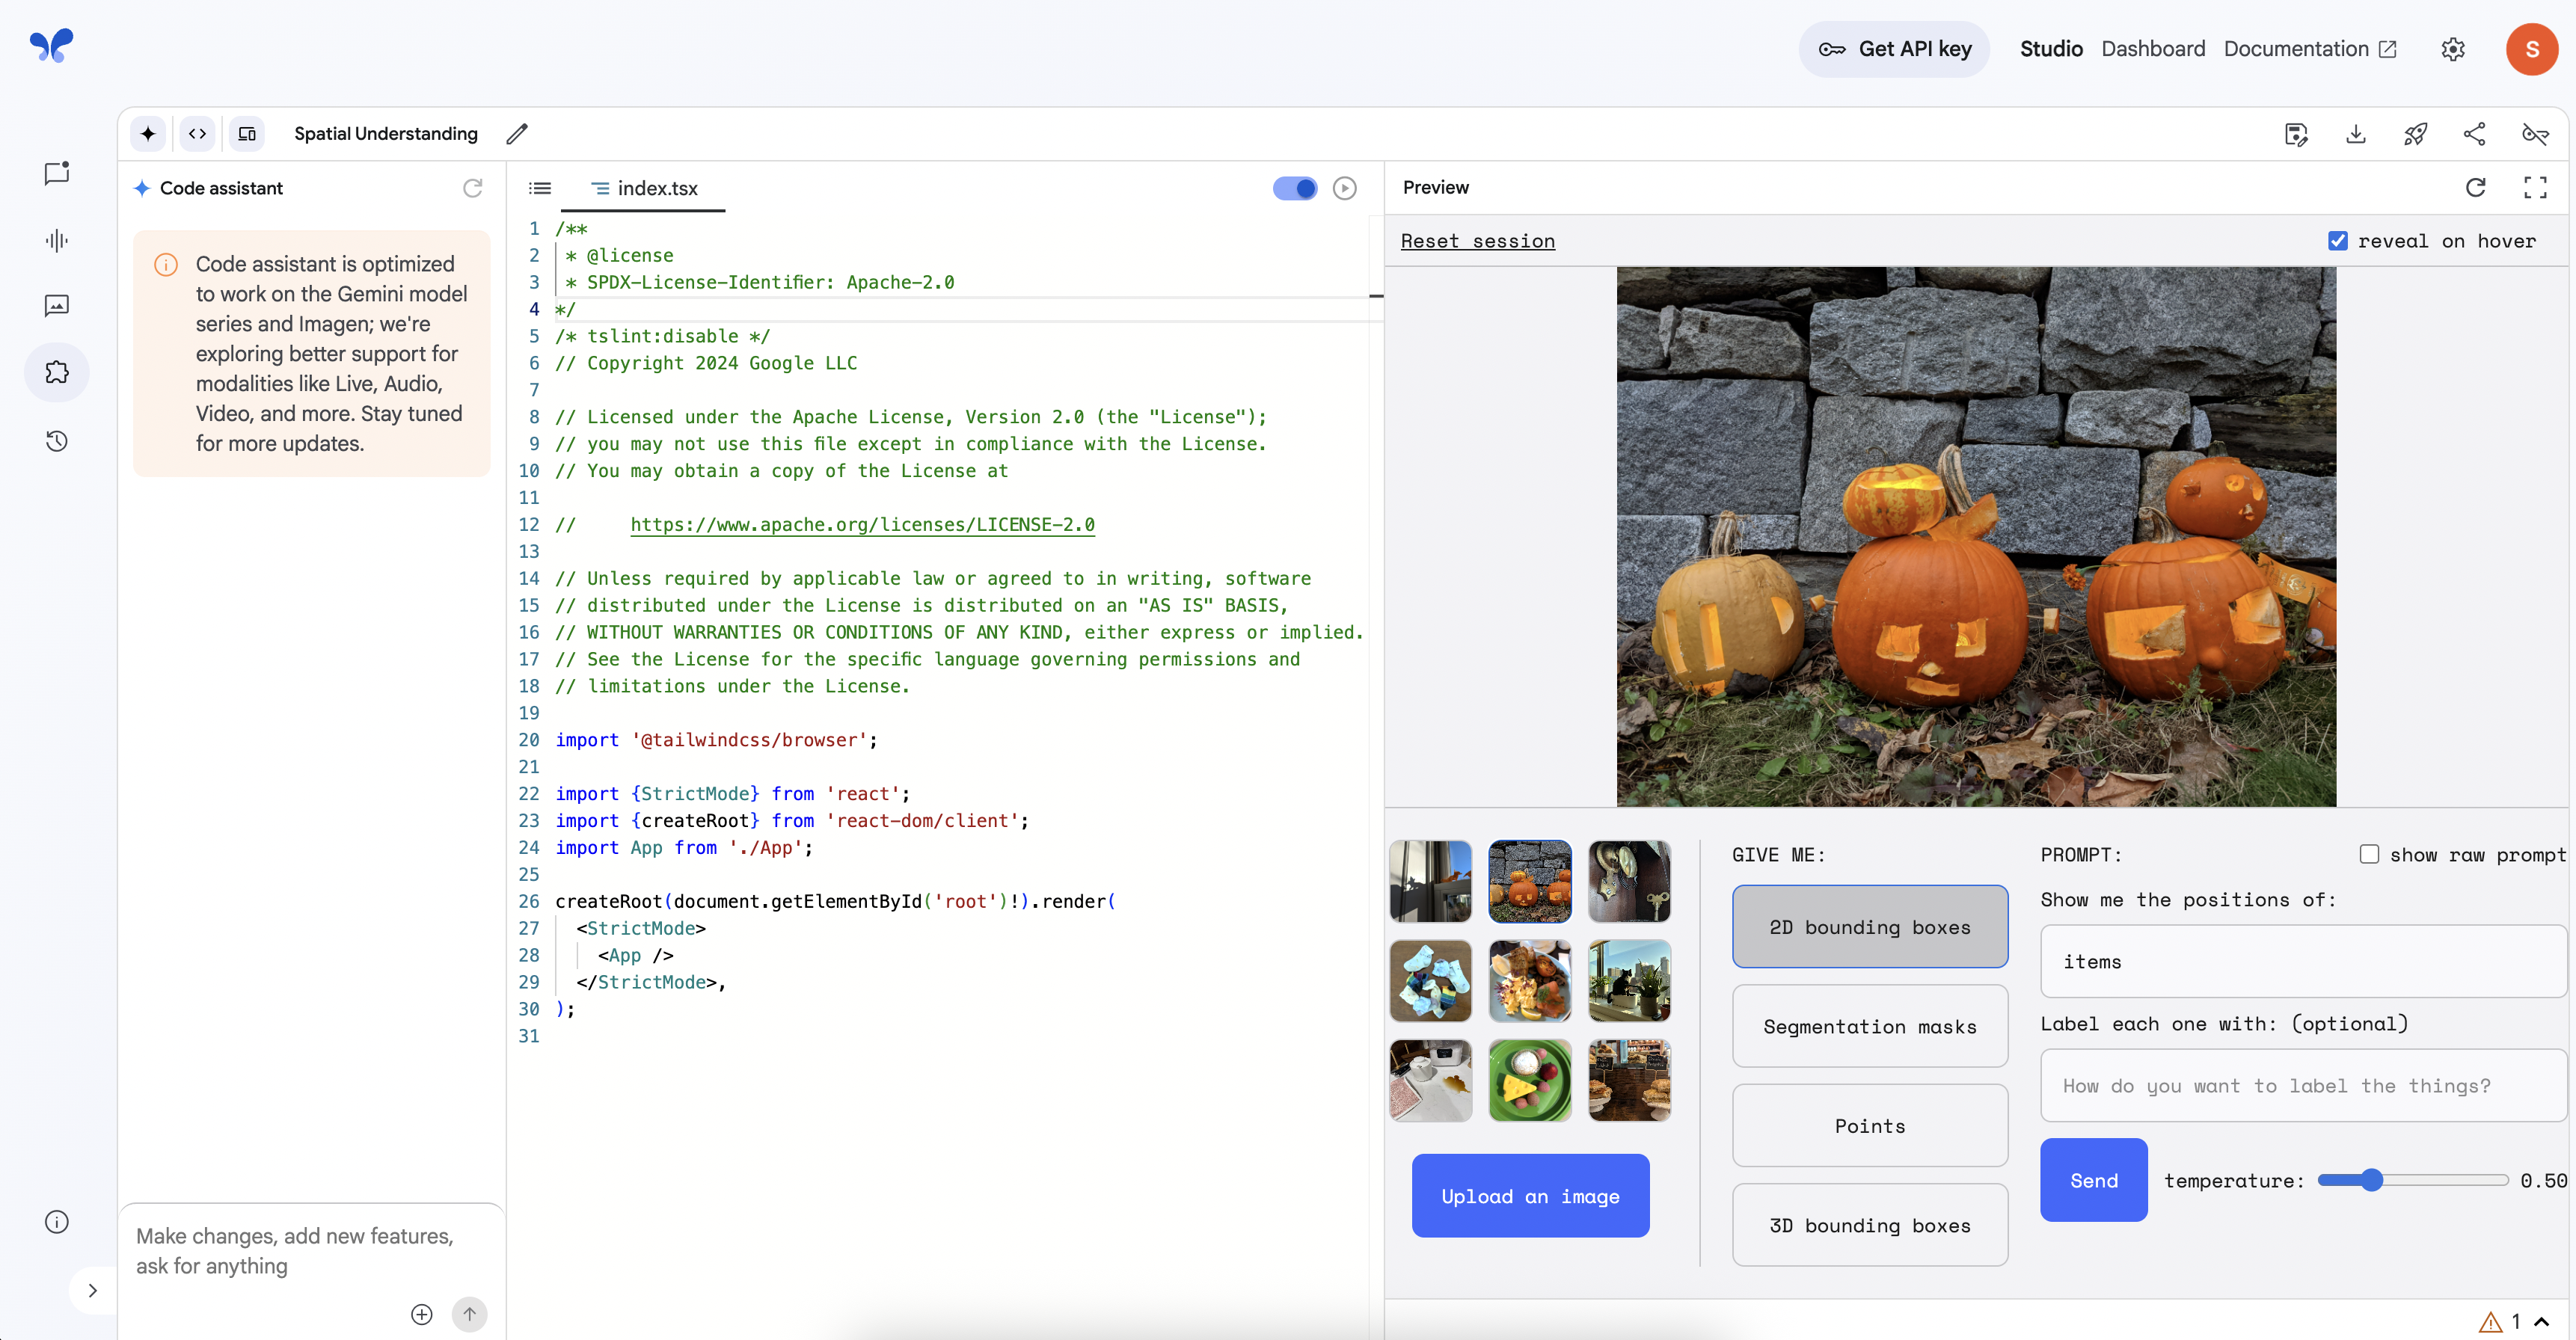
In the app's Preview pane on the right, locate the sample images at the bottom. Click on the image that shows several pumpkins on display.
-
Above the prompt box, ensure the 2D bounding boxes button is selected. In the PROMPT input box, type pumpkin and click Send. Observe the standard bounding boxes drawn around the pumpkins.
Note: A bounding box is a rectangle that highlights the precise location of an object in an image. It's the fundamental way a computer vision model demonstrates its spatial understanding—by showing you not just what it sees, but where it sees it.
-
Now, select the Segmentation masks button and click Send again. Notice how the output changes to color in the entire area of each detected pumpkin.
-
Finally, select the Points button and click Send. Observe how the model places key points on the detected objects.
Modify the app with the Code Assistant
-
Before proceeding, ensure the 2D bounding boxes button is selected in the Preview pane again.
-
Now, direct your attention to the Code assistant input field at the bottom left of the screen that says "Make changes, add new features...". Type the following command:
Make the bounding boxes red.
-
Press Enter or click the send button for the assistant. Observe as the assistant modifies the application code in the central editor window.
-
Once the code has been updated, return your focus to the Preview pane on the right. With the pumpkin image and 2D bounding boxes still selected, click the Send button for the pumpkin prompt one last time.
-
Observe the result. The bounding boxes drawn around the pumpkins should now be red, demonstrating that you have successfully modified a live application with a simple text command.
-
Optional Challenge: You've seen how easy it is to modify the app with text. Before you finish, try giving the Code assistant a few more commands. Can you figure out how to:
- Change the bounding box color to
green?
- Make the bounding box line
dotted instead of solid?
- Change the bounding box to a thick, dashed line?
- Change the label text color to white?
-
Save your app by clicking the save icon to edit the title and description of the prompt.
- For Prompt name, type Spatial Understanding.
-
Click Save.
Click Check my progress to verify the objective.
Prompt the spatial understanding app prototype
Congratulations!
Congratulations! You've successfully used Google AI Studio's multimodal features to brainstorm and prototype a new museum exhibit. You generated concept art and video clips, analyzed an existing video tour, and even built an interactive prototype with a spatial understanding app. You now have hands-on experience using AI that can see, understand, and generate a variety of rich media.
Google Cloud training and certification
...helps you make the most of Google Cloud technologies. Our classes include technical skills and best practices to help you get up to speed quickly and continue your learning journey. We offer fundamental to advanced level training, with on-demand, live, and virtual options to suit your busy schedule. Certifications help you validate and prove your skill and expertise in Google Cloud technologies.
Manual Last Updated June 23, 2025
Lab Last Tested June 23, 2025
Copyright 2025 Google LLC. All rights reserved. Google and the Google logo are trademarks of Google LLC. All other company and product names may be trademarks of the respective companies with which they are associated.


