Checkpoints
Create the firewall rule
/ 100
Improving Network Performance I
GSP045

Overview
In this hands-on lab you get to read through some real-world scenarios, recreate the environments, and work on improving the performance of some troubled networks.
What will be fun to try is comparing the different instances to each other, just like the trouble-shooting use case, so you can prove the results and become familiar with the steps used to improve your own systems' performance.
This lab was adapted from blog posts by Colt McAnlis: Core Count and the Egress problem and Internal IP vs External IP. Colt blogs about Google Cloud network performance on Medium.
Objectives
- How to test network connectivity and performance using open source tools
- How to inspect network traffic using open source tools
- How the size of your machine can affect the performance of your network
Prerequisites
- Basic knowledge of Google Cloud services (best obtained by having previously taken the labs in the Google Cloud Essentials)
- Basic Google Cloud networking and TCP/IP knowledge (best obtained by having taken the earlier labs in the Networking in the Google Cloud Quest)
- Basic Unix/Linux command line knowledge
Setup and requirements
Before you click the Start Lab button
Read these instructions. Labs are timed and you cannot pause them. The timer, which starts when you click Start Lab, shows how long Google Cloud resources will be made available to you.
This hands-on lab lets you do the lab activities yourself in a real cloud environment, not in a simulation or demo environment. It does so by giving you new, temporary credentials that you use to sign in and access Google Cloud for the duration of the lab.
To complete this lab, you need:
- Access to a standard internet browser (Chrome browser recommended).
- Time to complete the lab---remember, once you start, you cannot pause a lab.
How to start your lab and sign in to the Google Cloud console
-
Click the Start Lab button. If you need to pay for the lab, a pop-up opens for you to select your payment method. On the left is the Lab Details panel with the following:
- The Open Google Cloud console button
- Time remaining
- The temporary credentials that you must use for this lab
- Other information, if needed, to step through this lab
-
Click Open Google Cloud console (or right-click and select Open Link in Incognito Window if you are running the Chrome browser).
The lab spins up resources, and then opens another tab that shows the Sign in page.
Tip: Arrange the tabs in separate windows, side-by-side.
Note: If you see the Choose an account dialog, click Use Another Account. -
If necessary, copy the Username below and paste it into the Sign in dialog.
{{{user_0.username | "Username"}}} You can also find the Username in the Lab Details panel.
-
Click Next.
-
Copy the Password below and paste it into the Welcome dialog.
{{{user_0.password | "Password"}}} You can also find the Password in the Lab Details panel.
-
Click Next.
Important: You must use the credentials the lab provides you. Do not use your Google Cloud account credentials. Note: Using your own Google Cloud account for this lab may incur extra charges. -
Click through the subsequent pages:
- Accept the terms and conditions.
- Do not add recovery options or two-factor authentication (because this is a temporary account).
- Do not sign up for free trials.
After a few moments, the Google Cloud console opens in this tab.

The goal of this lab is to show you relationships between the core size and throughput, so the lab comes with 6 instances already built in. They were created when you started the lab.
- In the Cloud Console, navigate to Navigation menu > Compute Engine > VM Instances to see your instances:

Connection test
Run a quick connection test to make sure things are working well.
-
SSH into
instance-1by clicking the SSH button next to its name in the console. -
In your new shell window ping another one of your instances and run the following command, replacing
<external ip address of instance-2>with theinstance-2external IP address:
Example output:
- Ping another. Replace
<external ip address of instance-3>with theinstance-3external IP address andpingit:
Example output:
Everything looks good, continue on!
Review firewall rules
Firewall rules were also created for this lab.
- To see what they are, navigate to Navigation menu > Networking > VPC networks > Firewall and click on the
iperftestingfirewall.
The firewall rule iperftesting uses following configuration:
| Field | Value | Comments |
|---|---|---|
| Name | iperftesting | New rule name |
| Targets | All instances in the network | |
| Source IP ranges | 0.0.0.0/0 | We will open the firewall for any IP address from the Internet. |
| Protocols and ports | tcp:5001; udp:5001 | |
| Direction of traffic | Ingress | |
| Action on match | Allow |
Now you're ready to start using the lab.
Use case 1: Networking and Compute Engine core count
In this first scenario you'll see how the size of the machines being used affects throughput that you can measure.
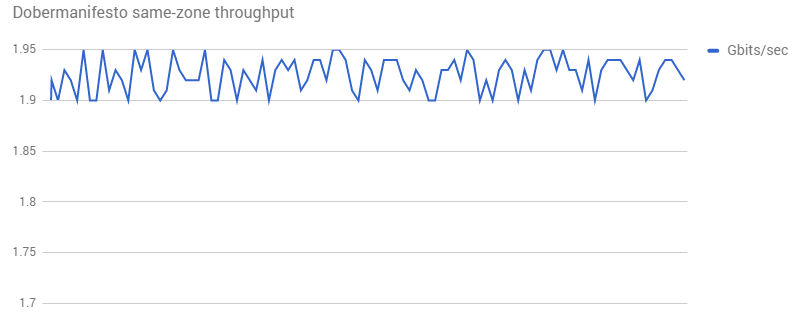
Dobermanifesto is a video microblogging network exclusively for pets. Animal based videos can be uploaded, worldwide, and sent anywhere to be viewed & experienced.
While transferring data to/from their Compute Engine backends, their observed bandwidth was not as high as they were hoping for:
Task 1. Reproducing behavior
To try and reproduce this behavior, two instances in the same zone were created, and iperf was run between them 100x.
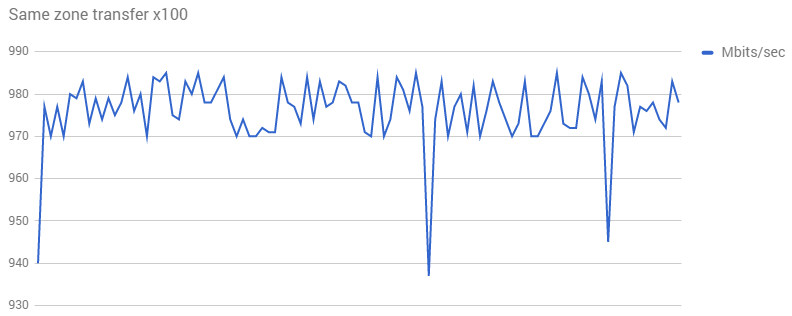
This performance is even worse! Obviously something was wrong with the test. We need more information and a deeper set of reproduction steps from the company.
Now you will set up the scenario.
Dobermanifesto's environment
-
Return to the VM instances list in the Compute Engine console.
-
SSH into
instance-1(1vCPU 3.75GB) and run this command, setting up aniperf"receiver":
- Then SSH into
instance-2(1vCPU 3.75GB) and generateiperftraffic pointing atinstance-1:
Example output:
- Return to
instance-1and enter CTRL + C to end the receiver.
Test environment
-
Go back to the Compute Engine console and open another SSH window into
instance-6(1vCPU e2-micro .6GB). -
Run the following command, setting it up as a "receiver":
Example output:
- In the
instance-2SSH window, test the connection toinstance-6:
Example output:
- Return to
instance-6and enter CTRL + C to end the receiver.
What happened? Bandwidth appears to have gone up. It may have in your case as well. It may have been less.
In the next section you will see how bandwidth is constrained by total core count, and that with core counts in this small range (core count of 1), the bandwidth will never exceed 2 Gbits/sec or so. As a result, the network speed is slow and bandwidth constrained, and similar to what Dobermanifesto was experiencing. When you test with 4-cpu machines in a minute, the results will be greater.
The number of cores correlates to Gb/s
Why weren't the results much different? The documentation for Compute Engine states:
Outbound or egress traffic from a virtual machine is subject to maximum network egress throughput caps. These caps are dependent on the number of vCPUs that a virtual machine instance has. Each core is subject to a 2 Gbits/second (Gbps) cap for peak performance. Each additional core increases the network cap, up to a theoretical maximum of 16 Gbps for each virtual machine
This means that the more virtual CPUs in your network, the more networking throughput you will get.
In order to figure out what this looks like in practice, different core size groups were set up in the same zone, and iperf was run between them 1000 times.
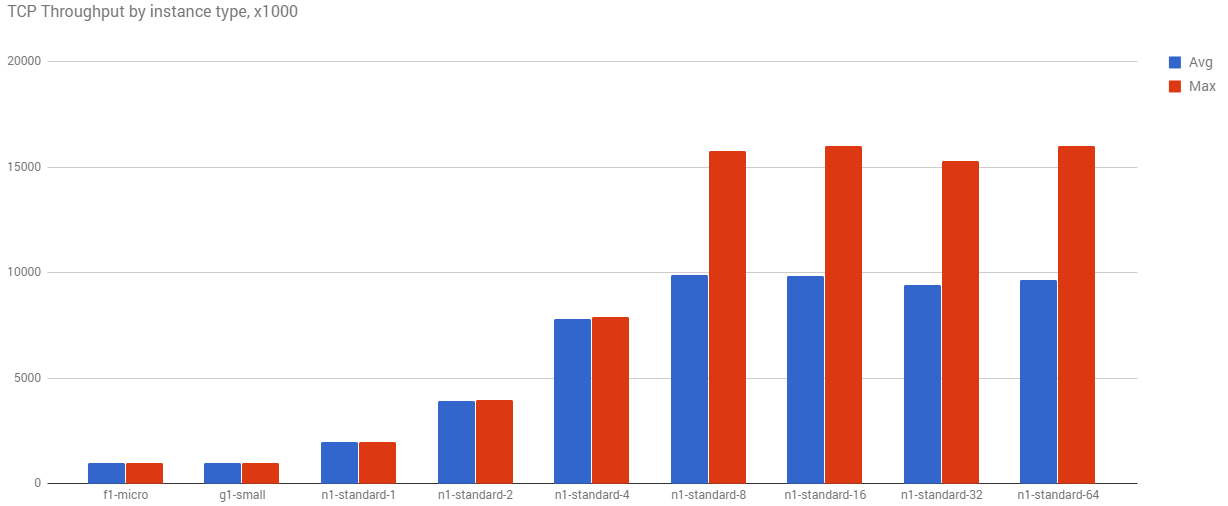
As the core count goes up, so does the avg and max throughput. Even with this simple test, you can see that hard 16Gbps limit on the higher machines.
Task 2. How to improve results
The network that Dobermanifesto has uses 1vCPU machines. Increasing the size of the core will probably help Dobermanifesto achieve better results. Time to test this theory.
- SSH into
instance-3(4vCPU 15GB memory) and run this command:
Example output:
- SSH into
instance-4(4vCPU 15GB memory):
Example output:
- Now try it again with 4 threads:
- And with 8 threads:
- Return to
instance-3and enter CTRL + C to end the receiver.
In these experiments, both the server and client were 4vCPUs, and the speed was greatly increased. The transfer rate was increased by 6.64 GBytes, and the Bandwidth by 5.71 Gbits/sec. With multiple threads, the performance was able to reach the cap for that core count.
- Continue testing with
instance-5, which is a higher performance 4vCPU machine, instance type "highcpu-4".
This instance type has faster CPUs, but less memory. What differences do you see, if any? With multiple threads?
Now the Dobermanifesto team needs to decide what route to take. After profiling their CPU usage and taking a look at the pricing info, they decided to go with a e2-standard-4 machine, which gave them almost 4x the increase in average throughput, but cheaper than the e2-standard-8 machines.
One of the nice things about moving to the larger machine is that it actually runs less frequently. It turns out that their machines were spending a lot of time staying awake, just to transfer data. With the new machine size, their instances had more downtime, allowing the load balancer to reduce the total number of instances on a daily basis. So on one hand, they ended up paying for a higher-grade machine, but on the other hand, they will use less core-hours on a monthly basis.
Once your performance directly impacts the bottom line, there's a lot of nuanced tradeoffs to consider.
Use case 2: Google Cloud networking with internal IPs
In this next example, you'll use iperf to test throughput speed. You'll set up one machine as the server, and then point other machines to it and compare the results.
Gecko Protocol, a B2B company offering a custom, light-weight networking protocol built for gaming and other real-time graphics systems, were seeing lower-than-expected throughput for their backend machines which were responsible for transferring and transcoding large video & graphics files.
Here's the results of their baseline iperf test:
When duplicating the test, the network setup was identical, but the test results were quite different:
1.95GB / sec was much higher than what Gecko Protocol was seeing in their graphs. So what's going on?
Now recreate this scenario.
- In the Console, SSH into
instance-1and set up the iperf receiver:
Example output:
- SSH into
instance-2and check the connection of the external IP address:
Example output:
After further discussion with Gecko Protocol, it was learned that they were using external IPs to connect their machines, and the test used internal IPs. When the machines are in a network, connecting them with internal IPs will result in faster throughput.
- Now check the connection with the internal address:
Example output:
Look at the two different Transfer and Bandwidth rates. In this example, changing to the internal IP address resulted in a .9 GBytes improvement in transfer rate, and .78 Gbits/sec improvement in bandwidth. You just proved that the internal connection is faster.
Building on what you learned from solving the Dobermanifesto problem, can the network speed be improved even more by using a larger machine? instance-2 is only 1vCPU. How fast will the connection be if the machine is a little larger? Or a lot larger? Continue to test using the internal IP address (but feel free to test the external one, too, if you have time).
4 x vCPU machine
- SSH into
instance-3and test the connection with the internal IP address:
Example output (your results may differ):
4 highCPU machine
- SSH into
instance-5and test the connection with the internal IP address:
Example output:
This really improves the throughput rate.
Looks like Gecko Protocol will also need to think about what size core will be best. This small debugging session resulted in their video and graphics data transfer improving by ~14x. Which is immense, considering their offering is built on performance backend services for high-performance compute scenarios.
Task 3. Testing in your own environment
This lab doesn't cover how to test your own system, but here's additional information to take back with you. For more information on testing your own network, please read Diagnosing Network Speed with Iperf.
If you have time and want to set up a VM to test, feel free. When you create your VMs, make sure to use the "iperftest' firewall rule & tag. Test both your internal and external IP address.
Settings for testing your own network speed
-
In the Console, go to Navigation menu > Networking > VPC networks > Firewall.
-
Click on Create firewall rule. Use the following configuration to create a firewall rule:
| Field | Value | Comments |
|---|---|---|
| Name | iperf-testing | New rule name |
| Targets | All instances in the network | |
| Source IP ranges | 0.0.0.0/0 | We will open the firewall for any IP address from the Internet. |
| Direction of traffic | ingress | |
| Action on match | Allow | |
| Protocols and ports | tcp:5001; udp:5001 |
- Click Create.
Click Check my progress to verify the objective.
The tendency is to get the workload as close to 100% as possible, which leaves little space for the disk to defrag, etc.
90-93% if usage is healthy, but 98% usage will see performance go down since you'll end up with lots of contention.
When you're testing, if the IO performance decays, look at throttle counters. If they're not being throttled, look at cpu usage. If it's high, there's the problem.
Task 4. If you have more time
In the lab interface, under Student Resources on the left-hand side, you'll see links to videos related to this lab. Very worth watching!
Congratulations!
Congratulations! In this lab, you learned how to test network connectivity and performance using open source tools, and how the size of your machine can affect the performance of your network.
Next steps / learn more
- Work through the Google Cloud post Using Google's cloud networking products: a guide to all the guides.
- Read the Compute Engine Networking Documentation.
- Learn about Subnetworks.
- Post questions and find answers on Stackoverflow under the google-compute-engine or google-cloud-platform tags.
Google Cloud training and certification
...helps you make the most of Google Cloud technologies. Our classes include technical skills and best practices to help you get up to speed quickly and continue your learning journey. We offer fundamental to advanced level training, with on-demand, live, and virtual options to suit your busy schedule. Certifications help you validate and prove your skill and expertise in Google Cloud technologies.
Manual Last Updated October 04, 2023
Lab Last Tested October 04, 2023
Copyright 2024 Google LLC All rights reserved. Google and the Google logo are trademarks of Google LLC. All other company and product names may be trademarks of the respective companies with which they are associated.

