Checkpoints
Configure HTTP and health check firewall rules
/ 40
Configure instance templates and create instance groups
/ 30
Configure the Internal Load Balancer
/ 30
Create an Internal Load Balancer
GSP216

Overview
Google Cloud offers Internal Load Balancing for your TCP/UDP-based traffic. Internal Load Balancing enables you to run and scale your services behind a private load balancing IP address that is accessible only to your internal virtual machine instances.
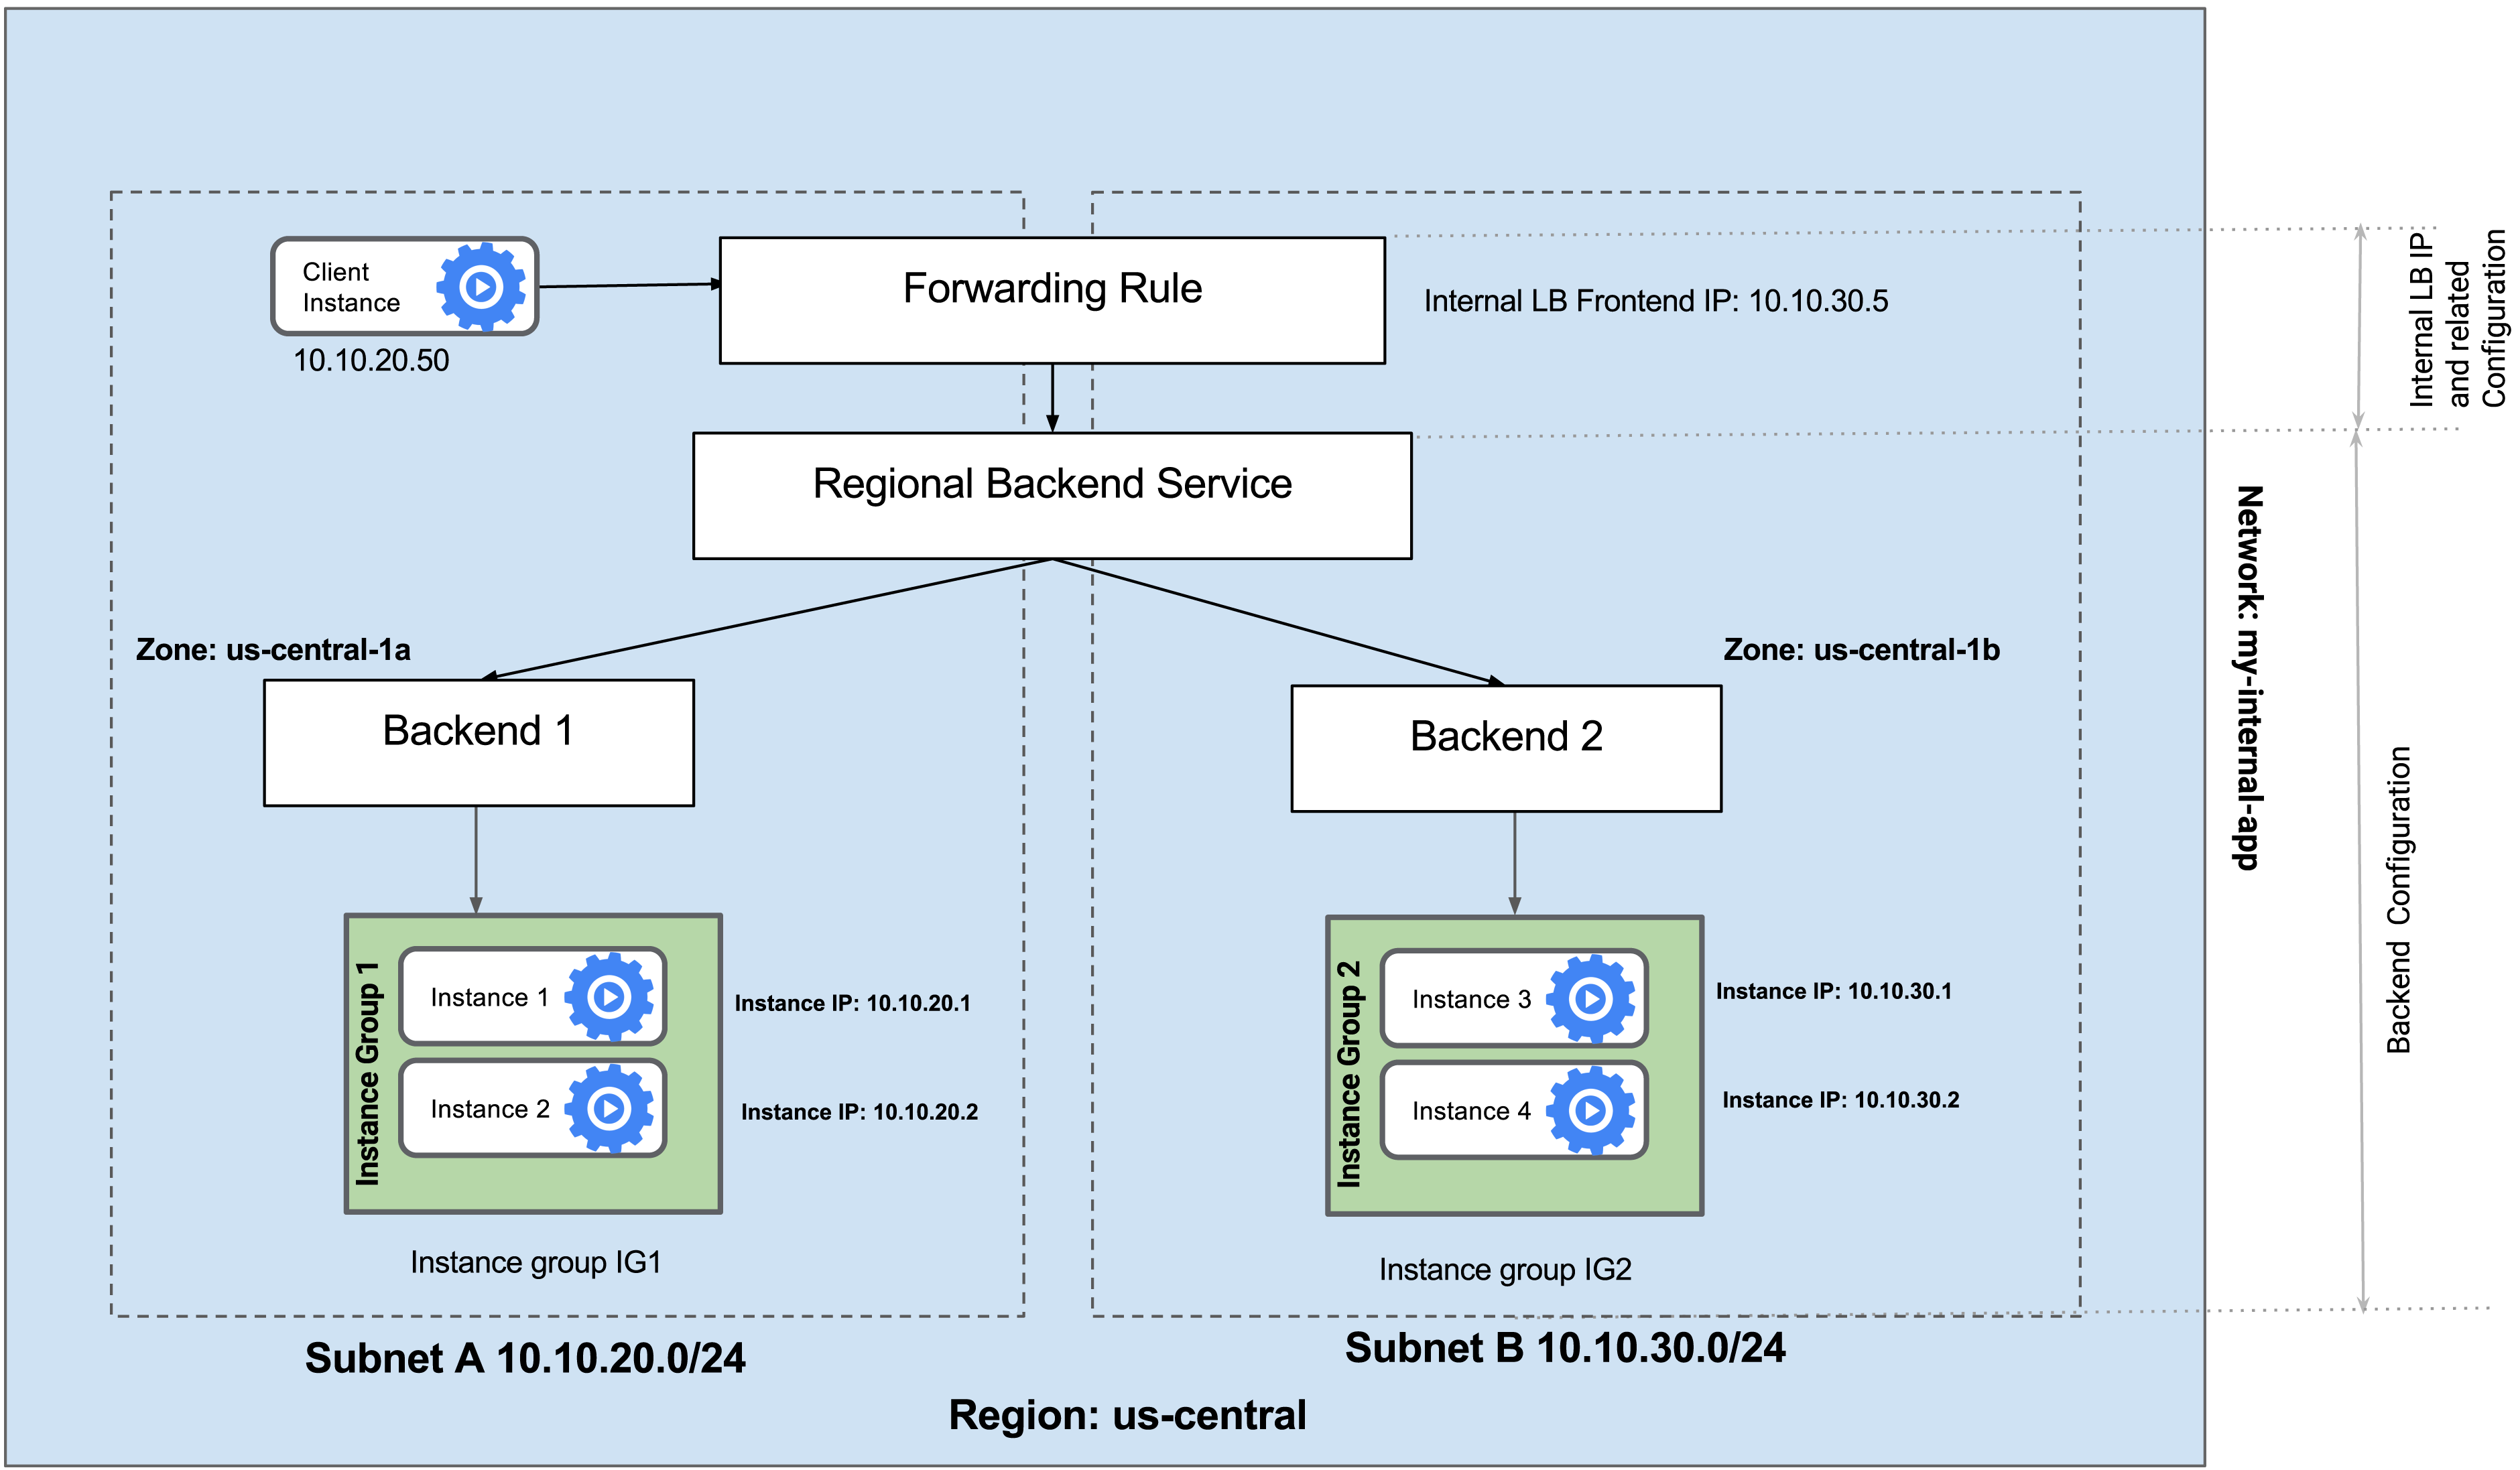
In this lab you create two managed instance groups in the same region. Then, you configure and test an Internal Load Balancer with the instances groups as the backends, as shown in this network diagram:
Objectives
In this lab you learn how to perform the following tasks:
- Create HTTP and health check firewall rules
- Configure two instance templates
- Create two managed instance groups
- Configure and test an internal load balancer
Setup and requirements
Before you click the Start Lab button
Read these instructions. Labs are timed and you cannot pause them. The timer, which starts when you click Start Lab, shows how long Google Cloud resources will be made available to you.
This hands-on lab lets you do the lab activities yourself in a real cloud environment, not in a simulation or demo environment. It does so by giving you new, temporary credentials that you use to sign in and access Google Cloud for the duration of the lab.
To complete this lab, you need:
- Access to a standard internet browser (Chrome browser recommended).
- Time to complete the lab---remember, once you start, you cannot pause a lab.
How to start your lab and sign in to the Google Cloud console
-
Click the Start Lab button. If you need to pay for the lab, a pop-up opens for you to select your payment method. On the left is the Lab Details panel with the following:
- The Open Google Cloud console button
- Time remaining
- The temporary credentials that you must use for this lab
- Other information, if needed, to step through this lab
-
Click Open Google Cloud console (or right-click and select Open Link in Incognito Window if you are running the Chrome browser).
The lab spins up resources, and then opens another tab that shows the Sign in page.
Tip: Arrange the tabs in separate windows, side-by-side.
Note: If you see the Choose an account dialog, click Use Another Account. -
If necessary, copy the Username below and paste it into the Sign in dialog.
{{{user_0.username | "Username"}}} You can also find the Username in the Lab Details panel.
-
Click Next.
-
Copy the Password below and paste it into the Welcome dialog.
{{{user_0.password | "Password"}}} You can also find the Password in the Lab Details panel.
-
Click Next.
Important: You must use the credentials the lab provides you. Do not use your Google Cloud account credentials. Note: Using your own Google Cloud account for this lab may incur extra charges. -
Click through the subsequent pages:
- Accept the terms and conditions.
- Do not add recovery options or two-factor authentication (because this is a temporary account).
- Do not sign up for free trials.
After a few moments, the Google Cloud console opens in this tab.

Task 1. Configure HTTP and health check firewall rules
Configure firewall rules to allow HTTP traffic to the backends and TCP traffic from the Google Cloud health checker.
Explore the my-internal-app network
The network my-internal-app with subnet-a and subnet-b along with firewall rules for RDP, SSH, and ICMP traffic have been configured for you.
-
In the console, navigate to Navigation menu > VPC network > VPC networks.
-
Scroll down and notice the my-internal-app network with its subnets: subnet-a and subnet-b
Each Google Cloud project starts with the default network. In addition, the my-internal-app network has been created for you, as part of your network diagram.
You will create the managed instance groups in subnet-a and subnet-b. Both subnets are in the
region because an Internal Load Balancer is a regional service. The managed instance groups will be in different zones, making your service immune to zonal failures.
Create the HTTP firewall rule
Create a firewall rule to allow HTTP traffic to the backends from the Load Balancer and the internet (to install Apache on the backends).
-
Still in VPC network, in the left pane click Firewall.
-
Notice the app-allow-icmp and app-allow-ssh-rdp firewall rules.
These firewall rules have been created for you.
-
Click Create Firewall Rule.
-
Set the following values, leave all other values at their defaults:
Property Value (type value or select option as specified) Name app-allow-http Network my-internal-app Targets Specified target tags Target tags lb-backend Source filter IPv4 Ranges Source IPv4 ranges 0.0.0.0/0 Protocols and ports Specified protocols and ports, and then check tcp, type: 80
- Click Create.
Create the health check firewall rules
Health checks determine which instances of a Load Balancer can receive new connections. For Internal load balancing, the health check probes to your load balanced instances come from addresses in the ranges 130.211.0.0/22 and 35.191.0.0/16. Your firewall rules must allow these connections.
-
Still in the Firewall rules page, click Create Firewall Rule.
-
Set the following values, leave all other values at their defaults:
Property Value (type value or select option as specified) Name app-allow-health-check Targets Specified target tags Target tags lb-backend Source filter IPv4 Ranges Source IPv4 ranges 130.211.0.0/22 and 35.191.0.0/16 Protocols and ports Specified protocols and ports, and then check tcp
- Click Create.
Click Check my progress to verify the objective.
Task 2. Configure instance templates and create instance groups
A managed instance group uses an instance template to create a group of identical instances. Use these to create the backends of the Internal Load Balancer.
Configure the instance templates
An instance template is an API resource that you can use to create VM instances and managed instance groups. Instance templates define the machine type, boot disk image, subnet, labels, and other instance properties. Create an instance template for both subnets of the my-internal-app network.
-
In the Console, navigate to Navigation menu > Compute Engine > Instance templates.
-
Click Create instance template.
-
For Name, type instance-template-1.
-
For Location, Select Global.
-
For Series, select E2.
-
Click Advanced options.
-
Click Networking.
-
For Network tags, specify lb-backend.
Note: The network tag lb-backend ensures that the HTTP and Health Check firewall rules apply to these instances. -
For Network interfaces, click the dropdown icon to edit.
-
Set the following values, leave all other values at their defaults:
Property Value (type value or select option as specified) Network my-internal-app Subnetwork subnet-a -
Click Done.
-
Click Management.
-
Under Metadata, click Add item and specify the following:
Key 1 Value 1 startup-script-url gs://cloud-training/gcpnet/ilb/startup.sh
- Click Create.
- Wait for the instance template to be created.
Configure the next instance template
Create another instance template for subnet-b by copying instance-template-1:
- Still in Instance templates, check the box next to instance-template-1, then click Copy. Make sure to update the name as instance-template-2.
- Click Advanced options.
- Click the Networking tab.
- For Network interfaces, click the dropdown icon to edit.
- Select subnet-b as the Subnetwork.
- Click Done and then click Create.
Create the managed instance groups
Create a managed instance group in subnet-a and one subnet-b.
us-west2-a, you could select us-west2-b for subnet-b.
-
Still in Compute Engine, in the left pane click Instance groups, and then click Create Instance group.
-
Set the following values, leave all other values at their defaults:
Property Value (type value or select option as specified) Name instance-group-1 Instance template instance-template-1 Location Single-zone Region Zone Autoscaling > Minimum number of instances 1 Autoscaling > Maximum number of instances 5 Autoscaling > Autoscaling signals (click the dropdown icon to edit) > Signal type CPU utilization Target CPU utilization 80 Initialization period 45
-
Click Create.
Repeat the same procedure for instance-group-2 in the different zone of same region as subnet-a:
-
Click Create Instance group.
-
Set the following values, leave all other values at their defaults:
Property Value (type value or select option as specified) Name instance-group-2 Instance template instance-template-2 Location Single-zone Region Zone Zone (Use the different zone in same region as subnet-a) Autoscaling > Minimum number of instances 1 Autoscaling > Maximum number of instances 5 Autoscaling > Autoscaling signals (click the dropdown icon to edit) > Signal type CPU utilization Target CPU utilization 80 Initialization period 45 -
Click Create.
Verify the backends
Verify that VM instances are being created in both subnets and create a utility VM to access the backends' HTTP sites.
-
Still in Compute Engine, click VM instances.
-
Notice two instances that start with
instance-group-1andinstance-group-2.These instances are in separate zones and their internal IP addresses are part of the subnet-a and subnet-b CIDR blocks.
-
Click Create instance.
-
Set the following values, leave all other values at their defaults:
Property Value (type value or select option as specified) Name utility-vm Region Zone Series E2 Machine type Shared-core > e2-micro (1 shared vCPU) -
Click Advanced options.
-
Click Networking.
-
For Network interfaces, click the dropdown icon to edit.
-
Set the following values, leave all other values at their defaults:
Property Value (type value or select option as specified) Network my-internal-app Subnetwork subnet-a Primary internal IPv4 address Ephemeral (Custom) Custom ephemeral IP address 10.10.20.50 -
Click Done and then click Create.
Click Check my progress to verify the objective.
- Note that the internal IP addresses for the backends are
10.10.20.2and10.10.30.2.
- For utility-vm, click SSH to launch a terminal and connect.
- To verify the welcome page for
instance-group-1-xxxx, run the following command:
The output should look like this:
- To verify the welcome page for
instance-group-2-xxxx, run the following command:
The output should look like this:
- Close the SSH terminal to utility-vm:
Task 3. Configure the Internal Load Balancer
Configure the Internal Load Balancer to balance traffic between the two backends (instance-group-1 and instance-group-2), as illustrated in this diagram:
Start the configuration
-
In the Cloud Console, navigate to Navigation menu > Network Services > Load balancing, and then click Create load balancer.
-
For Type of load balancer, select Network Load Balancer (TCP/SSL).
-
For Proxy or passthrough, select Passthrough load balancer.
-
For Public facing or internal, select Internal.
-
Click CONFIGURE.
-
For Name, type
my-ilb. -
For Region, select
. -
For Network, select my-internal-app.
Configure the regional backend service
The backend service monitors instance groups and prevents them from exceeding configured usage.
-
Click on Backend configuration.
-
Set the following values, leave all other values at their defaults:
Property Value (select option as specified) Instance group instance-group-1 -
Click Add backend.
-
For Instance group, select instance-group-2.
-
For Health Check, select Create a health check.
-
Set the following values, leave all other values at their defaults:
Property Value (select option as specified) Name my-ilb-health-check Protocol TCP Port 80
- Click Save.
- Verify that there is a blue check mark next to Backend configuration in the Cloud Console. If not, double-check that you have completed all the steps above.
Configure the frontend
The frontend forwards traffic to the backend.
-
Click on Frontend configuration.
-
Specify the following, leaving all other values with their defaults:
Property Value (type value or select option as specified) Subnetwork subnet-b Internal IP Under IP address select Create IP address -
Specify the following, leaving all other values with their defaults:
Property Value (type value or select option as specified) Name my-ilb-ip Static IP address Let me choose Custom IP address 10.10.30.5 -
Click Reserve.
-
In Port number, type
80. -
Click Done .
Review and create the Internal Load Balancer
-
Click on Review and finalize.
-
Review the Backend and Frontend.
-
Click on Create. Wait for the Load Balancer to be created, before moving to the next task.
Click Check my progress to verify the objective.
Task 4. Test the Internal Load Balancer
Verify that the my-ilb IP address forwards traffic to instance-group-1 and instance-group-2.
Access the Internal Load Balancer
- In the Cloud Console, navigate to Navigation menu > Compute Engine > VM instances.
- For utility-vm, click SSH to launch a terminal and connect.
- To verify that the Internal Load Balancer forwards traffic, run the following command:
The output should look like this:
- Run the same command a couple more times.
In the output, you should be able to see responses from instance-group-1 in
Congratulations!
In this lab you created two managed instance groups in the
Next steps / Learn more
For information on the basic concepts of Load Balancing, see Google Cloud Load Balancing Documentation.
Google Cloud training and certification
...helps you make the most of Google Cloud technologies. Our classes include technical skills and best practices to help you get up to speed quickly and continue your learning journey. We offer fundamental to advanced level training, with on-demand, live, and virtual options to suit your busy schedule. Certifications help you validate and prove your skill and expertise in Google Cloud technologies.
Manual Last Updated April 17, 2024
Lab Last Tested April 17, 2024
Copyright 2024 Google LLC All rights reserved. Google and the Google logo are trademarks of Google LLC. All other company and product names may be trademarks of the respective companies with which they are associated.