Checkpoints
Add Cloud Data Fusion API Service Agent role to service account
/ 25
Load the data
/ 25
Ingestion into BigQuery
/ 50
Building Transformations and Preparing Data with Wrangler in Cloud Data Fusion
Overview
Data integration is all about your data. When working with data, it’s handy to be able to see what the raw data looks like so that you can use it as a starting point for your transformation. With Wrangler, you can take a data-first approach to your data integration workflow.
The most common source of data for ETL (Extract-Transform-Load) applications is typically data stored in comma-separated value (CSV) format text files, as many database systems export and import data in this fashion. For the purposes of this lab you're using a CSV file, but the same techniques can be applied to database sources and any other data source that you have available in Cloud Data Fusion.
Objectives
In this lab you learn how to perform the following tasks:
- Create a pipeline to ingest from a CSV file.
- Use Wrangler to apply transformations by using point-and-click and the CLI interfaces.
For most of this lab, you're working with Wrangler Transformation Steps which are used by the Wrangler plugin so that your transformations are encapsulated in one place and you can group transformation tasks into manageable blocks. This data-first approach will let you quickly visualize your transformations.
Setup
For each lab, you get a new Google Cloud project and set of resources for a fixed time at no cost.
-
Sign in to Google Cloud Skills Boost using an incognito window.
-
Note the lab's access time (for example, 02:00:00), and make sure you can finish within that time.
There is no pause feature. You can restart if needed, but you have to start at the beginning. -
When ready, click Start lab.
Note: Once you click Start lab, it will take about 15 - 20 minutes for the lab to provision necessary resources and create a Data Fusion instance. During that time, you can read through the steps below to get familiar with the goals of the lab. When you see lab credentials (Username and Password) in the left panel, the instance is created and you can continue logging into the console. -
Note your lab credentials (Username and Password). You will use them to sign in to the Google Cloud console.
-
Click Open Google console.
-
Click Use another account and copy/paste credentials for this lab into the prompts.
If you use other credentials, you'll receive errors or incur charges. -
Accept the terms and skip the recovery resource page.
Log in to Google Cloud Console
- Using the browser tab or window you are using for this lab session, copy the Username from the Connection Details panel and click the Open Google Console button.
- Paste in the Username, and then the Password as prompted.
- Click Next.
- Accept the terms and conditions.
Since this is a temporary account, which will last only as long as this lab:
- Do not add recovery options
- Do not sign up for free trials
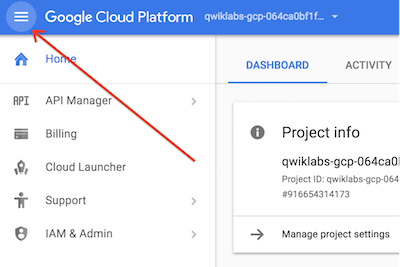
- Once the console opens, view the list of services by clicking the Navigation menu (
) at the top-left.
Activate Cloud Shell
Cloud Shell is a virtual machine that contains development tools. It offers a persistent 5-GB home directory and runs on Google Cloud. Cloud Shell provides command-line access to your Google Cloud resources. gcloud is the command-line tool for Google Cloud. It comes pre-installed on Cloud Shell and supports tab completion.
-
Click the Activate Cloud Shell button (
) at the top right of the console.
-
Click Continue.
It takes a few moments to provision and connect to the environment. When you are connected, you are also authenticated, and the project is set to your PROJECT_ID.
Sample commands
- List the active account name:
(Output)
(Example output)
- List the project ID:
(Output)
(Example output)
Check project permissions
Before you begin working on Google Cloud, you must ensure that your project has the correct permissions within Identity and Access Management (IAM).
-
In the Google Cloud console, on the Navigation menu (
-
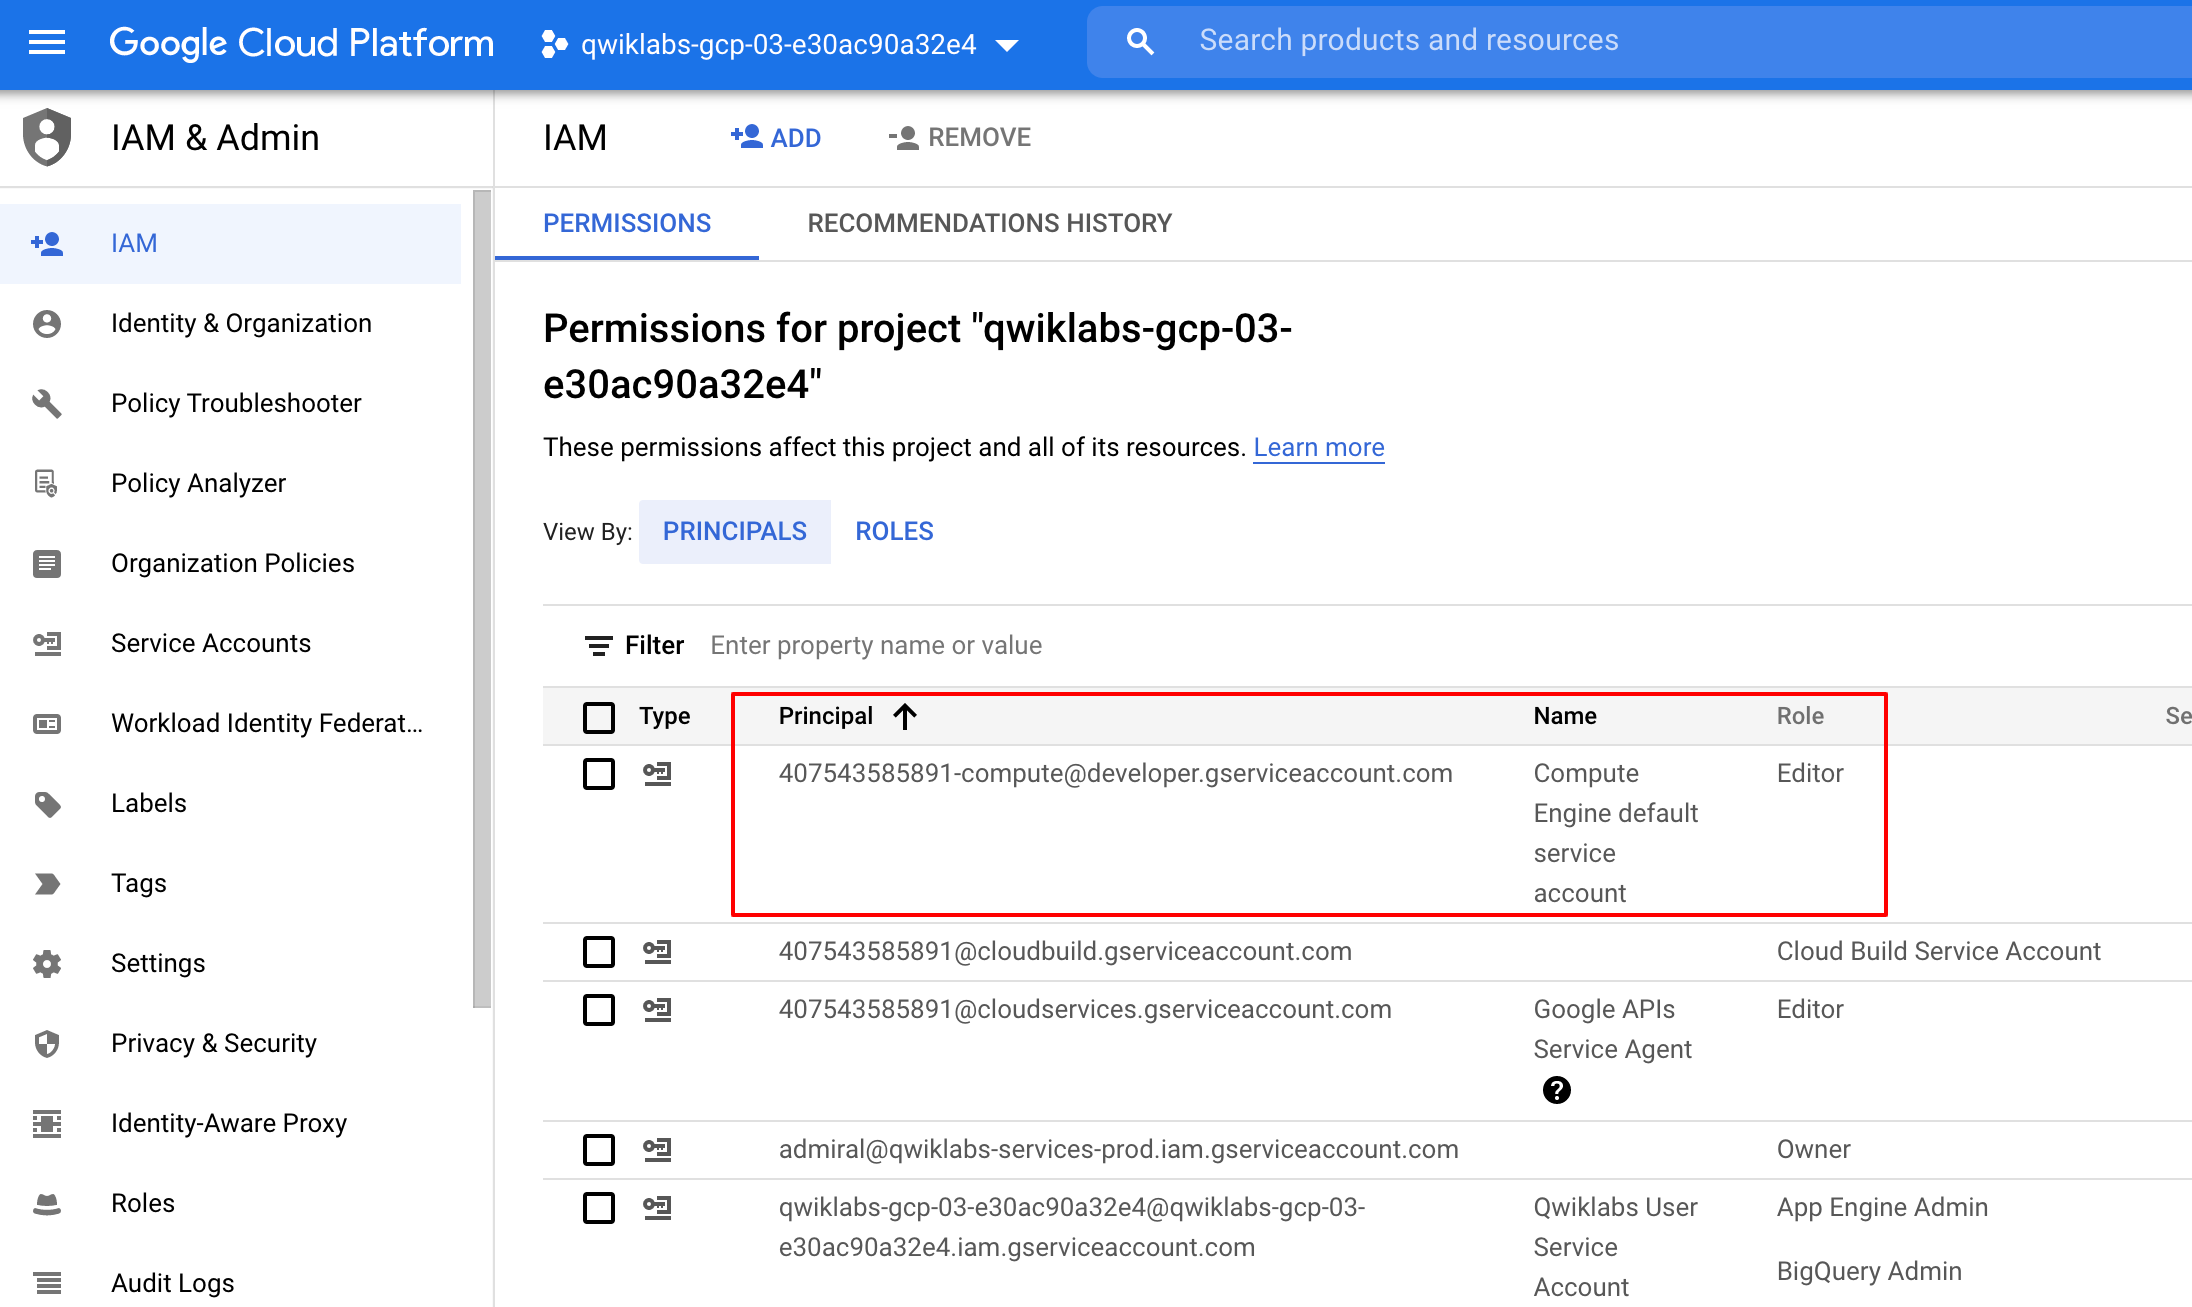
Confirm that the default compute Service Account
{project-number}-compute@developer.gserviceaccount.comis present and has theeditorrole assigned. The account prefix is the project number, which you can find on Navigation menu > Cloud overview.
If the account is not present in IAM or does not have the editor role, follow the steps below to assign the required role.
-
In the Google Cloud console, on the Navigation menu, click Cloud overview.
-
From the Project info card, copy the Project number.
-
On the Navigation menu, click IAM & Admin > IAM.
-
At the top of the IAM page, click Add.
-
For New principals, type:
Replace {project-number} with your project number.
-
For Select a role, select Basic (or Project) > Editor.
-
Click Save.
Task 1. Add necessary permissions for your Cloud Data Fusion instance
- In the Google Cloud console, from the Navigation menu select Data Fusion > Instances.
Next, you will grant permissions to the service account associated with the instance, using the following steps.
-
From the Google Cloud console, navigate to the IAM & Admin > IAM.
-
Confirm that the Compute Engine Default Service Account
{project-number}-compute@developer.gserviceaccount.comis present, copy the Service Account to your clipboard. -
On the IAM Permissions page, click +Grant Access.
-
In the New principals field paste the service account.
-
Click into the Select a role field and start typing "Cloud Data Fusion API Service Agent", then select it.
-
Click Save.
Click Check my progress to verify the objective.
Grant service account user permission
-
In the console, on the Navigation menu, click IAM & admin > IAM.
-
Select the Include Google-provided role grants checkbox.
-
Scroll down the list to find the Google-managed Cloud Data Fusion service account that looks like
service-{project-number}@gcp-sa-datafusion.iam.gserviceaccount.comand then copy the service account name to your clipboard.

-
Next, navigate to the IAM & admin > Service Accounts.
-
Click on the default compute engine account that looks like
{project-number}-compute@developer.gserviceaccount.com, and select the Permissions tab on the top navigation. -
Click on the Grant Access button.
-
In the New Principals field, paste the service account you copied earlier.
-
In the Role dropdown menu, select Service Account User.
-
Click Save.
Task 2. Load the data
Next you will create a Cloud Storage bucket in your project so that you can load some sample data for Wrangling. Cloud Data Fusion will later read data out of this storage bucket
- In Cloud Shell, execute the following commands to create a new bucket:
The created bucket name is your Project ID.
- Run the command to copy the data file (a CSV file) into your bucket:
Click Check my progress to verify the objective.
Now you're ready to proceed further.
Task 3. Navigate the Cloud Data Fusion UI
In the Cloud Data Fusion UI you can use the various pages, such as Pipeline Studio or Wrangler, to use Cloud Data Fusion features.
To navigate the Cloud Data Fusion UI, follow these steps:
- In the Console return to Navigation menu > Data Fusion.
- Then click the View Instance link next to your Data Fusion instance.
- Select your lab credentials to sign in.
The Cloud Data Fusion web UI comes with its own navigation panel (on the left) to navigate to the page you need.
- In the Cloud Data UI, click the Navigation menu on the top left to expose the navigation panel.
- Then choose Wrangler.
Task 4. Working with Wrangler
Wrangler is an interactive, visual tool that lets you see the effects of transformations on a small subset of your data before dispatching large, parallel-processing jobs on the entire dataset.
-
When Wrangler loads, on the left side is a panel with the pre-configured connections to your data, including the Cloud Storage connection.
-
In the GCS, select Cloud Storage Default.
-
Click the bucket corresponding to your Project ID.
-
Click titanic.csv.
-
In the parsing options select text format from the drop-down.
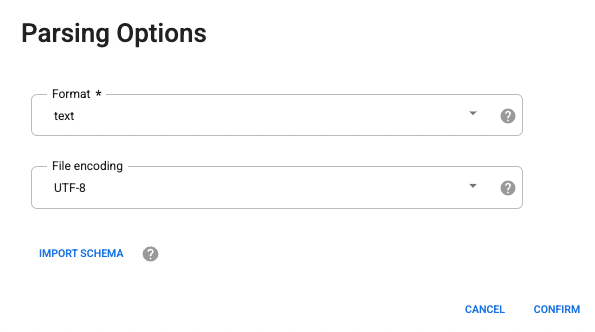
- Click Confirm. The data is loaded into the Wrangler.
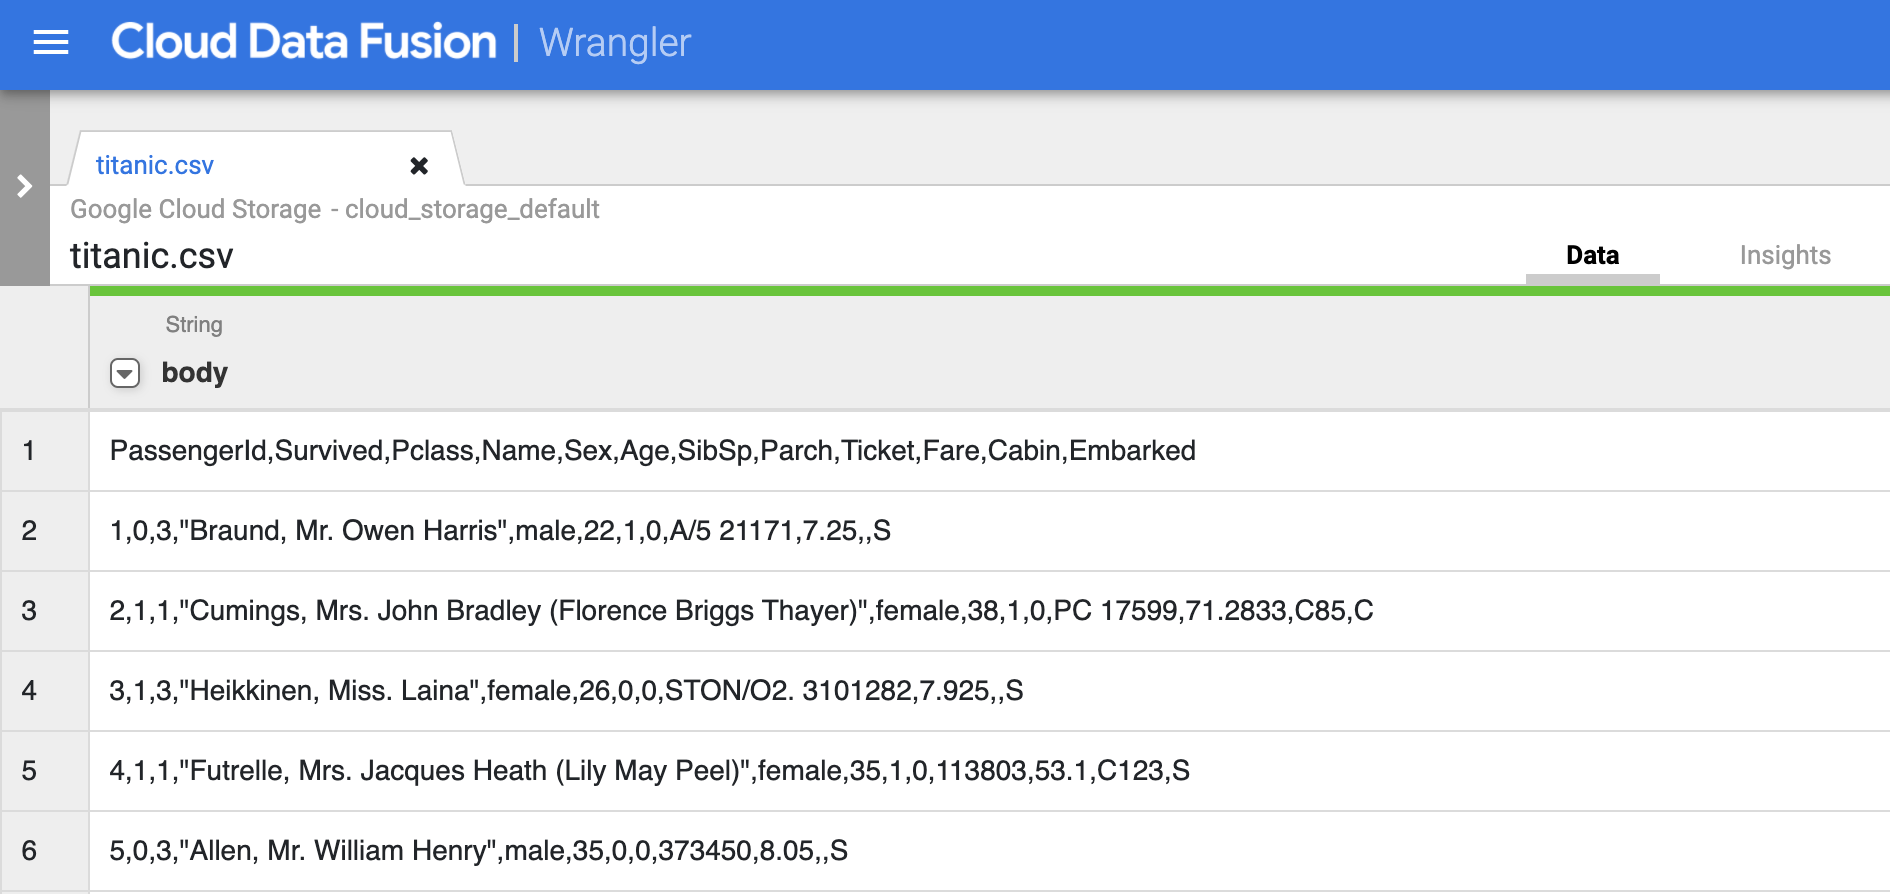
- The first operation is to parse the raw CSV data into a tabular representation that is split into rows and columns. To do this you will select the drop-down icon from the first column heading, then select the Parse menu item, and CSV from the submenu.
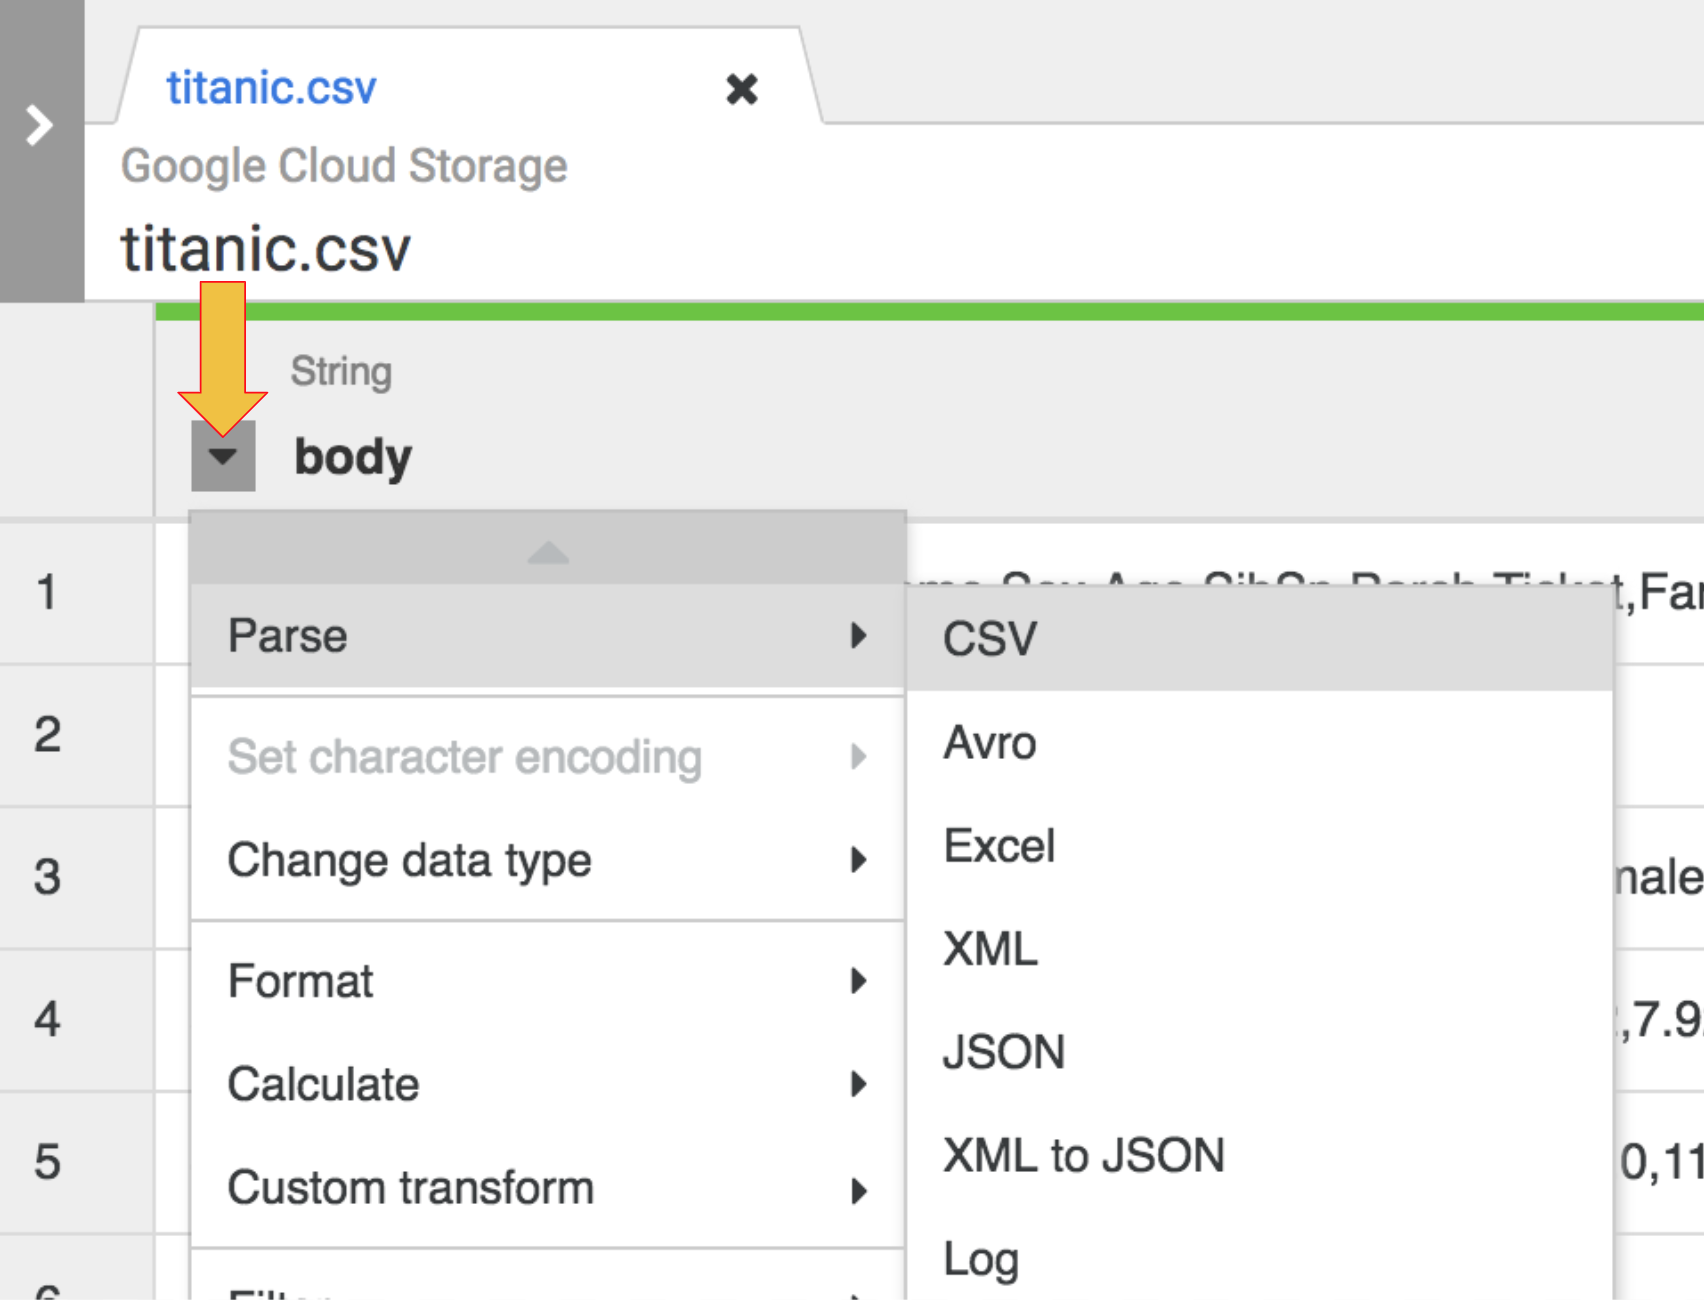
-
In the raw data we can see that the first row consists of column headings, so you need to select the option to Set first row as header in the dialog box for Parse as CSV that is presented to you, then click Apply.
-
At this stage, the raw data is parsed and you can see the columns generated by this operation on the right of the body column
-
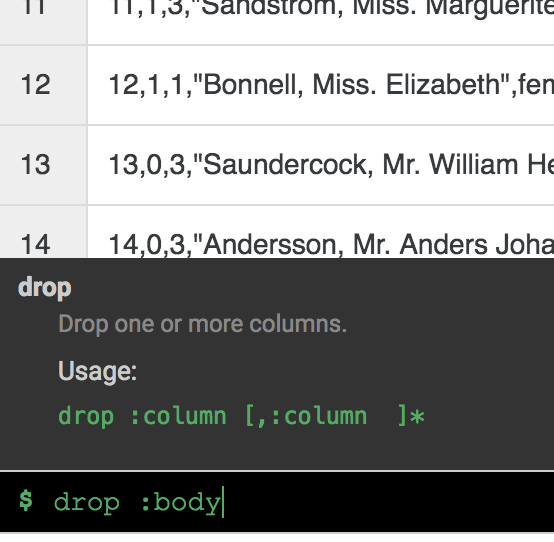
You no longer need the body column, so remove it by selecting the drop-down icon next to the body column heading, and select the Delete column menu item.
- Click the Transformation steps tab on the far right of your Wrangler UI. You will see the two transformations you have applied so far.
In a later part of the lab, you will add more transformation steps using the CLI.
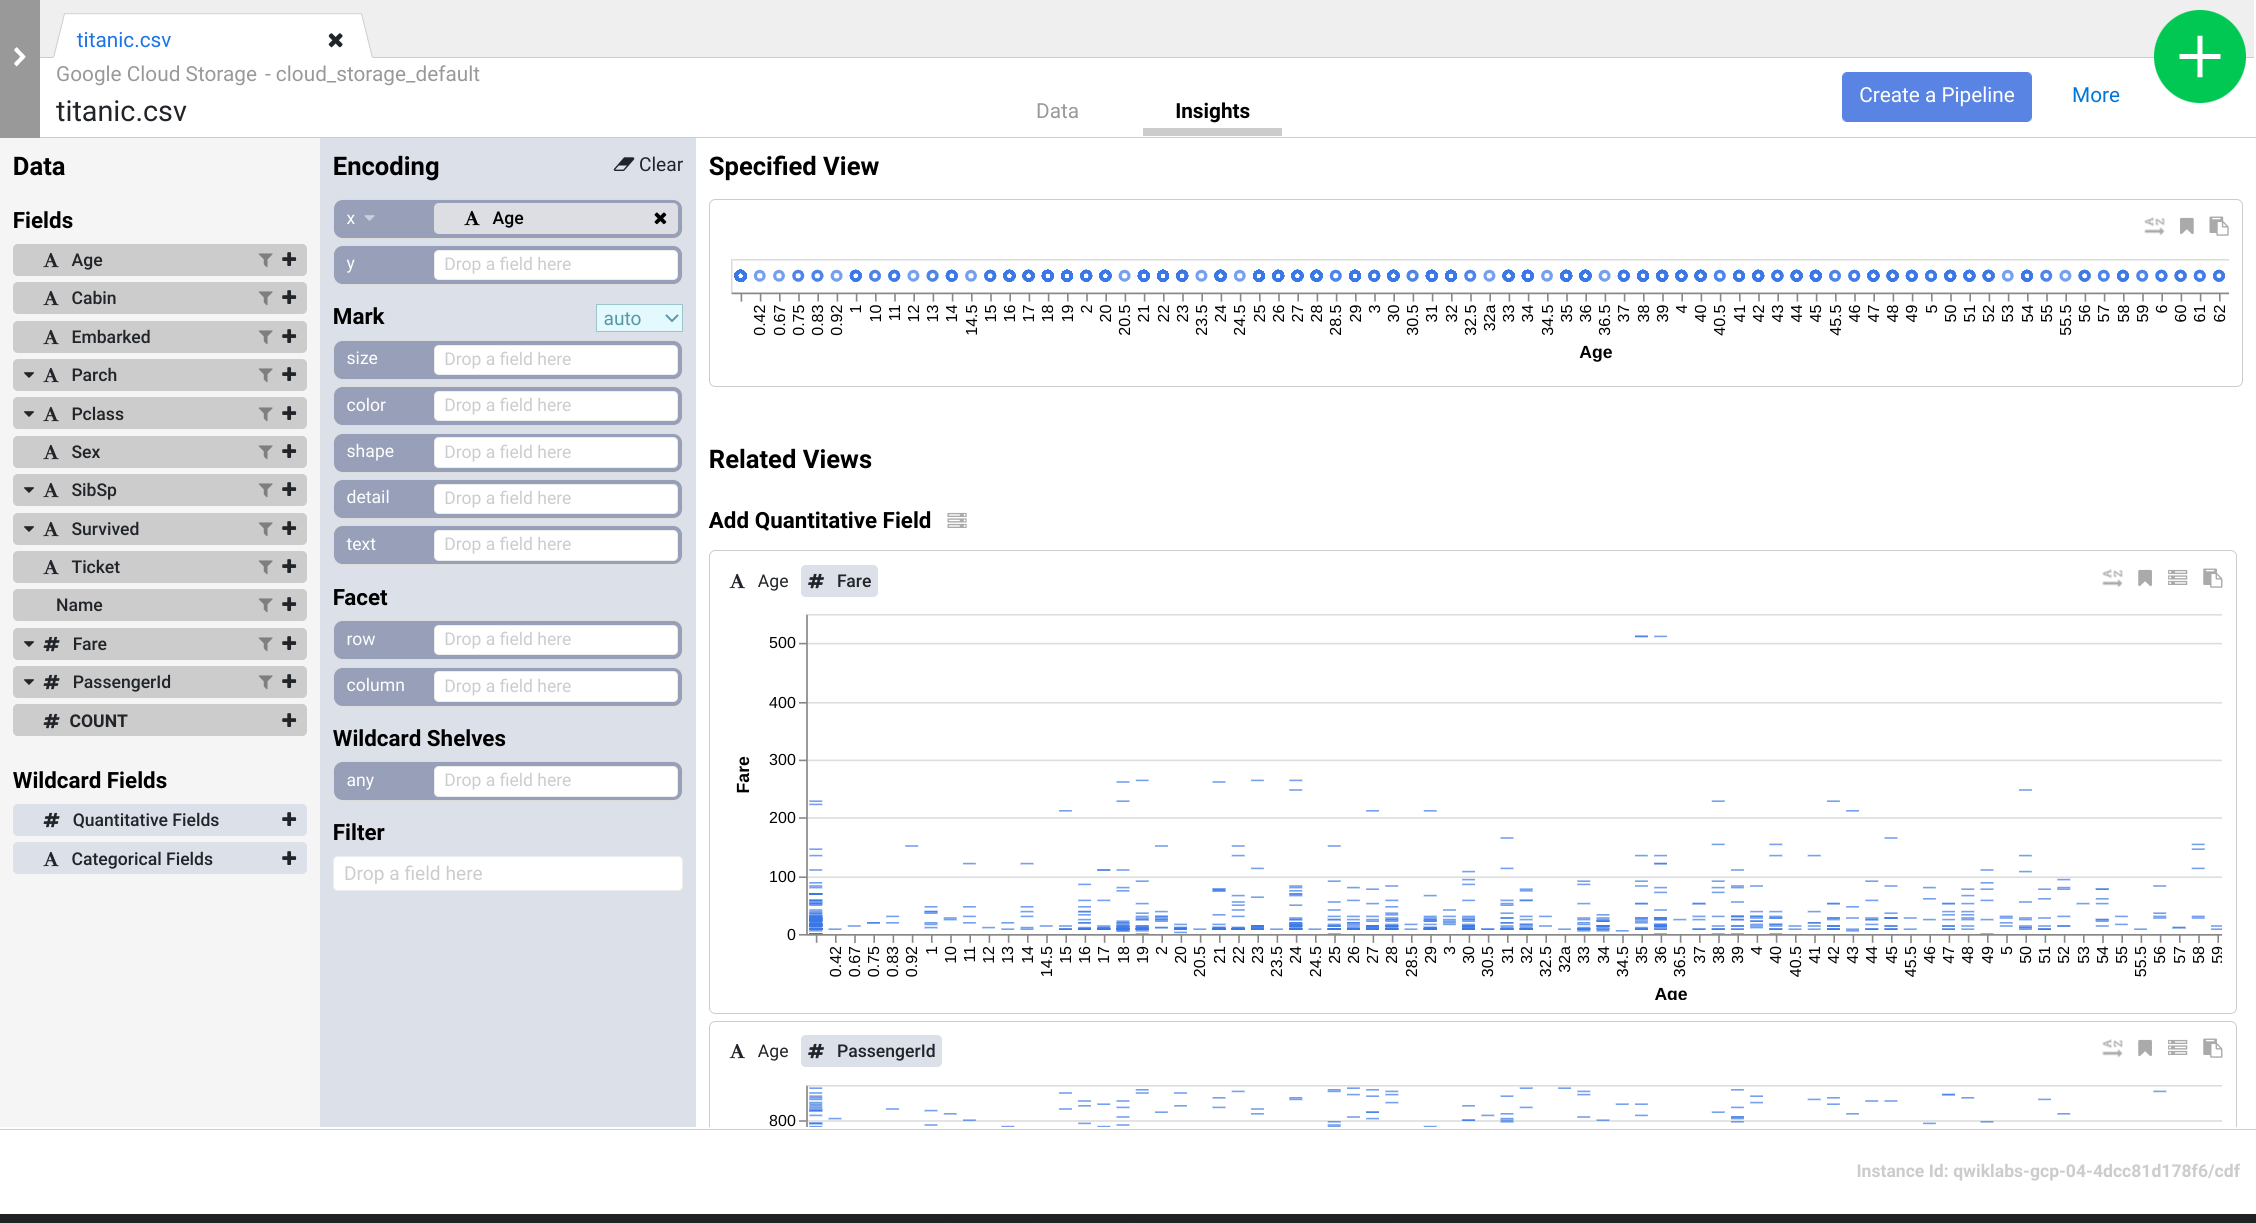
As you apply Transformation Steps to your dataset, the transformations affect the sampled data and provide visual cues that can be explored through the Insights browser.
- Click the Insights tab in the top middle area, to see how the data is distributed across the various columns.
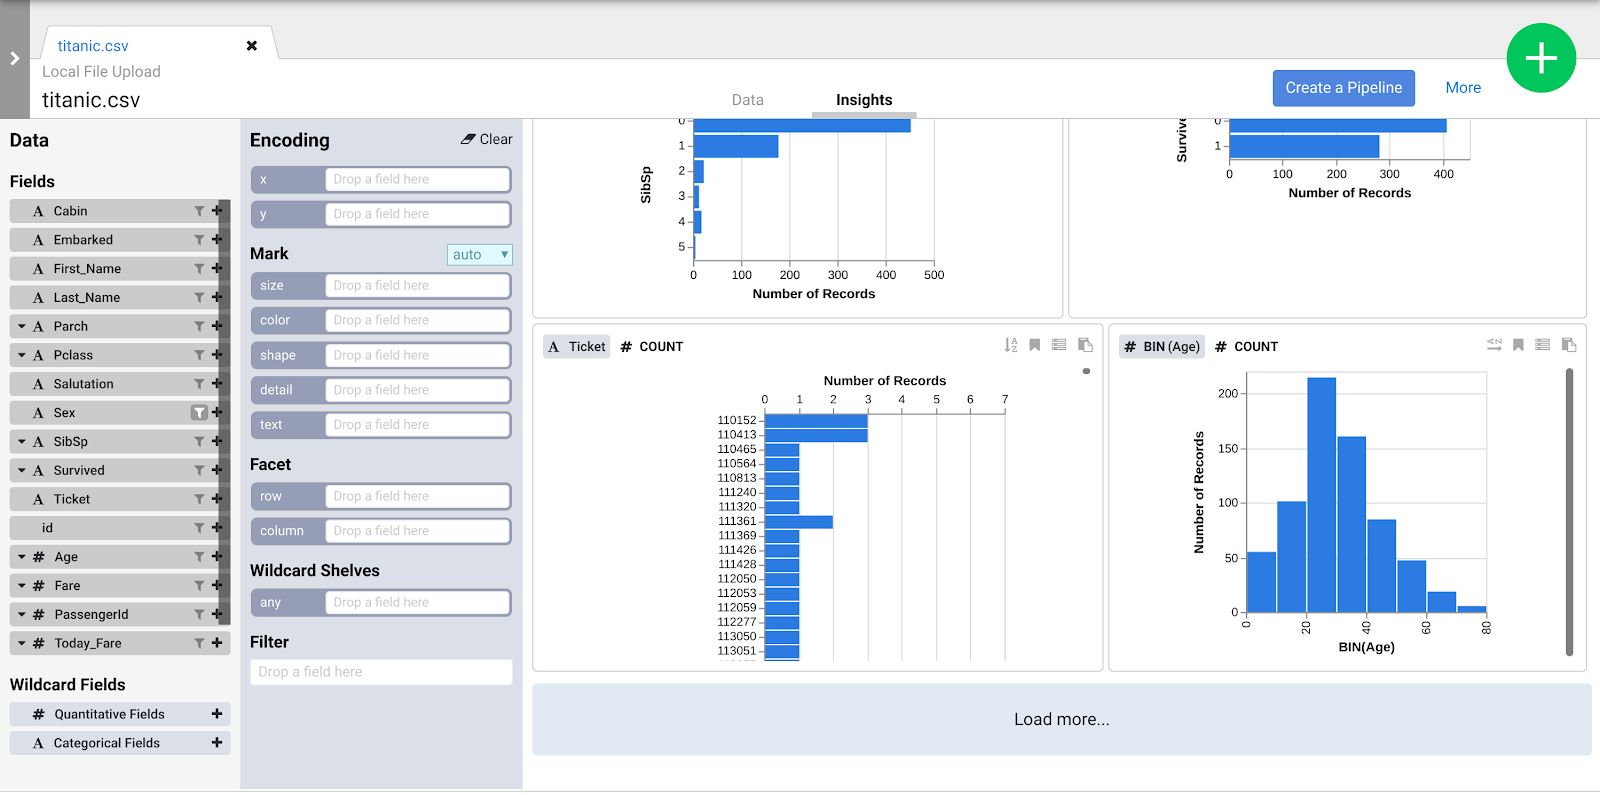
- Explore the interface to discover new ways of analyzing your data. Drag-and-drop the Age field to the x encoding to see how your data perspectives change.
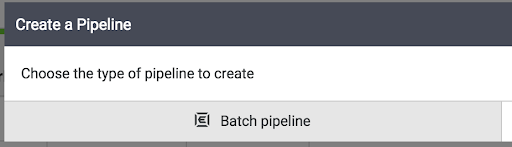
- You can click the Create Pipeline button to transition to the pipeline development mode, where you can check the directives that you created within the Wrangler plugin.

- When presented with the next dialog select Batch pipeline to continue.
-
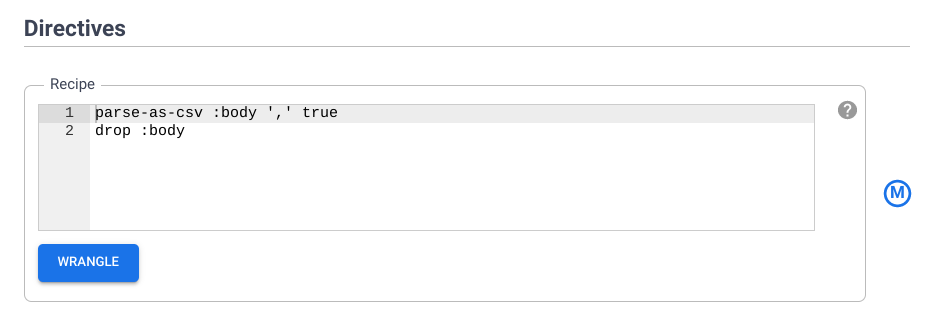
Once the Pipeline Studio opens, point to the Wrangler node and click Properties
-
Following Directives review the recipe of directives that were added by you earlier. In the next section, you will add more transformation steps using the CLI.
Task 5. Working with Transformation Steps
In this section, you will continue working in the Wrangler UI to explore the CSV dataset and apply transformations through CLI.
-
Click the Wrangle button under the Directives section of your Wrangler node's Properties box. You will be back in the Wrangler UI.
-
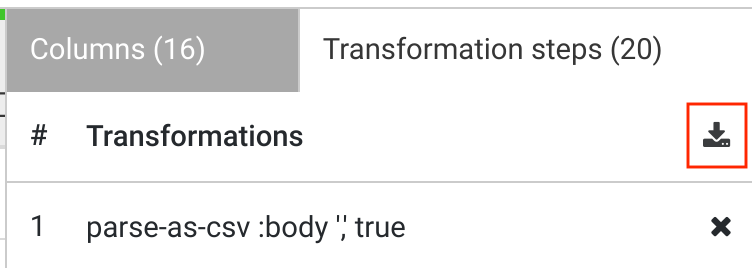
Click the Transformation steps on the far right of your Wrangler UI to expose the directives. Verify that you currently have two transformation steps.
You will now add more transformation steps using the CLI and see how they modify the data. The CLI is the black bar at the bottom of the screen (with the green $ prompt).
- Copy the directives, and paste them into your CLI at the $ prompt. You will see the Transformation Steps on the right of your screen get updated.
Following is an explanation of what the directives do to your data. DO NOT enter them again in the CLI as you have just already done so.
a. fill-null-or-empty :Cabin 'none' fixes the Cabin column so that it’s 100% complete.
b. send-to-error empty(Age) fixes the Age column so there are no empty cells
c. parse-as-csv :Name ',' false splits the Name columns into two separate columns containing the first name and last name
d. rename Name_1 Last_Name and rename Name_2 First_Name rename the newly created columns, Name_1 and Name_2, into Last_Name and First_Name
e. drop Name removes the Name column as it’s no longer needed
f. set-type :PassengerId integer converts the PassengerId column into an integer
g. The directives extract the salutation from the First_Name column, delete the redundant column and rename the newly created columns accordingly:
h. the send-to-error !dq:isNumber(Age) || !dq:isInteger(Age) || (Age == 0 || Age > 125) directive performs data quality checks on the Age column while the set-type :Age integer sets it as an Integer column
i. set-type :Fare double converts the Fare column to a Double so you can perform some arithmetic with the column values
j. set-column Today_Fare (Fare * 23.4058)+1 multiplies the Fare column by the inflation rate of the Dollar since 1912 to get the adjusted Dollar value
k. generate-uuid id creates an identity column to uniquely identify each record
l. mask-shuffle First_Name will mask the Last_Name column to de-identify the person, i.e. PII
-
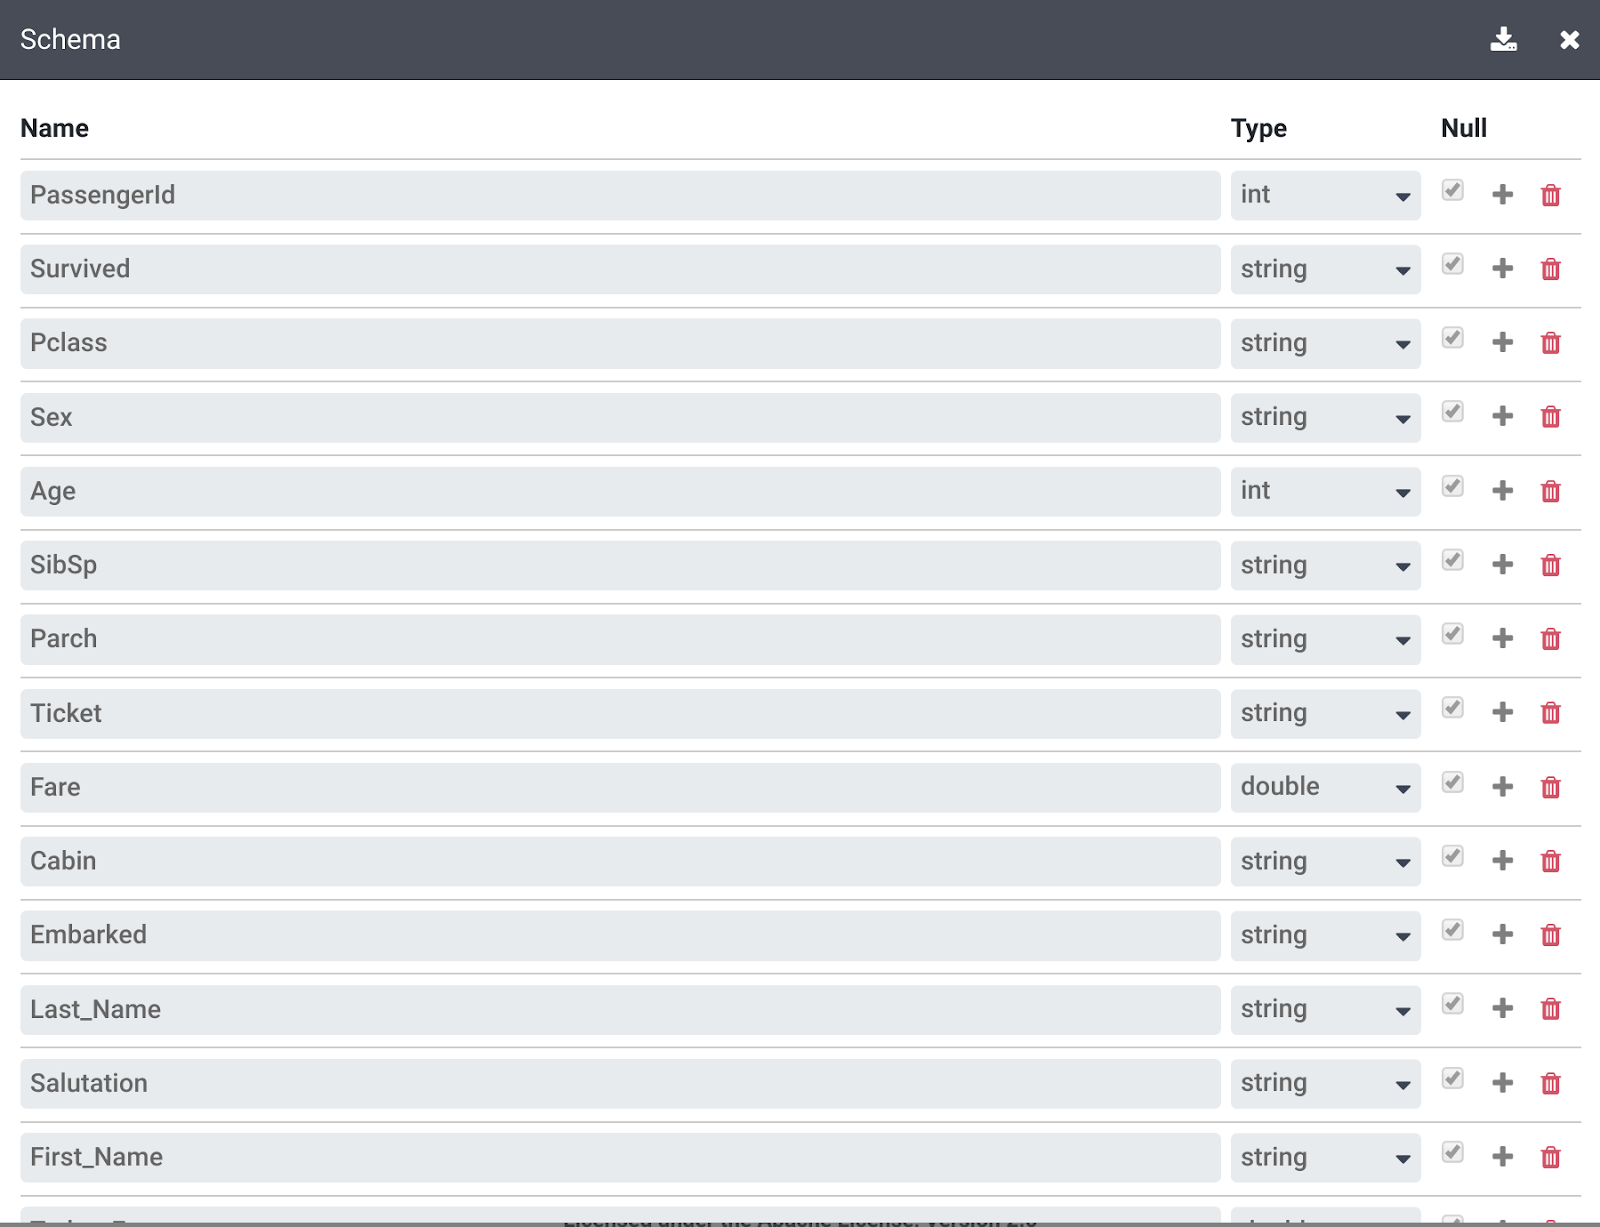
Click More link on the top right above your Transformation steps, and then click on View Schema to examine the schema that the transformations generated, and click the download icon to download it to your computer.
-
Click X to close the Schema page.
-
You can click the download icon under Transformation steps to download the directives recipe to your computer to keep a copy of the transformation steps for future use.
-
Click the Apply button on the top right to ensure all the newly entered transformation steps get added to the Wrangler node's configuration. You will then be redirected back to the properties box of the Wrangler node.
-
Click X to close it. You're back in the Pipeline Studio.
Task 6. Ingestion into BigQuery
In order to ingest the data into BigQuery, create a dataset.
-
In a new tab, open the BigQuery in the Google Cloud Console or right-click on the Google Cloud console tab and select Duplicate, then use the Navigation menu to select BigQuery. If prompted click Done.
-
In the Explorer pane, click the View actions icon next to your Project ID (it will start with
qwiklabs) and then select Create dataset.
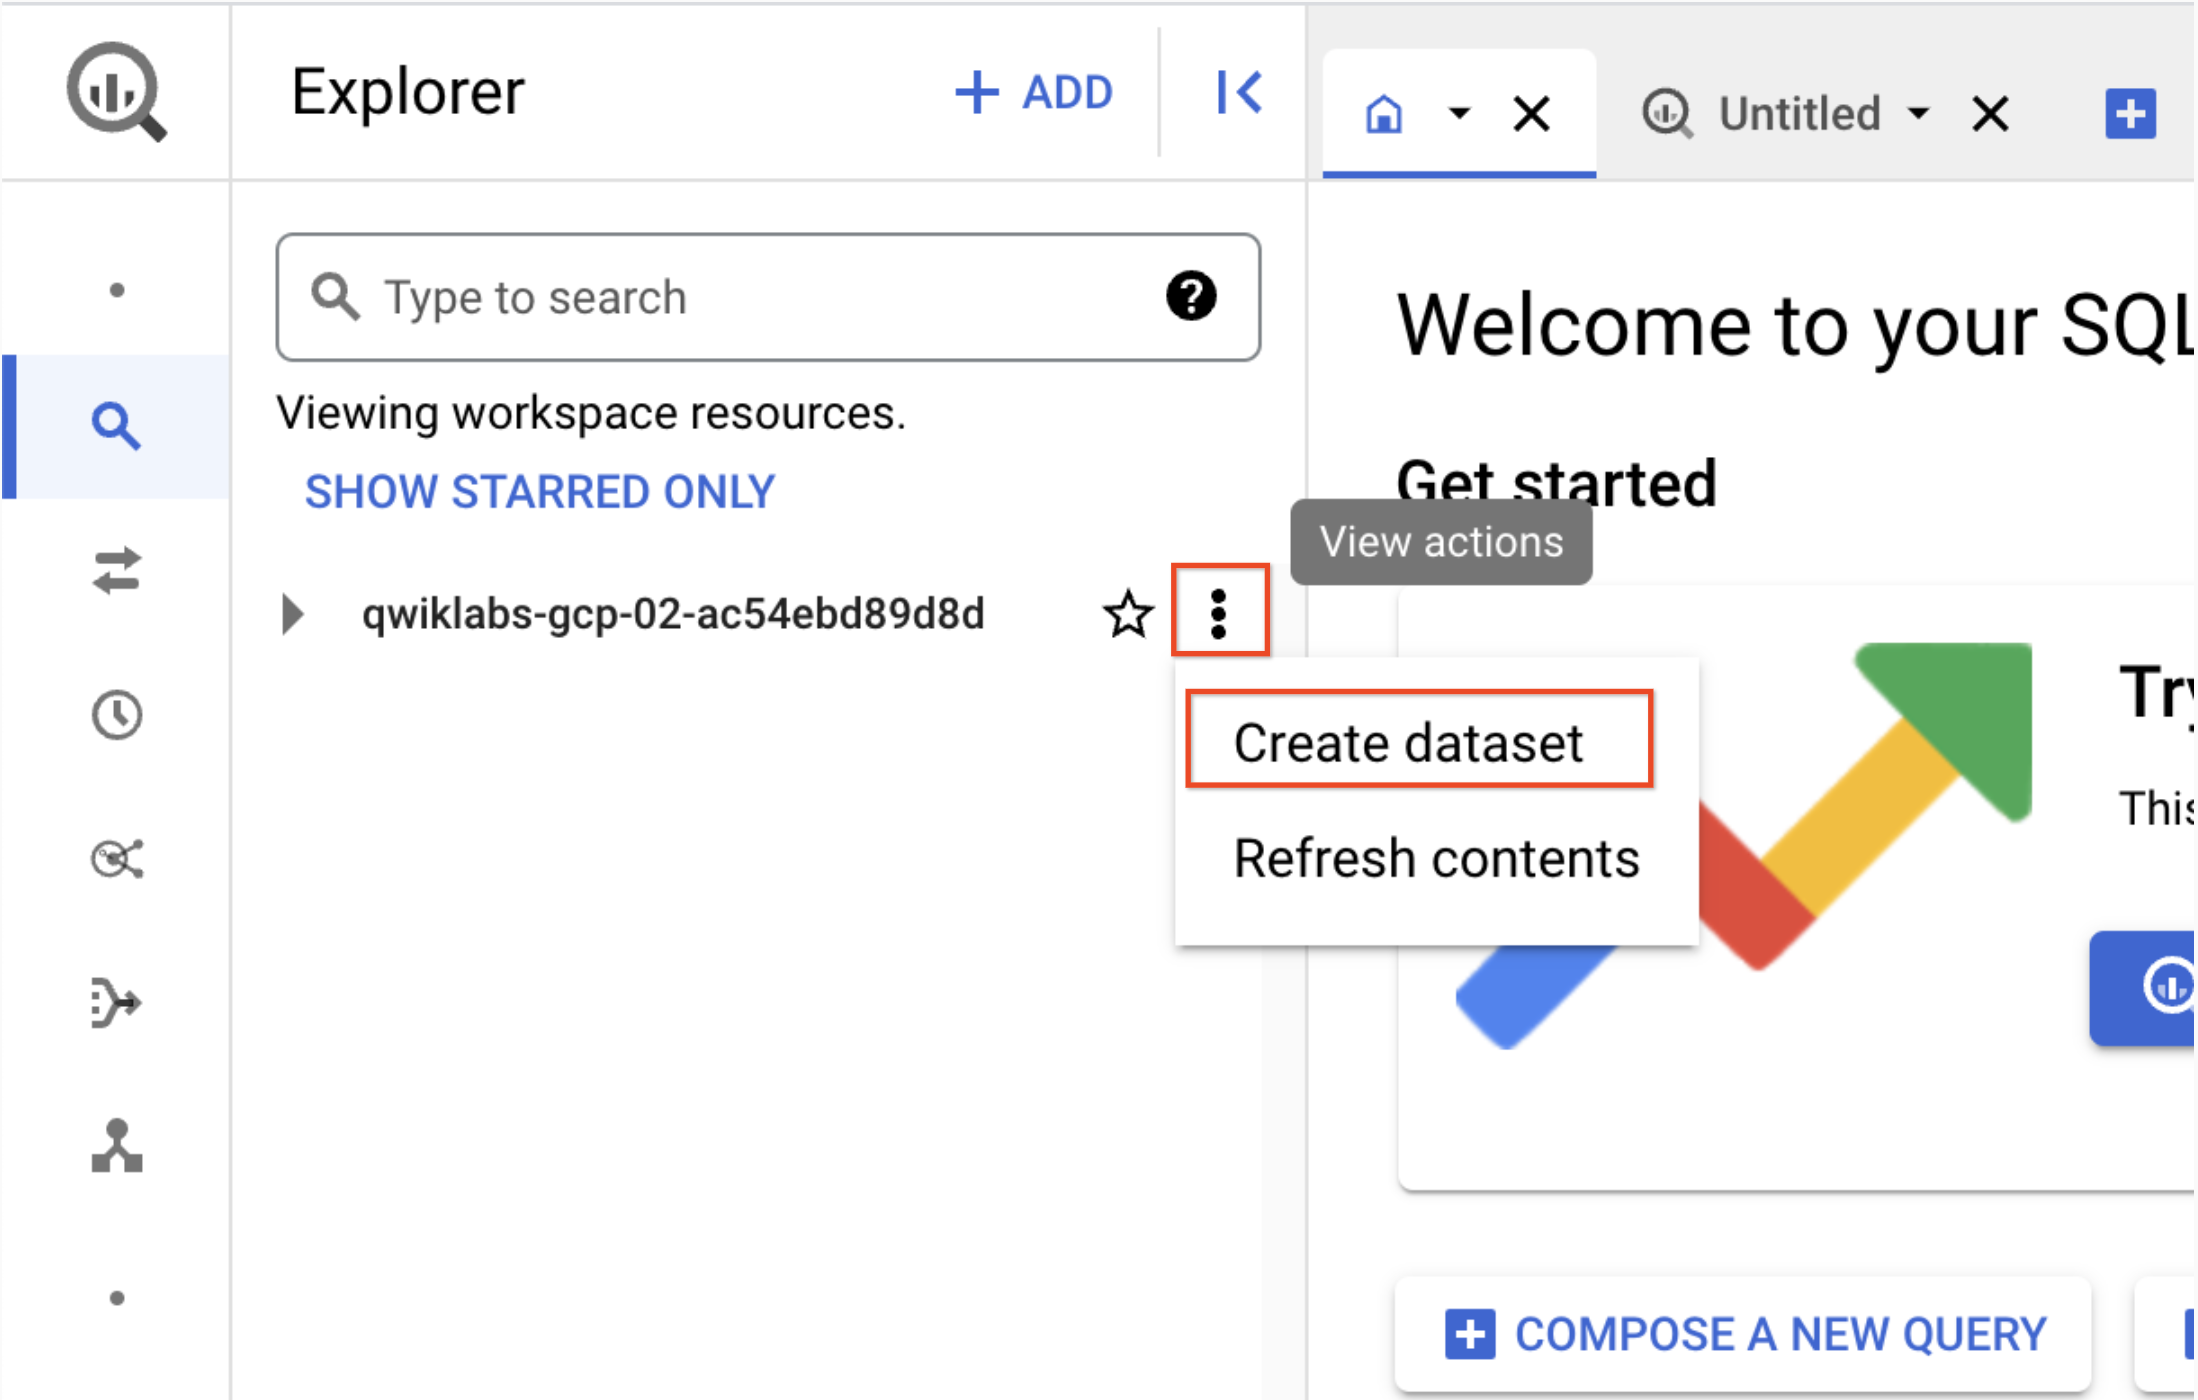
a. Dataset ID: demo_cdf
b. Click Create dataset. Record the name to use later in the lab.
- Navigate back to the Cloud Data Fusion UI tab
a. To add the BigQuery sink to the pipeline navigate to the Sink section on the left panel and click the BigQuery icon to place it on the canvas.
b. Once the BigQuery sink has been placed on the canvas, connect the Wrangler node with the BigQuery node. Do this by dragging the arrow from the Wrangler node to connect to the BigQuery node as illustrated.
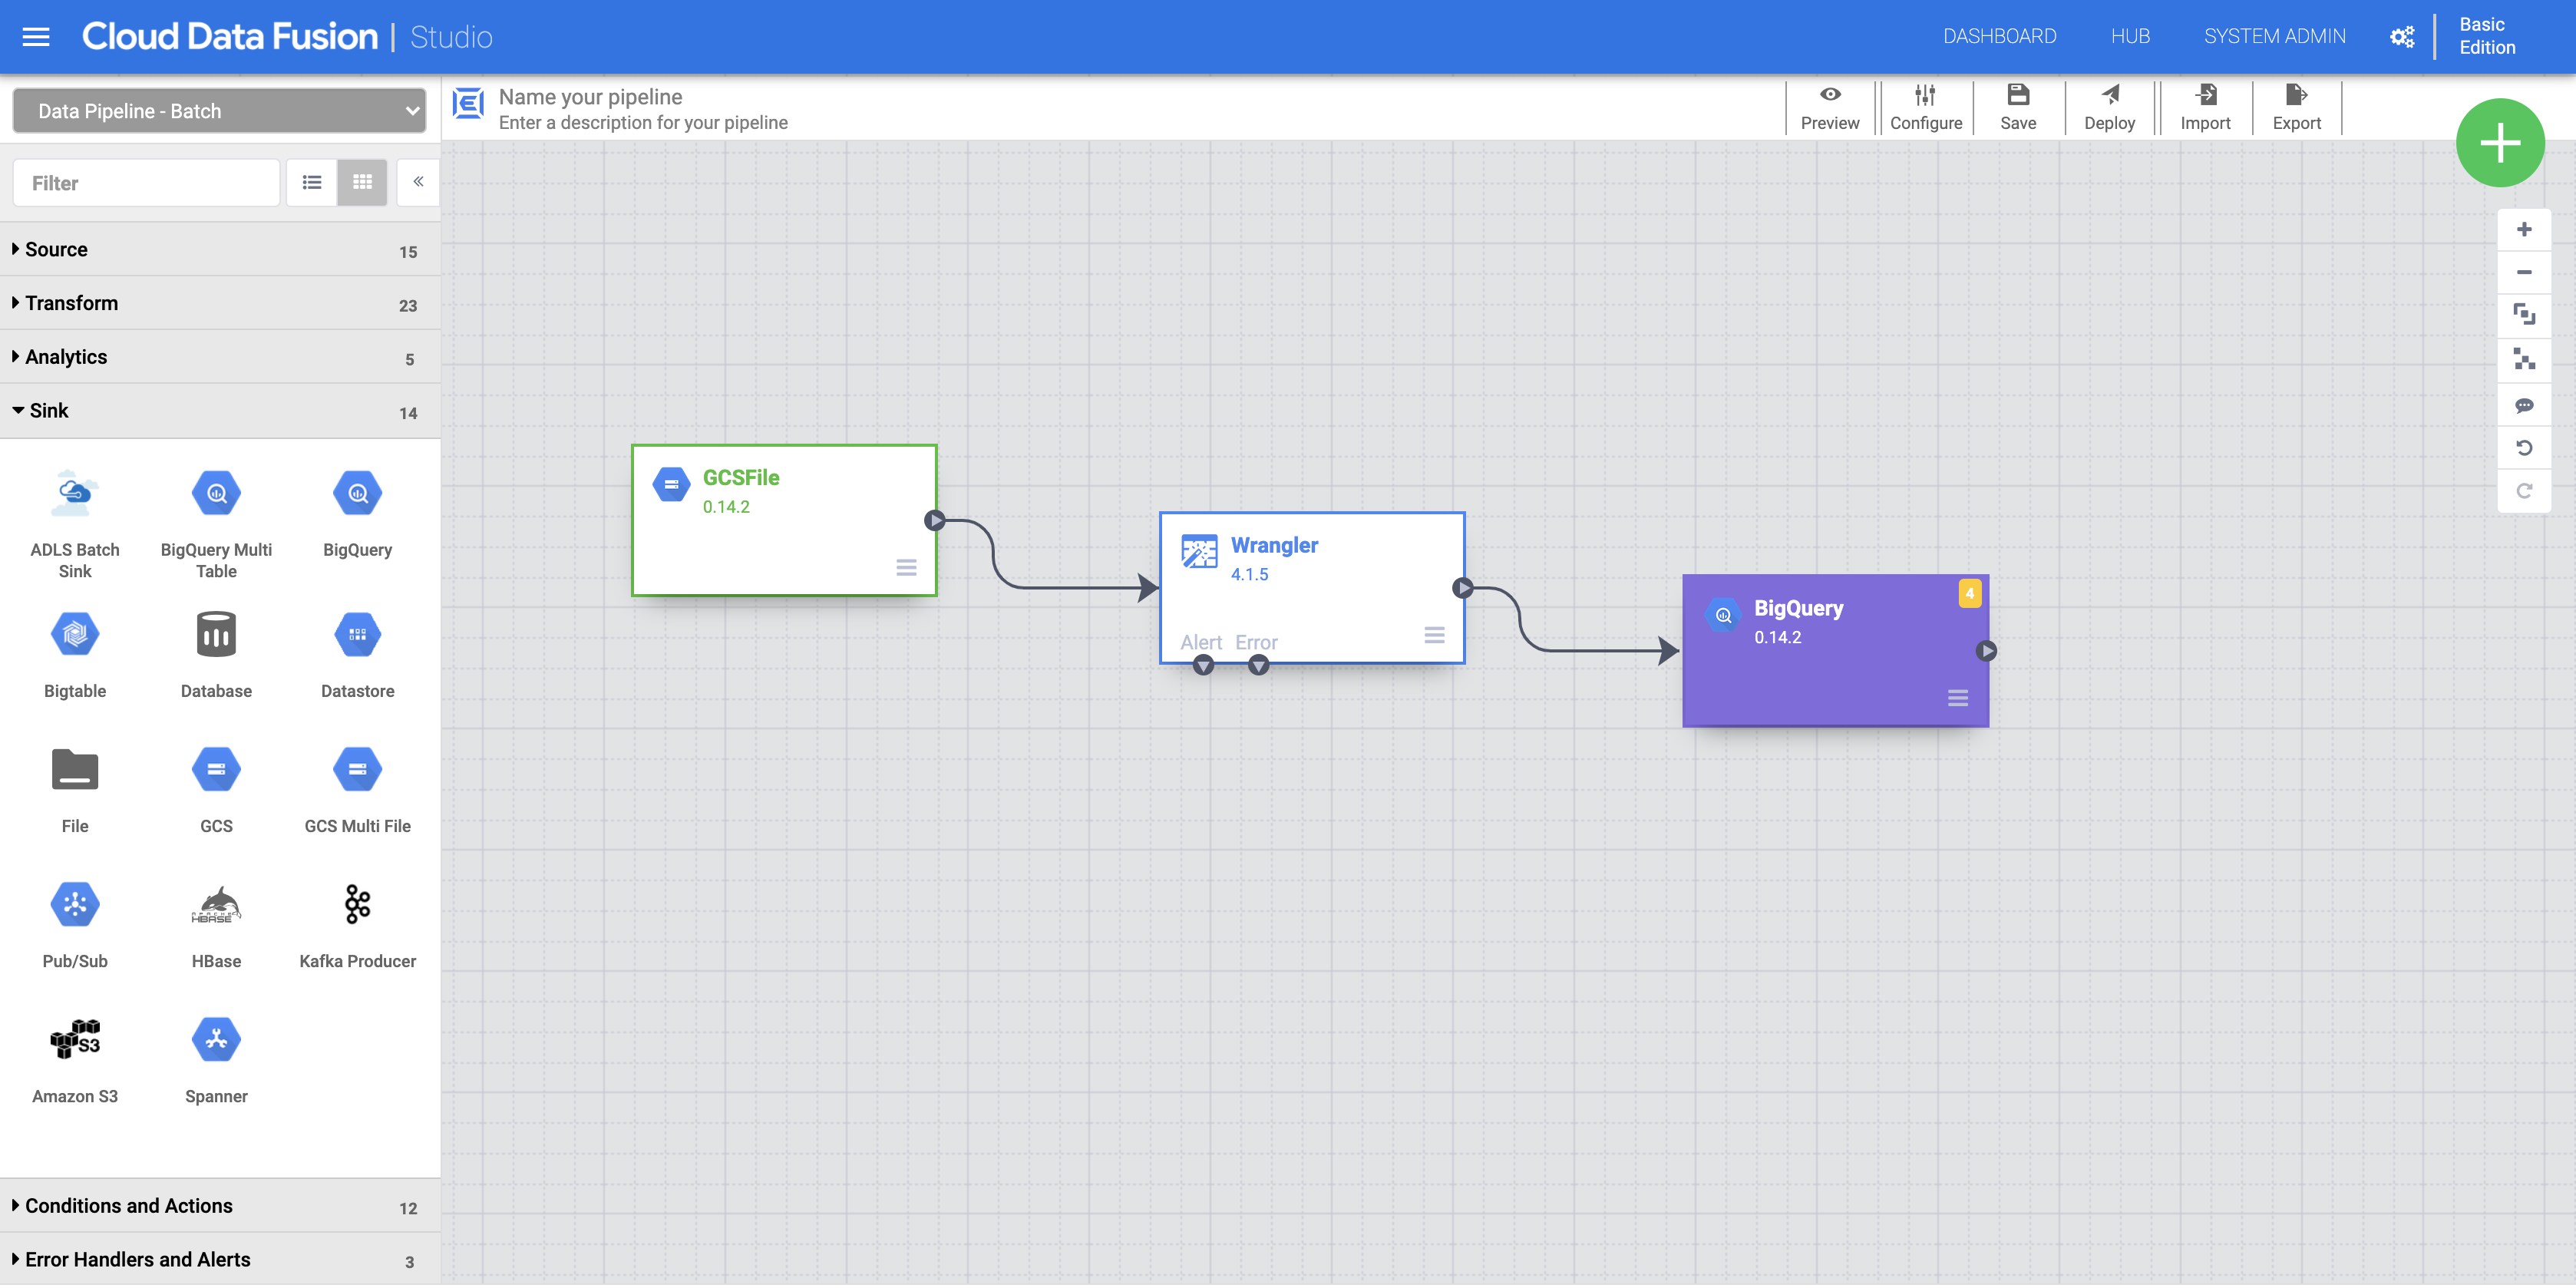
c. Point your mouse over your BigQuery node, click Properties and enter the following configuration settings:
| Field | Value |
|---|---|
| Reference Name | DemoSink |
| Dataset Project ID | Your Project ID |
| Dataset |
demo_cdf(the dataset you created in the previous step) |
| Table | Enter an appropriate name (like titanic) |
The table will be automatically created.
d. Click the Validate button to check if everything is set up correctly.
e. Click X to close it. And you're back in the Pipeline Studio.
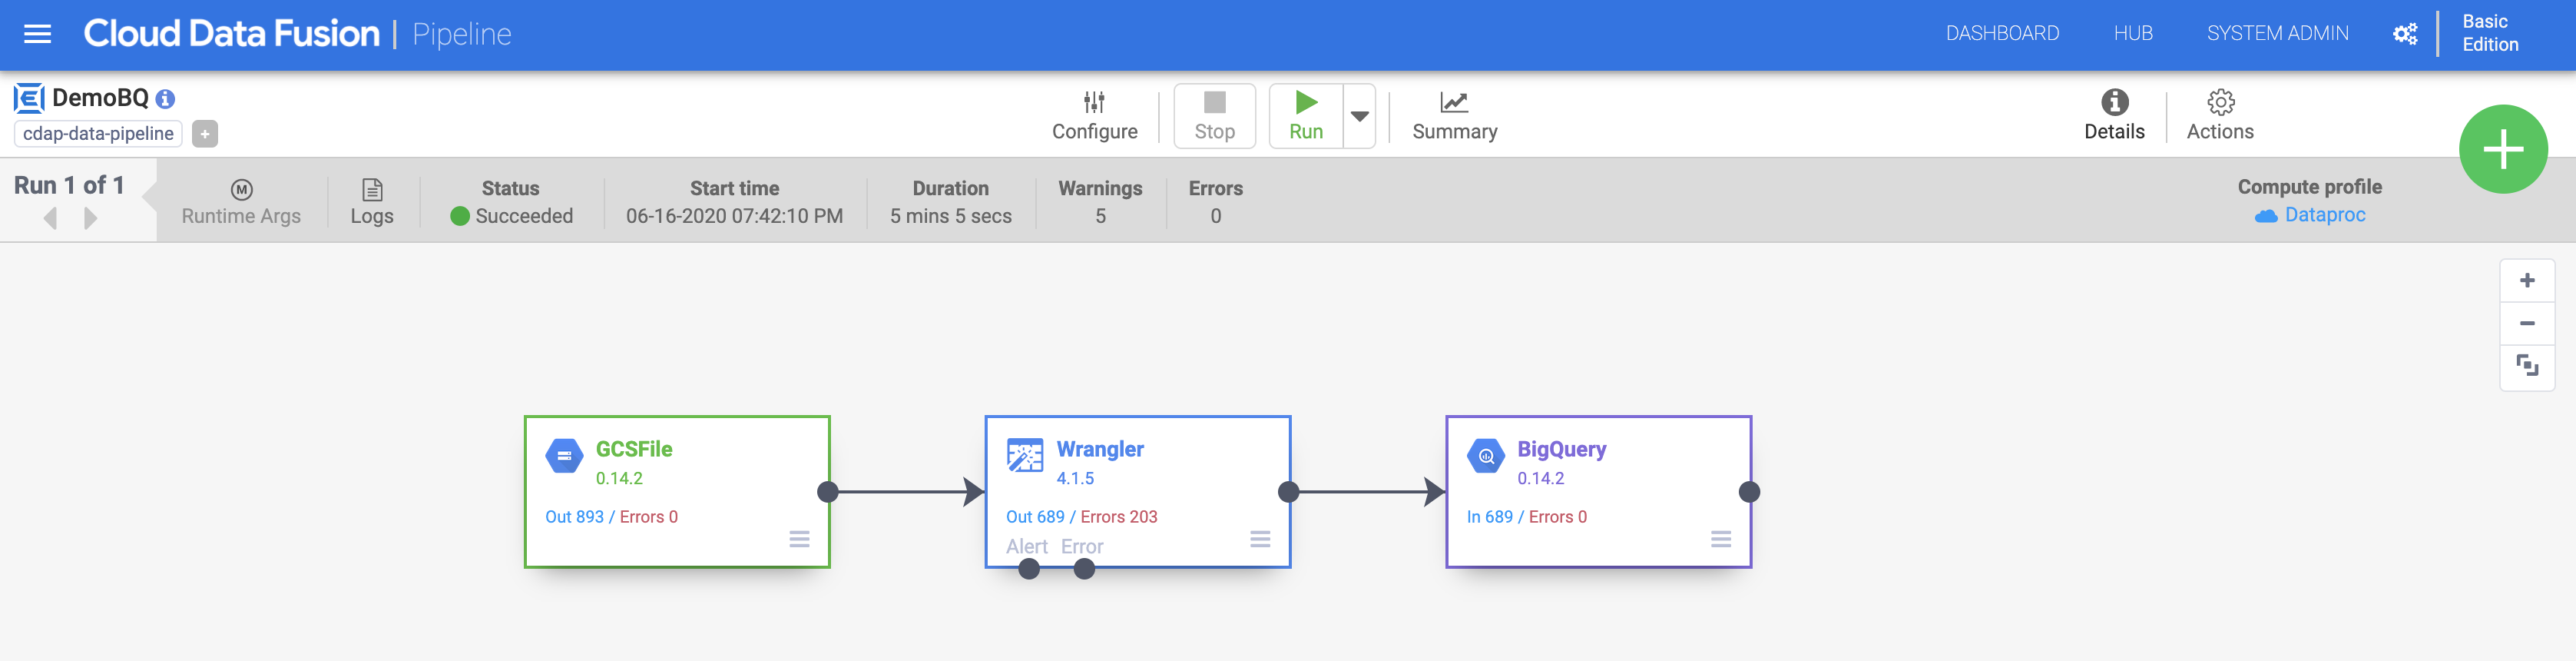
- Now you’re ready to execute your pipeline.
a. Give your pipeline a name (like DemoBQ)
b. Click Save and then click Deploy on the top right to deploy the pipeline.
c. Click Run to start the pipeline execution. You may click the Summary icon to look at some statistics.
After execution completes, the status changes to Succeeded. Navigate back to your BigQuery Console to query your results.
Click Check my progress to verify the objective.
Congratulations!
In this lab, you explored the Wrangler UI. You learned how to add transformation steps (directives) through the menu as well as using the CLI. Wrangler allows you to apply many powerful transformations to your data iteratively and you can use the Wrangler UI to view how it affects the schema of your data before you deploy and run your pipeline.
End your lab
When you have completed your lab, click End Lab. Qwiklabs removes the resources you’ve used and cleans the account for you.
You will be given an opportunity to rate the lab experience. Select the applicable number of stars, type a comment, and then click Submit.
The number of stars indicates the following:
- 1 star = Very dissatisfied
- 2 stars = Dissatisfied
- 3 stars = Neutral
- 4 stars = Satisfied
- 5 stars = Very satisfied
You can close the dialog box if you don't want to provide feedback.
For feedback, suggestions, or corrections, please use the Support tab.
Copyright 2022 Google LLC All rights reserved. Google and the Google logo are trademarks of Google LLC. All other company and product names may be trademarks of the respective companies with which they are associated.